Herunterladen Inhalt Inhalt Diese Seite drucken

Werbung

Verfügbare Sprachen

Verfügbare Sprachen

Espressomaschine
Espresso coffee maker
Cafetière espresso
Macchina per caffè espresso
GEBRAUCHSANLEITUNG
INSTRUCTIONS FOR USE
MODE D'EMPLOI
ISTRUZIONI PER L'USO
U 22.8CH1
1

Werbung

Inhaltsverzeichnis
loading

Inhaltszusammenfassung für Rotel E 228

  • Seite 1 Espressomaschine Espresso coffee maker Cafetière espresso Macchina per caffè espresso GEBRAUCHSANLEITUNG INSTRUCTIONS FOR USE MODE D’EMPLOI ISTRUZIONI PER L’USO U 22.8CH1...
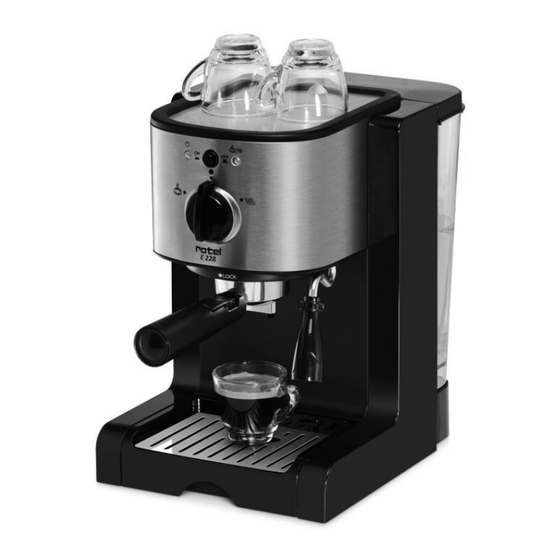
  • Seite 3 1. Ein/Aus Schalter 1. On/Off switch 2. Ein/Aus Anzeige 2. On/Off pilot light 3. Dampf/Espresso-Schalter 3. Steam/Coffee switch 4. Thermostat Anzeige 4. Thermostat pilot light 5. Tropfschale 5. Drip pan 6. Dossierlöffe 6. Dispenser spoon 7. Dampfdüsenschutz 7. Steam nozzle protector 8.
  • Seite 5: Sicherheitshinweise

    BEDIENUNGSANLEITUNG DEUTSCH Sicherheitshinweise - Bitte lesen Sie diese Anweisungen vor Inbetriebnahme der Espressomaschine sorgfältig durch. - Vergewissern Sie sich vor dem Anschluss des Gerätes, dass die auf dem Typenschild angegebene Netzspannung mit der Spannung Ihres Haushaltes übereinstimmt. - Die Espressomaschine nicht mit leerem Wassertank einschalten. - Unter gewissen Umständen können Dampf und Wasser aus dem Espressoauslauf austreten.
  • Seite 6: Betrieb

    Betrieb Espresso: a.- Espressozubereitung 1. Bevor Sie das Gerät einschalten stellen Sie sicher, dass der Dampf/Espresso-  gestellt ist (Abb B). Schalter (3) auf Position „Aus“ 2. Füllen Sie den Wassertank mit Wasser. Dazu entnehmen Sie entweder den Wassertank (9) an der Rückseite des Gerätes oder öffnen den Deckel (10) des Wassertanks und leeren das Wasser direkt hinein.
  • Seite 7: Reinigung Und Instandhaltung

    Falls Sie ein Pad oder Kapseln verwendet haben, entfernen Sie diese und entsorgen Sie sie entsprechend. Dampf: Zum Erhitzen von Flüssigkeiten mit der Dampfdüse (8): 1. Bevor Sie das Gerät einschalten stellen Sie sicher, dass der Dampf/Espresso-  gestellt ist (Abb B). Schalter (3) auf Position „Aus“...
  • Seite 8: Safety Instructions

    Zur gründlicheren Reinigung der Dampfdüse in regelmäßigen Abständen gehen Sie folgendermaßen vor: Warten Sie, bis die Dampfdüse abgekühlt ist und ziehen Sie den Dampfdüsenschutz (7) von der Dampfdüse (8) ab. Reinigen Sie die Dampfdüsenachse mit einem feuchten Tuch und waschen Sie den Schutz mit Seifenlauge.
  • Seite 9: Operation

    Do not operate the coffee maker without water in the tank. Steam and water may come out of the coffee output at certain times. This is not a symptom of a fault or malfunction. This espresso coffee maker is a professional high-pressure model (up to 18 bar) and has a built-in electric pump to draw out the maximum flavour and aroma from the coffee.
  • Seite 10 4. If you want to make sure your first cup of coffee is hot, insert the filter holder (13) without coffee in it and let one or two cups of hot water run out in order to warm the components of the coffee-maker. 5.
  • Seite 11: Cleaning And Maintenance

    6. Place an empty container under the steam nozzle (8), open the steam/coffee knob (3) to the right and let the steam out. 7. Turn the steam/coffee switch (3) back to the left to its original position 8. If you want to make coffee after using the steam nozzle, it is advisable to allow two cups of water to run out through the filter holder (with no coffee in the filter) to ensure that the next cup of coffee comes out at the right temperature.
  • Seite 12: Règles De Sécurité

    11. After limescale removal, rinse out the water tank (9) thoroughly and then fill with fresh water. 12. Heat up the appliance once more using the On/Off switch (1) and rinse it out well by turning the steam/coffee switch (3) to the left. (ca. 1 litre of fresh water) 13.
  • Seite 13 correspondant à 8 - 10 tasses. Vous obtiendrez ainsi un nettoyage complet de tout le système. Utilisez la cuillère de dosage (6) pour obtenir la dose de café nécessaire. Une cuillère correspond à une dose de café pour une tasse. Si vous observez que l’extraction du café...
  • Seite 14: Nettoyage Et Entretien

    c.- Nettoyage Si vous avez utilisé du café moulu, nettoyez le porte-filtres sous un robinet d’eau. Si vous avez utilisé une dosette de café ou une capsule, retirez-la et mettez-la au rebut conformément à la législation. Vapeur : Pour chauffer toutes sortes de liquides en utilisant le vaporisateur (8) 1.
  • Seite 15: Istruzioni Per L'uso

    protecteur (7) du vaporisateur (8). Nettoyez l’axe du vaporisateur à l’aide d’un chiffon humide et savonnez le protecteur (7). Remettez à nouveau le protecteur sur le vaporisateur. Détartrage Pour maintenir votre machine espresso en parfait état, vous devez la détartrer 1-3 fois par an en fonction de la teneur en calcaire de l’eau.
  • Seite 16: Funzionamento

    È possibile che in alcuni momenti fuoriescano vapore e acqua dal beccuccio erogatore del caffè. Non si tratta di un sintomo di difetto né di malfunzionamento. La macchina per caffè espresso è un modello professionale ad alta pressione (fino a 18 bar), dotata di un’elettropompa che consente di ottenere il massimo aroma e gusto dal caffè.
  • Seite 17 4. Perché il primo caffè sia più caldo, collocare il portafiltri (13) senza caffè e lasciare uscire una o due tazze di acqua calda. In questo modo i componenti dell’apparecchio si riscalderanno. 5. Collocare il filtro che si desidera usare, per 1 o 2 tazze (12 o 14), nel portafiltro (13) (D).
  • Seite 18: Pulizia E Manutenzione

    5. Una volta ultimata la preparazione, si raccomanda di pulire le impurità rimaste all’interno. A tal fine: 6. Collocare un recipiente vuoto sotto al vaporizzatore (8), ruotare l‘ interruttore vapore/caffè (3) nuovamente verso destra e far uscire il vapore. 7. Ruotare l‘ interruttore vapore/caffè...
  • Seite 19 7. Ruotare l‘ interruttore vapore/caffè (3) verso sinistra su Espresso e lasciare scorrere per circa un minuto la soluzione decalcificante attraverso il filtro erogatore (16). 8. Ruotare nuovamente l‘ interruttore vapore/caffè (3) verso destra. 9. Spegnere la macchina premendo l’interruttore ON/OFF (1) e fare agire la soluzione per circa 5 minuti.
  • Seite 20 L’invio deve avvenire nell’imballaggio originale. Le spese di trasporto sono a carico dell’acquirente. Non dimenticatevi p.f. di allegare all’invio il vostro indirizzo e, qualora il difetto non fosse chiaro, anche una spiegazione. Servicestation: Rotel AG Service après-vente: Parkstrasse 43 Servizio Assistenza : 5012 Schönenwerd Tel: 062 787 77 00 / e-mail: office@rotel.ch...

Inhaltsverzeichnis