Herunterladen Inhalt Inhalt Diese Seite drucken
Axis Communications Q60 Serie Installationsanleitung

Axis Communications Q60 Serie Installationsanleitung

Vorschau ausblenden Andere Handbücher für Q60 Serie:
Inhaltsverzeichnis

Werbung

Verfügbare Sprachen
  • DE

Verfügbare Sprachen

  • DEUTSCH, seite 51
AXIS Q60 Series
AXIS Q6042 Mk II PTZ Dome Network Camera
AXIS Q6044 PTZ Dome Network Camera
AXIS Q6045 Mk II PTZ Dome Network Camera
Installation Guide

Werbung

Inhaltsverzeichnis
loading

Inhaltszusammenfassung für Axis Communications Q60 Serie

  • Seite 1 AXIS Q60 Series AXIS Q6042 Mk II PTZ Dome Network Camera AXIS Q6044 PTZ Dome Network Camera AXIS Q6045 Mk II PTZ Dome Network Camera Installation Guide...
  • Seite 3 English France: Français Deutschland: Deutsch Italia: Italiano España: Español 日本: 日本語 中文: 简体中文...
  • Seite 4 A copy of the original declaration of conformity for a particular purpose. Axis Communications AB may be obtained from Axis Communications AB. See shall not be liable nor responsible for incidental Contact information on page 5.
  • Seite 5 If its connecting cables are routed outdoors, the product shall be grounded either through a shielded Contact information network cable (STP) or other appropriate method. Axis Communications AB Gränden 1 Disposal and recycling 223 69 Lund When this product has reached the end of its...
  • Seite 6 • find answers to resolved problems in the FAQ database, search by product, category, or phrase • report problems to Axis support staff by logging in to your private support area • chat with Axis support staff • visit Axis Support at axis.com/support Learn more! Visit Axis learning center axis.com/academy for useful trainings, webinars, tutorials and guides.
  • Seite 7: Hazard Levels

    AXIS Q60 Series Safety information Hazard levels DANGER Indicates a hazardous situation which, if not avoided, will result in death or serious injury. WARNING Indicates a hazardous situation which, if not avoided, could result in death or serious injury. CAUTION Indicates a hazardous situation which, if not avoided, could result in minor or moderate injury.
  • Seite 8 AXIS Q60 Series Safety instructions WARNING The Axis product shall be installed by a trained professional, and in compliance with local laws and regulations. NO TICE TICE TICE • The Axis product shall be used in compliance with local laws and regulations. •...
  • Seite 9 AXIS Q60 Series Lithium coin cell 3.0 V batteries contain 1,2-dimethoxyethane; ethylene glycol dimethyl ether (EGDME), CAS no. 110-71-4. Dome cover NO TICE TICE TICE • Be careful not to scratch, damage or leave fingerprints on the dome cover because this could decrease image quality.
  • Seite 11: Installation Steps

    AXIS Q60 Series Installation Guide This Installation Guide provides instructions for installing one of the following network cameras on your network: • AXIS Q6042 Mk II PTZ Dome Network Camera • AXIS Q6044 PTZ Dome Network Camera • AXIS Q6045 Mk II PTZ Dome Network Camera For other aspects of using the product, see the User Manual available at www.axis.com Installation Steps 1.
  • Seite 12: Hardware Overview

    AXIS Q60 Series Hardware overview NO TICE TICE TICE Make sure the dome is attached in operation mode, otherwise focus may be affected. Unit holder (3x) Camera base lid Camera base lid screw T20 (3x) Hook for safety wire Part number (P/N) & Serial number (S/N) Cable track (2x) Foam gasket Network connector (PoE+)
  • Seite 13: Camera Unit

    AXIS Q60 Series 11 Dome Camera Unit SD card slot Status LED indicator Control button Power button Dome Cover Dome bracket screw T20 (4x) Dome bracket Dome cover...
  • Seite 14 AXIS Q60 Series Dome ring screw T20 (4x) Dome ring Hard Ceiling Mount Mounting plate Safety wire Drop Ceiling Mount Mounting plate Mounting plate screw T20 (3x) Bracket arm Bracket arm screw T20 (3x) and washer (3x)
  • Seite 15: Led Indicators

    AXIS Q60 Series Bracket ring Trim ring Safety wire LED Indicators Indication Status LED Unlit Connection and normal operation. Green Steady green for 10 seconds for normal operation after startup completed. Amber Steady during startup. Flashes during firmware upgrade or reset to factory default.
  • Seite 16 AXIS Q60 Series SD card slot NO TICE TICE TICE • Risk of damage to SD card. Do not use sharp tools, metal objects, or excessive force when inserting or removing the SD card. Use your fingers to insert and remove the card. •...
  • Seite 17 AXIS Q60 Series I/O terminal connector - Use with external devices in combination with, for example, tampering alarms, motion detection, event triggering, time lapse recording and alarm notifications. In addition to the 0 V DC reference point and power (DC output), the I/O connector provides the interface to: •...
  • Seite 18: Specifications

    AXIS Q60 Series 0 V DC (-) DC output 3.3 V, max 250 mA I/O configured as input I/O configured as output Specifications Operating Conditions The Axis product is intended for indoor use. Product Classification Temperature Humidity AXIS Q6042 Mk IEC 60721-4-3 0 °C to 50 °C 10–85% RH (non-condensing)
  • Seite 19: Storage Conditions

    AXIS Q60 Series Storage Conditions Product Temperature AXIS Q6042 Mk II -40 °C to 60 °C (-40 °F to 140 °F) AXIS Q6044 AXIS Q6045 Mk II Power Consumption NO TICE TICE TICE Use a Safety Extra Low Voltage (SELV) compliant limited power source (LPS) with either a rated output power limited to ≤100 W or a rated output current limited to ≤5 A.
  • Seite 20: Connection Diagrams

    AXIS Q60 Series Connection Diagrams I/O Connector 0 V DC (-) DC output 3.3 V, max 250 mA I/O configured as input I/O configured as output Install the hardware Read all the instructions before installing the product. Some installation steps would benefit from being completed together because they require removal of the dome cover.
  • Seite 21 AXIS Q60 Series • Be careful not to scratch, damage or leave fingerprints on the dome cover because this could decrease image quality. If possible, keep the protective plastic on the dome cover until the installation is complete. Change the dome cover (optional) The premounted clear dome cover can be replaced if you want to use the smoked dome cover or if the dome cover is scratched or damaged.
  • Seite 22 AXIS Q60 Series 2. Install the mounting plate. The arrow on the mounting plate will align with the logotype on the camera. Mounting plate Safety wire 3. Loosen the camera base lid screws and remove the camera base lid. 4. Secure the camera using the supplied safety wire. 5.
  • Seite 23 AXIS Q60 Series 8. Slide the unit holders on the network camera into the slots in the mounting plate and rotate the camera unit. 9. Install the supplied midspan, see the Installation Guide delivered with the midspan or find it on www.axis.com Install the camera with a drop ceiling mount WARNING The combined weight of the camera and ceiling mount is approximately 3200 g (7.1 lb).
  • Seite 24 AXIS Q60 Series Cable holders Multi-connector cable Network cable 7. Turn the cable holders to keep the cables in place. 8. Put the camera base lid back in its original position and tighten the screws (torque 1.5 Nm). 9. Secure the camera using the supplied safety wire. Mounting plate Ceiling bracket Ceiling tile...
  • Seite 25 AXIS Q60 Series 10. Slide the unit holders on the network camera into the slots in the mounting plate and rotate the camera unit. 11. Install the supplied midspan, see the Installation Guide delivered with the midspan or find it on www.axis.com 12.
  • Seite 26 AXIS Q60 Series Screw T30 (3x) Slot for unit holder (3x) Safety wire 5. Connect the network cable and, if used, the multi-connector cable to the camera. NO TICE TICE TICE • Be careful not to damage the cables when connecting them. •...
  • Seite 27: How To Access The Product

    AXIS Q60 Series Cable holders Multi-connector cable Network cable 6. Turn the cable holders to keep the cables in place. 7. Put the camera base lid back in its original position and tighten the screws (torque 1.5 Nm). 8. Slide the unit holders on the network camera into the slots in the mounting bracket and rotate the camera unit.
  • Seite 28: Warranty Information

    AXIS Q60 Series Warranty information For information about Axis’ product warranty and thereto related information, go to axis.com/warranty.
  • Seite 29: Niveaux De Risques

    AXIS Q60 Series Informations sur la sécurité Niveaux de risques DANGER Indique une situation dangereuse qui, si elle n'est pas évitée, entraînera le décès ou des blessures graves. AVERTISSEMENT Indique une situation dangereuse qui, si elle n'est pas évitée, pourrait entraîner le décès ou des blessures graves.
  • Seite 30 AXIS Q60 Series Consignes de sécurité AVERTISSEMENT Le produit Axis doit être installé par un professionnel qualifié et conformément aux lois et règlementations locales en vigueur. A A A VIS • Le produit Axis doit être utilisé conformément aux lois et règlements locaux. •...
  • Seite 31 AXIS Q60 Series ATTENTION Ne remplacez pas la batterie vous-même. Contactez le support Axis si le message du journal demande un changement de batterie. Les piles boutons 3,0 V au lithium contiennent du 1,2-diméthoxyéthane, éthylène glycol diméthyl éther (EGDME), CAS n° 110-71-4. Couvercle de dôme A A A VIS •...
  • Seite 33: Procédures D'installation

    AXIS Q60 Series Guide d’installation Ce guide d'installation explique comment installer l'une des caméras réseau suivantes sur votre réseau : • Caméra dôme réseau PTZ AXIS Q6042 Mk II • Caméra dôme réseau PTZ AXIS Q6044 • Caméra dôme réseau PTZ AXIS Q6045 Mk II Pour toute autre information relative à...
  • Seite 34: Accessoires En Option

    AXIS Q60 Series Accessoires en option Pour une liste complète des accessoires disponibles pour ce produit, accédez à la page du produit sur axis.com et sélectionnez Logiciel et accessoires. Aperçu du matériel A A A VIS Vérifiez que le dôme est fixé en mode de fonctionnement, sinon la mise au point peut en être affectée.
  • Seite 35 AXIS Q60 Series Référence (P/N) et numéro de série (S/N). Porte-câble (2x) Joint en mousse Connecteur réseau (PoE+) Multiconnecteurs 10 Couvercle supérieur 11 Dôme Caméra Emplacement pour carte SD Voyant d’état Bouton de commande Bouton d’alimentation...
  • Seite 36 AXIS Q60 Series Couvercle de dôme Vis du support pour caméra dôme T20 (x4) Support pour caméra dôme Couvercle de dôme Vis de la garniture pour caméra dôme T20 (x4) Garniture pour caméra dôme Fixation au plafond de la caméra Plaque de montage Câble de sécurité...
  • Seite 37 AXIS Q60 Series Fixation au faux-plafond Plaque de montage Vis de la plaque de montage T20 (3x) Bras du support Vis T20 (3x) et rondelle (3x) du bras du support Garniture du support Garniture Câble de sécurité Voyants LED de statut Indication Branchement et fonctionnement normaux.
  • Seite 38 AXIS Q60 Series Connecteurs et boutons Pour les caractéristiques et les conditions d'utilisation, consultez page 41. Connecteur réseau Connecteur Ethernet RJ45 avec l'alimentation par Ethernet Plus (PoE+). A A A VIS Utilisez l'injecteur fourni. A A A VIS Le produit doit être connecté à l'aide d'un câble réseau blindé (STP). Tous les câbles reliant le produit au commutateur réseau doivent être destinés à...
  • Seite 39 AXIS Q60 Series • Réinitialisation du produit aux paramètres d’usine par défaut. Cf. page 49. • Connexion au service du Système d’hébergement vidéo AXIS. Pour en savoir plus sur ce service, consultez le site axis.com. Bouton d’alimentation Appuyez sur le bouton d'alimentation et maintenez-le enfoncé pour alimenter temporairement le produit lors du retrait du couvercle de dôme.
  • Seite 40 AXIS Q60 Series > Port & Devices > Port Status (Options du système > Port et dispositifs > État du port)). Fonction Broche Notes Caractéristiques 0 V CC (-) Sortie CC Peut servir à alimenter le matériel 3.3 V CC auxiliaire.
  • Seite 41: Caractéristiques Techniques

    AXIS Q60 Series Caractéristiques techniques Conditions d'utilisation Le produit Axis est uniquement destiné à une utilisation en intérieur. Produit Classification +Température Humidité AXIS Q6042 Mk IEC 60721-4-3 0 °C à 50 °C Humidité relative de 10 à Classe 3K3, 3M3 (32 °F à...
  • Seite 42: Installation Du Matériel

    AXIS Q60 Series Schémas de connexion Connecteur d’E/S 0 V CC (-) Sortie CC 3,3 V, maxi. 250 mA Entrée/sortie configurée comme entrée Entrée/sortie configurée comme sortie Installation du matériel Lisez toutes les instructions avant l'installation de l'appareil. Il serait préférable de réaliser certaines étapes en même temps parce qu'elles exigent le retrait du couvercle du dôme.
  • Seite 43 AXIS Q60 Series • Veillez à ne pas rayer, endommager ou laisser d'empreintes sur le couvercle du dôme car cela pourrait altérer la qualité d'image. Laissez, si possible, la protection en plastique sur le couvercle du dôme jusqu’à la fin de l’installation. Remplacement du couvercle de dôme (en option) Le couvercle du dôme prémonté...
  • Seite 44 AXIS Q60 Series 2. Installation de la plaque de montage. La flèche située sur la plaque de fixation s’aligne avec le logo de la caméra. Plaque de montage Câble de sécurité 3. Dévissez les vis fixant le couvercle sur la base de la caméra et retirez le couvercle de la base.
  • Seite 45 AXIS Q60 Series 7. Remettez le couvercle sur la base de la caméra dans sa position d'origine et serrez les vis (couple 1,5 Nm). 8. Glissez les supports de l'appareil sur la caméra réseau dans les fentes de la plaque de montage et faites tourner la caméra.
  • Seite 46 AXIS Q60 Series • Assurez-vous que les trous du joint en mousse sont alignés avec les porte-câbles. En cas d'utilisation d'un câble multiconnecteurs, retirez la pièce découpée du câble multiconnecteurs sur le joint en mousse. Supports des câbles Câble multiconnecteurs Câble réseau 7.
  • Seite 47 AXIS Q60 Series Dalle de plafond Câble de sécurité Crochet pour câble de sécurité 10. Glissez les supports de l'appareil sur la caméra réseau dans les fentes de la plaque de montage et faites tourner la caméra. 11. Installez l'injecteur fourni. Reportez-vous au Guide d’installation fourni avec l'injecteur ou téléchargez-le depuis www.axis.com 12.
  • Seite 48 AXIS Q60 Series Vis T30 (x3) Trou pour support de la caméra (x3) Câble de sécurité 5. Connectez le câble réseau et, en cas d'utilisation, le câble multiconnecteurs à la caméra. A A A VIS • Veillez à ne pas endommager les câbles lorsque vous les connectez. •...
  • Seite 49: Comment Accéder Au Produit

    AXIS Q60 Series Supports des câbles Câble multiconnecteurs Câble réseau 6. Retournez les supports des câbles pour maintenir les câbles en place. 7. Remettez le couvercle sur la base de la caméra dans sa position d'origine et serrez les vis (couple 1,5 Nm). 8.
  • Seite 50: Informations Sur La Garantie

    AXIS Q60 Series Informations sur la garantie Pour plus d'informations sur la garantie du produit Axis et des informations connexes, rendez-vous sur axis.com/warranty.
  • Seite 51: Gefährdungsstufen

    AXIS Q60 Series Sicherheitsinformationen Gefährdungsstufen GEFAHR Weist auf eine gefährliche Situation hin, welche, falls nicht verhindert, zu Tod oder schweren Verletzungen führen kann. WARNUNG Weist auf eine gefährliche Situation hin, welche, falls nicht verhindert, zu Tod oder schweren Verletzungen führen kann. VORSICHT Weist auf eine gefährliche Situation hin, welche, falls nicht verhindert, zu geringfügiger oder mäßiger Verletzung führen kann.
  • Seite 52 AXIS Q60 Series Sicherheitsanweisungen WARNUNG Das Axis Produkt muss von fachmännisch geschultem Personal und unter Einhaltung der örtlich geltenden Bestimmungen installiert werden. HINWEIS HINWEIS HINWEIS • Das Axis Produkt muss unter Beachtung der geltenden Gesetze und Bestimmungen betrieben werden. • Axis empfiehlt, ein abgeschirmtes Netzwerk-Kabel (STP) zu verwenden. •...
  • Seite 53 AXIS Q60 Series Tauschen Sie die Batterie nicht selbst aus. Wenden Sie sich an den Axis Support, wenn die Protokollnachricht einen Batterietausch anfordert. Lithium-Knopfzellen (3,0 V) enthalten 1,2-Dimethoxyethan; Ethylenglycoldimethylether (EGDME), CAS-Nr. 110-71-4. Kuppelabdeckung HINWEIS HINWEIS HINWEIS • Achten Sie darauf, die Kuppelabdeckung weder zu zerkratzen, zu beschädigen oder darauf Fingerabdrücke zu hinterlassen, da dies die Bildqualität beeinträchtigen kann.
  • Seite 55: Installationsschritte

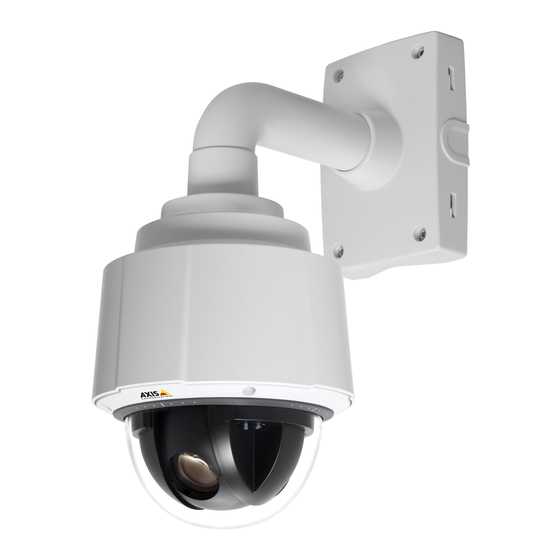
    AXIS Q60 Series Installationsanleitung In dieser Anleitung wird die Installation der folgenden Netzwerk-Kameras in Ihrem Netzwerk beschrieben: • AXIS Q6042 Mk II-PTZ-Dome-Netzwerk-Kamera • AXIS Q6044-PTZ-Dome-Netzwerk-Kamera • AXIS Q6045 Mk II-PTZ-Dome-Netzwerk-Kamera Weitere Informationen zur Nutzung dieses Produkts finden Sie im Benutzerhandbuch unter www.axis.com.
  • Seite 56: Optionales Zubehör

    AXIS Q60 Series Optionales Zubehör Eine vollständige Liste lieferbaren Zubehörs für dieses Produkt finden Sie auf axis.com unter Produkt, Software und Zubehör. Übersicht über die Hardware HINWEIS HINWEIS HINWEIS Die Kamera darf nur mit angebrachter Kuppel betrieben werden, damit der Fokus nicht beeinträchtigt wird.
  • Seite 57 AXIS Q60 Series Bestellnummer (P/N) und Seriennummer (S/N) Kabelbahn (2x) Schaumstoffdichtung Netzwerkanschluss (PoE+) Mehrfachanschluss 10 Obere Abdeckung 11 Kuppel Kameraeinheit SD-Kartensteckplatz LED-Statusanzeige Steuertaste Netzschalter...
  • Seite 58: Halterung Für Massivdecken

    AXIS Q60 Series Kuppelabdeckung Kuppelhalterungsschraube T20 (4x) Kuppelhalterung Kuppelabdeckung Kuppelringschraube T20 (4x) Kuppelring Halterung für Massivdecken Montageplatte Sicherheitsdraht...
  • Seite 59: Halterung Für Abgehängte Decken

    AXIS Q60 Series Halterung für abgehängte Decken Montageplatte Montagenplatteschraube T20 (3x) Halterungsarm Halterungsarmschraube T20 (3x) und Unterlegscheibe (3x) Halterungsring Klemmflansch Sicherheitsdraht LEDs LED-Statusanzeige Bedeutung Leuchtet nicht Anschluss und Normalbetrieb. Grün Leuchtet bei Normalbetrieb nach Abschluss des Startvorgangs 10 Sekunden dauerhaft grün. Gelb Leuchtet beim Start.
  • Seite 60 AXIS Q60 Series Netzwerkanschluss RJ45-Ethernetanschluss mit Power over Ethernet Plus (PoE+). HINWEIS HINWEIS HINWEIS Verwenden Sie den mitgelieferten Midspan. HINWEIS HINWEIS HINWEIS Das Produkt muss mit einem abgeschirmten Netzwerkkabel (STP) angeschlossen werden. Alle Kabel, die das Produkt mit dem Netzwerkswitch verbinden, müssen hierfür ausgelegt sein.
  • Seite 61 AXIS Q60 Series Netzschalter Drücken Sie den Netzschalter und halten Sie diesen gedrückt, um das Produkt bei entfernter Kuppelabdeckung kurzzeitig anzuschalten. Der Netzschalter wird auch zusammen mit der Steuertaste verwendet, um die Kamera auf die werksseitigen Standardeinstellungen zurückzusetzen. Siehe Seite 71. Axis Mehrfachkabel Zum Anschließen externer Geräte am Axis Produkt ist ein Axis Mehrfachkabel erforderlich, um die IP-Schutzklasse des Produkts zu gewährleisten.
  • Seite 62: Technische Daten

    AXIS Q60 Series Funktion Kontakt Hinweise Technische Daten 0 V DC (-) Gleichstro- Kann für die Stromversorgung von 3,3 V DC mausgang Zusatzgeräten verwendet werden. Max. Hinweis: Dieser Kontakt kann nur für den Stromstärke = Stromausgang verwendet werden. 250 mA 3–6 Konfigurier- Digitaleingang –...
  • Seite 63 AXIS Q60 Series Produkt Klassifikation Temperatur Luftfeuchtigkeit AXIS Q6042 Mk IEC 60721-4-3 0 °C bis 50 °C 10 bis 85 % rF (nicht Klasse 3K3, 3M3 kondensierend) AXIS Q6044 IEC 60529 IP52 AXIS Q6045 Mk II Lagerbedingungen Produkt Temperatur AXIS Q6042 Mk II -40 °C bis 60 °C AXIS Q6044 AXIS Q6045 Mk II...
  • Seite 64: Anschlussschaltbilder

    AXIS Q60 Series Anschlussschaltbilder E/A-Anschluss 0 V (-) DC DC-Ausgang 3,3 V, max. 250 mA E/A als Eingang konfiguriert E/A als Ausgang konfiguriert Die Hardware installieren Lesen Sie die Anweisungen, bevor Sie das Produkt installieren. Manche Installationsschritte sollten besser zusammen ausgeführt werden, denn sie erfordern die Entfernung der Kuppelabdeckung. HINWEIS HINWEIS HINWEIS...
  • Seite 65: Austausch Der Kuppelabdeckung (Optional)

    AXIS Q60 Series • Achten Sie darauf die Kuppelabdeckung weder zu zerkratzen, zu beschädigen oder darauf Fingerabdrücke zu hinterlassen, da dies die Bildqualität beeinträchtigen kann. Falls möglich, entfernen Sie die Schutzfolie erst nach Abschluss der Installation. Austausch der Kuppelabdeckung (optional) Die vormontierte klare Kuppelabdeckung kann ausgetauscht werden, wenn Sie die getönte Kuppelabdeckung verwenden möchten oder wenn die Kuppelabdeckung zerkratzt oder beschädigt ist.
  • Seite 66 AXIS Q60 Series Anbringen der Kamera mit einer Halterung für Massivdecken 1. Bereiten Sie die Decke für die Installation der Montageplatte vor. Markieren Sie die Position der Bohrlöcher mithilfe der Montageplatte. Stellen Sie sicher, dass die Bohrerspitzen, Schrauben und Dübel für den Baustoff geeignet sind. 2.
  • Seite 67 AXIS Q60 Series 6. Drehen Sie die Kabelhalter, um die Kabel in Position zu halten. 7. Bringen Sie die Grundplatte der Kamera wieder in ihre Position und ziehen Sie die Schrauben an (Anzugsmoment 1,5 Nm). 8. Schieben Sie die Gerätehalterung der Netzwerk-Kamera in die Öffnungen der Montageplatte und drehen Sie die Kameraeinheit.
  • Seite 68 AXIS Q60 Series • Vergewissern Sie sich, dass die Schaumstoffdichtungslöcher an den Kabelbahnen ausgerichtet sind. Entfernen Sie ggf. die Ausschnitte für das Mehrfachanschlusskabel aus der Schaumstoffdichtung. Kabelhalter Mehrfachanschlusskabel Netzwerkkabel 7. Drehen Sie die Kabelhalter, um die Kabel in Position zu halten. 8.
  • Seite 69 AXIS Q60 Series Deckenplatte Sicherheitsdraht Haken für Sicherheitsdraht 10. Schieben Sie die Gerätehalterung der Netzwerk-Kamera in die Öffnungen der Montageplatte und drehen Sie die Kameraeinheit. 11. Anweisungen zur Installation des mitgelieferten Midspan finden Sie in der beiliegenden Installationsanleitung oder unter www.axis.com. 12.
  • Seite 70 AXIS Q60 Series Schraube T30 (3x) Steckplatz für Gerätehalterung (3x) Sicherheitsdraht 5. Schließen Sie das Netzwerkkabel und ggf. das Mehrfachanschlusskabel an die Kamera an. HINWEIS HINWEIS HINWEIS • Achten Sie beim Verbinden der Kabel darauf, diese nicht zu beschädigen. • Vergewissern Sie sich, dass die Schaumstoffdichtungslöcher an den Kabelbahnen ausgerichtet sind.
  • Seite 71: Zugriff Auf Das Produkt

    AXIS Q60 Series Kabelhalter Mehrfachanschlusskabel Netzwerkkabel 6. Drehen Sie die Kabelhalter, um die Kabel in Position zu halten. 7. Bringen Sie die Grundplatte der Kamera wieder in ihre Position und ziehen Sie die Schrauben an (Anzugsmoment 1,5 Nm). 8. Schieben Sie die Gerätehalterung der Netzwerk-Kamera in die Öffnungen der Montagehalterung und drehen Sie die Kameraeinheit.
  • Seite 72: Gewährleistungsinformationen

    AXIS Q60 Series Gewährleistungsinformationen Informationen zur Gewährleistung für Axis-Produkte und andere in diesem Zusammenhang relevante Informationen finden Sie unter axis.com/warranty.
  • Seite 73: Livelli Di Pericolo

    AXIS Q60 Series Informazioni di sicurezza Livelli di pericolo PERICOLO Indica una situazione pericolosa che, se non evitata, provoca morte o lesioni gravi. AVVERTENZA Indica una situazione pericolosa che, se non evitata, potrebbe provocare la morte o lesioni gravi. ATTENZIONE Indica una situazione pericolosa che, se non evitata, potrebbe provocare lesioni medie o minori.
  • Seite 74 AXIS Q60 Series Informazioni di sicurezza AVVERTENZA Il dispositivo Axis deve essere installato da un professionista qualificato, in conformità alle leggi e alle disposizioni locali. A A A VVISO VVISO VVISO • Il dispositivo Axis deve essere utilizzato in conformità alle leggi e alle normative locali. •...
  • Seite 75 AXIS Q60 Series Non sostituire la batteria da soli. Contattare l'assistenza di Axis se il messaggio di registro richiede una sostituzione della batteria. Le batterie a bottone al litio da 3 V contengono 1,2-dimetossietano; etere dimetilico di glicole etilenico (EGDME), CAS n. 110-71-4. Copertura a cupola A A A VVISO VVISO...
  • Seite 77: Procedura Di Installazione

    AXIS Q60 Series Guida all'installazione Questa guida fornisce le istruzioni per l'installazione di una delle seguenti telecamere sulla rete in uso: • Telecamera di rete a cupola PTZ AXIS Q6042 Mk II • Telecamera di rete a cupola PTZ AXIS Q6044 •...
  • Seite 78: Accessori Opzionali

    AXIS Q60 Series Accessori opzionali Per un elenco completo degli accessori disponibili per questo dispositivo, andare alla pagina del dispositivo al sito axis.com e selezionare Software e accessori. Panoramica dell'hardware A A A VVISO VVISO VVISO Assicurarsi che la cupola venga collegata in modalità operativa in modo da non alterare la messa a fuoco.
  • Seite 79 AXIS Q60 Series Codice dispositivo (N/P) e numero di serie (N/S) Binario cavo (2x) Guarnizione in schiuma Connettore di rete (PoE+) Multiconnettore 10 Protezione superiore 11 Cupola Unità telecamera Slot per scheda SD Indicatore LED di stato Pulsante di comando Tasto di accensione...
  • Seite 80 AXIS Q60 Series Cupola di protezione Vite staffa cupola T20 (4x) Staffa cupola Custodia della cupola Viti anello cupola T20 (4x) Anello cupola Montaggio a soffitto Piastra di montaggio Cavo di sicurezza...
  • Seite 81: Indicatori Led

    AXIS Q60 Series Montaggio a controsoffitto Piastra di montaggio Viti piastra di montaggio T20 (3x) Braccio staffa Vite braccio staffa T20 (3x) e rondella (3x) Anello staffa Anello guarnizione Cavo di sicurezza Indicatori LED LED di stato Indicazione Spento Connessione e funzionamento normale. Verde Luce verde fissa per 10 secondi per il normale funzionamento una volta completato l'avvio.
  • Seite 82 AXIS Q60 Series Connettore di rete Connettore Ethernet RJ45 con Power over Ethernet Plus (PoE+). A A A VVISO VVISO VVISO Utilizzare il midspan fornito. A A A VVISO VVISO VVISO Il dispositivo deve essere collegato tramite un cavo di rete schermato (STP). Tutti i cavi che collegano il dispositivo alla rete sono destinati al loro uso specifico.
  • Seite 83 AXIS Q60 Series Tasto di accensione Tenere premuto il tasto di accensione per alimentare il prodotto temporaneamente quando è stata rimossa la cupola di protezione. Il pulsante di accensione è utilizzato anche con il tasto di controllo per ripristinare la fotocamera alle impostazioni predefinite di fabbrica. Consultare pagina 94. Multicavo Axis Quando si collega un apparecchio esterno al dispositivo Axis, è...
  • Seite 84: Dati Tecnici

    AXIS Q60 Series Funzione Note Specifiche 0 V CC (-) Il pin può essere utilizzato anche per Uscita CC 3,3 V CC alimentare una periferica ausiliaria. Carico massimo Nota: questo pin può essere usato solo = 250 mA come uscita alimentazione. 3–6 Configurabile Ingresso digitale - collegare al pin 1...
  • Seite 85: Consumo Energetico

    AXIS Q60 Series Dispositivo Classificazione Temperatura Umidità AXIS Q6042 Mk IEC 60721-4-3 Da 0 °C a 50 °C 10-85% (umidità relativa senza Classe 3K3, 3M3 condensa) AXIS Q6044 IEC 60529 IP52 AXIS Q6045 Mk II Condizioni di stoccaggio Dispositivo Temperatura AXIS Q6042 Mk II Da -40 °C a 60 °C AXIS Q6044...
  • Seite 86: Installazione Dell'hardware

    AXIS Q60 Series Schema delle connessioni Connettore I/O 0 V CC (-) Uscita CC 3,3 V, max 250 mA I/O configurato come ingresso I/O configurato come uscita Installazione dell'hardware Leggere attentamente tutte le istruzioni prima di installare il dispositivo. Alcune fasi d'installazione dovrebbero essere eseguite in parallelo perché...
  • Seite 87 AXIS Q60 Series • Fare attenzione a non graffiare, danneggiare o lasciare impronte sulla cupola, perché potrebbe diminuire la qualità dell'immagine. Se possibile, tenere la protezione in plastica sulla cupola fino a quando l'installazione non sarà completata. Sostituzione della cupola (facoltativo) La cupola trasparente premontata può...
  • Seite 88 AXIS Q60 Series Installazione della telecamera con montaggio a soffitto 1. Preparare il soffitto per l'installazione della piastra di montaggio. Usare la piastra di montaggio fornita per posizionare i fori. Assicurarsi di utilizzare punte, viti e tasselli che siano appropriati per il materiale. 2.
  • Seite 89 AXIS Q60 Series Cavo di rete 6. Ruotare i portacavi per mantenere i cavi in posizione. 7. Posizionare il coperchio posteriore della telecamera nella sua posizione originaria e serrare le viti (serraggio 1,5 Nm). 8. Far scorrere i supporti dell'unità sulla telecamera di rete nelle fessure della piastra di montaggio e ruotare la telecamera.
  • Seite 90 AXIS Q60 Series A A A VVISO VVISO VVISO • Fare attenzione a non danneggiare i cavi quando li si collega. • Assicurarsi che i fori della guarnizione in schiuma siano allineati con le tracce dei cavi e se si utilizza un cavo multiconnettore, rimuovere la prefrattura per il cavo multiconnettore dalla guarnizione in schiuma.
  • Seite 91 AXIS Q60 Series Piastra di montaggio Staffa per il montaggio a soffitto Pannello soffitto Cavo di sicurezza Gancio per cavo di sicurezza 10. Far scorrere i supporti dell'unità sulla telecamera di rete nelle fessure della piastra di montaggio e ruotare la telecamera. 11.
  • Seite 92 AXIS Q60 Series Anello guarnizione Viti anello di finitura T20 (4x) Installazione della telecamera con montaggio a staffa 1. Installare la staffa selezionata in base alle istruzioni fornite. Se è necessario forare, assicurarsi di utilizzare punte, viti e tasselli adatti al materiale. 2.
  • Seite 93 AXIS Q60 Series Vite T30 (3x) Slot per supporti unità (3x) Cavo di sicurezza 5. Collegare il cavo di rete e, se utilizzato, il cavo multiconnettore alla telecamera. A A A VVISO VVISO VVISO • Fare attenzione a non danneggiare i cavi quando li si collega. •...
  • Seite 94: Modalità Di Accesso Al Dispositivo

    AXIS Q60 Series Portacavi Cavo multiconnettore Cavo di rete 6. Ruotare i portacavi per mantenere i cavi in posizione. 7. Posizionare il coperchio posteriore della telecamera nella sua posizione originaria e serrare le viti (serraggio 1,5 Nm). 8. Far scorrere i supporti dell'unità sulla telecamera di rete nelle fessure della staffa di montaggio e ruotare la telecamera.
  • Seite 95: Informazioni Sulla Garanzia

    AXIS Q60 Series Informazioni sulla garanzia Per informazioni sulla garanzia del dispositivo Axis e informazioni ad esso relative, consultare la pagina axis.com/warranty.
  • Seite 97: Niveles De Peligro

    AXIS Q60 Series Información de seguridad Niveles de peligro PELIGRO Indica una situación peligrosa que, si no se evita, provocará lesiones graves o la muerte. ADVERTENCIA Indica una situación peligrosa que, si no se evita, puede provocar lesiones graves o la muerte.
  • Seite 98 AXIS Q60 Series Instrucciones de seguridad ADVERTENCIA El producto de Axis debe instalarlo un profesional formado conforme a las leyes y normativas locales. A A A VISO VISO VISO • Este producto de Axis debe utilizarse de acuerdo con las leyes y normativas locales. •...
  • Seite 99 AXIS Q60 Series No sustituya la batería usted mismo. Póngase en contacto con el servicio de asistencia técnica de Axis si el mensaje de registro solicita un cambio de batería. Las pilas de botón de litio de 3,0 V contienen 1,2-dimetoxietano; éter dimetílico de etilenglicol (EGDME), n.º...
  • Seite 101: Contenido Del Paquete

    AXIS Q60 Series Guía de instalación Esta Guía de instalación incluye las instrucciones necesarias para instalar una de las siguientes cámaras de red en su red: • Cámara domo de red PTZ AXIS Q6042 Mk II • Cámara domo de red PTZ AXIS Q6044 •...
  • Seite 102: Accesorios Opcionales

    AXIS Q60 Series Accesorios opcionales Para conocer una lista completa de los accesorios disponibles para este producto, vaya a la página axis.com y seleccione Software y accesorios. Información general del hardware A A A VISO VISO VISO Asegúrese de conectar el domo en modo de funcionamiento, si no, el enfoque puede verse afectado.
  • Seite 103 AXIS Q60 Series Número de pieza (N/P) y número de serie (N/S) Guía de cables (2x) Junta de goma Conector de red (PoE+) Multiconector 10 Cubierta superior 11 Domo Unidad de cámara Ranura para tarjetas SD Indicador LED de estado Botón de control Botón de encendido...
  • Seite 104 AXIS Q60 Series Cubierta del domo Tornillo del soporte del domo T20 (4x) Soporte del domo Cubierta del domo Tornillo del anillo del domo T20 (4x) Anillo del domo Montaje en techo duro Placa de montaje Cable de seguridad...
  • Seite 105 AXIS Q60 Series Montaje en falso techo Placa de montaje Tornillo T20 para placa de montaje (3x) Brazo del soporte Tornillo T20 para brazo del soporte (3x) y arandela (3x) Anillo del soporte Anillo de ajuste Cable de seguridad Indicadores LED LED de estado Indicación Apagado...
  • Seite 106 AXIS Q60 Series Conectores y botones Para conocer las especificaciones y las condiciones de funcionamiento, consulte página 109. Conector de red Conector Ethernet RJ45 con alimentación a través de Ethernet Plus (PoE+). A A A VISO VISO VISO Utilice el midspan suministrado. A A A VISO VISO VISO...
  • Seite 107 AXIS Q60 Series • Restablecer el producto a la configuración predeterminada de fábrica. Consulte página 117. • Conectarse a un servicio AXIS Video Hosting System. Para obtener más información acerca de este servicio, visite axis.com Botón de encendido Mantenga pulsado el botón de encendido para alimentar temporalmente el producto cuando se haya retirado la cubierta del domo.
  • Seite 108 AXIS Q60 Series Port & Devices > Port Status (Opciones del sistema > Puerto y dispositivos > Estado del puerto)). Notas Especificaciones Función 0 V CC (-) Salida de CC Se puede utilizar para conectar el equipo 3,3 V CC auxiliar.
  • Seite 109: Especificaciones

    AXIS Q60 Series Especificaciones Condiciones de funcionamiento El producto de Axis se ha diseñado para su uso en interior. Producto Temperatura Humedad Clasificación AXIS Q6042 Mk IEC 60721-4-3 De 0 °C a 50 °C Humedad relativa: del 10 al 85 Clase 3K3, 3M3 % (sin condensación) AXIS Q6044...
  • Seite 110: Diagramas De Conexión

    AXIS Q60 Series Diagramas de conexión Conector de E/S 0 V CC (-) Salida de CC 3,3 V, 250 mA máx. E/S configurada como entrada E/S configurada como salida Instalación del hardware Lea todas las instrucciones antes de instalar el producto. Es recomendable realizar algunos pasos de la instalación juntos, ya que en ellos se precisa la extracción de la cubierta del domo.
  • Seite 111 AXIS Q60 Series • Preste atención para no arañar, dañar o dejar las huellas en la cubierta del domo, puesto que esto puede provocar una disminución de la calidad de imagen. Si es posible, mantenga el plástico de protección en la cubierta del domo hasta que termine la instalación. Sustitución de la cubierta del domo (opcional) La cubierta del domo transparente premontada se puede sustituir si desea usar la cubierta ahumada o si la cubierta del domo se ha arañado o dañado.
  • Seite 112 AXIS Q60 Series Instalación de la cámara con un montaje en techo duro 1. Prepare el techo para instalar la placa de montaje. Utilice la placa de montaje como una plantilla proporcionada para realizar los orificios en su sitio. Asegúrese de usar brocas, tornillos y tacos adecuados para el material.
  • Seite 113 AXIS Q60 Series 6. Gire los soportes de cables para colocar los cables en su lugar. 7. Vuelva a colocar la tapa de la base de la cámara en su posición original y apriete los tornillos (par de torsión de 1,5 Nm). 8.
  • Seite 114 AXIS Q60 Series • Asegúrese de que los orificios de la junta de goma estén alineados con las guías de cables. Si se utiliza un cable multiconector, retire la pieza de corte del cable multiconector de la junta de goma. Soportes de cables Cable multiconector Cable de red...
  • Seite 115 AXIS Q60 Series Placa del techo Cable de seguridad Gancho para cable de seguridad 10. Deslice los soportes de la cámara de red por las ranuras de la placa de montaje y gire la unidad de cámara. 11. Instale el midspan suministrado siguiendo las instrucciones de la Guía de instalación facilitada con el midspan o localícelas en www.axis.com 12.
  • Seite 116 AXIS Q60 Series Tornillo T30 (3) Ranura para soporte de unidad (3) Cable de seguridad 5. Conecte el cable de red y el cable multiconector, si se utiliza, a la cámara. A A A VISO VISO VISO • Asegúrese de no dañar los cables cuando los conecte. •...
  • Seite 117: Cómo Acceder Al Producto

    AXIS Q60 Series Soportes de cables Cable multiconector Cable de red 6. Gire los soportes de cables para colocar los cables en su lugar. 7. Vuelva a colocar la tapa de la base de la cámara en su posición original y apriete los tornillos (par de torsión de 1,5 Nm).
  • Seite 118: Información De Garantía

    AXIS Q60 Series • Para consultar webinars y cursos en línea que pueden resultarle útiles, vaya a axis.com/academy. Información de garantía Para obtener más detalles sobre la garantía del producto Axis y la información relacionada con ella, visite axis.com/warranty.
  • Seite 119 AXIS Q60 Series 安 安 安 全 全 全 情 情 情 報 報 報 危 危 危 険 険 険 レ レ レ ベ ベ ベ ル ル ル 危険 回避しない場合、死亡または重傷につながる危険な状態を⽰します。 警告 回避しない場合、死亡または重傷につながるおそれのある危険な状態を ⽰します。 注意 回避しない場合、軽傷または中程度の怪我につながるおそれのある危険 な状態を⽰します。 注記 回避しない場合、器物の破損につながるおそれのある状態を⽰します。 そ...
  • Seite 120 AXIS Q60 Series 安 安 安 全 全 全 ⼿ ⼿ ⼿ 順 順 順 警告 本製品の設置は、お使いになる地域の法律や規制に準拠して、訓練を受け た専⾨技術者が⾏ってください。 注記 • 本製品は、お使いになる地域の法律や規制に準拠して使⽤してください。 • Axisは、シールドネットワークケーブル (STP) の使⽤を推奨します。 • 本製品を屋外またはそれに準じる環境で使⽤する場合は、認定済みの屋外⽤ 筐体に収納して設置する必要があります。 • 本製品は乾燥した換気のよい環境に保管してください。 • 本製品に衝撃または強い圧⼒を加えないでください。 • 本製品を不安定なポール、ブラケット、表⾯、または壁に設置しないで ください。 • 本製品を設置する際には、適切な⼯具のみを使⽤してください。 電動⼯具を 使⽤して過剰な⼒をかけると、製品が損傷することがあります。 • 化学薬品、腐⾷剤、噴霧式クリーナーは使⽤しないでください。 •...
  • Seite 121 AXIS Q60 Series ⾃分でバッテリーを交換しないでください。 ログメッセージがバッテリーの 交換を要求している場合は、アクシスサポートに連絡してください。 リチウムコイン型3.0 V電池は、1,2-ジメトキシエタン (エチレングリコールジメチル エーテル (EGDME)、CAS番号110-71-4) を含有しています。 ド ド ド ー ー ー ム ム ム カ カ カ バ バ バ ー ー ー 注記 • 画質低下の原因となるため、ドームカバーに傷や指紋を付けたり、損傷しな いように注意してください。 可能であれば、設置が完了するまでドームカ バーに保護プラスチックを付けたままにしてください。 • ⾁眼で⾒て汚れがない場合は、ドームカバーを掃除しないでください。ま た、絶対に表⾯を磨かないでください。 過度な清掃により、表⾯が破損す ることがあります。...
  • Seite 123 AXIS Q60 Series イ イ イ ン ン ン ス ス ス ト ト ト ー ー ー ル ル ル ガ ガ ガ イ イ イ ド ド ド このインストールガイドでは、次のネットワークカメラのいずれかをお使いのネッ トワークにインストールする⼿順について説明します。 AXIS Q6042 Mk II PTZドームネットワークカメラ • AXIS Q6044 PTZドームネットワークカメラ •...
  • Seite 124 AXIS Q60 Series オ オ オ プ プ プ シ シ シ ョ ョ ョ ン ン ン ア ア ア ク ク ク セ セ セ サ サ サ リ リ リ ー ー ー axis.com 本製品で利⽤可能なすべてのアクセサリーについては、 で本製品のページを 開いて「ソフトウェア&アクセサリー」を参照してください。 ハ...
  • Seite 125 AXIS Q60 Series 型番 (P/N) とシリアル番号 (S/N) ケーブルトラック (×2) フォームガスケット ネットワークコネクター (PoE+) マルチコネクタ 10 上蓋 11 ドーム カ カ カ メ メ メ ラ ラ ラ ユ ユ ユ ニ ニ ニ ッ ッ ッ ト ト ト SDカードスロット ステータスLEDインジケーター コントロールボタン...
  • Seite 126 AXIS Q60 Series ド ド ド ー ー ー ム ム ム カ カ カ バ バ バ ー ー ー ドームブラケットネジ T20 (×4) ドームブラケット ドームカバー ドームリングネジ T20 (×4) ドームリング 天 天 天 井 井 井 取 取 取 り り り 付 付 付 け け け キ キ キ ッ ッ ッ ト ト ト 取り付けプレート...
  • Seite 127 AXIS Q60 Series 埋 埋 埋 め め め 込 込 込 み み み 取 取 取 り り り 付 付 付 け け け キ キ キ ッ ッ ッ ト ト ト 取り付けプレート 取り付けプレートネジ T20 (×3) ブラケットアーム...
  • Seite 128 AXIS Q60 Series コ コ コ ネ ネ ネ ク ク ク タ タ タ と と と ボ ボ ボ タ タ タ ン ン ン 130ページ 仕様と動作条件については、 を参照してください。 ネ ネ ネ ッ ッ ッ ト ト ト ワ ワ ワ ー ー ー ク ク ク コ コ コ ネ ネ ネ ク ク ク タ タ タ Power over Ethernet Plus (PoE+) 対応RJ45イーサネットコネクタ...
  • Seite 129 AXIS Q60 Series 140ページ 製品を⼯場出荷時の設定にリセットする。 を参照してください。 • AXIS Video Hosting Systemサービスに接続する。 このサービスの詳細につい • axis.com ては、 を参照してください。 電 電 電 源 源 源 ボ ボ ボ タ タ タ ン ン ン ドームカバーを取り外したとき、製品の電源を⼀時的に⼊れるには、電源ボタンを 押し続けます。 電源ボタンとコントロールボタンを同時に押すと、カメラが⼯場出 140ページ 荷時の設定にリセットされます。 を参照してください。 AXIS マ マ マ ル ル ル チ チ チ ケ ケ ケ ー ー ー ブ ブ ブ ル ル ル AXIS AXIS 外部装置を本製品に接続する場合、本製品のIP定格を維持するため、AXISマルチ...
  • Seite 130 AXIS Q60 Series 機 機 機 能 能 能 ピ ピ ピ ン ン ン 備 備 備 考 考 考 仕 仕 仕 様 様 様 0 V DC (-) 3.3 V DC DC出⼒ 補助装置の電源供給に使⽤できま 最 ⼤ 負 荷 = す。...
  • Seite 131 AXIS Q60 Series 製 製 製 品 品 品 等 等 等 級 級 級 温 温 温 度 度 度 湿 湿 湿 度 度 度 IEC 60721-4-3 AXIS Q6042 Mk 0 °C〜50 °C 10〜85% RH (結露不可) Class 3K3、 AXIS Q6044 IEC 60529 IP52 AXIS Q6045 Mk II...
  • Seite 132 AXIS Q60 Series 接 接 接 続 続 続 図 図 図 I/O コ コ コ ネ ネ ネ ク ク ク タ タ タ 0 V DC (-) DC出⼒3.3 V、最⼤250 mA I/O (⼊⼒として設定) I/O (出⼒として設定) ハ ハ ハ ー ー ー ド ド ド ウ ウ ウ ェ ェ ェ ア ア ア の の の イ イ イ ン ン ン ス ス ス ト ト ト ー ー ー ル ル ル 製品を取り付ける前に、すべての説明に⽬を通してください。...
  • Seite 133 AXIS Q60 Series • 画質低下の原因となるので、ドームカバーに傷や指紋を付けたり、損傷しな いように注意してください。 可能であれば、設置が完了するまでドームカ バーに保護プラスチックを付けたままにしてください。 ド ド ド ー ー ー ム ム ム カ カ カ バ バ バ ー ー ー の の の 交 交 交 換 換 換 ( ( ( オ オ オ プ プ プ シ シ シ ョ ョ ョ ン ン ン ) ) ) スモークドームカバーを使⽤したい場合や、ドームカバーに傷が付いたり、損傷し...
  • Seite 134 AXIS Q60 Series 天 天 天 井 井 井 取 取 取 り り り 付 付 付 け け け キ キ キ ッ ッ ッ ト ト ト へ へ へ の の の カ カ カ メ メ メ ラ ラ ラ の の の 取 取 取 り り り 付 付 付 け け け 1.
  • Seite 135 AXIS Q60 Series ネットワークケーブル 6. ケーブルが適切な位置に保持されるよう、ケーブルホルダーを回転させま す。 7. カメラ本体のふたを元の位置に戻し、ネジをしっかりと締めます (トル ク1.5 Nm)。 8. ネットワークカメラのユニットホルダーを据付プレートの溝⽳に滑り込ま せ、カメラユニットを回転させます。 9. 付属のミッドスパンを設置します。ミッドスパンに同梱のインストールガ www.axis.com イド、または を参照してください 埋 埋 埋 め め め 込 込 込 み み み 取 取 取 り り り 付 付 付 け け け キ キ キ ッ ッ ッ ト ト ト へ へ へ の の の カ カ カ メ メ メ ラ ラ ラ の の の 取 取 取 り り り 付 付 付 け け け 警告...
  • Seite 136 AXIS Q60 Series 注記 • 接続時にケーブルを傷つけないよう、注意してください。 • フォームガスケット孔とケーブルレールの位置を合わせます。 マルチコネク タケーブルを使⽤している場合は、フォームガスケットにマルチコネクタ ケーブル⽤のカットアウトを開きます。 ケーブルホルダー マルチコネクタケーブル ネットワークケーブル 7. ケーブルが適切な位置に保持されるよう、ケーブルホルダーを回転させま す。 8. カメラ本体のふたを元の位置に戻し、ネジをしっかりと締めます (トル ク1.5 Nm)。 9. 付属の安全ワイヤーを使⽤してカメラを固定します。...
  • Seite 137 AXIS Q60 Series 取り付けプレート 天井ブラケット 天井ボード 安全ワイヤー 安全ワイヤーフック 10. ネットワークカメラのユニットホルダーを据付プレートの溝⽳に滑り込ま せ、カメラユニットを回転させます。 11. 付属のミッドスパンを設置します。ミッドスパンに同梱のインストールガ www.axis.com イド、または を参照してください 12. カメラを取り付けた天井ボードを設置します。 13. 天井ブラケットにトリムリングをはめ、ネジでしっかりと⽌めます。...
  • Seite 138 AXIS Q60 Series トリムリング トリムリングネジ T20 (×4) ブ ブ ブ ラ ラ ラ ケ ケ ケ ッ ッ ッ ト ト ト へ へ へ の の の カ カ カ メ メ メ ラ ラ ラ の の の 取 取 取 り り り 付 付 付 け け け 1.
  • Seite 139 AXIS Q60 Series ネジ T30 (×3) ユニットホルダー⽤スロット (×3) 安全ワイヤー 5. ネットワークケーブルと、使⽤する場合はマルチコネクタケーブルをカ メラに接続します。 注記 • 接続時にケーブルを傷つけないよう、注意してください。 • フォームガスケット孔とケーブルレールの位置を合わせます。 マルチコネク タケーブルを使⽤している場合は、フォームガスケットにマルチコネクタ ケーブル⽤のカットアウトを開きます。...
  • Seite 140 AXIS Q60 Series ケーブルホルダー マルチコネクタケーブル ネットワークケーブル 6. ケーブルが適切な位置に保持されるよう、ケーブルホルダーを回転させま す。 7. カメラ本体のふたを元の位置に戻し、ネジをしっかりと締めます (トル ク1.5 Nm)。 8. ネットワークカメラのユニットホルダーを取り付け⽤ブラケットのスロッ トにはめ込み、カメラユニットを回転させます。 9. ネジを締め、ネットワークカメラを取り付けブラケットに固定します。 10. 付属のミッドスパンを設置します。ミッドスパンに同梱のインストールガ www.axis.com イド、または を参照してください 製 製 製 品 品 品 の の の ア ア ア ク ク ク セ セ セ ス ス ス ⽅ ⽅ ⽅ 法 法 法 Windows®でネットワーク上のAxisデバイスを⾒つけて、それらにIPアドレスを割り...
  • Seite 141 AXIS Q60 Series 役に⽴つオンライントレーニングおよびWebセミナーをご⽤意しておりま • axis.com/academy す。 をご覧ください。 保 保 保 証 証 証 情 情 情 報 報 報 axis.com/warranty アクシスの製品保証と関連情報については、 をご覧ください。...
  • Seite 143 AXIS Q60 Series 安 安 安 全 全 全 信 信 信 息 息 息 危 危 危 险 险 险 等 等 等 级 级 级 危险 表示如果不避免则会导致死亡或严重伤害的危险情况。 警告 表示如果不避免则可能导致死亡或严重伤害的危险情况。 小心 表示如果不避免则可能导致轻微或中度伤害的危险情况。 注意 表示如果不避免则可能导致财产损失的情况。 其 其 其 他 他 他 消 消 消 息 息 息 等 等 等 级 级 级 重要...
  • Seite 144 AXIS Q60 Series 安 安 安 全 全 全 说 说 说 明 明 明 警告 Axis 产品应由受过培训的专业人员进行安装,并遵守当地法律和法规。 注意 • 使用 Axis 产品时应遵守当地法律和法规。 • Axis 推荐使用屏蔽网络电缆 (STP)。 • 要在室外或类似环境中使用 Axis 产品,应将该产品安装在获得批准的室外 防护罩中。 • 在干燥通风的环境中存放 Axis 产品。 • 避免将 Axis 产品暴露在冲击或高压环境下。 •...
  • Seite 145 AXIS Q60 Series 半 半 半 球 球 球 罩 罩 罩 注意 • 小心不要划伤、损坏或在半球罩上留下指纹,因为这可能会降低图像质量。 如 果可能,请保留半球罩上的保护塑料,直至安装完成。 • 请勿清洁看起来干净的半球罩,也不要对表面进行抛光。 过度清洁可能会 损坏表面。 • 对于半球罩的一般清洁,建议将无腐蚀性、不含溶剂的中性肥皂或洗涤剂与纯 水混合,并使用柔软、干净的布进行清洁。 用温水冲洗干净。 用一块柔软 干净的布擦干,以避免留下水渍。 • 切勿使用带有刺鼻气味的洗涤剂、汽油、苯、丙酮或类似化学品。 • 避免在阳光直射或高温下清洁半球罩。 • 确保在操作模式下连接半球,否则可能会影响对焦。...
  • Seite 147 AXIS Q60 Series 安 安 安 装 装 装 指 指 指 南 南 南 本安装指南说明了如何在网络上安装以下一款网络摄像机: AXIS Q6042 Mk II PTZ 球型网络摄像机 • AXIS Q6044 PTZ 球型网络摄像机 • AXIS Q6045 Mk II PTZ 球型网络摄像机 • www.axis.com 有关使用该产品的其他信息,请参见用户手册,网址: 安 安 安 装 装 装 步 步 步 骤 骤 骤 第147页...
  • Seite 148 AXIS Q60 Series 硬 硬 硬 件 件 件 概 概 概 览 览 览 注意 确保球型罩安装在运行模式下,否则可能影响对焦。 单元固定装置 (3x) 摄像机底盖 摄像机底盖螺丝 T20 (3x) 保险丝挂钩 零件编号 (P/N) 和序列号 (S/N) 线缆槽 (2x) 泡沫密封垫 网络接口 (PoE+) 多接头 10 顶盖...
  • Seite 149 AXIS Q60 Series 11 球型罩 摄 摄 摄 像 像 像 机 机 机 单 单 单 元 元 元 SD 卡插槽 LED 状态指示灯 控制按钮 电源按钮 球 球 球 型 型 型 罩 罩 罩 球型支架螺丝 T20 (4x) 球型支架...
  • Seite 150 AXIS Q60 Series 球型罩 球型环螺丝 T20 (4x) 球型环 硬 硬 硬 天 天 天 花 花 花 板 板 板 安 安 安 装 装 装 支 支 支 架 架 架 安装板 保险丝 吊 吊 吊 顶 顶 顶 安 安 安 装 装 装 支 支 支 架 架 架 安装板...
  • Seite 151 AXIS Q60 Series 托架臂螺丝 T20 (3x) 和垫圈 (3x) 支架环 装饰环 保险丝 LED 指 指 指 示 示 示 灯 灯 灯 LED 状 状 状 态 态 态 指 指 指 示 示 示 灯 灯 灯 指 指 指 示 示 示 不亮...
  • Seite 152 AXIS Q60 Series SD 卡 卡 卡 插 插 插 槽 槽 槽 注意 • 损坏 SD 卡的风险。 插入或取出 SD 卡时,请勿使用锋利的工具、金属物体或 过大力气。 使用手指插入和取出该卡。 • 数据丢失和录制内容损坏的风险。 产品正在运行时,请勿取出 SD 卡。 在取 出 SD 卡之前,请先从产品的网页上卸载 SD 卡。 本产品支持 SD/SDHC/SDXC 卡。 axis.com 有关 SD 卡的建议,请参见 。...
  • Seite 153 AXIS Q60 Series 数字输出—用于连接外部设备,如继电器和 LED 灯。已连接设备可通 • 过 VAPIX® 应用编程接口(API)、Live View(实时视图)页面上的输 出按钮或 Action Rule(操作规则)激活。当警报设备被激活后,该输出 接口将显示为激活(显示在 系 系 系 统 统 统 选 选 选 项 项 项 > > > 端 端 端 口 口 口 和 和 和 设 设 设 备 备 备 > > > 端 端 端 口 口 口 状 状 状 态 态 态 下)。 数字输入—...
  • Seite 154 AXIS Q60 Series 规 规 规 格 格 格 工 工 工 作 作 作 条 条 条 件 件 件 该安讯士产品为室内使用而设计。 产 产 产 品 品 品 分 分 分 类 类 类 温 温 温 度 度 度 湿...
  • Seite 155 AXIS Q60 Series 连 连 连 接 接 接 图 图 图 I/O 接 接 接 口 口 口 0 V DC (-) DC 输出 3.3 V ,最大 250 mA I/O 配置为输入 I/O 配置为输出 安 安 安 装 装 装 硬 硬 硬 件 件 件 请在安装产品前阅读说明。有几项安装步骤要求移去球型罩,因此,建议同时完成...
  • Seite 156 AXIS Q60 Series 更 更 更 换 换 换 球 球 球 型 型 型 罩 罩 罩 ( ( ( 可 可 可 选 选 选 ) ) ) 在以下情况下可更换预装的透明球型罩:您希望使用烟雾型球型罩,或球型罩被刮伤或 损害。备用的球型罩可通过您的安讯士经销商购买。 硬件概览 在第148页 有关组件的位置信息,请参见 。 1. 松开球型环螺丝,并移去球型罩。 2. 从球型环中卸下球型支架螺丝、球型支架和球型罩。 3.
  • Seite 157 AXIS Q60 Series 安装板 保险丝 3. 松开摄像机底盖螺丝,并移去摄像机底盖。 4. 确保摄像机使用所提供的保险丝。 5. 将网线及(如使用)多接头线缆连接到摄像机上。 注意 • 连接线缆时注意不要损坏线缆。 • 确保泡沫垫圈孔对其线缆槽。使用多接头线缆时,将多接头线缆的切割部件 从泡沫垫圈上移除。 线缆支架 多接头线缆 网线 6. 旋转线缆支架,使线缆固定。 7. 将摄像机底盖放回其原有位置,并拧紧螺丝(扭矩为 1.5 纳米)。 8. 将网络摄像机的单元固定装置推入安装板中的插槽,并拧动摄像机单元。 9. 安装随附的 PoE 模块时请参考 PoE 模块随附的安装指南,或访问 www.axis.com 查找安装指南。...
  • Seite 158 AXIS Q60 Series 使 使 使 用 用 用 吊 吊 吊 顶 顶 顶 安 安 安 装 装 装 支 支 支 架 架 架 安 安 安 装 装 装 摄 摄 摄 像 像 像 机 机 机 警告...
  • Seite 159 AXIS Q60 Series 线缆支架 多接头线缆 网线 7. 旋转线缆支架,使线缆固定。 8. 将摄像机底盖放回其原有位置,并拧紧螺丝(扭矩为 1.5 纳米)。 9. 确保摄像机使用所提供的保险丝。 安装板 天花板支架 天花板 保险丝 保险丝挂钩...
  • Seite 160 AXIS Q60 Series 10. 将网络摄像机的单元固定装置推入安装板中的插槽,并拧动摄像机单元。 11. 安装随附的 PoE 模块时请参考 PoE 模块随附的安装指南,或访问 www.axis.com 查找安装指南。 12. 将天花板与安装在天花板上的摄像机安装在一起。 13. 将装饰环放到吊顶支架上,并拧紧螺丝。 装饰环 装饰环螺丝 T20 (4x) 使 使 使 用 用 用 安 安 安 装 装 装 支 支 支 架 架 架 安 安 安 装 装 装 摄 摄 摄 像 像 像 机 机 机 1.
  • Seite 161 AXIS Q60 Series 螺丝 T30 (3x) 单元固定装置插槽 (3x) 保险丝 5. 将网线及(如使用)多接头线缆连接到摄像机上。 注意 • 连接线缆时注意不要损坏线缆。 • 确保泡沫垫圈孔对其线缆槽。使用多接头线缆时,将多接头线缆的切割部件 从泡沫垫圈上移除。...
  • Seite 162 AXIS Q60 Series 线缆支架 多接头线缆 网线 6. 旋转线缆支架,使线缆固定。 7. 将摄像机底盖放回其原有位置,并拧紧螺丝(扭矩为 1.5 纳米)。 8. 将网络摄像机的单元固定装置推入安装支架中的插槽,并旋转摄像机单元。 9. 拧紧螺丝,将网络摄像机固定至安装支架。 10. 安装随附的 PoE 模块时请参考 PoE 模块随附的安装指南,或访问 www.axis.com 查找安装指南。 如 如 如 何 何 何 访 访 访 问 问 问 产 产 产 品 品 品 若要在网络中查找安讯士设备并为它们分配...
  • Seite 163 AXIS Q60 Series 质 质 质 保 保 保 信 信 信 息 息 息 axis.com/warranty 有关安讯士产品质保的信息及相关信息,请转到 。...
  • Seite 164 Installation Guide Ver. M6.2 AXIS Q60 Series Date: May 2021 © 2014 - 2021 Axis Communications AB Part No. 1485659...

Diese Anleitung auch für:

Q6042Q6044Q6045

Inhaltsverzeichnis