Inhaltsverzeichnis
Werbung
Verfügbare Sprachen
Verfügbare Sprachen
Quicklinks
Werbung
Kapitel
Inhaltsverzeichnis

Verwandte Anleitungen für De Dietrich DHD 1129 DG


Inhaltszusammenfassung für De Dietrich DHD 1129 DG
- Seite 1 FR GUIDE D'UTILISATION EN GUIDE TO INSTALLATION ES MANUAL DE UTILIZACIÓN PT GUIA DE UTILIZAÇÃO DE BETRIEBSANLEITUNG Hotte décorative Decorative Hood Campana extractora decorativa Exaustor decorativo Dekor-Dunstabzugshaube...
- Seite 2 En vous remerciant de votre confiance. De Dietrich Retrouvez toutes les informations de la marque sur www.de-dietrich.com Visitez La Galerie De Dietrich, 6 rue de la Pépinière à Paris VIIIème Ouvert du mardi au samedi de 10h à 19h. Service Consommateurs 0892 02 88 04.
-
Seite 3: Inhaltsverzeichnis
SOMMAIRE 1 / A L’ATTENTION DE L’UTILISATEUR • • Consignes de sécurité ______________________________________ • • Respect de l’environnement _________________________________ • • Description de votre appareil _________________________________ 2 / INSTALLATION DE VOTRE APPAREIL • • Utilisation en version évacuation ______________________________ • • Utilisation en version recyclage _______________________________ •... -
Seite 4: A L'attention De L'utilisateur
1 1 / / A L’ATTENTION DE L’UTILISATEUR de cuisson, au dessous de la hotte (les flam- mes aspirées risqueraient de détériorer l'ap- Important • • pareil). Conservez cette notice d'utilisation — — Les fritures effectuées sous l'appareil doi- avec votre appareil. Si l'appareil devait être vent faire l'objet d'une surveillance constante. -
Seite 5: Respect De L'environnement
1 1 / / A L’ATTENTION DE L’UTILISATEUR RESPECT DE L’ENVIRONNEMENT • • — Les matériaux d'emballage de cet appareil sont recyclables. Participez à leur recyclage et contribuez ainsi à la protection de l'environnement en les déposant dans les conteneurs munici- paux prévus à... -
Seite 6: Description De Votre Appareil
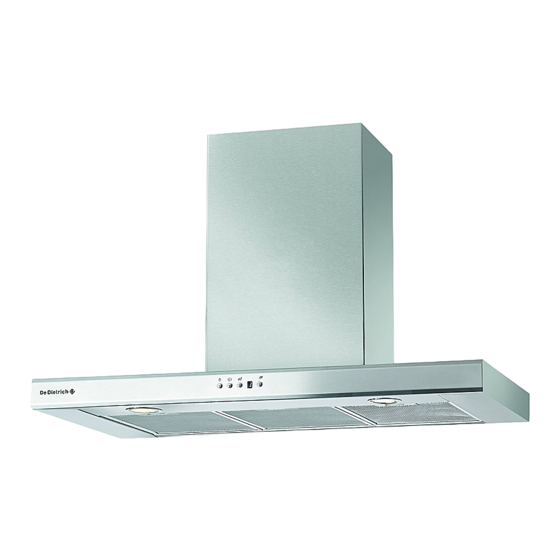
1 1 / / A L’ATTENTION DE L’UTILISATEUR • • DESCRIPTION DE VOTRE APPAREIL Ouïes Enveloppe Cheminée Commandes... -
Seite 7: Installation De Votre Appareil
2 2 / / INSTALLATION DE VOTRE APPAREIL - L'appareil doit être débranché pendant l'installation ou dans l'éventualité d'une intervention. - Vérifiez que la tension du réseau correspond à la tension mentionnée sur la plaque signalétique située à l'intérieur de la hotte. - Si l'installation électrique de votre habitation nécessite une modification pour le branchement de votre appareil, faites appel à... -
Seite 8: Raccordement Électrique
2 2 / / INSTALLATION DE VOTRE APPAREIL • • RACCORDEMENT ELECTRIQUE Lors de l'installation et des opérations d'en- tretien, l'appareil doit être débranché du réseau électrique, les fusibles doivent être coupés ou retirés. Le raccordement électrique est à réaliser après assemblage et fixation. -
Seite 9: Montage De La Hotte
2 2 / / INSTALLATION DE VOTRE APPAREIL • • MONTAGE DE LA HOTTE Attention L’installation doit être conforme aux règlements en vigueur pour la ventilation des locaux. En France, ces règlements sont indi- qués dans le DTU 61.1 du CSTB. En particu- lier, l’air évacué... -
Seite 10: Montage De La Cheminée
2 2 / / INSTALLATION DE VOTRE APPAREIL Conseil • • MONTAGE DE LA CHEMINEE Pour une utilisation optimale de votre • • Evacuation extérieure appareil, nous vous conseillons le raccorde- ment à une gaine diamètre 150 mm (non livrée). —... -
Seite 11: º Recyclage
2 2 / / INSTALLATION DE VOTRE APPAREIL • • Recyclage — Retirez le clapet anti-retour (fig. 1). — Fixez contre le mur, en appui sur le plafond, le déflecteur plastique de fumée avec les deux vis (fig. 2). Prendre soin de centrer le déflecteur par rapport au trait vertical tracé... -
Seite 12: Utilisation De Votre Appareil
3 3 / / UTILISATION DE VOTRE APPAREIL • • DESCRIPTION DES COMMANDES (*Selon modèles) Eclairage Afficheur Affichage des vitesses (1,2,3,ou 4) Marche / Arrêt Saturation des filtres Sélection des vitesses de 1 à 4 Temporisation / Arrêt différé (10 min) Mode automatique* MODE AUTOMATIQUE (selon modèle) •... -
Seite 13: Nettoyage Du Filtre Cassette
3 / UTILISATION DE VOTRE APPAREIL Passage en mode automatique Effectuez un appui court sur , un point apparait su l’afficheur. Un clignote dés qu’une source de chaleur est détectée, la hotte se met en route. A la fin de la cuisson, la hotte continue de fonctionner de 40 sec à... -
Seite 14: Entretien Et Nettoyage De Votre Appareil
4 4 / / ENTRETIEN ET NETTOYAGE DE VOTRE APPAREIL Attention Débranchez (soit en retirant la prise, soit en actionnant le disjoncteur) l'appareil avant de procéder à l'entretien et au nettoyage de l'appareil. Un entretien régulier de votre appareil est une garantie de bon fonctionnement, de bon rendement et de durabilité. Attention Le non-respect des instructions de nettoyage de l'appareil et des filtres peut occasion- ner des incendies. -
Seite 15: Entretenir Votre Appareil
4 4 / / ENTRETIEN ET NETTOYAGE DE VOTRE APPAREIL Attention Avant toute intervention, la hotte doit être mise hors tension, soit en retirant la prise, soit en actionnant le disjoncteur. • • ENTRETENIR VOTRE APPAREIL P P R R O O D D U U I I T T S S / / A A C C C C E E S S S S O O I I R R E E S S E E N N T T R R E E T T I I E E N N . -
Seite 16: Anomalies De Fonctionnement
5 5 / / ANOMALIES DE FONCTIONNEMENT S S Y Y M M P P T T O O M M E E S S S S O O L L U U T T I I O O N N S S Vérifiez que: •... -
Seite 17: Service Apres-Vente
à l'écoute de toutes vos remarques, suggestions, propositions auxquelles nous vous répondrons personnellement. > Vous pouvez nous écrire : Service Consommateurs DE DIETRICH BP 9526 95069 CERGY PONTOISE CEDEX > ou nous téléphoner au : * * Service fourni par Brandt Customer Services, société par actions simplifiée au capital de 2.5000.000 euros, 5/7 avenue des Béthunes, 95310 Saint Ouen l’Aumône - RCS Pontoise 440 303 303... - Seite 18 Dear valued customer, To discover a De Dietrich product is to experience the range of unique emotions which only high-value items can produce. The attraction is immediate, from the moment you set eyes on the pro- duct. The sheer quality of the design shines through thanks to the time-...
- Seite 19 TABLE OF CONTENTS 1 1 / / N N O O T T I I C C E E S S T T O O T T H H E E U U S S E E R R • Safety recommendations ........20 •...
-
Seite 20: Safety Recommendations
1 / NOTICES TO THE USER Attention Keep this user guide with your appli- — You should never "flambé" dishes under the ance. If the appliance is ever sold or trans- hood or operate gas rings under the hood ferred to another person, ensure that the without placing cookware on them (the flames new owner receives the user guide. -
Seite 21: Environmental Protection
1 / NOTICES TO THE USER ENVIRONMENTAL PROTECTION • — This appliance's packaging material is recyclable. Help recycle it and protect the environment by dropping it off in the municipal receptacles provided for this purpose. — Your appliance also contains a great amount of recyclable material. It is marked with this label to indicate the used appliances that should not be mixed with other waste. -
Seite 22: Description Of Your Appliance
1 / NOTICES TO THE USER • DESCRIPTION OF YOUR APPLIANCE Vents Top surface Ventilation shaft Control panel... -
Seite 23: Using The Evacuation Mode
2 / INSTALLING YOUR APPLIANCE - The appliance must be unplugged during installation or when any repair or maintenance work is being performed. - Ensure that the network voltage corresponds to the voltage noted on the identification plate located inside the hood. - If the electrical installation at your residence requires any changes in order to hook up your Appliance, call upon a professional electrician. -
Seite 24: Electrical Connections
2 / INSTALLING YOUR APPLIANCE • ELECTRICAL CONNECTIONS During installation and maintenance opera- tions, the appliance must be unplugged from the electrical grid; fuses must be cut off or re- moved. Carry out the electrical connection after as- sembly and mounting are completed. Ensure that: - the electrical installation has sufficient volt- age,... -
Seite 25: Assembling The Hood
2 / INSTALLING YOUR APPLIANCE • ASSEMBLING THE HOOD Warning The hood must be installed in compli- ance with all applicable regulations concern- ing the ventilation of premises. In France these regulations are described in DTU 61.1 from the CSTB. In particular, the evacuated air should never be conveyed to a duct used to evacuate smoke from appliances that use >... -
Seite 26: Assembling The Ventilation Shaft
2 / INSTALLING YOUR APPLIANCE • ASSEMBLING THE VENTILATION For optimal use of your appliance, we recommend that you connect the hood to a SHAFT 150 mm-diameter flue (not delivered with the appliance). Minimise the number of angles •Outdoor evacuation and bends and the lengths of the flue. -
Seite 27: Recycling
2 / INSTALLING YOUR APPLIANCE •Recycling — Remove the back-flow valve (fig. 1). — Using the two screws (fig. 2), attach the plastic smoke deflector against the wall, flush with the ceiling for support. Be careful to centre the deflector in relation to the vertical line drawn on the wall (fig. -
Seite 28: Description Of Control Panel
3 / USING YOUR APPLIANCE • DESCRIPTION OF CONTROL PANEL Lighting Indicator Speed display (1, 2, 3 or 4) On/Off Filter saturation Speed selection (1 to 4) Timer/Delayed shutdown (10 Min) AUTOMATIC MODE (depending on model) • This type of hood has a smart capability. Fitted with sensors, it switches on automatically when it detects heat or steam and adjusts its suction speed accordingly. - Seite 29 3 / USING YOUR APPLIANCE Changing to automatic mode Press briefly. A dot appears in the display. A flashes. As soon as heat is detected, the hood starts to run. At the end of cooking, the hood will continue to run for between 40 seconds and 10 minutes.
-
Seite 30: Cleaning The Filter Cartridges
4 / CARING FOR AND CLEANING YOUR APPLIANCE Warning Always unplug the hood before cleaning it or performing other maintenance acts. Regular maintenance of your appliance is a guarantee of proper functioning, good perform- ance and durability. Warning Failure to respect the guidelines for cleaning the appliance and filters may cause fires. Please carefully adhere to the maintenance recommendations. -
Seite 31: Maintaining Your Appliance
4 / CARING FOR AND CLEANING YOUR APPLIANCE Warning Before carrying out any work, the power supply to the hood must be turned off, either by unplugging it or by using the circuit breaker switch. • MAINTAINING YOUR APPLIANCE M M A A I I N N T T E E N N A A N N C C E E T T O O U U S S E E W W H H A A T T T T O O D D O O P P R R O O D D U U C C T T S S / / A A C C C C E E S S S S O O R R I I E E S S N N e e v v e e r r u u s s e e m m e e t t a a l l s s c c o o u u r r i i n n g g p p a a d d s s , ,... -
Seite 32: 5 / / T T R R O O U U B B L L E E S S H H O O O O T T I I N N G G
5 / TROUBLESHOOTING S S Y Y M M P P T T O O M M S S S S O O L L U U T T I I O O N N S S Ensure that: • The power is not cut off. The hood is not working... - Seite 34 De Dietrich Conozca todas las noticias de la marca en www.de-dietrich.com Visite La Galería De Dietrich, 6 rue de la Pépinière, en París VIII Abierto de martes a sábado de las 10:00 a las 19:00. Servicio de atención al cliente: +33(0)892 02 88 04...
- Seite 35 INDICE 1 / A LA ATENCIÓN DEL USUARIO • • Consignas de seguridad ____________________________________ • • Respeto del medio ambiente _________________________________ • • Descripción de su aparato ___________________________________ 2 / INSTALACIÓN DE SU APARATO • • Utilización en versión evacuación _____________________________ •...
-
Seite 36: Consignas De Seguridad
1 1 / / A LA ATENCIÓN DEL USUARIO Importante piente bajo la campana (las llamas aspiradas podrían deteriorar el aparato). Conserve este manual con el aparato. Si debe vender o ceder el aparato a otra per- — — Cuando esté friendo debajo del aparato, de- sona, asegúrese de que el manual de utiliza- berá... -
Seite 37: Respeto Del Medio Ambiente
1 1 / / A LA ATENCIÓN DEL USUARIO RESPETO DEL MEDIO AMBIENTE • • — Los materiales del embalaje de este aparato son reciclables. Participe en su reciclaje y ayude a proteger el medio ambiente llevándolos a los contenedores municipales previstos para ello. —... - Seite 38 1 1 / / A LA ATENCIÓN DEL USUARIO • • DESCRIPCION DE SU APARATO Aberturas Carcasa Chimenea Mandos...
- Seite 39 2 2 / / INSTALACIÓN DE SU APARATO - El aparato debe estar desconectado al instalarlo o al realizar cualquier intervención en él. - Compruebe que la tensión de la red corresponde a la tensión indicada en la placa de caracte- rísticas que se encuentra en el interior de la campana.
-
Seite 40: Conexion Electrica
2 2 / / INSTALACIÓN DE SU APARATO • • CONEXION ELECTRICA Al efectuar la instalación y las operaciones de mantenimiento, el aparato deberá estar des- conectado de la red eléctrica y los fusibles estarán cortados y quitados. La conexión eléctrica se debe realizar una vez realizado el montaje y la sujeción. - Seite 41 2 2 / / INSTALACIÓN DE SU APARATO • • MONTAJE DE LA CAMPANA EXTRACTORA Atención La instalación debe ser conforme a las normativas vigentes para la ventilación de los locales. En Francia, dichas normativas vienen indicadas en el DTU 61.1 del CSTB. En parti- >...
- Seite 42 2 2 / / INSTALACIÓN DE SU APARATO Consejo • • MONTAJE DE CHIMENEA Para lograr un funcionamiento óptimo del • • Evacuación exterior aparato, le aconsejamos que lo conecte a un conducto de 150 mm de diámetro (no incluido). —...
- Seite 43 2 2 / / INSTALACIÓN DE SU APARATO • • Reciclaje — Quite la válvula de retención (fig. 1). — Fije contra la pared, con los dos tornillos, el soporte metálico de la chimenea, apoyándolo contra el techo (fig. 2). Tenga cuidado de que el deflector quede centrado con respecto al trazo vertical hecho en la pared (fig.
-
Seite 44: Descripcion De Los Mandos
3 3 / / UTILIZACIÓN DEL APARATO • • DESCRIPCION DE LOS MANDOS Iluminación Pantalla Visualización de las velocidades Marcha/Parada (1,2, 3,o 4) Saturación de los filtros Selección de las velocida- des de 1 a 4 Temporización / Parada retardada (10 min) •... - Seite 45 3 3 / / UTILIZACIÓN DEL APARATO Paso a modo automático Pulse brevemente , aparecerá un punto en la pantalla. Al detectar una fuente de calor, par- padeará un y la campana se pondrá en marcha. Al finalizar la cocción, la campana conti- nuará...
-
Seite 46: Limpieza De La Superficie Exterior
4 4 / / MANTENIMIENTO Y LIMPIEZA DEL APARATO Atención Desconecte (retirando la toma o accionando el disyuntor) el aparato antes de realizar su mantenimiento o de limpiarlo. Un mantenimiento periódico es una garantía de buen fun- cionamiento, buen rendimiento y duración. Atención No respetar las instrucciones de limpieza del aparato y los filtros puede ocasionar incendios. -
Seite 47: Limpiar El Aparato
4 4 / / MANTENIMIENTO Y LIMPIEZA DEL APARATO Atención Antes de realizar cualquier intervención, deberá dejar la campana sin tensión, bien desenchufándola o bien accionando el disyuntor. • • LIMPIAR EL APARATO P P R R O O D D U U C C T T O O S S / / A A C C C C E E S S O O R R I I O O S S M M A A N N T T E E N N I I M M I I E E N N T T O O . - Seite 48 5 5 / / ANOMALIAS DE FUNCIONAMIENTO S S Í Í N N T T O O M M A A S S S S O O L L U U C C I I O O N N E E S S Compruebe que: •...
- Seite 49 6 6 / / SERVICIO TÉCNICO...
- Seite 50 6 6 / / SERVICIO TÉCNICO...
- Seite 51 6 6 / / SERVICIO TÉCNICO...
- Seite 52 A seguir, vem a irresistível vontade de tocar. O design De Dietrich assen- ta em materiais robustos e prestigiantes; O autêntico é privilegiado. Ao associar a tecnologia mais evoluída aos materiais nobres, a De Dietrich assegura a criação de produtos de alta execução ao serviço de arte da...
- Seite 53 ÍNDICE 1 1 / / I I N N F F O O R R M M A A Ç Ç Õ Õ E E S S D D E E S S T T I I N N A A D D A A S S A A O O U U T T I I L L I I Z Z A A D D O O R R •...
-
Seite 54: Instruções De Segurança
1 /INFORMAÇÕES DESTINADAS AO UTILIZADOR Importante —— Ventile convenientemente a cozinha em ca- Guarde este guia de utilização junta- so de funcionamento simultâneo do exaustor mente com o aparelho. Se o aparelho for com outros aparelhos funcionando com fon- vendido ou cedido a outra pessoa, tenha o tes de energia diferentes da electricidade, pa- cuidado de remeter igualmente o guia de uti- ra que o exaustor não aspire os gases de... -
Seite 55: Protecção Do Ambiente
1 / INFORMAÇÕES DESTINADAS AO UTILIZADOR PROTECCAO DO AMBIENTE • — Os materiais de embalagem deste aparelho são recicláveis. Por isso, participe na reciclagem dos mesmos e contribua, assim, para a protecção do ambiente, depositando-os nos contentores municipais previstos para este efeito. —... -
Seite 56: Descrição Do Aparelho
1 / INFORMAÇÕES DESTINADAS AO UTILIZADOR • DESCRICAO DO APARELHO Orifícios Campânula Chaminé Comandos... -
Seite 57: Utilização Na Versão De Evacuação
2 / INSTALAÇÃO DO APARELHO - O exaustor deve estar desligado durante a sua instalação ou em caso de intervenção. - Veri- fique se a tensão da rede eléctrica corresponde à tensão mencionada na placa de característi- cas situada no interior do exaustor. - Se a instalação eléctrica da sua residência necessitar de uma alteração para a ligação do exaustor, contacte um electricista qualificado. -
Seite 58: Ligação Eléctrica
2 / INSTALAÇÃO DO APARELHO • LIGACAO ELECTRICA Durante a instalação e as operações de ma- nutenção, o exaustor deve ser desligado da corrente eléctrica e os fusíveis devem ser cor- tados ou retirado. A ligação eléctrica tem de ser efectuada após a montagem e fixação. -
Seite 59: Montagem Do Exaustor
2 / INSTALAÇÃO DO APARELHO • MONTAGEM DO EXAUSTOR Atenção A instalação deve cumprir os requisi- tos dos regulamentos em vigor para a venti- lação dos locais. Em França, estes regula- mentos são indicados no DTU 61.1 do CSTB. Designadamente, o ar evacuado não deve ser enviado para uma conduta utilizada para a evacuação de fumos de aparelhos a gás >... -
Seite 60: Montagem Da Chaminé
2 / INSTALAÇÃO DO APARELHO Conselho • MONTAGEM DA CHAMINE Para uma utilização ideal do exaustor, •Evacuação exterior aconselhamos que a ligação seja efectuada a um tubo com 150 mm de diâmetro (vendi- — Coloque o suporte metálico da chaminé na do separadamente). -
Seite 61: º Reciclagem
2 / INSTALAÇÃO DO APARELHO •Reciclagem — Retire a válvula de retenção (fig. 1). — Coloque o deflector plástico de fumos contra a parede, encoste-o ao tecto e fixe-o com os dois parafusos (fig. 2). Não se esque- cer de centrar o deflector em relação ao traço vertical feito na parede (fig. -
Seite 62: Descrição Dos Comandos
3 / UTILIZAÇÃO DO EXAUSTOR • DESCRICAO DOS COMANDOS Iluminação Visor Visor de velocidades (1,2,3 ou 4) Funcionamento / Paragem Saturação dos filtros Selecção de velocidades de 1 a 4 Temporização / Paragem diferi- da (10 min) MODO AUTOMATICO (de acordo com o modelo) Estes exaustores têm um sentido inato de adaptação. - Seite 63 3 / UTILIZAÇÃO DO EXAUSTOR Passagem para o modo automático Prima , aparece um ponto no visor. Um pisca quando for detectada uma fonte de calor. O exaustor começa a funcionar. No final da cozedura, o exaustor continua a funcionar de 40 segundos a 10 minutos.
-
Seite 64: Limpeza Do Filtro Cassete
4 / MANUTENÇÃO E LIMPEZA DO APARELHO Atenção Desligue o aparelho (retirando-o da tomada, ou accionando o disjuntor) antes de pro- ceder à sua limpeza e manutenção. Uma manutenção periódica do aparelho é uma garantia para o seu devido funcionamento, bom rendimento e durabilidade. Atenção O não cumprimento das instruções de limpeza do aparelho e dos filtros pode provocar incêndios. -
Seite 65: Manutenção Do Exaustor
4 / MANUTENÇÃO E LIMPEZA DO APARELHO Atenção Antes de efectuar qualquer intervenção, desligue o exaustor da corrente eléctrica, quer reti- rando a ficha da tomada, ou accionando o disjuntor. • MANUTENCAO DO EXAUSTOR P P R R O O D D U U T T O O S S / / A A C C E E S S S S Ó Ó R R I I O O S S A A U U T T I I - - C C O O M M O O P P R R O O C C E E D D E E R R ? ? M M A A N N U U T T E E N N Ç... -
Seite 66: 5 / / A A N N O O M M A A L L I I A A S S D D E E F F U U N N C C I I O O N N A A M M E E N N T T O O
5 / ANOMALIAS DE FUNCIONAMENTO S S I I N N T T O O M M A A S S S S O O L L U U Ç Ç Õ Õ E E S S Verificar se: •não há um corte de electricidade. O exaustor não funciona... - Seite 68 Wir danken Ihnen für das entgegengebrachte Vertrauen. De Dietrich Alle Informationen über die Marke auf www.de-dietrich.com Besuchen Sie La Galerie De Dietrich, 6 rue de la Pépinière in Paris im VIII. Arrondissement Geöffnet von dienstags bis samstags von 10:00 bis 19:00 Uhr...
- Seite 69 INHALT 1 1 / / F F Ü Ü R R D D E E N N B B E E N N U U T T Z Z E E R R • Sicherheitshinweise ......... . 70 •...
-
Seite 70: Sicherheitshinweise
1 / FÜR DEN BENUTZER Wichtig —— Bei gleichzeitigem Betrieb der Dunstab- Diese Betriebsanleitung mit dem Gerät zugshaube und anderer nicht mit Strom be- aufbewahren. Sollte das Gerät an eine ande- triebener Geräte den Raum angemessen be- re Person verkauft oder weitergegeben wer- lüften. -
Seite 71: Umweltschutz
1 / FÜR DEN BENUTZER UMWELTSCHUTZ • — Die Verpackungsmaterialien dieses Geräts sind recyclebar. Entsorgen Sie sie in den von den Gemeinden eigens zur Verfügung gestellten Containern und tragen Sie auf diese Weise zu ihrem Recycling und zum Umweltschutz bei. —... -
Seite 72: Gerätebeschreibung
1 / FÜR DEN BENUTZER • GERATEBESCHREIBUNG Ansaugöffnungen Gehäuse Kamin Bedienelement... -
Seite 73: Benutzung Mit Abluftbetrieb
2 / INSTALLATION DES GERÄTS - Das Gerät muss während der Installation oder bei einem eventuellen Eingriff vom Stromnetz ge- trennt sein. - Prüfen, dass die Netzspannung dem auf dem Geräteschild in der Dunstabzugshaube angege- benen Spannungswert entspricht. - Wenn die Stromanlage der Wohnung für den Anschluss des Geräts eine Änderung erfordert, ei- nen qualifizierten Elektriker heranziehen. -
Seite 74: Stromanschluss
2 / INSTALLATION DES GERÄTS • STROMANSCHLUSS Achtung Bei der Installation und den Pflegevorgängen Die Installation muss die geltenden muss das Gerät vom Stromnetz abgetrennt Bestimmungen für die Belüftung von Räumen einhalten. In Frankreich werden werden, die Schmelzsicherungen müssen ab- diese Regeln in der DTU 61.1 des CSTB geschaltet oder herausgenommen werden. -
Seite 75: Montage Der Dunstabzugshaube
2 / INSTALLATION DES GERÄTS MONTAGE DER DUNSTABZUGS- • HAUBE Der Mindestabstand zwischen dem Kochfeld und dem niedrigsten Teil der Dunstabzugs- haube muss 70 cm betragen. Wenn in der Be- triebsanleitung des unter der Dunstabzugs- haube installierten Kochfelds ein größerer Ab- >... -
Seite 76: Montage Des Kamins
2 / INSTALLATION DES GERÄTS Ratschlag • MONTAGE DES KAMINS Wir empfehlen für die optimale Nutzung •Abluft ins Freie des Geräts den Anschluss an ein Rohr mit 150 mm Querschnitt (nicht mitgeliefert). — Die Metallhalterung des Kamins mit den bei- Möglichst wenig Winkelstücke und ein mög- den Schrauben an die Wand mit Stoß... -
Seite 77: º Umluft
2 / INSTALLATION DES GERÄTS •Umluft — Die Rücklaufklappe entfernen (Abb. 1). — Mit den beiden Schrauben den Kunststoffrau- chablenker an der Wand mit Stoß an der Decke befestigen (Abb. 2). Darauf achten, den Ablenker im Verhältnis zum vertikalen Strich an der Wand zu zentrieren (Abb. -
Seite 78: Beschreibung Der Bedienelemente
3 / BENUTZUNG DES GERÄTS • BESCHREIBUNG DER BEDIENELEMENTE Kochstellenbeleuchtung Anzeige Drehzahlanzeige (1, 2, 3 oder 4) An / Aus Filtersättigung Auswahl der Drehzahl von 1 bis 4 Nachlauffunktion / Ausschal- ten mit Verzögerung (10 min) AUTOMATIMODUS (modellabhängig) Diese Dunstabzugshauben können sich automatisch anpassen. Sie sind mit Sensoren ausge- stattet und schalten sich automatisch ein, sobald sie Wärme oder Dampf erkennen. -
Seite 79: Umschalten In Den Automatikmodus
3 / BENUTZUNG DES GERÄTS Umschalten in den Automatikmodus Kurz auf drücken; in der Anzeige erscheint ein Punkt. Sobald eine Wärmequelle erfasst wird, blinkt ein und die Dunstabzugshaube schaltet sich ein. Nach Beendigung des Kochen läuft die Dunstabzugshaube noch 40 Sek. bis 10 Min. weiter. Durch kurzes Drücken auf wird der Automatikmodus wieder ausgeschaltet. -
Seite 80: Reinigung Der Filterkassette
4 / PFLEGE UND REINIGUNG DES GERÄTS Achtung Das Gerät vor der Pflege und Reinigung vom Stromnetz trennen (entweder durch Ziehen des Netzsteckers oder Betätigen des Überlastschalters). Die regelmäßige Pflege des Geräts ist eine Garantie für richtigen Betrieb, gute Leistung und Dauerhaftigkeit. Achtung Wenn die Anweisungen zur Reinigung des Geräts und der Filter nicht eingehalten wer- den, kann dies zu Bränden führen. -
Seite 81: Pflege Des Geräts
4 / PFLEGE UND REINIGUNG DES GERÄTS Achtung Vor jedem Eingriff muss die Dunstabzugshaube vom Stromnetz getrennt werden, entweder durch Ziehen des Netzsteckers oder durch Betätigen des Überlastschalters. • PFLEGE DES GERATS Z Z U U V V E E R R W W E E N N D D E E N N D D E E P P R R O O D D U U K K T T E E / / P P F F L L E E G G E E W W I I E E V V O O R R G G E E H H E E N N Z Z U U B B E E H H Ö... -
Seite 82: 5 / / F F U U N N K K T T I I O O N N S S S S T T Ö Ö R R U U N N G G E E N N
5 / FUNKTIONSSTÖRUNGEN S S Y Y M M P P T T O O M M E E L L Ö Ö S S U U N N G G E E N N Prüfen, ob: •kein Stromausfall vorliegt. Die Dunstabzugshaube •wirklich eine Drehzahl gewählt wurde. - Seite 83 6 / KUNDENDIENST...
- Seite 84 CZ5700569_01 - 01/12...