Herunterladen Inhalt Inhalt Diese Seite drucken
Thrustmaster T-Wireless 3-in-1 Rumble Force Benutzerhandbuch
Vorschau ausblenden Andere Handbücher für T-Wireless 3-in-1 Rumble Force:

Werbung

Verfügbare Sprachen
  • DE

Verfügbare Sprachen

  • DEUTSCH, seite 14
PODRĘCZNIK UŻYTKOWNIKA

Werbung

Inhaltsverzeichnis
loading

Inhaltszusammenfassung für Thrustmaster T-Wireless 3-in-1 Rumble Force

  • Seite 1 PODRĘCZNIK UŻYTKOWNIKA...
  • Seite 2: Technical Features

    Compatible: PC / PlayStation® 3 / PlayStation® 2 User Manual TECHNICAL FEATURES 2 vibration motors Gamepad CONNECT button (for PlayStation® 2) PS2 Gameport connector on 8 action buttons Wireless receiver SELECT and START buttons 10. USB PC and PS3 connector on 2 analog mini-sticks / 2 digital action buttons Wireless receiver D-Pad...
  • Seite 3: Installing Batteries

    INSTALLING BATTERIES Insert 3 1.5V type LR03 / AAA batteries in the battery compartment located at the back of the gamepad (14). OVERVIEW  POWER switch (13): - OFF position = the gamepad is off (and doesn’t use up batteries). - ON position = the gamepad is on.
  • Seite 4 PLAYSTATION® 3 INSTALLATION ON PLAYSTATION® 3 1. Connect the receiver’s USB connector (10) to USB port number 1 on your console. 2. Switch on your console. 3. Switch on your gamepad using the POWER ON switch (13). 4. Start up your game. You are now ready to play! USING THE “HOME”...
  • Seite 5: Advanced Functions

    ADVANCED FUNCTIONS PROGRAMMING BUTTONS / MINI-STICKS / D-PAD All progressive buttons (on PS2 and PS3) or digital buttons (on PC), directions of the mini-sticks and of the D-Pad can be switched using the MAPPING button (6).  Examples of possible applications: - Switching the functions of buttons - Switching the 2 mini-sticks (in this case, you must map the 4 directions of the first mini-stick to the 4 directions of the second)
  • Seite 6: Technical Support

    (Frequently Asked Questions (FAQ), the latest versions of drivers and software) that may help to resolve your problem. If the problem persists, you can contact the Thrustmaster products technical support service (“Technical Support”): By email: In order to take advantage of technical support by email, you must first register online.
  • Seite 7 Where authorized by applicable law, the full liability of Guillemot and its subsidiaries (including for indirect damages) is limited to the repair or replacement of the Thrustmaster product. The consumer’s legal rights with respect to legislation applicable to the sale of consumer goods are not affected by this warranty.
  • Seite 8 Compatible : PC – Playstation® 3 – Playstation® 2 Manuel de l'utilisateur CARACTERISTIQUES TECHNIQUES 2 moteurs de vibration Bouton CONNECT de la manette (pour PlayStation® 2) Connecteur Gameport PS2 8 boutons d'action du récepteur Wireless Boutons SELECT et START 10. Connecteur USB PC et PS3 2 sticks analogiques / 2 boutons d'action digitaux du récepteur Wireless D-Pad...
  • Seite 9: Installation Des Piles

    INSTALLATION DES PILES Installez 3 piles 1,5V de type LR03 / AAA dans le compartiment à piles situé à l’arrière de la manette (14). GENERALITES  Bouton INTERRUPTEUR POWER (13) - Position OFF = la manette est éteinte (et n’use pas les piles). - Position ON = la manette est allumée.
  • Seite 10 PLAYSTATION® 3 INSTALLATION SUR « PLAYSTATION® 3 » 1. Branchez le connecteur USB (10) du récepteur sur le port USB n°1 de la console. 2. Allumez votre console. 3. Allumez votre manette à l’aide de l’interrupteur POWER ON (13). 4. Lancez le jeu. Vous êtes maintenant prêt à...
  • Seite 11: Fonctions Avancees

    FONCTIONS AVANCEES PROGRAMMATION DES BOUTONS / MINI-STICKS / CROIX DIGITALE Tous les boutons progressifs (sur PS2 et PS3) ou digitaux (sur PC), les directions des mini-sticks et de la croix digitale peuvent être inversés à l’aide du bouton MAPPING (6). ...
  • Seite 12: Support Technique

    POWER (13) de votre manette en position OFF (afin d’économiser les piles). SUPPORT TECHNIQUE Si vous rencontrez un problème avec votre produit, rendez-vous sur le site http://ts.thrustmaster.com et cliquez sur Support Technique. Vous aurez alors accès à différents services (Foire Aux Questions (FAQ), dernières versions des pilotes et logiciels) susceptibles de résoudre votre problème.
  • Seite 13 Dans le monde entier, Guillemot Corporation S.A. (« Guillemot ») garantit au consommateur que le présent produit Thrustmaster est exempt de défauts matériels et de vices de fabrication, et ce, pour une période de deux (2) ans à compter de la date d’achat d’origine.
  • Seite 14: Power -Und Motor-Schalter

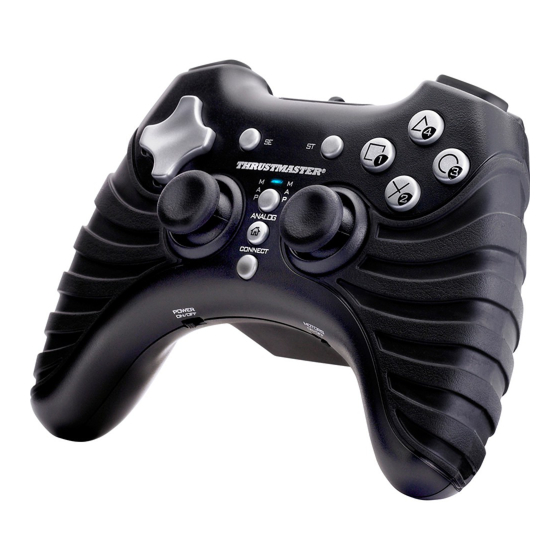
    Kompatibel: PC – PlayStation® 3 – PlayStation® 2 Benutzerhandbuch TECHNICAL FEATURES 2 Vibrationsmotoren Gamepad CONNECT Button (für PlayStation® 2) PS2 Gameport stecker am 8 Actionbuttons kabellosen Empfänger SELECT und START Buttons 10. USB PC- und PS3-Stecker am 2 analoge Mini-Sticks / 2 digitale Actionbuttons kabellosen Empfänger D-Pad 11.
  • Seite 15: Batterien Einlegen

    BATTERIEN EINLEGEN Legen Sie 3 1.5V (Typ LR03) AAA Batterien in das Batteriefach auf der Rückseite des Gamepads ein (14). ÜBERSICHT  POWER-Schalter (13): - OFF Position = das Gamepad ist Aus (und verbraucht keinen Batteriestrom). - ON Position = das Gamepad ist AN. ...
  • Seite 16: Wichtige Anmerkungen Für Die Playstation

    PLAYSTATION® 3 INSTALLATION AUF DER PLAYSTATION® 3 1. Verbinden Sie den USB Stecker (10) mit dem USB Port 1 an Ihrer Console. 2. Schalten Sie Ihre Console ein. 3. Schalten Sie Ihr Gamepad mittels des POWER ON-Schalters ein (13). 4. Starten Sie das Spiel. Sie sind nun Spielbereit! BENUTZEN DES “HOME”...
  • Seite 17: Erweiterte Funktionen

    ERWEITERTE FUNKTIONEN PROGRAMMIERBUTTONS / MINI-STICKS / D-PAD Alle progressiven Buttons (auf PS2 und PS3) oder digitale Buttons (auf PC), Richtungen der Mini-Sticks und des D-Pad, können mittels des MAPPING Button (6) umgeschaltet werden.  Beispiele möglicher Applikationen: - Umschalten der Buttonfunktionen - Umschalten der beiden Mini-Sticks (in diesem Fall müssen Sie die vier Richtungen des ersten Mini-Sticks den vier Richtungen des zweiten Mini-Sticks zuordnen)
  • Seite 18: Fehlerbeseitigung Und Warnungen

    POWER Schalters (13) auszuschalten. TECHNISCHER SUPPORT Sollten Sie mit Ihrem Produkt ein Problem haben, besuchen Sie bitte die Seite http://ts.thrustmaster.com und klicken Sie auf Technischer Support. Von dort aus können Sie auf verschiedene Hilfen zugreifen (Fragen und Antworten (FAQ), die neuesten Versionen von Treibern und Software), die Ihnen bei der Lösung Ihres Problems helfen könnten.
  • Seite 19: Gewährleistungsinformation

    COPYRIGHT © 2012 Guillemot Corporation S.A. Alle Rechte vorbehalten. Thrustmaster® ist ein eingetragenes Warenzeichen der Guillemot Corporation S.A. PlayStation® ist ein eingetragenes Warenzeichen der Sony Computer Entertainment Inc. Microsoft® Windows® sind eingetragene Warenzeichen der Microsoft Corporation in den Vereinigten Staaten von Amerika und/oder anderen Ländern.
  • Seite 20: Technische Specificaties

    Compatibel met pc / PlayStation® 2 / PlayStation® 3 Handleiding TECHNISCHE SPECIFICATIES Twee trilmotoren Gamepad CONNECT-knop (voor PlayStation® 2) Connector voor PS2 Gameport op Acht actieknoppen draadloze ontvanger Knoppen voor SELECT en START 10. Connector voor USB PC en PS3 op Twee analoge mini-joysticks / twee digitale draadloze ontvanger actieknoppen...
  • Seite 21: Plaatsing Van De Batterijen

    PLAATSING VAN DE BATTERIJEN Plaats drie batterijen van 1,5V (LR03 / AAA) in het batterijvak aan de achterzijde van de gamepad (14). OVERZICHT  POWER-schakelaar (13): - OFF-stand = de gamepad staat uit (er wordt geen batterijstroom verbruikt). - ON-stand = de gamepad staat aan. ...
  • Seite 22 PLAYSTATION® 3 INSTALLATIE OP PLAYSTATION® 3 1. Sluit de USB-connector (10) van de ontvanger aan op USB-poort 1 van uw console. 2. Zet de console aan. 3. Zet de gamepad aan met schakelaar (13). 4. Start de game. Nu kan er gespeeld worden! DE HOME-KNOP (7) GEBRUIKEN Met de Home-knop van de gamepad kunt u een game verlaten, naar de menu's gaan van uw PlayStation®...
  • Seite 23: Geavanceerde Functies

    GEAVANCEERDE FUNCTIES PROGRAMMERING VAN KNOPPEN / MINISTICKS / D-PAD Alle progressief reagerende knoppen (op de PS2 en PS3) of digitale knoppen (op de pc) en de richtingen van de mini-joysticks en de D-pad kunnen met behulp van de MAPPING-knop (6) worden verwisseld.
  • Seite 24: Technische Ondersteuning

    Technical Support. U hebt daar toegang tot verschillende onderwerpen die u helpen bij het vinden van oplossingen, zoals de FAQ (veelgestelde vragen) en de meest recente drivers en software. Als het probleem op die manier niet kan worden verholpen, kunt u contact opnemen met de Thrustmaster product technical support service (Technical Support).
  • Seite 25 Guillemot en haar dochterondernemingen (inclusief de aansprakelijkheid voor indirecte schade) zich tot het repareren of vervangen van het Thrustmaster product. De wettelijke rechten van de klant volgens de wetgeving die van toepassing is op de verkoop van consumentproducten, worden op generlei wijze beperkt door deze garantie.
  • Seite 26: Caratteristiche Tecniche

    Compatibile con: PC – PlayStation® 3 – PlayStation® 2 Manuale d’uso CARATTERISTICHE TECNICHE 2 motori per effetti di vibrazioni Pulsante CONNECT del gamepad (per PlayStation® 2) Connettore Gameport PS2 posto 8 pulsanti azione sul ricevitore wireless Pulsanti SELECT e START 10.
  • Seite 27: Installazione Delle Batterie

    INSTALLAZIONE DELLE BATTERIE Inserisci 3 batterie da 1,5V tipo LR03 / AAA nell’apposito vano sistuato nella parte posteriore del gamepad (14). INTRODUZIONE  Interruttore POWER (13): - posizione OFF: il gamepad è spento (e non fa alcun uso delle batterie). - posizione ON: il gamepad è...
  • Seite 28 PLAYSTATION® 3 INSTALLAZIONE SU PLAYSTATION® 3 1. Collega il connettore USB del ricevitore (10) alla porta USB 1 della tua console. 2. Accendi la tua console. 3. Accendi il tuo gamepad tramite l’interruttore POWER ON (13). 4. Avvia il tuo gioco. Ora sei pronto per giocare! USO DEL PULSANTE “HOME”...
  • Seite 29: Funzioni Avanzate

    FUNZIONI AVANZATE PROGRAMMAZIONE PULSANTI / MINI-STICK / D-PAD Tutti i pulsanti progressivi (per PS2 e PS3) o digitali (per PC), le direzioni dei mini-stick e del D-Pad possono essere scambiati tra loro, utilizzando il pulsante MAPPING (6).  Esempi di usi possibili: - Scambio di funzioni tra i pulsanti - Scambio dei 2 mini-stick fra loro (in questo caso, dovrai assegnare le 4 direzioni del primo mini-stick alle 4 direzioni del secondo...
  • Seite 30: Assistenza Tecnica

    POWER (13) in posizione OFF (aumentando così la durata delle batterie). ASSISTENZA TECNICA Qualora riscontrassi un problema con il tuo prodotto, accedi al sito http://ts.thrustmaster.com e clicca su Assistenza tecnica. Da qui, potrai accedere a vari servizi ed informazioni (Risposte alle Domande più...
  • Seite 31: Informazioni Sulla Garanzia

    Nel mondo, Guillemot Corporation S.A. (“Guillemot”) garantisce al consumatore che questo prodotto Thrustmaster è privo di difetti nei materiali e nell’assemblaggio per un periodo di due (2) anni dalla prima data di acquisto. Qualora il prodotto presentasse dei difetti durante tale periodo, contatta immediatamente il servizio di Assistenza Tecnica, che ti indicherà...
  • Seite 32 Compatible: PC – PlayStation® 3 – PlayStation® 2 Manual del usuario CARACTERÍSTICAS TÉCNICAS 2 motores de vibración Botón CONNECT del gamepad (para PlayStation® 2) Conector Gameport de PS2 en 8 botones de acción receptor inalámbrico Botones SELECT y START 10. Conector USB para PC y PS3 en 2 mini-sticks analógicos / 2 botones de acción receptor inalámbrico digitales...
  • Seite 33: Instalación De Las Pilas

    INSTALACIÓN DE LAS PILAS Inserta 3 pilas de 1,5 V tipo LR03 / AAA en el compartimento de las pilas situado en la parte trasera del gamepad (14). VISTA GENERAL  Interruptor POWER (13): - Posición OFF = el gamepad está apagado (y no utiliza las pilas). - Posición ON = el gamepad está...
  • Seite 34 PLAYSTATION® 3 INSTALACIÓN EN PLAYSTATION® 3 1. Enchufa el conector USB del receptor (10) al puerto USB número 1 de la consola. 2. Enciende la consola. 3. Enciende el gamepad utilizando el interruptor POWER ON (13). 4. Ejecuta el juego. ¡Ya estás listo para jugar! UTILIZACIÓN DEL BOTÓN “HOME”...
  • Seite 35: Funciones Avanzadas

    FUNCIONES AVANZADAS PROGRAMACIÓN DE BOTONES / MINI-STICKS / D-PAD Todos los botones progresivos (en PS2 y PS3) o los botones digitales (en PC), direcciones de los mini- sticks y del D-Pad se pueden intercambiar utilizando el botón MAPPING (6).  Ejemplos de aplicaciones posibles: - Intercambiar las funciones de los botones - Intercambiar los 2 mini-sticks...
  • Seite 36 POWER (13) del gamepad en la posición OFF (para aumentar la vida de las pilas). SOPORTE TÉCNICO Si encuentras un problema con tu producto, visita http://ts.thrustmaster.com y haz clic en Technical Support. Desde allí podrás acceder a distintas utilidades (preguntas frecuentes (Frequently Asked Questions, FAQ), las últimas versiones de controladores y software) que pueden ayudarte a resolver tu...
  • Seite 37 En todo el mundo, Guillemot Corporation S.A. (“Guillemot”) garantiza al consumidor que este producto de Thrustmaster estará libre de defectos materiales y fallos de fabricación por un periodo de dos (2) años a partir de la fecha de compra original. Si el producto pareciera estar defectuoso durante el periodo de garantía, contacte inmediatamente con el Soporte Técnico, que le indicará...
  • Seite 38: Технические Характеристики

    Совместим: PC – PlayStation® 3 – PlayStation® 2 Руководство пользователя ТЕХНИЧЕСКИЕ ХАРАКТЕРИСТИКИ 1. 2 вибрационных двигателя (для PlayStation® 2) 8. Кнопка CONNECT (СОЕДИНЕНИЕ) 2. 8 командных кнопок игрового контроллера 3. Кнопки START (ПУСК) и SELECT (ВЫБОР) 9. Разъем игрового порта PS2 на беспроводном...
  • Seite 39: Установка Батареек

    УСТАНОВКА БАТАРЕЕК Установите три батарейки 1,5В (LR03 / типа AAA) в отсек для батареек на тыльной стороне игрового контроллера (14). ОБЗОР  Выключатель электропитания (13): - Положение OFF (Выкл)= игровой контроллер выключен (и не расходует заряд батарей). - Положение ON (Вкл)= игровой контроллер включен. ...
  • Seite 40 PLAYSTATION® 3 ПОДКЛЮЧЕНИЕ К PLAYSTATION® 3 1. Присоедините разъем USB приемника (10) к USB-порту 1 на консоли. 2. Включите консоль. 3. Включите игровой контроллер при помощи переключателя POWER ON (ВКЛЮЧЕНИЕ ПИТАНИЯ) (13). 4. Запустите игру. Теперь можно начинать игру! КНОПКА HOME (7) С...
  • Seite 41 ФУНКЦИИ ДЛЯ ОПЫТНЫХ ПОЛЬЗОВАТЕЛЕЙ КНОПКИ ПРОГРАММИРОВАНИЯ / МИНИ-ДЖОЙСТИКИ / МАНИПУЛЯТОР D-PAD Все кнопки с пропорциональным (на PS2 и PS3) или цифровым (на ПК) управлением, а также оси мини-джойстиков и D-Pad могут переопределяться при помощи кнопки ПЕРЕОПРЕДЕЛЕНИЯ (6).  Примеры возможного применения: - Переопределение...
  • Seite 42: Техническая Поддержка

    на веб-сайт http://ts.thrustmaster.com и перейдите по ссылке Technical Support (техническая поддержка). На этой странице есть доступ к различным утилитам (часто задаваемые вопросы (FAQ), самые новые версии драйверов и программного обеспечения) – это может помочь решению проблемы. Если это не помогло, можно связаться со...
  • Seite 43 Login (вход). ИНФОРМАЦИЯ О ГАРАНТИИ Во всех странах, корпорация Guillemot Corporation S.A. (“Guillemot”) дает гарантию на изделия Thrustmaster в том, что эти изделия не имеют дефектов материалов или производства на (2) года от даты покупки. При обнаружении дефекта в течении гарантийного срока немедленно свяжитесь со службой технической поддержки, которая...
  • Seite 44 Kompatybilny z PC / PlayStation® 3 / PlayStation® 2 Podręcznik użytkownika CECHY TECHNICZNE 2 mechanizmy wibracji Przycisk CONNECT pada (dla PlayStation® 2) Złącze PS2 Gameport na 8 przycisków funkcyjnych odbiorniku bezprzewodowym Przyciski SELECT i START 10. Złącze USB PC i PS3 na odbiorniku 2 analogowe minijoysticki / 2 cyfrowe przyciski bezprzewodowym funkcyjne...
  • Seite 45: Instalacja Baterii

    INSTALACJA BATERII Włóż 3 baterie 1,5V typu LR03 / AAA do komory na baterie znajdującej się z tyłu pada (14). ZARYS OGÓLNY  Przełącznik POWER (13): - Pozycja OFF = pad jest wyłączony (i nie zużywa baterii). - Pozycja ON = pad jest włączony. ...
  • Seite 46 PLAYSTATION® 3 INSTALACJA NA PLAYSTATION® 3 1. Podłącz złącze USB (10) odbiornika do portu USB nr 1 na konsoli. 2. Włącz konsolę. 3. Włącz pad przy pomocy przełącznika POWER ON (13). 4. Uruchom grę. Możesz zacząć grać! KORZYSTANIE Z PRZYCISKU „HOME” (7) Przycisk HOME na padzie pozwala na wychodzenie z gier, dostęp do menu i bezpośrednie wyłączenie systemu PlayStation®3.
  • Seite 47: Funkcje Zaawansowane

    FUNKCJE ZAAWANSOWANE PROGRAMOWANIE PRZYCISKÓW / MINIJOYSTICKÓW / D-PADA Wszystkie przyciski progresywne (na PS2 i PS3) lub przyciski cyfrowe (na PC), kierunki minijoysticków i D-Pada można zamieniać funkcjami przy pomocy przycisku do MAPOWANIA (6).  Przykłady możliwych zastosowań: - Zamiana funkcji przycisków - Zamiana 2 minijoysticków (w tym przypadku musisz zaprogramować...
  • Seite 48: Wsparcie Techniczne

    Na całym świecie Guillemot Corporation S.A. („Guillemot”) udziela konsumentowi gwarancji, że niniejszy produkt Thrustmaster będzie wolny od wad materiałowych i fabrycznych przez okres dwóch (2) lat od daty oryginalnego zakupu. Jeśli produkt okaże się wadliwy w trakcie trwania gwarancji, należy natychmiast skontaktować się z działem wsparcia technicznego, który udzieli informacji na temat procedury.
  • Seite 49: Prawa Autorskie

    W sytuacjach dopuszczalnych przez obowiązujące prawo, pełna odpowiedzialność firmy Guillemot i jej jednostek zależnych (w tym dla szkód pośrednich) ograniczona jest do naprawy lub wymiany produktu Thrustmaster. Zapisy niniejszej gwarancji nie wpływają na prawa ustawowe konsumenta odnośnie ustawodawstwa obowiązującego przy sprzedaży dóbr konsumenckich.

Inhaltsverzeichnis