Herunterladen Inhalt Inhalt Diese Seite drucken

Werbung

Verfügbare Sprachen

Verfügbare Sprachen

DE | EN | FR
All manuals and user guides at all-guides.com
FL 55 Plus HP
BEDIENUNGSANLEITUNG
USER MANUAL
MODE D'EMPLOI
www.geo-fennel.de
www.geo-fennel.com
www.geo-fennel.fr

Werbung

Inhaltsverzeichnis
loading

Inhaltszusammenfassung für geo-FENNEL FL 55 Plus HP

  • Seite 1 DE | EN | FR All manuals and user guides at all-guides.com FL 55 Plus HP BEDIENUNGSANLEITUNG USER MANUAL MODE D‘EMPLOI www.geo-fennel.de www.geo-fennel.com www.geo-fennel.fr...
  • Seite 2: Inhaltsverzeichnis

    All manuals and user guides at all-guides.com Sehr geehrter Kunde, vielen Dank für das Vertrauen, welches Sie uns beim Erwerb Ihres neuen geo-FENNEL-Gerätes ent- gegengebracht haben. Dieses hochwertige Qualitätsprodukt wurde mit größter Sorgfalt produziert und qualitätsgeprüft. Die beigefügte Anleitung wird Ihnen helfen, das Gerät sachgemäß zu bedienen. Bitte lesen Sie ins- besondere auch die Sicherheitshinweise vor der Inbetriebnahme aufmerksam durch.
  • Seite 3: Technische Daten

    All manuals and user guides at all-guides.com Technische Daten Selbstnivellierbereich ± 3,5° Genauigkeit ±3 mm / 10 m • bei eingespielter Libelle ±2 mm / 10 m Arbeitsbereich • ohne Empfänger 20 m* • mit Empfänger 60 m Stromversorgung NiHM-Akku / 4 x 1,5 V Alkalinebatterien Betriebsdauer 12 h**...
  • Seite 4: Bedienelemente

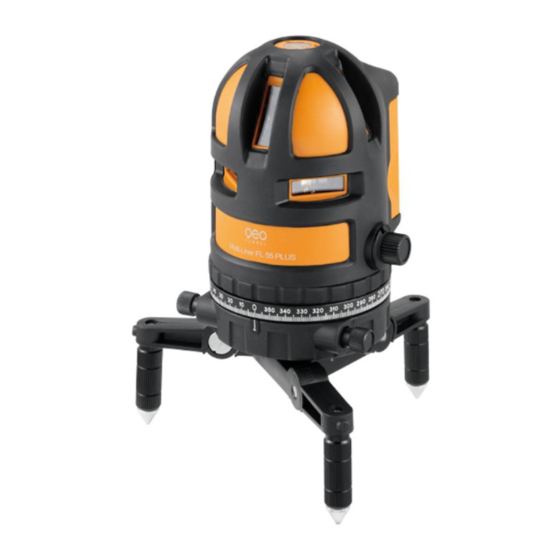
    All manuals and user guides at all-guides.com BEDIENELEMENTE Laseraustrittsfenster (5) Dosenlibelle AN / AUS-Schalter Seitenfeintrieb (2) Bedienfeld Batteriefach Lotpunkt (Geräteunterseite) 5/8“-Gewinde (Geräteunterseite) Bodenstativ BEDIENFELD A) Power-LED (leuchtet, wenn das Gerät eingeschaltet ist, blinkt bei schwacher Batterieleistung) B) MANUELL-LED C) MANUELL AN / AUS D) Vertikale Laserline 2 E) Horizontale Laserlinie F) Vertikale Laserline 1...
  • Seite 5: Stromversorgung

    All manuals and user guides at all-guides.com STROMVERSORGUNG Der Laser kann mit NiMH-Akku und alternativ mit handelsüblichen Alkaline-Einwegbatterien betrieben werden. NiMH-Akkupack Der Laser ist mit einem wiederaufladbaren NiMH-Akkupack ausgestattet. Ladegerät mit Netz und Ladebuchse am Gerät verbinden. Der Ladezustand wird an der kleinen Lampe neben der Ladebuchse angezeigt: Permanentes rotes Licht zeigt an, dass der Akkupack geladen wird.
  • Seite 6: Einschalten

    Die MANUELL - Funktion ist nur möglich im OFF - Zustand des Gerätes (da andernfalls Kompensatoralarm ausgelöst würde). Dazu MANUELL - Taste (C) drücken und dann gewünschte Linien schalten. Nun kann der FL 55 Plus HP in Schrägpositionen angewendet werden. VERSTELLBARER 360°-TEILKREIS UND FEINTRIEB FL55 Plus HP ist mit einem 360°-Teilkreis ausgerüstet.
  • Seite 7: Empfängerbetrieb

    All manuals and user guides at all-guides.com EMPFÄNGERBETRIEB Der FL 55 Plus HP kann zur Verlängerung des Arbeitsbereiches oder bei Arbeiten unter ungünstigen Lichtverhältnissen mit dem Empfänger FR 55 eingesetzt werden. Bei Verwendung des Empfängers Taste „P“ am FL 55 Plus HP drücken (Kontrolllampe neben der Taste leuchtet).
  • Seite 8: Lieferumfang

    WICHTIG – den Empfänger langsam auf und ab bewegen, um den Laserstrahl zu empfangen. FL 55 Plus HP und FR 55 arbeiten mit einer anderen Technik, als Sie es eventuell von Rotationslasern her kennen. Daher muss der Empfänger wesentlich sensibler geführt werden.
  • Seite 9: Einlegen Der Batterie

    All manuals and user guides at all-guides.com EINLEGEN DER BATTERIE • Batteriefachdeckel (14) öffnen. • 1 x 9 V AA Batterie gemäss dem Installationssymbol (auf der Rückseite) einlegen und dabei auf korrekte Polarität achten. Deckel schließen. • Zur Verlängerung der Lebensdauer der Batterie schaltet sich der Empfänger nach ca. 10 Min. ohne Anwendung automatisch ab.
  • Seite 10: Sicherheitshinweise

    All manuals and user guides at all-guides.com SICHERHEITSHINWEISE UMSTÄNDE, DIE DAS MESSERGEBNIS VERFÄLSCHEN KÖNNEN Messungen durch Glas- oder Plastikscheiben; verschmutzte Laseraustrittsfenster; Sturz oder starker Stoß. Bitte Genauigkeit überprüfen. Große Temperaturveränderungen: Wenn das Gerät aus warmer Umgebung in eine kalte oder umgekehrt gebracht wird, vor Benutzung einige Minuten warten.
  • Seite 11: Bestimmungsgemässe Verwendung

    All manuals and user guides at all-guides.com BESTIMMUNGSGEMÄSSE VERWENDUNG Das Gerät sendet einen sichtbaren Laserstrahl aus, um z.B. folgende Messaufgaben durchzuführen: Ermittlung von Höhen, rechten Winkeln, Ausrichtung von horizontalen und vertikalen Bezugsebenen sowie Lotpunkten. WARN- UND SICHERHEITSHINWEISE · Richten Sie sich nach den Anweisungen der Bedienungsanleitung. ·...
  • Seite 12 All manuals and user guides at all-guides.com Dear customer, Thank you for your confidence in us having purchased a geo-FENNEL instrument. This manual will help you to operate the instrument appropriately. Please read the manual carefully - particularly the safety instructions. A proper use only guarantees a longtime and reliable operation.
  • Seite 13: Technical Data

    All manuals and user guides at all-guides.com Technical Data Self-levelling range ± 3,5° Accuracy ±3 mm / 10 m • with adjusted vial ±2 mm / 10 m Working range • without receiver 20 m* • with receiver 60 m Power supply NiMH rechargeable battery / 4 x 1,5V alkaline batteries...
  • Seite 14: Operating Panel

    All manuals and user guides at all-guides.com FEATURES Laser emitting window (5) Vial ON / OFF knob Tangent screw (2) Keypad Battery case Plumb down beam (bottom side) 5/8“ thread (bottom side) Floor tripod OPERATING PANEL A) POWER-LED (is illuminated if the unit is switched on; it is blinking in case of a weak battery B) MANUAL -LED C) MANUAL ON / OFF D) Vertical laser line 2...
  • Seite 15: Battery And Charger

    Both the standard NiMH battery or 4 x AA alkaline batteries can be used. NiMH battery pack FL 55 Plus HP comes with NiMH rechargeable battery pack. Connect the AC/DC converter with the socket. Permanent red light (at the charger) indicates that the batteries are being charged.
  • Seite 16: Manual Function

    MANUAL FUNCTION The MANUAL function is only available in OFF mode (as otherwise compensator alarm would start). Press the MANUAL key (C) and choose the desired laser lines. Now FL 55 Plus HP can be used in slope position. ROTATABLE CIRCLE AND TANGENT SCREW FL 55 Plus HP is equipped with a 360°...
  • Seite 17 Press button „P“ (operating lamp besides the button is illuminated) to change to the receiver mode. Receiver FR 55 can now detect the signal of FL 55 Plus HP (the visibility of the laser lines is weaker in this mode).
  • Seite 18 All manuals and user guides at all-guides.com IMPORTANT – move the receiver FR 55 up and down carefully to detect the laser beam. FL 55 PLUS HP and FR 55 are working with another technology than rotating laser levels. Because of this the receiver FR 55 must be moved much more slowly.
  • Seite 19: Installation Of Batteries

    All manuals and user guides at all-guides.com INSTALLATION OF BATTERIES •Open the battery compartment cover (14). •Insert 1 x 9 V AA battery according to the installation symbol (ensure correct polarity!) and close the cover. •In order to save battery power the receiver will automatically turn off if it has not received a laser scanning signal for 10 minutes.
  • Seite 20: Safety Notes

    All manuals and user guides at all-guides.com SAFETY NOTES SPECIFIC REASONS FOR ERRONEOUS MEASURING RESULTS Measurements through glass or plastic windows; dirty laser emitting windows; after the instrument has been dropped or hit. Please check the accuracy. Large fluctuation of temperature: If the instrument will be used in cold areas after it has been stored in warm areas (or the other way round) please wait some minutes before carrying out measurements.
  • Seite 21: Intended Use Of Instrument

    All manuals and user guides at all-guides.com INTENDED USE OF INSTRUMENT The instrument emits a visible laser beam in order to carry out the following measuring tasks (depending on instru- ment): Setting up heights, horizontal and vertical planes, right angles and plumbing points. SAFETY INSTRUCTIONS ·...
  • Seite 22: Livré Comme Suit

    3. Écran 4. Alimentation en courant 5. Application 6. Notices de sécurité LIVRÉ COMME SUIT • Laser à lignes FL 55 Plus HP • Cellule de réception avec son support • Trépied • Lunette pour laser • Cible magnétique • Accu-pack •...
  • Seite 23: Données Techniques

    All manuals and user guides at all-guides.com Données techniques Plage d‘autonivellement ± 3,5° Précision ±3 mm / 10 m • avec nivelle calée ±2 mm / 10 m Portée • sans détecteur 20 m* • avec détecteur 60 m Alimentation en courant Accu NiMH / 4 x 1,5 V piles alcalines Autonomie...
  • Seite 24: Description De L'appareil

    All manuals and user guides at all-guides.com DESCRIPTION DE L‘APPAREIL Fenêtres de sortie des faisceaux laser (5 x) Nivelle sphérique Interrupteur MARCHE / ARRÊT Vis de réglage fin (2) Écran Logement de piles Point d‘aplomb (au dessous) Filetage 5/8“ (au dessous) Support de sol 3 pieds ÉCRAN A) LED marche...
  • Seite 25: Alimentation En Courant

    All manuals and user guides at all-guides.com ALIMENTATION EN COURANT Le laser peut fonctionner avec accu NiMH, comme alternative, aussi avec des piles alcalines. Accu NiMH Le laser est équipé d’un accu-pack NiMH rechargeable. Relier le chargeur au réseau électrique et à la douille de charge.
  • Seite 26: Mise En Marche De L'appareil

    Pour ce faire, presser la touche MANUELL - soit la touche (C) – puis mettre en circuit les lignes désirées. L ’appareil FL 55 Plus HP peut alors être utilisé dans les positions inclinées CERCLE GRADUE 360°...
  • Seite 27: Exemples D'application

    FL 55 Plus HP avec le détecteur FR 55. Lors de l’emploi du détecteur, presser la touche P du FL 55 Plus HP (le voyant de contrôle situé à côté de la touche s’allume). Le FL 55 Plus HP marche alors en mode récepteur / la marche à...
  • Seite 28 All manuals and user guides at all-guides.com IMPORTANT – Pour capter le faisceau laser, faire monter et descendre lentement le détecteur. FL 55 Plus HP et FR 55 fonctionnement selon une technique différente de celle des lasers rotatifs que vous connaissez éventuellement.
  • Seite 29: Mise En Marche

    All manuals and user guides at all-guides.com MISE EN PLACE DE PILE • Ouvrir le couvercle du logement de piles (14). • Mettre en place une pile 1 x 9 V AA, conformément au symbole d‘installation (sur la face postérieur), en veillant à...
  • Seite 30: Notices De Sécurité

    All manuals and user guides at all-guides.com NOTICES DE SÉCURITÉ CIRCONSTANCES POUVANT FAUSSER LES RÉSULTATS DE MESURES Mesures effectuées à travers des plaques de verre ou de matière plastique; mesures effectuées à travers la fenêtre de sortie du faisceau laser lorsqu‘elle est sale. Mesures après que le niveau soit tombé ou ait subi un choc très fort. Mesures effectuées pendant de grandes différences de température - p.ex.
  • Seite 31 All manuals and user guides at all-guides.com 5. Le fabricant et son représentant déclinent toute responsabilité pour les dommages et le bénéfices non réalisés par suite d‘une manoeuvre non conforme aux instructions. 6. Le fabricant et son représentant déclinent toute responsabilité pour les dommages et les bénéfices non réalisés qui decoulent d‘une utilisation inadéquante ou en liaison avec des produits d‘autres fabricants.
  • Seite 32 All manuals and user guides at all-guides.com geo-FENNEL GmbH Technische Änderungen vorbehalten. Kupferstraße 6 All instruments subject to technical changes. D-34225 Baunatal Sous réserve de modifications techniques. Tel. +49 561 / 49 21 45 +49 561 / 49 72 34 info@geo-fennel.de...

Inhaltsverzeichnis