Inhaltsverzeichnis
Werbung
Verfügbare Sprachen
Verfügbare Sprachen
Quicklinks
Werbung
Kapitel
Inhaltsverzeichnis

Verwandte Anleitungen für Vermeiren Squod SU


Inhaltszusammenfassung für Vermeiren Squod SU
- Seite 1 VERMEIREN Squod SU I N S T R U C T I O N M A N U A L M O D E D ’ E M P L O I G E B R U I K S A A N W I J Z I N G...
- Seite 2 Aucune partie de ce mode d’emploi ne peut être reproduite sous quelque forme que ce soit (impression, photocopie, microfilm ou autre procédé) sans l’autorisation écrite de l’éditeur ou traitée, reproduite ou diffusée à l’aide de systèmes électroniques. © N.V. Vermeiren N.V., 2009 Instructies voor de vakhandelaar: Deze handleiding is deel van het product en dient bij ieder product te worden geleverd.
-
Seite 3: Inhaltsverzeichnis
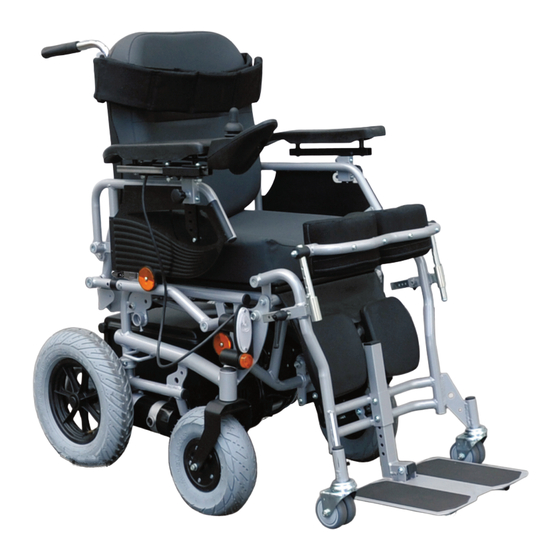
CONTENTS Section Page Contents.............................1 Preface...............................2 Technical details ..........................2 General notes ............................3 Applicability ............................3 Contents of the consignment ......................3 Explanation of symbols ........................4 Operating elements..........................4 SHARK 2 controls ..........................4 Adjusting the steering unit........................5 Back ..............................6 Adjusting the depth of the seat ......................6 Leg support ............................7 Knee protector ...........................7 Armrests.............................8... -
Seite 4: Preface
PREFACE First of all we want to thank you for putting your trust in us by selecting one of our wheelchairs. The electric wheelchairs supplied by Vermeiren are the result of reseach and experience over many years. But the expected working life of your vehicle depends essentially on your care and maintenance. -
Seite 5: General Notes
When using your electric wheelchair on footpaths, you should comply with any applicable laws. It may not be used on the public highway. Since the SQUOD SU has a top speed of six km/h, you do not require a driving licence and neither is vehicle insurance necessary. However, we recommend that you take out voluntary third-party insurance. -
Seite 6: Explanation Of Symbols
SQUOD_SU 06/2009 EXPLANATION OF THE SYMBOLS Observe the safety instructions! Read the instruction manual before use! Position: Parking brakes activated (electronic driving possible) Position: Parking brakes deactivated (free running and pushing possible, no electronic driving) During free running, be careful with slopes and inclinations Separate recovery and recycling of electric and electronic devices THE OPERATING ELEMENTS The electric wheelchair is delivered fully assembled. -
Seite 7: Adjusting The Steering Unit
SQUOD_SU 06/2009 Note that, when pressing the "ON/OFF" button, the joystick stays in the central position for at least two seconds. It is programmed this way for technical and safety reasons, to prevent the joystick being pushed at the same time as the wheelchair is being switched on. If both processes are activated at the same time, the steering unit locks itself and can only become operational again after being switched off completely. -
Seite 8: Back
SQUOD_SU 06/2009 When moving the control unit to one side, ensure that no objects or body parts are within the range of adjustment, as there is risk that they could get caught! BACK The fixed back section is designed to be detachable. Loosen the screws (1) and lift the cushioned back section up and out of the retainers. -
Seite 9: Leg Support
SQUOD_SU 06/2009 LEG SUPPORT The leg support consists of a one-piece footplate whose height can be adjusted. Loosen the screw connections (1) and pull the screws all the way out of the bracket. Move the footplate to the position you want and re-tighten it again with the screws (1). -
Seite 10: Armrests
SQUOD_SU 06/2009 ARMRESTS The height of the arm rests can be adjusted and they can also be detached (e.g. so that the patient can be moved sideways). Loosen the adjustable screw (1) a little and then pull it out. The armrest can now be put into the position you want. The adjustable screw (1) must then be replaced in one of the holes in the plate (2) and hand-tightened. -
Seite 11: Standing/Upright Function
SQUOD_SU 06/2009 STANDING/UPRIGHT FUNCTION To use the standing/upright function, you must always ensure beforehand that the legs are made secure with the knee brackets and the upper body likewise with the chest belt (see descriptions in the relevant sections, "Leg support" and "Chest belt"). The standing/upright function must only ever be used when another person is supervising. -
Seite 12: Battery Charger
SQUOD_SU 06/2009 Make sure that no objects, persons or body parts are inside the movement range of the upright function, since this could cause damage or injury. BATTERY CHARGER To charge the batteries, only use the battery charger supplied - IMPULSE S (8 A). Primary voltage 230 Vac –... -
Seite 13: Batteries
SQUOD_SU 06/2009 If the charger cable is not removed, a tiny current will keep the batteries topped up (trickle charging). When charging is complete, always remove the plug from the steering unit first and only then the mains plug from the wall socket. CHARGER DISPLAYS •... -
Seite 14: Battery Storage
SQUOD_SU 06/2009 BATTERY STORAGE If you no longer use your wheelchair, you can leave it connected to the battery charger. Charging is automatically controlled by the battery charger. If you remove and store the batteries, kindly note the following: Remove the cable clamps from the poles of the battery. •... -
Seite 15: Tyres
The end user should not change the wheels themselves. TYRES The SQUOD SU electric wheelchair is fitted with 3.00-8 driving wheels (pneumatic) and 260x85 steering wheels (pneumatic). Consult your specialist dealer about other wheel combinations. He will advise you as to which combinations are suitable for your individual requirements. -
Seite 16: Tyre Changing
SQUOD_SU 06/2009 TYRE CHANGING If you want to change the tyres or inner tubes, you should note the following: STEERING WHEELS A. Loosen the screw on the steering wheel axle and remove it from the steering wheel fork. B. Let the air out of the steering wheel by lightly pressing the pressure pin on the valve. - Seite 17 SQUOD_SU 06/2009 Place the groove pin into the motor axle recess (1). Pull the wheel over the motor axle (1) to the stopping point (avoid poor alignment). In doing this, ensure that the recess on the rim hub fits over the groove pin (2). Hand-tighten the washer and screw (thread locker can be used to secure it).
-
Seite 18: Pushing The Wheelchair
SQUOD_SU 06/2009 rim on both sides of the tyre, then the tyre is centered properly. If not - let out the air and position the tyre afresh. Now the tyre can be inflated to its full operating pressure (note the maximum) and the valve cap should be replaced. -
Seite 19: Transporting The Wheelchair
06/2009 TRANSPORTING THE WHEELCHAIR If your SQUOD SU is to be transported, please note the following: Before lifting up the wheelchair, all moveable parts must be dismantled. Before moving the wheelchair, the seat/back unit should be moved to the seated position. - Seite 20 SQUOD_SU 06/2009 Make sure that the headrest is inserted at least to the marked position to be fixed securely and reliably. The depth of the headrest can be adjusted by slightly loosening the adjusting screws to allow movement of the sprocket gears. Then you can adjust the headrest to your needs and secure it by retightening the adjusting screws.
-
Seite 21: For Your Safety
SQUOD_SU 06/2009 To adjust the depth of the "pelotten", you can loosen screws (2) and set the "pelotten" to the desired depth. Make sure that all screws are properly tightened after the assembly, otherwise the stability of the "pelotten" is endangered, and this may cause injury and/or damage. Make sure that the rail system is properly mounted and that nothing obstructs its functional integrity. -
Seite 22: Making Regular Checks
SQUOD_SU 06/2009 Make sure that the maximum load (130 kg) is not exceeded. MAKING REGULAR CHECKS As with any technical product, your wheelchair, too, requires regular checks if it is to be kept fully- functional. The steps to be taken to fully enjoy the advantages of your wheelchair even after protracted use, are described below. -
Seite 23: Tools
SQUOD_SU 06/2009 processes. Only an electrician is able to release the electric wheelchair for use after successful checking measurements or servicing. The service must be confirmed in the service plan when at least the above-mentioned aspects have been checked. The manufacturer is not liable for damage caused by lacking or improper service. TOOLS To repair individual components and accessory attachments, and to carry out inspections, the following tools are the minimum required:... -
Seite 24: Disinfection
SQUOD_SU 06/2009 DISINFECTION Only a hygiene technician or someone appointed by him can disinfect your wheelchair and this should be done every time before its use is resumed or before it is provided to a different person. All parts of the wheelchair can be treated with a disinfectant cloth. -
Seite 25: Guarantee
SQUOD_SU 06/2009 Lysoformin Lysoform Lysoformin 2000 Lysoform Melsept B.Braun Melsitt B.Braun Minutil Ecolab Multidor Ecolab Nüscosept Dr.Nüsken Chemie Optisept Dr.Schumacher Pursept-FD Merz Ultrasol F Fresenius Amphotensid Tensodur 103 MFH Marienfelde Alkaline solution Lime-wash Insufficiently effective against myco-bacteria when disinfecting surfaces, especially in the presence of blood. Not suitable for disinfecting blood-contaminated or porous surfaces (e.g. -
Seite 26: Conformity
SQUOD_SU 06/2009 CONFORMITY The SQUOD SU electric wheelchair complies with the requirements of the European directive: - 93/42/EEC (Medical Products Directive) and the product norms: - EN 12182: 1999 - (DIN) EN 12184: 1999 DISPOSAL The manufacturer is responsible for taking back and recycling the electric wheelchair and shall meet the requirements of European Directive 2002/96/EC on Waste Electrical and Electronic Equipment. - Seite 27 SQUOD_SU 06/2009 Left motor (or its Check whether the plugs of both motors have been inserted properly. connection) is defective. Check the plug contacts of both motors for corrosion or damage. Check both motors. Unplug the motors and measure the plug connection with an Ohm meter.
- Seite 28 TABLE DES MATIÈRES Chapitre Page Table des matières ..........................1 Avant-propos............................2 Caractéristiques techniques.......................2 Généralités............................3 Domaine d'utilisation ..........................3 Étendue de la fourniture........................4 Explication des symboles........................4 Les organes de commande .......................4 Commande SHARK 2 ........................4 Réglage de l’unité de commande ......................6 Dossier ...............................6 Réglage de la profondeur d’assise ....................7 Repose-jambes ..........................7 Protection des genoux ........................8...
-
Seite 29: Avant-Propos
état de fonctionnement et lui assurer une longue durée de vie. Ce mode d'emploi reflète l'état le plus récent de développement du produit. La société Vermeiren se réserve toutefois le droit d’apporter des modifications sans obligation d’adapter ou de remplacer les modèles livrés précédemment. -
Seite 30: Généralités
Comme différentes possibilités de pneus existent, il y a lieu de respecter les pressions de gonflage indiquées. GÉNÉRALITÉS Le fauteuil roulant électronique SQUOD SU est équipé de deux moteurs d'une puissance de 200 watts chacun. Il s’agit d’un véhicule mixte destiné à un usage tant à l’intérieur qu’à l’extérieur et avec fonction debout/redressement utilisable sur sols plans en intérieur. -
Seite 31: Étendue De La Fourniture
SQUOD_SU 06/2009 ÉTENDUE DE LA FOURNITURE Châssis avec moteurs, siège et dossier (fonction debout réglable électriquement) • Repose-pied (avec protection des genoux et des jambes) • 2 x batteries, y compris 4 poignées de transport et chargeur • Sangle de poitrine •... - Seite 32 SQUOD_SU 06/2009 Actionnez le bouton « MARCHE/ARRÊT » (1). Le témoin de charge (2), qui fournit en même temps des informations sur l’état de charge des batteries, s’allume pendant un bref instant. Si toutes les lampes s’allument, l’état de charge des batteries est suffisant. Si elles ne s’allument pas toutes, vous devez adapter vos activités de conduite à...
-
Seite 33: Réglage De L'unité De Commande
SQUOD_SU 06/2009 Si vous voulez protéger votre fauteuil roulant contre un accès non autorisé, appuyez sur le bouton MARCHE/ARRÊT (1) pendant plus de deux secondes lors de la mise hors tension : la commande est verrouillée. Pour la libérer, activez la commande. Pendant 10 secondes, vous voyez un témoin de fonctionnement sur le témoin de charge. -
Seite 34: Réglage De La Profondeur D'assise
SQUOD_SU 06/2009 REGLAGE DE LA PROFONDEUR D'ASSISE Vous pouvez régler la profondeur d’assise en déplaçant le cadre du dossier sur différentes positions. Desserrez pour cela le vissage (1) des deux côtés du cadre et tirez le cadre du dossier vers l'extérieur ou vers l'intérieur jusqu'à atteindre la position souhaitée ou jusqu'à... -
Seite 35: Protection Des Genoux
SQUOD_SU 06/2009 PROTECTION DES GENOUX Toujours utiliser la protection des genoux pour la fonction debout/redressement. Desserrez les vis à garret (1) des deux côtés du repose- jambes et faites sortir aussi loin que possible le logement qu'elles fixent. Placez le repose-jambes (2) avec les rembourrages de genoux et leurs tringleries verticales des deux côtés dans les logements prévus. -
Seite 36: Sangle De Poitrine
SQUOD_SU 06/2009 Veillez lors du rabattage vers le bas des accoudoirs à ce qu'aucun objet ou aucune partie du corps n'entre dans zone basculement des accoudoirs, afin d'éviter dommages/blessures. Si vous détectez des changements, des dégâts ou de l'usure aux fixations, adressez-vous à votre revendeur qui pourra réparer ces défauts. -
Seite 37: Chargeur
SQUOD_SU 06/2009 Remarquez que lors de l'utilisation de la fonction de redressement, le fauteuil roulant repose sur les roulettes avant de l'appareil sous le repose-pieds et les roues directrices (200x85) sont soulevées d'environ 1 cm au- dessus du sol. Pour la conduite, le fauteuil roulant est déplacé... -
Seite 38: Charger Les Batteries
SQUOD_SU 06/2009 CHARGER LES BATTERIES Comme le chargeur IMPULSE S (8 A) adapte la courbe de charge à l'état de chargement des batteries AGM, vous pouvez charger votre fauteuil roulant après chaque utilisation. Cela évite un chargement agressif des batteries et l'« effet mémoire ». Chargez votre fauteuil roulant au plus tard lorsque le témoin de l'état de charge sur votre commande entre dans la zone rouge. -
Seite 39: Batteries
SQUOD_SU 06/2009 N'interrompez jamais l'opération de chargement. Le chargeur vous indique quand le cycle de charge est terminé. (voyant vert allumé fixe). Vous trouverez des informations supplémentaires dans la notice jointe au chargeur. BATTERIES Votre fauteuil roulant électronique est équipé en série de 2 batteries AGM fermées de 12 V / 70 Ah. Les batteries utilisées pour votre fauteuil roulant électronique sont des batteries d’entraînement, qui atteignent leur capacité... -
Seite 40: Coupe-Circuit Thermique
SQUOD_SU 06/2009 SYSTEME DE RACCORDEMENT Moteur gauche Batterie 24 V Moteur droit Raccordements lumière Raccordement moteur de réglage (uniquement sur SHARK SHARK 2 SHARK 2) Module Commande d'alimentation Charge Programmation (basée sur PC ou appareil manuel) COUPE-CIRCUIT THERMIQUE Pour protéger les moteurs contre une surcharge, nous avons placé un coupe-circuit thermique sur le côté... -
Seite 41: Pneus
être effectuée par l’utilisateur final. PNEUS Le fauteuil roulant électronique SQUOD SU est équipé en standard de roues motrices 3.00-8 (pneumatiques) et de roues directrices 260x85 (pneumatiques). Pour d’autres combinaisons de roues, adressez-vous à votre revendeur qui vous conseillera volontiers sur les combinaisons de roues qui conviennent à... -
Seite 42: Roues Motrices
SQUOD_SU 06/2009 Vérifiez que la chambre à air n'est pas pincée par les côtés de la jante Ne gonflez les pneus qu'à la pression maximale (voir « Caractéristiques techniques ») Avant d'utiliser le fauteuil roulant, contrôler le serrage de tous les vissages des roues. ROUES MOTRICES Les roues motrices peuvent être séparées du moteur d'entraînement. - Seite 43 SQUOD_SU 06/2009 dégâts provoqués par l’utilisation de pièces de rechange qui ne sont pas des pièces d’origine. Contactez votre revendeur. Montage : Faites glisser la garniture de jante au-dessus de la valve de la chambre à air et introduisez ensuite celle-ci dans la jante. Vous pouvez maintenant tendre la garniture de jante sans difficulté.
-
Seite 44: Pousser Le Fauteuil Roulant
TRANSPORT DU FAUTEUIL ROULANT Pour le transport de votre SQUOD SU, vous devez suivre quelques instructions : Avant de soulever le fauteuil roulant, il faut que toutes les pièces mobiles soient démontées. Avant le transport du fauteuil roulant, amener l'unité siège et dossier en position assise. -
Seite 45: Transport Via Des Rampes
SQUOD_SU 06/2009 Pour le transport au-dessus de marches ou dans des escaliers, il faut toujours être deux personnes au minimum. Pendant le transport, aucune personne et aucun objet ne peuvent se trouver sous le fauteuil roulant, sous peine de provoquer des blessures ou des dégâts. Il est interdit de transporter le fauteuil roulant avec un patient assis dedans. -
Seite 46: Ceinture De Retenue De La Personne (B58)
SQUOD_SU 06/2009 Avant la mise en service des appuie-tête, il faut serrer à fond toutes les vis de blocage, car un affaissement ou un déplacement involontaires de l’appuie-tête risquent de provoquer des blessures. Si vous voulez caler la position de votre tête, cet appuie-tête s’adapte aux dimensions latérales de votre tête en comprimant les ailes latérales légèrement vers l’avant, celles-ci devant caler votre tête pour empêcher le basculement latéral. -
Seite 47: Pour Votre Sécurité
SQUOD_SU 06/2009 Après le montage, vérifiez que toutes les vis sont bien serrées, sinon la stabilité des coussins risque d’être compromise, ce qui peut provoquer des blessures et/ou des dégâts. Vérifiez que le système de rails est placé de manière à ne pas gêner dans l'utilisation. Si le fauteuil n’a pas été... -
Seite 48: Contrôles Réguliers
SQUOD_SU 06/2009 Pour être bien visible dans l’obscurité, portez des vêtements clairs ou réfléchissants et veillez à ce que les réflecteurs placés sur le fauteuil roulant soient bien visibles. Soyez prudent avec le feu, en particulier avec les cigarettes incandescentes ; en effet, le tissu du siège et du dossier risque de s'enflammer. -
Seite 49: Outillage
SQUOD_SU 06/2009 Mesure du courant de fuite équivalent (A) du chargeur suivant VDE 0702 • Mesure de la résistance d’isolement (MO) du chargeur suivant VDE 0702 • Contrôle du fonctionnement des accoudoirs et des repose-pieds (verrouillage, sollicitation, • déformation, usure par sollicitation) Contrôle du fonctionnement des entraînements (au cours d’un parcours de test"... -
Seite 50: Stockage
SQUOD_SU 06/2009 ou d’ustensiles à arêtes vives (éponge métallique, brosse, etc.), car ceux-ci risquent de griffer la surface de la commande et d’enlever la protection contre les éclaboussures. Contrôlez régulièrement que les fiches de raccordement ne sont pas corrodées ou endommagées, car cela risque de nuire au bon fonctionnement de l’électronique. - Seite 51 SQUOD_SU 06/2009 Chloramin-T DAB 9 Substances chlorées organiques ou Clorina Lysoform inorganiques avec Trichlorol Lysoform chlore actif Apesin AP100 Tana Professional Composés per Dismozon pur Bode Chemie Perform Schülke & Mayr Wofesteril Kesla Pharma Aldasan 2000 Lysoform Formaldéhyde Schülke & Mayr Antifect FD 10 et/ou divers Antiseptique...
-
Seite 52: Garantie
Les conditions de garantie peuvent varier suivant les pays. Contactez votre revendeur pour recevoir plus d'informations. CONFORMITÉ Le fauteuil roulant électronique SQUOD SU respecte les exigences de la directive européenne : - 93/42/CEE (directive sur les produits médicaux) ainsi que les normes pour les produits :... -
Seite 53: Codes D'erreur
SQUOD_SU 06/2009 Témoin de Système Shark bloqué Pour le débloquer, fonctionnement de appuyez deux fois sur le la « droite vers la bouton de l’avertisseur Témoin gauche » / dans un délai de 10 du « vert vers le secondes après la mise en fonctio rouge »... - Seite 54 SQUOD_SU 06/2009 Le frein de stationnement Voir plus haut. droit (ou la connexion) est défectueux La commande Shark est Retirez la fiche des deux moteurs. Mettez la commande hors tension défectueuse et sous tension quand le joystick se trouve en position zéro neutre. Si cette séquence de clignotement s’affiche à...
- Seite 55 INHOUDSOPGAVE Hoofdstuk Pagina Inhoudsopgave ..........................1 Voorwoord............................2 Technische gegevens ........................2 Algemene instructies..........................3 Toepassingsgebied ..........................3 Levering .............................3 Gebruikte symbolen ...........................4 De bedieningselementen ........................4 Sturing SHARK 2 ..........................4 Instellen van de stuureenheid ......................5 Rug ..............................6 Verstellen van de zitdiepte .........................6 Beensteun ............................7 Kniebeveiliging ...........................7 Armsteunen............................8 Borstgordel............................8 Sta-/oprichtfunctie ..........................9...
-
Seite 56: Voorwoord
We willen u danken voor het vertrouwen dat u in onze producten stelt. De elektrische rolstoelen van Vermeiren zijn het resultaat van jarenlange studies en ervaringen. De levensduur van het product hangt in sterke mate af van de zorg waarmee u de rolstoel behandelt. -
Seite 57: Algemene Instructies
06/2009 ALGEMENE INSTRUCTIES De elektrische rolstoel SQUOD SU is uitgerust met twee motoren die ieder een vermogen van 200 Watt hebben. Deze stoel is ontworpen voor gebruik binnen en buiten. De sta-/oprichtfunctie is bedoeld voor gebruik op een vlakke ondergrond binnenshuis. -
Seite 58: Gebruikte Symbolen
SQUOD_SU 06/2009 GEBRUIKTE SYMBOLEN Veiligheidsinstructies respecteren! Voor gebruik de handleiding lezen! Positie: parkeerrem geactiveerd (elektrisch rijden mogelijk) Positie: parkeerrem uitgeschakeld (vrijloop en duwen mogelijk, elektrisch rijden niet mogelijk) Opletten bij vrijloop op hellingen Gescheiden inzameling en recycling van elektrische en elektronische apparaten DE BEDIENINGSELEMENTEN De elektrische rolstoel wordt gemonteerd geleverd. -
Seite 59: Instellen Van De Stuureenheid
SQUOD_SU 06/2009 Om de rolstoel in beweging te brengen beweegt u de joystick langzaam naar voor. Hoe verder u de joystick naar voor beweegt, hoe sneller de rolstoel beweegt. Wanneer u naar links of naar rechts wilt rijden, verplaatst u de joystick in de betreffende richting. Om achteruit te rijden trekt u de joystick vanuit de middenpositie naar achter. -
Seite 60: Rug
SQUOD_SU 06/2009 OPMERKING: De schroef (1) kan, afhankelijk van de uitvoering, ook onder de stuurstang (2) zijn aangebracht. Let erop dat bij zijwaarts draaien van de sturing geen voorwerpen of lichaamsdelen in het verstelgebied terechtkomen – gevaar voor beknelling! De stijve rug is afneembaar ontworpen. Maak de schroeven (1) los en neem de gevulde rug naar boven uit de houders. -
Seite 61: Beensteun
SQUOD_SU 06/2009 BEENSTEUN De beensteun bestaat uit een eendelige voetsteun die in de hoogte kan worden versteld. Maak de schroeven (1) los en trek deze volledig uit de houder. Schuif de voetsteun in de gewenste positie en zet deze daarna weer handvast met de schroeven (1). Voor u de rolstoel gebruikt, dient u te controleren beensteun... -
Seite 62: Armsteunen
SQUOD_SU 06/2009 ARMSTEUNEN De armsteunen kunnen worden verwijderd en in hoogte worden versteld (bijvoorbeeld voor zijwaartse verplaatsing van de patiënt). Draai de stelschroef (1) iets los en trek deze daarna naar buiten. De armsteun kan nu in de gewenste positie worden gezet. Ter bevestiging moet de stelschroef (1) weer in de voorziene openingen van de gatenplaat (2) vastklikken en handvast worden aangehaald. -
Seite 63: Sta-/Oprichtfunctie
SQUOD_SU 06/2009 STA-/OPRICHTFUNCTIE Gebruik de sta-/oprichtfunctie pas nadat de benen met de kniebeugel en het bovenlichaam met de borstgordel zijn vastgezet (zie de desbetreffende hoofdstukken "Beensteun" en "Borstgordel"). Bij gebruik van de sta-/oprichtfunctie dient altijd een tweede persoon toezicht te houden. Gebruik van de sta-/oprichtfunctie zonder borstgordel en kniebeveiliging is uitgesloten en gebeurt op eigen risico. -
Seite 64: Laadapparaat
SQUOD_SU 06/2009 Let erop dat zich in het draaibereik van de oprichtfunctie geen voorwerpen, personen of lichaamsdelen bevinden omdat er anders gevaar is voor schade of letsel. LAADAPPARAAT Gebruik voor het opladen van de batterijen uitsluitend het bijgeleverde laadapparaat IMPULSE S (8 Primaire spanning 230 Vac –... - Seite 65 SQUOD_SU 06/2009 Als het laadproces is beëindigd, gaat de gele LED uit en gaat de groene LED branden. Trek de laadkabel uit de stuureenheid; het laadapparaat schakelt weer over op de "STAND-BY"-toestand (gele en groene LED branden). Als de laadkabel aangesloten blijft, worden de batterijen door middel van een heel geringe stroom in optimale toestand gehouden (onderhoudslading).
-
Seite 66: Batterijen
SQUOD_SU 06/2009 AANSLUITING BATTERIJEN Aansluitstekker stroommodule 24 V Transportgrepen voor batterijen (aan de zwart zijinkepingen van de batterijen bevestigen) 30 A Thermische zekering OPBERGEN VAN DE BATTERIJEN Wanneer u uw rolstoel gedurende langere tijd niet gebruikt, kan deze aangesloten blijven aan de lader. -
Seite 67: Thermische Zekering
SQUOD_SU 06/2009 THERMISCHE ZEKERING Om de motor te beveiligen tegen overbelasting is de rolstoel rechts op het frame voorzien van een thermische zekering (overgang naar het rugframe) die automatisch het vermogen naar de motoren onderbreekt omdat deze anders warm kunnen lopen en daardoor sneller verslijten of defect raken. De thermische zekering kan worden geactiveerd wanneer hellingen worden bereden die de vermelde maximumwaarden overschrijden. -
Seite 68: Banden
06/2009 BANDEN De elektrische rolstoel SQUOD SU is standaard uitgerust met 3.00-8 – aandrijfwielen (lucht) en 260x85 - stuurwielen (lucht). Voor andere wielcombinaties neemt u contact op met de vakhandelaar. Deze geeft u graag advies over wielen die zijn aangepast aan uw situatie. - Seite 69 SQUOD_SU 06/2009 Schroefverbinding wiel (4) losdraaien en verwijderen. Wiel (3) volledig van de motoras (1) trekken. De pen (2), die op de motoras ligt, kan klem komen te zitten in de velg. WIELMONTAGE Verwijder vuil dat zich op de schroefdraad en de as van de wielbevestiging op de motor bevindt en ontvet de schroefdraad.
-
Seite 70: Duwen Van De Rolstoel
SQUOD_SU 06/2009 Controleer rondom en aan beide zijden of de binnenband niet tussen de bandhiel en velg is geklemd. Schuif het ventiel lichtjes terug en trek het weer uit zodat de band goed is gepositioneerd in de buurt van het ventiel. Om de band correct op te pompen, pompt u eerst lucht tot de band nog goed met de duim kan worden ingedrukt. -
Seite 71: Transport Van De Rolstoel
06/2009 TRANSPORT VAN DE ROLSTOEL Voor het transporteren van de SQUOD SU dient u op volgende punten te letten: Voor het optillen van de rolstoel dienen alle bewegende delen te worden gedemonteerd. Voor het transport van de rolstoel dient de zit-/rugeenheid in de zitpositie te worden geplaatst. -
Seite 72: Gordels (B58)
SQUOD_SU 06/2009 Let erop dat u de hoofdsteun minstens tot de markering in de houder schuift zodat deze veilig kan worden bevestigd. Nu kunt u de hoofdsteun met behulp van de stelschroeven in de diepte aanpassen. Draai de stelschroeven iets los tot u de tandwielen kunt bewegen. Stel de hoofdsteun in voor uw lengte en haal de stelschroef weer vast aan. -
Seite 73: Voor Uw Veiligheid
SQUOD_SU 06/2009 Om de pelot in de diepte aan te passen maakt u de schroeven (2) los en stelt u de pelot in de gewenste stand in. Let erop dat na de montage alle schroeven vast zijn aangehaald. Anders komt de stabiliteit van de pelot in het gedrang, wat letsel en/of schade kan veroorzaken. -
Seite 74: Regelmatig Controleren
SQUOD_SU 06/2009 Let op met brandende voorwerpen, zoals sigaretten. De rug- en zittingbekleding kunnen vlam vatten. Let erop dat de maximale belasting (130 kg) niet wordt overschreden. REGELMATIG CONTROLEREN Net zoals ieder ander technisch product heeft uw rolstoel regelmatige controles nodig om de veilige werking te handhaven. -
Seite 75: Gereedschap
SQUOD_SU 06/2009 Werking van de aandrijvingen (controle uitvoeren tijdens een testrit " geluid, snelheid, • soepelheid, enz.. Indien nodig: Meten van het opgenomen vermogen, eerst zonder last, daarna met de nominale last (SWL), om zo eventuele slijtage van de motoren te kunnen meten via de stroomopname en de waarden te kunnen vergelijken met de waarden bij levering, toestand en functie van de koolstaven. -
Seite 76: Opslag
SQUOD_SU 06/2009 OPSLAG Alleen in een droge ruimte opslaan (+ 5°C tot + 45°C). • Relatieve luchtvochtigheid van 30% tot 70%. • Luchtdruk tussen 700 hPa en 1060 hPa. • Stroomsnoer van de lader uit het stopcontact trekken. • Batterijen: zie het hoofdstuk "Opbergen van de batterijen" •... -
Seite 77: Garantie
SQUOD_SU 06/2009 Tana Professional Apesin AP30 Bacillocid Spezial Bode Chemie Buraton 10F Schülke & Mayr Desomed A 2000 Desomed Desinfectie- Dreiturm reiniging hospitaal Desomed Perfekt Desomed Formaldehyde- oplossing DAB 10 (Formalin) Incidin perfekt Ecolab Incidin Plus Ecolab Kohrsolin Bode Chemie Lysoform Lysoform Lysoformin... -
Seite 78: Conformiteit
De garantiebepalingen kunnen per land verschillen. Neem voor meer informatie contact op met uw vestiging. CONFORMITEIT De elektrische rolstoel SQUOD SU voldoet aan de vereisten van de Europese richtlijn: - 93/42/EG (richtlijn medische hulpmiddelen) en aan de productnormen: - EN 12182: 1999... - Seite 79 SQUOD_SU 06/2009 Controleer of de zekeringen aan de sturing en de batterijen defect of geactiveerd zijn. Bedieningsfout Mogelijk uitgeschakelde zekering of bedieningsfout (joystick) Joystick in neutrale stand zetten en het systeem opnieuw starten. Batterijstoring Batterijen en kabels controleren en eventueel laden. Batterijen eventueel vervangen.
- Seite 80 INHALT Abschnitt Seite Inhalt ..............................1 Vorwort...............................2 Technische Angaben .........................2 Allgemeine Hinweise..........................3 Anwendungsgebiet ..........................3 Lieferumfang ............................4 Zeichenerklärung ..........................4 Die Bedienelemente...........................4 Steuerung SHARK 2 ..........................4 Einstellen der Steuereinheit .......................6 Rücken ...............................6 Sitztiefenverstellung ...........................7 Beinstütze ............................7 Kniesicherung ............................8 Armlehnen............................8 Brustgurt ............................9 Steh-/Aufrichtfunktion.........................9 Ladegerät ............................10 Laden der Batterien ...........................11 Batterien.............................12 Anschluss Batterien ...........................12...
-
Seite 81: Vorwort
Lebensdauer geben können. Diese Gebrauchsanweisung spiegelt den neuesten Stand der Produktentwicklung wider. Die Firma Vermeiren behält sich jedoch das Recht vor, Veränderungen vorzunehmen, ohne die Verpflichtung einzugehen, zuvor gelieferte Modelle anzupassen oder zu ersetzen. Bitte bedenken Sie, dass die Berücksichtigung unserer Hinweise Ihren Rollstuhl auch nach Jahren des Gebrauchs in... -
Seite 82: Allgemeine Hinweise
03/2009 ALLGEMEINE HEINWEISE Der Elektrorollstuhl SQUOD SU ist mit zwei Motoren von jeweils 200 Watt Leistung ausgestattet. Konzipiert wurde er als Mischfahrer für den Innen- und Außenbereich und mit seiner Steh- /Aufrichtfunktion für die Nutzung auf ebenen Böden im Innenbereich. -
Seite 83: Lieferumfang
SQUOD_SU 03/2009 LIEFERUMFANG Rahmenkonstruktion inkl. Motoren, Sitz- & Rückeneinheit (elektrisch verstellbare Stehfunktion) • Fußplatte (inkl. Knie-/Beinsicherung) • 2 x Batterien inkl. 4 Tragegriffe und Ladegerät • Brustgurt • Kippschutz • Steuerelektronik • Werkzeug (Inbusschlüssel) • Gebrauchsanweisung • Bitte beachten Sie, dass die Grundausstattung in den verschiedenen europäischen Ländern unterschiedlich sein kann. -
Seite 84: Anschlüsse Ladegerät / Programmiergerät
SQUOD_SU 03/2009 Betätigen Sie die "EIN/AUS"-Taste (1). Die Ladeanzeige (2), die gleichzeitig Auskunft über den Ladezustand der Batterien gibt, leuchtet kurz auf. Leuchten alle Lampen, so ist der Ladezustand der Batterien ausreichend. Sollten nicht alle Lampen aufleuchten, so müssen Sie Ihre Fahraktivitäten auf die geringere Kapazität der Batterien abstimmen. -
Seite 85: Einstellen Der Steuereinheit
SQUOD_SU 03/2009 Möchten Sie Ihren Rollstuhl vor unbefugtem Zugriff schützen drücken Sie die AN/AUS-Taste (1) beim Ausschalten länger als zwei Sekunden und die Steuerung ist gesperrt. Zu Freigabe schalten Sie die Steuerung an. Während der Zeitdauer von 10 Sekunden sehen Sie ein Lauflicht in der Ladestandanzeige. -
Seite 86: Sitztiefenverstellung
SQUOD_SU 03/2009 SITZTIEFENVERSTELLUNG Sitztiefe lässt sich durch Verschieben Rückenrahmens in verschiedene Positionen einstellen. Lösen Sie dafür die Verschraubung (1) auf beiden Seiten des Rahmens und ziehen den Rückenrahmen soweit heraus oder hinein, bis die gewünschte Position erreicht wird, bzw. die vorgesehenen Lochung übereinanderliegen... -
Seite 87: Kniesicherung
SQUOD_SU 03/2009 KNIESICHERUNG Für die Steh-/Aufrichtfunktion ist immer die Kniesicherung zu nutzen. Lösen Sie die Knebelschrauben (1) auf beiden Seiten der Beinstütze und ziehen Sie die damit gesicherte Aufnahme soweit wie möglich heraus. Setzen Sie die Beinhalterung (2) mit den Kniepolstern mit deren senkrechten Gestängen an beiden Seiten in die dafür vorgesehen Aufnahmen. -
Seite 88: Brustgurt
SQUOD_SU 03/2009 Sollten Sie Veränderungen an den Armlehnen und/oder Armlehnenaufnahmen vornehmen, geschieht dies auf eigene Verantwortung. Ihr Gewährleistungsanspruch erlischt. Achten Sie beim Herabklappen der Armlehnen darauf, dass keine Gegenstände oder Körperteile unter Schwingbereich Armlehne geraten, dies Schäden/Verletzungen führen kann. Sollten Veränderungen, Beschädigungen oder Abnutzungen in den Aufhängungen erkennbar sein, wenden Sie sich bitte an Ihren Fachhändler, der diesen Mangel beheben kann. -
Seite 89: Ladegerät
SQUOD_SU 03/2009 Beachten Sie, dass Nutzung Aufrichtfunktion Rollstuhl vorderen Geräterollen unterhalb der Fußplatte aufsetzt und die Lenkräder (200x85) ca. 1 cm vom Boden abheben. Für Fahrkorrekturen wird der Rollstuhl dann über die Geräterollen Antriebsräder bewegt. Fahrfunktionen sind eingeschränkt möglich. Lösen Sie den Brustgurt und die Kniesicherung erst wieder, wenn der Rollstuhl wieder in die Sitzposition verfahren worden ist. -
Seite 90: Laden Der Batterien
SQUOD_SU 03/2009 LADEN DER BATTERIEN Da das Ladegerät IMPULSE S (8 A) die Ladekurve an den Beladungszustand der AGM-Batterien angleicht, können Sie Ihren Rollstuhl nach jeder Nutzung laden. Dadurch werden eine aggressive Beladung der Batterien und der „Memory-Effekt“ weitgehend vermieden. Laden Sie Ihren Rollstuhl spätestens, wenn die Anzeige für den Ladestand an Ihrer Steuerung in den roten Bereich eintritt. -
Seite 91: Batterien
SQUOD_SU 03/2009 Für Schäden, die durch Ladefehler auftreten, haftet der Hersteller nicht. Unterbrechen Sie den Ladezyklus niemals. Das Ladegerät zeigt Ihnen an, wann der Ladezyklus abgeschlossen ist. (grüne Leuchtdiode brennt stetig). Weitere Informationen entnehmen Sie bitte der dem Ladegerät beiliegenden Gebrauchsanweisung. BATTERIEN Serienmäßig besitzt Ihr Elektrorollstuhl 2 geschlossene AGM-Batterien mit der Leistung von 12V/70Ah. -
Seite 92: Anschluss System
SQUOD_SU 03/2009 ANSCHLUSS SYSTEM Linker Motor 24 V Batterie- versorgung Rechter Motor Lichtanschlüsse Anschluss Verstellmotor (nur bei SHARK 2) SHARK SHARK 2 Powermodul Steuerung Lade- gerät Programmierung (PC-basierend oder Handgerät) THERMISCHE SICHERUNG Zum Schutz der Motoren vor Überbelastung befindet sich auf der rechten Seite des Sitzrahmens eine thermische Sicherung (Übergang zum Rückenrahmen), die automatisch die Leistungsaufnahme zu den Motoren unterbricht, da diese sonst heiß... -
Seite 93: Bereifung
Endverbraucher nicht durchzuführen. BEREIFUNG Der Elektrorollstuhl SQUOD SU ist standardmäßig mit 3.00-8 - Antriebsrädern (Luft) und 260x85 - Lenkrädern (Luft) ausgestattet. Für andere Radkombinationen wenden Sie sich an Ihren Fachhändler, der Sie gerne berät, welche Radkombinationen für Ihre individuellen Bedingungen ratsam sind. - Seite 94 SQUOD_SU 03/2009 Vor Felgenteilung immer zuerst die Luft aus den Reifen entweichen lassen, da die Felgen- seiten sonst explosionsartig auseinandergedrückt werden können – Verletzungsgefahr ! Stellen Sie sicher, dass der Schlauch nicht durch die Felgenseiten eingeklemmt wird Räder nur mit max. Reifendruck befüllen (siehe „Technische Angaben“) Vor der Nutzung des Rollstuhls sind alle Radverschraubungen auf ihren festen Halt zu prüfen.
- Seite 95 SQUOD_SU 03/2009 Vor der Montage des neuen Schlauchs sollten Sie folgende Dinge beachten: Das Felgenbett und die Reifeninnenwand auf Fremdkörper untersuchen und gegebenenfalls gründlich säubern. Den Zustand des Felgenbettes, besonders am Ventilloch überprüfen. Verwenden Sie bitte nur Originalersatzteile. Für Beschädigungen kann keine Gewährleistung übernommen werden, wenn diese durch Ersatzteile hervorgerufen wurden, die keine Originalersatzteile sind.
-
Seite 96: Schieben Des Rollstuhls
Bewegt sich Ihr Rollstuhl im Freilauf unfreiwillig, dient das Hochziehen des Kipphebels als NOTSTOPP. TRANSPORT DES ROLLSTUHLS Für den Transport Ihres SQUOD SU sollten Sie einige Hinweise beachten: Vor dem Anheben des Rollstuhls sollten alle beweglichen Teile abgebaut werden. Vor dem Transport des Rollstuhl ist die Sitz-/Rückeneinheit in die Sitzposition zu verfahren. -
Seite 97: Transport Über Rampen
SQUOD_SU 03/2009 Während des Transportes dürfen sich keine Personen oder Gegenstände unterhalb des Rollstuhles befinden, da sonst Verletzungsgefahr besteht oder Beschädigungen am Rollstuhl entstehen können. Ein Transport des Rollstuhls, während der Patient in dem Rollstuhl sitzt ist ausgeschlossen. TRANSPORT ÜBER RAMPEN Sollten Sie zur Überwindung eines Hindernisses auf die Möglichkeit von Rampen zurückgreifen, bitten wir Sie folgende Hinweise zu beachten: Das Sitz-/Rückensystem muss zuvor in die Sitzposition gefahren werden. -
Seite 98: Personenrückhaltesystem (B58)
SQUOD_SU 03/2009 Wünschen Sie eine Sicherung Ihrer Kopfhaltung, so lässt sich diese Kopfstütze Ihren seitlichen Kopfabmessungen anpassen, indem Sie die Seitenflügel leicht nach vorne zusammendrücken können, wodurch die Seitenflügel Ihren Kopf vor seitlichem Wegkippen sichern sollen. Achten Sie darauf, dass bei anliegendem Kopf nicht zuviel Druck auf die Seitenflügel ausgeübt wird, da dies Quetschungen hervorrufen kann. -
Seite 99: Für Ihre Sicherheit
SQUOD_SU 03/2009 Achten Sie darauf, dass das Schienensystem so angebracht wurde, dass keine Behinderungen der Funktionstauglichkeit entstehen. Lassen Sie die Montage, wenn der Stuhl nicht bereits in montiertem Zustand geliefert wurde, nur von Ihrem Fachhändler durchführen, der über geeignetes Werkzeug und Kenntnis zur Montage verfügt. -
Seite 100: Regelmäßige Kontrollen
SQUOD_SU 03/2009 Vorsicht beim Umgang mit Feuer, insbesondere brennenden Zigaretten; Sitz- und Rückenbespannung könnten sich entzünden. Achten sie darauf, dass die maximale Zuladung (130 kg) nicht überschritten wird. REGELMÄßIGE KONTROLLEN Wie jedes andere technische Produkt bedarf auch Ihr Elektrorollstuhl regelmäßiger Kontrollen, um die Funktionstauglichkeit aufrecht zu erhalten. -
Seite 101: Werkzeug
SQUOD_SU 03/2009 Funktionsprüfung der Antriebe (Prüfungen durchführen während einer Testfahrt " • Geräusche, Geschwindigkeit, Leichtlauf, etc., falls erforderlich: Messen Leistungsaufnahme zuerst ohne Last, dann mit der Nennlast (SWL), um evtl. Verschleiß der Motoren über die Stromaufnahme ermitteln zu können und Vergleich mit den Werten bei Auslieferung, Zustand und Funktion der Kohlestifte. -
Seite 102: Lagerung
SQUOD_SU 03/2009 LAGERUNG Nur in trockenen Räumen lagern (+ 5°C bis + 45°C). • Bei relativer Luftfeuchtigkeit von 30% bis 70%. • Bei Luftdruck von 700 hPa bis 1060 hPa. • Netzanschlussleitung des Ladegerätes vom Netz trennen. • Batterien siehe Kapitel „Einlagerung der Batterien“ •... -
Seite 103: Gewährleistung
SQUOD_SU 03/2009 Bacillocid Spezial Bode Chemie Buraton 10F Schülke & Mayr Desomed A 2000 Desomed Desinfektions- Dreiturm reiniger Hospital Desomed Perfekt Desomed Formaldehyd- lösung DAB 10 (Formalin) Incidin perfekt Ecolab Incidin Plus Ecolab Kohrsolin Bode Chemie Lysoform Lysoform Lysoformin Lysoform Lysoformin 2000 Lysoform Melsept... -
Seite 104: Konformität
In verschiedenen Ländern können die Gewährleistungsbestimmungen differieren. Bitte setzen Sie sich mit Ihrer Niederlassung in Verbindung, um weitere Informationen zu erhalten. KONFORMITÄT Der Elektrorollstuhl SQUOD SU entspricht den Anforderungen der europäischen Richtlinie: - 93/42/EWG (Medizinprodukterichtlinie) sowie den Produktnormen: - EN 12182: 1999... - Seite 105 SQUOD_SU 03/2009 nachdem die Steuerung Überprüfen Sie, ob die Batterien korrekt miteinander verbunden sind. eingeschaltet ist Überprüfen Sie, ob die Batterien beladen sind. Überprüfen Sie die Sicherungen an Steuerung und Batterien, ob diese defekt oder gelöst sind. Bedienungsfehler Mögliche Sicherungsabschaltung oder Bedienerfehler (Joystick) Joystick in Neutralposition bringen und erneut System starten.
- Seite 106 INDICE Sezione Pagina Indice ..............................1 Premessa ............................2 Dati tecnici ............................2 Generalità ............................3 Campo d'impiego ..........................3 Prodotti forniti .............................3 Significato dei simboli ........................4 Organi di comando..........................4 Comando SHARK 2 ...........................4 Posizionamento dell'unità di comando....................5 Schienale ............................6 Regolazione della profondità del sedile .....................6 Poggiapiedi ............................7 Protezione ginocchia..........................7 Braccioli .............................8...
-
Seite 107: Premessa
Ringraziamo per la fiducia accordataci con l’acquisto di una sedia a rotelle di nostra produzione. Le sedie a rotelle elettriche Vermeiren sono il risultato di lunghi anni di studi e di esperienza. La durata del veicolo dipende in modo sostanziale dalla cura e dall'attenzione con cui lo si tratta. Le presenti Istruzioni per l’uso hanno lo scopo di far acquisire all'utilizzatore familiarità... -
Seite 108: Generalità
03/2009 GENERALITÀ La sedia a rotelle elettrica SQUOD SU è dotata di due motori della potenza unitaria di 200 Watt. La sedia è stata progettata come veicolo misto per funzionamento all'interno e all'esterno e per l'uso su pavimenti piani in ambienti interni con la funzione verticalizzante e di sollevamento. -
Seite 109: Significato Dei Simboli
SQUOD_SU 03/2009 SIGNIFICATO DEI SIMBOLI Fare attenzione alle indicazioni di sicurezza ! Prima dell'uso leggere le relative istruzioni ! Posizione: freno di stazionamento attivato (possibile azionamento elettrico) Posizione: freno di stazionamento disattivato (possibili marcia in folle e a spinta, senza azionamento elettrico) Attenzione alla marcia in folle in salita e in discesa Raccolta differenziata e riciclaggio delle parti elettriche ed elettroniche... -
Seite 110: Posizionamento Dell'unità Di Comando
SQUOD_SU 03/2009 Joystick nella direzione voluta. Per andare a marcia indietro spostare il Joystick all'indietro rispetto alla posizione centrale. Si tenga presente che mentre si preme il tasto di "MARCIA/ARRESTO" il Joystick resta per circa 2 secondi in posizione centrale (folle): si tratta di un accorgimento tecnico di sicurezza per impedire l'azionamento del Joystick mentre si sta azionando la sedia. -
Seite 111: Schienale
SQUOD_SU 03/2009 NOTA: A seconda del modello, la vite (1) può trovarsi anche sotto al tubo di guida (2). Prestare attenzione a che in fase di spostamento laterale del comando non entrino nell'area di regolazione oggetti o parti del corpo, pericolo di schiacciamento! SCHIENALE Lo schienale fisso può... -
Seite 112: Protezione Ginocchia
SQUOD_SU 03/2009 POGGIAGAMBE Il poggiagambe consta di un poggiapiedi di un pezzo che può essere regolato in altezza. Allentare le viti (1) ed estrarre completamente le viti dal supporto. Spostare il poggiapiedi nella posizione desiderata e fissare nuovamente viti (1) a mano. Verificare che il poggiagambe sia stato avvitato prima dell'utilizzo. -
Seite 113: Braccioli
SQUOD_SU 03/2009 BRACCIOLI I braccioli possono essere regolati in altezza ed essere smontati (ad es. per il trasferimento laterale del paziente). Allentare leggermente la vite di regolazione (1), quindi tirarla verso l'esterno. A questo punto è possibile regolare nella posizione voluta il bracciolo. Per fissare i braccioli, la vite di regolazione (1) deve essere inserita nuovamente negli appositi fori della piastra forata (2) e serrata a mano. -
Seite 114: Funzione Verticalizzante E Di Sollevamento
SQUOD_SU 03/2009 FUNZIONE VERTICALIZZANTE E DI SOLLEVAMENTO Per utilizzare la funzione verticalizzante e di sollevamento si deve sempre verificare, prima, che le gambe siano bloccate dai poggiaginocchia e il busto dalla cinghia toracica (vedere descrizione nei relativi capitoli "Poggiagambe" e "Cinghia toracica"). La funzione verticalizzante e di sollevamento deve essere utilizzata sempre con la supervisione di una seconda persona. -
Seite 115: Caricabatterie
SQUOD_SU 03/2009 La funzione verticalizzante e di sollevamento deve essere utilizzata solo sedia a rotelle si trova su una superficie piatte con tutte le 4 ruote (e durante l'uso sulle due ruote anteriori). Verificare che nell'area di azione della funzione di sollevamento non si trovino oggetti, persone o parti del corpo, poiché... -
Seite 116: Batterie
SQUOD_SU 03/2009 Collegare quindi il cavo di carica con la spina a tre poli nella presa di carica dell'unità di comando della sedia. Non appena creato il collegamento con le batterie, il caricabatterie procede automaticamente alla carica. Ora si illumina solo il LED giallo. Una volta terminato il processo di carica, il LED giallo si spegne e si accende il LED verde. -
Seite 117: Collegamento Delle Batterie
SQUOD_SU 03/2009 COLLEGAMENTO DELLE BATTERIE Connettore modulo di 24 V alimentazione Maniglie di trasporto per batterie (inserire nelle nero dentature laterali delle batterie) 30 A Fusibile termico STOCCAGGIO DELLE BATTERIE In caso di prolungata inattività, la sedia a rotelle può essere lasciata collegata al caricabatterie, il quale provvede a regolare automaticamente la carica. -
Seite 118: Freno Di Stazionamento
GOMMATURA Di serie la sedia a rotelle elettrica SQUOD SU è dotata di ruote motrici 3.00-8 (ad aria) e ruote direttrici 260x85 (ad aria). Per altri tipi di gommatura rivolgersi al rivenditore. Onde evitare incidenti verificare che la pressione delle gomme sia sufficiente. La pressione di gonfiaggio è... -
Seite 119: Sostituzione Dei Pneumatici
SQUOD_SU 03/2009 SOSTITUZIONE DEI PNEUMATICI Per la sostituzione dei copertoni o delle camere d'aria procedere come segue: RUOTE DIREZIONALI A. Allentare la vite sull'asse delle ruote motrici ed estrarla dalla forcella delle ruote motrici. B. Far fuoriuscire l'aria dalla ruota motrice, premendo leggermente l'otturatore della valvola. - Seite 120 SQUOD_SU 03/2009 Inserire il perno nell'incavo dell'asse del motore (1). Sollevare la ruota lungo l'asse del motore (1) fino all'innesto (evitare di piegare). Durante questa operazione verificare che l'incavo del mozzo del cerchione passi per il perno (2). Serrare a mano la rondella e la vite di bloccaggio (per sicurezza è possibile utilizzare un collante per filettature).
-
Seite 121: Spinta Della Sedia A Rotelle
SQUOD_SU 03/2009 distanza rispetto al tallone del cerchione significa che la gomma è centrata. In caso contrario, sgonfiare la gomma e ripetere l'allineamento. Gonfiare la gomma alla pressione massima (non superare la pressione di gonfiaggio) ed applicare il tappo alla valvola. In fase di sostituzione della ruota verificare che la filettatura dell'asse del motore sia stata pulita dallo sporco prima di fissare la vite della ruota. -
Seite 122: Trasporto Della Sedia A Rotelle
03/2009 TRASPORTO DELLA SEDIA A ROTELLE Per il trasporto della sedia a rotelle SQUOD SU attenersi alle seguenti istruzioni: Prima di sollevare la sedia togliere tutte le parti smontabili. Prima del trasporto della sedia, riportare il sedile e lo schienale in posizione eretta. -
Seite 123: Protezione Antiribaltamento (B78)
SQUOD_SU 03/2009 Per garantire un appoggio sicuro e affidabile inserire il poggiatesta nell'alloggiamento almeno fino al riferimento indicato. Con le viti di regolazione è possibile regolare la profondità del poggiatesta, allentandole leggermente fino a far muovere le ruote dentate. Regolare il poggiatesta a piacimento e ribloccare le viti. Se la posizione del poggiatesta non soddisfa ripetere la procedura su esposta. -
Seite 124: Sicurezza
SQUOD_SU 03/2009 Per regolare in profondità gli immobilizzatori allentare i collegamenti a vite (2) e regolare la posizione a piacimento. Al termine dell'installazione verificare che tutte le viti siano serrate a fondo, altrimenti la stabilità del sistema non è garantita, con conseguenti rischi di danni ed/o lesioni. Verificare che il montaggio del sistema di guide non pregiudichi in alcun modo il funzionamento della sedia. -
Seite 125: Controlli Regolari
SQUOD_SU 03/2009 CONTROLLI REGOLARI Le sedie a rotelle necessitano di controlli regolari come qualsiasi altro prodotto tecnologico, al fine di mantenere efficiente la loro funzionalità. Di seguito sono riportate le misure da adottare per mantenere in perfetto stato di efficienza la sedia anche dopo molti anni. PRIMA DELL’USO 1. -
Seite 126: Attrezzatura
SQUOD_SU 03/2009 La casa costruttrice declina ogni e qualsiasi responsabilità per danni derivanti da manutenzione impropria o mancante. ATTREZZATURA Per la riparazione di singoli componenti, parti di accessori e le operazioni di controllo è necessaria la seguente attrezzatura minima: Chiave a brugola (dimensioni 3, 4, 5 e 6 mm) •... -
Seite 127: Disinfezione
SQUOD_SU 03/2009 Stoccare tutti i componenti senza sottoporli a sollecitazioni. Bloccare la sedia per una parte • fissa del telaio. DISINFEZIONE La disinfezione della sedia a rotelle deve essere eseguita da personale competente e autorizzato e ripetuta a ogni rimessa in funzione o cessione a un terzo. Tutte le parti della sedia devono essere sottoposte a disinfezione mediante sfregamento. -
Seite 128: Garanzia
SQUOD_SU 03/2009 DAB 10 (Formalina) Incidin perfekt Ecolab Incidin Plus Ecolab Kohrsolin Bode Chemie Lysoform Lysoform Lysoformin Lysoform Lysoformin 2000 Lysoform Melsept B.Braun Melsitt B.Braun Minutil Ecolab Multidor Ecolab Nüscosept Dr.Nüsken Chemie Optisept Dr.Schumacher Pursept-FD Merz Ultrasol F Fresenius Tensioattivi anfoteri Tensodur 103 MFH Marienfelde Soluzione salina... -
Seite 129: Dichiarazione Di Conformità
SQUOD_SU 03/2009 DICHIARAZIONE DI CONFORMITÀ La sedia a rotelle SQUOD SU è conforme ai requisiti della direttiva europea: - 93/42/CEE (Direttiva sui prodotti medici) e alle norme sui prodotti: - EN 12182: 1999 - (DIN) EN 12184: 1999 SMALTIMENTO Il produttore è responsabile del ritiro e del riciclaggio della sedia a rotelle nel rispetto dei requisiti previsti dalla direttiva europea 2002/96/CE sui rifiuti di apparecchiature elettriche ed elettroniche. - Seite 130 SQUOD_SU 03/2009 Motore sinistro (o Verificare che i connettori di entrambi i motori siano ben inseriti. collegamento) difettoso. Verificare che i contatti dei connettori di entrambi i motori non presentino segni di corrosione e danni. Verificare entrambi i motori. Scollegare i motori e misurare il collegamento con un ohmmetro.
- Seite 131 ÍNDICE Apartado Página Índice ..............................1 Prefacio ..............................2 Especificaciones técnicas ........................2 Indicaciones generales ........................3 Ámbito de aplicación ..........................3 Componentes de la entrega.......................4 Explicación de los símbolos .......................4 Los elementos de mando........................4 Control SHARK 2 ..........................4 Configuración de la unidad de control ....................6 Respaldo ............................6 Regulación de la profundidad del asiento ..................7 Apoyapiernas .............................7...
-
Seite 132: Prefacio
Las sillas de ruedas eléctricas de Vermeiren son el resultado de años de investigación y experiencia. No obstante, la vida útil de este vehículo depende en gran medida del mantenimiento que le dé y del cuidado con el que lo trate. -
Seite 133: Indicaciones Generales
INDICACIONES GENERALES La silla de ruedas eléctrica SQUOD SU está equipada con dos motores, cada uno de ellos con una potencia de 200 vatios. Está concebida como vehículo mixto tanto para interiores como para exteriores y, con su función erguida, para su uso sobre suelos lisos en interiores. -
Seite 134: Componentes De La Entrega
SQUOD_SU 06/2009 COMPONENTES DE LA ENTREGA Bastidor, incluidos los motores, el asiento y el respaldo (función erguida con ajuste eléctrico) • Reposapiés (incl. la sujeción de las rodillas/ de las piernas) • 2 baterías incl. 4 asas y cargador • Correa para el pecho •... - Seite 135 SQUOD_SU 06/2009 Pulse la tecla de encendido/apagado (1). El indicador de carga (2), que también informa sobre el estado de carga de las baterías, se enciende durante unos segundos. Si se encienden todos, significa que la carga de las baterías es suficiente. Si no se encienden todos los LED, deberá limitar las operaciones de circulación para que el consumo de las baterías sea mínimo.
-
Seite 136: Configuración De La Unidad De Control
SQUOD_SU 06/2009 Si quiere proteger su silla de ruedas de las personas, al apagarla, pulse el botón ON/OFF (1) durante más de dos segundos y el control quedará bloqueado. Para liberarlo, encienda el control. Durante 10 segundos, verá una luz en marcha en el indicador de carga. Mientras esta luz esté encendida, pulse la bocina (9) dos veces y la electrónica de marcha está... -
Seite 137: Regulación De La Profundidad Del Asiento
SQUOD_SU 06/2009 REGULACIÓN DE LA PROFUNDIDAD DEL ASIENTO La profundidad del asiento se puede ajustar desplazando el bastidor del respaldo a las distintas posiciones. Para ello, suelte la unión roscada (1) a ambos lados del bastidor y tire del bastidor del respaldo hacia dentro o hacia fuera hasta alcanzar la posición deseada, o bien hasta que los orificios previstos coincidan y los tornillos de sujeción (1) se puedan introducir por el bastidor. -
Seite 138: Sujeción Para Las Rodillas
SQUOD_SU 06/2009 SUJECIÓN PARA LAS RODILLAS Para la función erguida, se debe usar siempre la sujeción para las rodillas. Suelte los tornillos de muletilla (1) a ambos lados del apoyapiernas y saque el soporte así asegurado todo lo que pueda. Coloque el soporte de las piernas (2) con los acolchados de las rodillas y las barras verticales a ambos lados en los soportes previstos para ello. -
Seite 139: Correa Para El Pecho
SQUOD_SU 06/2009 Si se realizan modificaciones en los apoyabrazos y/o en las suspensiones de los mismos, dichas modificaciones se realizan por riesgo propio. Además perdería su derecho a la garantía. Al desplegar los reposabrazos, asegúrese de que no haya objetos ni partes del cuerpo bajo el área de oscilación del reposabrazos, ya que podría provocar daños o lesiones. -
Seite 140: Cargador
SQUOD_SU 06/2009 Tenga en cuenta que, en caso de usar la función erguida, la silla de ruedas está apoyada sobre ruedines delanteros situados bajo el reposapiés, y que las ruedas direccionales (200x85) se elevan aprox. 1 cm sobre el suelo. Para realizar correcciones en la marcha, la silla de ruedas se mueve sobre los ruedines y las ruedas motrices. -
Seite 141: Carga De Las Baterías
SQUOD_SU 06/2009 CARGA DE LAS BATERÍAS El cargador IMPULSE S (8 a) iguala la curva de carga al estado de carga de las baterías AGM, puede cargar la silla de ruedas después de cada uso. De este modo, se evita una carga agresiva de las baterías y el efecto memoria. -
Seite 142: Baterías
SQUOD_SU 06/2009 El fabricante no asume ningún tipo de responsabilidad por errores cometidos durante la carga. No interrumpa nunca el ciclo de carga. El cargador indica cuándo ha finalizado dicho ciclo. (el diodo luminiscente verde está permanentemente encendido). Puede obtener más información en el manual de instrucciones que acompaña al cargador. BATERÍAS Según la serie, su silla de ruedas eléctrica tendrá... -
Seite 143: Fusible Térmico
SQUOD_SU 06/2009 SISTEMA DE CONEXIÓN Motor izquierdo Alimentación por batería de 24 V Motor derecho Conexiones de luz Conexión motor de ajuste (sólo con SHARK SHARK SHARK 2 Powermodul Control Car- gador Programación (basada en PC o aparato manual) FUSIBLE TÉRMICO Para proteger a los motores de la sobrecarga, tiene a su disposición un fusible térmico a la derecha del bastidor del asiento (en la unión con el bastidor del respaldo), que interrumpe automáticamente la alimentación de potencia de los motores. -
Seite 144: Cambio De Neumáticos
NEUMÁTICOS La silla de ruedas eléctrica SQUOD SU viene equipada de serie con ruedas de propulsión (neumáticas) de 3.00-8 y ruedas direccionales (neumáticas) de 260 x 85. Si requiere otras combinaciones de ruedas, póngase en contacto con su distribuidor especializado, que le podrá... -
Seite 145: Montaje De La Rueda
SQUOD_SU 06/2009 Antes de dividir la llanta, deje siempre que salga el aire del neumático, ya que los lados de la llanta pueden salir disparados de un modo explosivo: riesgo de lesiones Asegúrese de que la cámara no quede atrapada por los lados de la llanta Al hinchar las ruedas, no supere la presión máxima de los neumáticos (ver "Especificaciones Técnicas") Antes de usar la silla de ruedas debe comprobar que todos los tornillos están firmemente... - Seite 146 SQUOD_SU 06/2009 Antes de montar la cámara nueva, haga lo siguiente: Compruebe que no haya partículas ni objetos en la base de la llanta ni en la pared interior de la rueda y, en caso dado, límpielas bien. Compruebe que la base de la llanta esté en buen estado, sobre todo en la zona del orificio de la válvula.
-
Seite 147: Impulsión De La Silla De Ruedas
FRENO DE EMERGENCIA. TRANSPORTE DE LA SILLA DE RUEDAS Si desea transportar el SQUOD SU, deberá observar las indicaciones siguientes: Antes de levantar la silla de ruedas, desmonte todas las partes móviles. Antes de transportar la silla de ruedas, debe llevar la unidad asiento/respaldo a la posición sentada. -
Seite 148: Transporte Sobre Rampas
SQUOD_SU 06/2009 Para que la silla no se deslice sin querer durante el transporte, ponga el bloqueo en modo de marcha electrónica (activación de los frenos de estacionamiento electromagnéticos). Aparte, accione bien los frenos de estacionamiento, siempre que su modelo así lo indique. Si utiliza otros sistemas de cinturones de seguridad, compruebe que estén sujetos únicamente en las partes fijas del bastidor. -
Seite 149: Protección Antivuelco (B78)
SQUOD_SU 06/2009 Asegúrese de que la nuca esté soportada por el apoyo para la cabeza mientras se encuentra sentado cómodamente. Antes de utilizar el apoyacabezas, es necesario apretar bien todas las arandelas de bloqueo, ya que si la pieza de apoyo se resbala hacia abajo o cambia de posición, esto podría producir daños materiales. -
Seite 150: Para Su Seguridad
SQUOD_SU 06/2009 Cuando acabe el montaje, compruebe que todos los tornillos estén bien sujetos. De lo contrario, peligraría la estabilidad de las almohadillas y esto podría acarrear lesiones y/o daños. Asegúrese de que el sistema de deslizamiento está correctamente colocado, de modo que no limite el funcionamiento de la silla. -
Seite 151: Controles Regulares
SQUOD_SU 06/2009 Asegúrese de que el reflector de la silla de ruedas no esté cubierto por suciedad ni ningún objeto. Para que se le identifique mejor en la oscuridad, lleve ropa de colores claros o equipada con reflectores y compruebe que los reflectores de la silla de ruedas sean bien visibles. Tenga cuidado al manipular fuego, sobre todo con los cigarrillos encendidos, puesto que la tapicería del asiento y del respaldo son inflamables. -
Seite 152: Herramientas
SQUOD_SU 06/2009 Prueba visual de todas las cajas, comprobar que todos los tornillos estén bien apretados y • que los cerramientos no presenten daños. Prueba de medición de la corriente de escape de reserva (A) del cargador según VDE 0702 •... -
Seite 153: Almacenamiento
SQUOD_SU 06/2009 de metal, cepillos, etc.), ya que la superficie del control se puede rayar, dañándose así la protección contra las salpicaduras. Compruebe regularmente que las conexiones insertables no estén corroídas ni dañadas, puesto que esto puede mermar la funcionalidad de la electrónica. Antes de proceder a las labores de mantenimiento, saque las baterías para evitar el flujo involuntario de corriente. - Seite 154 SQUOD_SU 06/2009 jabonadura cresol m DAB 6 Mucocit-F 2000 Merz Cloramina-T DAB 9 Cloro, sustancias orgánicas o Clorina Lysoform inorgánicas con cloro Trichlorol Lysoform activo Apesin AP100 Tana Professional Percompuestos Dismozon pur Bode Chemie Perform Schülke & Mayr Wofesteril Kesla Pharma Aldasan 2000 Lysoform Formaldehído...
-
Seite 155: Garantía
Los términos de la garantía pueden variar en función del país. Póngase en contacto con su sucursal si desea recibir más información. CONFORMIDAD La silla de ruedas electrónica SQUOD SU cumple los requisitos de la directiva europea: - 93/42/CEE (Directiva de productos sanitarios) así como las normas de producto:... -
Seite 156: Códigos De Error
SQUOD_SU 06/2009 Luz en marcha de Sistema Shark Para liberar, pulse el botón "derecha a izquierda" bloqueado. de bocina dos veces en el transcurso de 10 segundos Luz en "verde a rojo" tras conectar el control. march Luz en marcha de Shark se está... - Seite 157 SQUOD_SU 06/2009 valores son superiores a 100 ohmios o inferiores a 20 ohmios, probablemente el freno de estacionamiento esté defectuoso. Freno de estacionamiento Igual que se describe arriba. derecho (o conexión) defectuoso Control Shark defectuoso Retire los conectores de ambos motores. Apague y vuelva a encender el control mientras el joystick se encuentre en la posición cero neutral.
- Seite 158 SPIS TRE!CI Rozdzia! Strona Spis tre!ci ............................3 Wst"p ..............................4 Dane techniczne ..........................4 Wskazówki ogólne ..........................5 Zakres zastosowania .........................5 Zakres dostawy ..........................6 Obja!nienia symboli ...........................6 Elementy obs#ugi..........................6 Uk#ad sterowania SHARK 2 .......................6 Regulacja jednostki steruj$cej ......................8 Oparcie ..............................8 Regulacja g#"boko!ci siedzenia ......................9 Podpórka na nogi ..........................9 Os#ona na kolana ..........................10 Pod#okietniki ............................10...
-
Seite 159: Wst"P
WST"P Pragniemy podzi"kowa' za okazane nam zaufanie i zakup jednego z naszych wózków inwalidzkich. Elektryczne wózki inwalidzkie firmy Vermeiren s$ efektem wieloletnich bada& i do!wiadcze&. Okres trwa#o!ci u)ytkowej wózka zale)y jednak w znacznym stopniu od konserwacji i sposobu jego u)ytkowania. W niniejszej instrukcji obs#ugi znale(' mo)na informacje dotycz$ce obs#ugi wózka oraz wskazówki, które pomog$ w utrzymaniu go w dobrym stanie przez d#ugi czas. -
Seite 160: Wskazówki Ogólne
Podczas korzystania z elektrycznego wózka inwalidzkiego na chodnikach nale)y przestrzega' obowi$zuj$cych przepisów. U)ycie w ruchu drogowym jest zabronione. Poniewa) model SQUOD SU jest wersj$, której pr"dko!' maksymalna jest ograniczona do 6 km/h, nie wymaga posiadania prawa jazdy ani obowi$zkowego ubezpieczenia. Zaleca si" jednak wykupienie nieobowi$zkowego ubezpieczenia od odpowiedzialno!ci cywilnej. -
Seite 161: Zakres Dostawy
SQUOD_SU 06/2009 ZAKRES DOSTAWY Konstrukcja ramowa, #$cznie z silnikami, modu#em siedzenia i oparcia (elektronicznie regulowana • funkcja stania) Podstawka na stopy (#$cznie z zabezpieczeniem kolanowym/no)nym) • 2 akumulatory z 4 uchwytami do noszenia i #adowark$ • Pas piersiowy • Zabezpieczenie przed przewróceniem •... - Seite 162 SQUOD_SU 06/2009 Nacisn$' przycisk „W%./WY%.” (1). Na krótko zapala si" wska(nik #adowania (2), który jednocze!nie udziela informacji o stanie na#adowania akumulatorów. Gdy !wiec$ si" wszystkie lampki, akumulatory s$ wystarczaj$co na#adowane. Je!li nie wszystkie lampki si" !wiec$, nale)y dostosowa' prac" wózka do stanu na#adowania akumulatorów.
-
Seite 163: Regulacja Jednostki Steruj$Cej
SQUOD_SU 06/2009 Aby zapobiec u)ywaniu wózka przez osoby nieupowa)nione, nale)y podczas wy#$czania przytrzyma' wci!ni"ty przycisk W%./WY%. (1) przez d#u)ej ni) dwie sekundy. Spowoduje to zablokowanie uk#adu sterowania. Zwolnienie blokady nast"puje po w#$czeniu uk#adu sterowania. Przez 10 sekund widoczny b"dzie przemieszczaj$cy si" sygna# !wietlny wska(nika stanu na#adowania. W czasie wy!wietlania tego sygna#u !wietlnego naci!nij dwukrotnie przycisk klaksonu (9), aby w#$czy' elektroniczny uk#ad jezdny. -
Seite 164: Regulacja G#"Boko!Ci Siedzenia
SQUOD_SU 06/2009 REGULACJA G*"BOKO!CI SIEDZENIA G#"boko!' siedzenia mo)na regulowa', wybieraj$c ró)ne pozycje ramy oparcia. W tym celu poluzuj po#$czenie !rubowe (1) po obu stronach ramy i przesuwaj oparcie do przodu b$d( do ty#u, a) do uzyskania )$danej pozycji lub do momentu a) otwory znajd$ si"... -
Seite 165: Pod#Okietniki
SQUOD_SU 06/2009 ZABEZPIECZENIE KOLANOWE Podczas u)ywania funkcji stania/pionizacji nale)y zawsze korzysta' z zabezpieczenia kolanowego. Odkr"' !ruby dociskowe (1) znajduj$ce si" po obu stronach podpórki na nogi i odsu& w ten sposób przykr"cone mocowanie mo)liwie daleko. Ustaw w odpowiednich mocowaniach stabilizator nóg (2) z os#onami kolanowym, u)ywaj$c w tym celu prostopad#ych dr$)ków znajduj$cych si"... -
Seite 166: Pas Piersiowy
SQUOD_SU 06/2009 Zwró' uwag", by podczas sk#adania pod#okietników )adne przedmioty lub cz"!ci cia#a nie dosta#y si" w stref" sk#adania pod#okietników, gdy) mog#oby to prowadzi' do uszkodze& lub obra)e&. Je!li zauwa)ysz zmiany, uszkodzenia lub oznaki zu)ycia zawieszenia skontaktuj si" ze sprzedawc$, który mo)e usun$' te usterki. PAS PIERSIOWY W celu zapewnienia bezpiecze&stwa podczas korzystania z funkcji pionizacji/stania w górnej cz"!ci oparcia zamontowano... -
Seite 167: Adowarka
SQUOD_SU 06/2009 Nale)y dopilnowa', )eby podczas korzystania z funkcji pionizacji wózek by# ustawiony na przednich kó#kach urz$dzenia znajduj$cych si" pod podstawk$ na stopy, a kó#ka zwrotne (200x85) by#y uniesione oko#o 1 cm nad pod#o)em. Korekty jazdy b"dzie mo)na wtedy dokona' za pomoc$ kó#ek urz$dzenia i kó# nap"dowych. -
Seite 168: Adowanie Akumulatorów
SQUOD_SU 06/2009 *ADOWANIE AKUMULATORÓW Poniewa) #adowarka IMPULSE S (8 A) dostosowuje krzyw$ #adowania do statusu na#adowania akumulatorów AGM, wózek mo)na #adowa' po ka)dym korzystaniu. W ten sposób w du)ym stopniu unika si" agresywnego #adowania baterii i „efektu pami"ci“. Akumulatory wózka nale)y #adowa' najpó(niej wtedy, gdy wska(nik na#adowania na jednostce steruj$cej znajdzie si"... -
Seite 169: Akumulatory
SQUOD_SU 06/2009 Producent nie ponosi odpowiedzialno!ci za szkody powsta#e w wyniku nieprawid#owego #adowania. Nigdy nie przerywaj cyklu #adowania. %adowarka wskazuje zako&czenie cyklu. (Zielona dioda pali si" !wiat#em ci$g#ym). Dalsze informacje znajduj$ si" w instrukcji obs#ugi do#$czonej do #adowarki. AKUMULATORY Standardowo elektryczny wózek inwalidzki jest wyposa)ony w 2 zamkni"te akumulatory AGM o mocy 12 V/70 Ah. -
Seite 170: Bezpiecznik Termiczny
SQUOD_SU 06/2009 SCHEMAT PO*+CZENIOWY Lewy silnik Zasilanie akumulatorem 24 V Prawy silnik Przy cza wietlne Przy cze si ownika (tylko w przypadku SHARK 2) SHARK SHARK 2 Powermodul Uk ad sterowania ado- warka Programowanie (bazuj ce na PC lub urz dzeniu r cznym) BEZPIECZNIK TERMICZNY W celu zabezpieczenia silników przed przeci$)eniem po prawej stronie ramy siedzenia zamontowany zosta# bezpiecznik termiczny (przej!cie do ramy oparcia), który automatycznie przerywa pobór mocy... -
Seite 171: Ogumienie
U)ytkownik ko&cowy nie mo)e przeprowadza' wymiany kompletnych kó#. OGUMIENIE Elektryczny wózek inwalidzki SQUOD SU jest standardowo wyposa)ony w ko#a nap"dowe 3.00-8 (pneumatyczne) i ko#a zwrotne 260x85 (pneumatyczne). Informacji na temat innych kombinacji kó# udziela sprzedawca, który pomo)e je dobra' stosownie do indywidualnych potrzeb klienta. - Seite 172 SQUOD_SU 06/2009 Przed u)yciem wózka nale)y sprawdzi', czy wszystkie po#$czenia !rubowe kó# zosta#y stabilnie zamocowane. KO*A NAP"DOWE Ko#a nap"dowe mo)na zdejmowa' z silnika nap"dowego. 1 = pó#o! silnika 2 = trzpie& 3 = ko#o 4 = po#$czenie !rubowe ko#a Poluzuj i zdejmij po#$czenie !rubowe (4). Zdejmij ca#e ko#o (3) z pó#osi silnika (1).
- Seite 173 SQUOD_SU 06/2009 Monta$: Na#ó) ochraniacz na zawór d"tki, a nast"pnie umie!' j$ w obr"czy. Teraz mo)na #atwo na#o)y' ochraniacz d"tki. Sprawd(, czy wszystkie g#owice szprych s$ os#oni"te (w przypadku obr"czy wykonanych z tworzywa sztucznego nie stosuje si" ochraniacza d"tki). Nast"pnie wci!nij os#on" w kraw"d( obr"czy, poczynaj$c od zaworu. Lekko napompuj d"tk", tak by si"...
-
Seite 174: Pchanie Wózka Inwalidzkiego
Gdy na biegu ja#owym wózek zacznie niespodziewanie si" porusza', poci$gni"cie d(wigni do góry spowoduje jego awaryjne zatrzymanie. TRANSPORT WÓZKA INWALIDZKIEGO Podczas transportu wózka inwalidzkiego SQUOD SU nale)y post"powa' zgodnie z poni)szymi wskazówkami. Przed podniesieniem wózka zdemontuj wszystkie ruchome cz"!ci. Przed transportem wózka ustaw modu# siedzenia i oparcia w pozycji do siedzenia. -
Seite 175: Akcesoria
SQUOD_SU 06/2009 Podczas transportu pod wózkiem nie powinny znajdowa' si" )adne osoby ani przedmioty, gdy) mog#oby to prowadzi' do powstania obra)e& cia#a lub uszkodzenia wózka. Transport wózka wraz z siedz$cym na nim pacjentem jest zabroniony. JAZDA PO RAMPACH W przypadku korzystania z ramp w celu pokonania przeszkody nale)y stosowa' si" do poni)szych wskazówek: Modu# siedzenia i oparcia musi zosta' uprzednio ustawiony w pozycji do siedzenia. -
Seite 176: System Bezpiecze&Stwa Osób (B58)
SQUOD_SU 06/2009 Zwró' uwag", by skrzyde#ka boczne nie uciska#y g#owy zbyt mocno. Skrzyde#ek bocznych nie nale)y sk#ada', gdy) grozi to ich z#amaniem, co oprócz obra)e& mog#oby prowadzi' do utraty ich funkcji. Producent nie ponosi odpowiedzialno'ci w przypadku wprowadzania zmian w konstrukcji zag)ówka. SYSTEM BEZPIECZE/STWA OSÓB (B58) Ze wzgl"dów bezpiecze&stwa wózek jest standardowo wyposa)ony w pas bezpiecze&stwa z zatrzaskiem (podobny do pasa stosowanego w samochodach). - Seite 177 SQUOD_SU 06/2009 W przypadku powstania szkód wynikaj$cych z nieprawid#owego monta)u klient traci prawo do roszcze& gwarancyjnych. Aby umo)liwi' odpowiednie dopasowanie pelot, nale)y siedzie' w wózku bez ruchu i w naturalnej pozycji. W trakcie dopasowywania pelot sprawd(, czy podczas ich dokr"cania mi"dzy pelotami a oparciem nie znajduj$ si"...
-
Seite 178: Regularne Kontrole
SQUOD_SU 06/2009 REGULARNE KONTROLE Podobnie jak inne urz$dzenia elektryczny wózek inwalidzki wymaga regularnych przegl$dów zapewniaj$cych zachowanie jego sprawno!ci. W poni)szych wskazówkach opisano czynno!ci, które nale)y wykonywa', aby korzysta' z zalet wózka nawet po d#ugim okresie jego u)ytkowania. PRZED PRZYST+PIENIEM DO JAZDY 1. -
Seite 179: Narz"Dzia
SQUOD_SU 06/2009 umo)liwi' porównanie z warto!ciami zmierzonymi w momencie dostawy, stan i funkcj" elektrod w"glowych. Kontrola stanu baterii, pokry', d"tek, os#on. • Kontrole pomiarowe mog$ przeprowadza' wy#$cznie osoby, które zosta#y przeszkolone w zakresie bada& wózków inwalidzkich i poinstruowane przez elektryka na temat stosowanych !rodków i procedur kontrolnych. -
Seite 180: Przechowywanie
SQUOD_SU 06/2009 PRZECHOWYWANIE Przechowuj wózek wy#$cznie w suchych pomieszczeniach (od + 5°C do + 45°C). • Wzgl"dna wilgotno!' powietrza: 30–70%. • Ci!nienie powietrza: 700–1060 hPa. • Od#$cz przewód sieciowy #adowarki od sieci. • Akumulatory – patrz rozdzia# „Przechowywanie akumulatorów”. • Sprawd(, czy przewody wewn"trzne nie s$ nara)one na zgniecenia i za#amania. -
Seite 181: Gwarancja
SQUOD_SU 06/2009 Formaldehyd Schülke & Mayr Antifect FD 10 i/lub inne Antiseptica Antiseptica Aldehydy lub Dezynfekcja pochodne powierzchni 7 Tana Professional Apesin AP30 Bacillocid Spezial Bode Chemie Buraton 10F Schülke & Mayr Desomed A 2000 Desomed Szpitalny rodek Dreiturm dezynfekuj cy Desomed Perfekt Desomed Roztwór... -
Seite 182: Zgodno!' Z Normami
W ró)nych krajach postanowienia gwarancyjne mog$ by' ró)ne. Aby uzyska' dodatkowe informacje, nale)y skontaktowa' si" ze swoj$ fili$. ZGODNO!0 Z NORMAMI Elektryczny wózek inwalidzki SQUOD SU spe#nia wymagania dyrektywy europejskiej: - 93/42/EWG (dyrektywa dot. produktów medycznych) oraz norm produktowych: - EN 12182: 1999... - Seite 183 SQUOD_SU 06/2009 Symbol miga szybko w sta#ych odst"pach czasu. Liczba migni"' przypadaj$cych na jeden okres daje nast"puj$ce wskazówki. (Wymienione dzia#ania i kontrole powinny by' przeprowadzane wy#$cznie przez osoby uprawnione). Liczba Problem/b)#d Kontrola Brak wska(nika poziomu Sprawd(, czy po#$czenie wtykowe uk#adu sterowania jest poprawnie i na#adowania kompletnie pod#$czone do wtyczki akumulatorów.
- Seite 184 SQUOD_SU 06/2009 Nieznany b#$d Sprawd(, czy przewody i wtyczki nie s$ uszkodzone/skorodowane. Sprawd( przewody po#$czeniowe magistrali BUS (rezystancja). Skontaktuj si" z producentem. Niekompatybilna Niepoprawnie zaprogramowany i niekompatybilny uk#ad sterowania jednostka steruj$ca (w zale)no!ci od systemu). Sprawd(, czy programowanie IM i jednostki steruj$cej si" zgadza.
- Seite 187 Les listes des contrôles à effectuer lors des entretiens de même que toute autre information technique sont • disponibles auprès de nos filiales. Pour de plus amples informations, consultez le site: www.vermeiren.fr. Servicelijsten en andere technische informatie kunt u aanvragen bij onze vestigingen. Meer informatie vindt u •...
- Seite 188 Poland The Netherlands Vermeiren Polska Sp. z o.o Vermeiren Nederland B.V. Domstraat 50 Łączna PL-55-100 Trzebnica NL-3864 PR Nijkerkerveen Tel: +48(0)71 387 42 00 Tel: +31(0)33 2536424 Fax: +48(0)71 387 05 74 Fax: +31(0)33 2536517 website: www.rehapola.pl...