Maxview GAZELLE Montage- Und Betriebsanleitung

Verwandte Anleitungen für Maxview GAZELLE


Inhaltszusammenfassung für Maxview GAZELLE
- Seite 1 TEMPLATE MATRICE SCHABLONE LA SAGOMA Page 12...
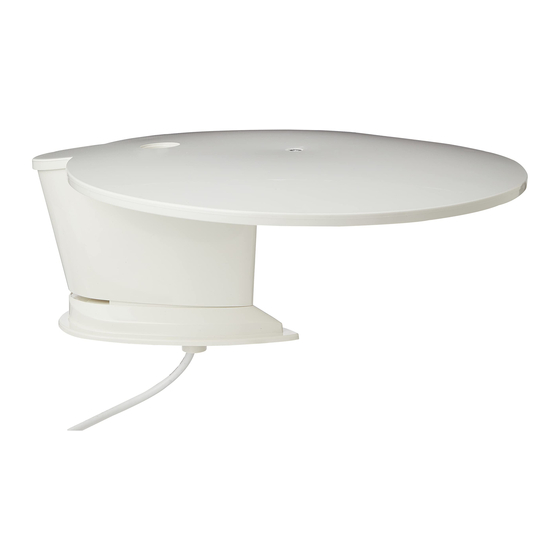
- Seite 2 GAZELLE 360˚ TV/FM/UKW Antenna Easy to fit instructions Antenne TV/FM/UKW sur 360˚ Notice de montage facile 360˚ TV/UKW-Antenne Montage-und Betriebsanleitung Antenna TV/FM/UKW a 360˚ Istruzioni d’uso Page 1 9111055 Iss 3...
- Seite 3 22dB variable gain signal booster provide optimum picture and sound quality. The Gazelle can be fitted by any competent DIY person. Should you have any difficulties installing this product, please contact our Customer Helpline on 01553 811000.
-
Seite 4: Safety Warning
● Se durante l’installazione si dovessero verificare problemi, rivolgetevi al commerciante autorizzato di Vs. fiducia MAXVIEW LIMITED SETCHEY, KING’S LYNN NORFOLK, PE33 0AT, ENGLAND CUSTOMER HELPLINE (01553) 811000 e-mail: cust_serv@maxview.ltd.uk website: www.maxview.co.uk MAXVIEW VERTRIEBS GMBH AUGSBURGER STRASSE 11 D-82291, MAMMENDORF, GERMANY TEL: 08145 8840 FAX: 08145 8845 e-mail: info@maxview.de www.maxview.de... - Seite 5 équipment audiovisuel. crayon pointu. Der Verstärker kann auch Alternativ kann der In jede Seite ein ausreichend Elektronik-Teil mit dem Mit der Gazelle ist auch lose hinter dem TV-Gerät Verstärker auch Unterputz großes Loch bohren und mit Gehäuseteil verschrauben. Radioempfang möglich liegen montiert werden.
- Seite 6 00 49 8145 8840. Trial Assembly We recommend that you have a trial assembly of your Gazelle before fitting it into Die aerodynamische ästhetische Gazelle ist eine echte its permanent position.
- Seite 7 230V AC 12/24V d.c 12\24V d.c 12/24V d.c. Version To supply power, push d.c. 12/24V d.c./230V AC Connect screw connector on Screw the other end of 5 Version 5 metre Coaxial Lead C into metre Coaxial Lead C into Connect power lead on switch on the Signal Booster Signal Booster B to 12V B downwards - the red light...
- Seite 8 Fixing Variable Signal Use the back casing to locate Fix back casing to your Connect to chosen power Replace casing on Signal Booster in permanent a suitable position. Mark the chosen location (fixing screws supply (see figs 2, 3 and 4 - Booster.
- Seite 9 Push through screw Use Security Key H to Secure Antenna Head A into Once secure replace Security For vertically polarised Cap H (see fig 23 but in connector on 5 metre Coaxial remove cap on Antenna position with Fixing Bolt and and FM/UHF stations the Lead C and connect into Head A by turning 20...
- Seite 10 The red light will illuminate on Connect one end of the 1 Connect the other end of 1 If a good picture cannot be To shorten cable and re-fit the rear of Antenna Head A. metre flylead D into the metre flylead D into the screw connector received immediately turn the...
- Seite 11 Pour replacer le connecteur Enlevez la moitié de Faites passer le fil interne en Coupez le conducteur en Monter la Gazelle le plus vissable, enlevez tout d’abord l’isolation transparente cuivre à travers le connecteur cuivre qui dépasse juste au-...
- Seite 12 8˚ Use Mounting Base F as a If the surface is angled use When drilling fixing holes we Make sure retaining nut is Fix Mounting Base onto your the angle pad(s) E provided located in Mounting Base E. template to mark the location advise that you first use a selected position using Roof to give the Antenna Head A a...