Maxview Gazelle Pro B2414 Einbau- Und Bedienungsanleitung
Vorschau ausblenden
Andere Handbücher für Gazelle Pro B2414:
- Einbau- und bedienungsanleitung (12 Seiten)
Inhaltsverzeichnis
Werbung
Quicklinks
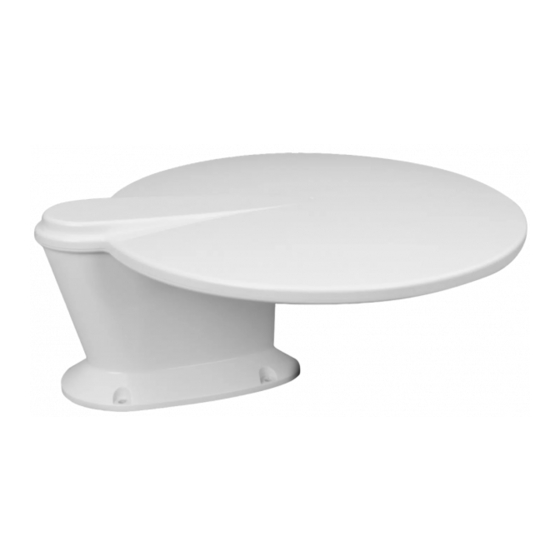
Gazelle Pro
B2414, B2414/G, B2415
Installation and user manual
Einbau- und Bedienungsanleitung
Installation et mode d'emploi
Installatie- en gebruiksaanwijzing
Manual de Usuario e Instalación
UK contact:
Helpline:
+44 (0) 1553 811000
Email:
support@maxview.co.uk
Web:
www.maxview.co.uk
Maxview reserve the right to change specifications without prior notice
Maxview behält sich das Recht vor die Spezifikation ohne weitere Ankündigung zu ändern
9111055 Iss 6
DE Kontakt:
Tel:
+49 (0) 8145 9969980
Email:
info@maxview.de
Web:
www.maxview.de
Werbung
Inhaltsverzeichnis

Verwandte Anleitungen für Maxview Gazelle Pro B2414


Inhaltszusammenfassung für Maxview Gazelle Pro B2414
- Seite 1 +44 (0) 1553 811000 Tel: +49 (0) 8145 9969980 Email: support@maxview.co.uk Email: info@maxview.de Web: www.maxview.de Web: www.maxview.co.uk Maxview reserve the right to change specifications without prior notice Maxview behält sich das Recht vor die Spezifikation ohne weitere Ankündigung zu ändern 9111055 Iss 6...
-
Seite 2: General Safety Warnings
• We recommend you check the mechanical integrity of a roof mounted product at least once a year • If in the event that you do experience a problem with the product call Maxview Customer Service +44 (0)1553 811000 For Variable Signal Booster •... -
Seite 3: Sicherheitshinweise
Sie uns unter: kundenservice@maxview.de Bewahren Sie diese Anleitung auf. Sicherheitshinweise Lesen Sie diese Anleitung sorgfältig durch und machen Sie sich mit Ihrem Maxview-Produkt vertraut. Das schützt Sie und das Produkt vor evtl. Verletzungen oder Schäden. Bei Nichtbeachtung der Anleitung lehnt Maxview jegliche Verantwortung für den Fall eines Unfalls oder daraus ergangene Schäden am Produkt ab, wenn diese auf eine Nichtbeachtung der Installationsanleitung hervorgeht. -
Seite 4: Consignes De Sécurité Générales
à son installation et utilisation. Le non-respect des consignes peut causer des dommages à votre véhicule et / ou des blessures graves. Maxview décline toute responsabilité en cas d’incident ou d’accident si elles sont dues à la non observation des instructions d’installation ou du mode l’utilisation du produit. -
Seite 5: Veiligheidsaanwijzingen
Bewaar deze aanwijzingen voor toekomstig gebruik. Veiligheidsaanwijzingen Lees deze aanwijzingen zorgvuldig door, zodat u goed bekend bent met dit product van Maxview. U moet bij het installeren en gebruik ervan de toepassingen, beperkingen en eventuele gevaren volledig begrijpen. Als de veiligheidsvoorschriften niet volledig in acht worden genomen, kan dit schade aan uw voertuig en/of ernstig letsel veroorzaken. -
Seite 6: Advertencias Generales De Seguridad
• Recomendamos que revise la integridad mecánica de un producto montado en el techo al menos una vez al año • En caso de que experimente un problema con el producto, llame al Servicio de Atención al Cliente de Maxview +44 (0)1553 811000 Para amplificador de señal variable... - Seite 7 Product contents Product contents / Contenu du produit / Productinhoud / Contenido del Producto A. Antenna Head Unit D. 1m F to Coaxial Flylead H. Roof Fixing Screws B. Mounting Foot with integrated E. Fused Power Cable I. Foot Mounting Bolts 5 Metre Coaxial Cable F.
- Seite 8 Installation Installation / Installation / Installatie / Instalación...
- Seite 9 1. Fit Mounting Foot Montagefuß montieren / Fixer le pied de montage / Bevestig de Montagevoet / Coloque el Pie de Montaje Choose a fixing method that best suits your requirements. Where possible, we always recommend the use of the Roof Fixings Screws (method A) and the clamping tool if possible.
- Seite 10 X = 2mm Y = 22mm Y = 22mm Front of Front of vehicle* vehicle* Choose a location, ensure the antenna is positioned on Choose a location, ensure the antenna is positioned a flat surface and is clear from obstructions. on a flat surface, and is clear from obstructions.
- Seite 11 A & B Apply sealant generously to the wet seal channel, Thread the Coaxial Cable through the hole in the roof, ensuring the bead is consistent in size with no gaps. position the Mounting Foot and press down firmly. Dichtmittel großzügig auf den Dichtkanal auftragen, Wipe away any excess sealant with a cloth, Vergewissern Sie sich, dass der Dichtkanal ausreichend ensuring a watertight seal has been achieved.
- Seite 12 Use the 4 Roof Fixing Screws, secure the Mounting Foot to the vehicle roof. Verwenden Sie die 4 Dachbefestigungsschrauben, um die Montageplatte auf dem Dach zu befestigen. Utilisez les 4 vis de fixation au toit pour fixer le pied de montage au toit du véhicule.
- Seite 13 Optional: Wenn die Dachstärke zwischen 19-40 mm Schrauben Sie die Hohlschraube vom Fahrzeuginnenraum beträgt, können Sie die Montageplatte zusätzlich mit an die Montageplatte und drehen Sie die Hohlschraube der Hohlschraube befestigenum die Bohrung abzudeck- fest. Vergewissern Sie sich, dass die Montageplatte in der en.Schrauben Sie die Hohlschraube fest und fixieren Sie richtigen Richtung steht.Schrauben Sie die Hohlschraube diese wie auf dem Bild gezeigt.
- Seite 14 Installing the Antenna Head Unit Installation des Antennenkopfs / Installation de l’unité principale de l’antenne / Installatie van de Antenne / Instalación de la Unidad Principal de la Antena Place the Antenna Head Unit onto the Mounting Foot. Tighten the 4 Foot Mounting Bolts by hand with an Allen Key. We recommend the use of a Torque Wrench set to 3.5Nm.
- Seite 15 Fitting an F Connector (Optional) Montage des F-Steckers / Montage d’un connecteur F / Een F-verbinding aansluiten / Instalación de un Conector F (Opcional) If you decide to shorten the cable please see below method of preparing cable. Wenn Sie das Koaxial-Kabel kürzen möchten gehen Sie wie folgt vor: Voir le procédé...
- Seite 16 5. Using Variable Signal Booster Bedienung des regalbaren Signalverstärkers / Utilisation de l’Amplificateur de signal Variabele signaalversterker gebruiken / Uso de Amplificador de Señal Variable 12/24V Connections & features Mounting Option A. 12/24V power inpu D. Antenna input G. Gain control knob Can be mounted to vehicle shelving B.
- Seite 17 Connexions et caractéristique Fonctionnement A. Tension d’entrée 12/24V D. Entrée d’antenne G. Molette de Peut être monté sur les tablettes ou B. Interrupteur de marche/arrêt E. Sortie 1 TV/Radio commande de gain les panneaux latéraux du véhicule à C. rou de fixation au mur F.
-
Seite 18: Year Guarantee
Aerial Height: 145mm Aerial Weight: 1.1kg 2 year guarantee Variable Signal Booster Specifications The Maxview Gazelle Pro is guaranteed against defective parts or workmanship for 2 years from the Compatibility: Digital TV and DAB radio time of purchase. This excludes any... -
Seite 19: Gazelle Pro Spezifikationen
Der Antennenkopf kann mit einem feuchten Lappen abgewischt werden ¢ ¢ Verwenden Sie zur Reinigung keinen Dampfstrahler oder aggressive chemischen Reinigungsprodukte Sonstiges Gazelle Pro Spezifikationen Maxview behält sich das Recht vor Kompatibilität: SD, HD, 3D und 4K TV/ FM und DAB Radio technische Änderungen die der Frequenzbereich:... - Seite 20 Garantie 2 ans Aerial Height: 145cm La taille: 1.1kg La Maxview Gazelle Pro est garantie contre les pièces défectueuses ou les Spécifications de l’Amplificateur de signal défauts de fabrication pendant 2 ans à compter de la date d’achat. Cela exclut tout dysfonctionnement causé...
-
Seite 21: Jaar Garantie
Behuizing: 2 jaar garantie Hoogte Antenne: 145cm Gewicht Antenne : 1.1kg De Maxview Gazelle Pro wordt 2 jaar Specificatie variabele signaalversterker lang gegarandeerd tegen defecten of productiefouten vanaf het moment van aankoop. Hiervan uitgesloten Compatibiliteit: Digitale tv zijn defecten die ontstaan zijn door... -
Seite 22: Años De Garantía
145mm instalaciones. Peso Aéreo: 0.9kg 2 años de garantía Especificaciones del Amplificador de Señal Variable El Maxview Gazelle Pro esta Compatibilidad: TV Digital y radio DAB garantizado contra piezas Rango de Frecuencia: Banda ancha para UHF TV y radio VHF defectuosas o mano de obra durante 2 Fuente de Alimentación:... - Seite 24 Fixing template Template Fixant Schablone Vaststelling van sjabloon Plantilla de Fijación Front of vehicle Avant du véhicule / Fahrtrichtung Voorzijde van het voertuig / Frente del Vehículo X = 2mm holes Trous/Bohrungs/Gats/agujeros de 2mm Y = 22mm hole Trou/Bohrung/Gat/agujeros de 22mm...