Herunterladen Inhalt Inhalt Diese Seite drucken
Inhaltsverzeichnis

Werbung

Verfügbare Sprachen

Verfügbare Sprachen

All manuals and user guides at all-guides.com
Schnurlostelefon
Téléphone sans fil
TAF 80
Telefono senza fili
Cordless telephone
Bedienungsanleitung
Mode d'emploi
Istruzioni per l'uso
Operating Instructions

Werbung

Inhaltsverzeichnis
loading

Inhaltszusammenfassung für switel TAF 80

  • Seite 1 All manuals and user guides at all-guides.com Schnurlostelefon Téléphone sans fil TAF 80 Telefono senza fili Cordless telephone Bedienungsanleitung Mode d’emploi Istruzioni per l’uso Operating Instructions...
  • Seite 2 All manuals and user guides at all-guides.com Bedienungsanleitung ..Mode d’emploi ... . Istruzioni per l’uso ..Operating Instructions .
  • Seite 3: Inhaltsverzeichnis

    All manuals and user guides at all-guides.com Inhaltsverzeichnis Sicherheitshinweise ........Bestimmungsgemäße Verwendung .
  • Seite 4 All manuals and user guides at all-guides.com Inhaltsverzeichnis Anruferliste (CLIP) ........Anruferliste einsehen .
  • Seite 5: Sicherheitshinweise

    Lacke und Oberflächen kann es jedoch nicht ausgeschlossen werden, dass durch die Gerätefüße Spuren auf der Abstellfläche entstehen. Netzteil Verwenden Sie nur das mitgelieferte SWITEL Netzteil, da andere Netzteile den Anrufbeantworter zerstören können. Netzteil nicht öffnen. Es besteht Lebensgefahr, wenn das Netzteil geöffnet wird, solange es an das Stromnetz angeschlossen ist.
  • Seite 6: Temperatur Und Umgebungsbedingungen

    All manuals and user guides at all-guides.com Sicherheitshinweise Temperatur und Umgebungsbedingungen Der Anrufbeantworter ist für den Betrieb in geschützten Räumen mit einem Temperaturbereich von 10 °C bis 30 °C ausgelegt. Der Anrufbeantworter darf nicht in Feuchträumen wie Bad oder Wasch- küche aufgestellt werden.
  • Seite 7: Bedienelemente

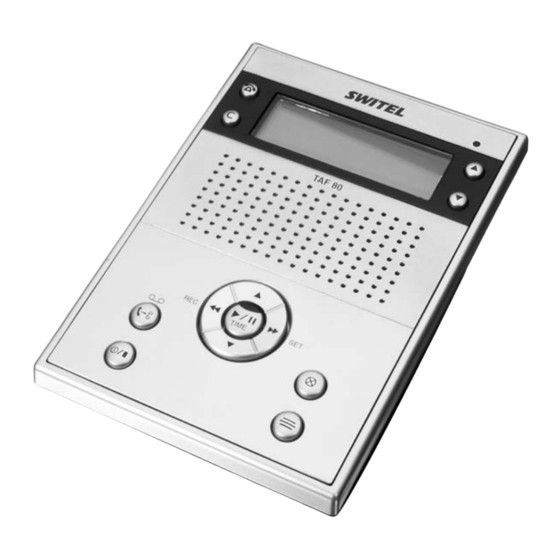
    All manuals and user guides at all-guides.com Bedienelemente 2 Bedienelemente 1. Schalter Sprachauswahl GER/FRE 2. Schalter Anrufannahme 3. Anschlussbuchse Netzteil 4. Anschlussbuchse Telefonkabel 5. LED Anzeige für neu eingegangene Anrufe 6. Auswahltasten der Anruferliste (CLIP) 7. Lautstärke (lauter) 8. Vorwärts / Tag− und Zeitansage prüfen 9.
  • Seite 8: Inbetriebnahme

    All manuals and user guides at all-guides.com Inbetriebnahme 3 Inbetriebnahme Sicherheitshinweise Lesen Sie vor der Inbetriebnahme unbedingt die Sicherheitshinweise am Anfang dieser Be- dienungsanleitung. Verpackungsinhalt prüfen Zum Lieferumfang gehören: ein Anrufbeantworter ein Netzteil ein Telefonanschlusskabel eine Bedienungsanleitung Batterie einsetzen (nicht im Lieferumfang) Bevor Sie Ihren Anrufbeantworter mit dem Telefonnetz verbinden, legen Sie eine neue Batterie des Typs Blockbatterie 9V Alkaline ein.
  • Seite 9: Grundeinstellung Vornehmen

    All manuals and user guides at all-guides.com Inbetriebnahme Grundeinstellung vornehmen Bevor Sie den Anrufbeantworter in Betrieb nehmen, müssen einige Grundeinstellungen vorgenom- men werden. Dazu gehört die Eingabe des aktuellen Datums, der Uhrzeit, Ihrer Ortsvorwahl und der Landesvorwahl. Erscheint die Meldung LCD KONTRAST nicht im Display oder wollen Sie die Uhrzeit korrigieren, drücken Sie für 4 Sekunden die Taste .
  • Seite 10 All manuals and user guides at all-guides.com Inbetriebnahme Möchten Sie die Grundeinstellungen verändern, halten Sie die Taste  solange gedrückt, bis im Display LCD KONTRAST erscheint. Mit den Auswahltasten y und z bewegen Sie sich im Menü. Mit der Taste c wählen Sie den gewünschten Menüpunkt.
  • Seite 11: Bedienung

    All manuals and user guides at all-guides.com Bedienung 4 Bedienung Standardbegrüßung benutzen Wenn Sie keinen eigenen Begrüßungstext aufgenommen haben, dann verwendet der Anrufbeant- worter eine Standardbegrüßung. Die Stimme der Standardbegrüßung kann männlich oder weiblich sein. Zur Auswahl der männlichen bzw. weiblichen Stimme drücken Sie zweimal kurz hintereinander die Taste x/REC.
  • Seite 12: Anruflänge

    All manuals and user guides at all-guides.com Bedienung Anruflänge Die maximale Aufzeichnungsdauer eines Anrufes beträgt 60 Sekunden. Spricht der Anrufer länger, ertönt ein Signalton und das Telefonat wird abgebrochen. Wenn während der Aufnahme eine Pause von mehr als sieben Sekunden entsteht, wird das Telefonat automatisch mit einem Signalton beendet.
  • Seite 13: Einzelne Nachricht Löschen

    All manuals and user guides at all-guides.com Bedienung Einzelne Nachricht löschen Drücken Sie die Taste –, während die zu löschende Nachricht abgespielt wird. Alle Nachrichten löschen Nachdem alle Nachrichten wiedergegeben wurden drücken und halten Sie die Taste –, bis ein Signalton erklingt.
  • Seite 14: Anruferliste (Clip)

    All manuals and user guides at all-guides.com Anruferliste (CLIP) 5 Anruferliste (CLIP) Durch die Rufnummernanzeige im Display erkennen Sie bei eingehenden Gesprächen, wer Sie an- ruft. Voraussetzung dafür ist, dass diese Funktion an Ihrer Telefonleitung zur Verfügung steht. Erscheint im Display die Meldung KEINE NUMMER, wurde die Rufnummer nur teilweise oder fehler- haft empfangen.
  • Seite 15: Telefonnummer Aus Der Anruferliste Anwählen

    All manuals and user guides at all-guides.com Anruferliste (CLIP) Wird 30 Sekunden lang keine Taste gedrückt, zeigt das Display wieder die aktuelle Uhrzeit, das Da- tum, die Anzahl der in der Anruferliste gespeicherten Rufnummern und die Anzahl der neu gespei- cherten Rufnummern an.
  • Seite 16: Fernabfrage

    All manuals and user guides at all-guides.com Fernabfrage 6 Fernabfrage Die Fernabfrage erlaubt es, den Anrufbeantworter von einem beliebigen Telefon mit Tonwahlfunktion aus anzurufen, um Nachrichten abzuhören und weitere Funktionen durchzuführen. Berechtigungscode zur Fernabfrage Ihr Anrufbeantworter besitzt eine persönliche Zugriffsberechtigung (Fernabfrage Code), so dass nur Sie die eingegangenen Nachrichten per Fernabfrage abhören können.
  • Seite 17: Wenn Der Speicher Voll Ist

    All manuals and user guides at all-guides.com Fernabfrage Begrüßungstext neu aufnehmen Drücken Sie die Tastenfolge 8" und #" Aufnahme beenden Drücken Sie die Tastenfolge 5" und #" Notiz (Memo) aufnehmen Drücken Sie die Tastenfolge 9" und #" Aufnahme beenden Drücken Sie die Tastenfolge 5" und #" Raumüberwachung *2) Drücken Sie die Tastenfolge 0"...
  • Seite 18: Wichtige Informationen

    Sollte Ihr Gerät dennoch einen Defekt innerhalb der Garantiezeit aufweisen, wenden Sie sich bitte unter Vorlage Ihrer Kaufquittung ausschließlich an das Geschäft, in dem Sie Ihr SWITEL − Gerät ge- kauft haben. Alle Gewährleistungsansprüche nach diesen Bestimmungen sind ausschließlich ge- genüber Ihrem Fachhändler geltend zu machen.
  • Seite 19 All manuals and user guides at all-guides.com Table des matières Remarques concernant la sécurité ......Utilisation conforme aux prescriptions .
  • Seite 20 All manuals and user guides at all-guides.com Table des matières Liste d’appels (CLIP) ........Visualiser la liste d’appels .
  • Seite 21: Remarques Concernant La Sécurité

    Bloc secteur N’utilisez que le bloc d’alimentation SWITEL livré avec l’appareil, d’autres modèles pouvant détruire votre répondeur. Ne l’ouvrez pas. Il y a danger de mort si vous l’ouvrez tant qu’il est raccordé au réseau.
  • Seite 22: Température Et Conditions D'environnement

    All manuals and user guides at all-guides.com Remarques concernant la sécurité Température et conditions d’environnement Ce répondeur a été concu pour fonctionner dans des pièces protégées dont la plage de température est comprise entre 10 °C et 30 °C. Il ne doit pas être installé dans des pièces humides telles que salle de bains ou la- verie.
  • Seite 23: Eléments De Manipulation

    All manuals and user guides at all-guides.com Eléments de manipulation 2 Eléments de manipulation 1. Interrupteur de sélection de la langue GER/FRE 2. Régulateur à coulisse prise d’appel 3. Prise de raccordement bloc d’alimentation 4. Prise de raccordement câble de téléphone 5.
  • Seite 24: Mise En Service

    All manuals and user guides at all-guides.com Mise en service 3 Mise en service Remarques concernant la sécurité Veuillez lire impérativement les consignes de sécurité mentionnées au début de ce mode d’emploi avant de mettre votre appareil en service. Contrôler le contenu du paquet Les éléments suivants font partie de la livraison : un répondeur un bloc d’alimentation...
  • Seite 25: Réglages De Base

    All manuals and user guides at all-guides.com Mise en service Réglages de base Avant de mettre votre répondeur en service, vous devez effectuer quelques réglages de base. L’entrée de la date, de l’heure, de votre préfixe local et du préfixe national en font partie. Si le message CONTRASTE LCD n’apparaît pas à...
  • Seite 26 All manuals and user guides at all-guides.com Mise en service Si vous désirez modifier les réglages de base, maintenez la touche appuyée jusqu’à ce que CONTRASTE LCD apparaisse à l’écran. Vous vous déplacez dans le menu avec les touches de sélection yet z. Vous sélectionnez l’option désirée avec la touche c.
  • Seite 27: Manipulation

    All manuals and user guides at all-guides.com Manipulation 4 Manipulation Utiliser l’annonce standard Si vous n’avez pas enregistré de message d’accueil personnel, votre répondeur en utilise un stan- dard. La voix de l’accueil standard peut être masculine ou féminine. Pour sélectionner la voix ma- sculine ou féminine, appuyez rapidement deux fois de suite sur la touche x/ REC.
  • Seite 28: Régler La Longueur De L'appel

    All manuals and user guides at all-guides.com Manipulation Régler la longueur de l’appel La durée maximale de l’enregistrement d’un appel est de 60 secondes. Si votre correspondant parle plus longtemps, une bip sonore retentit et la communication est inter- rompue. S’il y a une pause de plus de sept secondes pendant l’enregistrement, la commmunication est automatiquement terminée par un signal sonore.
  • Seite 29: Effacer Individuellement Des Messages

    All manuals and user guides at all-guides.com Manipulation Effacer individuellement des messages Appuyez sur la touche – pendant que le message devant être effacé est écouté. Suppression de tous les messages Après avoir écouté tous les messages, maintenez la touche appuyée – jusqu’à ce qu’un signal sonore se fasse entendre.
  • Seite 30: Liste D'appels (Clip)

    All manuals and user guides at all-guides.com Liste d’appels (CLIP) 5 Liste d’appels (CLIP) L’affichage du numéro d’appel sur l’écran vous permet de visualiser les appels entrants. Pour cela, il faut que cette fonctionnalité soit disponible sur votre ligne téléphonique. Si le message SANS NUMERO s’affiche sur l’écran, c’est que ce numéro n’a été...
  • Seite 31: Sélectionner Le Numéro Depuis Le Journal Des Appels

    All manuals and user guides at all-guides.com Liste d’appels (CLIP) Si vous n’appuyez pas sur une touche pendant 30 secondes, l’écran affiche à nouveau l’heure ac- tuelle, la date, le nombre des appels enregistrés dans le journal ainsi que le nombre des numéros nouvellement enregistrés.
  • Seite 32: Consultation À Distance

    All manuals and user guides at all-guides.com Consultation à distance 6 Consultation à distance La consultation à distance permet d’appeler le répondeur d’un téléphone quelconque ayant la fonc- tionnalité numérotation par tonalité pour écouter des messages et effectuer d’autres fonctionnalités. Code d’authentification pour la consultation à...
  • Seite 33: Si La Mémoire Est Pleine

    All manuals and user guides at all-guides.com Consultation à distance Enregistrer un mémo Appuyez sur les touches 9" et #" Terminer l’enregistrement Appuyez sur les touches 5" et #" Surveillance de pièce *2) Appuyez sur les touches 0" et #" Terminer l’enregistrement Appuyez sur les touches 5"...
  • Seite 34: Informations Importantes

    Effacez des messages pour vider la mémoire. Garantie Les appareils SWITEL sont fabriqués et testés selon les procédés de production les plus modernes. Des matériels sélectionnés et des technologies de pointe ont pour effet un fonctionnement irrépro- chable et une longue durée de vie. La garantie ne rentre pas en jeu si l’exploitant du réseau télépho- nique ou une installation à...
  • Seite 35 All manuals and user guides at all-guides.com Sommario Indicazioni di sicurezza ....... . . Impiego conforme agli usi previsti .
  • Seite 36 All manuals and user guides at all-guides.com Sommario Elenco chiamate (CLIP) ....... . . Visualizzare l’elenco chiamate .
  • Seite 37: Indicazioni Di Sicurezza

    Alimentatore di rete Si consiglia di utilizzare solo l’alimentatore di rete SWITEL fornito in dotazione, visto che altri alimen- tatori di rete potrebbero anche distruggere la segreteria telefonica. Non aprire l’alimentatore di rete.
  • Seite 38: Temperatura E Ambiente Circostante

    All manuals and user guides at all-guides.com Indicazioni di sicurezza Temperatura e ambiente circostante La segreteria telefonica è concepita per il funzionamento in ambienti protetti con una temperatura compresa tra 10 °C e 30 °C. Si consiglia di evitare l’uso della segreteria telefonica in ambienti espo- sti a umidità...
  • Seite 39: Elementi Di Comando

    All manuals and user guides at all-guides.com Elementi di comando 2 Elementi di comando 1. Interruttore di selezione lingua GER/FRE 2. Interruttore ricezione di chiamata 3. Adattatore di connessione alla rete 4. Adattatore di connessione al cavo telefonico 5. Segnalazione LED per nuove chiamate ricevute 6.
  • Seite 40: Messa In Funzione

    All manuals and user guides at all-guides.com Messa in funzione 3 Messa in funzione Indicazioni di sicurezza Leggere assolutamente prima della messa in funzione le indicazioni di sicurezza riportate all’inizio delle presenti istruzioni per l’uso. Verificare il contenuto della confezione La confezione contiene: una segreteria telefonica un alimentatore di rete...
  • Seite 41: Compiere Le Impostazioni Di Base

    All manuals and user guides at all-guides.com Messa in funzione Compiere le impostazioni di base Prima di mettere in funzione la segreteria telefonica si rende necessario compiere alcune imposta- zioni di base. Queste riguardano l’immissione di data, ora, prefisso locale e prefisso internazionale attuali.
  • Seite 42 All manuals and user guides at all-guides.com Messa in funzione Se si desiderano modificare le impostazioni di base, tenere premuto il tasto fino a quando sul display è visualizzata l’indicazione LCD KONTRAST. Con i tasti di selezione y e z ci si sposta all’interno del menu. Con il tasto c è possibile selezionare il punto di menu desiderato.
  • Seite 43: Esercizio

    All manuals and user guides at all-guides.com Esercizio 4 Esercizio Utilizzare l’annuncio di saluto standard In caso di mancata registrazione di un annuncio di saluto personale, la segreteria telefonica utilizza un messaggio standard. La voce del saluto standard può essere maschile o femminile. È possibile scegliere tra una voce maschile ed una femminile premendo brevemente per due volte consecutive il tasto x / REC.
  • Seite 44: Impostare La Lunghezza Di Chiamata

    All manuals and user guides at all-guides.com Esercizio Impostare la lunghezza di chiamata La durata di registrazione max. di una chiamata corrisponde a 60 secondi. Se il chiamante parla oltre la durata impostata, si avverte un segnale acustico e la chiamata è inter- rotta.
  • Seite 45: Cancellare Singoli Messaggi

    All manuals and user guides at all-guides.com Esercizio Cancellare singoli messaggi Premere il tasto – durante la riproduzione del messaggio da cancellare. Cancellare tutti i messaggi Dopo la riproduzione di tutti i messaggi, tenere premuto il tasto – fino ad avvertire un segnale acustico.
  • Seite 46: Elenco Chiamate (Clip)

    All manuals and user guides at all-guides.com Elenco chiamate (CLIP) 5 Elenco chiamate (CLIP) Grazie alla funzione di visualizzazione del numero di chiamata è possibile individuare sul display il chiamante in caso di telefonata in arrivo. Per poter usufruire di tale funzione è necessario che il pro- prio allacciamento telefonico sia abilitato al servizio.
  • Seite 47: Selezionare Un Numero Telefonico Dall'elenco Chiamate

    All manuals and user guides at all-guides.com Elenco chiamate (CLIP) In presenza dell’indicazione NEW la chiamata selezionata non è stata ancora controllata. Ora e data della chiamata. Sul display appare alla voce CALL # il numero della posizione di memoria selezionata. Numero telefonico del chiamante (se disponibile).
  • Seite 48: Interrogazione A Distanza

    All manuals and user guides at all-guides.com Interrogazione a distanza 6 Interrogazione a distanza L’interrogazione a distanza consente di chiamare la propria segreteria telefonica da un telefono qualsiasi con procedura di selezione a toni per ascoltare eventuali messaggi e compiere altre fun- zioni.
  • Seite 49: Con Memoria Piena

    All manuals and user guides at all-guides.com Interrogazione a distanza Saltare il messaggio attuale Premere la sequenza di tasti 6" e #" Attivare o disattivare la segreteria telefonica *1) Premere la sequenza di tasti 7" e #" Registrare un nuovo annuncio Premere la sequenza di tasti 8"...
  • Seite 50: Informazioni Importanti

    Cancellare dei messaggi per disporre nuovamente di spazio memoria. Garanzia Gli apparecchi SWITEL sono costruiti e collaudati in osservanza dei processi di produzione più mo- derni. L’impiego di materiali selezionati e tecnologie altamente sviluppate sono garanti di una per- fetta funzionalità e lunga durata in vita. La garanzia non viene considerata esecutiva qualora la causa del malfunzionamento dell’apparecchio è...
  • Seite 51 All manuals and user guides at all-guides.com Contents Safety Information ........Intended use .
  • Seite 52 All manuals and user guides at all-guides.com Contents Calls List (CLIP) ........Viewing the calls list .
  • Seite 53: Safety Information

    Power supply Only use the SWITEL power adapter plug supplied because other power supplies could destroy the answering machine. Do not open the power adapter plug. There is a risk of fatal injury if the power adapter plug is opened and not disconnected from the power supply.
  • Seite 54: Temperature And Ambient Conditions

    All manuals and user guides at all-guides.com Safety Information Temperature and ambient conditions The answering machine is designed for use in protected rooms with a temperature range from 10 °C to 30 °C. The answering machine should not be used in rooms exposed to moisture, such as bathrooms or laundries.
  • Seite 55: Operating Elements

    All manuals and user guides at all-guides.com Operating Elements 2 Operating Elements 1. Language selection switch GER/FRE 2. Take call switch 3. Power adapter plug connection socket 4. Telephone line jack 5. LED indicating new calls available 6. Calls list selection button (CLIP) 7.
  • Seite 56: Starting Up

    All manuals and user guides at all-guides.com Starting Up 3 Starting Up Safety notes It is essential to read the Safety Information at the beginning of this manual before starting Checking the package contents The package contains: an answering machine a power adapter plug a telephone connection cable an operating manual...
  • Seite 57: Defining The Basic Setting

    All manuals and user guides at all-guides.com Starting Up Defining the basic setting Before putting the answering machine into operation, certain basic settings must be defined. This includes entering the current date, time, local access code and international dialling code for Ger- many.
  • Seite 58 All manuals and user guides at all-guides.com Starting Up If you ever want to change the basic settings, start Programming mode by pressing the button  for 4 seconds. Use the selection buttons y and z to navigate in the menu. Press the c button to select the respective menu option. If the battery becomes fully discharged, the basic settings must be entered again.
  • Seite 59: Operation

    All manuals and user guides at all-guides.com Operation 4 Operation Using the default outgoing message If you have not recorded an outgoing message, the answering machine automatically plays the de- fault outgoing message. The default message can have a male or female voice. To select between a male and female voice, press the x/REC button twice in short succession.
  • Seite 60: Setting The Recording Time

    All manuals and user guides at all-guides.com Operation Setting the recording time The length of time for a recorded message is 60 seconds. If the caller speaks for a longer period, an acoustic signal is issued and the call is disconnected. If there is a pause in excess of seven seconds during recording, the call is automatically ended, ac- companied by an acoustic signal.
  • Seite 61: Deleting Individual Messages

    All manuals and user guides at all-guides.com Operation Deleting individual messages Press the – button while the message to be deleted is being played. Deleting all messages After all messages have been played, press and hold the – button until an acoustic signal is issued.
  • Seite 62: Calls List (Clip)

    All manuals and user guides at all-guides.com Calls List (CLIP) 5 Calls List (CLIP) The call number display, which appears when a call is received, enables you recognise who is cal- ling before actually taking the call. A condition for this is that the function is available on your tele- phone line.
  • Seite 63: Dialling A Phone Number From The Calls List

    All manuals and user guides at all-guides.com Calls List (CLIP) If no button is pressed for 30 seconds, the current time, date, number of phone numbers in the calls list and number of newly registered phone numbers return to the display. Dialling a phone number from the calls list Phone numbers can be selected from the calls list and dialled by the connected telephone.
  • Seite 64: Remote Access

    All manuals and user guides at all-guides.com Remote Access 6 Remote Access Remote access enables the answering machine to be contacted from any telephone which uses tone dialling in order to listen to messages received and execute other functions. Access code for remote access The answering machine is provided with a personal identification number (remote access code) so only you can listen to incoming messages via the remote access feature.
  • Seite 65: Insufficient Memory Capacity

    All manuals and user guides at all-guides.com Remote Access Record memo Press key sequence 9" and #" End recording Press key sequence 5" and #" Room monitoring *2) Press key sequence 0" and #" End room monitoring Press key sequence 5" and #" If you want to delete all messages, please press 3 and # after the last message has been played.
  • Seite 66: Important Information

    If your device shows signs of defect during the period of guarantee, please return it to the sales out- let in which you purchased the SWITEL device together with the purchase receipt. All rights to claims under the terms of guarantee in accordance with this agreement must be asserted exclusively with regard to your sales outlet.
  • Seite 67: Declaration Of Conformity

    All manuals and user guides at all-guides.com Declaration of conformity TELGO AG Route d’Englisberg 11 CH−1763 Granges−Paccot Declare under our own responsibility that the product MODEL: TAF80 DESCRIPTION: Digital Answering Machine Is in conformity with directives: R&TTE Directive (1999/5/EC) COMPLIANCE IS ACHIEVED BY CONFORMITY TO THE FOLLOWING: EN 550 22: 1998+A1+2, EN 61000−3−2: 2000+2, EN 61000−3−3: 1995+A1, EN 55024: 1998+A1+2, EN 60950−1: 2001, TBR 21: 1998 TEST REPORT NUMBER:...

Inhaltsverzeichnis