Herunterladen Inhalt Inhalt Diese Seite drucken
switel TE16 Bedienungsanleitung

switel TE16 Bedienungsanleitung

Schnurgebundenes telefon
Inhaltsverzeichnis

Werbung

Verfügbare Sprachen

Verfügbare Sprachen

Schnurgebundenes Telefon
Téléphone à fil
Telefono con filo
Conventional telephone
TE16
Bedienungsanleitung
Mode d'emploi
Istruzioni per l'uso
Operating Instructions

Werbung

Inhaltsverzeichnis
loading

Inhaltszusammenfassung für switel TE16

  • Seite 1 Schnurgebundenes Telefon Téléphone à fil Telefono con filo Conventional telephone TE16 Bedienungsanleitung Mode d'emploi Istruzioni per l'uso Operating Instructions...
  • Seite 2 Bedienungsanleitung ..Mode d'emploi ... . Istruzioni per l'uso ..Operating Instructions ..Declaration of Confirmity .
  • Seite 3 Inhaltsverzeichnis Sicherheitshinweise ....Inbetriebnahme ....Bedienelemente .
  • Seite 4: Bestimmungsgemäße Verwendung

    Sicherheitshinweise 1 Sicherheitshinweise Lesen Sie diese Bedienungsanleitung sorgfältig durch. Bestimmungsgemäße Verwendung Dieses Telefon ist geeignet zum Telefonieren innerhalb eines Telefonnetzes. Jede an­ dere Verwendung gilt als nicht bestimmungsgemäß. Eigenmächtige Veränderungen oder Umbauten sind nicht zulässig. Öffnen Sie das Gerät in keinem Fall selbst und füh­ ren Sie keine eigenen Reparaturversuche durch.
  • Seite 5: Sicherheitshinweise

    Sicherheitshinweise Medizinische Geräte Achtung: Benutzen Sie das Telefon nicht in der Nähe von medizinischen Geräten. Eine Beeinflussung kann nicht völlig ausgeschlossen werden. Entsorgung Wollen Sie Ihr Gerät entsorgen, bringen Sie es zur Sammelstelle Ihres kom­ munalen Entsorgungsträgers (z. B. Wertstoffhof). Nach dem Elektro- und Elektronikgerätegesetz sind Besitzer von Altgeräten gesetzlich verpflichtet, alte Elektro- und Elektronikgeräte einer getrennten Abfallerfassung zuzu­...
  • Seite 6: Verpackungsinhalt Prüfen

    Inbetriebnahme 2 Inbetriebnahme Achtung: Lesen Sie vor der Inbetriebnahme unbedingt die Sicherheitshin­ weise in Kapitel 1. Verpackungsinhalt prüfen Zum Lieferumfang gehören: - Basisgerät - Spiralkabel - Telefonhörer - Telefonanschlusskabel - Telefonanschlussadapter - Bedienungsanleitung Batterien einsetzen Die Batterien werden für die Displayanzeige des Telefons benötigt. Bevor Sie die Batterien einsetzen oder wechseln, achten Sie darauf, dass das Telefon nicht mit dem Telefonnetz verbunden ist! Das Batteriefach befindet sich auf der Unterseite Ihres Telefons (Ihres Basisgeräts).
  • Seite 7: Telefonhörer Anschließen

    Inbetriebnahme Telefonhörer anschließen Verwenden Sie das Spiralkabel, um den Telefonhörer mit dem Basisgerät zu verbin­ den. Das Spiralkabel hat zwei identische Anschlüsse; stecken Sie das eine Ende des Spiralkabels in die Spiralkabelbuchse am unteren Ende des Telefonhörers, das andere Ende des Spiralkabels in die Spiralkabelbuchse auf der Unterseite des Basisgeräts. Die Stecker rasten hörbar ein.
  • Seite 8: Datum Und Uhrzeit Einstellen

    Inbetriebnahme Datum und Uhrzeit einstellen Datum und Uhrzeit stellen Sie über das Menü ein. Auf Seite 12 finden Sie die genaue Vorgehensweise. Nebenstellenanlagen Auf Seite 13 erhalten Sie weitere Informationen, falls Sie Ihr Telefon an eine Nebenstel­ lenanlage anschließen möchten. Wandmontage Ihr Telefon ist zur Wandmontage geeignet.
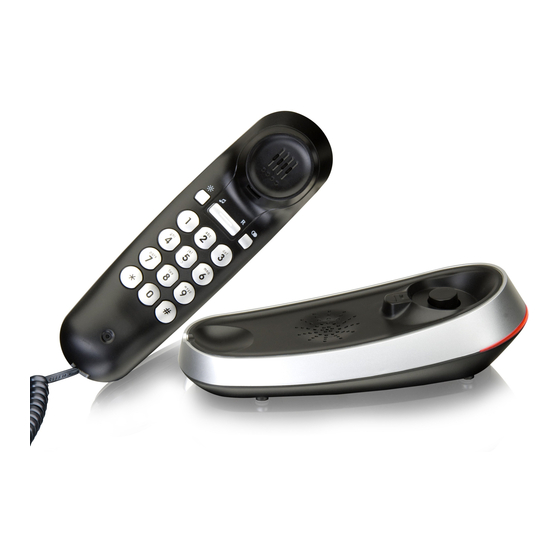
  • Seite 9: Bedienelemente

    Bedienelemente 3 Bedienelemente Die Tasten werden in dieser Bedienungsanleitung nachfolgend mit vereinheitlichten um­ randeten Symbolen dargestellt. Leichte Abweichungen der Tastensymbole Ihres Tele­ fons gegenüber den hier verwendeten Tastensymbolen sind daher möglich. Basisgerät Auflegekontakt Höreraufhängung (bei Wandmontage) Lautsprecher Aufhängungen Telefonanschlussbuchse Batteriefachabdeckung Schiebeschalter “Klingellautstärke“...
  • Seite 10 Bedienelemente Telefonhörer Lautsprecher Aufnahme für Einhängehaken H-Taste G-Taste Zifferntasten Mikrofon I-Taste J-Taste Spiralkabelbuchse Display A-Taste C-Taste E-Taste B-Taste d-Taste...
  • Seite 11: Einführende Informationen

    Einführende Informationen 4 Einführende Informationen In diesem Kapitel finden Sie grundlegende Informationen zur Handhabung der Bedie­ nungsanleitung. Darstellungsweise in der Bedienungsanleitung Darstellung Beschreibung ë Ziffern eingeben Telefon klingelt è Telefonhörer abnehmen é Telefonhörer auflegen Darstellung von Displaytexten ---End--- Bereitschaftsmodus Alle Beschreibungen in dieser Bedienungsanleitung gehen davon aus, dass sich das Telefon im Bereitschaftsmodus befindet.
  • Seite 12 Einstellungen 5 Einstellungen Der Telefonhörer muss für alle Einstellungen in diesem Kapitel auf dem Basisgerät aufliegen. Datum und Uhrzeit einstellen Gehen Sie folgendermaßen vor, um Datum und Uhrzeit einzustellen: Taste drücken SET 1 DATE E Menüpunkt auswählen und bestätigen Jahreszahl einstellen und bestätigen Monate einstellen und bestätigen Tag einstellen und bestätigen Stunde einstellen und bestätigen...
  • Seite 13: Einstellungen

    Einstellungen Betrieb an Nebenstellenanlagen Amtskennzahl für Nebenstellenanlagen Bei Nebenstellenanlagen ist es erforderlich, eine Amtskennzahl vorzuwählen, um ein Freizeichen zu bekommen. Oftmals ist die Amtskennzahl eine “0" oder eine “9". Tippen Sie zuerst diese Amtskennziffer ein und warten Sie das Freizeichen ab. Jetzt können Sie die eigentliche Rufnummer eingeben.
  • Seite 14: Displaykontrast Einstellen

    Einstellungen Auto-IP einstellen Wollen Sie das Telefon in ein Netzwerk für Internet-Telefonie einbinden, können Sie durch das Aktivieren dieser Funktion die IP-Adresse für das Telefon automatisch bezie­ hen lassen. In Europa ist die Internet-Telefonie unüblich und wird daher nicht von je­ dem Internet-Provider unterstützt.
  • Seite 15: Bedienung

    Bedienung 6 Bedienung Telefonieren Anruf annehmen }, è Telefonhörer abnehmen / Anruf annehmen Gespräch führen Gespräch beenden é Telefonhörer auflegen / Gespräch beenden Anrufen è Telefonhörer abnehmen ë Rufnummer wählen Telefonat führen Anruflisten Ihr Telefon verfügt über zwei Anruflisten. Eine Liste speichert die entgangenen Anrufe, die andere speichert die fünf zuletzt gewählten Rufnummern.
  • Seite 16: Wahlwiederholung

    Bedienung Wahlwiederholung Ihr Telefon speichert die zuletzt gewählte Rufnummer. Möchten Sie diese Rufnummer noch einmal wählen, z. B. weil der Anschluss zuvor besetzt war oder Sie niemanden erreichen konnten, nutzen Sie die Wahlwiederholung: è Telefonhörer abnehmen Taste drücken, Verbindung herstellen Die gespeicherte Rufnummer wird automatisch gewählt.
  • Seite 17 Probleme 7 Probleme Fragen Antworten Kein Telefongespräch möglich - Das Telefon ist nicht korrekt angeschlossen oder gestört. Verwenden Sie nur das mitgelieferte Tele­ fonanschlusskabel. - Testen Sie mit einem anderen Telefon, ob Ihr Tele­ fonanschluss in Ordnung ist. - Das Telefonanschlusskabel ist nicht eingesteckt oder es liegt ein totaler Stromausfall vor.
  • Seite 18: Pflegehinweise

    Sollte Ihr Gerät dennoch einen Defekt innerhalb der Garantiezeit aufweisen, wenden Sie sich bitte unter Vorlage Ihrer Kaufquittung ausschließlich an das Geschäft, in dem Sie Ihr SWITEL - Gerät gekauft haben. Alle Gewährleistungsansprüche nach diesen Bestimmungen sind ausschließlich gegenüber Ihrem Fachhändler geltend zu machen.
  • Seite 19 Stichwortverzeichnis 9 Stichwortverzeichnis Amtskennzahl, 13 Lautstärke Rufton, 16 Anruf annehmen, 15 Anrufen, 15 Nebenstellanlagen, 13 Anruferliste, 15 Rufnummern aus der Anrufliste wählen, 15 Pflegehinweise, 19 Batterien einsetzen, 6 Rufnummern löschen, 15 Bedienelemente, 9 Bedienung, 15 Sicherheitshinweise, 4 Bereitschaftsmodus, 11 Stand-by-Modus, 11 Darstellungsweise, 11 Telefonhörer anschließen, 7 Datum, 8...
  • Seite 20: Inhaltsverzeichnis

    Table des matières Consignes de sécurité ....Mise en service ....Éléments de manipulation .
  • Seite 21: Consignes De Sécurité

    Consignes de sécurité 1 Consignes de sécurité Lisez très attentivement ce mode d'emploi. Utilisation conforme à son usage Ce téléphone avec combiné convient pour téléphoner à l'intérieur d'un réseau télépho­ nique. Toute autre utilisation est considérée comme non conforme à son usage. Des modifications ou transformations effectuées de façon arbitraire sont interdites.
  • Seite 22: Consignes De Sécurité

    Consignes de sécurité Appareils médicaux Attention : N'utilisez pas ce téléphone à proximité d'appareils médicaux. Il n'est pas entièrement exclu qu'il pourrait exercer une influence sur ceux- Élimination Si vous voulez mettre votre appareil au rebut, veuillez l'apporter au centre de collecte de l'organisme d'élimination des déchets de votre commune (par ex.
  • Seite 23: Mise En Service

    Mise en service 2 Mise en service Attention : Avant de mettre votre téléphone en service, lisez impérati­ vement les consignes de sécurité mentionnées au chapitre 1. Vérifier le contenu du coffret Son contenu : - Base - Cordon spiralé - Combiné...
  • Seite 24: Raccorder Le Combiné

    Mise en service Raccorder le combiné Utilisez le cordon spiralé pour raccorder le combiné à la base. Le cordon a deux rac­ cordements identiques ; introduisez l'une des extrémités dans la prise qui se trouve en bas de le combiné et l'autre dans celle qui se trouve sous la base. Les fiches s'enclenc­ hent de façon audible.
  • Seite 25: Programmer La Date Et L'heure

    Mise en service Programmer la date et l'heure Vous programmez la date et l'heure via le menu. La page 29 vous donnera la manière exacte de procéder. Installations PABX La page 30 vous fournit de plus amples informations au cas où vous désireriez rac­ corder votre téléphone à...
  • Seite 26: Éléments De Manipulation

    Éléments de manipulation 3 Éléments de manipulation Dans ce mode d'emploi, les touches de votre téléphone seront représentées par des icônes standardisées encadrées. Il peut donc y avoir de légères différences entre les symboles des touches de votre téléphone et ceux des touches utilisés ici. Base Contact Raccrocher Suspension du combiné...
  • Seite 27: Éléments De Manipulation

    Éléments de manipulation Combiné Haut-parleur Logement pour les crochets de suspension Touche H Touche G Touches numériques Microphone Touche I Touche J Prise pour cordon spiralé Écran Touche A Touche C Touche E Touche B Touche d...
  • Seite 28: Introduction

    Introduction 4 Introduction Dans ce chapitre, vous trouverez des informations de base vous expliquant comment vous servir du guide de l'utilisateur. Représentation dans le guide Représentation Description ë Entrer des chiffres Le téléphone sonne è Décrocher le combiné é Raccrocher le combiné Représentation des textes d'affichage ---End--- Mode veille...
  • Seite 29: Paramètres

    Paramètres 5 Paramètres Le combiné doit reposer sur l'appareil la base pour tous les réglages décrits dans ce chapitre. Programmer la date et l'heure Procéder comme suit pour programmer la date et l'heure : Appuyez sur la touche SET 1 DATE E Sélectionner l'option de menu et valider Programmer le chiffre de l'année et valider Programmer les mois et valider...
  • Seite 30 Paramètres Comment elles Fonctionnement Code réseau des installations PABX : Dans le cas d'installations PABX, il faut composer auparavant un code réseau pour obtenir la tonalité. Souvent, le code réseau est «0» ou «9». Tapez d'abord le code d'ac­ cès au réseau et attendez la tonalité. Vous pouvez maintenant entrer le numéro. Vous pouvez enregistrer dans le téléphone un code réseau à...
  • Seite 31: Régler Le Contraste De L'écran

    Paramètres Programmer le système de numérotation Il est possible que vous n'ayez pas de connexion si vous commutez le sys­ tème de numérotation sur impulsions. À l'échelle européenne, le système de numérotation par tonalité est entretemps défini comme standard. Procéder comme suit pour basculer d'un système de numérotation à un autre : Appuyez sur la touche SET 5 P-T E Sélectionner l'option de menu et valider...
  • Seite 32: Utilisation

    Utilisation 6 Utilisation Téléphoner Prendre un appel }, è Décrocher le combiné / prendre l'appel Téléphoner Fin d'appel é Raccrocher le combiné / Fin d'appel Appeler è Décrocher le combiné Composer le numéro Téléphoner Liste d'appels Votre téléphone dispose de deux listes d'appels. Une liste enregistre les appels manqués, l'autre enregistre les cinq derniers numéros composés.
  • Seite 33 Utilisation Répétition des derniers numéros Votre téléphone enregistre le dernier numéro composé. Si vous souhaitez composer une nouvelle fois les numéros, p. ex. parce que la ligne était occupée ou parce que vous n'avez pas pu atteindre votre correspondant, utilisez la touche Bis : è...
  • Seite 34: Problèmes

    Problèmes 7 Problèmes Questions Réponses Pas de communication télé­ - Le téléphone n'est pas raccordé correctement ou est phonique possible en dérangement. N'utilisez que le câble de rac­ cordement téléphonique fourni avec l'appareil. - Testez avec un autre téléphone si votre rac­ cordement téléphonique fonctionne.
  • Seite 35: Remarques D'entretien / Garantie

    Si votre appareil devait malgré tout présenter une défectuosité pendant la période de garantie, veuillez vous adresser, muni de votre reçu, exclusivement au magasin où vous avez acheté votre appareil SWITEL. Vous ne pouvez faire valoir vos droits à la garantie selon ces dispositions qu'exclusivement auprès de votre revendeur. Deux ans après l'achat et la remise de nos produits, il n'est plus possible de faire valoir les droits...
  • Seite 36: Index

    Index 9 Index Appeler, 32 Mettre la communication en attente, 33 Mise en service, 23 Montage mural, 25 Code réseau, 30 Composer des numéros de la liste d'appels, 32 Numérotation par impulsions, 31 Consignes de sécurité, 21 Numérotation par tonalité , 31 Contenu du coffret, 23 Crochet de suspension, 25 Prendre un appel, 32...
  • Seite 37 Contenuto Indicazioni di sicurezza ....Messa in funzione ....Elementi di comando .
  • Seite 38: Accumulatori Ricaricabili

    Indicazioni di sicurezza 1 Indicazioni di sicurezza Leggere attentamente le presenti istruzioni per l'uso. Impiego conforme agli usi previsti Il telefono munito di unità portatile consente di svolgere chiamate all'interno di una rete telefonica. Qualsiasi altro impiego è considerato come non conforme agli usi previsti. Non sono consentite modifiche o trasformazioni non autorizzate.
  • Seite 39: Indicazioni Di Sicurezza

    Indicazioni di sicurezza Apparecchiature mediche Attenzione: Non utilizzare il telefono in prossimità di apparecchiature me­ diche. Non è possibile escludere il rischio di possibili interferenze. Smaltimento Smaltire l'apparecchio consegnandolo presso uno dei punti di raccolta istituiti dalla propria società di smaltimento rifiuti comunale (ad es. centro di riciclo materiali).
  • Seite 40: Verificare Il Contenuto Della Confezione

    Messa in funzione 2 Messa in funzione Attenzione: Prima della messa in funzione, leggere attentamente le indi­ cazioni di sicurezza riportate al capitolo 1. Verificare il contenuto della confezione La confezione include: - Unità base - Cavo a spirale - Ricevitore - Cavo di collegamento telefonico - Adattatore di connessione telefonica - Istruzioni per l'uso...
  • Seite 41: Messa In Funzione

    Messa in funzione Collegamento del ricevitore Utilizzare il cavo spiralato per collegare il ricevitore alla stazione base. Il cavo spiralato presenta due estremità identiche; introdurre pertanto un’estremità del cavo nell’apposito adattatore di connessione cavo sul lato inferiore del ricevitore, l’altra estremità del cavo spiralato va invece introdotta nell’adattatore di connessione cavo sul lato inferiore dell’unità...
  • Seite 42: Impostazione Di Data E Ora

    Messa in funzione Impostazione di data e ora Una voce di menu consente l’impostazione di data e ora. A pagina 46 è indicata la procedura da seguire. Impianti telefonici interni A pag. 47 sono riportate ulteriori informazioni riguardo l'eventuale collegamento del telefono ad un impianto telefonico interno.
  • Seite 43: Elementi Di Comando

    Elementi di comando 3 Elementi di comando I tasti riportati nelle presenti istruzioni per l'uso sono raffigurati come simboli racchiusi in un riquadro. Sono possibili lievi scostamenti dei simboli dei tasti sul telefono rispetto ai simboli qui raffigurati. Unità base Contatto di riaggancio Dispositivo di aggancio ricevitore (per montaggio a parete) Altoparlante...
  • Seite 44 Elementi di comando Ricevitore Altoparlante Alloggiamento per ganci di fissaggio Tasto H Tasto G Tasti numerici Microfono Tasto I Tasto J Adattatore di connessione cavo Display Tasto A Tasto C Tasto E Tasto B Tasto d...
  • Seite 45: Informazioni Introduttive

    Informazioni introduttive 4 Informazioni introduttive Il capitolo riporta le principali informazioni sull'uso delle presenti istruzioni per l'uso. Modi di rappresentazione nelle istruzioni per l'uso Rappresentazione Descrizione ë Immettere cifre Telefono squilla è Sollevare il ricevitore é Riagganciare il ricevitore Visualizzazione di testi di display ---End--- Modalità...
  • Seite 46 Impostazioni 5 Impostazioni Per tutte le impostazioni riportate nel presente manuale d’istruzione è ne­ cessario che il ricevitore risulti appoggiato sulla stazione base. Impostazione di data e ora Per impostare la data e l’ora, procedere come segue: Premere il tasto SET 1 DATE E Selezionare la voce di menu e confermare Impostare l’anno e confermare...
  • Seite 47: Funzionamento In Impianti Telefonici Interni

    Impostazioni Funzionamento in impianti telefonici interni Numero di accesso alla rete esterna per impianti telefonici interni In presenza di impianti telefonici interni è necessario preselezionare un numero di accesso alla rete esterna per ottenere un segnale di linea libera prima di poter compiere una telefonata.
  • Seite 48 Impostazioni Per assegnare automaticamente un indirizzo IP, procedere come segue: Premere il tasto SET 4 AUTO IP E Selezionare la voce di menu e confermare ON / OFF E Attivare o disattivare la funzione Impostazione della procedura di selezione Avendo impostato la procedura di selezione a impulsi, può risultare impos­ sibile instaurare una linea di collegamento.
  • Seite 49 Funzionamento 6 Funzionamento Telefonare Ricevere una chiamata }, è Sollevare il ricevitore / Accettare la chiamata Condurre la telefonata Concludere la chiamata é Riagganciare il ricevitore / Concludere la chiamata Compiere telefonate è Sollevare il ricevitore ë Comporre il numero telefonico Condurre la telefonata Elenchi di chiamata Il telefono presenta due elenchi di chiamata.
  • Seite 50: Ripetizione Di Chiamata

    Funzionamento Ripetizione di chiamata Il telefono memorizza l'ultimo numero di chiamata selezionato. Volendo selezionare questi numeri telefonici ancora una volta, ad es. perché la linea risultava precedentemente occupata o non avendo raggiunto nessuno, è possibile utilizzare la funzione ripetizione di chiamata: è...
  • Seite 51: Consigli Per La Cura / Garanzia

    Garanzia Gli apparecchi SWITEL sono costruiti e collaudati in osservanza dei processi di produ­ zione più moderni. L'impiego di materiali selezionati e tecnologie altamente sviluppate sono garanti di una perfetta funzionalità e lunga durata in vita. La garanzia non viene considerata esecutiva qualora la causa del malfunzionamento dell'apparecchio sia ri­...
  • Seite 52 Problemi 8 Problemi Domande Risposte Non è possibile condurre una - Il telefono non è collegato correttamente oppure chiamata telefonica presenta un guasto. Utilizzare esclusivamente il ca­ vo di collegamento telefonico fornito. - Provare con un altro telefono se l'allacciamento tele­ fonico in questione è...
  • Seite 53 Indice alfabetico 9 Indice alfabetico Cancellare il numero telefonico, 49 Messa in funzione, 40 Chiamata in linea, 50 Modalità di stand-by, Modalità di stand-by, 45 Collegamento del ricevitore, 41 Modi di rappresentazione, 45 Collegamento telefonico, 41 Montaggio a parete, 42 Compiere telefonate, 49 Concludere la chiamata, 49 Consigli per la cura, 51...
  • Seite 54 Contents Safety Information ....Starting Up ..... . . Operating Elements .
  • Seite 55: Safety Information

    Safety Information 1 Safety Information Please read this operating instruction manual thoroughly. Intended use The telephone with handset is suitable for telephoning within a public telephone network system. Any other use is considered unintended use. Unauthorised modification or re­ construction is not permitted. Under no circumstances open the device or complete any repair work yourself.
  • Seite 56 Safety Information Disposal In order to dispose of your device, take it to a collection point provided by your local public waste authorities (e.g. recycling centre). According to laws on the disposal of electronic and electrical devices, owners are obliged to dispose of old electronic and electrical devices in a separate waste container.
  • Seite 57: Starting Up

    Starting Up 2 Starting Up Attention: It is essential to read the Safety Information in Chapter 1 before starting up. Checking the package contents The package contains: - Base unit - Helix cable - Receiver - Telephone connection cable - Telephone connection adapter - Operating manual Inserting the batteries The batteries are necessary to operate the telephone display.
  • Seite 58: Connecting The Receiver

    Starting Up Connecting the receiver Use the helix cable to connect the receiver to the telephone base unit. The helix cable has two identical connectors; plug one end of the cable in the helix cable socket at the bottom end of the receiver and the other end of the cable in the helix cable socket on the underside of the base station.
  • Seite 59: Private Branch Exchanges

    Starting Up Setting the date and time The time and date are set via the menu. A detailed description is provided on Page 63. Private branch exchanges The information on Page 64 explains how to install your telephone in a private branch exchange.
  • Seite 60: Operating Elements

    Operating Elements 3 Operating Elements The telephone buttons in this operating manual are subsequently depicted with a uni­ form contour. Therefore, slight deviations in the appearance of the symbols on the tele­ phone keys compared to those depicted here are possible. Base unit On-hook contact Receiver hook (for wall installation)
  • Seite 61 Operating Elements Receiver Loudspeaker Slot for receiver hook H button G button Digit keys Microphone I button J button Helix cable socket Display A button C button E button B button d button...
  • Seite 62: Preliminary Information

    Preliminary Information 4 Preliminary Information This chapter provides basic information on using the operating instruction manual. Description of operating sequences in the manual Display Description ë Enter digits Phone rings è Lift the receiver é Replace the receiver Texts which appear in the display ---End--- Standby mode All descriptions in this operating manual assume that the handset is in Standby mode.
  • Seite 63: Settings

    Settings 5 Settings The receiver must be replaced on the base unit to complete all the settings described in this chapter. Setting the date and time Proceed as follows to set the date and time: Press the button SET 1 DATE E Select the menu option and confirm it Set the year and confirm it Set the month and confirm it...
  • Seite 64 Settings Operating on PABX systems Access code for PABX systems When using private branch exchanges, it is necessary to dial an access code to obtain the dialling tone for an outside line. The number for an outside line is often "0" or "9". Dial this number first and wait for the dialling tone.
  • Seite 65: Setting The Display Contrast

    Settings Setting the dialling mode It is possible that no connection can be established if the dialling mode is set to "Pulse". Tone dialling mode is now the standard mode throughout Europe. Proceed as follows to change the dialling mode: Press the button SET 5 P-T E Select the menu option and confirm it...
  • Seite 66: Operation

    Operation 6 Operation Telephoning Taking a call }, è Lift the receiver / Take the call Complete the call Ending a call é Replace the receiver on-hook / End the call Making a call è Lift the receiver ë Dial the phone number Complete the call Calls lists The phone records two call lists.
  • Seite 67: Setting The Ringing Tone Volume

    Operation Redialling Your telephone stores the last phone number dialled. If you want to dial a number again, e.g. because the connection was engaged or the call was not taken, use the re­ dialling function: è Lift the receiver Press the button, dial the number The phone number stored is automatically dialled.
  • Seite 68: Problems

    Problems 7 Problems Problems Solutions No telephone calls possible - The telephone is not connected properly or is defect­ ive. Only use the telephone connection cable sup­ plied. - Test whether the telephone connection is in order by using another telephone. - The telephone connection cable is not plugged in or there is a complete power failure.
  • Seite 69: Maintenance / Guarantee

    If your device does show signs of a defect within the period of guarantee, please con­ tact the sales outlet where you purchased the SWITEL device, producing the purchase receipt as evidence. All claims under the terms of guarantee in accordance with this agreement can only be asserted at the sales outlet.
  • Seite 70 Index 9 Index Access code, 64 PABX systems, 64 Package contents, 57 Pulse dialling, 65 Calls lists, 66 Putting a call on hold, 67 CLIP feature, 67 Connecting the receiver, 58 Connecting the telephone cable, 58 Redialling, 67 Ring volume, 67 Date, 59 Deleting phone numbers, 66 Safety information, 55...
  • Seite 71 Notes Notes...
  • Seite 72: Declaration Of Conformity

    Quest'apparecchiatura è conforme alla direttiva europea R&TTE. Per la dichiarazione di conformità completa si prega di voler usufruire del servizio gratuito di download dal nostro sito Internet www.switel.com. This equipment complies with the European R&TTE directive. To view the complete Declaration of Conformity, please refer to the free download availa­...

Inhaltsverzeichnis