Inhaltsverzeichnis
Werbung
Verfügbare Sprachen
Verfügbare Sprachen
Quicklinks
Copyright Notice:
Copyright Notice:
Copyright Notice:
Copyright Notice:
Copyright Notice:
No part of this installation guide may be reproduced, transcribed, transmitted, or trans-
lated in any language, in any form or by any means, except duplication of documen-
tation by the purchaser for backup purpose, without written consent of ASRock Inc.
Products and corporate names appearing in this guide may or may not be registered
trademarks or copyrights of their respective companies, and are used only for identifica-
tion or explanation and to the owners' benefit, without intent to infringe.
Disclaimer:
Disclaimer:
Disclaimer:
Disclaimer:
Disclaimer:
Specifications and information contained in this guide are furnished for informational
use only and subject to change without notice, and should not be constructed as a
commitment by ASRock. ASRock assumes no responsibility for any errors or omissions
that may appear in this guide.
With respect to the contents of this guide, ASRock does not provide warranty of any kind,
either expressed or implied, including but not limited to the implied warranties or
conditions of merchantability or fitness for a particular purpose. In no event shall
ASRock, its directors, officers, employees, or agents be liable for any indirect, special,
incidental, or consequential damages (including damages for loss of profits, loss of
business, loss of data, interruption of business and the like), even if ASRock has been
advised of the possibility of such damages arising from any defect or error in the guide
or product.
This device complies with Part 15 of the FCC Rules. Operation is subject to the
following two conditions:
(1) this device may not cause harmful interference, and
(2) this device must accept any interference received, including interference that
may cause undesired operation.
CALIFORNIA, USA ONLY
The Lithium battery adopted on this motherboard contains Perchlorate, a toxic
substance controlled in Perchlorate Best Management Practices (BMP) regulations
passed by the California Legislature. When you discard the Lithium battery in
California, USA, please follow the related regulations in advance.
"Perchlorate Material-special handling may apply, see
www.dtsc.ca.gov/hazardouswaste/perchlorate"
ASRock Website: http://www.asrock.com
Copyright©2007 ASRock INC. All rights reserved.
ASRock
Published November 2007
ALiveNF6P-VSTA
Motherboard
1 1 1 1 1
Werbung
Inhaltsverzeichnis

Verwandte Anleitungen für ASROCK ALIVENF6P-VSTA


Inhaltszusammenfassung für ASROCK ALIVENF6P-VSTA
- Seite 1 ASRock. ASRock assumes no responsibility for any errors or omissions that may appear in this guide. With respect to the contents of this guide, ASRock does not provide warranty of any kind, either expressed or implied, including but not limited to the implied warranties or conditions of merchantability or fitness for a particular purpose.
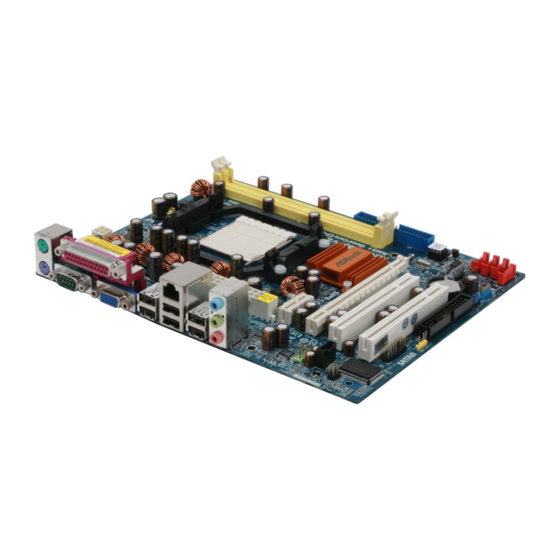
- Seite 2 PCI Express x16 Slot (PCIE2) SATAII Connector (SATAII_2 (PORT1), Red) PCI Express x1 Slot (PCIE1) SATAII Connector (SATAII_3 (PORT2), Red) ATX Power Connector (ATXPWR1) SATAII Connector (SATAII_4 (PORT3), Red) CPU Fan Connector (CPU_FAN1) 2 2 2 2 2 ASRock ALiveNF6P-VSTA Motherboard...
- Seite 3 ASRock 6CH I/O Plus ASRock 6CH I/O Plus ASRock 6CH I/O Plus ASRock 6CH I/O Plus ASRock 6CH I/O Plus PS/2 Mouse Port (Green) Microphone (Pink) Parallel Port Shared USB 2.0 Ports (USB45) USB 2.0 Ports (USB23) USB 2.0 Ports (USB01)
- Seite 4 In case any modifications of this manual occur, the updated version will be available on ASRock website without further notice. You may find the latest VGA cards and CPU support lists on ASRock website as well. ASRock website http://www.asrock.com If you require technical support related to this motherboard, please visit our website for specific information about the model you are using.
-
Seite 5: Specifications
- CPU Frequency Stepless Control (see CAUTION 5) - ASRock U-COP (see CAUTION 6) - Boot Failure Guard (B.F.G.) - ASRock AM2 Boost: ASRock Patented Technology to boost memory performance up to 12.5% (see CAUTION 7) Expansion Slot - 1 x PCI Express x16 slot... - Seite 6 Overclocking may affect your system stability, or even cause damage to the components and devices of your system. It should be done at your own risk and expense. We are not responsible for possible damage caused by overclocking. 6 6 6 6 6 ASRock ALiveNF6P-VSTA Motherboard...
- Seite 7 64-bit / Vista / XP 64-bit / XP SP1 or SP2 / 2000 SP4. 10. WiFi/E header supports WiFi+AP function with ASRock WiFi-802.11g or WiFi-802.11n module, an easy-to-use wireless local area network (WLAN) adapter. It allows you to create a wireless environment and enjoy the convenience of wireless network connectivity.
- Seite 8 Premium or Basic logo, please adjust the shared memory size of onboard VGA to 128MB or above. * If you plan to use external graphics card on this motherboard, please refer to Premium Discrete requirement at http://www.asrock.com * After June 1, 2007, all Windows ®...
-
Seite 9: Cpu Installation
CPU. The lever clicks on the side tab to indicate that it is locked. Step 5. Install CPU fan and heatsink. For proper installation, please kindly refer to the instruction manuals of your CPU fan and heatsink vendors. 9 9 9 9 9 ASRock ALiveNF6P-VSTA Motherboard... -
Seite 10: Installing A Dimm
2.2 Installation of Memor y Modules (DIMM) ALiveNF6P-VSTA motherboard provides two 240-pin DDRII (Double Data Rate) DIMM slots, and supports Dual Channel Memory Technology. For dual channel configuration, you always need to install two identical (the same brand, speed, size and chip-type) memory modules in the DDRII DIMM slots to activate Dual Channel Memory Technology. -
Seite 11: Installing An Expansion Card
Remove the bracket facing the slot that you intend to use. Keep the screws for later use. Step 3. Align the card connector with the slot and press firmly until the card is com- pletely seated on the slot. Step 4. Fasten the card to the chassis with screws. ASRock ALiveNF6P-VSTA Motherboard... - Seite 12 / Vista 64-bit OS: Right click the desktop, choose “Personalize”, and select the “Display Settings” tab so that you can adjust the parameters of the multi-monitor according to the steps below. A. Click the number ”2” icon. ASRock ALiveNF6P-VSTA Motherboard...
- Seite 13 BIOS. If you need to clear the CMOS when you just finish updating the BIOS, you must boot up the system first, and then shut it down before you do the clear-CMOS action. ASRock ALiveNF6P-VSTA Motherboard...
- Seite 14 SATA power cable to the power connector on each drive. Then (Optional) connect to the SATA connect the white end of SATA HDD power connector connect to power cable to the power the power connector of the power supply. supply ASRock ALiveNF6P-VSTA Motherboard...
- Seite 15 (see p.2 No. 16) motherboard. This USB 2.0 header can support two USB 2.0 ports. WiFi/E Header This header supports WiFi+AP function with ASRock (15-pin WIFI/E) WiFi-802.11g or WiFi-802.11n (see p.2 No. 20) module, an easy-to-use wireless local area network (WLAN) adapter.
- Seite 16 CPU fan still can work successfully even without the fan speed control function. If you plan to connect the 3-Pin CPU fan to the CPU fan connector on this motherboard, please connect it to Pin 1-3. Pin 1-3 Connected 3-Pin Fan Installation ASRock ALiveNF6P-VSTA Motherboard...
- Seite 17 (Optional) HDMI_SPDIF header on the motherboard. Then connect the white end (B or C) of HDMI_SPDIF cable to the HDMI_SPDIF connector of HDMI VGA card. A. black end B. white end (2-pin) C. white end (3-pin) ation ASRock ALiveNF6P-VSTA Motherboard...
- Seite 18 Connect the HDMI output connector on HDMI VGA card to HDMI device, such as HDTV. Please refer to the user manual of HDTV and HDMI VGA card vendor for detailed connection procedures. Step 5. Install HDMI VGA card driver to your system. ASRock ALiveNF6P-VSTA Motherboard...
- Seite 19 Please visit HITACHI’s website for details: http://www.hitachigst.com/hdd/support/download.htm The above examples are just for your reference. For different SATAII hard disk products of different vendors, the jumper pin setting methods may not be the same. Please visit the vendors’ website for the updates. ASRock ALiveNF6P-VSTA Motherboard...
- Seite 20 If SATA / SATAII HDDs are built as RAID1 or RAID 5 then it is called “Hot Swap” for the action to insert and remove the SATA / SATAII HDDs while the system is still power-on and in working condition. ASRock ALiveNF6P-VSTA Motherboard...
- Seite 21 SATA / SATAII HDDs with RAID functions, please follow below steps. STEP 1: Make a SATA / SATAII Driver Diskette. Insert the ASRock Support CD into your optical drive to boot your system. During POST at the beginning of system boot-up, press <F11> key, and then a window for boot devices selection appears.
- Seite 22 ® Vista 64-bit on your SATA / SATAII HDDs with RAID functions, please follow below steps. STEP 1: Set Up BIOS. Enter BIOS SETUP UTILITY Advanced screen IDE Configuration. Set the “SATA Operation Mode” option to [RAID]. ASRock ALiveNF6P-VSTA Motherboard...
- Seite 23 / Windows Vista 64-bit OS on your system. When you see “Where do you want to install Windows? ” page, please insert the ASRock Support CD into your optical drive, and click the “Load ® ® Driver” button on the left on the bottom to load the NVIDIA RAID drivers.
- Seite 24 ROM drive. It will display the Main Menu automatically if “AUTORUN” is enabled in your computer. If the Main Menu does not appear automatically, locate and double-click on the file “ASSETUP.EXE” from the “BIN” folder in the Support CD to display the menus. ASRock ALiveNF6P-VSTA Motherboard...
- Seite 25 ASRock ALiveNF6P-VSTA Motherboard...
- Seite 26 ™ ‘ ’ ™ ® ® ® ASRock ALiveNF6P-VSTA Motherboard...
- Seite 27 ® ® ASRock ALiveNF6P-VSTA Motherboard...
- Seite 28 ® ® ® ® ® ASRock ALiveNF6P-VSTA Motherboard...
- Seite 29 ® ® ® ® ® ® ASRock ALiveNF6P-VSTA Motherboard...
- Seite 30 ASRock ALiveNF6P-VSTA Motherboard...
- Seite 31 ASRock ALiveNF6P-VSTA Motherboard...
- Seite 32 ASRock ALiveNF6P-VSTA Motherboard...
- Seite 33 ® ® ® ASRock ALiveNF6P-VSTA Motherboard...
- Seite 34 ASRock ALiveNF6P-VSTA Motherboard...
- Seite 35 SATAII_1 (PORT0) SATAII_2 (PORT1) SATAII_3 (PORT2) SATAII_4 (PORT3) ASRock ALiveNF6P-VSTA Motherboard...
- Seite 36 ® ® ASRock ALiveNF6P-VSTA Motherboard...
- Seite 37 ASRock ALiveNF6P-VSTA Motherboard...
- Seite 38 ASRock ALiveNF6P-VSTA Motherboard...
- Seite 39 ASRock ALiveNF6P-VSTA Motherboard...
- Seite 40 ASRock ALiveNF6P-VSTA Motherboard...
- Seite 41 ® ASRock ALiveNF6P-VSTA Motherboard...
- Seite 42 ® ® ® ® ® ® ® ® ® ® ® ® ® ® ® ® ® ® ® ® ® ® ASRock ALiveNF6P-VSTA Motherboard...
- Seite 43 ® ® ® ® ® ® ® ® ® ® ® ® ® ® ASRock ALiveNF6P-VSTA Motherboard...
- Seite 44 ® ® ® ® ® ® ® ® ® ® ® ® ASRock ALiveNF6P-VSTA Motherboard...
- Seite 45 ® ® ASRock ALiveNF6P-VSTA Motherboard...
- Seite 46 ASRock ALiveNF6P-VSTA Motherboard...
- Seite 47 1. Einführung 1. Einführung 1. Einführung Wir danken Ihnen für den Kauf des ASRock ALiveNF6P-VSTA Motherboard, ein zuverlässiges Produkt, welches unter den ständigen, strengen Qualitätskontrollen von ASRock gefertigt wurde. Es bietet Ihnen exzellente Leistung und robustes Design, gemäß der Verpflichtung von ASRock zu Qualität und Halbarkeit.
-
Seite 48: Spezifikationen
Hybrid Booster - Schrittloser CPU-Frequenz-Kontrolle (siehe VORSICHT 5) - ASRock U-COP (siehe VORSICHT 6) - Boot Failure Guard (B.F.G. – Systemstartfehlerschutz) - ASRock AM2 Boost: ASRocks patentgeschützte Technologie zur Erhöhung der Arbeitsspeicherleistung um bis zu 12,5% (siehe VORSICHT 7) Erweiterungs- - 1 x PCI Express x16-Steckplätze... - Seite 49 Dritten, mit einem gewissen Risiko behaftet ist. Overclocking kann sich nachteilig auf die Stabilität Ihres Systems auswirken oder sogar Komponenten und Geräte Ihres Systems beschädigen. Es geschieht dann auf eigene Gefahr und auf Ihre Kosten. Wir übernehmen keine Verantwortung für mögliche Schäden, die aufgrund von Overclocking verursacht wurden. ASRock ALiveNF6P-VSTA Motherboard...
- Seite 50 Sie bitte den Stromkabelstecker aus und dann wieder ein. Um die Wärmeableitung zu verbessern, bitte nicht vergessen, etwas Wärmeleitpaste zwischen CPU und Kühlkörper zu sprühen. Dieses Motherboard unterstützt die ASRock AM2 Boost Übertaktungstechnologie. Wenn Sie diese Funktion im BIOS-Setup aktivieren, wird die Arbeitsspeicherleistung um bis zu 12,5% gesteigert.
- Seite 51 64-Bit / Vista / XP 64-Bit / XP SP1 oder SP2/2000 SP4 einwandfrei. 10. WiFi/E Sockel unterstützt WiFi+AP Funktion mit ASRock WiFi-802.11g oder WiFi-802.11n Modul, einem einfach zu bedienenden Wireless Local Area Network (WLAN) Adapter. Damit sind Sie in der Lage, ein drahtloses Netzwerk aufzubauen und die Vorzüge drahtloser...
-
Seite 52: Sicherheitshinweise Vor Der Montage
Hebel nach unten drücken, bis er hörbar einrastet. Schritt 5: Installieren Sie einen aktiven CPU-Kühler, der die gesamte Fläche der CPU abdeckt und eine ausreichende Wärmeableitung für den von Ihnen verwendeten CPU-Typ bietet. Weitere Hinweise finden Sie der Installationsanleitung für Ihren CPU-Kühler. ASRock ALiveNF6P-VSTA Motherboard... -
Seite 53: Installation Der Speichermodule (Dimm)
2.2 Installation der Speichermodule (DIMM) 2.2 Installation der Speichermodule (DIMM) 2.2 Installation der Speichermodule (DIMM) Das ALiveNF6P-VSTA Motherboard bietet zwei 240polige DDRII (Double Data Rate) DIMM-Steckplätze und unterstützt Zweikanal-Speichertechnologie. Es müssen immer zwei identische Speichermodule (selbe Marke, Geschwindigkeit, Größe und Chip-Art) in den DDRII DIMM-Steckplätzen installiert werden, um die Zweikanal-... -
Seite 54: Einbau Einer Erweiterungskarte
-Steckplätze) -Steckplätze) -Steckplätze) -Steckplätze) Es gibt einen 2 PCI-Steckplätze und 2 PCI Express-Steckplätze am ALiveNF6P-VSTA Motherboard. PCI-Slots: PCI-Slots werden zur Installation von Erweiterungskarten mit dem 32bit PCI-Interface genutzt. PCI Express-Slots: PCIE1 (PCIE x1-Steckplatz) wird für PCI Express- Grafikkarten mit x1-Busbreite verwendet wie Gigabit LAN- Karten, SATA2-Karten, usw. - Seite 55 Monitore steuern, ist ein Monitor der Hauptmonitor und alle anderen Monitore werden als sekundäre Monitore bezeichnet. C. Wählen Sie das Anzeige-Symbol, das mit der Ziffer 2 gekennzeichnet ist. D. Klicken Sie auf “ Extend my Windows desktop onto this monitor (Windows- Desktop auf diesen Monitor erweitern)”. ASRock ALiveNF6P-VSTA Motherboard...
- Seite 56 6. Verwenden Sie Surround-Display. Klicken Sie die Anzeige-Symbole an und ziehen Sie sie in die räumliche Position, in der Sie sie benutzen möchten. Die Platzierung der Anzeige-Symbole bestimmt, wie Sie Objekte von einem Monitor zu einem anderen ziehen. ASRock ALiveNF6P-VSTA Motherboard...
-
Seite 57: Einstellung Der Jumper
Sie nicht, den Jumper wieder zu entfernen, nachdem das CMOS gelöscht wurde. Wenn Sie den CMOS-Inhalt gleich nach dem Aktualisieren des BIOS löschen müssen, müssen Sie zuerst das System starten und dann wieder ausschalten, bevor Sie den CMOS-Inhalt löschen. ASRock ALiveNF6P-VSTA Motherboard... - Seite 58 (SATAII_4 (PORT3): siehe S.2, Punkt 14) ermöglicht eine SATAII_3 (PORT2) Datenübertragungsrate bis 3,0 Gb/s. SATAII_4 (PORT3) Serial ATA- (SATA-) Sie können beide Enden des Datenkabel SATA-Datenkabels entweder mit der SATA / SATAII- (Option) Festplatte oder dem SATAII-Anschluss am Mainboard verbinden. ASRock ALiveNF6P-VSTA Motherboard...
- Seite 59 USB 2.0-Anschlussleisten am Motherboard. Pro USB 2.0- Anschlussleiste werden zwei USB 2.0-Ports unterstützt. WiFi/E Sockel Dieser Sockel unterstützt WiFi+AP Funktion mit ASRock (15-pol. WIFI/E) WiFi-802.11g oder WiFi-802.11n (siehe S.2 - No. 20) Modul, einem einfach zu bedienenden Wireless Local Area Network (WLAN) Adapter.
- Seite 60 Die Rechtoberseite „Dateiordner“ Ikone anklicken , „Schalttafel Buchse Entdeckung sperren“ wählen und die Änderung speichern, indem Sie „OKAY“ klicken. System Panel Anschluss Dieser Anschluss ist für die verschiedenen Funktionen der (9-Pin PANEL1) Gehäusefront. (siehe S.2, Punkt 15) ASRock ALiveNF6P-VSTA Motherboard...
- Seite 61 Obwohl dieses Motherboard einen 24-pol. ATX-Stromanschluss bietet, kann es auch mit einem modifizierten traditionellen 20-pol. ATX-Netzteil verwendet werden. Um ein 20-pol. ATX-Netzteil zu verwenden, stecken Sie den Stecker mit Pin 1 und Pin 13 ein. Installation eines 20-pol. ATX-Netzteils ASRock ALiveNF6P-VSTA Motherboard...
- Seite 62 Ende (A) des HDMI_SPDIF-Kabels mit dem HDMI_SPDIF-Anschluss am Motherboard. Schließen Sie dann das weiße Ende (B oder C) des HDMI_SPDIF-Kabels an den HDMI_SPDIF-Anschluss der HDMI-VGA-Karte an. A. Schwarzes Ende B. Weißes Ende (zweipolig) C. Weißes Ende (dreipolig) ASRock ALiveNF6P-VSTA Motherboard...
- Seite 63 In der Abbildung sehen Sie ein Beispiel für einen falschen Anschluss: Hier wird versucht, das HDMI_SPDIF-Kabel mit dem Lüfteranschluss der PCI Express-VGA-Karte zu verbinden. Schauen Sie in die Dokumentation Ihrer VGA-Karte und informieren Sie sich schon im Vorfeld über die richtige Nutzung der Anschlüsse. ASRock ALiveNF6P-VSTA Motherboard...
- Seite 64 DOS ausführbares Dienstprogramm. Auf der Internetseite von HITACHI finden Sie entsprechende Details: http://www.hitachigst.com/hdd/support/download.htm Die Beispiele oben dienen lediglich Ihrer Referenz. Die Steckbrückeneinstellungen können bei unterschiedlichen SATA II Festplatten verschiedener Hersteller abweichen. Aktualisierungen und ergänzende Informationen finden Sie auf der Internetseite des Herstellers. ASRock ALiveNF6P-VSTA Motherboard...
- Seite 65 AII- Festplatten Festplatten Festplatten Festplatten Festplatten Das Motherboard ALiveNF6P-VSTA unterstützt Hot-Plug-Funktion für SATA / SATAII- Geräte. HINWEIS Was ist die Hot-Plug-Funktion? Wenn SATA / SATAII-Festplatten NICHT für RAID-Konfiguration eingestellt sind, werden sie “Hot-Plug” genannt: Ein Einfügen und Entfernen von SATA / SATAII-Festplatten, während das System in Betrieb ist und einwandfrei läuft.
-
Seite 66: Installation Von Windows Raid-Funktionen
XP 64-Bit auf Ihren SATA / SATAII-Festplatten mit RAID-Funktionen installieren möchten. SCHRITT 1: Erstellen Sie eine SATA / SATAII-Treiberdiskette. Legen Sie die ASRock Support-CD in Ihr optisches Laufwerk, um Ihr System hochzufahren. (Legen Sie zu diesem Zeitpunkt KEINE Diskette in das Diskettenlaufwerk ein!) Während des Selbsttests zu Beginn des Systemstarts drücken Sie die <F11>-... - Seite 67 Neuaufbau) mit SATA / SATAII-Festplatten nutzen möchten, müssen Sie dennoch zunächst den “SATA Operation Mode” (SATA-Betriebsmodus) auf [RAID] einstellen. Bitte lesen Sie Windows RAID-Installationsanleitung in dem folgenden Pfad auf der Support-CD, um die RAID-Konfiguration vorzunehmen: .. \ RAID Installation Guide ASRock ALiveNF6P-VSTA Motherboard...
- Seite 68 / Vista 64-Bit Betriebssystem auf Ihrem System zu installieren. Wenn die Frage “Wo möchten Sie Windows installieren?” erscheint, legen Sie bitte die ASRock Support CD in Ihr optisches Laufwerk ein. Klicken Sie anschließend die “Treiber laden”-Schaltfläche links unten, ® ®...
-
Seite 69: Entkoppelte Übertaktungstechnologie Entkoppelte Übertaktungstechnologie (Untied Overclocking T (Untied Overclocking Technology) Echnology)
ASSETUP.EXE im BIN-Verzeichnis der Support-CD, um die Menüs aufzurufen. Das Setup-Programm soll es Ihnen so leicht wie möglich machen. Es ist menügesteuert, d.h. Sie können in den verschiedenen Untermenüs Ihre Auswahl treffen und die Programme werden dann automatisch installiert. ASRock ALiveNF6P-VSTA Motherboard... - Seite 70 1. Introduction Merci pour votre achat d’une carte mère ASRock ALiveNF6P-VSTA, une carte mère très fiable produite selon les critères de qualité rigoureux de ASRock. Elle offre des performances excellentes et une conception robuste conformément à l’engagement d’ASRock sur la qualité et la fiabilité au long terme.
- Seite 71 - Contrôle direct de la fréquence CPU (voir ATTENTION 5) hybride - ASRock U-COP (voir ATTENTION 6) - Garde d’échec au démarrage (B.F.G.) - ASRock AM2 Boost: Technologie brevetée par ASRock pour augmenter les performances mémoire jusqu’à 12,5% (voir ATTENTION 7) Slot d’extension...
- Seite 72 - Ventilateur silencieux d’unité centrale - Monitoring de la tension: +12V, +5V, +3.3V, Vcore ® ® - Microsoft Windows 2000 / XP / XP Media Center / XP 64-bit / Vista / Vista 64-bit Certifications - FCC, CE, WHQL ASRock ALiveNF6P-VSTA Motherboard...
- Seite 73 CPU le dissipateur lors de l’installation du Cette carte mère prend en charge la technologie d’overbooking ASRock AM2 Boost. Si vous activez cette fonction dans la configuration du BIOS, les performances de la mémoire d’améliorent jusqu’à 12,5%, lais l’effet dépend du CPU AM2 que vous adoptez.
- Seite 74 / XP 64-bit / XP SP1; SP2/ 2000 SP4. 10. L’en-tête WiFi/E accepte la fonction WiFi+AP avec le module ASRock WiFi-802.11g ou WiFi-802.11n ; c’est un adaptateur de réseau local sans-fil (WLAN) facile d’utilisation. Il vous permettra de créer un environnement sans fil et de bénéficier des avantages de la...
- Seite 75 CPU. Le verrouillage du levier dans son encoche latérale est annoncé par un clic. Etape 5. Installez le ventilateur et le radiateur du CPU. Pour une installation correcte, reportez-vous aux manuels du fabricant du ventilateur et du radiateur de CPU. ASRock ALiveNF6P-VSTA Motherboard...
- Seite 76 2.2 Installation des modules mémoire (DIMM) 2.2 Installation des modules mémoire (DIMM) La carte mère ALiveNF6P-VSTA possède deux emplacements DIMM DDRII (Double Débit de données) 240 broches, et prend en charge la technologie Dual Channel Memory. Pour la configuration Double canal, vous devez toujours installer deux modules de mémoire identiques (mêmes marque, vitesse, dimensions et type de...
- Seite 77 (Slots PCI et Slots PCI Express) (Slots PCI et Slots PCI Express) Il y a 2 ports PCI et 2 ports PCI Express sur la carte mère ALiveNF6P-VSTA. Slots PCI: Les slots PCI sont utilisés pour installer des cartes d’extension dotées d’une interface PCI 32 bits.
- Seite 78 C. Sélectionnez l’icône d’affichage avec le numéro 2. D. Cliquez sur “Extend my Windows desktop onto this monitor (Ajouter mon bureau Windows sur ce moniteur)”. E. Cliquez avec le bouton droit sur l’icône d’affichage et sélectionnez “Attached (Attaché)“ si nécessaire. ASRock ALiveNF6P-VSTA Motherboard...
- Seite 79 6. Utilisez la fonction d’affichage Surround. Cliquez et glissez les icônes affichées sur les positions représentants le montage physique de vos moniteurs en fonction de vos préférences. Le placement des icônes d’affichage détermine la manière dont vous déplacez des éléments d’un moniteur à l’autre. ASRock ALiveNF6P-VSTA Motherboard...
- Seite 80 BIOS à jour. Si vous avez besoin d’effacer la CMOS lorsque vous avez fini de mettre le BIOS à jour, vous devez d’abord initialiser le système, puis le mettre hors tension avant de procéder à l’opération d’effacement de la CMOS. ASRock ALiveNF6P-VSTA Motherboard...
- Seite 81 3,0 Go/s. SATAII_4 (PORT3) Câble de données L’une des deux extrémités du Série ATA (SATA) câble de données SATA peut être connectée au disque dur (en option) SATA / SATAIIou au connecteur SATAII sur la carte mère. ASRock ALiveNF6P-VSTA Motherboard...
- Seite 82 2.0. En-tête WiFi/E Header Cet en-tête supporte les fonctions WiFi+AP avec le (WIFI/E br.15) module ASRock WiFi-802.11g (voir p.2 No. 20) ou WiFi-802.11n, c’est un adaptateur de réseau local sans- fil (WLAN) facile d’utilisation. Il vous permettra de créer un environnement sans fil et de bénéficier des avantages de la...
- Seite 83 Ce connecteur offre plusieurs fonctions système en façade. (PANEL1 br. 9) (voir p.2 fig. 15) Connecteur du haut-parleur Veuillez connecter le haut- du châssis parleur de châssis sur ce connecteur. (SPEAKER1 br. 4) (voir p.2 fig. 10) ASRock ALiveNF6P-VSTA Motherboard...
- Seite 84 électrique avec (ATX12V1 br. 4) prise ATX 12V sur ce (voir p.2 fig. 2) connecteur afin d’avoir une alimentation suffisante. Faute de quoi, il ne sera pas possible de mettre sous tension. ASRock ALiveNF6P-VSTA Motherboard...
- Seite 85 HDMI_SPDIF de la carte-mère. Connectez ensuite l’extrémité blanche (B ou C) du câble HDMI_SPDIF au nectées connecteur HDMI_SPDIF de la carte VGA HDMI. A. extrémité noire B. extrémité blanche C. extrémité blanche (2 briches) (3 briches) ASRock ALiveNF6P-VSTA Motherboard...
- Seite 86 HDMI_SPDIF au connecteur du ventilateur de la carte VGA PCI Express. Veuillez vous reporter au préalable au manuel de l’utilisateur de la carte VGA pour l’utilisation du connecteur. ASRock ALiveNF6P-VSTA Motherboard...
- Seite 87 Pour les différents produits disques durs SATAIII provenant de différents vendeurs, les méthodes de mise en place de cavaliers ne sont pas les mêmes. Veuillez visiter le site Internet des vendeurs pour les mises à jours. ASRock ALiveNF6P-VSTA Motherboard...
- Seite 88 A / SA A / SA A / SA A / SAT T T T T AII La Carte Mère ALiveNF6P-VSTA supporte la fonction “Hot Plug” pour les périphériques SATA / SATAII. REMARQUE Qu’est-ce que la fonction « Hot Plug »? Si les disques durs SATA / SATAII ne sont pas en configuration RAID, l’action d’insérer et de retirer des disques SATA / SATAII alors que le...
- Seite 89 SATA / SATAII avec fonctions RAID, veuillez suivre la procédure ci-dessous. ETAP 1: Créez une disquette pilotes SATA / SATAII. A. Insérez le CD de soutien ASRock dans votre lecteur de disque optique pour démarrer votre système. (N’insérez AUCUNE disquette dans le lecteur de disquette pour l’instant!) B.
- Seite 90 SATA / SATAII, vous avez encore besoin de configurer “Mode d’opération SATA” à [RAID] tout d’abord. Veuillez ensuite configurer le RAID à l’aide de la partie Guide d’installation RAID Windows du document sous le chemin suivant du CD Support: .. \ RAID Installation Guide ASRock ALiveNF6P-VSTA Motherboard...
- Seite 91 / Vista 64-bits sur votre système. Lorsque vous voyez la page “Où souhaitez-vous installer Windows ?”, veuillez insérer le CD Support d’ ASRock dans votre lecteur optique, et cliquer sur le bouton “Charger le pilote” en bas à gauche ®...
- Seite 92 CD-ROM. Le Menu principal s’affiche automatiquement si “AUTORUN” est activé dans votre ordinateur. Si le Menu principal n’apparaît pas automatiquement, localisez dans le CD technique le fichier “ASSETUP.EXE” dans le dossier BIN et double-cliquez dessus pour afficher les menus. ASRock ALiveNF6P-VSTA Motherboard...
- Seite 93 Grazie per aver scelto una scheda madre ASRock ALiveNF6P-VSTA, una scheda madre affidabile prodotta secondo i severi criteri di qualità ASRock. Le prestazioni eccellenti e il design robusto si conformano all’impegno di ASRock nella ricerca della qualità e della resistenza. Questa Guida Rapida all’Installazione contiene l’introduzione alla motherboard e la guida passo-passo all’installazione.
- Seite 94 - Stepless control per frequenza del processore (vedi ATTENZIONE 5) - ASRock U-COP (vedi ATTENZIONE 6) - Boot Failure Guard (B.F.G.) - ASRock AM2 Boost: Tecnologia brevettata ASRock per migliorare le prestazioni della memoria fino al 12,5% (vedi ATTENZIONE 7) Slot di...
- Seite 95 - Ventola CPU silenziosa - Voltaggio: +12V, +5V, +3.3V, Vcore ® ® Compatibi- - Microsoft Windows 2000 / XP / Centro multimediale XP / XP 64 lità SO bit / Vista / Vista 64 bit Certificazioni- FCC, CE, WHQL ASRock ALiveNF6P-VSTA Motherboard...
- Seite 96 Questa scheda madre supporta la tecnologia di overclocking ASRock AM2 Boost. Se si abilita questa funzione nel Setup del BIOS, le prestazioni della memoria miglioreranno fino al 12,5%, per gli effetti dipendono sempre dalla CPU AM2 che si adotta.
- Seite 97 11g o WiFi-802.11n ASRock, un adattatore WLAN (rete locale wireless) semplice da usare. Consente di creare un ambiente wireless e godersi la comodità di una connettività di rete wireless. Visitate il nostro sito web per la disponibilità del modulo ASRock WiFi-802.11g o WiFi-802.11n. Sito web ASRock http://www.asrock.com...
-
Seite 98: Installazione
Quando la leva fa clic sulla linguetta laterale significa che è bloccata. Step 5. Installare la ventola del processore e l’heatsink. Per una corretta installazione, per favore fare riferimento ai manuali di istruzione dei produttori della ventola e dell’heatsink del processore. ASRock ALiveNF6P-VSTA Motherboard... - Seite 99 2.2 Installazione dei moduli di memoria (DIMM) 2.2 Installazione dei moduli di memoria (DIMM) La motherboard ALiveNF6P-VSTA dispone di due slot DIMM DDRII (Double Data Rate) a 240 pin e supporta la tecnologia Dual Channel Memory. Per attivare la configurazione Dual Channel Memory bisogna installare sempre due moduli di memoria identici (stessa marca, velocità, dimensioni e tipo di chip) negli slot DIMM.
- Seite 100 Slot di espansione (Slot PCI ed Slot PCI Express) Slot di espansione (Slot PCI ed Slot PCI Express) Sulla scheda madre ALiveNF6P-VSTA c’è 2 slot PCI ed 2 slot PCI Express. Slot PCI: Sono utilizzati per installare schede di espansione con Interfaccia PCI a 32-bit.
- Seite 101 D. Fare clic su “Extend my Windows desktop onto this monitor (Estendi desktop su questo schermo)”. E. Fare clic con il tasto destro sull’icona del display e selezionare “Attached (Allegato)”, se necessario. 1 0 1 1 0 1 1 0 1 1 0 1 1 0 1 ASRock ALiveNF6P-VSTA Motherboard...
- Seite 102 La posizione delle icone del display determina lo spostamento delle voci da uno schermo ad un altro. 1 0 2 1 0 2 1 0 2 1 0 2 1 0 2 ASRock ALiveNF6P-VSTA Motherboard...
- Seite 103 BIOS. Se è necessario cancellare la CMOS una volta completato l’aggiornamento del BIOS, è necessario riavviare prima il sistema, e poi spegnerlo prima di procedere alla cancellazione della CMOS. 1 0 3 1 0 3 1 0 3 1 0 3 1 0 3 ASRock ALiveNF6P-VSTA Motherboard...
- Seite 104 Entrambe le estremità del cavo dati SATA possono collegarsi (Opzionale) all’hard disk SATA / SATAII o al connettore SATAII sulla scheda madre. 1 0 4 1 0 4 1 0 4 1 0 4 1 0 4 ASRock ALiveNF6P-VSTA Motherboard...
- Seite 105 Questo header supporta la funzione WiFi+AP con il modulo (15-pin WIFI/E) WiFi-802.11g o WiFi-802.11n (vedi p.2 Nr. 20) ASRock, un adattatore per WLAN (rete locale wireless). Consente di creare un ambiente wireless e godersi la comodità di una connettività di rete wireless.
- Seite 106 Collegare il cavo della ventolina telaio a questo connettore e far (3-pin CHA_FAN1) combaciare il filo nero al pin (vedi p.2 item 3) terra. 1 0 6 1 0 6 1 0 6 1 0 6 1 0 6 ASRock ALiveNF6P-VSTA Motherboard...
- Seite 107 (vedi p.2 Nr. 19) sistema di collegare dispositivi per TV digitale HDMI/proiettori/ LCD . Collegare il connettore HDMI_SPDIF della scheda VGA HDMI a questo header. 1 0 7 1 0 7 1 0 7 1 0 7 1 0 7 ASRock ALiveNF6P-VSTA Motherboard...
- Seite 108 C) del cavo HDMI_SPDIF al connettore HDMI_SPDIF della scheda HDMI VGA. A. estremità nera B. estremità bianca (2 pin) C. estremità bianca (3 pin) 1 0 8 1 0 8 1 0 8 1 0 8 1 0 8 ASRock ALiveNF6P-VSTA Motherboard...
- Seite 109 HDTV. Consultare il manuale dell’utente di HDTV e della scheda HDMI VGA per il collegamento dettagliato. Punto 5. Installare il driver della scheda HDMI VGA nel sistema. 1 0 9 1 0 9 1 0 9 1 0 9 1 0 9 ASRock ALiveNF6P-VSTA Motherboard...
- Seite 110 Visitare i siti web dei produttori per gli aggiornamenti. 1 1 0 1 1 0 1 1 0 1 1 0 1 1 0 ASRock ALiveNF6P-VSTA Motherboard...
- Seite 111 A / SAT T T T T AII dischi rigidi SA dischi rigidi SA A / SA La scheda madre ALiveNF6P-VSTA supporta la funzione di collegamento e scambio a per i dispositivi SATA / SATAII. NOTA Che cosa è la funzione di collegamento a caldo? Se i dischi rigidi SATA / SATAII NON sono impostati per una configurazione RAID, è...
- Seite 112 SATA / SATAII con funzioni RAID, seguire le istruzioni in basso. 1° PASSO: Creare un dischetto driver SATA / SATAII. Inserire il CD di supporto ASRock nel lettore ottico prima di accendere il sistema. (NON inserire nessun dischetto floppy nel drive in questo momento!) Durante la fase di POST, all’inzio del boot-up del sistema, premere il tasto...
- Seite 113 RAID usando la sezione Windows RAID della guida all’installazione che si trova sul seguente percorso del CD di supporto: .. \ RAID Installation Guide (Guida all’installazione RAID) 1 1 3 1 1 3 1 1 3 1 1 3 1 1 3 ASRock ALiveNF6P-VSTA Motherboard...
- Seite 114 64-bit sul sistema. Quando si vede la pagina “Where do you want to install Windows?” (Dove si vuole eseguire l’istallazione di Windows), inserire il CD di supporto ASRock nell’unità ottica e fare clic sul pulsante “Carica driver” , in basso a sinistra, per caricare i driver NVIDIA ®...
- Seite 115 Se il Menù principale non appare automaticamente, posizionarsi sul file ASSETUP.EXE nel CESTINO del CD di supporto e cliccare due volte per visualizzare i menù. 1 1 5 1 1 5 1 1 5 1 1 5 1 1 5 ASRock ALiveNF6P-VSTA Motherboard...
- Seite 116 1. Introducción 1. Introducción Gracias por su compra de ASRock ALiveNF6P-VSTA placa madre, una placa de confianza producida bajo el control de calidad estricto y persistente. La placa madre provee realización excelente con un diseño robusto conforme al compromiso de calidad y resistencia de ASRock.
- Seite 117 - Stepless control de frecuencia de CPU (vea ATENCIÓN 5) Híbrido - ASRock U-COP (vea ATENCIÓN 6) - Protección de Falla de Inicio (B.F.G..) - ASRock AM2 Boost: tecnología patentada de ASRock que permite mejorar el rendimiento de la memoria hasta en un 12,5% (vea ATENCIÓN 7) Ranuras de - 1 x ranura PCI Express x16 Expansión...
- Seite 118 2000 / XP / XP Media Center / XP 64 bits / Vista / Vista 64 bits Certificaciones - FCC, CE, WHQL 1 1 8 1 1 8 1 1 8 1 1 8 1 1 8 ASRock ALiveNF6P-VSTA Motherboard...
- Seite 119 PC. Esta placa base admite la tecnología ASRock AM2 Boost para aumento de la velocidad del reloj. Si habilita esta función en la configuración del BIOS, el rendimiento de la memoria mejorará hasta en un 12,5%, pero seguirá...
- Seite 120 SP4. 10. El conector WiFi/E es compatible con la función WiFi+AP con módulo ASRock WiFi-802.11g o WiFi-802.11n, un adaptador de área local (WLAN) fácil de usar. Le permite crear un entorno de red inalámbrico y disfrutar de la comodidad proporcionada por una conectividad inalámbrica a la red.
-
Seite 121: Instalación
Paso 4. Encierre el zócalo bajando la palanca. Paso 5. Instale el disipador de calor con ventilador del CPU ( consulte la documentación del disipador de calor). 1 2 1 1 2 1 1 2 1 1 2 1 1 2 1 ASRock ALiveNF6P-VSTA Motherboard... - Seite 122 2.2 Instalación de Memoria 2.2 Instalación de Memoria La placa base ALiveNF6P-VSTA proporciona dos ranuras DIMM DDRII (Double Data Rate, es decir, Tasa doble de datos) de 240 contactos y es compatible con la Tecnología de memoria de canal dual. Para la configuración de canal dual, siempre es necesario instalar dos módulos de memoria idénticos (la misma marca, velocidad,...
- Seite 123 (ranuras PCI y ranuras PCI Express) (ranuras PCI y ranuras PCI Express) (ranuras PCI y ranuras PCI Express) La placa madre ALiveNF6P-VSTA cuenta con 2 ranuras PCI y 2 ranuras PCI Express. Ranura PCI: Para instalar tarjetas de expansión que tienen 32-bit Interface PCI.
- Seite 124 Quality (Calidad de color)” de la forma adecuada para el segundo monitor. Haga clic en “Apply (Aplicar)” o “OK (Aceptar)” para aplicar los cambios. 1 2 4 1 2 4 1 2 4 1 2 4 1 2 4 ASRock ALiveNF6P-VSTA Motherboard...
- Seite 125 La colocación de los iconos de pantalla determinará como se moverán los elementos de un monitor a otro. 1 2 5 1 2 5 1 2 5 1 2 5 1 2 5 ASRock ALiveNF6P-VSTA Motherboard...
- Seite 126 CMOS cuando acabe de finalizar la actualización de la BIOS, debe arrancar primero el sistema y, a continuación, apagarlo antes de realizar la acción de borrado de CMOS. 1 2 6 1 2 6 1 2 6 1 2 6 1 2 6 ASRock ALiveNF6P-VSTA Motherboard...
- Seite 127 Ambos extremos del cable serie ATA (SATA) pueden conectarse al disco duro SATA / SATAII o la (Opcional) conexión de la placa base. 1 2 7 1 2 7 1 2 7 1 2 7 1 2 7 ASRock ALiveNF6P-VSTA Motherboard...
- Seite 128 USB 2.0. Conector WiFi/E Este conector es compatible con la función WiFi+AP con el (15-pin WIFI/E) módulo ASRock WiFi-802.11g o (vea p.2, N. 20) WiFi-802.11n, un adaptador de área local (WLAN) fácil de usar. Le permite crear un entorno de red inalámbrico y disfrutar de la...
- Seite 129 CHA_FAN1) con el conector de tierra. (vea p.2, No. 3) 1 2 9 1 2 9 1 2 9 1 2 9 1 2 9 ASRock ALiveNF6P-VSTA Motherboard...
- Seite 130 (vea p.2, No. 2) con el enchufe ATX 12V, de modo que proporcione suficiente electricidad. De lo contrario no se podrá encender. 1 3 0 1 3 0 1 3 0 1 3 0 1 3 0 ASRock ALiveNF6P-VSTA Motherboard...
- Seite 131 HDMI_SPDIF en el conector HDMI_SPDIF de la tarjeta VGA HDMI. A. Extremo negro B. Extremo blanco (2 patillas) C. Extremo blanco (3 patillas) 1 3 1 1 3 1 1 3 1 1 3 1 1 3 1 ASRock ALiveNF6P-VSTA Motherboard...
- Seite 132 VGA HDMI para conocer el procedimiento detallado de conexión. Paso 5. Instale el controlador de la tarjeta VGA HDMI en su sistema. 1 3 2 1 3 2 1 3 2 1 3 2 1 3 2 ASRock ALiveNF6P-VSTA Motherboard...
- Seite 133 Por favor visite el sitio Web de los proveedores para obtener las actualizaciones. 1 3 3 1 3 3 1 3 3 1 3 3 1 3 3 ASRock ALiveNF6P-VSTA Motherboard...
- Seite 134 A / SA A / SA A / SA A / SAT T T T T AII La placa base ALiveNF6P-VSTA soporta la función de conexión en caliente para Dispositivos SATA / SATAII. NOTA ¿Qué es la función de conexión en caliente? Si los HDDs SATA / SATAII no están fijados para su configuración...
- Seite 135 HDDs SATA / SATAII con funciones RAID, por favor siga los pasos siguientes. PASO 1: Haga un Disquete de Controlador SATA / SATAII. Inserte el CD de soporte de ASRock en la unidad óptica de la unidad para iniciar el sistema. (NO inserte ningún disquete en la unidad de disco en este momento) Durante la comprobación inicial (POST) del sistema, pulse la tecla <F11>...
- Seite 136 Windows RAID del documento que se encuentra en la siguiente ruta del CD de soporte: .. \ RAID Installation Guide 1 3 6 1 3 6 1 3 6 1 3 6 1 3 6 ASRock ALiveNF6P-VSTA Motherboard...
- Seite 137 64 bits en el equipo. Cuando aparezca la página “Where do you want to install Windows?” (¿Dónde desea instalar Windows?), inserte el CD de soporte de ASRock en la unidad óptica y haga clic en el botón “Load Driver” (Cargar controlador) situado en la parte inferior izquierda para ®...
- Seite 138 Menú Principal automáticamente si «AUTORUN» está habilitado en su computadora. Si el Menú Principal no aparece automáticamente, localice y doble-pulse en el archivo ASSETUP.EXE para iniciar la instalación. 1 3 8 1 3 8 1 3 8 1 3 8 1 3 8 ASRock ALiveNF6P-VSTA Motherboard...
- Seite 139 Gratos por comprar nossa placa–mãe ALiveNF6P-VSTA, um produto confiável feito com ASRock um estrito controle de qualidade consistente. Com um excelente desempenho, essa placa é dotada de um projeto robusto que atende a ASRock de compromisso com a qualidade e durabilidade.
- Seite 140 - Frequência da CPU com controle contínuo (veja o AVISO 5) - ASRock U-COP (veja o AVISO 6) - B.F.G. (Boot Failure Guard) - ASRock AM2 Boost: Tecnologia patenteada da ASRock para melhorar o desempenho da memória até 12,5% (veja o AVISO 7) Slots de Expansão...
- Seite 141 2000 / XP / Centro de multimedia XP / XP 64-bit / Vista / Vista 64-bit Operacional Certificações - FCC, CE, WHQL 1 4 1 1 4 1 1 4 1 1 4 1 1 4 1 ASRock ALiveNF6P-VSTA Motherboard...
- Seite 142 Esta placa principal suporta a tecnologia de overclocking ASRock AM2 Boost. Se activar esta função na configuração do BIOS, o desempenho da memória sofrerá...
- Seite 143 / XP de 64 bits / XP SP1; SP2/2000 SP4. 10. O cabeçalho WiFi/E suporta a função Wifi+AP com o módulo ASRock WiFi-802.11g ou WiFi-802.11n, um adaptador de rede de área local sem fios (WLAN) fácil de utilizar. Permite-lhe criar um ambiente sem fios e desfrutar da conveniência da conectividade de rede sem fios.
- Seite 144 CPU e o dissipador de calor. Para fazer uma instalação correta, consulte antes os manuais de instrução dos fabricantes da CPU e do dissipador de calor. 1 4 4 1 4 4 1 4 4 1 4 4 1 4 4 ASRock ALiveNF6P-VSTA Motherboard...
- Seite 145 2.3 Instalação dos Módulos de Memória (DIMM) 2.3 Instalação dos Módulos de Memória (DIMM) A placa-mãe ALiveNF6P-VSTA possui dois slots DIMM DDRII (taxa de dados dupla) de 240 pinos e suporta a tecnologia de memória de duplo canal. Para a configuração de duplo canal, instale sempre dos módulos de memória idênticos (mesma marca,...
- Seite 146 2.3 Slots de Expansão (Slots de PCI e PCI Express) 2.3 Slots de Expansão (Slots de PCI e PCI Express) Há 2 slots de PCI e 2 slots de PCI Express na placa–mãe do ALiveNF6P-VSTA. Slots PCI: Os slots PCI se usam para instalar placas de expansão com uma interface de PCI de 32 bit.
- Seite 147 Windows para este monitor)”. E. Clique com o botão direito do rato sobre o ícone de apresentação e seleccione “Attached (Anexo)”, se for necessário. 1 4 7 1 4 7 1 4 7 1 4 7 1 4 7 ASRock ALiveNF6P-VSTA Motherboard...
- Seite 148 A localização dos ícones de apresentação determina a forma como desloca os itens de um monitor para outro. 1 4 8 1 4 8 1 4 8 1 4 8 1 4 8 ASRock ALiveNF6P-VSTA Motherboard...
- Seite 149 CMOS ao concluir a atualização do BIOS, deverá reiniciar o sistema primeiro e, em seguida, desligá-lo antes de executar a ação de limpeza o CMOS. 1 4 9 1 4 9 1 4 9 1 4 9 1 4 9 ASRock ALiveNF6P-VSTA Motherboard...
- Seite 150 Tanto a saída do cabo de Serial ATA (SATA) dados SATA pode ser conectado ao disco rígido (opcional) SATA / SATAII quanto o conector SATAII na placa mãe. 1 5 0 1 5 0 1 5 0 1 5 0 1 5 0 ASRock ALiveNF6P-VSTA Motherboard...
- Seite 151 Suporte de Detecção Automática de Este suporte suporta a função de SATA ou SATAII Periféricos DeskExpress detecção automática de os de armaze- Periféricos para ASRock (IR1 de 5 pinos) os. A atual inter- DeskExpress. (veja a folha 2, No. 21) mite uma taxa de e dados de até...
- Seite 152 Ligue o cabo do ventilador neste chassis conector, coincidindo o fio preto com o pino de aterramento. (CHA_FAN1 de 3 pinos) (veja a folha 2, No. 3) 1 5 2 1 5 2 1 5 2 1 5 2 1 5 2 ASRock ALiveNF6P-VSTA Motherboard...
- Seite 153 (ATX12V1 de 4 pinos ) conector ATX 12V neste (veja a folha 2, No. 2) conector para fornecer alimentação suficiente. Do contrário, haverá falhas de funcionamento. 1 5 3 1 5 3 1 5 3 1 5 3 1 5 3 ASRock ALiveNF6P-VSTA Motherboard...
- Seite 154 C) do cabo HDMI_SPDIF ao conector HDMI_SPDIF da placa VGA HDMI. A. Extremidade negra B. Extremidade branca C. Extremidade branca (2 pinos) (3 pinos) 1 5 4 1 5 4 1 5 4 1 5 4 1 5 4 ASRock ALiveNF6P-VSTA Motherboard...
- Seite 155 HDMI_SPDIF ao conector da ventoinha da placa VGA PCI Express. Consulte o manual de utilizador da placa VGA para se informar acerca do método de ligação correcto do conector. 1 5 5 1 5 5 1 5 5 1 5 5 1 5 5 ASRock ALiveNF6P-VSTA Motherboard...
- Seite 156 SATAII ou diferentes vendedores, os métodos de definição dos pinos jumper poderão não ser os mesmos. Por favor visite o sítio Web do vendedor para actualizações. 1 5 6 1 5 6 1 5 6 1 5 6 1 5 6 ASRock ALiveNF6P-VSTA Motherboard...
- Seite 157 A / SA A / SAT T T T T AII A / SA A placa-mãe ALiveNF6P-VSTA suporta a função de conexão a quente de dispositivos SATA / SATAII. O que é a função de conexão a quente? Se as unidades de disco rígido SATA / SATAII não forem configuradas para RAID, chama-se “conexão a quente”...
- Seite 158 SATA / SATAII antes de iniciar a instalação do sistema operativo. ETAPA 1: Crie uma disquete com o controlador SATA / SATAII. Insira o CD ASRock Support no acionador ótico para reiniciar seu sistema. (NÃO insira nenhum disquete no acionador de disquete neste momento!)
- Seite 159 RAID. Após a leitura da disquete, o controlador surgirá. Escolha o controlador a instalar de acordo com o modo que pretender e o Sistema Operativo instalado. 1 5 9 1 5 9 1 5 9 1 5 9 1 5 9 ASRock ALiveNF6P-VSTA Motherboard...
- Seite 160 64 bits no computador. Quando vir a página “Where do you want to install Windows?” (Onde quer instalar o Windows?), introduza o CD de suporte da ASRock na unidade óptica e clique no botão “Carregar controlador” que encontra no canto ®...
- Seite 161 FSB possa funcionar num ambiente de overclocking mais estável. Consulte o aviso na página 142 relativo a possíveis riscos antes de utilizar a tecnologia Untied Overclocking. 1 6 1 1 6 1 1 6 1 1 6 1 1 6 1 ASRock ALiveNF6P-VSTA Motherboard...
- Seite 162 “AUTORUN” esteja ativado. Se o menu principal não aparecer automaticamente, explore o CD e execute o “ASSETUP.EXE” localizado na pasta “BIN”. 1 6 2 1 6 2 1 6 2 1 6 2 1 6 2 ASRock ALiveNF6P-VSTA Motherboard...
- Seite 163 1 6 3 1 6 3 1 6 3 1 6 3 1 6 3 ASRock ALiveNF6P-VSTA Motherboard...
- Seite 164 ‘ ’ ® ® ® 1 6 4 1 6 4 1 6 4 1 6 4 1 6 4 ASRock ALiveNF6P-VSTA Motherboard...
- Seite 165 ® 1 6 5 1 6 5 1 6 5 1 6 5 1 6 5 ASRock ALiveNF6P-VSTA Motherboard...
- Seite 166 “ ” ® ® ® ® “ 1 6 6 1 6 6 1 6 6 1 6 6 1 6 6 ASRock ALiveNF6P-VSTA Motherboard...
- Seite 167 ® ® ® ® ® ® 1 6 7 1 6 7 1 6 7 1 6 7 1 6 7 ASRock ALiveNF6P-VSTA Motherboard...
- Seite 168 1 6 8 1 6 8 1 6 8 1 6 8 1 6 8 ASRock ALiveNF6P-VSTA Motherboard...
- Seite 169 1 6 9 1 6 9 1 6 9 1 6 9 1 6 9 ASRock ALiveNF6P-VSTA Motherboard...
- Seite 170 1 7 0 1 7 0 1 7 0 1 7 0 1 7 0 ASRock ALiveNF6P-VSTA Motherboard...
- Seite 171 ” ® “ ” “ ” “ ” “ ” “ ” “ ” “ ” “ ” “ ” “ ” 1 7 1 1 7 1 1 7 1 1 7 1 1 7 1 ASRock ALiveNF6P-VSTA Motherboard...
- Seite 172 ® ” “ ” “ ” “ ” “ ” “ ” 1 7 2 1 7 2 1 7 2 1 7 2 1 7 2 ASRock ALiveNF6P-VSTA Motherboard...
- Seite 173 “ ” “ ” “ ” “ ” 1 7 3 1 7 3 1 7 3 1 7 3 1 7 3 ASRock ALiveNF6P-VSTA Motherboard...
- Seite 174 SATAII_1 (PORT0) SATAII_2 (PORT1) SATAII_3 (PORT2) SATAII_4 (PORT3) 1 7 4 1 7 4 1 7 4 1 7 4 1 7 4 ASRock ALiveNF6P-VSTA Motherboard...
- Seite 175 ® 1 7 5 1 7 5 1 7 5 1 7 5 1 7 5 ASRock ALiveNF6P-VSTA Motherboard...
- Seite 176 ® ® 1 7 6 1 7 6 1 7 6 1 7 6 1 7 6 ASRock ALiveNF6P-VSTA Motherboard...
- Seite 177 1 7 7 1 7 7 1 7 7 1 7 7 1 7 7 ASRock ALiveNF6P-VSTA Motherboard...
- Seite 178 1 7 8 1 7 8 1 7 8 1 7 8 1 7 8 ASRock ALiveNF6P-VSTA Motherboard...
- Seite 179 1 7 9 1 7 9 1 7 9 1 7 9 1 7 9 ASRock ALiveNF6P-VSTA Motherboard...
- Seite 180 ® “ ” “ ” 1 8 0 1 8 0 1 8 0 1 8 0 1 8 0 ASRock ALiveNF6P-VSTA Motherboard...
- Seite 181 ® ® ® ® ® ® ® ® ® ® ® ® ® ® ® ® ® ® ® ® ® ® 1 8 1 1 8 1 1 8 1 1 8 1 1 8 1 ASRock ALiveNF6P-VSTA Motherboard...
- Seite 182 “ ” ® ® ® ® ® ® ® ® ® ® ® “ ” 1 8 2 1 8 2 1 8 2 1 8 2 1 8 2 ASRock ALiveNF6P-VSTA Motherboard...
- Seite 183 ® ® ® “ ” ® ® ® ® ® ® ® ® ® ® ® “ ” 1 8 3 1 8 3 1 8 3 1 8 3 1 8 3 ASRock ALiveNF6P-VSTA Motherboard...
- Seite 184 “ ” 1 8 4 1 8 4 1 8 4 1 8 4 1 8 4 ASRock ALiveNF6P-VSTA Motherboard...
- Seite 185 “ ” “ ” 1 8 5 1 8 5 1 8 5 1 8 5 1 8 5 ASRock ALiveNF6P-VSTA Motherboard...