Herunterladen Inhalt Inhalt Diese Seite drucken
Sony HMD-A200 Bedienungsanleitung

Sony HMD-A200 Bedienungsanleitung

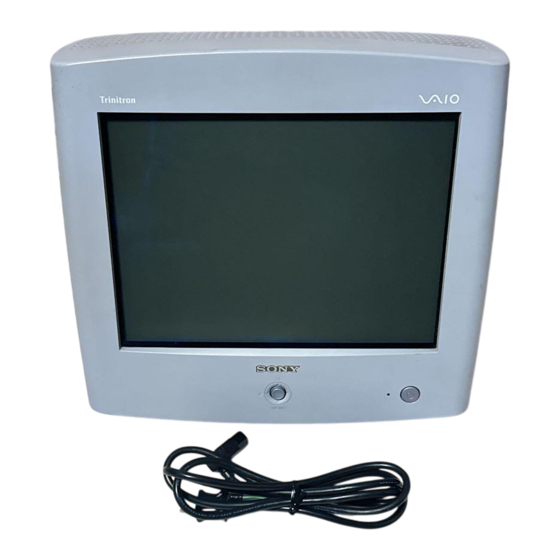
Trinitron color computer display
Inhaltsverzeichnis

Werbung

Verfügbare Sprachen
  • DE

Verfügbare Sprachen

  • DEUTSCH, seite 45
Trinitron Color
Computer Display
Operating Instructions
Mode d'emploi
Bedienungsanleitung
Manual de instrucciones
Istruzioni per l'uso
Bruksanvisning
HMD-A100
HMD-A200
© 1999 Sony Corporation
®
3-867-863-21 (1)
GB
FR
DE
ES
IT IT IT IT IT
NL

Werbung

Inhaltsverzeichnis
loading

Inhaltszusammenfassung für Sony HMD-A200

  • Seite 1 3-867-863-21 (1) Trinitron Color ® Computer Display Operating Instructions Mode d’emploi Bedienungsanleitung Manual de instrucciones IT IT IT IT IT Istruzioni per l’uso Bruksanvisning HMD-A100 HMD-A200 © 1999 Sony Corporation...
  • Seite 2 Model No.: HMD-A100, HMD-A200 Vorschriften für Betrieb in Wohngebieten, gewerblicher Gebleten und Leichtindustriegebieten. Responsible Party: Sony Electronics Inc. Address: 1 Sony Drive, Park Ridge, NJ. 07656 USA EN55022/1994 Klasse B Telephone No.: 201-930-6970 EN50082-1/1992 EN60555-2/1987 This device complies with Part 15 of the FCC Rules. Operation is...
  • Seite 3: Inhaltsverzeichnis

    • Trinitron is a registered trademark of Sony Corporation. Technical Features ......13 •...
  • Seite 4: Precautions

    Use of the groove on top (HMD-A200 only) You can put a photo frame or CD case in the groove. The equipment should be installed near an easily accessible outlet.
  • Seite 5: Identifying Parts And Controls

    Identifying parts and controls See the pages in parentheses for further details. (Model HMD- A200 is used for illustration purposes.) Front Rear AC IN MENU 1 Control button (page 9) 4 Video input connector (HD15) (page 6) The control button is used to display the menu and make This connector inputs RGB video signals (0.700 Vp-p, adjustments to the monitor, including brightness and contrast positive) and sync signals.
  • Seite 6: Setup

    Step 2: Connect the power cord Setup With the monitor and computer switched off, first connect the Before using your monitor, check that the following accessories power cord to the monitor, then connect it to a power outlet. are included in your carton: •...
  • Seite 7: Connecting Universal Serial Bus (Usb) Compliant Peripherals

    If no picture appears on your screen Connecting Universal Serial Bus • Check that the monitor is correctly connected to the computer. (USB) compliant peripherals • If NO INPUT SIGNAL appears on the screen, confirm that your computer’s graphic board is completely seated in the Your monitor has one upstream USB connector (on the rear correct bus slot.
  • Seite 8: Selecting The On-Screen Menu Language (Language/Information)

    Selecting the on-screen menu Customizing Your Monitor language You can make numerous adjustments to your monitor using the (LANGUAGE/INFORMATION) on-screen menu. English, French, German, Italian, Spanish, Russian, and Japanese versions of the on-screen menus are available. The default setting Navigating the menu is English.
  • Seite 9 x Using the control button 6 ROTATION (page 11) ROTAT I ON Select the ROTATION menu to RO T A T I ON Display the main MENU. adjust the picture’s rotation. Press the center of the control button to display the main MENU on your screen.
  • Seite 10: Adjusting The Brightness And Contrast (Brightness/Contrast)

    Adjusting the brightness and Adjusting the vertical size or contrast centering of the picture (BRIGHTNESS/CONTRAST) (V-SIZE/CENTER) Brightness and contrast adjustments are made using a separate These settings are stored in memory for the current input signal. BRIGHTNESS/CONTRAST menu. These settings are stored in memory for all input signals. Press the center of the control button.
  • Seite 11: Adjusting The Angle Of The Picture's Sides (Key/Key Balance)

    Adjusting the angle of the picture’s Adjusting the color of the picture sides (KEY/KEY BALANCE) (COLOR) The COLOR settings allow you to adjust the picture’s color These settings are stored in memory for the current input signal. temperature by changing the color level of the white color field. Colors appear reddish if the temperature is low, and bluish if the Press the center of the control button.
  • Seite 12: Additional Settings (Degauss/Cancel Moire)

    Additional settings Resetting the adjustments (RESET) (DEGAUSS/CANCEL MOIRE) This monitor has the following two reset methods. Use the RESET menu to reset the adjustments. You can manually degauss (demagnetize) the screen, and cancel the moire. Press the center of the control button. The main MENU appears on the screen.
  • Seite 13: Technical Features

    Power mode Power Input signal condition OUT OF SCAN RANGE consumption ≤ 115 W normal green operation (HMD-A200) ≤ 95 W The input signal condition (HMD-A100) OUT OF SCAN RANGE ≤ 15 W 1 standby green and orange indicates that the input signal is not supported by the alternate monitor’s specifications.
  • Seite 14: Trouble Symptoms And Remedies

    • If you replaced an old monitor with this monitor, reconnect the old monitor and do the following. Install the Windows Monitor Information Disk (page 7) and select this monitor (“HMD-A100” or “HMD-A200”) from among the Sony monitors in the Windows 95/98 monitor selection screen.
  • Seite 15 * If a second degauss cycle is needed, allow a minimum interval of 20 minutes for the best result. A humming noise may be heard, but this is not a malfunction. Displaying this monitor’s name, serial number, If the problem persists, call your authorized Sony dealer and give the following information. and date of manufacture (INFORMATION) •...
  • Seite 16: Self-Diagnosis Function

    1 (power) indicator and inform your authorized Mass Approx. 19 kg (41 lb 14 oz) Sony dealer of the monitor’s condition. Be sure to note the model Plug and Play DDC1/DDC2B name and serial number of your monitor. Also note the make and...
  • Seite 17 Réglage des couleurs de l’image (COULEUR)....11 déposée de Sony Corporation. Réglages supplémentaires (DÉMAGNÉTISÉ/MOIRÉ)..12 •...
  • Seite 18: Précautions

    à proximité. Placez ces systèmes d’enregistrement magnétique (HMD-A200 uniquement) et ces bandes, et disquettes à l’écart du moniteur. Vous pouvez placer un cadre avec une photo ou un CD dans la rainure.
  • Seite 19: Identification Des Composants Et Des Commandes

    Identification des composants et des commandes Pour plus de détails, reportez-vous aux pages indiquées entre parenthèses. (C’est le modèle HMD-A200 qui est représenté dans les illustrations.) Avant Arrière AC IN MENU 1 Manette de commande (page 9) 4 Connecteur d’entrée vidéo (HD15) (page 6) Ce connecteur assure l’entrée des signaux vidéo RVB...
  • Seite 20: Installation

    2e étape: Branchez le cordon Installation d’alimentation Avant de mettre ce moniteur en service, vérifiez si tous les Le moniteur et l’ordinateur étant hors tension, branchez d’abord accessoires suivants se trouvent bien dans le carton: le cordon d’alimentation sur le moniteur et ensuite sur une prise •...
  • Seite 21: Raccordement De Périphériques Compatibles Usb (Universal Serial Bus)

    Si aucune image n’apparaît à l’écran Raccordement de périphériques • Vérifiez si le moniteur est correctement raccordé à l’ordinateur. compatibles USB (Universal Serial • Si l’indication PAS ENTREE VIDEO apparaît à l’écran, vérifiez si la carte graphique de votre ordinateur est Bus) complètement introduite dans la fente de bus correcte.
  • Seite 22: Sélection De La Langue D'affichage Des Menus (Langue/Information)

    Sélection de la langue d’affichage Personnalisation de votre des menus moniteur (LANGUE/INFORMATION) Vous pouvez effectuer de multiples réglages sur votre moniteur à Les écrans de menu peuvent être affichés en français, anglais, l’aide des écrans de menu. allemand, italien, espagnol, russe et japonais. La langue sélectionnée par défaut est l’anglais.
  • Seite 23 x Utilisation de la manette de commande 6 ROTATION (page 11) ROTAT I ON Sélectionnez le menu RO T A T I ON Affichez le MENU principal. ROTATION pour régler la Appuyez au centre de la manette de commande pour afficher rotation de l’image.
  • Seite 24: Réglage De La Luminosité Et Du Contraste (Luminosité/Contraste)

    Réglage de la luminosité et du Réglage de la taille verticale ou du contraste centrage de l’image (LUMINOSITÉ/CONTRASTE) (TAILLE V/POSITION) Les réglages de la luminosité et du contraste sont effectués au Ces réglages sont enregistrés dans la mémoire pour le signal moyen d’un menu LUMINOSITÉ/CONTRASTE séparé.
  • Seite 25: Réglage De L'angle Des Côtés De L'image (Trapézoïd/Parallél)

    Réglage de l’angle des côtés de Réglage des couleurs de l’image l’image (TRAPÉZOÏD/PARALLÉL) (COULEUR) Ces réglages sont enregistrés dans la mémoire pour le signal Les réglages COULEUR vous permettent de régler la température d’entrée en cours. des couleurs de l’image en changeant le niveau de couleur du champ de couleur blanche.
  • Seite 26: Réglages Supplémentaires (Démagnétisé/Moiré)

    Réglages supplémentaires Réinitialisation des réglages (DÉMAGNÉTISÉ/MOIRÉ) (RAPPEL) Vous pouvez dégausser (démagnétiser) l’écran manuellement et Ce moniteur est doté des deux modes de réinitialisation suivants. supprimer le moiré. Utilisez le menu RAPPEL pour réinitialiser les réglages. Appuyez au centre de la manette de commande. Appuyez au centre de la manette de commande.
  • Seite 27: Caractéristiques Techniques

    La condition du signal d’entrée ≤ 115 W fonctionnement vert HORS PLAGE DE BALAYAGE normal (HMD-A200) indique que le signal d’entrée n’est pas supporté par les ≤ 95 W spécifications du moniteur. (HMD-A100) PAS ENTREE VIDEO ≤ 15 W indique qu’aucun signal n’est entré...
  • Seite 28: Symptômes Et Remèdes

    • Si vous remplacez un ancien moniteur par ce moniteur, reconnectez l’ancien moniteur et procédez comme suit. Installez la disquette “Windows Monitor Information Disk” (page 7) et sélectionnez ce moniteur (“HMD-A100” ou “HMD-A200”) parmi les moniteurs Sony dans l’écran de sélection de moniteur de Windows 95/98.
  • Seite 29 Affichage de la désignation, du numéro de série et Si le problème persiste, appelez votre revendeur Sony agréé et fournissez-lui les informations suivantes: de la date de fabrication du moniteur •...
  • Seite 30: Fonction D'autodiagnostic

    1 (alimentation) et informez votre revendeur supérieure à 1,0 µs. Sony agréé de l’état du moniteur. Notez également la désignation • La largeur de suppression horizontale doit être supérieure à du modèle et le numéro de série de votre moniteur. Notez 3,0 µs.
  • Seite 31 • Trinitron es una marca comercial registrada de Sony Corporation. Características técnicas ......13 • Macintosh es una marca comercial de Apple Computer, Inc., registrada en...
  • Seite 32: Precauciones

    Uso de la ranura de la parte superior El equipo debe instalarse cerca de una toma de corriente de (sólo HMD-A200) fácil acceso. Es posible colocar un marco para fotografías o una caja de CD en la ranura.
  • Seite 33: Identificación De Los Componentes Y Los Controles

    Identificación de los componentes y los controles Consulte las páginas entre paréntesis para obtener más información. (El modelo HMD-A200 es el utilizado en las ilustraciones.) Parte frontal Parte posterior AC IN MENU 1 Botón de control (página 9) 4 Conector de entrada de vídeo (HD15) (página 6) Este conector introduce las señales de vídeo RVA...
  • Seite 34: Instalación

    Paso 2: Conexión del cable de Instalación alimentación Antes de utilizar el monitor, compruebe que ha recibido los Con el monitor y el ordenador apagados, conecte primero el cable siguientes accesorios: de alimentación al monitor y, a continuación, a una toma de •...
  • Seite 35: Conexión De Periféricos Conformes Con Usb (Bus Serie Universal)

    Si no aparece ninguna imagen en la pantalla Conexión de periféricos conformes • Compruebe que el monitor esté correctamente conectado al con USB (Bus serie universal) ordenador. • Si NO SEÑAL aparece en pantalla, compruebe que la tarjeta El monitor dispone de un conector USB de flujo de salida (en el gráfica del ordenador esté...
  • Seite 36: Selección Del Idioma De Los Menús En Pantalla (Lenguaje/Información)

    Selección del idioma de los menús Personalización del en pantalla monitor (LENGUAJE/INFORMACIÓN) Es posible realizar diversos ajustes en el monitor mediante el Puede seleccionar inglés, francés, alemán, italiano, español, ruso menú en pantalla. o japonés como idioma de los menús en pantalla. El ajuste de fábrica es inglés.
  • Seite 37 x Uso del botón de control 5 TRAPECIO/PARALELO TRAPEC I O / PARALELO (página 11) T R A P E C I O Acceda al MENU principal. Seleccione el menú TRAPECIO/ Pulse el centro del botón de control para que el MENU PARALELO para ajustar el SE L ECT EX I T...
  • Seite 38: Ajuste Del Brillo Y Del Contraste (Brillo/Contraste)

    Ajuste del brillo y del contraste Ajuste del tamaño o centrado (BRILLO/CONTRASTE) vertical de la imagen (TAMAÑO V/POSICIÓN) Los ajustes de brillo y contraste se realizan mediante un menú BRILLO/CONTRASTE independiente. Estos ajustes se almacenan en memoria para la señal de entrada Estos ajustes se almacenan en memoria para todas las señales de actual.
  • Seite 39: Ajuste Del Ángulo De Los Lados De La Imagen (Trapecio/Paralelo)

    Ajuste del ángulo de los lados de Ajuste del color de la imagen la imagen (TRAPECIO/PARALELO) (COLOR) Estos ajustes se almacenan en memoria para la señal de entrada Los ajustes de COLOR permiten definir la temperatura del color actual. de la imagen mediante el cambio del nivel de color del campo blanco.
  • Seite 40: Ajustes Adicionales (Desmagnetizar/Muare)

    Ajustes adicionales Restauración de los ajustes (DESMAGNETIZAR/MUARE) (RECUPERAR) Es posible desmagnetizar manualmente la pantalla y cancelar el Este monitor dispone de los siguientes métodos de restauración. muaré. Utilice el menú RECUPERAR para restaurar los ajustes. Pulse el centro del botón de control. Pulse el centro del botón de control.
  • Seite 41: Características Técnicas

    RANGO EXPLORACION alimentación energía* de entrada ≤ 115 W funcionamiento verde normal (HMD-A200) ≤ 95 W Condición de la señal de entrada (HMD-A100) FUERA DE RANGO EXPLORACION ≤ 15 W indica que las especificaciones del monitor no aceptan la 1 espera verde y naranja señal de entrada.
  • Seite 42: Problemas Y Soluciones

    • Si ha sustituido un monitor antiguo por éste, vuelva a conectar el antiguo y realice lo siguiente. Instale el disquete Windows Monitor Information Disk (página 7) y seleccione este monitor (“HMD-A100” o “HMD-A200”) entre los monitores Sony de la pantalla de selección de monitor de Windows 95/98.
  • Seite 43 Es posible que se oiga un zumbido, pero no es un fallo de funcionamiento. Visualización del nombre, número de serie y fecha Si el problema no se soluciona, póngase en contacto con un proveedor Sony autorizado y proporciónele la siguiente de fabricación de este monitor (INFORMACIÓN) información.
  • Seite 44: Función De Autodiagnóstico

    1 (alimentación) e • La anchura de supresión horizontal debe ser superior a informe al proveedor Sony autorizado sobre el estado del monitor. 3,0 µseg. Asegúrese de anotar el nombre del modelo y el número de serie •...
  • Seite 45 Weitere Einstellungen (ENTMAGNETIS/MOIRE)....12 Warenzeichen der Sony Corporation. Zurücksetzen der Einstellungen (ZURÜCKSETZEN) ... 12 •...
  • Seite 46: Sicherheitsmaßnahmen

    Nähe beschädigen kann. Legen Sie magnetische Datenträger und Bänder/Disketten daher nicht zu nahe bei diesem Monitor ab. Zweck der Vertiefung an der Oberseite (nur HMD-A200) Die Netzsteckdose sollte sich in der Nähe des Geräts befinden Sie können einen Fotorahmen oder eine CD-Hülle in die und leicht zugänglich sein.
  • Seite 47: Lage Und Funktion Der Teile Und Bedienelemente

    Lage und Funktion der Teile und Bedienelemente Weitere Informationen finden Sie auf den in Klammern angegebenen Seiten. (Für die Abbildungen wurde das Modell HMD-A200 verwendet.) Vorderseite Rückseite AC IN MENU 1 Steuertaste (Seite 9) Stift Nr. Signal Mit der Steuertaste können Sie die Menüs aufrufen und die Einstellungen des Monitors, einschließlich der Helligkeits-...
  • Seite 48: Anschließen Des Geräts

    Schritt 2: Anschließen des Anschließen des Geräts Netzkabels Bevor Sie mit dem Monitor arbeiten, überprüfen Sie bitte, ob Schließen Sie bei ausgeschaltetem Monitor und Computer das folgende Zubehörteile mitgeliefert wurden: Netzkabel an den Monitor an, und stecken Sie den Netzstecker in •...
  • Seite 49: Anschließen Von Usb-Kompatiblen Peripheriegeräten (Usb - Universeller Serieller Bus)

    Wenn auf dem Bildschirm kein Bild erscheint Anschließen von USB-kompatiblen • Überprüfen Sie, ob der Monitor korrekt an den Computer Peripheriegeräten (USB - angeschlossen ist. • Wird KEIN EINGANGSSIGNAL auf dem Bildschirm Universeller Serieller Bus) angezeigt, überprüfen Sie, ob die Grafikkarte des Computers korrekt in den richtigen Steckplatz eingebaut ist.
  • Seite 50: Auswählen Der Sprache Für Die Bildschirmmenüs

    Auswählen der Sprache für die Einstellen des Monitors Bildschirmmenüs Mit den Bildschirmmenüs können Sie eine Vielzahl von (SPRACHE/INFORMATION) Einstellungen vornehmen. Für die Bildschirmmenüs stehen die Sprachen Englisch, Französisch, Deutsch, Italienisch, Spanisch, Russisch und Navigieren in den Menüs Japanisch zur Verfügung. Die Standardeinstellung ist Englisch. Drücken Sie auf die Mitte der Steuertaste, um das Hauptmenü...
  • Seite 51 x Die Steuertaste 6 DREHUNG (Seite 11) DREHUNG Im Menü DREHUNG können Sie DR E HUNG Rufen Sie das Hauptmenü MENÜ auf. die Rotation des Bildes einstellen. Drücken Sie auf die Mitte der Steuertaste, um das Hauptmenü EX I T MENÜ...
  • Seite 52: Einstellen Von Helligkeit Und Kontrast (Helligkeit/Kontrast)

    Einstellen von Helligkeit und Einstellen von Höhe oder Position Kontrast des Bildes (V-GRÖSSE/LAGE) (HELLIGKEIT/KONTRAST) Diese Einstellungen werden nur für das gerade eingespeiste Eingangssignal gespeichert. Helligkeit und Kontrast können Sie über ein spezielles Menü, HELLIGKEIT/KONTRAST, einstellen. Drücken Sie auf die Mitte der Steuertaste. Diese Einstellungen werden gespeichert und gelten für alle Das Hauptmenü...
  • Seite 53: Einstellen Des Winkels Der Bildränder (Trapezform/Parallel)

    Einstellen des Winkels der Bildränder Einstellen der Farbe des Bildes (TRAPEZFORM/PARALLEL) (FARBE) Diese Einstellungen werden nur für das gerade eingespeiste Mit den Optionen im Menü FARBE können Sie die Eingangssignal gespeichert. Farbtemperatur des Bildes einstellen. Dabei ändert sich der Farbwert im weißen Farbfeld. Farben erscheinen bei einer Drücken Sie auf die Mitte der Steuertaste.
  • Seite 54: Weitere Einstellungen (Entmagnetis/Moire)

    Weitere Einstellungen Zurücksetzen der Einstellungen (ENTMAGNETIS/MOIRE) (ZURÜCKSETZEN) Sie können den Bildschirm manuell entmagnetisieren und den Bei diesem Monitor haben Sie zwei Möglichkeiten, die Moiré-Effekt korrigieren. Einstellungen zurückzusetzen. Im Menü ZURÜCKSETZEN können Sie die Einstellungen zurücksetzen. Drücken Sie auf die Mitte der Steuertaste. Das Hauptmenü...
  • Seite 55: Technische Merkmale

    Status des Betriebsmodus Leistungsaufnahme* Netzanzeige ABTASTBERE I CH Eingangssignals ≤ 115 W Normalbetrieb grün (HMD-A200) ≤ 95 W Status des Eingangssignals NICHT IM ABTASTBEREICH (HMD-A100) Gibt an, daß das Eingangssignal nicht den technischen Daten ≤ 15 W 1 Bereitschaft abwechselnd des Monitors entspricht.
  • Seite 56: Symptome Für Fehler Und Abhilfemaßnahmen

    System wieder an, und gehen Sie folgendermaßen vor: Installieren Sie die Diskette „Windows Monitor Information Disk“ (Seite 7), und wählen Sie diesen Monitor („HMD-A100“ oder „HMD-A200“) aus den Sony-Monitoren im Monitorauswahlfenster in Windows 95/98 aus. Sie arbeiten mit einem Macintosh- •...
  • Seite 57 Ergebnisse. Dabei ist möglicherweise ein Summgeräusch zu hören, aber dies ist keine Fehlfunktion. Anzeigen des Namens, der Seriennummer und Bleibt das Problem bestehen, wenden Sie sich an Ihren autorisierten Sony-Händler. Halten Sie die folgenden des Herstellungsdatums des Monitors Informationen bereit: (INFORMATION) •...
  • Seite 58: Selbstdiagnosefunktion

    Sie sich mit der Beschreibung des Problems an einen • Die horizontale Austastbreite sollte über 3,0 µSek. liegen. autorisierten Sony-Händler. Notieren Sie sich unbedingt die • Die vertikale Austastbreite sollte über 500 µSek. liegen. Modellbezeichnung und die Seriennummer des Monitors.
  • Seite 59 • Trinitron è un marchio di fabbrica registrato di Sony Corporation. Caratteristiche tecniche ......13 • Macintosh è un marchio di fabbrica concesso in licenza a Apple Computer, Modo preimpostato e modo utente .
  • Seite 60: Precauzioni

    Utilizzo della fessura situata nella parte superiore situati vicino al monitor. Collocare eventuali apparecchiature di del monitor (solo per il modello HMD-A200) registrazione magnetica, nastri e dischi lontano dal monitor. Questa fessura può essere utilizzata per inserirvi la custodia di un CD o una fotografia in cornice.
  • Seite 61: Identificazione Dei Componenti E Dei Comandi

    Identificazione dei componenti e dei comandi Per maggiori informazioni, vedere le pagine fra parentesi. (Per le illustrazioni è stato utilizzato il modello HMD-A200.) Parte anteriore Parte posteriore AC IN MENU 1 Tasto di comando (pagina 9) 4 Connettore di ingresso video (HD15) (pagina 6)
  • Seite 62: Installazione

    Punto 2:Collegamento del cavo di Installazione alimentazione Prima di utilizzare il monitor, verificare che la confezione Con il monitor e il computer spenti, collegare prima il cavo di contenga i seguenti accessori. alimentazione al monitor, quindi collegarlo alla presa di rete. •...
  • Seite 63: Collegamento Delle Periferiche Conformi A Usb

    Se sullo schermo non appare alcuna immagine Collegamento delle periferiche • Verificare che il monitor sia collegato al computer conformi a USB correttamente. • Se sullo schermo appare il messaggio NO SEGNALE Il monitor è dotato di un connettore upstream USB (sul pannello INGRESSO, verificare che la scheda grafica del computer sia posteriore) e di quattro connettori downstream USB (due sul lato completamente inserita nel corretto alloggiamento del bus.
  • Seite 64: Selezione Della Lingua Del Menu A Schermo (Lingua/Informazione)

    Selezione della lingua del menu a Personalizzazione del schermo monitor (LINGUA/INFORMAZIONE) È possibile effettuare numerose regolazioni del monitor usando il I menu a schermo sono disponibili in inglese, francese, tedesco, menu a schermo. italiano, spagnolo, russo e giapponese. La lingua preimpostata è l’inglese.
  • Seite 65 x x x x Utilizzo del tasto di comando 6 ROTAZIONE (pagina 11) ROTAZ IONE Selezionare il menu ROTAZIONE RO T A Z I ON E Visualizzazione del MENU principale. per regolare la rotazione Per visualizzare il MENU principale, premere il tasto di dell’immagine.
  • Seite 66: Regolazione Della Luminosità E Del Contrasto (Luminosita/Contrasto)

    Regolazione della luminosità e del Regolazione della dimensione contrasto verticale o della centratura (LUMINOSITA/CONTRASTO) dell’immagine (DIM.VERT/POSIZIONE) Le regolazioni relative alla luminosità e al contrasto vengono effettuate utilizzando il menu LUMINOSITA/CONTRASTO. Queste impostazioni vengono memorizzate per il segnale di Queste impostazioni vengono memorizzate per tutti i segnali ingresso corrente.
  • Seite 67: Regolazione Dell'angolo Dei Lati Dell'immagine (Trapezio/Parall)

    Regolazione dell’angolo dei lati Regolazione del colore dell’immagine dell’immagine (COLORE) (TRAPEZIO/PARALL) Le impostazioni del menu COLORE consentono di regolare la temperatura di colore dell’immagine modificando il livello del Queste impostazioni vengono memorizzate per il segnale di campo di colore bianco. I colori appaiono rossastri se la ingresso corrente.
  • Seite 68: Impostazioni Aggiuntive (Smagnetiz/Moire)

    Impostazioni aggiuntive Reimpostazione delle regolazioni (SMAGNETIZ/MOIRE) (RICHIAMO) È possibile smagnetizzare lo schermo manualmente ed eliminare Questo monitor dispone dei due metodi di reimpostazione l’effetto moiré. descritti di seguito. Per reimpostare le regolazioni usare il menu RICHIAMO. Premere il tasto di comando al centro. Sullo schermo appare il MENU principale.
  • Seite 69: Caratteristiche Tecniche

    Condizione del segnale ≤ 115 W FUOR I GAMMA SCANS funzionamento verde di ingresso normale (HMD-A200) ≤ 95 W (HMD-A100) La condizione del segnale di ingresso ≤ 15 W 1 attesa verde e arancione FUORI GAMMA SCANS alternato Indica che il segnale di ingresso non è...
  • Seite 70: Sintomi E Soluzioni Dei Problemi

    • Se con questo monitor è stato sostituito un vecchio monitor, ricollegare il vecchio monitor e effettuare le seguenti operazioni. Installare il Windows Monitor Information Disk (pagina 7) e selezionare questo monitor (“HMD-A100” o “HMD-A200”) tra i monitor Sony nella schermata di selezione monitor Windows 95/98.
  • Seite 71 * Nel caso in cui sia necessario un secondo ciclo di smagnetizzazione, attendere almeno 20 minuti per ottenere un risultato migliore. Potrebbe venire udito un ronzio che non è un problema di funzionamento. Visualizzazione del nome del monitor, del numero Se il problema persiste, rivolgersi al rivenditore autorizzato Sony comunicando le seguenti informazioni. di serie e della data di produzione •...
  • Seite 72: Funzione Di Autodiagnostica

    • L’ampiezza di sincronizzazione orizzontale dovrebbe essere tra il lampeggiamento nel colore arancione dell’indicatore di superiore a 1,0 µsec. accensione 1 e rivolgersi al rivenditore autorizzato Sony. • L’ampiezza di oscuramento orizzontale dovrebbe essere Annotare il nome del modello e il numero di serie del monitor.
  • Seite 73 • Trinitron is een geregistreerd handelsmerk van Sony Corporation. • Macintosh is een handelsmerk in Technische kenmerken ......13 licentie gegeven aan Apple Computer, Inc., geregistreerd in de U.S.A.
  • Seite 74: Voorzorgsmaatregelen

    Hou dergelijke zaken dan ook uit de buurt van de monitor. Gebruik van de groef bovenaan (alleen HMD-A200) Het toestel moet in de buurt van een makkelijk bereikbaar In deze gleuf kunt een fotolijstje of een CD-doosje stoppen.
  • Seite 75: Onderdelen En Bedieningselementen

    Onderdelen en bedieningselementen Meer details vindt u op de pagina’s tussen haakjes. (In de illustraties wordt model HMD-A200 weergegeven.) Voorkant Achterkant AC IN MENU 1 Regeltoets (pagina 9) 4 Video-ingang (HD15) (pagina 6) Met de regeltoets kan men het menu op het scherm laten...
  • Seite 76: Opstelling

    Stap 2: Sluit het netsnoer aan Opstelling Zet de monitor en de computer af en sluit het netsnoer eerst aan Alvorens de monitor in gebruik te nemen, moet u controleren of op de monitor en pas dan op een stopcontact. de verpakking de volgende zaken bevat: •...
  • Seite 77: Universal Serial Bus (Usb) Compatibele Randapparatuur Aansluiten

    Als er geen beeld verschijnt op het scherm Universal Serial Bus (USB) • Controleer of de monitor correct is aangesloten op de computer. compatibele randapparatuur • Als NO INPUT SIGNAL verschijnt op het scherm, controleer dan of de grafische kaart van uw computer goed vastzit in de aansluiten juiste busgleuf.
  • Seite 78: De Schermmenutaal Kiezen (Language/Information)

    De schermmenutaal kiezen Uw monitor persoonlijk (LANGUAGE/INFORMATION) instellen Schermmenu’s zijn beschikbaar in het Engels, Frans, Duits, Italiaans, Spaans, Russisch en Japans. Standaard is Engels Via het schermmenu kunt u talrijke instellingen verrichten aan de ingesteld. monitor. Druk in het midden van de regeltoets. Het menu overlopen Zie pagina 9 voor meer informatie over het gebruik van de regeltoets.
  • Seite 79 x Gebruik van de regeltoets 6 ROTATION (pagina 11) ROTAT I ON Kies het ROTATION menu om RO T A T I ON Het hoofdmenu laten verschijnen. het beeld te roteren. Druk in het midden van de regeltoets om het hoofdmenu op het scherm te laten verschijnen.
  • Seite 80: Helderheid En Contrast Instellen (Brightness/Contrast)

    Helderheid en contrast instellen Het verticale formaat of de (BRIGHTNESS/CONTRAST) verticale centrering van het beeld regelen (V-SIZE/CENTER) Helderheid en contrast worden ingesteld via een apart BRIGHTNESS/CONTRAST menu. Deze instellingen worden gememoriseerd voor het huidige Deze instellingen worden gememoriseerd voor alle ingangssignaal.
  • Seite 81: De Hoek Van De Zijkanten Van Het Beeld Regelen (Key/Key Balance)

    De hoek van de zijkanten van het De beeldkleur regelen (COLOR) beeld regelen Met de COLOR instellingen kunt u de beeldkleurtemperatuur (KEY/KEY BALANCE) regelen door het kleurniveau van het witte kleurveld te veranderen. De kleuren hebben een rode tint bij lage temperatuur Deze instellingen worden gememoriseerd voor het huidige en een blauwe kleur bij hoge temperatuur.
  • Seite 82: Bijkomende Instellingen (Degauss/Cancel Moire)

    Bijkomende instellingen De instellingen terugstellen (DEGAUSS/CANCEL MOIRE) (RESET) U kunt het scherm handmatig demagnetiseren (degauss) en de Deze monitor beschikt over de volgende twee moiré-annulering te regelen. terugstelmogelijkheden. Gebruik het RESET menu om de instellingen terug te stellen. Druk in het midden van de regeltoets. Het hoofdmenu verschijnt op het scherm.
  • Seite 83: Technische Kenmerken

    1 (aan/uit) Werkingsstand Stroomverbruik indicator Toestand ingangssignaal OUT OF SCAN RANGE ≤ 115 W normale werking groen (HMD-A200) ≤ 95 W (HMD-A100) Toestand van het ingangssignaal ≤ 15 W 1 standby afwisselend groen OUT OF SCAN RANGE en oranje geeft aan dat de monitor het ingangssignaal niet kan ≤...
  • Seite 84: Storingen En Oplossingen

    • Als u een oude monitor hebt vervangen door deze monitor, sluit dan de oude monitor weer aan en ga als volgt tewerk. Installeer de Windows Monitor Information Disk (pagina 7) en kies deze monitor (“HMD-A100” of “HMD-A200”) uit de Sony monitors in het Windows 95/98 monitorkeuzescherm.
  • Seite 85 Model, serienummer en productiedatum van de Als het probleem niet is opgelost, neem dan contact op met uw erkende Sony dealer en bezorg hem de volgende informatie. monitor laten verschijnen (INFORMATION) • Modelnaam: HMD-A100, HMD-A200 Druk in het midden van de regeltoets.
  • Seite 86: Zelfdiagnosefunctie

    Horizontaal: max. 1280 dots Als de kleurbalkjes niet verschijnen, is de monitor mogelijk Verticaal: max. 1024 lijnen Ong. 312 × 234 mm (b/h) defect. Informeer uw Sony dealer over de staat van de monitor. Standaard beeldzone Afbuigfrequentie* Horizontaal: 30 tot 70 kHz...
  • Seite 87: Appendix

    Appendix Preset mode timing table No. Resolution Horizontal Vertical Graphics (dots × lines) Frequency Frequency Mode 640 × 480 31.5 kHz 60 Hz VGA-G 640 × 480 43.3 kHz 85 Hz VESA 720 × 400 31.5 kHz 70 Hz VGA-Text 800 ×...
  • Seite 88 Sony Corporation Printed in Thailand...

Diese Anleitung auch für:

Hmd-a100

Inhaltsverzeichnis