Inhaltsverzeichnis
Werbung
Verfügbare Sprachen
Verfügbare Sprachen
Quicklinks
Werbung
Kapitel
Inhaltsverzeichnis
Fehlerbehebung

Verwandte Anleitungen für Pentair INTELLIFLO WHISPERFLO VF


Inhaltszusammenfassung für Pentair INTELLIFLO WHISPERFLO VF
- Seite 1 INTELLIFLO WHISPERFLO VF SWIMMING POOL PUMP INSTALLATION GUIDE IntelliFlo VF Installation and User’s Guide IMPORTANT SAFETY INSTRUCTIONS READ AND FOLLOW ALL INSTRUCTIONS SAVE THESE INSTRUCTIONS WATER SOLUTION 357220 (Rev. 08/2016)
-
Seite 2: Customer Support
United States and/or other counties. Unless noted, names and brands of others that may be used in this document are not used to indicate an affiliation or endorsement between the proprietors of these names and brands and Pentair. Those names and brands may be the trademarks or registered trademarks of those parties or others. -
Seite 3: Inhaltsverzeichnis
Contents Important Safety Precautions ......................3 Section 1: Introduction ........................6 IntelliFlo Overview ..........................6 IntelliFlo Features ........................ 7 IntelliFlo Motor Assembly ..................... 7 IntelliFlo Motor Features ...................... 8 IntelliFlo Drive Assembly and Control Panel ................ 9 Operator Control Panel Features ..................9 Section 2: Operator Control Panel .................... - Seite 4 Contents (Continued) Wave ..........................35 Pulse ..........................36 Features Settings ......................37 Feature 1 or 2 Setup ......................38 Feature 3-9 Setup ......................39 Feature 3-9 Operation ....................... 40 M.O. Flo Setup ........................41 Features Menu (Continued) ....................42 M.O. Flo Operation ......................42 Wave and Pulse Setup ......................
-
Seite 5: Important Safety Precautions
IMPORTANT SAFETY PRECAUTIONS Important Notice: Attention Installer: This manual contains important information about the installation, operation and safe use of this product. This information should be given to the owner and/or operator of this equipment. WARNING — Before installing this product, read and follow all warning notices and instructions which are included. -
Seite 6: General Installation Information
IMPORTANT SAFETY PRECAUTIONS (continued) WARNING — Water temperature in excess of 100° Fahrenheit (38°C) may be hazardous to your health. Prolonged immersion in hot water may induce hyperthermia. Hyperthermia occurs when the internal temperature of the body reaches a level several degrees above normal body temperature of 98.6°... - Seite 7 IMPORTANT SAFETY PRECAUTIONS (continued) WARNING — Pumps improperly sized or installed or used in applications other than for which the pump was intended can result in severe personal injury or death. These risks may include but not be limited to electric shock, fire, flooding, suction entrapment or severe injury or property damage caused by a structural failure of the pump or other system component WARNING —...
-
Seite 8: Section 1: Introduction
Section 1 Introduction IntelliFlo VF Overview ® The IntelliFlo VF variable flow pump control system offers pool and spa filter automation and advanced features that include energy conservation and programmable scheduled water features for your pool, spa, cleaner, waterfall, and other applications. The IntelliFlo pump can adapt to any application up to 29m /h (130 US gallons per minute). -
Seite 9: Intelliflo Features
IntelliFlo Features • Sizes itself to any pool = less time needed for installation • Reduces energy cost by as much as 90% = an eco-friendly product • Protects against loss of prime or flow blockage = convenient safety • Prevents thermal overload = reduced overheating risk •... -
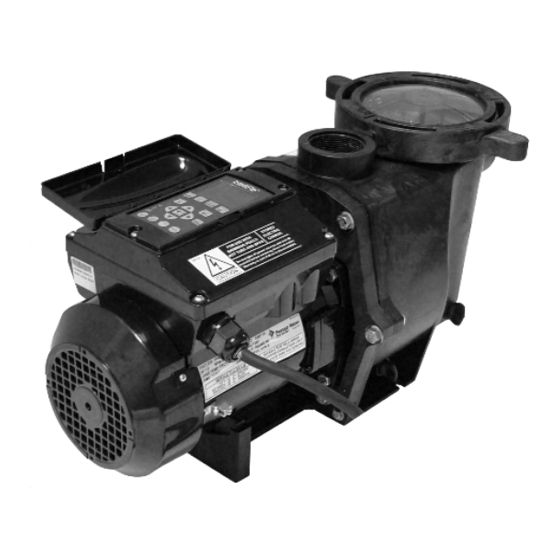
Seite 10: Intelliflo Motor Features
Operator control panel cover Drive assembly and electronics enclosure Motor fan cover Motor assembly Communication Port for RS-485 (IntelliTouch and IntelliComm) Motor stand IntelliFlo Motor Assembly IntelliFlo Motor Features • Permanent Magnet Synchronous Motor (PMSM) = like for hybrid cars •... -
Seite 11: Intelliflo Drive Assembly And Control Panel
IntelliFlo VF Drive Assembly and Control Panel The IntelliFlo drive consists of an operator control panel and system electronics that convert the incoming 230 volt single phase power to 3 phase variable frequency to drive the motor. The drive microprocessor controls the motor by changing the frequency of the current it receives together with changing the voltage to control the rotational speed. -
Seite 12: Intelliflo Operator Control Panel
Section 2 Operator Control Panel This section describes the operator control panel controls and LEDs. IntelliFlo Operator Control Panel ® FILTER 12:15 15.W POWER RUNNING Controls and LEDs Filter button/LED: Starts Filter mode. The LED is on when Filter mode is active. Vacuum button/LED: Starts Vacuum mode. -
Seite 13: Arrow Buttons
Controls and LEDs (Continued) ® FILTER 12:15 Line 1 15.W Line 2 Line 3 POWER RUNNING Line 4 Arrow buttons: • Up arrow: Move one level up in the menu tree or increase a digit when editing a setting. • Down arrow: Move one level down in the menu tree or decrease a digit when editing a setting. •... -
Seite 14: Priming Setup Example
Priming Setup Example The following example illustrates the steps to set up Priming Mode. The control panel buttons are pictured below to help you become familiar with their appearance and function. To set up the Priming Mode flow rate and time: Priming Setup 1. -
Seite 15: Section 3: Operating Intelliflo
Section 3 Operating IntelliFlo VF This section describes how to use the IntelliFlo VF operator control panel to set up the pump’s operating modes. IntelliFlo Operating Modes: The operating mode buttons are Manual Mode, Filter Mode, Backwash Mode, Vacuum Mode, Feature 1, and Feature 2. Feature 3 through 9 are set up in the Features settings menu. -
Seite 16: Manual Rpm Mode
Use Manual Mode to meaure and test the requirements of each flow-operated device in your pool system, and record your results for later setup in the IntelliFlo’s menus. See “Menus” on page 21 for detailed instructions. To operate IntelliFlo in manual mode: Manual RPM Mode 1. -
Seite 17: Manual Flow Mode
Manual Mode (Continued) Manual Flow Mode 4. Press the Start/Stop button to stop the pump. Use the Up and Down arrow buttons to scroll to the “Set FLOW” menu item. Press the Select button to select it. 5. To change the setting, press the Left and Right arrows to select which digit to modify, then use the Up and Down arrows to change the selected digit. - Seite 18 Manual Mode (Continued) ® ® ® MANUAL RPM 12:15 MANUAL RPM 12:15 MANUAL RPM 12:15 1 000.RPM 2000.RPM 1000. RPM Set SPEED Set SPEED Set SPEED STOPPED STOPPED STOPPED Cursor hi-lights in Left/Right arrow Press the Enter black buttons to change button to save.
-
Seite 19: Backwash Mode
Backwash Mode When the pool filter’s internal pressure reaches “Clean Filter Pressure,” IntelliFlo displays a “Service System Soon” alert on the control panel display (See “To set the Clean Filter Pressure” on page 26 and “Clean Fiter Pressure Example” on page 30.), indicating that the filter needs to be cleaned, or “backwashed.”... -
Seite 20: Vacuum Mode
Backwash Mode (Continued) 4. When Backwash Mode is stopped, manually or upon completion of the preset backwash cycle, the IntelliFlo will stop, and the control panel will display “Rinse” in the top left corner. IntelliFlo will not begin the rinse cycle until you press the Start/Stop ®... -
Seite 21: Filter Mode
Vacuum Mode (Continued) 3. Use the Up and Down arrow buttons to view the screens below: • REMAINING TIME: Displays time remaining in programmed duration • POWER (Watts): Displays power to the motor shaft in continuous watts • ACTUAL SPEED (RPM): Displays pump speed in RPM •... -
Seite 22: Feature 1(2) Mode
External Control Mode IntelliFlo With IntelliComm Communication Center The IntelliFlo can be connected to the Pentair IntelliComm Communication Center via an optional communications cable (P/N 350122). The IntelliComm is equipped with four pairs of input terminal connections which can be connected to IntelliFlo’s Program 1(4) in the External Control menu (See page 44 for more information on setting up External Control.). -
Seite 23: Menu Button
External Control Mode (Continued) Additionally, Programs 1(4) are equipped with a “Time Delay Stop” setting which allows you to specify a period of time for which IntelliFlo will continue to operate at the programmed flow rate after the voltage has stopped. See “External Control Setup with IntelliComm”... -
Seite 24: Intelliflo Menus
(hr:mm) Start Cycle 2 Stop Cycle 2 (hr:mm) Start Cycle 3 (hr:mm) Stop Cycle 3 (hr:mm) Start Cycle 4 (hr:mm) IntelliFlo Menus Stop Cycle 4 (hr:mm) TIME / CONTR Set Time (hr:min - AM/PM) (page 31) Contrast Level (0 - 9) MAIN SCREEN Press MENU button to access menus FEATURES... -
Seite 25: Pool Data Menu
Pool Data Menu Use the Pool Data menu to configure IntelliFlo for the pool and spa system. From this menu you can set the language of the control panel LCD, enter an address for the IntelliFlo pump when connected to an IntelliTouch system, enter the volume of pool water in cubic meters (m ), and enter an estimate of the pool water temperature. -
Seite 26: Units Menu
Pool Data Menu (Continued) ® Pool Data 12:15 Use the Up and Down arrow buttons to d) To enter the water temperature: 24 °C scroll to the “Water Temperature” setting. Press the Select button to select it. To change the setting, press the Left and Right arrows to select which Water Temperature digit to modify, then use the Up and Down arrows to change the selected digit. - Seite 27 Priming Menu (Continued) When the pump is priming, the control panel LCD displays “Priming” and then, for a moment, displays “Primed” when priming is complete. CAUTION: To avoid permanent damage to the IntelliFlo pump, before starting the system, fill the IntelliFlo housing strainer with water so that the pump will prime correctly.
-
Seite 28: Filter Menu
Priming Menu (Continued) ® Priming 12:15 Use the Up and Down arrow buttons to c) To set the System Priming Time: 0. MIN scroll to the “System Priming Time” setting. Press the Select button to select System Priming Time it. To enter additional priming time to ensure that the entire system is fully primed, see step 4. - Seite 29 Filter Menu (Continued) The value entered for the “Clean Filter Pressure” sets how far above “starting pressure” the internal pressure of the filter must climb before the IntelliFlo ® Filter 12:15 displays a “Service System Soon” alert. The “starting pressure” is the 965.mbar 1.0 bar filter pressure reading at the completion of the last backwashing.
- Seite 30 Filter Menu (Continued) Use the Up and Down arrow d) To set the Start and Stop times of Cycles 1 through 4: buttons to find the “Start Cycle 1” setting. Press the Select button to select it. 9:00 is the default setting.
-
Seite 31: Filter Cycle Settings
Filter Menu (Continued) Filter Cycle Settings The table below shows the settings available in Filter Mode. NAME VALUE DESCRIPTION Clean Filter 0,1 to 3,5 bar The differential pressure from the 0-pressure to 100% Pressure (default 1.0 bar) filter status. Turnovers The number of times per day the volume of water 1-8 (Default 1) Per Day... -
Seite 32: Clean Filter Pressure Example
Filter Menu (Continued) Clean Filter Pressure Example Pool filters work by trapping dirt. At startup, when a pool filter is still clean, it registers an internal pressure known as “starting pressure.” As dirt builds up in the filter, internal pressure increases. Eventually, the filter will need a) to be cleaned, or “backwashed”, to remove the dirt if it is a sand or D.E. -
Seite 33: Using Filter Mode In Conjunction With Features Mode
Filter Menu (Continued) Using Filter Mode in conjunction with Features Mode IntelliFlo will start and stop at the times you program for filter cycles 1-4, however the parameters you set to operate features in Features Mode (Feature 3-9 only) supercede the filter cycle parameters you set in Filter Mode. -
Seite 34: Flow Control And Filter Mode
Filter Menu (Continued) Flow Control and Filter Mode The Filter Mode feature enables IntelliFlo to overcome head pressure loss to maintain the required flow. The flow that the unit can provide is limited by the installed plumbing. If more flow is demanded than the IntelliFlo can provide, it will ramp to full speed and create pressure. -
Seite 35: Time And Contrast Menu
Time and Contrast Menu Use the “Time/Contr” menu to set the IntelliFlo system clock and to adjust the contrast of the control panel display. The IntelliFlo system clock controls all scheduled start and stop times, functions, and programmed cycles. The system clock can store the correct time for up to 96 hours after power is shut off. After 96 hours, the clock must be reset to the correct time. -
Seite 36: Features Menu
Features Menu Use the Features Mode to control water features such as fountains, spa, automatic cleaner, waterfalls, etc. Features Mode includes: • Feature 1 and 2 • Feature 3-9 • M.O. Flo • Wave • Pulse Feature 1 and 2 Feature 1 and Feature 2 are designed for “on demand”... - Seite 37 Features Menu (Continued) By entering the following parameters in the M.O. Flo setting, however, you can program IntelliFlo to increase the flow rate from 4 m /h to 12 m /h for three minute intervals, every two hours, thus tripping the pressure switch: Flow Rate=9m /h, Run Time=:03 (3 minutes), Interval Time=2 hours.
-
Seite 38: Pulse
Features Menu (Continued) Pulse Like the M.O. Flo and Wave features, the Pulse feature is designed for water features requiring flow rates of varying intensity. As with the Wave feature, the Pulse feature setting includes parameters for minimum and maximum pump speeds, and period, however these pararmeters function differently than in the Wave feature. The Pulse feature randomly selects a pump speed between the minimum and maximum values you specify, and directs IntelliFlo to run at that speed for the span of time you enter for the “Period”... -
Seite 39: Features Settings
Features Menu (Continued) Features Settings Name Value Description F1-9, M.O. Flo 4-29m Programs the rate of flow for feature 1 - 10 Set Flow (Default 12m F3-9, M.O. Flo, Wave, When this setting is set to Enabled, the feature activates at the time Enabled / Disabled Pulse specified in the “Set Start Time”... -
Seite 40: Feature 1 Or 2 Setup
Features Menu (Continued) Feature 1 or 2 Setup To access the Features 1(2) menu: 1. Ensure that the green power LED is on and the pump is stopped. 2. Press the Menu button. “Pool Data” is displayed. 3. Use the Up and Down arrow buttons to scroll to the “Features” menu item. Press the Select button to select it. -
Seite 41: Feature 3-9 Setup
Features Menu (Continued) Feature 3-9 Setup To access the Features 3-9 menu: 1. Ensure that the green power LED is on and the pump is stopped. 2. Press the Menu button. “Pool Data” is displayed. 3. Use the Up and Down arrow buttons to scroll to the “Features” menu item. Press the Select button to select it. -
Seite 42: Feature 3-9 Operation
Features Menu (Continued) 4. To change a setting, press the Left and Right arrows to select which digit to modify, then use the Up and Down arrows to change the selected digit. 5. When you are done, press the Enter button to save the changes. To cancel any changes, press the Escape button to exit the setting without saving. - Seite 43 Features Menu (Continued) M.O. Flo Setup To access the M.O. Flo menu: 1. Ensure that the green power LED is on and the pump is stopped. 2. Press the Menu button. “Pool Data” is displayed. 3. Use the Up and Down arrow buttons to scroll to the “Features” menu item. Press the Select button to select it.
-
Seite 44: M.o. Flo Operation
Features Menu (Continued) 4. To change a setting, press the Left and Right arrows to select which digit to modify, then use the Up and Down arrows to change the selected digit. 5. When you are done, press the Enter button to shave the changes. To cancel any changes, press the Escape button to exit mode without saving. -
Seite 45: Wave And Pulse Operation
Features Menu (Continued) 4. To change a setting, press the Left and Right arrows to select which digit to modify, then use the Up and Down arrows to change the selected digit. 5. When you are done, press the Enter button to shave the changes. To cancel any changes, press the Escape button to exit mode without saving. -
Seite 46: External Control Menu
External Control Menu External Control Setup with IntelliComm External Control Mode is activated and operated through the IntelliComm communication center. See “External Control Mode” on page 20 for more information on operating the IntelliFlo by remote control. To access the Ext. Ctrl. menu: 1. -
Seite 47: Backwash Menu
External Control Menu (Continued) ® se the Up and Down arrow To set the Time Delay Stop parameter: U Program 1 12:16 0:00 buttons to scroll to the “Time Delay Stop” setting. Press the Select button to access it (Default 0, or 00:00). To change the setting, see step 4, below. Time Delay Stop 4. -
Seite 48: Vacuum Menu
Vacuum Menu Vacuum Mode Setup To access the Vacuum menu: 1. Ensure that the green power LED is on and the pump is stopped. 2. Press the Menu button. “Pool Data” is displayed. 3. Use the Up and Down arrow buttons to scroll to the “Vacuum” menu item. Press the Select button to select it. -
Seite 49: Section 4: Maintenance
Section 4 User Maintenance The following information describes how to service and maintain the IntelliFlo pump. Pump Strainer Basket The strainer, sometimes referred to as the “Hair and Lint Pot,” at the front of the pump. The Hair and Lint Pot contains a basket which must be kept clean of leaves and debris at all times. -
Seite 50: Pump Strainer Basket Service
Pump Strainer Basket Service (Continued) 10. Ensure that the lid o-ring is properly placed. Seat the clamp and lid then turn clockwise until the handles are horizontal as shown. 11. Reconnect the communication cable to the pump if required. 12. Switch the power ON at the circuit breaker. Reset the pool time clock to the correct time. Clamp WARNING - FILTER OPERATES UNDER HIGH PRESSURE. -
Seite 51: Winterizing
Winterizing The IntelliFlo’s internal anti-freeze protection is disabled when connected to an IntelliTouch. Freeze protection is provided by selecting YES at the ON WITH FREEZE portion of the IntelliTouch’s appropriate circuit function menu. To re-enable the IntelliFlo’s internal anti-freeze protection, the power to the drive must be cycled off then back on. - Seite 52 4. Make sure all electrical connections are clean and tight. 5. Open the air release valve on the filter, and stand clear of the filter. 6. Switch the IntelliFlo on at the circuit breaker. Ensure that the green power LED is on. 7.
-
Seite 53: Section 5: Installation And Removal
Section 5 Installation and Removal The following general information describes how to install the IntelliFlo pump. Attention Installer: Before installing the IntelliFlo pump, read and follow all warning notices, instructions and safety precautions on pages 3, 4 and 5. Installing the IntelliFlo Only a qualified service person should install the IntelliFlo. -
Seite 54: Wiring The Intelliflo
Wiring the IntelliFlo To connect the IntelliFlo to AC power: 1. Make sure all electrical breakers and switches are turned off before wiring motor. 2. Make sure that the wiring voltage is 230 VAC. 3. Use #12 AWG for wire runs up to 30 m or 100 feet and #10 AWG for lengths longer than 30 m or 100 feet. - Seite 55 Wiring the IntelliFlo VF (for models with side AC Power connection) NOTE THIS WORK MUST BE DONE BY THE QUALIFIED ELECTRICIAN in accordance with the national wiring rules (AS/NZS 3000) taking into account its ratings (Class I, IPX5). To connect the IntelliFlo to AC power: 1.
-
Seite 56: Pump Disassembly
Pump Disassembly WARNING — Always disconnect power to the pool pump at the circuit breaker before servicing the pump. Failure to do so could result in death or serious injury to serviceman, pool users or others due to electric shock. Read all servicing instructions before working on the pump. -
Seite 57: Pump Reassembly/Seal Replacement
Pump Disassembly (Continued) 9. To unscrew the impeller from the shaft, twist the impeller counterclockwise. SEAL PLATE 10. Remove the rotating portion of the mechanical seal from the G ASKET impeller. 11. Remove the four bolts from the seal plate to the motor, using a IMPELLER M O TO R BO LT 9/16 inch wrench. -
Seite 58: Drive Assembly Removal And Installation
Drive Assembly Removal and Installation To remove the IntelliFlo drive and control panel from the motor assembly: 1. Make sure all electrical breakers and switches are turned off before removing the drive. 2. Disconnect the communication cable from the pump. 3. -
Seite 59: Illustrated Parts List
Illustrated Parts List 11 18 17 29 12 14 8 Replacement Parts Item Part No. Description Item Part No. Description 070387 BASKET AQ & WF 072184 WASHER 3/8 ID X 7/8 OD .05 THICK 18-8 s/s, (QTY 6) 070429 BOLT HEX HD, 2-56x0.875 s/s, (QTY 4) 072928 DIFFUSER ASSEMBLY WFE 12... -
Seite 60: Intelliflo Pump Dimensions
IntelliFlo Pump Dimensions (59.5 cm) (27.5 cm) (31.8 cm) Intelliflo Performance Curve 35.00 30.00 25.00 3450 RPM 20.00 15.00 10.00 1500 RPM 5.00 0.00 10.0 15.0 20.0 25.0 30.0 35.0 / HR IntelliFlo Electrical Specifications Circuit Protection: Two-pole 20 AMP device at the Electrical Panel. Input: 230 VAC, 50/60 Hz, 3200 Watts, 16 Amps IntelliFlo VF Installation and User’s Guide... -
Seite 61: Section 6: Troubleshooting
Section 6 Troubleshooting CAUTION: Before troubleshooting the IntelliFlo pump, read and follow all warning notices, instructions and safety precautions on pages 3, 4 and 5. Alerts and Warnings The IntelliFlo displays all alarms and warnings on the control panel display. When an alarm or warning condition exists, the corresponding LED will be lit on the display. -
Seite 62: General Intelliflo Troubleshooting Problems
General IntelliFlo Troubleshooting Problems Use the following general troubleshooting information to resolve possible problems with your IntelliFlo pump. Note: Turn off power to unit prior to attempting service or repair. Problem Possible Cause Corrective Action Pump failure. Pump will not prime - Air leak in suction. Check suction piping and valve (For IntelliFlo alert dis- glands on any suction gate valves. - Seite 63 Troubleshooting Problems (Continued) Problem Possible Cause Corrective Action Inadequate circulation. Pump overcurrent. Check trap basket; if plugged, turn (For IntelliFlo alert dis- pump off and clean basket. Suc- play messages, refer to tion/discharge piping is too small. Alerts and Warning on Check and clean pool filter.
-
Seite 64: General Warnings
General Warnings • Never go inside the drive enclosure. There is a capacitor bank that holds a 230 VAC charge even when there is no power to the unit. • IntelliFlo is not submersible • The pump is capable of 160 GPM or 104 feet of head; use caution when installing and programming to limit pumps performance potential with old or questionable equipment •... -
Seite 65: How To Make Your Pool More Energy Efficient
How to make your pool more energy efficient Swimming pools are great for relaxing, exercising or just having fun. But they also mean higher than average energy bills. The key to saving energy with your pool is to correctly manage the filter pump time, pool temperature and lighting. Consider the following when operating your swimming pool: Using your IntelliFlo pump Your pool needs to be filtered every 24 hours. -
Seite 66: Preventive Maintenance
Pentair warrants its products to be free of defects in material and workmanship during the warranty period. If a product proves to be defective in material or workmanship during the warranty period, then Pentair will, at its sole option repair or replace the product with a like product. - Seite 67 Notes IntelliFlo VF Installation and User’s Guide...
- Seite 68 Copyright – Eingeschränkte Lizenz: soweit hierin nicht ausdrücklich zugelassen, dürfen die Inhalte dieses Dokuments ohne vorausgehende schriftliche Genehmigung der Pentair International SRL weder ganz noch auszugsweise und in gleich welcher Form und mit welchen Mitteln vervielfältigt werden. Copyright – Beperkte licentie: behalve zoals hierin specifiek toegestaan, mag geen enkel deel van de inhoud van dit document op om het even welke manier of hoe dan ook gereproduceerd worden zonder de voorafgaande schriftelijke toestemming van Pentair International SRL.
- Seite 69 INTELLIFLO WHISPERFLO VF SCHWIMMBADPUMPEN BEDIENUNGSANTLEITUNG IntelliFlo VF Montage- und Bedienungsanleitung IMPORTANT SAFETY INSTRUCTIONS READ AND FOLLOW ALL INSTRUCTIONS SAVE THESE INSTRUCTIONS WATER SOLUTION 357220 (Rev. 08/2016)
-
Seite 70: Konformitätserklärung
Marken Dritter, die gegebenenfalls in diesem Dokument genannt sind, nicht auf eine Verbindung oder gegenseitige Unterstützung zwischen den Eigentümern dieser Namen und der Pentair verweisen. Diese Namen und Marken können Marken oder eingetragene Warenzeichen dieser Parteien oder Dritter sein. - Seite 71 Inhaltsverzeichnis Wichtige Sicherheitshinweise ....................... 3 Abschnitt 1: Einführung ......................... 6 IntelliFlo Übersicht ............................ 6 Merkmale der IntelliFlo ....................... 7 IntelliFlo Motorbaugruppe ......................7 IntelliFlo Motoreigenschaften ...................... 8 IntelliFlo VF Steuerungsbaugruppe und Bedienfeld ..............9 Eigenschaften des Bedienfelds ....................9 Abschnitt 2: Bedienfeld ......................... 10 IntelliFlo Bedienfeld ..........................
- Seite 72 Inhaltsverzeichnis (Fortsetzung) Welle ............................35 Impuls ............................36 Merkmale-Einstellungen ......................37 Einrichten Merkmal 1 bzw. 2 .....................38 Einrichten Merkmal 3-9 ......................39 Betrieb Merkmal 3-9 ........................40 Einrichten von M.O. Flo ......................41 Merkmale-Menü (Fortsetzung) ....................42 M.O. Flo-Betrieb ........................42 Einrichten von Welle und Impuls ....................42 Welle- und Impuls-Betrieb ......................43 Externe Kontrolle-Menü...
-
Seite 73: Wichtige Sicherheitshinweise
WICHTIGE SICHERHEITSHINWEISE Wichtiger Hinweis: Hinweis für den Monteur: Dieses Handbuch enthält wichtige Informationen für die Montage, den Betrieb und die sichere Verwendung dieses Produkts. Diese Informationen sollten an den Eigentümer und/oder Betreiber dieser Ausrüstungen übergeben werden. WARNUNG — Lesen und befolgen Sie alle in diesem Handbuch enthaltenen Warnhinweise und Anweisungen, bevor Sie das Produkt installieren. -
Seite 74: Allgemeine Informationen Zur Installation
WICHTIGE SICHERHEITSHINWEISE (Fortsetzung) WARNUNG — Eine Wassertemperatur über 38 °C (100 °Fahrenheit) kann für Sie gesundheitsschädlich sein. Ein längerer Aufenthalt in heißem Wasser kann eine Hyperthermie herbeiführen. Eine Hyperthermie entsteht, wenn die Körpertemperatur eine bestimmte Gradzahl über der normalen Körpertemperatur von 37 °C (98,6 °F) erreicht. Zu den Symptomen einer Hyperthermie gehören: Schläfrigkeit, Lethargie, Benommenheit, Ohnmacht und ein Anstieg der Körpertemperatur. - Seite 75 WICHTIGE SICHERHEITSHINWEISE (Fortsetzung) WARNUNG — Unsachgemäß bemessene oder installierte Pumpen bzw. Pumpen, die nicht bestimmungsgemäß verwendet werden, können schwere bzw. tödliche Verletzungen verursachen. Zu diesen Risiken können u. a. Stromschlag, Feuer, Überschwemmung, Aufsaugverletzungen bzw. schwere Verletzungen oder Sachschaden durch ein baulich bedingtes Versagen der Pumpe oder einer anderen Systemkomponente gehören.
-
Seite 76: Abschnitt 1: Einführung
Abschnitt 1 Einführung IntelliFlo VF Übersicht ® Das Pumpensteuersystem mit regelbarem Fluss IntelliFlo VF bietet automatische Filterfunktionen für Pools und Schwimmbäder sowie erweiterte Funktionen wie Energieeinsparungen und programmierbare Wasserfunktionen nach einem vorab eingestellten Ablauf für Ihre Pool- und Schwimmbad-, Reinigungs-, Wasserfall- und anderen Anwendungen. -
Seite 77: Merkmale Der Intelliflo
Merkmale der IntelliFlo • Passt sich selbst jedem Pool an = weniger Montagezeit erforderlich • Senkt Energiekosten um bis zu 90 % = ein umweltfreundliches Produkt • Schützt vor Ansaugverlusten bzw. Flussunterbrechungen = komfortable Sicherheit • Schützt vor thermischer Überlastung = geringeres Überhitzungsrisiko •... -
Seite 78: Intelliflo Motoreigenschaften
Abdeckung Bedienfeld Steuerungsbaugruppe und Elektronik Abdeckung Motorlüfter Motorbaugruppe Kommunikations-Port für RS-485 (IntelliTouch und IntelliComm) Lagerbock des Motors IntelliFlo Motorbaugruppe IntelliFlo Motoreigenschaften • Permanentmagnet-Synchronmotor (PMSM) = wie bei Hybridfahrzeugen • Hoher Wirkungsgrad (3450 U/min 92 % und 400 U/min 90 %) = viel höher als bei klassischen Induktionsmotoren •... -
Seite 79: Intelliflo Vf Steuerbaugruppe Und Bedienfeld
IntelliFlo VF Steuerbaugruppe und Bedienfeld Die IntelliFlo-Steuerung besteht aus einem Bedienfeld und der Systemelektronik, die die einphasige 230 V-Eingangsspannung in 3 Phasen mit variabler Frequenz zur Steuerung des Motors umwandelt. Der Mikroprozessor der Steuerung steuert den Motor durch Änderung der Frequenz des bei ihm ankommenden Eingangsstroms, wobei die Spannung geändert wird, um die Drehzahl zu regeln. -
Seite 80: Abschnitt 2: Bedienfeld
Abschnitt 2 Bedienfeld In diesem Abschnitt werden die Elemente und LEDs des Bedienfelds beschrieben. IntelliFlo Bedienfeld ® FILTER 12:15 15.W LEISTUNG LÄUFT Bedienelemente und LEDs Filter-Taste/LED: Startet den Filter-Modus. Die LED leuchtet, wenn der Filter-Modus aktiviert ist. Vacuum-Taste/LED: Startet den Vakuum-Modus. Die LED leuchtet, wenn der Vakuum-Modus aktiviert ist. Backwash-Taste/LED: Startet den Rückspül-Modus. - Seite 81 Bedienelemente und LEDs (Fortsetzung) ® FILTER 12:15 Zeile 1 15.W Zeile 2 LEISTUNG Zeile 3 LÄUFT Zeile 4 Pfeiltasten: • Pfeiltaste Nach Oben: Zur Bewegung in die nächst höhere Ebene im Menübaum oder zur Erhöhung um eine Stelle bei der Bearbeitung einer Einstellung. •...
-
Seite 82: Beispiel Einrichten Der Ansaugfunktion
Beispiel Einrichten der Ansaugfunktion Das folgende Beispiel beschreibt die Schritte zum Einrichten des Ansaugmodus. Nachstehend sind die Tasten des Bedienfelds dargestellt, um Sie mit ihrem Aussehen und ihrer Funktion vertraut zu machen. Um die Flussgeschwindigkeit und Zeit im Ansaugen-Modus einzurichten: Einrichten der Ansaugfunktion 1. -
Seite 83: Betriebsarten
Abschnitt 3 Betrieb der IntelliFlo VF Dieser Abschnitt beschreibt die Verwendung des Bedienfelds der IntelliFlo VF zum Einrichten der Betriebsarten der Pumpe. IntelliFlo Betriebsarten: Die Tasten für die Betriebsarten sind handbetriebener Modus (Manual), Filter- Modus (Filter), Rückspül-Modus (Backwash), Vakuum-Modus (Vacuum), Merkmal 1 (Feature 1) und Merkmal 2 (Feature 2). -
Seite 84: Handbetriebener Rpm-Modus
Verwenden Sie den handbetriebenen Modus und prüfen Sie die Anforderungen jeder im Fluss betriebenen Einrichtung in Ihrem Poolsystem und protokollieren Sie die Ergebnisse für die späteren Einstellungen in den IntelliFlo-Menüs. Genauere Anleitungen sind unter "Menüs" auf Seite 21 zu finden. Um die IntelliFlo im manuellen Modus zu betreiben: Handbetriebener RPM-Modus 1. -
Seite 85: Handbetriebener Fluss-Modus
Handbetriebener Modus (Fortsetzung) Handbetriebener Fluss-Modus 4. Drücken Sie die Start/Stop-Taste, um die Pumpe anzuhalten. Verwenden Sie die Pfeiltasten Nach Oben und Nach Unten, um zur Menüoption "FLUSS einstel." zu scrollen. Drücken Sie zur Auswahl die Select- Taste. 5. Zur Änderung der Einstellung drücken Sie die Pfeiltasten Nach Links und Nach Rechts, um die zu ändernde Stelle auszuwählen, und verwenden dann die Pfeiltasten Nach Oben und Nach Unten, um die ausgewählte Stelle zu ändern. -
Seite 86: Zur Einstellung Des Flusses
Handbetriebener Modus (Fortsetzung) Verwenden Sie die Pfeiltasten Nach Oben und Nach a) Zur Einstellung der Geschwindigkeit: Unten, um zum Bildschirm „DREHZAHL einst.“ zu scrollen. Drücken Sie zur Auswahl die Select- Taste. Die Drehzahl kann von 400 bis 3450 U/min (Standard 1000 U/min) eingestellt werden. Zur Änderung der Einstellung siehe nachfolgenden Schritt 4. -
Seite 87: Rückspül-Modus
Rückspül-Modus Erreicht der Innendruck des Poolfilters den "Druck sauberer Filter", zeigt die IntelliFlo eine Warnung "Service in kürze" auf der Anzeige des Bedienfelds an (siehe "Einstellen des Drucks sauberer Filter" auf Seite 26 und "Beispiel Druck sauberer Filter" auf Seite 30), womit angezeigt wird, dass der Filter gereinigt oder "rückgespült"... -
Seite 88: Vakuum-Modus
Rückspül-Modus (Fortsetzung) 4. Wird der Rückspül-Modus manuell oder nach Abschluss des voreingestellten Rückspülzyklusses angehalten, stoppt die IntelliFlo, und das Bedienfeld zeigt in der ® linken oberen Ecke "Spülend" an. Die IntelliFlo beginnt erst mit dem Spülzyklus, wenn SPÜLEND 12:15 Sie die Start/Stop-Taste drücken. Stellen Sie zuerst das Rückspül-Ventil am Filter auf 1.MIN "Spülend"... -
Seite 89: Filter-Modus
Vakuum-Modus (Fortsetzung) 3. Verwenden Sie die Pfeiltasten Nach Oben und Nach Unten, um die nachfolgenden Bildschirme anzeigen zu lassen: • RESTZEIT: Die verbleibende Zeit der programmierten Dauer wird angezeigt. • LEISTUNG (Watts): Die Leistungsaufnahme des Motors als kontinuierliche Leistung in Watt wird angezeigt. -
Seite 90: Merkmal 1(2)-Modus
Externe Kontrolle-Modus IntelliFlo mit IntelliComm Kommunikationszentrum Die IntelliFlo kann mit einem optionalen Kommunikationskabel (P/N 350122) an das Pentair IntelliComm Kommunikationszentrum angeschlossen werden. Für IntelliComm stehen vier Paare von Eingangsklemmen zur Verfügung, die mit dem Programm 1(4) im Menü Externe Kontrolle der IntelliFlo verbunden werden können (siehe weitere Informationen zum Einrichten von Externer Kontrolle auf Seite 44). - Seite 91 Externe Kontrolle-Modus (Fortsetzung) Zusätzlich steht für die Programme 1(4) eine Einstellung "Verzögerter Stopp" zur Verfügung, mit der Sie eine Dauer eingeben können, während der IntelliFlo bei der programmierten Flussgeschwindigkeit weiterläuft, nachdem die Spannungsversorgung unterbrochen wurde. Weitere Informationen zur Einrichtung von IntelliComm finden Sie unter "Einrichten der externen Steuerung mit IntelliComm"...
-
Seite 92: Intelliflo-Menüs
(Std.:mm) Start Zyklus 2 Ende Zyklus 2 (Std.:mm) Start Zyklus 3 (Std.:mm) Ende Zyklus 3 (Std.:mm) Start Zyklus 4 (Std.:mm) IntelliFlo-Menüs Ende Zyklus 4 (Std.:mm) Zeit (Std.:min - AM/PM) ZEIT/KONTR (Seite 31) Kontrast level (0 - 9) Drücken Sie die Taste MENU, HAUPTBILDSCHIRM um zu den Menüs zu gelangen Merkmal 1... -
Seite 93: Pooldaten-Menü
Pooldaten-Menü Verwenden Sie das Pooldaten-Menü zum Konfigurieren der IntelliFlo für das Pool- und Schwimmbadsystem. In diesem Menü können Sie die Sprache des LCD-Bedienfelds einstellen, eine Adresse für die IntelliFlo-Pumpe bei Anschluss an ein IntelliTouch-System eingeben, die Poolwassermenge in Kubikmetern (m ) festlegen und einen ca.-Wert für die Poolwassertemperatur wählen. -
Seite 94: Einheiten-Menü
® Pooldaten-Menü (Fortsetzung) Pooldaten 12:15 Verwenden Sie die Pfeiltasten Nach d) Zur Eingabe der Wassertemperatur: 24 °C Oben und Nach Unten, um zur Einstellung "Wasser temperatur“ zu scrollen. Wassertemperatur Drücken Sie zur Auswahl die Select-Taste. Zur Änderung der Einstellung drücken Sie die Pfeiltasten Nach Links und Nach Rechts, um die zu ändern- de Stelle auszuwählen, und verwenden dann die Pfeiltasten Nach Oben und Nach Unten, um die ausgewählte Stelle zu ändern. - Seite 95 Ansaug-Menü (Fortsetzung) Wenn die Pumpe angesaugt wird, zeigt das LCD-Bedienfeld "Ansaugen" an sowie einen Moment danach "Angesaugt", wenn der Ansaugvorgang abgeschlossen ist. ACHTUNG: Um eine dauerhafte Beschädigung der IntelliFlo-Pumpe zu vermeiden, füllen Sie vor dem Starten des Systems das Sieb im IntelliFlo-Gehäuse mit Wasser, sodass die Pumpe richtig angesaugt werden kann.
-
Seite 96: Zum Einstellen Der Systemansaugzeit
Ansaug-Menü (Fortsetzung) ® Ansaugen 12:15 Verwenden Sie die Pfeiltasten Nach Oben c) Zum Einstellen der Systemansaugzeit: 0. MIN und Nach Unten, um zur Einstellung "Systemansaug. Zeit" zu scrollen. Drücken Systemansaug. Zeit Sie zur Auswahl die Select-Taste. Zum Eingeben einer zusätzlichen Ansaugzeit, mit der gewährleistet wird, dass das gesamte System vollständig angesaugt ist, siehe Schritt 4. - Seite 97 Filter-Menü (Fortsetzung) Der für “Druck sauberer Filter” eingegebene Wert legt fest, wie weit der Innendruck des Filters über den "Anfangsdruck" steigen muss, bevor die ® IntelliFlo eine Warnmeldung “Service in kürze” anzeigt. Der "Anfangsdruck" Filter 12:15 965.mbar 1,0 bar ist der Filterdruck, der bei Abschluss der letzten Rückspülung angezeigt wird. Auch Kartuschenfilter müssen in einen sauberen Zustand "rückgespült"...
- Seite 98 Filter-Menü (Fortsetzung) Verwenden Sie die Pfeiltasten d) Zum Einstellen der Start- und Stoppzeiten von Zyklus 1 bis 4: Nach Oben und Nach Unten, um zur Einstellung “Start Zyklus 1” zu gelangen. Drücken Sie zur Auswahl die Select-Taste. Die Standardeinstellung ist 9:00. Drücken Sie Enter zur Eingabe 9:00 als Startzeit.
-
Seite 99: Filterzyklus-Einstellungen
Filter-Menü (Fortsetzung) Filterzyklus-Einstellungen Die nachfolgende Tabelle zeigt die Einstellungen, die im Filter-Modus zur Verfügung stehen. BEZEICHNUNG WERT BESCHREIBUNG Druck 0,1 bis 3,5 bar Differenzdruck zwischen 0-Druck bis 100 % Filterstatus sauberer Filter (Standardeinstellung 1,0 bar). Fluss Die Einstellung der Anzahl des Vielfachen pro Tag des 1-8 (Standardeinstellung 1) pro Tag Wasservolumens bei "Poolvolumen"... -
Seite 100: Beispiel Druck Sauberer Filter
Filter-Menü (Fortsetzung) Beispiel Druck sauberer Filter Poolfilter dienen dem Auffangen von Verschmutzungen. Beim Anfahren, wenn ein Poolfilter noch sauber ist, wird ein Innendruck als "Anfangsdruck" erfasst. Mit der Ansammlung von Schmutz im Filter steigt der Innendruck. Schließlich muss der Filter a) gereinigt bzw. "rückgespült" werden, um den Schmutz zu entfernen, wenn es sich um einen Sand- oder DE-Filter (Kieselguhr) handelt, oder b) seine Kartusche gereinigt bzw. -
Seite 101: Verwendung Des Filter-Modus In Verbindung Mit Dem Merkmale-Modus
Filter-Menü (Fortsetzung) Verwendung des Filter-Modus in Verbindung mit dem Merkmale-Modus Die IntelliFlo startet und stoppt zu den Zeiten, die Sie für die Filterzyklen 1-4 eingegeben haben, wobei jedoch die Parameter, die Sie für die Funktionen im Merkmal-Modus (nur Merkmal 3-9) eingegeben haben, Vorrang gegenüber den von Ihnen im Filter-Modus eingegebenen Parametern haben. -
Seite 102: Flusskontrolle Und Filter-Modus
Filter-Menü (Fortsetzung) Flusskontrolle und Filter-Modus Die Filter-Modusfunktion ermöglicht der IntelliFlo, Kopfdruckverluste zu bewältigen, um den erforderlichen Fluss aufrecht zu erhalten. Der Fluss, den die Anlage bereitstellen kann, ist vom installierten Rohrleitungssystem abhängig. Ist ein höherer Fluss erforderlich als ihn die IntelliFlo bereitstellen kann, läuft sie zur vollen Drehzahl hoch und erzeugt Druck. -
Seite 103: Zeit Und Kontrast-Menü
Zeit und Kontrast-Menü Verwenden Sie das Menü "Zeit/Kontr" zur Einstellung der Systemuhr der IntelliFlo und Kontrastanpassung der Anzeige auf dem Bedienfeld. Die Systemuhr der IntelliFlo steuert alle vorgegebenen Start- und Stoppzeiten, Funktionen und programmierten Zyklen. Die Systemuhr kann die richtige Zeit für bis zu 96 Stunden speichern, wenn die Stromversorgung unterbrochen wird. -
Seite 104: Merkmale-Menü
Merkmale-Menü Verwenden Sie den Merkmale-Modus für Eingaben zur Regelung der Wasserfunktionen wie Springbrunnen, Schwimmbad, automatischer Reiniger, Wasserfälle usw. Zum Merkmale-Modus gehören: • Merkmal 1 und 2 • Merkmal 3-9 • M.O. Flo • Welle • Impuls Merkmal 1 und 2 Merkmal 1 und Merkmal 2 sind für den Betrieb der Wasserfunktionen "auf Abruf"... -
Seite 105: Merkmale-Menü (Fortsetzung)
Merkmale-Menü (Fortsetzung) Durch Eingabe der folgenden Parameter bei der M.O. Flo-Einstellung können sie jedoch die IntelliFlo so programmieren, dass die Flussgeschwindigkeit von 4 m /h auf 12 m /h in 3-Minuten-Intervallen alle zwei Stunden erhöht wird, wodurch der Druckschalter betätigt wird. Flussgeschwindigkeit = 9m /h, Laufzeit =:03 (3 Minuten), Intervallzeit = 2 Stunden. -
Seite 106: Pumpengeschwindigkeit
Merkmale-Menü (Fortsetzung) Impuls Wie die Funktionen M.O. Flo und Welle ist die Impuls-Funktion für Wasserfunktionen vorgesehen, die Flussgeschwindigkeiten unterschiedlicher Stärke erfordern. Wie bei der Welle-Funktion gehören zu den Einstellungen bei der Impuls-Funktion Parameter für die Mindest- und maximale Pumpendrehzahl und Zeitdauer, wobei jedoch diese Parameter anders als bei der Welle-Funktion funktionieren. - Seite 107 Merkmale-Menü (Fortsetzung) Merkmale-Einstellungen Bezeichnung Wert Beschreibung F1-9, M.O. Flo 4-29 m Programmiert die Flussgeschwindigkeit für Merkmal 1 - 10 Fluss einstellen (Standardeinstellung 12m Wird diese Einstellung auf Aktiv. gesetzt, wird diese Funktion zu der Zeit F3-9, M.O. Flo, Welle, Impuls Aktiviert / deaktiviert aktiviert, die bei der Einstellung "Startzeit einstel."...
-
Seite 108: Einrichten Merkmal 1 Bzw
Merkmale-Menü (Fortsetzung) Einrichten Merkmal 1 bzw. 2 Um zum Menü Merkmal 1(2) zu gelangen: 1. Gewährleisten Sie, dass die grüne LED für die Stromversorgung leuchtet und die Pumpe nicht mehr läuft. 2. Drücken Sie die Menu-Taste. Auf der Anzeige erscheint "Pooldaten". 3. - Seite 109 Merkmale-Menü (Fortsetzung) Einrichten von Merkmal 3-9 Um zum Menü Merkmale 3-9 zu gelangen: 1. Gewährleisten Sie, dass die grüne LED für die Stromversorgung leuchtet und die Pumpe nicht mehr läuft. 2. Drücken Sie die Menu-Taste. Auf der Anzeige erscheint "Pooldaten". 3.
-
Seite 110: Betrieb Merkmal
Merkmale-Menü (Fortsetzung) 4. Zur Änderung einer Einstellung drücken Sie die Pfeiltasten Nach Links und Nach Rechts, um die zu ändernde Stelle auszuwählen, und verwenden dann die Pfeiltasten Nach Oben und Nach Unten, um die ausgewählte Stelle zu ändern. 5. Sobald Sie fertig sind, drücken Sie die Enter-Taste, um die Änderungen zu speichern. Um die Eingabe von Änderungen abzubrechen, drücken Sie die Escape-Taste, um die Einstellung ohne Speichern zu verlassen. - Seite 111 Merkmale-Menü (Fortsetzung) Einrichten von M.O. Flo Um zum M.O. Flo-Menü zu gelangen: 1. Gewährleisten Sie, dass die grüne LED für die Stromversorgung leuchtet und die Pumpe nicht mehr läuft. 2. Drücken Sie die Menu-Taste. Auf der Anzeige erscheint "Pooldaten". 3. Verwenden Sie die Pfeiltasten Nach Oben und Nach Unten, um zur Menüoption "Merkmale" zu scrollen.
-
Seite 112: M.o. Flo-Betrieb
Merkmale-Menü (Fortsetzung) 4. Zur Änderung einer Einstellung drücken Sie die Pfeiltasten Nach Links und Nach Rechts, um die zu ändernde Stelle auszuwählen, und verwenden dann die Pfeiltasten Nach Oben und Nach Unten, um die ausgewählte Stelle zu ändern. 5. Sobald Sie fertig sind, drücken Sie die Enter-Taste, um die Änderungen zu speichern. Um die Eingabe von Änderungen abzubrechen, drücken Sie die Escape-Taste, um den Modus ohne Speichern zu verlassen. -
Seite 113: Welle- Und Impuls-Betrieb
Merkmale-Menü (Fortsetzung) 4. Zur Änderung einer Einstellung drücken Sie die Pfeiltasten Nach Links und Nach Rechts, um die zu ändernde Stelle auszuwählen, und verwenden dann die Pfeiltasten Nach Oben und Nach Unten, um die ausgewählte Stelle zu ändern. 5. Sobald Sie fertig sind, drücken Sie die Enter-Taste, um die Änderungen zu speichern. Um die Eingabe von Änderungen abzubrechen, drücken Sie die Escape-Taste, um den Modus ohne Speichern zu verlassen. -
Seite 114: Externe Kontrolle-Menü
Externe Kontrolle-Menü Einrichten von Externer Kontrolle mit IntelliComm Der Externe Kontrolle-Modus wird über das IntelliComm Kommunikationszentrum oder über das IntelliTouch Pool and Spa Control System aktiviert und betrieben. Weitere Informationen für den ferngesteuerten Betrieb der IntelliFlo erhalten Sie unter "Externe Kontrolle-Modus" auf Seite 20. Um zum Ext. -
Seite 115: Rückspül-Menü
Externe Kontrolle-Menü (Fortsetzung) ® Progr. 1 12:16 4. Zur Änderung einer Einstellung drücken Sie die Pfeiltasten Nach Links und Nach 0:00 Rechts, um die zu ändernde Stelle auszuwählen, und verwenden dann die Pfeiltasten Verzögerter Stopp Nach Oben und Nach Unten, um die ausgewählte Stelle zu ändern. 5. -
Seite 116: Vakuum-Menü
Vakuum-Menü Vakuum-Modus einrichten Um zum Vakuum-Menü zu gelangen: 1. Gewährleisten Sie, dass die grüne LED für die Stromversorgung leuchtet und die Pumpe nicht mehr läuft. 2. Drücken Sie die Menu-Taste. Auf der Anzeige erscheint "Pooldaten". 3. Verwenden Sie die Pfeiltasten Nach Oben und Nach Unten, um zur Menüoption "Vakuum" zu scrollen. -
Seite 117: Wartung Durch Den Nutzer
Abschnitt 4 Wartung durch den Nutzer Die folgenden Informationen dienen der Beschreibung, wie die IntelliFlo-Pumpe zu instand zu halten und zu warten ist. Pumpensiebkorb Das Sieb, das gelegentlich auch als Fremdkörperfalle bezeichnet wird, befindet sich an der Vorderseite der Pumpe. Die Fremdkörperfalle besteht aus einem Korb, der ständig frei von Blättern und Schmutz gehalten werden muss. -
Seite 118: Instandhaltung Pumpensiebkorb
Instandhaltung Pumpensiebkorb (Fortsetzung) 10. Gewährleisten Sie den ordnungsgemäßen Sitz des O-Rings des Schauglases. Setzen Sie die Überwurfmutter und das Schauglas wieder auf und drehen Sie sie im Uhrzeigersinn, bis die Flügel gemäß Abbildung waagerecht sind. 11. Schließen Sie das Kommunikationskabel, wenn erforderlich, an die Pumpe wieder an. 12. -
Seite 119: Überwinterung
Überwinterung Der interne Frostschutz der IntelliFlo ist außer Kraft gesetzt, wenn sie an ein IntelliTouch angeschlossen wird. Für den Frostschutz wird bei Auswahl JA im entsprechenden Menü der Funktionsschaltungen der IntelliTouch unter FROSTSCHUTZBETRIEB gesorgt. Um den internen Frostschutz der IntelliFlo erneut zu aktivieren, muss die Stromversorgung des Antriebs aus und dann wieder eingeschaltet werden. - Seite 120 4. Gewährleisten Sie, dass alle elektrischen Anschlüsse sauber sind und fest sitzen. 5. Öffnen Sie das Entlüftungsventil am Filter und halten Sie Abstand zum Filter. 6. Schalten Sie die IntelliFlo am Hauptschalter ein. Gewährleisten Sie, dass die grüne LED für die Stromversorgung leuchtet.
-
Seite 121: Abschnitt 5: Installation Und Demontage
Abschnitt 5 Installation und Demontage Die folgenden allgemeinen Informationen dienen der Beschreibung, wie die IntelliFlo-Pumpe installiert wird. Hinweis für den Monteur: Bevor Sie die IntelliFlo-Pumpe installieren, lesen und befolgen Sie alle Warnhinweise, Anweisungen und Sicherheitsvorkehrungen auf den Seiten 3, 4 und 5. Installation der IntelliFlo Die IntelliFlo sollte nur von einem Fachmann installiert werden. -
Seite 122: Verdrahtung Der Intelliflo
Verdrahtung der IntelliFlo Um die IntelliFlo an das Wechselstromnetz anzuschließen: 1. Gewährleisten Sie, dass alle Hauptschalter und sonstigen Schalter ausgeschaltet sind, bevor der Motor angeschlossen wird. 2. Gewährleisten Sie eine Anschlussspannung von 230 V AC. 3. Verwenden Sie AWG 12 für Leitungen bis 30 m bzw. 100 Fuß und AWG 10 für Längen über 30 m bzw. 100 Fuß. -
Seite 123: Verdrahtung Der Intelliflo Vf (Bei Modellen Mit Seitlichem Wechselstromanschluss)
Verdrahtung der IntelliFlo VF (bei Modellen mit seitlichem Wechselstromanschluss) BEACHTEN SIE, DASS DIESE ARBEIT VON EINEM ELEKTROFACHMANN gemäß den nationalen Verdrahtungsvorschriften (AS/NZS 3000) unter Berücksichtigung der entsprechenden Leistungskennwerte (Klasse I, IPX5) auszuführen ist. Um die IntelliFlo an die Wechselstromversorgung anzuschließen: 1. -
Seite 124: Demontage Der Pumpe
Demontage der Pumpe WARNUNG — Trennen Sie die Poolpumpe immer am Hauptschalter von der Stromversorgung, bevor Sie die Pumpe warten. Anderenfalls könnte dies zum Tod oder schweren Verletzungen bei der Wartungsperson, den Poolbenutzern oder anderen Personen durch Stromschlag führen. Lesen Sie alle Wartungsanweisungen, bevor Sie mit den Arbeiten an der Pumpe beginnen. WARNUNG —... -
Seite 125: Zusammenbau Der Pumpe/Austauschen Der Dichtung
Demontage der Pumpe (Fortsetzung) 9. Zum Lösen des Laufrads von der Welle drehen Sie das Laufrad entgegen dem Uhrzeigersinn. Dichtungsplatte SEAL PLATE 10. Entfernen Sie den rotierenden Teil der mechanischen Dichtung vom Laufrad. Dichtung G ASKET 11. Entfernen Sie die vier Schrauben von der Dichtungsplatte am Motor mit einem 9/16"... -
Seite 126: Entfernen Und Einbau Der Steuerungsbaugruppe
Entfernen und Einbau der Steuerungsbaugruppe Zum Entfernen der IntelliFlo-Steuerung und des Bedienfelds von der Motorbaugruppe: 1. Gewährleisten Sie, dass vor dem Entfernen des Antriebs alle Hauptschalter und sonstigen Schalter ausgeschaltet sind. 2. Trennen Sie das Kommunikationskabel von der Pumpe. 3. Öffnen Sie die Abdeckung des Bedienfelds. 4. -
Seite 127: Illustrierte Teileliste
Illustrierte Teileliste 11 18 17 29 12 14 8 Ersatzteile Artikel- Teile- Bezeichnung Artikel- Teile- Bezeichnung 072184 UNTERLEGSCHEIBE 3/8 ID X 7/8 OD 070387 KORB AQ & WF .05 DICK 18-8 s/s, (6 Stck.) 070429 SECHSKANTSCHRAUBE HD, 2-56x0.875 072928 DIFFUSORBAUGRUPPE WFE 12 s/s, (4 Stck.) 073131 LAUFRAD WFE 12 1000 SER... -
Seite 128: Abmessungen Der Intelliflo-Pumpe
Abmessungen der IntelliFlo-Pumpe (59.5 cm) (27.5 cm) (31.8 cm) Leistungskurve der IntelliFlo 35.00 30.00 25.00 3450 RPM 3450 U/min 20.00 15.00 10.00 1500 RPM 5.00 1500 U/min 0.00 10.0 15.0 20.0 25.0 30.0 35.0 / HR Elektrische Spezifikation der IntelliFlo Stromkreisschutz: Zweipolige Einrichtung 20 AMP auf elektrischer Schalttafel Stromversorgung: 230 V AC, 50/60 Hz, 3,2 kW, 16 A IntelliFlo VF Montage- und Bedienungsanleitung... -
Seite 129: Abschnitt 6: Fehlerbeseitigung
Abschnitt 6 Fehlerbeseitigung ACHTUNG: Bevor Sie Fehler an der IntelliFlo-Pumpe beheben, lesen und befolgen Sie alle Warnhinweise, Anweisungen und Sicherheitsvorkehrungen auf den Seiten 3, 4 und 5. Alarme und Warnungen Die IntelliFlo zeigt alle Alarme und Warnungen auf dem Bildschirm des Bedienfelds an. Besteht ein Alarm- oder Warnzustand, leuchtet die entsprechende LED auf dem Bildschirm auf. -
Seite 130: Allgemeine Fehlerbeseitigung An Der Intelliflo
Allgemeine Fehlerbeseitigung an der IntelliFlo Befolgen Sie die folgenden allgemeinen Hinweise zur Fehlerbeseitigung, um mögliche Probleme an Ihrer IntelliFlo- Pumpe zu beheben. Hinweis: Trennen Sie die Pumpe vor Beginn von Wartungs- bzw. Reparaturarbeiten vom Netz. Problem Mögliche Ursache Beseitigung Ausfall der Pumpe. Pumpe saugt nicht an - Luftleck im Ansaugsystem. - Seite 131 Fehlerbeseitigung (Fortsetzung) Problem Mögliche Ursache Beseitigung Unzureichende Überlast Pumpe: Kontrollieren Sie den Abscheiderkorb und Zirkulation. schalten Sie die Pumpe ab, wenn dieser (Siehe Mitteilungen auf verstopft ist, und reinigen Sie den Korb. der Alarmanzeige der Saug-/Förderrohre sind zu klein. Kontrollieren IntelliFlo unter "Alarme und reinigen Sie den Poolfilter.
-
Seite 132: Allgemeine Warnhinweise
Allgemeine Warnhinweise • Halten Sie sich vom Inneren des Antriebsgehäuses fern. Darin befindet sich eine Kondensatorbank, an der immernoch 230 V AC anliegen, auch wenn das Gerät von der Stromversorgung getrennt ist. • Die IntelliFlo ist keine Tauchpumpe. • Die Pumpe hat eine Druckhöhe von 33 m /h bzw. -
Seite 133: Wie Machen Sie Ihren Pool Energieeffizienter
Wie machen Sie Ihren Pool energieeffizienter? Swimming-Pools sind ein großartiger Ort zum Erholen, Sporttreiben oder einfach, um Spaß zu haben. Sie bedeuten jedoch auch überdurchschnittlich hohe Stromrechnungen. Der Schlüssel zum Energiesparen bei Ihrem Pool ist die richtige Einstellung der Filterpumpenzeit, Pooltemperatur und Beleuchtung. Beachten Sie folgende Hinweise, wenn Sie Ihren Swimming-Pool betreiben. -
Seite 134: Vorbeugende Wartung
Wasser oder der Einwirkung von unnormalen korrosiven Einflüssen oder Trockenlauf allen anderen Ursachen, die nicht mit einem Produktmangel in Verbindung stehen. 2) Schäden am Produkt, die infolge der Verwendung eines Produkts eines anderen Herstellers in Verbindung mit Pentair und verbundenen Unternehmen verursacht werden 3) Elektrische Störungen durch das Eindringen von Insekten in das Gerät - auf die Vermeidung solcher Störungen ist zu achten. - Seite 135 Bemerkungen IntelliFlo VF Montage- und Bedienungsanleitung...
- Seite 136 Copyright – Eingeschränkte Lizenz: soweit hierin nicht ausdrücklich zugelassen, dürfen die Inhalte dieses Dokuments ohne vorausgehende schriftliche Genehmigung der Pentair International SRL weder ganz noch auszugsweise und in gleich welcher Form und mit welchen Mitteln vervielfältigt werden. Copyright – Beperkte licentie: behalve zoals hierin specifiek toegestaan, mag geen enkel deel van de inhoud van dit document op om het even welke manier of hoe dan ook gereproduceerd worden zonder de voorafgaande schriftelijke toestemming van Pentair International SRL.
- Seite 137 INTELLIFLO WHISPERFLO VF POMPES POUR PISCINES GUIDE DE L’INSTALLATION Manuel d'installation et d'utilisation IntelliFlo VF IMPORTANT SAFETY INSTRUCTIONS READ AND FOLLOW ALL INSTRUCTIONS SAVE THESE INSTRUCTIONS WATER SOLUTION 357220 (Rev. 08/2016)
-
Seite 138: Service Après-Vente
10951 West Los Angeles Ave., Moorpark, CA 93021 IntelliFlo® et Pentair® sont des marques de commerce et/ou marques déposées de Pentair et/ou de ses filiales aux États-Unis et/ou ailleurs. Sauf mention contraire, les noms et marques d'autres produits qui peuvent être utilisés dans ce document ne signifient aucunement une quelconque adhésion entre les propriétaires de ces noms... - Seite 139 Table des matières Précautions de sécurité importantes ................... 3 Section 1: Introduction ........................6 Aperçu IntelliFlo ..........................6 Caractéristiques IntelliFlo ....................7 Moteur IntelliFlo ........................7 Caractéristiques du moteur IntelliFlo ................... 8 Boîtier électronique et panneau de commande IntelliFlo VF ..........9 Caractéristique du panneau de commande .................
- Seite 140 Table des matières (suite) Vague ..........................35 Impulsion ..........................36 Réglages des caractéristiques ................... 37 Configuration de la caractéristique 1 ou 2 ................38 Configuration des caractéristiques 3-9 ................39 Utilisation des caractéristiques 3-9 ..................40 Configuration M.O. Flo ....................... 41 Menu Caractéristiques (suite) .....................
-
Seite 141: Précautions De Sécurité Importantes
PRÉCAUTIONS DE SÉCURITÉ IMPORTANTES Remarque importante: À l'attention de l'installateur: Ce manuel contient des informations importantes concernant l'installation, le fonctionnement et l'utilisation en toute sécurité de ce produit. Ces informations doivent être données au propriétaire et/ou à l'opérateur de cet équipement. AVERTISSEMENT —... - Seite 142 PRÉCAUTIONS DE SÉCURITÉ IMPORTANTES (suite) Une température de l'eau supérieure à 38°C peut être dangereuse pour la santé. Une AVERTISSEMENT — immersion prolongée dans l'eau chaude peut entraîner de l'hyperthermie. L'hyperthermie se produit lorsque la température interne du corps atteint un niveau supérieur à la température corporelle normale (37°C).
- Seite 143 PRÉCAUTIONS DE SÉCURITÉ IMPORTANTES (suite) AVERTISSEMENT — Les pompes mal dimensionnées ou installées ou utilisées dans des applications autres que celles pour lesquelles la pompe a été conçue peuvent entraîner des blessures graves, voire la mort. Ces risques peuvent inclure, mais ne sont pas limités, à un choc électrique, un incendie, une inondation, une prise au piège dans les sorties d'aspiration ou des blessures graves ou des dégâts matériels provoqués par une défaillance structurelle de la pompe ou d'autres composants du système.
-
Seite 144: Aperçu Intelliflo
Section 1 Introduction Aperçu IntelliFlo ® La pompe à débit variable IntelliFlo VF offre une automatisation de la filtration de piscine et du spa ainsi que des caractéristiques avancées telles que l'économie d'énergie et des programmes d'eau pour la piscine, le spa, le nettoyeur, la chute d'eau et d'autres applications. -
Seite 145: Caractéristiques Intelliflo
Caractéristiques IntelliFlo • S'adapte automatiquement à n'importe quelle taille de piscine = moins de temps nécessaire pour l'installation • Réduit le coût énergétique de près de 90% = un produit respectueux de l'environnement • Protège contre la perte d'amorçage ou l'obstruction des conduites = sécurité pratique •... -
Seite 146: Caractéristiques Du Moteur Intelliflo
Couvercle du panneau de commande Encapsulage de l'entraînement et de l'électronique Couvercle du moteur de ventilateur Ensemble moteur Port de communication pour RS-485 (IntelliTouch et IntelliComm) Support moteur Moteur IntelliFlo Caractéristiques du moteur IntelliFlo • Moteur synchrone à aimant permanent (PMSM) = comme sur les voitures hybrides •... -
Seite 147: Caractéristique Du Panneau De Commande
Boîtier de commande et panneau de commande IntelliFlo VF Le boîtier de commande IntelliFlo consiste en un panneau de commande et une électronique qui convertit le courant monophasé de 230 V en fréquence variable triphasée pour entraîner le moteur. Le microprocesseur de l'entraînement commande le moteur en changeant la fréquence du courant qu'il reçoit tout en changeant la tension de commande du régime de rotation. -
Seite 148: Panneau De Commande
Section 2 Panneau de commande Cette section décrit les commandes et les LED du panneau de commande. Panneau de commande ® FILTRE 12:15 15.W PUISSANCE EN MARCHE Commandes Bouton Filter: Démarre le mode Filtre. La LED est allumée lorsque le mode Filtre est actif. Bouton Vacuum: Démarre le mode Aspiration. - Seite 149 Commandes (suite) ® FILTRE 12:15 Ligne 1 15.W Ligne 2 PUISSANCE Ligne 3 EN MARCHE Ligne 4 Touches fléchées: • Flèche vers le haut: Monte d'un niveau dans l'arborescence du menu ou augmente d'un chiffre lors de l'édition d'un réglage. •...
-
Seite 150: Exemple De Configuration D'amorçage
Exemple de configuration d’amorçage L'exemple suivant illustre les étapes de réglage du mode Amorçage. Les boutons du panneau de commande sont illustrés ci-dessous pour se familiariser avec leur aspect et fonction. Pour configurer le débit et l'heure du mode Amorçage: Configuration d'amorçage 1. -
Seite 151: Mode Manuel
Section 3 Utilisation de l'IntelliFlo VF Cette section décrit comment utiliser le panneau de commande de l'IntelliFlo VF pour régler les modes de fonctionnement de la pompe. Modes de fonctionnement IntelliFlo: Les boutons du mode de fonctionnement sont Mode Manuel, Mode Filtre, Mode Contre-lavage, Mode Aspiration, Caractéristique 1 et Caractéristique 2. -
Seite 152: Mode Régime Manuel
Utiliser le mode Manuel pour mesurer et tester les exigences de chaque dispositif de la piscine fonctionnant par débit et noter ces résultats pour une configuration ultérieure dans les menus d'IntelliFlo. Voir “Menus” à la page 21 pour des instructions détaillées. Pour utiliser IntelliFlo en mode manuel: Mode régime manuel 1. -
Seite 153: Mode Débit Manuel
Mode manuel (suite) Mode débit manuel 4. Appuyer sur le bouton Start/Stop pour arrêter la pompe. Utiliser les touches fléchées vers le haut et vers le bas jusqu'à l'option de menu “Régler DÉBIT”. Appuyer sur le bouton Select pour le sélectionner. 5. - Seite 154 Mode manuel (suite) ® ® ® MANUEL RPM 12:15 MANUEL RPM 12:15 MANUEL RPM 12:15 1 000.RPM 2000.RPM 1000. RPM Régler VITESSE Régler VITESSE Régler VITESSE ARRÊTÉ ARRÊTÉ ARRÊTÉ Le curseur est mis en Flèches gauche/droite Appuyer sur évidence en noir pour modifier le chiffre le bouton Enter pour sauvegarder.
-
Seite 155: Mode Contre-Lavage
Mode Contre-lavage Lorsque la pression interne du filtre de piscine atteint “Press. filtre propre,” l'IntelliFlo affiche une alerte “Entretien nécessaire” sur l'écran du panneau de commande (voir “Réglage de la pression du filtre propre” à la page 26 et “Exemple de pression de filtre propre” à la page 30.) pour indiquer que le filtre doit être nettoyé... -
Seite 156: Mode Aspiration
Mode Contre-lavage (suite) 4. Lorsque le mode Contre-lavage est arrêté, manuellement ou à la fin du cycle de lavage prédéfini, l'IntelliFlo s'arrêtera et le panneau de commande affichera “Rinçage” dans le coin supérieur gauche. L'IntelliFlo n'entamera pas le cycle de rinçage tant que le ®... -
Seite 157: Mode Filtre
Mode Aspiration (suite) 3. Utiliser les flèches haut et bas pour visualiser les écrans ci-dessous: • TEMPS RESTANT: Affiche le temps restant en durée programmée • PUISSANCE (Watts): Affiche la puissance envoyée à l'arbre du moteur en Watts continus • VITESSE EFFECTIVE (RPM): Affiche le régime de pompe en t/min •... -
Seite 158: Mode Contrôle Externe
Mode Contrôle externe IntelliFlo avec centre de communication IntelliComm L'IntelliFlo peut être connecté au centre de communication Pentair IntelliComm via un câble de communication en option (N/P 350122). L'IntelliComm est équipé de quatre paires de bornes d'entrée qui peuvent être connectées au Programme 1(4) d'IntelliFlo dans le menu Contrôle externe (voir page 44 pour plus d'informations sur le réglage Contrôle externe.). -
Seite 159: Bouton Menu
Mode Contrôle externe (suite) Par ailleurs, les Programmes 1(4) sont équipés d'un réglage “Arrêt après tempo” qui permet de spécifier une période de temps pendant laquelle l'IntelliFlo continuera à fonctionner au débit programmé après l'arrêt du courant. Voir “Configuration de la commande externe avec IntelliComm” à la page 44 pour plus d'informations sur la configuration d'IntelliComm. -
Seite 160: Menus Intelliflo
(hr:mm) Arrêt cycle 1 (hr:mm) Démarrage cycle 2 (hr:mm) Arrêt cycle 2 (hr:mm) Démarrage cycle 3 (hr:mm) Arrêt cycle 3 (hr:mm) Démarrage cycle 4 Menus IntelliFlo (hr:mm) Arrêt cycle 4 (hr:min - AM/PM) Régler H H/CONTRAST (page 31) (0 - 9) Niveau de contraste ÉCRAN PRINCIPAL Appuyez sur le bouton MENU pour accéder aux menus... -
Seite 161: Menu Données De Piscine
Menu Données de piscine Utiliser le menu Données de piscine pour configurer l'IntelliFlo pour le système de piscine et de spa. À partir de ce menu, il est possible de régler la langue de l'écran du panneau de commande, entrer une adresse pour la pompe IntelliFlo lorsqu'elle est branchée à... -
Seite 162: Menu Unités
Menu Données de piscine (suite) ® Don. Pisc. 12:15 Utiliser les flèches haut et bas d) Pour entrer la température d'eau: 24 °C pour naviguer jusqu'au réglage “Température de l'eau”. Appuyer sur le bouton Select pour le sélectionner. Pour modifier le réglage, appuyer Température eau sur les flèches gauche et droite pour sélectionner le chiffre à... -
Seite 163: Menu Amorçage
Menu d'amorçage (suite) Lorsque la pompe s'amorce, l'écran du panneau de commande affiche “Amorçage”, puis, pendant un instant, affiche “Amorcé” lorsque l'amorçage est terminé. ATTENTION: Pour éviter des dégâts permanents à la pompe IntelliFlo, avant de démarrer le système, remplir le panier de pré-filtre d'eau de manière à ce que la pompe s'amorce correctement. S'il n'y a pas d'eau dans le panier de pré-filtre, la pompe ne s'amorcera pas. -
Seite 164: Menu Filtre
Menu d'amorçage (suite) ® Amorçage 12:15 Utiliser les flèches haut et bas c) Pour régler la durée d'amorçage du système: 0. MIN pour naviguer jusqu'au réglage “Tps amorçage syst.”. Appuyer sur le bouton Tps amorçage syst. Select pour le sélectionner. Pour entrer une durée d'amorçage supplémentaire et garantir que le système complet est bien amorti, voir l'étape 4. - Seite 165 Menu Filtre (suite) La valeur entrée pour la “Pression de filtre propre” définit jusqu'où au-dessus de la “pression de départ” la pression interne du filtre doit grimper avant que ® Filtre 12:15 l'IntelliFlo affiche l'alerte “Entretien nécessaire”. La “pression de départ” 965.mbar 1,0 bar est le relevé...
- Seite 166 Menu Filtre (suite) Utiliser les flèches d) Pour régler les heures de démarrage et d'arrêt des cycles 1 à 4: haut et bas pour trouver le réglage “Démarrage cycle 1”. Appuyer sur le bouton Select pour le sélectionner. 9:00 est le réglage par défaut. Appuyer sur Enter pour régler 9:00 comme heure de départ.
-
Seite 167: Réglages De Cycle De Filtration
Menu Filtre (suite) Réglages de cycle de filtration Le tableau ci-dessous affiche les réglages disponibles dans le mode Filtre. VALEUR DESCRIPTION 0,1 à 3,5 bars La pression différentielle de la pression nulle au statut Pression de filtre propre (1,0 bar par défaut) de filtre à... -
Seite 168: Exemple De Pression De Filtre Propre
Menu Filtre (suite) Exemple de pression de filtre propre Les filtres de piscine fonctionnent en retenant la saleté. Au démarrage, lorsqu'un filtre de piscine est encore propre, il enregistre une pression interne appelée “pression de démarrage”. À mesure que la saleté s'accumule dans le filtre, la pression interne augmente. -
Seite 169: Utilisation Du Mode Filtre En Association Avec Le Mode Caractéristiques
Menu Filtre (suite) Utilisation du mode Filtre en association avec le mode Caractéristiques IntelliFlo démarrera et s’arrêtera aux heures programmées pour les cycles de filtration 1-4; toutefois, les paramètres définis pour actionner les caractéristiques en mode Caractéristiques (caractéristiques 3-9 uniquement) remplacent les paramètres de cycle de filtre définis dans le mode Filtre. Comme le montre l'exemple ci-dessous, les cycles programmés dans Caractéristiques 3-9 annuleront les cycles de filtration programmés en mode Filtre;... -
Seite 170: Mode Contrôle Du Débit & Filtre
Menu Filtre (suite) Mode Contrôle du débit & Filtre La fonction de mode Filtre permet à IntelliFlo de surmonter la perte de pression de refoulement pour maintenir le débit requis. Le débit que l'unité peut fournir est limité par la tuyauterie installée. S'il faut plus de débit que l'IntelliFlo ne peut fournir, il passera au régime maximum et créera de la pression. -
Seite 171: Menu Heure & Contraste
Menu Heure & Contraste Utiliser le menu “Heure et Contraste” pour régler l'horloge du système IntelliFlo et pour ajuster le contraste de l'affichage du panneau de commande. L'horloge du système IntelliFlo commande toutes les heures de démarrage et d'arrêt programmées ainsi que les cycles programmés. L'horloge du système peut stocker l'heure correcte pendant 96 heures après la coupure du courant. -
Seite 172: Menu Caractéristiques
Menu Caractéristiques Utiliser le mode Caractéristiques pour contrôler les fonctions d'eau telles que les fontaines, spas, nettoyeur automatique, chute d'eau, etc. Le mode Caractéristiques inclut: • Caractéristiques 1 et 2 • Caractéristiques 3-9 • M.O. Flo • Vague • Impulsion Caractéristiques 1 et 2 Les caractéristiques 1 et 2 sont conçues pour un fonctionnement “à... - Seite 173 Menu Caractéristiques (suite) En entrant les paramètres suivants dans le réglage M.O. Flo, il est possible de programmer IntelliFlo pour augmenter le débit de 4 m /h à 12 m /h par intervalles de trois minutes, toutes les deux heures, ce qui déclenchera le contacteur de pression: Débit=9m /h, Temps de fonctionnement=:03 (3 minutes), Intervalle=2 heures.
- Seite 174 Menu Caractéristiques (suite) Pouls À l'instar des fonctions M.O. Flo et Onde, la fonction Pouls est conçue pour actionner les fonctions d’ondes qui requièrent des débits d'intensité variable. Comme pour la fonction Onde, le réglage de la fonction Pouls inclut les paramètres de régimes minimum et maximum de pompe et la période; cependant, ces paramètres fonctionnent différemment de la fonction Onde.
-
Seite 175: Réglages Des Caractéristiques
Menu Caractéristiques (suite) Réglages des caractéristiques Valeur Description F1-9, M.O. Flo 4-29m Programme le débit de la caractéristique 1 - 10 Régler Débit (12m /h par défaut) Lorsque ce réglage est mis sur Activé, la fonction s'active à l'heure F3-9, M.O. Flo, Onde, Pouls Activé... -
Seite 176: Configuration De La Caractéristique 1 Ou 2
Menu Caractéristiques (suite) Configuration de la caractéristique 1 ou 2 Pour accéder au menu Caractéristiques 1(2): 1. Vérifier que la LED verte est allumée et que la pompe est à l'arrêt. 2. Appuyer sur le bouton Menu . “Donn. Pisc.” s'affiche. 3. - Seite 177 Menu Caractéristiques (suite) Configuration des Caractéristiques 3-9 Pour accéder au menu Caractéristiques 3-9: 1. Vérifier que la LED verte est allumée et que la pompe est à l'arrêt. 2. Appuyer sur le bouton Menu. “Donn. Pisc.” s'affiche. 3. Utiliser les flèches haut et bas pour naviguer jusqu'à l'option de menu “Caract.”. Appuyer sur le bouton Select pour le sélectionner.
- Seite 178 Menu Caractéristiques (suite) 4. Pour modifier un réglage, appuyer sur les flèches gauche et droite pour sélectionner le chiffre à modifier, puis utiliser les flèches haut et bas pour modifier le chiffre sélectionné. 5. Lorsque c'est terminé, appuyer sur le bouton Enter pour sauvegarder les changements. Pour annuler les changements, appuyer sur le bouton Escape pour quitter le réglage sans sauvegarder.
- Seite 179 Menu Caractéristiques (suite) Configuration M.O. Flo Pour accéder au menu M.O. Flo: 1. Vérifier que la LED verte est allumée et que la pompe est à l'arrêt. 2. Appuyer sur le bouton Menu. “Donn. Pisc.” s'affiche. 3. Utiliser les flèches haut et bas pour naviguer jusqu'à l'option de menu “Caractéristiques”. Appuyer sur le bouton Select pour le sélectionner.
-
Seite 180: Utilisation M.o. Flo
Menu Caractéristiques (suite) 4. Pour modifier un réglage, appuyer sur les flèches gauche et droite pour sélectionner le chiffre à modifier, puis utiliser les flèches haut et bas pour modifier le chiffre sélectionné. 5. Lorsque c'est terminé, appuyer sur le bouton Enter pour sauvegarder les changements. Pour annuler les changements, appuyer sur le bouton Escape pour quitter le mode sans sauvegarder. - Seite 181 Menu Caractéristiques (suite) 4. Pour modifier un réglage, appuyer sur les flèches gauche et droite pour sélectionner le chiffre à modifier, puis utiliser les flèches haut et bas pour modifier le chiffre sélectionné. 5. Lorsque c'est terminé, appuyer sur le bouton Enter pour sauvegarder les changements. Pour annuler les changements, appuyer sur le bouton Escape pour quitter le mode sans sauvegarder.
-
Seite 182: Menu Contrôle Externe
Menu Contrôle externe Configuration Contrôle externe avec IntelliComm Le mode Contrôle externe est activé et utilisé par le centre de communication IntelliComm. Voir “Mode Contrôle externe” à la page 20 pour plus d'informations sur l'utilisation d'IntelliFlo avec la télécommande. Pour accéder au menu Contrôle externe: 1. -
Seite 183: Menu Contre-Lavage
Menu Contrôle externe (suite) ® Progr. 1 12:16 4. Pour modifier un réglage, appuyer sur les flèches gauche et droite pour sélectionner 0:00 le chiffre à modifier, puis utiliser les flèches haut et bas pour modifier le chiffre Arrêt après tempo sélectionné. -
Seite 184: Menu Aspiration
Menu Aspiration Configuration du mode Aspiration Pour accéder au menu Aspiration: 1. Vérifier que la LED verte est allumée et que la pompe est à l'arrêt. 2. Appuyer sur le bouton Menu. “Donn. Pisc.” s'affiche. 3. Utiliser les flèches haut et bas pour naviguer jusqu'à l'option de menu “Aspiration”. Appuyer sur le bouton Select pour le sélectionner. -
Seite 185: Entretien Du Panier De Pré-Filtre De La Pompe
Section 4 Maintenance utilisateur L'information suivante décrit la manière d'entretenir la pompe IntelliFlo. Panier de pré-filtre de la pompe Il contient un panier qui doit rester propre et exempt de feuilles et de débris à tout moment. Pour vérifier s'il y a des feuilles ou débris, observer le panier par le couvercle transparent sur le dessus. Quel que soit l'intervalle entre les nettoyages de filtre, il est très important d'inspecter visuellement le panier au moins une fois par semaine. -
Seite 186: Entretien Du Moteur
Entretien du panier de pré-filtre de la pompe (suite) 10. S'assurer que le joint torique est bien en place. Placer le collier et le couvercle, puis tourner dans le sens horaire jusqu'à ce que les poignées soient horizontales, comme illustré. 11. -
Seite 187: Hivernage
Hivernage La protection antigel interne de l'IntelliFlo est désactivée lorsqu'elle est connectée à un IntelliTouch. La protection antigel est activée en sélectionnant YES sur la partie ON WITH FREEZE du menu de fonction de circuit approprié de l'IntelliTouch. Pour réactiver la protection antigel interne de l'IntelliFlo, la puissance vers la transmission doit être interrompue, puis rétablie. - Seite 188 4. S'assurer que toutes les connexions électriques sont propres et étanches. 5. Ouvrir la vanne de purge d'air sur le filtre, et s'éloigner du filtre. 6. Allumer l'IntelliFlo au niveau de l'interrupteur. S'assurer que la LED verte est allumée. 7. Appuyer sur le bouton Manual (LED allumée) pour mettre l'IntelliFlo en mode manuel. 8.
-
Seite 189: Installation De L'intelliflo
Section 5 Montage et démontage Les informations générales suivantes décrivent comment installer la pompe IntelliFlo. À l'attention de l'installateur: Avant d'installer la pompe IntelliFlo, lire et suivre toutes les notices d'avertissement, instructions et précautions de sécurité aux pages 3, 4 et 5. Installation de l'IntelliFlo Seul un technicien qualifié... -
Seite 190: Câblage De L'intelliflo
Câblage de l'IntelliFlo Pour raccorder l'IntelliFlo au secteur: 1. S'assurer que tous les interrupteurs et disjoncteurs électriques sont coupés avant de raccorder le moteur. 2. S'assurer que la tension sur le câblage est bien de 230 V CA. 3. Utiliser du AWG 12 pour les fils allant jusqu'à 30 m et du AWG 10 pour des longueurs supérieures à 30 m. - Seite 191 Raccordement de l'IntelliFlo VF (pour les modèles avec connexion électrique sur le côté) À NOTER QUE CE TRAVAIL DOIT ÊTRE RÉALISÉ PAR UN ÉLECTRICIEN QUALIFIÉ conformément aux règles de câblage nationales (AS/NZS 3000) en tenant compte de sa capacité (classe I, IPX5). Pour raccorder l'IntelliFlo au secteur: 1.
-
Seite 192: Démontage De La Pompe
Démontage de la pompe AVERTISSEMENT — Toujours débrancher le courant de la pompe de piscine au niveau de l'interrupteur avant d'intervenir sur la pompe. Le non-respect de cette consigne risque d'entraîner la mort ou des blessures graves au technicien, aux utilisateurs de la piscine ou à d'autres personnes en raison d'un choc électrique. -
Seite 193: Remontage De La Pompe/Remplacement Des Joints
Démontage de la pompe (suite) 9. Pour dévisser la turbine de l'arbre, tourner la turbine dans le sens anti-horaire. Plaque de joint SEAL PLATE 10. Déposer la partie rotative du joint mécanique de la turbine. Joint G ASKET 11. Enlever les quatre boulons assujettissant la plaque de joint au Turbine moteur à... - Seite 194 Démontage et remontage du boîtier électronique Pour enlever la transmission IntelliFlo et le panneau de commande de l'ensemble du moteur: 1. S'assurer que tous les interrupteurs et disjoncteurs électriques sont coupés avant de retirer la transmission. 2. Débrancher le câble de communication de la pompe. 3.
-
Seite 195: Liste Des Pièces Illustrées
Liste des pièces illustrées 11 18 17 29 12 14 8 Pièces de rechange N° N° de Description N° N° de Description d'ar- pièce d'ar- pièce ticle ticle 072184 BOULON 3/8 - À TÊTE HEX 7 X 8 18-8 s/s, 070387 PANIER AQ &... -
Seite 196: Dimensions De La Pompe Intelliflo
Dimensions de la pompe IntelliFlo (59.5 cm) (27.5 cm) (31.8 cm) Courbe de performance Intelliflo 35.00 30.00 25.00 3450 RPM 3450 t/min 20.00 15.00 10.00 1500 RPM 5.00 1500 t/min 0.00 10.0 15.0 20.0 25.0 30.0 35.0 / HR Spécifications électriques IntelliFlo Protection de circuit: Dispositif bipôle 20 AMP sur le tableau électrique. -
Seite 197: Alertes Et Avertissements
Section 6 Dépannage ATTENTION: Avant de rechercher les pannes sur la pompe IntelliFlo, lire et suivre toutes les notices d'avertissement, instructions et précautions de sécurité aux pages 3, 4 et 5. Alertes et avertissements L'IntelliFlo affiche toutes les alarmes et avertissements sur l'écran du panneau de commande. Lorsqu'une situation d'alarme ou d'avertissement existe, la LED correspondante s'allume à... -
Seite 198: Problèmes De Dépannage Intelliflo Généraux
Problèmes de dépannage IntelliFlo généraux Utiliser les informations de dépannage générales suivantes pour résoudre les problèmes éventuels de la pompe IntelliFlo. Remarque: Couper le courant vers l'unité avant de tenter un entretien ou une réparation. Problème Cause probable Remède Défaillance de pompe La pompe ne s'amorce pas - Fuite d'air dans l'aspira- Vérifier les tuyaux et vannes d'aspiration. - Seite 199 Problèmes de dépannage (suite) Problème Cause probable Remède Circulation inadéquate. Courant trop élevé de pompe. Vérifier le panier; si elle est branchée, débran- (Pour les messages cher la pompe et nettoyer le panier. La tuyauterie d'alerte IntelliFlo, se d'aspiration/décharge est trop petite. Vérifier et reporter à...
-
Seite 200: Avertissements Généraux
Avertissements généraux • Ne jamais entrer dans l'enceinte de la transmission. Même lorsque l'unité n'est pas alimentée, le moteur et son boîtier contiennent toujours du courant 230 V CA. • L'IntelliFlo n'est pas submersible • La pompe autorise 33 m /h à... -
Seite 201: Comment Rendre Sa Piscine Moins Énergivore
Comment rendre sa piscine moins énergivore Les piscines sont sources de plaisir, de relaxation et de sport. Mais elles représentent également des coûts énergétiques supérieurs à la moyenne. La solution pour réduire la note de la piscine consiste à gérer correctement le temps de pompe de filtration, la température de l'eau et l'éclairage. -
Seite 202: Maintenance Préventive
Ce que couvre la garantie: Pentair garantit que ses produits sont exempts de défauts de matériel et de fabrication pendant toute la période de garantie. Si un produit s'avère défectueux en termes de matériel ou de fabrication pendant la période de garantie, alors Pentair prendra en charge la réparation ou remplacera le produit par un produit similaire. - Seite 203 Notes Manuel d'installation et d'utilisation IntelliFlo VF...
- Seite 204 Copyright – Eingeschränkte Lizenz: soweit hierin nicht ausdrücklich zugelassen, dürfen die Inhalte dieses Dokuments ohne vorausgehende schriftliche Genehmigung der Pentair International SRL weder ganz noch auszugsweise und in gleich welcher Form und mit welchen Mitteln vervielfältigt werden. Copyright – Beperkte licentie: behalve zoals hierin specifiek toegestaan, mag geen enkel deel van de inhoud van dit document op om het even welke manier of hoe dan ook gereproduceerd worden zonder de voorafgaande schriftelijke toestemming van Pentair International SRL.
- Seite 205 INTELLIFLO WHISPERFLO VF ZWEMBAD POMP INSTALLATIE GIDS IntelliFlo VF - Installatie- en gebruikershandleiding IMPORTANT SAFETY INSTRUCTIONS READ AND FOLLOW ALL INSTRUCTIONS SAVE THESE INSTRUCTIONS WATER SOLUTION 357220 (Rev. 08/2016)
-
Seite 206: Conformiteitsverklaring
Verenigde Staten en/of andere landen. Tenzij speciaal toegelicht, zijn namen en merken van anderen die in dit document voorkomen niet gebruikt om een verband aan te geven tussen de eigenaars van deze namen en merken en Pentair. Die namen kunnen de handelsmerken of geregistreerde handelsmerken van deze derden zijn. - Seite 207 Inhoudsopgave Belangrijke veiligheidsvoorzorgen ....................3 Sectie 1: Inleiding .......................... 6 IntelliFlo - Overzicht ......................... 6 IntelliFlo - Kenmerken ......................7 IntelliFlo - Motorgeheel ......................7 IntelliFlo - Motorkenmerken ....................8 IntelliFlo - Aandrijving en bedieningspaneel ................ 9 Bedieningspaneel - Kenmerken ..................9 Sectie 2: Bedieningspaneel ......................
- Seite 208 Inhoudsopgave (vervolg) Baar ........................... 35 Pols ............................ 36 Features - Instellingen ....................... 37 Feature 1 of 2 - Setup ......................38 Feature 3-9 - Setup ......................39 Feature 3-9 - Werking ......................40 M.O. Flo - Setup ........................ 41 Features-menu (vervolg) ....................42 Werking van de M.O.
-
Seite 209: Belangrijke Veiligheidsvoorzorgen
BELANGRIJKE VEILIGHEIDSVOORZORGEN Belangrijk: T.a.v. de installateur: Deze handleiding bevat belangrijke informatie over de installatie, de werking en het veilige gebruik van dit product. Deze informatie dient altijd aan de eigenaar en/of bediener van deze uitrusting gegeven te worden. WAARSCHUWING — Vooraleer dit product te installeren, dient u alle waarschuwingen en instructies in de handleiding te lezen en op te volgen. - Seite 210 BELANGRIJKE VEILIGHEIDSVOORZORGEN (vervolg) WAARSCHUWING — Een watertemperatuur van 38°C of meer kan uw gezondheid schaden. Langdurige onderdompeling in heet water kan hyperthermie veroorzaken. Hyperthermie (sterk verhoogde lichaamstemperatuur) komt voor wanneer de inwendige temperatuur van het lichaam meerdere graden boven de normale lichaamstemperatuur van 37°C uitstijgt. De symptomen van hyperthermie zijn o.a.: slaperigheid, lethargie, duizeligheid, bezwijmen en een verhoogde inwendige temperatuur van het lichaam.
- Seite 211 BELANGRIJKE VEILIGHEIDSVOORZORGEN (vervolg) WAARSCHUWING — Pompen van verkeerde grootte of slecht geïnstalleerde pompen, of pompen die gebruikt worden in andere toepassingen dan voor de pomp voorzien, kunnen ernstige verwondingen of zelfs de dood tot gevolg hebben. Deze risico's kunnen de volgende zijn maar zijn er niet toe beperkt: elektrische schok, brand, overstroming, vastraken in de aanzuigopening of ernstige verwondingen of materiële schade veroorzaakt door een structureel defect van de pomp of van een ander deel van het systeem...
-
Seite 212: Intelliflo ® Vf - Overzicht
Sectie 1 Inleiding IntelliFlo VF - Overzicht ® De snelheidsregeling van de IntelliFlo VF-pomp met regelbaar debiet maakt het mogelijk zwembaden en bubbelbaden automatisch te filteren en heeft geavanceerde functies, waaronder energiebesparingsfuncties en programmeerbare waterkenmerken voor uw zwembad, bubbelbad, reinigingstoestel, waterval en andere toepassingen. -
Seite 213: Intelliflo - Kenmerken
IntelliFlo - Kenmerken • Past zichzelf aan elk zwembad aan = minder tijd vereist voor de installatie • Vermindert de energiekosten met max. 90% = een milieuvriendelijk product • Beschermt tegen leegzuigen of blokkering = comfortabele veiligheid • Voorkomt thermische overbelasting = verminderd risico op oververhitting •... -
Seite 214: Intelliflo - Motorkenmerken
Deksel van het bedieningspaneel Huis van de aandrijving en de elektronica Motorventilatordeksel Motorgeheel Communicatiepoort voor RS-485 (IntelliTouch en IntelliComm) Motorbevestiging IntelliFlo - Motorgeheel IntelliFlo - Motorkenmerken • Synchrone motor met permanente magneet (PMSM) = zoals bij hybride auto's • Hoog rendement (bij 3450 t/min 92% en bij 400 t/min 90%) = veel hoger dan klassieke inductiemotoren •... -
Seite 215: Bedieningspaneel - Kenmerken
IntelliFlo VF - Aandrijving en bedieningspaneel De IntelliFlo-aandrijving bestaat uit een bedieningspaneel en elektronische schakelingen die de inkomende enkelfasige voedingsspanning van 230 volt omvormen in een driefasige spanning met regelbare frequentie om de motor aan te drijven. De microprocessor van de aandrijving regelt het motortoerental door de frequentie van de toegevoerde stroom samen met de spanning te wijzigen. -
Seite 216: Intelliflo - Bedieningspaneel
Sectie 2 Bedieningspaneel Deze sectie beschrijft de bedieningselementen en LEDs van het bedieningspaneel. IntelliFlo - Bedieningspaneel ® FILTER 12:15 15.W VERMOGEN ACTIEF Bedieningselementen en LEDs Filter-knop/LED: Start de Filter-modus. De LED brandt wanneer de Filter-modus actief is. Vacuum-knop/LED: Start de Vacuüm-modus. De LED brandt wanneer de Vacuüm-modus actief is. Backwash-knop/LED: Start de Filter reinigen-modus. - Seite 217 Bedieningselementen en LEDs (vervolg) ® FILTER 12:15 Rij 1 15.W Rij 2 Rij 3 VERMOGEN ACTIEF Rij 4 Pijl-knoppen: • Pijl-omhoog: Beweeg een niveau omhoog in de menuboom of verhoog met 1 bij het wijzigen van een instelling. • Pijl-omlaag: Beweeg een niveau omlaag in de menuboom of verhoog met 1 bij het wijzigen van een instelling.
- Seite 218 Bedieningselementen en LEDs (vervolg) Het volgende voorbeeld illustreert de stappen om de Aanzuigpomp-modus in te stellen. De knoppen op het bedieningspaneel zijn hieronder afgebeeld om u te helpen vertrouwd te worden met hun uitzicht en functie. Aanzuigpomp - setup Om het debiet en de tijd van de Aanzuigpomp-modus in te stellen: 1.
-
Seite 219: Manual-Modus (Handmatige Modus)
Sectie 3 Werken met de IntelliFlo VF Deze sectie beschrijft hoe het bedieningspaneel van de IntelliFlo VF gebruikt dient te worden om de pompmodi in te stellen. IntelliFlo - Werkwijzen (modi): De knoppen die betrekking hebben op de modi zijn: Manual, Filter, Backwash, Vacuum, Feature 1 en Feature 2. - Seite 220 Gebruik de Manual-modus om de vereisten voor elk toestel van uw zwembadsysteem waar water door stroomt te meten en te testen, en uw resultaat te bewaren voor latere instellingen in de menu's van de IntelliFlo. Zie “Menu's” op pagina 21 voor gedetailleerde instructies. Om met de IntelliFlo in Manual-modus te werken: HANDM RPM-modus 1.
-
Seite 221: Handm Flow-Modus
Manual-modus (vervolg) HANDM FLOW-modus 4. Druk op de Start/Stop-knop om de pomp te stoppen. Gebruik de knoppen pijl-omhoog en pijl-omlaag om naar de "DEBIET inst"-menuopdracht te gaan. Druk op de Select-knop om uw keuze te bevestigen. 5. Om de instelling te wijzigen, drukt u op de knoppen pijl-links en pijl-rechts om het te wijzigen cijfer te kiezen en gebruikt u vervolgens de knoppen pijl-omhoog en pijl-omlaag om het gekozen cijfer te wijzigen. - Seite 222 Manual-modus (vervolg) ® ® ® HANDM RPM 12:15 HANDM RPM 12:15 HANDM RPM 12:15 1 000.RPM 2000.RPM 1000. RPM SNELH inst SNELH inst SNELH inst GESTOPT GESTOPT GESTOPT De cursor verandert in Knoppen pijl-links/ Druk op de Enter- een zwart blokje pijl-rechts om het knop om op te slaan.
-
Seite 223: Filter Reinigen-Modus
Filter reinigen-modus Wanneer de inwendige zwembadfilter de druk “Filterreinigingsdruk” bereikt, toont de IntelliFlo een melding “Spoedig onderhoud” op het display (Zie “De filterreinigingsdruk instellen” op pagina 26 en “Voorbeeld van de filterreinigingsdruk” op pagina 30), die aangeeft dat de filter moet gereinigd worden of “gespoeld door het water er omgekeerd door te laten circuleren". -
Seite 224: Vacuum-Modus
Filter reinigen-modus (vervolg) 4. Wanneer de Filter reinigen-modus gestopt is, manueel of na voltooiing van de ingestelde Filter reinigen-cyclus, zal de IntelliFlo stoppen en zal ® het bedieningspaneel in de hoek bovenaan links van het display "Spoelen" SPOELEN 12:15 weergeven. IntelliFlo zal de spoelcyclus pas beginnen als u de Start/Stop-knop 1.MIN hebt ingedrukt. -
Seite 225: Filter-Modus
Vacuüm-modus (vervolg) 3. Gebruik de knoppen pijl-omhoog en pijl-omlaag om de onderstaande schermen te bekijken: • RESTTIJD: Toont de resterende tijd van de geprogrammeerde duur • VERMOGEN (Watt): Toont voortdurend het door de motor opgenomen vermogen in watt • SNELHEID (TPM): Toont de pompsnelheid in t/min •... -
Seite 226: Feature 1 (2)-Modus
Externe bediening IntelliFlo met IntelliComm-communicatiecentrum De IntelliFlo kan verbonden worden met het Pentair IntelliComm-communicatiecentrum via een facultatieve communicatiekabel (artikelnummer 350122). De IntelliComm bevat vier paar ingangsklemmen die verbonden kunnen worden met het IntelliFlo-programma 1 (4) in het "Externe bediening"-menu (zie pagina 44 voor meer informatie over de instelling van de externe bediening). - Seite 227 Externe bediening (vervolg) Bovendien bevatten de programma's 1 (4) een "Looptijd"-instelling die u in staat stelt een periode op te geven waarop de IntelliFlo zal blijven werken met het geprogrammeerde debiet nadat hij spanningsloos is gemaakt. Zie "Instelling externe bediening met IntelliComm" op pagina 44 voor meer informatie over de instelling van de IntelliComm.
-
Seite 228: Intelliflo-Menu's
Startcyclus 2 (U:mm) Stopcyclus 2 (U:mm) Startcyclus 3 (U:mm) Stopcyclus 3 (U:mm) Startcyclus 4 (U:mm) IntelliFlo-menu's (U:mm) Stopcyclus 4 Klok (U:min - AM/PM) TIJD/CONT. (pag. 31) Contrast (0 - 9) HOOFDSCHERM Druk op de MENU-knop om de menu’s te openen Features 1 Debiet inst (4 - 29 m FEATURES... -
Seite 229: Gegev. Bad-Menu
Gegev. Bad-menu Gebruik het Gegev. Bad-menu om de IntelliFlo te configureren voor het zwembad- en bubbelbadsysteem. Vanuit dit menu kunt u de taal van het LCD-scherm van het bedieningspaneel instellen, een adres invoeren voor de IntelliFlo-pomp wanneer die verbonden is met een IntelliTouch-systeem, het volume van het zwembad in m invoeren en een raming invoeren van de temperatuur van het zwembadwater. -
Seite 230: Eenheden-Menu
Gegev. Bad-menu (vervolg) ® Gegev. Bad 12:15 Druk op de knop pijl-omhoog d) Om de watertemperatuur in te voeren: 24 °C of pijl-omlaag om naar de “Watertemperatuur”-instelling te gaan. Druk op de Select-knop om uw keuze te bevestigen. Om de instelling Watertemperatuur te wijzigen, drukt u op de knoppen pijl-links en pijl-rechts om het te wijzigen cijfer te kiezen en gebruikt u vervolgens de knoppen pijl-... - Seite 231 Aan.pomp-menu (vervolg) Wanneer de aanzuiging van de pomp bezig is, toont het LCD-display op het bedieningspaneel "Aanzu.pomp" en toont daarna kortstondig "Gevuld" wanneer het aanzuigen is afgelopen. OPGELET: Om blijvende schade aan de IntelliFlo-pomp te vermijden, dient u alvorens het systeem te starten, de zeef in het IntelliFlo-huis met water te vullen opdat de pomp naar behoren gevoed zou worden.
-
Seite 232: Filter-Menu
Aan.pomp-menu (vervolg) ® Aan.pomp 12:15 Druk op de knop pijl-omhoog of c) Om de "Systeemaanzuigtijd" in te stellen: 0. MIN pijl-omlaag om naar de “Systeemaanzuigtijd”-instelling te gaan. Druk op de Systeemaanzuigtijd Select-knop om uw keuze te bevestigen Om extra aanzuigtijd in te voeren om ervoor te zorgen dat het volledige systeem volledig met water is gevuld, zie stap De eventuele extra tijd die nodig is voor het leidingwerk van het zwembad om gevuld te worden met water nadat het vullen gestart is, wordt... - Seite 233 Filter-menu (vervolg) De waarde die ingevoerd wordt voor de "filterreinigingsdruk" bepaalt hoe ver boven de "begindruk" de inwendige filterdruk moet stijgen alvorens de ® Filter 12:15 IntelliFlo een "Spoedig onderhoud"-melding zal weergeven. De “begindruk” 965.mbar 1,0 bar is de filterdruk die gemeten werd na afloop van de laatste reiniging. Filt.
- Seite 234 Filter-menu (vervolg) Druk op de knop pijl- d) De start- en stoptijden van de cycli 1 tot en met 4 instellen: omhoog of pijl-omlaag om naar de “Startcyclus”-instelling te gaan. Druk op de Select- knop om uw keuze te bevestigen. 9:00 is de standaardinstelling. Druk op Enter om 9:00 als starttijd in te stellen.
-
Seite 235: Filtercyclusinstellingen
Filter-menu (vervolg) Filtercyclusinstellingen De onderstaande tabel toont de beschikbare instellingen in de Filter-modus. NAAM WAARDE BESCHRIJVING Filter- 0,1 tot 3,5 bar De verschildruk tussen de nul-druk en de 100% reinigingsdruk (Standaard = 1,0 bar). vervuilde-filterstatus. Omkeringen/ Het aantal keren per dag dat het watervolume dat 1-8 (Standaard = 1) ingesteld is in "Volume Bad"... -
Seite 236: Voorbeeld Van De Filterreinigingsdruk
Filter-menu (vervolg) Voorbeeld van de filterreinigingsdruk Zwembadfilters werken door vuil tegen te houden. Bij de start, wanneer een zwembadfilter nog niet vervuild is, wordt de gemeten inwendige druk "de begindruk" (starting pressure) genoemd. Naarmate het vuil zich in de filter ophoopt, verhoogt de inwendige druk. Uiteindelijk zal de filter a) gereinigd moeten worden of "uitgewassen"... -
Seite 237: De Filter-Modus Samen Met De Features-Modus Gebruiken
Filter-menu (vervolg) De Filter-modus samen met de Features-modus gebruiken IntelliFlo zal starten en stoppen op het moment dat u de filtercycli 1-4 programmeert maar de parameters die u hebt ingesteld om functies te bedienen in de in Features-modus (alleen Functies 3-9) hebben voorrang op de cyclusparameters die u ingesteld hebt in de Filter-modus. -
Seite 238: Debietregelings- En Filter-Modus
Filter-menu (vervolg) Debietregelings- en Filter-modus De Filter-modusfunctie stelt de IntelliFlo in staat het drukverlies in de persleiding te compenseren om het benodigde debiet in stand te houden. Het debiet dat de eenheid kan leveren wordt beperkt door het geïnstalleerde leidingwerk. Als meer debiet gevraagd wordt dan de IntelliFlo kan leveren, zal hij versnellen tot de maximale snelheid en de druk verhogen. -
Seite 239: Tijd/Cont.-Menu
Tijd/Cont.-menu Gebruik het "Tijd/Cont."-menu om de IntelliFlo-systeemklok en het contrast van het display op het bedieningspaneel in te stellen. De systeemklok van de IntelliFlo regelt alle geprogrammeerde start- en stoptijden, functies en geprogrammeerde cycli. De systeemklok bewaart de juiste tijd tot 96 uur na uitschakeling. -
Seite 240: Features-Menu
Features-menu Gebruik de Features-modus om waterkenmerken te gebruiken zoals fonteintjes, bubbelbad, automatische reinigingstoestellen, watervallen enz. • Feature 1 & 2 • Feature 3-9 • M.O. Flo (gemoduleerde opbrengst) • Baar • Pols Feature 1 & 2 Feature 1 en Feature 2 zijn bedoeld om kenmerken die werken op water "op aanvraag" te doen werken, d.w.z. -
Seite 241: Features-Menu (Vervolg)
Features-menu (vervolg) Door de volgende parameters in de M.O. Flo-instelling in te voeren, kunt u de IntelliFlo programmeren om het debiet van 4 m /u tot 12 m /u te verhogen gedurende intervallen van drie minuten, om de twee uur, waardoor de drukschakelaar dus wel zal omschakelen: Debietsnelheid = 9 m /u, draaitijd =:03 (3 minuten), intervaltijd = 2 uur. - Seite 242 Features-menu (vervolg) Pols Net als de M.O. Flo- en Baar-kenmerken is het Pols-kenmerk ontworpen voor waterkenmerken die wisselende debieten vereisen. Net als de Baar-functie berust de instelling van het Pols-kenmerk op parameters voor de minimale en de maximale pompsnelheid en periode; deze parameters werken echter anders dan in de Baar- functie.
- Seite 243 Features-menu (vervolg) Features - Instellingen Naam Waarde Beschrijving F1-9, M.O. Flo 4-29 m Programmeert het debiet voor functie (feature) 1 - 10 DEBIET inst (Standaard 12 m Wanneer deze instelling op "Ingeschakeld" staat, activeert de functie F3-9, M.O. Flo, Baar, Pols Ingesch / Uitgesch op het moment dat is opgegeven in de "Starttijd inst"-instelling.
- Seite 244 Features-menu (vervolg) Feature 1 of 2 - Setup Om naar het Features 1 (2)-menu te gaan: 1. Zorg ervoor dat de groene vermogen-LED brandt en dat de pomp stilstaat. 2. Druk op de Menu -knop. “Gegev. Bad” wordt weergegeven. 3. Druk op de knop pijl-omhoog of pijl-omlaag om naar de “Tijd”-instelling te gaan. Druk op de Select-knop om uw keuze te bevestigen.
- Seite 245 Features-menu (vervolg) Feature 3-9 - Setup Om naar het Features 3-9-menu te gaan: 1. Zorg ervoor dat de groene vermogen-LED brandt en dat de pomp stilstaat. 2. Druk op de Menu-knop. “Gegev. Bad” wordt weergegeven. 3. Druk op de knop pijl-omhoog of pijl-omlaag om naar de “Tijd”-instelling te gaan. Druk op de Select-knop om uw keuze te bevestigen.
- Seite 246 Features-menu (vervolg) 4. Om de instelling te wijzigen, drukt u op de knoppen pijl-links en pijl-rechts om het te wijzigen cijfer te kiezen en gebruikt u vervolgens de knoppen pijl-omhoog en pijl-omlaag om het gekozen cijfer te wijzigen. 5. Wanneer u klaar bent, drukt u op de Enter-knop om de wijzigingen op te slaan. Om eventuele wijzigingen te annuleren, drukt u op de Escape-knop om de wijzigingsmodus ("edit") te verlaten zonder op te slaan.
- Seite 247 Features-menu (vervolg) M.O. Flo - Setup Om naar het M.O. Flo-menu te gaan: 1. Zorg ervoor dat de groene vermogen-LED brandt en dat de pomp stilstaat. 2. Druk op de Menu-knop. “Gegev. Bad” wordt weergegeven. 3. Druk op de knop pijl-omhoog of pijl-omlaag om naar de “Tijd”-instelling te gaan. Druk op de Select-knop om uw keuze te bevestigen.
-
Seite 248: Werking Van De M.o. Flo-Functie
Features-menu (vervolg) 4. Om de instelling te wijzigen, drukt u op de knoppen pijl-links en pijl-rechts om het te wijzigen cijfer te kiezen en gebruikt u vervolgens de knoppen pijl-omhoog en pijl-omlaag om het gekozen cijfer te wijzigen. 5. Wanneer u klaar bent, drukt u op de Enter-knop om de wijzigingen op te slaan. Om eventuele wijzigingen te annuleren, drukt u op de Escape-knop om de wijzigingsmodus ("edit") te verlaten zonder op te slaan. -
Seite 249: Werking Van De Baar En Pols-Functies
Features-menu (vervolg) 4. Om de instelling te wijzigen, drukt u op de knoppen pijl-links en pijl-rechts om het te wijzigen cijfer te kiezen en gebruikt u vervolgens de knoppen pijl-omhoog en pijl-omlaag om het gekozen cijfer te wijzigen. 5. Wanneer u klaar bent, drukt u op de Enter-knop om de wijzigingen op te slaan. Om eventuele wijzigingen te annuleren, drukt u op de Escape-knop om de wijzigingsmodus ("edit") te verlaten zonder op te slaan. -
Seite 250: Externe Bediening-Menu
Externe bediening-menu Instelling "Externe bediening" met IntelliComm De modus "Externe bediening" wordt geactiveerd en bestuurd door het IntelliComm- communicatiecentrum. Zie "Externe bediening" op pagina 20 voor meer informatie over de bediening van de IntelliFlo vanop afstand. Om naar het "Ext. Cont."-menu te gaan: 1. -
Seite 251: "Filter Reinigen" - Setup
Externe bediening-menu (vervolg) ® 4. Om de instelling te wijzigen, drukt u op de knoppen pijl-links en pijl-rechts om Progr. 1 12:16 0:00 het te wijzigen cijfer te kiezen en gebruikt u vervolgens de knoppen pijl-omhoog en pijl-omlaag om het gekozen cijfer te wijzigen. Looptijd 5. -
Seite 252: Vacuüm-Menu
Vacuüm-menu Setup Vacuüm-modus Om naar het Vacuüm-menu te gaan: 1. Zorg ervoor dat de groene vermogen-LED brandt en dat de pomp stilstaat. 2. Druk op de Menu-knop. “Gegev. Bad” wordt weergegeven. 3. Druk op de knop pijl-omhoog of pijl-omlaag om naar de menuopdracht “Vacuüm” te gaan. Druk op de Select-knop om uw keuze te bevestigen. -
Seite 253: Onderhoud Door De Gebruiker
Sectie 4 Onderhoud door de gebruiker De volgende informatie beschrijft hoe de IntelliFlo-pomp te onderhouden en repareren. Pompzeefmand De zeef, soms ook “haar- en pluisjesvanger” genoemd, aan de voorkant van de pomp. De haar- en pluisjesvanger bevat een mand die altijd vrij gehouden moet worden van bladeren en deeltjes vuil. Om de mand te inspecteren op bladeren en deeltjes vuil, bekijkt u hem van langs boven, via het doorzichtige deksel. -
Seite 254: Motoronderhoud
Onderhoud van de pompzeefmand (vervolg) 10. Zorg ervoor dat de O-ring van het deksel goed is geplaatst. Breng de klem en het deksel aan en draai ze rechtsom tot de hendels horizontaal staan zoals getoond. 11. Verbind de communicatiekabel met de pomp indien van toepassing. 12. -
Seite 255: Klaar Maken Voor De Winter
Klaar maken voor de winter De inwendige bescherming van de IntelliFlo tegen bevriezing is uitgeschakeld wanneer hij verbonden is met een IntelliTouch. Antibevriesbescherming wordt verschaft door JA te kiezen in het "AAN BIJ VORST"-deel van het overeenkomstige IntelliTouch-kringfunctiemenu. Om de inwendige antibevriesbescherming van de IntelliFlo opnieuw vrij te geven, moet de voeding van de aandrijving UIT- en vervolgens weer AAN-gezet worden. - Seite 256 4. Vergewis u ervan dat alle elektrische aansluitingen schoon zijn en vastgedraaid. 5. Open de ontluchtingsklep op de filter en blijf daarbij zo ver mogelijk van de filter. 6. Zet de IntelliFlo onder spanning via de automatische uitschakelaar. Zorg ervoor dat de groene vermogen-LED brandt.
-
Seite 257: De Intelliflo Installeren
Sectie 5 Installatie en verwijderen De volgende algemene informatie beschrijft hoe de IntelliFlo-pomp te installeren. T.a.v. de installateur: Vooraleer de IntelliFlo-pomp te starten, moet u alle waarschuwingen, instructies en veiligheidsvoorzorgen op pagina 3, 4 en 5 gelezen hebben en opvolgen. De IntelliFlo installeren Alleen gekwalificeerd servicepersoneel mag de IntelliFlo installeren. -
Seite 258: De Intelliflo Bedraden
De IntelliFlo bedraden Om de IntelliFlo met de wisselspanningbron te verbinden: 1. Zorg ervoor dat alle automatische uitschakelaars en schakelaars uitgeschakeld zijn alvorens de motor te bedraden. 2. Vergewis u ervan dat de netspanning 230 VAC is. 3. Gebruik een 12 AWG draad (4 mm²) voor draden tot 30 m of en 10 AWG (6 mm²) voor draden langer dan 30 m. - Seite 259 Bedrading van de IntelliFlo VF (voor modellen met zijdelingse wisselspanningsaansluiting) NOOT: DIT WERK MOET GEDAAN WORDEN DOOR EEN GEKWALIFICEERDE ELEKTRICIEN in overeenstemming met de nationale elektrische reglementering (in België: het AREI) en rekening houdend met de eigenschappen (Klasse I, IPX5). Om de IntelliFlo met de wisselspanningbron te verbinden: 1.
-
Seite 260: Demontage Van De Pomp
Demontage van de pomp WAARSCHUWING — Maak de zwembadpomp altijd spanningsloos via de automatische uitschakelaar alvorens hem te onderhouden. Als u dit niet doet, kan dit de dood of ernstige verwondingen van de monteur, zwembadgebruikers of anderen tot gevolg hebben wegens een elektrisch schok. Lees alle onderhoudsinstructies alvorens met de pomp te werken. -
Seite 261: Pomp Opnieuw Samenbouwen / Vervanging Van De Dichting
Demontage van de pomp (vervolg) 9. Om het schoepenrad van de as te draaien, draait u hem linksom. 10. Verwijder het draaiende deel van Dichtingsplaat SEAL PLATE de mechanische dichting van het schoepenrad. Pakking G ASKET 11. Verwijder de vier bouten van de dichtingsplaat van de motor met Schoepenrad behulp van een 9/16"... -
Seite 262: Aandrijving Verwijderen En Aanbrengen
Aandrijving verwijderen en aanbrengen Om de IntelliFlo-aandrijving en bedieningspaneel van het motorgeheel te verwijderen: 1. Zorg ervoor dat alle automatische uitschakelaars en schakelaars uitgeschakeld zijn alvorens de aandrijving te verwijderen. 2. Ontkoppel de communicatiekabel van de pomp. 3. Open het deksel van het bedieningspaneel. 4. -
Seite 263: Geïllustreerde Onderdelenlijst
Geïllustreerde onderdelenlijst 11 18 17 29 12 14 8 Vervangstukken Arti- Stuk- Beschrijving Arti- Stuk- Beschrijving kelnr. nummer kelnr. nummer 070387 MAND AQ & WF 072184 SLUITRING 3/8 Binnendiam. X 7/8 070429 BOUT MET ZESKANTE KOP 2-56x0,875 Buitendiam. 0,05" DIK 18-8 roestvast staal roestvast staal (4 stuks) (6 stuks) 070430... -
Seite 264: Intelliflo - Pompafmetingen
IntelliFlo - Pompafmetingen (59.5 cm) (27.5 cm) (31.8 cm) IntelliFlo - Pompkromme 35.00 30.00 25.00 3450 RPM 3450 t/min 20.00 15.00 10.00 1500 RPM 5.00 1500 t/min 0.00 10.0 15.0 20.0 25.0 30.0 35.0 / HR IntelliFlo - Elektrische specificaties Bescherming: Tweepolig 20 A-toestel in het elektrische bord. -
Seite 265: Sectie 6 Problemen Oplossen
Sectie 6 Problemen oplossen OPGELET: Vooraleer problemen met de IntelliFlo-pomp op te sporen en te verhelpen, moet u alle waarschuwingen, instructies en veiligheidsvoorzorgen op pagina 3, 4 en 5 gelezen hebben en opvolgen. Meldingen en waarschuwingen De IntelliFlo toont alle alarmmeldingen en waarschuwingen op het display van het bedieningspaneel. Wanneer een alarm- of waarschuwingstoestand actief is, zal de overeenkomstige LED op het display branden. -
Seite 266: Opsporen En Verhelpen Van Problemen Met De Intelliflo
Opsporen en verhelpen van problemen met de IntelliFlo Gebruik de volgende algemene informatie voor het opsporen van fouten om mogelijke problemen met uw IntelliF- lo-pomp op te lossen. Noot: Schakel de elektrische voeding uit alvorens een onderhoud of reparatie te doen. Probleem Mogelijke oorzaak Remedie / Wat te doen? - Seite 267 Opsporen en verhelpen van problemen (vervolg) Probleem Mogelijke oorzaak Remedie / Wat te doen? Onvoldoende circulatie. Stroom pomp te hoog. Indien verstopt, zet de pomp uit en (Voor IntelliFlo- maak de mand schoon. Aanzuig/ meldingsberichten, persleidingwerk is te klein. Controleer zie Meldingen en en reinig de zwembadfilter.
-
Seite 268: Algemene Waarschuwingen
Algemene waarschuwingen • Kom nooit met een lichaamsdeel in het huis van de aandrijving. Er is een condensatorbatterij die onder een spanning staat van 230 VAC zelfs als de eenheid niet gevoed wordt. • De IntelliFlo is niet dompelbaar • De IntelliFlo VF-pomp heeft een debiet van 33 m /u of een opvoerhoogte van 31 m;... -
Seite 269: Hoe Uw Zwembad Minder Laten Verbruiken
Hoe uw zwembad minder laten verbruiken Zwembaden zijn heel leuk voor het relaxen, om te oefenen of gewoon om plezier te maken. Maar ze resulteren ook in hogere energiefacturen dan gemiddeld. Om energie te besparen bij het gebruik van uw zwembad, bestaat de truc erin de filterpomptijd, de watertemperatuur in het zwembad en de verlichting goed onder controle te houden. -
Seite 270: Preventief Onderhoud
Hoe lang geldt de garantie: Dit Pentair-product geniet een garantie van drie (3) jaar op alle onderdelen vanaf de datum van de eerste aankoop door de consument. Wat is door de garantie gedekt: Deze garantie is alleen geldig voor de consument die het product heeft aangekocht. - Seite 271 Noten IntelliFlo VF - Installatie- en gebruikershandleiding...
- Seite 272 Copyright – Eingeschränkte Lizenz: soweit hierin nicht ausdrücklich zugelassen, dürfen die Inhalte dieses Dokuments ohne vorausgehende schriftliche Genehmigung der Pentair International SRL weder ganz noch auszugsweise und in gleich welcher Form und mit welchen Mitteln vervielfältigt werden. Copyright – Beperkte licentie: behalve zoals hierin specifiek toegestaan, mag geen enkel deel van de inhoud van dit document op om het even welke manier of hoe dan ook gereproduceerd worden zonder de voorafgaande schriftelijke toestemming van Pentair International SRL.
- Seite 273 INTELLIFLO WHISPERFLO VF BOMBAS PARA PISCINAS GUIA DE INSTALACION Guía de Instalación y del Usuario - IntelliFlo VF IMPORTANT SAFETY INSTRUCTIONS READ AND FOLLOW ALL INSTRUCTIONS SAVE THESE INSTRUCTIONS WATER SOLUTION 357220 (Rev. 08/2016)
-
Seite 274: Soporte Al Cliente
Pentair. Estos nombres y marcas pueden ser marcas comerciales, o marcas comerciales registradas de dichas partes o de otros. - Seite 275 Contenido Medidas de Seguridad Importantes ....................3 Sección 1: Presentación ........................ 6 Vista General de IntelliFlo ........................ 6 Características de IntelliFlo ....................7 Grupo Motor IntelliFlo ......................7 Características del Motor IntelliFlo ..................8 Grupo Controlador y Panel de Control IntelliFlo ..............9 Características del Panel de Control de Operador ..............
- Seite 276 Contenido (Continuación) Onda ..........................35 Pulso ..........................36 Parámetros de Funciones ....................37 Configuración para Función 1 o 2 ..................38 Configuración para Función 3-9 ..................39 Operación de Función 3-9 ....................40 Configuración de M.O. Flo ....................41 Menú Funciones (Continuación) ..................42 Operación de M.O.
-
Seite 277: Medidas De Seguridad Importantes
MEDIDAS DE SEGURIDAD IMPORTANTES Aviso importante: Atención Instalador: Este manual contiene información importante sobre la instalación, operación y utilización segura de este producto. Esta información debe darse al propietario y/o operador de este equipo. AVISO Antes de instalar este producto, lean y cumplan todas las notas de aviso e instrucciones que están incluidas. - Seite 278 MEDIDAS DE SEGURIDAD IMPORTANTES (continuación) AVISO Una temperatura del agua superior a 100° Fahrenheit (38° C) puede ser peligrosa para su salud. Una inmersión prolongada en agua caliente puede causar hipertermia. La hipertermia se produce cuando la temperatura interior del cuerpo humano alcanza un nivel de varios grados por encima de la temperatura normal del cuerpo de 98,6°...
- Seite 279 MEDIDAS DE SEGURIDAD IMPORTANTES (continuación) AVISO Las bombas dimensionadas o instaladas inadecuadamente, o utilizadas en aplicaciones no previstas para las bombas, pueden causar graves daños personales o muerte. Estos riesgos pueden incluir, pero no están limitados a descargas eléctricas, incendio, inundación, atrapamiento por succión, o heridas graves, o daños a la propiedad causados por un fallo estructural de la bomba o por otros componentes del sistema AVISO...
- Seite 280 Sección 1 Presentación IntelliFlo VF - Vista General ® El sistema de control de caudal variable de la bomba IntelliFlo VF, ofrece la automatización de filtros en piscinas y spa, así como funciones avanzadas que incluyen la conservación de energía y otras funciones programables del agua para su piscina, spa, limpiadores, cascadas, y otras aplicaciones.
-
Seite 281: Características De Intelliflo
Características de IntelliFlo • Se adapta por si misma a cualquier piscina = es necesario menos tiempo para su instalación • Reduce el costo de energía hasta con un 90% = producto amigable para el entorno • Protege frente a pérdidas de cebado o atasco de caudal = seguridad cómoda •... -
Seite 282: Características Del Motor Intelliflo
Cubierta del panel de control de operador Grupo controlador y caja de electrónica: Cubierta del ventilador del motor Grupo Motor Puerto de comunicación para RS-485 (IntelliTouch e IntelliComm) Soporte del motor Grupo Motor IntelliFlo Características del Motor IntelliFlo • Motor síncrono de imán permanente (PMSM) = como en los coches híbridos •... -
Seite 283: Grupo Controlador Y Panel De Control Intelliflo
Grupo Controlador y Panel de Control IntelliFlo VF El controlador IntelliFlo está compuesto por un panel de control de operador y la electrónica del sistema, que convierten la corriente monofásica entrante de 230 voltios, a frecuencia variable trifásica para impulsar el motor. El microprocesador controla el motor cambiando la frecuencia de la corriente que recibe, y cambiando también el voltaje para controlar la velocidad de rotación. -
Seite 284: Panel De Control De Operador Intelliflo
Sección 2 Panel de Control de Operador Esta sección describe los controles y los LEDs del panel de control de operador. Panel de Control de Operador IntelliFlo ® FILTRO 12:15 15.W POTENCIA EN MARCHA Controles y LEDs Botón/LED Filter: Inicia el modo Filtro. El LED está encendido cuando está activo el modo Filtro. Botón/LED Vacuum: Inicia el modo Aspiración. - Seite 285 Controles y LEDs (Continuación) ® FILTRO 12:15 Línea 1 15.W Línea 2 POTENCIA Línea 3 EN MARCHA Línea 4 Botones de Flecha: • Flecha Arriba: Sube un nivel en el árbol del menú, o aumenta un dígito cuando se edita un parámetro. •...
-
Seite 286: Ejemplo De Configuración De Cebado
Ejemplo de Configuración de Cebado El ejemplo siguiente ilustra los pasos para configurar el Modo Cebadura. Los botones del panel de control se reproducen abajo para ayudarle a familiarizarse con su apariencia y función. Para configurar la intensidad de caudal y el horario del Modo Cebadura: Configuración de cebado 1. -
Seite 287: Modos Operativos
Sección 3 Trabajar con IntelliFlo VF Esta sección describe como utilizar el panel de control de operador de IntelliFlo VF, para configurar los modos operativos de la bomba. Modos Operativos de IntelliFlo: Los botones de modo operativo son Modo Manual (Manual), Modo Filtro (Filter), Modo Limpia Filtro (Backwash), Modo Aspiración (Vacuum), Función 1 (Feature 1), y Función 2 (Feature 2). -
Seite 288: Modo Manual Rpm
Use el Modo Manual para medir y probar las necesidades de cada dispositivo por caudal en su sistema de piscina, y guarde sus resultados para configurarlo después en los menús de IntelliFlo. Vea “Menús” en la página 21, para instrucciones detalladas. Para trabajar con IntelliFlo en el modo manual: Modo Manual RPM 1. -
Seite 289: Modo Manual Caudal
Modo Manual (Continuación) Modo Manual Caudal 4. Pulse el botón Start/Stop para parar la bomba. Use los botones de flecha Arriba y Abajo para desplazarse al elemento de menú “Ajustar CAUDAL”. Pulse el botón Select para seleccionarlo. 5. Para modificar el parámetro, pulse las flechas Izquierda y Derecha para seleccionar el dígito a modificar, después use las flechas Arriba y Abajo para cambiar el dígito seleccionado. - Seite 290 Modo Manual (Continuación) ® ® ® MANUAL RPM 12:15 MANUAL RPM 12:15 MANUAL RPM 12:15 1 000.RPM 2000.RPM 1000. RPM Ajustar VELOC. Ajustar VELOC. Ajustar VELOC. PARADO PARADO PARADO El cursor resalta en Botones de Pulse el botón Enter negro flecha Izquierda/ para guardarlo.
-
Seite 291: Modo Limpia Filtro
Modo Limpia Filtro Cuando la presión interior del filtro de la piscina alcanza la “Presión Filtro Limpio” IntelliFlo muestra una alerta “Necesitar Manutenc.” en la pantalla del panel de control (Vea “Para definir la Presión Filtro Limpio” en la página 26 y “Ejemplo de Presión Filtro Limpio” en la página 30.), indicando que el filtro debe limpiarse, o aplicar “Limpia Filtro.”... -
Seite 292: Modo Aspiración
Modo Limpia Filtro (Continuación) 4. Cuando se para el Modo Limpia Filtro, manualmente o al finalizar el ciclo Limpia Filtro predeterminado, IntelliFlo se parará y el panel de control mostrará “Aclarado” en la esquina superior izquierda. IntelliFlo no iniciará el ciclo Aclarado hasta ®... -
Seite 293: Modo Filtro
Modo Aspiración (Continuación) 3. Use los botones de flecha Arriba y Abajo para ver las pantallas de abajo: • TIEMPO RESTANTE: Muestra el tiempo restante en la duración programada • POTENCIA (vatios): Muestra la potencia para el eje del motor en vatios continuos •... -
Seite 294: Modo Control Externo
Modo Control Externo IntelliFlo con IntelliComm Communication Center IntelliFlo se puede conectar al Pentair IntelliComm Communication Center mediante un cable opcional de comunicaciones (P/N 350122). IntelliComm está equipado con cuatro pares de conexiones de terminal de entrada, que se pueden conectar a los programas 1(4) de IntelliFlo en el menú Control Externo (Vea la página 44 para más información sobre configurar Control Externo). - Seite 295 Modo Control Externo (Continuación) Adicionalmente, los programas 1(4) tienen un parámetro “Parada tras retardo” que permite especificar un período de tiempo durante el que IntelliFlo continuará funcionando con la intensidad de caudal programada, después de parar el voltaje. Vea “Configuración de Control Externo con IntelliComm” en la página 44, para más información sobre configurar IntelliComm.
-
Seite 296: Menús De Intelliflo
Ciclo de arranque 2 (hr:mm) Ciclo de parada 2 (hr:mm) Ciclo de arranque 3 (hr:mm) Ciclo de parada 3 (hr:mm) Ciclo de arranque 4 (hr:mm) Menús de IntelliFlo Ciclo de parada 4 (hr:mm) Aj. Tiempo (hr:min - AM/PM) HORA/CONTR (Página 31) Nivel de contraste (0 - 9) PANTALLA PRINCIPAL... -
Seite 297: Menú Datos Piscina
Menú Datos Piscina Use el menú Datos Piscina, para configurar IntelliFlo para el sistema de piscina y spa. Desde este menú puede definir el idioma del panel LCD de control, introducir una dirección para la bomba IntelliFlo cuando está conectada a un sistema IntelliTouch, introducir el volumen de agua de la piscina en metros cúbicos (m ), e introducir una valoración de la temperatura del agua de la piscina. -
Seite 298: Menú Unidades
Menú Datos Piscina (Continuación) ® Datos Pis. 12:15 Use los botones de flecha d) Para introducir la temperatura del agua: 24 °C Arriba y Abajo para desplazarse al parámetro “Temperatura Agua”. Pulse el botón Select para seleccionarlo. Para modificar el parámetro, Temperatura agua pulse las flechas Izquierda y Derecha para seleccionar el dígito a modificar, después use las flechas Arriba y Abajo para cambiar el dígito... - Seite 299 Menú Cebadura (Continuación) Cuando la bomba está cebando, el panel de control LCD muestra “Cebadura” y después, muestra un momento, “Cebado” cuando se ha completado el cebado. PRECAUCIÓN: Para evitar daños permanentes a la bomba IntelliFlo, antes de poner en marcha el sistema, llene la cámara del prefiltro de IntelliFlo con agua, para que la bomba cebe correctamente.
-
Seite 300: Menú Filtro
Menú Cebadura (Continuación) ® Cebadura 12:15 Use los botones de flecha c) Para definir el Tiempo de Cebadura del Sistema: 0. MIN Arriba y Abajo para desplazarse al parámetro “Tiempo Cebad. Sist.”. Pulse Tiempo Cebad. Sist. el botón Select para seleccionarlo. Para introducir tiempo de cebado adicional, para garantizar que el sistema completo está... - Seite 301 Menú Filtro (Continuación) Los valores introducidos para “Pres. filtro limpio” definen cuanto debe superar la “presión de inicio” la presión interior del filtro, antes que IntelliFlo muestre ® Filtro 12:15 una alerta “Necesitar Manutenc.”. La “presión de inicio” es la lectura de la 965.mbar 1,0 bar presión del filtro al completar el último Limpia Filtro.
- Seite 302 Menú Filtro (Continuación) Use los botones de flecha d) Para definir los tiempos de Inicio y Paro de los Ciclos 1 a 4: Arriba y Abajo para encontrar el parámetro “Iniciar Ciclo 1”. Pulse el botón Select para seleccionarlo. 9:00 es el valor predeterminado. Pulse Enter para definir 9:00 como hora de inicio.
-
Seite 303: Parámetros Del Ciclo De Filtrado
Menú Filtro (Continuación) Parámetros del Ciclo de Filtrado La tabla de abajo muestra los parámetros disponibles en el Modo Filtro. NOMBRE VALOR DESCRIPCIÓN Presión para 0,1 a 3,5 bar La presión diferencial desde presión 0 hasta el filtro limpio (valor predefinido 1,0 bar) estado de filtro 100%. -
Seite 304: Ejemplo De Presión Filtro Limpio
Menú Filtro (Continuación) Ejemplo de Presión Filtro Limpio Los filtros de la piscina funcionan capturando la suciedad. Al inicio, cuando el filtro de la piscina aún está limpio, registra una presión interna llamada “presión de inicio”. A medida que se acumula la suciedad en el filtro, aumenta la presión interna. -
Seite 305: Utilización Del Modo Filtro Junto Con El Modo Funciones
Menú Filtro (Continuación) Utilización del Modo Filtro junto con el Modo Funciones IntelliFlo se iniciará y se parará en las horas que ha programado para los ciclos 1-4 de filtrado, pero embargo los parámetros que ha definido el Modo Funciones (solo Función 3-9) tienen prioridad sobre los parámetros de ciclo de filtrado que ha definido en el Modo Filtro. -
Seite 306: Control De Caudal Y Modo Filtro
Menú Filtro (Continuación) Control de Caudal y Modo Filtro La función Modo Filtro permite a IntelliFlo resolver la pérdida de presión en cabeza, para mantener el caudal requerido. El caudal que la unidad puede proporcionar está limitada por las tuberías instaladas. Si existe una demanda de más caudal del que IntelliFlo puede proporcionar, aumentará... -
Seite 307: Menú Hora Y Contraste
Menú Hora y Contraste Use el menú “Hora/Contr” para definir el reloj del sistema IntelliFlo y para ajustar el contraste de la pantalla del panel de control. El reloj del sistema IntelliFlo control todos los horarios programados de inicio y paro, las funciones y los ciclos programados. El reloj del sistema puede conservar la hora correcta durante hasta 96 horas después de desconectarlo de la corriente. -
Seite 308: Menú Funciones
Menú Funciones Use el Modo Funciones para controlar las funciones de agua, como fuentes, spa, limpiador automático, cascadas, etc. El Modo Funciones incluye: • Función 1 y 2 • Función 3-9 • M.O. Flo • Onda • Pulso Función 1 y 2 Función 1 y Función 2 están diseñadas para la operación “a la demanda”... -
Seite 309: Menú Funciones (Continuación)
Menú Funciones (Continuación) Introduciendo los siguientes parámetros en la configuración de M.O. Flo, puede programar que IntelliFlo aumente la intensidad de caudal de 4 m /h a 12 m /h durante intervalos de tres minutos, cada dos horas, activando así el interruptor por presión: Intensidad de Caudal = 9m /h, Tiempo Ejecución = :03 (3 minutos), Interv. - Seite 310 Menú Funciones (Continuación) Pulso Como las funciones M.O. Flo y Onda, la función Pulso está diseñada para las funciones de agua que requieren intensidades de caudal variable. Como con la función Onda, la configuración de la función Pulso incluye parámetros para velocidades mínimas y máximas de bomba, y período, pero estos parámetros funcionan diferente de la función Onda.
- Seite 311 Menú Funciones (Continuación) Parámetros de Funciones Nombre Valor Descripción F1-9, M.O. Flo 4-29 m Programa la intensidad de caudal para las funciones 1 - 10 Caudal definido (Valor predefinido 12 m Cuando este parámetro se define como Activado, la función se activa F3-9, M.O.
- Seite 312 Menú Funciones (Continuación) Configuración de Función 1 o 2 Para acceder al menú Funciones 1(2): 1. Asegúrese que el LED verde está encendido y que la bomba está parada. 2. Pulse el botón Menu. Se muestra “Datos Pis.”. 3. Use los botones de flecha Arriba y Abajo para desplazarse al elemento de menú “Funciones”. Pulse el botón Select para seleccionarlo.
- Seite 313 Menú Funciones (Continuación) Configuración para Función 3-9 Para acceder al menú Funciones 3-9: 1. Asegúrese que el LED verde está encendido y que la bomba está parada. 2. Pulse el botón Menu. Se muestra “Datos Pis.”. 3. Use los botones de flecha Arriba y Abajo para desplazarse al elemento de menú “Funciones”. Pulse el botón Select para seleccionarlo.
- Seite 314 Menú Funciones (Continuación) 4. Para modificar un parámetro, pulse las flechas Izquierda y Derecha para seleccionar el dígito a modificar, después use las flechas Arriba y Abajo para cambiar el dígito seleccionado. 5. Cuando haya terminado, pulse el botón Enter para guardar los cambios. Para cancelar cualquier cambio, pulse el botón Escape para salir del modo sin guardarlo.
- Seite 315 Menú Funciones (Continuación) Configuración de M.O. Flo Para acceder al menú M.O. Flo: 1. Asegúrese que el LED verde está encendido y que la bomba está parada. 2. Pulse el botón Menu. Se muestra “Datos Pis.”. 3. Use los botones de flecha Arriba y Abajo para desplazarse al elemento de menú “Funciones”. Pulse el botón Select para seleccionarlo.
-
Seite 316: Operación De M.o. Flo
Menú Funciones (Continuación) 4. Para modificar un parámetro, pulse las flechas Izquierda y Derecha para seleccionar el dígito a modificar, después use las flechas Arriba y Abajo para cambiar el dígito seleccionado. 5. Cuando haya terminado, pulse el botón Enter para guardar los cambios. Para cancelar cualquier cambio, pulse el botón Escape para salir del modo sin guardarlo. -
Seite 317: Operación De Onda Y Pulso
Menú Funciones (Continuación) 4. Para modificar un parámetro, pulse las flechas Izquierda y Derecha para seleccionar el dígito a modificar, después use las flechas Arriba y Abajo para cambiar el dígito seleccionado. 5. Cuando haya terminado, pulse el botón Enter para guardar los cambios. Para cancelar cualquier cambio, pulse el botón Escape para salir del modo sin guardarlo. -
Seite 318: Menú Control Externo
Menú Control Externo Configuración de Control Externo con IntelliComm Modo Control Externo se activa y opera por medio del centro de comunicación IntelliComm. Vea “Modo Control Externo” en la página 20, para más información sobre la operación de IntelliFlo por control remoto. Para acceder al menú... -
Seite 319: Menú Limpia Filtro
Menú Control Externo (Continuación) ® Progr. 1 12:16 4. Para modificar un parámetro, pulse las flechas Izquierda y Derecha para seleccionar 0:00 el dígito a modificar, después use las flechas Arriba y Abajo para cambiar el dígito Parada tras retardo seleccionado. -
Seite 320: Menú Aspiración
Menú Aspiración Configuración del Modo Aspiración Para acceder al menú Aspiración: 1. Asegúrese que el LED verde está encendido y que la bomba está parada. 2. Pulse el botón Menu. Se muestra “Datos Pis.”. 3. Use los botones de flecha Arriba y Abajo para desplazarse al elemento de menú “Aspiración”. Pulse el botón Select para seleccionarlo. -
Seite 321: Mantenimiento Por El Usuario
Sección 4 Mantenimiento por el Usuario La información siguiente describe como cuidar y mantener la bomba IntelliFlo. Colador de prefiltro de la bomba El colador de prefiltro, algunas veces llamado “Colector de residuos”, se encuentra en la parte frontal de la bomba. El colector de residuos contiene un colador que debe mantenerse siempre limpio de hojas y residuos. -
Seite 322: Mantenimiento Del Motor
Cuidados para el colador del prefiltro de la bomba (Continuación) 10. Asegúrese que la arandela redonda de la tapa esté colocada correctamente. Ajuste la sujeción y la tapa, luego gírela en sentido horario hasta que las asas queden horizontales, como se muestra. 11. -
Seite 323: Hibernación
Hibernación La protección interna anticongelación de IntelliFlo, se desactiva cuando se conecta a IntelliTouch. La protección frente a congelación se activa seleccionando SÍ en la parte anticongelación de la función adecuada del menú de circuito IntelliTouch. Para reactivar la protección interna anticongelación de IntelliFlo, la corriente al controlador debe desconectarse del ciclo y volverse a conectar. - Seite 324 4. Asegúrese que todas las conexiones eléctricas estén limpias y bien sujetas. 5. Abra la válvula de purga de aire en el filtro, y manténgase apartado del filtro. 6. Conecte IntelliFlo a la alimentación del circuito eléctrico. Asegúrese que el LED verde está encendido.
-
Seite 325: Instalación De Intelliflo
Sección 5 Instalación y Desmontaje La información general siguiente describe como instalar la bomba IntelliFlo. Atención Instalador: Antes de instalar la bomba IntelliFlo, lea y respete todos los avisos, instrucciones y medidas de seguridad de las páginas 3, 4 y 5. Instalación de IntelliFlo Solo debe instalar IntelliFlo un técnico cualificado. -
Seite 326: Cableado De Intelliflo
Cableado de IntelliFlo Para conectar IntelliFlo a corriente CA: 1. Asegúrese que todos los interruptores y conectores eléctricos estén desconectados antes de instalar los cables para el motor. 2. Asegúrese que el voltaje de la red es 230 VCA. 3. Use #12 AWG para tiradas de cable hasta 30 m y #10 AWG para longitudes mayores de 30 m. En caso de duda use un cable de diámetro mayor. - Seite 327 Cableado de IntelliFlo VF (para modelos con conexión eléctrica CA lateral) ESTE TRABAJO DEBE REALIZARLO UN ELECTRICISTA AUTORIZADO, según la normativa nacional para cableado (AS/NZS 3000) teniendo en cuenta sus clasificaciones (CLASS I, IPX5). Para conectar IntelliFlo a corriente CA: 1.
-
Seite 328: Desmontar La Bomba
Desmontar la Bomba AVISO Desconecten siempre la electricidad de la bomba de la piscina, mediante el interruptor del circuito, antes de cualquier intervención en la bomba. De no hacerlo podría causar la muerte o heridas graves al personal de mantenimiento, a los usuarios de la piscina o a otros, debido a descarga eléctrica. -
Seite 329: Reensamblado De La Bomba/Sustitución De La Junta
Desmontar la Bomba (Continuación) 9. Para desatornillar el propulsor, del eje, gire el propulsor en sentido antihorario. Placa de estanqueidad SEAL PLATE 10. Extraiga la parte que gira de la junta mecánica de estanqueidad, Junta G ASKET del propulsor. 11. Extraiga los cuatro tornillos de la Propulsor placa de estanqueidad al motor, IMPELLER... -
Seite 330: Desmontaje E Instalación Del Grupo Controlador
Desmontaje e Instalación del Grupo Controlador Para separar el controlador y el panel de control IntelliFlo del grupo motor: 1. Asegúrese que todos los interruptores y conectores eléctricos estén desconectados, antes de separar el controlador. 2. Desconecte el cable de comunicación de la bomba. 3. -
Seite 331: Lista Ilustrada De Las Piezas
Lista Ilustrada de las Piezas 11 18 17 29 12 14 8 Piezas de Recambio Nº de Nº de refe- Descripción Nº de Nº de refe- Descripción pieza rencia pieza rencia 070387 Colador AQ & WF 072184 Arandela 3/8 ID X 7/8 DE, grueso 0,05 18-8 s/s, (6 piezas) 070429 Perno HEX HD, 2-56 x 0,875 s/s, (4 piezas) -
Seite 332: Dimensiones De La Bomba Intelliflo
Dimensiones de la Bomba IntelliFlo (59.5 cm) (27.5 cm) (31.8 cm) Curva de Prestaciones de IntelliFlo 35.00 30.00 25.00 3450 RPM 3450 RPM 20.00 15.00 10.00 1500 RPM 1500 RPM 5.00 0.00 10.0 15.0 20.0 25.0 30.0 35.0 /HORA / HR Especificaciones Eléctricas de IntelliFlo Protección de Circuito: Dispositivo bipolar de 20 AMP en el Panel Eléctrico. -
Seite 333: Alertas Y Avisos
Sección 6 Solución de problemas PRECAUCIÓN: Antes de intentar resolver problemas en la bomba IntelliFlo, lea y siga todas las notas de aviso, instrucciones y medidas de seguridad en las páginas 3, 4 y 5. Alertas y Avisos IntelliFlo muestra todas las alarmas y avisos en la pantalla del panel de control. Cuando existe una condición de alarma o aviso, el LED correspondiente se enciende en la pantalla. -
Seite 334: Solución General De Problemas En Intelliflo
Solución General de Problemas en IntelliFlo Use la siguiente información general para solucionar los problemas posibles problemas con su bomba IntelliFlo. Nota: Desconecte la corriente antes intentar operaciones de mantenimiento o de reparación. Problema Causa posible Acción Correctiva Fallo en la bomba. La bomba no ceba - Fuga de aire en la succión. - Seite 335 Solución de Problemas (Continuación) Problema Causa posible Acción Correctiva Circulación inadecuada. Exceso de tensión en la bomba. Compruebe la rejilla del colador; si está (Para los mensajes de atascada, pare la bomba y limpie el colador. alerta en la pantalla La tubería de succión/descarga es demasiado de IntelliFlo, consulte pequeña.
-
Seite 336: Avisos Generales
Avisos Generales • No acceda nunca dentro del cuerpo del controlador. Contiene una batería de condensadores con una carga de 230 VCA, incluso cuando la unidad no está conectada a la corriente. • IntelliFlo no es sumergible • La bomba tiene capacidad para 33 m /h a 31 m;... -
Seite 337: Como Conseguir Que Su Piscina Sea Más Eficiente En Energía
Como conseguir que su piscina sea más eficiente en energía Las piscinas de natación son estupendas para relajarse, hacer ejercicio, o divertirse. Pero también significan unas facturas de energía superiores a la media. La clave para ahorrar energía con su piscina es gestionar correctamente el horario de la bomba del filtro, la temperatura de la piscina y el alumbrado. -
Seite 338: Mantenimiento Preventivo
Duración de la garantía: Este producto de Pentair está garantizado durante tres (3) años en todas sus partes, a partir de la fecha de compra del primer consumidor. Sujeto protegido por la garantía: Esta garantía es válida solo para el consumidor comprador. - Seite 339 Notas Guía de Instalación y del Usuario - IntelliFlo VF...
- Seite 340 Copyright – Eingeschränkte Lizenz: soweit hierin nicht ausdrücklich zugelassen, dürfen die Inhalte dieses Dokuments ohne vorausgehende schriftliche Genehmigung der Pentair International SRL weder ganz noch auszugsweise und in gleich welcher Form und mit welchen Mitteln vervielfältigt werden. Copyright – Beperkte licentie: behalve zoals hierin specifiek toegestaan, mag geen enkel deel van de inhoud van dit document op om het even welke manier of hoe dan ook gereproduceerd worden zonder de voorafgaande schriftelijke toestemming van Pentair International SRL.
- Seite 341 INTELLIFLO WHISPERFLO VF POMPE PER PISCINE GUIDE ALL’INSTALLAZIONE IntelliFlo VF – Istruzioni per l'installazione e l'uso IMPORTANT SAFETY INSTRUCTIONS READ AND FOLLOW ALL INSTRUCTIONS SAVE THESE INSTRUCTIONS WATER SOLUTION 357220 (Rev. 08/2016)
-
Seite 342: Assistenza Clienti
Uniti e/o in altri Paesi. Se non diversamente indicato, la menzione di nomi e marchi di terzi all'interno di questo documento non implica alcun rapporto di collegamento tra i proprietari di detti nomi e marchi e Pentair, né alcuna approvazione o raccoman da zione specifica. I nomi e i marchi di altre società potrebbero essere marchi o marchi registrati di altri. - Seite 343 Indice Norme di sicurezza importanti ...................... 3 Sezione 1: Introduzione ......................... 6 Presentazione di IntelliFlo ........................ 6 Caratteristiche di IntelliFlo ....................7 Gruppo motore di IntelliFlo ....................7 Caratteristiche del motore di IntelliFlo ................. 8 Modulo convertitore e pannello di controllo di IntelliFlo ............9 Funzioni del pannello di controllo ..................
- Seite 344 Indice (segue) Onda ..........................35 Impulso ..........................36 Impostazioni del menu Funzioni ..................37 Impostare le modalità Funzione 1 e Funzione 2 ..............38 Impostare le funzioni Funzione 3-9 ................... 39 Descrizione delle funzioni Funzione 3-9 ................40 Impostare la funzione M.O. Flo ..................41 Menu Funzioni (segue) ......................
-
Seite 345: Norme Di Sicurezza Importanti
NORME DI SICUREZZA IMPORTANTI Nota importante: Per l'installatore – Attenzione! Questo manuale contiene informazioni importanti per l'installazione, il funzionamento e l'uso sicuro del prodotto. Queste informazioni devono essere comunicate al proprietario e/o all'operatore dell'apparecchio. ALLERTA — Prima di installare il prodotto, leggere attentamente e rispettare tutte le istruzioni e le avvertenze contenute nel presente manuale. - Seite 346 NORME DI SICUREZZA IMPORTANTI (segue) ALLERTA — Una temperatura dell'acqua superiore a 38°C può essere pericolosa per la salute. La prolungata immersione in acqua calda può indurre ipertermia. L'ipertermia è un forte aumento della temperatura corporea, di diversi gradi al di sopra dei normali 37° C. I sintomi dell'ipertermia sono: sonnolenza, letargia, vertigini, svenimento e aumento della temperatura interna del corpo.
- Seite 347 NORME DI SICUREZZA IMPORTANTI (segue) ALLERTA — Se la pompa non è dimensionata in modo corretto, o se viene installata e utilizzata in applicazioni diverse da quelle per cui è stata progettata, può causare gravi lesioni personali o morte. I possibili rischi in queste situazioni sono: folgorazione, incendio, allagamento, intrappolamento da aspirazione, gravi infortuni e danni alle cose provocati dal cedimento strutturale della pompa o di altri componenti del sistema.
-
Seite 348: Sezione 1: Introduzione
Sezione 1 Introduzione Presentazione di IntelliFlo ® Il sistema di controllo della pompa a flusso variabile IntelliFlo VF offre avanzate funzionalità di automazione e gestione filtri per applicazioni in piscine e vasche per idromassaggio. Include opzioni di risparmio energetico e funzioni programmabili per la creazione di giochi d'acqua, la pulizia e altre esigenze degli ambienti acquatici salubri a uso ricreativo. -
Seite 349: Caratteristiche Di Intelliflo
Caratteristiche di IntelliFlo • Compatibile con piscine di qualsiasi dimensione = installazione più rapida • Risparmio energetico fino al 90% = prodotto ecocompatibile • Protezione dal funzionamento a secco e i cali di portata = sicurezza • Protezione dal sovraccarico termico = basso rischio di surriscaldamento •... -
Seite 350: Caratteristiche Del Motore Di Intelliflo
Coperchio pannello di controllo Modulo convertitore e componenti elettronici Coperchio ventola motore Gruppo motore Porta di comunicazione RS-485 (IntelliTouch e IntelliComm) Supporto motore Gruppo motore di IntelliFlo Caratteristiche del motore di IntelliFlo • Motore sincrono a magneti permanenti (PMSM) = come nelle auto ibride •... -
Seite 351: Modulo Convertitore E Pannello Di Controllo Di Intelliflo
Modulo convertitore e pannello di controllo di IntelliFlo VF La pompa IntelliFlo è dotata di un pannello di controllo e di un convertitore di frequenza che trasforma la corrente monofase in ingresso a 230 V in frequenza trifase variabile per l'azionamento del motore. Il microprocessore del convertitore controlla il motore variando la frequenza della corrente e la tensione per regolare la velocità... -
Seite 352: Sezione 2: Pannello Di Controllo
Sezione 2 Pannello di controllo Questa sezione descrive i pulsanti e i LED del pannello di controllo. Pannello di controllo di IntelliFlo ® FILTRO 12:15 15.W POTENZA IN FUNZ. Pulsanti e LED Pulsante/LED Filter: attiva la modalità di filtrazione. Il LED si accende quando la modalità Filtro è attiva. Pulsante/LED Vacuum: attiva la modalità... - Seite 353 Pulsanti e LED (segue) ® FILTRO 12:15 Riga 1 15.W Riga 2 Riga 3 POTENZA IN FUNZ. Riga 4 Tasti freccia: • Freccia Su: passa al livello superiore nella gerarchia dei menu o incrementa di un'unità il valore visualizzato durante l'impostazione. •...
-
Seite 354: Esempio Di Impostazione Della Modalità Adescamento
Esempio di impostazione della modalità Adescamento L'esempio seguente illustra la procedura di impostazione della modalità Adescamento. Le icone dei pulsanti sono inserite nel testo per aiutare l'utente a familiarizzare con le funzioni del pannello di controllo. Per impostare il flusso e il tempo nella modalità Adescamento: Impostare l'adescamento 1. -
Seite 355: Sezione 3: Istruzioni Per Il Funzionamento Di Intelliflo
Sezione 3 Istruzioni per il funzionamento di IntelliFlo VF Questa sezione spiega come utilizzare il panello di controllo di IntelliFlo VF per impostare le diverse modalità operative della pompa. Modalità operative di IntelliFlo: i pulsanti che corrispondono alle diverse modalità operative sono Modalità... -
Seite 356: Modalità Manuale Rpm
La modalità Manual consente di misurare e testare i requisiti di portata di tutti i dispositivi presenti all'interno della piscina: i risultati ottenuti verranno registrati e serviranno a impostare i menu di IntelliFlo. Vedere "Menu" a pag. 21 per le istruzioni dettagliate. Per utilizzare la pompa IntelliFlo in modalità... -
Seite 357: Modalità Manuale Flusso
Modalità Manuale (segue) Modalità Manuale Flusso 4. Premere il pulsante Start/Stop per arrestare la pompa. Con i tasti freccia Su e Giù, andare alla voce di menu "Imposta FLUSSO". Premere Select per selezionarla. 5. Per cambiare l'impostazione, premere i tasti freccia Sinistra e Destra per spostarsi sulla cifra che si intende modificare, quindi premere i tasti freccia Su e Giù... - Seite 358 Modalità Manuale (segue) ® ® ® MANUALE RPM 12:15 MANUALE RPM 12:15 MANUALE RPM 12:15 1 000.RPM 2000.RPM 1000. RPM Imposta VELOCITÀ Imposta VELOCITÀ Imposta VELOCITÀ FERMO FERMO FERMO Il cursore evidenzia Freccia Sinistra/ Premere Enter per in nero Destra per salvare.
-
Seite 359: Modalità Pulizia Del Filtro
Modalità Pulizia del Filtro Quando la pressione interna del filtro della piscina raggiunge il valore impostato come pressione di pulizia del filtro (Press. filtro pulito), sul pannello di controllo di IntelliFlo compare il messaggio "Richiesta Manutenz." per segnalare all'utente che il filtro deve essere pulito con un "controlavaggio". (Vedere "Impostare la pressione di pulizia del filtro"... -
Seite 360: Modalità Aspiratore
Modalità Pulizia del Filtro (segue) 4. Quando la pompa esce dalla modalità Pulizia del Filtro, per intervento dell'operatore o al completamento del ciclo di controlavaggio impostato, IntelliFlo si ferma e nell'angolo in alto a sinistra del display compare la scritta "Risciacquo". Per ®... -
Seite 361: Modalità Filtro
Modalità Aspiratore (segue) 3. Utilizzare i tasti freccia Su e Giù per richiamare le seguenti schermate: • TEMPO RESIDUO: mostra il tempo rimanente per l'esecuzione della funzione programmata. • POTENZA (W): mostra la potenza continua dell'albero motore in watt. • VELOCITA ATTUALE (RPM): mostra la velocità... -
Seite 362: Modalità Funzione 1(2)
Modalità di controllo esterno IntelliFlo con IntelliComm Communication Center La pompa IntelliFlo può essere collegata al Pentair IntelliComm Communication Center mediante un cavo di comunicazione opzionale (P/N 350122). Il centro di comunicazione IntelliComm è dotato di quattro coppie di morsetti di ingresso che possono essere collegate ai Programmi 1(4) di IntelliFlo nel menu Controllo Esterno. -
Seite 363: Menu
Modalità di controllo esterno (segue) Inoltre, i Programmi 1(4) hanno l'impostazione "Tempo Ritardo Arr." che consente di specificare un intervallo di tempo nel quale IntelliFlo continua a funzionare alla portata programmata dopo l'interruzione della tensione. Vedere "Impostare il controllo esterno con IntelliComm" a pag. 44 per ulteriori informazioni sull'impostazione di IntelliComm. -
Seite 364: Menu Di Intelliflo
(1 - 8 conteggi) Acq. circ. al giorno (1 - 4 conteggi) Cicli al giorno Avvio ciclo 1 (hh:mm) (hh:mm) Arr. ciclo 1 Avvio ciclo 2 (hh:mm) Arr. ciclo 2 (hh:mm) Menu di IntelliFlo (hh:mm) Avvio ciclo 3 Arr. ciclo 3 (hh:mm) (hh:mm) Avvio ciclo 4... -
Seite 365: Menu Dati Piscina
Menu Dati Piscina Il menu Dati Piscina permette di configurare IntelliFlo per la piscina e le vasche termali. Da questo menu si seleziona la lingua del pannello di controllo LCD, si inserisce un indirizzo per la pompa IntelliFlo da utilizzare quando questa è... -
Seite 366: Menu Unità
Menu Dati Piscina (segue) ® Dati Pisc. 12:15 con i tasti freccia Su e Giù, andare d) Inserire la temperatura dell'acqua: 24 °C alla voce "Temperatura Acqua". Premere Select per selezionarla. Per cambiare l'impostazione, premere i tasti freccia Sinistra e Destra per Temperatura acqua spostarsi sulla cifra che si intende modificare, quindi premere i tasti freccia Su e Giù... - Seite 367 Menu Adescamento (segue) Durante l'adescamento, sul pannello di controllo compare la scritta "Adescam.". Al termine del processo, sul pannello compare "Adescato". ATTENZIONE: per evitare danni irreparabili alla pompa IntelliFlo e garantire un corretto adescamento, prima di avviare il sistema riempire d'acqua il filtro di aspirazione di IntelliFlo. Se non c'è acqua nel filtro di aspirazione, la pompa non si riempie.
-
Seite 368: Menu Filtro
Menu Adescamento (segue) ® Adescam. 12:15 con i tasti freccia Su e c) Impostare il tempo di adescamento del sistema: 0. MIN Giù, andare alla voce "Tempo adesc. sist.". Premere Select per selezionarla. Per Tempo adesc. sist. specificare un tempo di adescamento supplementare, in modo da assicurare il completo riempimento del sistema, vedere il punto 4. - Seite 369 Menu Filtro (segue) Il valore inserito come pressione di pulizia del filtro (Press. filtro pulito) indica di quanto la pressione interna del filtro deve salire al di sopra della ® FILTRO 12:15 "pressione iniziale" prima che la pompa IntelliFlo visualizzi il messaggio 965.mbar 1.0 bar "Richiesta Manutenz.".
- Seite 370 Menu Filtro (segue) con i tasti freccia Su e Giù, andare d) Impostare i tempi di inizio e fine dei cicli da 1 a 4: alla voce "Avvio ciclo 1". Premere Select per selezionarla. L'impostazione di default è 9:00. Premere Enter per impostare le 9:00 come ora di inizio ciclo. Per modificare l'impostazione, vedere il punto 4.
-
Seite 371: Impostazioni Dei Cicli Di Filtrazione
Menu Filtro (segue) Impostazioni dei cicli di filtrazione La tabella seguente elenca le impostazioni disponibili nella modalità Filtro. NOME VALORE DESCRIZIONE Pressione da 0,1 a 3,5 bar Differenza di pressione tra la pressione 0 e lo stato di pulizia (default 1,0 bar) 100% del filtro. -
Seite 372: Esempio Di Pressione Di Pulizia Del Filtro
Menu Filtro (segue) Esempio di pressione di pulizia del filtro I filtri delle piscine trattengono impurità e sporcizia. All'avviamento, quando il filtro della piscina è pulito, ha una pressione interna che viene denominata "pressione iniziale". A mano a mano che sul filtro si accumula la sporcizia, la pressione interna aumenta. -
Seite 373: Utilizzare La Modalità Filtro Insieme Alla Modalità Funzioni
Menu Filtro (segue) Utilizzare la modalità Filtro insieme alla modalità Funzioni IntelliFlo si avvia e si arresta secondo i tempi programmati per i cicli di filtrazione 1-4. Tuttavia, i parametri che l'utente imposta per gestire le funzioni della pompa nella modalità Funzioni (solo per le funzioni Funzione 3-9) hanno validità... -
Seite 374: Controllo Del Flusso E Modalità Filtro
Menu Filtro (segue) Controllo del Flusso e modalità Filtro La modalità Filtro permette a IntelliFlo di controbilanciare la perdita di pressione in testa per mantenere il flusso richiesto. La portata dell'unità è limitata dall'impianto idraulico installato. Se è richiesta una portata superiore a quella che IntelliFlo può... -
Seite 375: Menu Ora E Contrasto
Menu Ora e Contrasto Il menu "Ora/Contr" consente di impostare l'orologio di sistema di IntelliFlo e di regolare il contrasto del display del pannello di controllo. L'orologio di IntelliFlo controlla le impostazioni degli orari di inizio/ fine, le funzioni del sistema e i cicli programmati. In caso di interruzione dell'alimentazione, l'orologio tiene in memoria l'ora esatta per 96 ore. -
Seite 376: Menu Funzioni
Menu Funzioni Il menu Funzioni permette di gestire le funzionalità della piscina, come fontane, idromassaggi, pulitori automatici, cascate, ecc. Comprende le seguenti funzioni: • Funzione 1 e 2 • Funzione 3-9 • M.O. Flo • Onda • Impulso Funzione 1 e 2 Le modalità... -
Seite 377: Onda
Menu Funzioni (segue) Impostando i parametri di M.O. Flo nel modo seguente, è possibile programmare IntelliFlo perché aumenti il flusso da 4 m /h a 12 m /h a intervalli di 3 minuti ogni 2 ore, facendo scattare il pressostato: Portata = 9 m /h, Durata = 00:03 (3 minuti), Intervallo = 2 ore. -
Seite 378: Impulso
Menu Funzioni (segue) Impulso Come le funzioni M.O. Flo e Onda, la funzione Impulso permette di gestire le funzioni della piscina che richiedono una portata di intensità variabile. Come per la funzione Onda, la funzione Impulso consente di impostare i parametri di velocità minima e massima della pompa, e l'intervallo di tempo; questi parametri hanno però... -
Seite 379: Impostazioni Del Menu Funzioni
Menu Funzioni (segue) Impostazioni del menu Funzioni Nome Valore Descrizione F1-9, M.O. Flo 4-29 m Programma il flusso per le funzioni Funzione 1-10 Imposta FLUSSO (default 12 m F3-9, M.O. Flo, Onda, Se l'impostazione è Abilitato (Abilitata), la funzione si attiva all'ora Abilitato / Disabilitato Impulso impostata in "Imposta Ora Avvio". -
Seite 380: Impostare Le Modalità Funzione 1 E Funzione 2
Menu Funzioni (segue) Impostare le modalità Funzione 1 e Funzione 2 Per accedere al menu Funzioni: 1. Verificare che il LED di alimentazione verde sia acceso e che la pompa sia ferma. 2. Premere il pulsante Menu. Sul display compare "Dati Pisc.". 3. -
Seite 381: Impostare Le Funzioni Funzione 3-9
Menu Funzioni (segue) Impostare le funzioni Funzione 39 Per accedere al menu Funzioni: 1. Verificare che il LED di alimentazione verde sia acceso e che la pompa sia ferma. 2. Premere il pulsante Menu. Sul display compare "Dati Pisc.". 3. Con i tasti freccia Su e Giù, andare alla voce "Funzioni". Premere Select per selezionarla. Sul display compare "Funzione 1". -
Seite 382: Descrizione Delle Funzioni Funzione 3-9
Menu Funzioni (segue) 4. Per cambiare un'impostazione, premere i tasti freccia Sinistra e Destra per spostarsi sulla cifra che si intende modificare, quindi premere i tasti freccia Su e Giù per modificare la cifra selezionata. 5. Premere Enter per salvare le modifiche. Per annullare le modifiche effettuate, uscire senza salvare premendo il pulsante Escape. -
Seite 383: Impostare La Funzione M.o. Flo
Menu Funzioni (segue) Impostare la funzione M.O. Flo Per accedere al menu M.O. Flo: 1. Verificare che il LED di alimentazione verde sia acceso e che la pompa sia ferma. 2. Premere il pulsante Menu. Sul display compare "Dati Pisc.". 3. -
Seite 384: Menu Funzioni (Segue)
Menu Funzioni (segue) 4. Per cambiare un'impostazione, premere i tasti freccia Sinistra e Destra per spostarsi sulla cifra che si intende modificare, quindi premere i tasti freccia Su e Giù per modificare la cifra selezionata. 5. Premere Enter per salvare le modifiche. Per annullare le modifiche effettuate, uscire senza salvare premendo il pulsante Escape. -
Seite 385: Descrizione Delle Funzioni Onda E Impulso
Menu Funzioni (segue) 4. Per cambiare un'impostazione, premere i tasti freccia Sinistra e Destra per spostarsi sulla cifra che si intende modificare, quindi premere i tasti freccia Su e Giù per modificare la cifra selezionata. 5. Premere Enter per salvare le modifiche. Per annullare le modifiche effettuate, uscire senza salvare premendo il pulsante Escape. -
Seite 386: Menu Controllo Esterno
Menu Controllo Esterno Impostare il controllo esterno con IntelliComm La modalità di controllo esterno si attiva e si gestisce attraverso il centro di comunicazione IntelliComm. Vedere "Modalità di controllo esterno" a pag. 20 per ulteriori informazioni sull'utilizzo di IntelliFlo tramite controllo remoto. Per accedere al menu Ctrl. -
Seite 387: Menu Pulizia Del Filtro
Menu Controllo Esterno (segue) ® 4. Per cambiare un'impostazione, premere i tasti freccia Sinistra e Destra per Progr. 1 12:16 0:00 spostarsi sulla cifra che si intende modificare, quindi premere i tasti freccia Su e Giù per modificare la cifra selezionata. Tempo Ritardo Arr. -
Seite 388: Menu Aspiratore
Menu Aspiratore Impostare la modalità Aspiratore Per accedere al menu Aspiratore: 1. Verificare che il LED di alimentazione verde sia acceso e che la pompa sia ferma. 2. Premere il pulsante Menu. Sul display compare "Dati Pisc.". 3. Con i tasti freccia Su e Giù, andare alla voce "Aspiratore". Premere Select per selezionarla. Sul display compare "Flusso Aspiratore". -
Seite 389: Sezione 4: Manutenzione
Sezione 4 Manutenzione Questa sezione descrive le procedure di manutenzione e pulizia della pompa IntelliFlo. Cestello del filtro di aspirazione della pompa Il filtro di aspirazione sul lato anteriore della pompa trattiene lo sporco (capelli, sassolini, foglie, ecc.). Il filtro contiene un cestello che deve essere pulito regolarmente. Il coperchio trasparente del cestello consente di verificare a colpo d'occhio se il filtro è... -
Seite 390: Motore
Pulizia del cestello del filtro di aspirazione (segue) 10. Accertarsi che l'O-ring del coperchio sia posizionato correttamente. Riavvitare l'anello di fermo e il coperchio ruotandoli in senso orario finché le maniglie non si trovano in posizione orizzontale come mostrato in figura. 11. -
Seite 391: Precauzioni Per La Stagione Invernale
Precauzioni per la stagione invernale La protezione antigelo interna di IntelliFlo viene disabilitata quando si collega la pompa al sistema IntelliTouch. In questo caso la protezione antigelo si attiva selezionando SI nella sezione antigelo del menu delle funzioni di IntelliTouch. Per riabilitare la protezione antigelo interna di IntelliFlo, spegnere e riaccendere il convertitore di frequenza. - Seite 392 4. Verificare che tutti i collegamenti elettrici siano puliti e ben serrati. 5. Aprire la valvola di sfiato aria sul filtro e allontanarsi dal filtro. 6. Accendere l'interruttore della pompa. Verificare che il LED di alimentazione verde sia acceso. 7. Premere il pulsante Manual (LED acceso) per portare IntelliFlo in modalità manuale. 8.
-
Seite 393: Sezione 5: Installazione E Rimozione
Sezione 5 Installazione e rimozione Questa sezione descrive come installare la pompa IntelliFlo. Per l'installatore – Attenzione! Prima di installare la pompa IntelliFlo, leggere e seguire attentamente le avvertenze, le istruzioni e le norme di sicurezza riportate alle pagg. 3, 4 e 5. Installare IntelliFlo La pompa IntelliFlo deve essere installata solo da tecnici qualificati. -
Seite 394: Cablare Intelliflo
Cablare IntelliFlo Per collegare IntelliFlo all'alimentazione in c.a.: 1. Assicurarsi che tutti gli interruttori elettrici siano spenti prima di cablare il motore. 2. Verificare che la tensione di alimentazione sia 230 Vca. 3. Utilizzare 12 AWG per cavi fino a 30 m e 10 AWG per cavi superiori a 30 m. In caso di dubbio, utilizzare cavi di diametro più... - Seite 395 Cablare IntelliFlo VF (modelli con collegamento all'alimentazione in c.a. sul lato) QUESTI INTERVENTI DEVONO ESSERE ESEGUITI SOLO DA UN ELETTRICISTA QUALIFICATO in conformità alle norme elettriche nazionali (AS/NZS 3000) e tenendo conto dei valori nominali (Classe I, IPX5). Collegare IntelliFlo all'alimentazione in c.a.: 1.
-
Seite 396: Smontare La Pompa
Smontare la pompa Prima di effettuare interventi sulla pompa, disinserire sempre l'alimentazione della ALLERTA — pompa spegnendo l'interruttore. Il mancato rispetto di questa allerta può causare gravi lesioni o morte per folgorazione a carico di tecnici, utenti della piscina e terzi. Leggere tutte le istruzioni prima di intervenire sulla pompa. -
Seite 397: Rimontare/Sostituire La Pompa
Smontare la pompa (segue) 9. Per svitare la girante dall'albero, ruotare la girante in senso antiorario. 10. Rimuovere la porzione rotante della Piastra di tenuta SEAL PLATE tenuta meccanica dalla girante. 11. Con una chiave da 9/16", rimuovere Guarnizione G ASKET i quattro bulloni dalla piastra di tenuta sul motore. -
Seite 398: Rimuovere E Installare Il Modulo Convertitore
Rimuovere e installare il modulo convertitore Per rimuovere il convertitore e il pannello di controllo di IntelliFlo dal gruppo motore: 1. Assicurarsi che tutti gli interruttori elettrici siano spenti prima di rimuovere il convertitore. 2. Scollegare il cavo di comunicazione dalla pompa. 3. -
Seite 399: Illustrazione Dei Componenti Della Pompa
Illustrazione dei componenti della pompa 11 18 17 29 12 14 8 Pezzi di ricambio Codice Descrizione Codice Descrizione 070387 CESTELLO AQ e WF 072184 RONDELLA 3/8 dia. int. X 7/8 dia. est. SPESS. 0,05 18-8 s/s, (6 PZ.) 070429 BULLONE T. -
Seite 400: Dimensioni Della Pompa Intelliflo
Dimensioni della pompa IntelliFlo (59.5 cm) (27.5 cm) (31.8 cm) Curva di performance di IntelliFlo 35.00 30.00 25.00 3450 RPM 3450 RPM 20.00 15.00 10.00 1500 RPM 5.00 1500 RPM 0.00 10.0 15.0 20.0 25.0 30.0 35.0 / HR Dati elettrici di IntelliFlo Protezione circuiti: dispositivo bipolare 20 amp sul pannello di controllo. -
Seite 401: Sezione 6: Individuazione E Correzione Dei Guasti
Sezione 6 Individuazione e correzione dei guasti ATTENZIONE: prima di individuare e correggere i guasti della pompa IntelliFlo, leggere e seguire attentamente le avvertenze, le istruzioni e le norme di sicurezza riportate alle pagg. 3, 4 e 5. Avvertenze e allarmi IntelliFlo visualizza tutti gli allarmi e i messaggi di allerta sul display del pannello di controllo. -
Seite 402: Individuazione E Correzione Dei Guasti Di Intelliflo
Individuazione e correzione dei guasti di IntelliFlo Utilizzare le informazioni contenute nelle seguenti tabelle per individuare e risolvere i problemi di funzionamento della pompa IntelliFlo. Nota: disinserire l'alimentazione prima di intervenire sull'unità. Problema Possibile causa Azione correttiva Guasto della pompa. La pompa non si riempie –... - Seite 403 Individuazione e correzione dei guasti (segue) Problema Possibile causa Azione correttiva Circolazione insufficiente. Sovracorrente nella pompa. Controllare il cestello del filtro della pompa; (Per le segnalazioni se intasato, spegnere la pompa e pulirlo. I dei problemi della condotti di aspirazione/mandata sono troppo pompa IntelliFlo, vedere piccoli.
-
Seite 404: Avvertenze Generali
Avvertenze generali • Non aprire mai il convertitore. Il banco di condensatori al suo interno mantiene una carica di 230 Vca anche quando l'unità non è alimentata. • IntelliFlo non è una pompa di tipo sommerso. • La pompa genera 33 m /h a 31 m;... -
Seite 405: Per Una Migliore Efficienza Energetica Della Piscina
Per una migliore efficienza energetica della piscina Le piscine sono il luogo ideale per rilassarsi, fare sport e divertirsi. Ma i costi energetici di questi impianti sono di norma molto elevati. La soluzione per risparmiare energia sta nella corretta gestione dei tempi di filtrazione della pompa, della temperatura dell'acqua e dell'illuminazione. -
Seite 406: Manutenzione Preventiva
2) Danni causati al prodotto in conseguenza dell'uso di un prodotto di altra marca con i prodotti di Pentair e delle sue società collegate. - Seite 407 Note IntelliFlo VF – Istruzioni per l'installazione e l'uso...
- Seite 408 Copyright – Eingeschränkte Lizenz: soweit hierin nicht ausdrücklich zugelassen, dürfen die Inhalte dieses Dokuments ohne vorausgehende schriftliche Genehmigung der Pentair International SRL weder ganz noch auszugsweise und in gleich welcher Form und mit welchen Mitteln vervielfältigt werden. Copyright – Beperkte licentie: behalve zoals hierin specifiek toegestaan, mag geen enkel deel van de inhoud van dit document op om het even welke manier of hoe dan ook gereproduceerd worden zonder de voorafgaande schriftelijke toestemming van Pentair International SRL.