Inhaltsverzeichnis
Werbung
Verfügbare Sprachen
Verfügbare Sprachen
Quicklinks
SAVE THESE INSTRUCTIONS !
PENTAIR AQUATIC SYSTEMS
INDUSTRIEPARK WOLFSTEE, TOEKOMSTLAAN 30, 2200 HERENTALS - BELGIUM, WWW.PENTAIRPOOLEUROPE.COM
Copyright – Limited License: except as specifically permitted herein, no portion of the content on this document may be reproduced in any form or by any mean without the
prior written permission of Pentair International SRL.
Copyright – Eingeschränkte Lizenz: soweit hierin nicht ausdrücklich zugelassen, dürfen die Inhalte dieses Dokuments ohne vorausgehende schriftliche Genehmigung der
Pentair International SRL weder ganz noch auszugsweise und in gleich welcher Form und mit welchen Mitteln vervielfältigt werden.
Copyright – Beperkte licentie: behalve zoals hierin specifiek toegestaan, mag geen enkel deel van de inhoud van dit document op om het even welke manier of hoe dan ook
gereproduceerd worden zonder de voorafgaande schriftelijke toestemming van Pentair International SRL.
Copyright – Licence limitée: sauf expressément autorisé ci-après, aucune partie du contenu de ce document ne peut être reproduite sous toute forme ou par tout moyen
sans la permission écrite préalable de Pentair International SRL.
Copyright – Licencia limitada: salvo en lo expresamente permitido en el presente documento, se prohíbe la reproducción total o parcial del mismo por cualquier medio sin
la previa autorización por escrito de Pentair International SRL.
Copyright – Licenza limitata: se non indicato specificatamente di seguito, nessuna porzione del contenuto di questo documento può essere riprodotta in qualsiasi forma o
con qualsiasi mezzo senza preventiva autorizzazione scritta di Pentair International SRL.
INTELLIFLO
VSD
®
SWIMMING POOL PUMPS
INSTALLATION
GUIDE
/
INSTALLATIEHANDLEIDING
BEDIENUNGSANTLEITUNG / GUIDE DE L'INSTALLATION
GUIA DE INSTALACION / GUIDE ALL'INSTALLAZIONE
INTELLIFLO
WHISPERFLO
VSD
®
®
INTELLIFLO
SW5P6R
VSD
®
™
IMPORTANT SAFETY INSTRUCTIONS READ AND FOLLOW ALL INSTRUCTIONS SAVE THESE INSTRUCTIONS
WATER SOLUTIONS
P-INSB-VSD (Rev. 08/2016)
INTELLIFLO
ULTRAFLOW
VSD
®
®
INTELLIFLO
5PXF
VSD/
®
™
INTELLIFLO WXF-VSD
Werbung
Kapitel
Inhaltsverzeichnis
Fehlerbehebung

Verwandte Anleitungen für Pentair INTELLIFLO VSD series


Inhaltszusammenfassung für Pentair INTELLIFLO VSD series
- Seite 1 Copyright – Eingeschränkte Lizenz: soweit hierin nicht ausdrücklich zugelassen, dürfen die Inhalte dieses Dokuments ohne vorausgehende schriftliche Genehmigung der Pentair International SRL weder ganz noch auszugsweise und in gleich welcher Form und mit welchen Mitteln vervielfältigt werden. Copyright – Beperkte licentie: behalve zoals hierin specifiek toegestaan, mag geen enkel deel van de inhoud van dit document op om het even welke manier of hoe dan ook gereproduceerd worden zonder de voorafgaande schriftelijke toestemming van Pentair International SRL.
- Seite 2 Pentair. Those names and brands may be the trademaks or registered trademarks of those parties or others.
- Seite 3 Installation and User’s Guide page 2 - 39 Montage- und Bedienungsanleitung Seite 40 - 77 Installatie- en gebruikershandleiding pagina 78 - 115 Manuel d’installation et d’utilisation page 116 - 153 Guía de Instalación y del Usuario página 154 - 191 Istruzioni per l’installazione e l’uso página 192 - 229...
-
Seite 4: Inhaltsverzeichnis
Contents Important Warning and Safety Instructions ..................4 Section 1: Pump Overview ..................7 IntelliFlo VSD Pump ....................7 ® External Control .......................7 Features ........................7 IntelliFlo VSD Drive Assembly and Control Panel ..........8 ® IntelliFlo VSD Motor Features ................8 ® Section 2: Operator Control Panel ................9 IntelliFlo Operator Control Panel ................9 ®... - Seite 5 Contents Section 4: User Maintenance ........................29 Pump Strainer Basket ....................29 Pump Strainer Basket Service .................29 Motor Service ......................30 Winterizing .......................31 Priming the pump after service ................31 Section 5: Installation and Removal ..................... 32 IntelliFlo VSD Kit Contents ..................32 ® Installing the IntelliFlo .....................32 ®...
-
Seite 6: Important Safety Precautions
IMPORTANT SAFETY PRECAUTIONS Important Notice: Attention Installer: This manual contains important information about the installation, operation and safe use of this product. This information should be given to the owner and/or operator of this equipment. WARNING — Before installing this product, read and follow all warning notices and instructions which are included. - Seite 7 IMPORTANT SAFETY PRECAUTIONS (continued) WARNING — Water temperature in excess of 38° C (100° F) may be hazardous to your health. Prolonged immersion in hot water may induce hyperthermia. Hyperthermia occurs when the internal temperature of the body reaches a level several degrees above normal body temperature of 37°...
- Seite 8 IMPORTANT SAFETY PRECAUTIONS (continued) General Installation Information WARNING — Pumps improperly sized or installed or used in applications other than for which the pump was intended can result in severe personal injury or death. These risks may include but not be limited to electric shock, fire, flooding, suction entrapment or severe injury or property damage caused by a structural failure of the pump or other system component WARNING —...
-
Seite 9: Section 1: Pump Overview
Section 1 Pump Overview Introduction The IntelliFlo VSD pump is well suited for all of your pool, spa, cleaner, waterfall and other water ® applications. Using the control panel, IntelliFlo can use one of the four selectable preset speeds or ®... -
Seite 10: Intelliflo Vsd Drive Assembly And Control Panel
Features (continued) LCD Display Power and Speed Text Alerts Antifreeze Protection Adjustable speed Adjustable Temperatures Enable and Disable in stand alone Additional Features Clock and Timer M aximum and Minimum Speed Limits Quick Clean Mode Timeout Mode IntelliFlo VSD Drive Assembly and Control Panel ®... -
Seite 11: Section 2: Operator Control Panel
Section 2 Operator Control Panel This section describes the IntelliFlo Variable Speed pump operator controls and LEDs. ® IntelliFlo VSD Operator Control Panel ® ® 12:15 Current Time Line 1: Key Lockout Icon 750 RPM Line 2: Current Speed T 0.00 150 WATTS Line 3: Countdown Time Current Power Usage Running Speed 1... - Seite 12 Controls and LEDs (Continued) ® 12:15 Line 1 750 RPM Line 2 T 0.00 150 WATTS Line 3 Running Speed 1 Line 4 Speed Speed Speed Speed Time Quick Clean Arrow buttons: • Up arrow: Move one level up in the menu tree or increase a digit when editing a setting. •...
-
Seite 13: Section 3: Operating The Pump
Section 3 Operating the Pump This section describes how to operate the IntelliFlo pump using the control panel buttons and menu ® features. Starting the pump To start the pump 1. Be sure the pump is powered on and the green power LED is on. 2. -
Seite 14: Pump Operating Modes
Pump Operating Modes The IntelliFlo VSD pump can be programmed three ways: ® 1. Manual Operation: Speed buttons 1-4 can be programmed for Manual operation. This means the speed button is pressed and then the start button and the pump runs a programmed speed. -
Seite 15: Intelliflo ® Vsd Speed Pump Menus
IntelliFlo VSD Pump Menus ® M AI N SCREEN Pr ess M ENU but t on t o access m enus SETTI NG S Pum p Addr ess ( 1- 16) Def aul t : ADDRESS 1 ( page 14) Set Ti m e ( hr : m m ) Def aul t : 12: 00 AM AM / PM... -
Seite 16: Settings: Pump Address
IntelliFlo VSD Pump Menus ® The IntelliFlo pump menu descriptions are as follows: ® Settings: Pump Address The “Pump Address” setting is used when the IntelliFlo pump is connected via the RS-485 COM port ® to an IntelliPool or IntelliComm system. -
Seite 17: Settings: Set Am/Pm Or 24 Clock
Settings: Set AM/PM or 24 Clock This setting is for changing the pump’s time clock from regular time (AM/PM) to a 24 hour clock. For example, Midnight (12:00 AM) is 0000 hr., 8:00 AM is 0800 hr., and 11:00 PM is 2300 hr. -
Seite 18: Settings: Language
Settings: Language To access the language menu: 1. Check that the green power LED is on. 2. Press the Menu button. “Settings” is displayed. 3. Press the Select button. “Pump Address” is displayed. 4. Use the Up or Down arrow button to scroll to “Language”. 5. -
Seite 19: Settings: Password
Settings: Password When the Password feature is enabled, the pump will enter into password protection mode for a preprogrammed amount of time after the last button is pressed. The entered password is any combination of four (4) digits. To access the Password menu: 1. - Seite 20 ® 12:15 Key Lockout Icon 750 RPM Actual Speed Running Speed 1 Entering Password • When Password Protection is enabled, press any button (besides the speed button) to prompt the screen to for a password. To enter password, use the left and right arrows to move the cursor and the Up and Down •...
-
Seite 21: Speed 1-8 (Schedule A Time To Run The Pump)
Speed 1-8 (Schedule a Time to Run the Pump) By setting a start time and a stop time, Speeds 1-8 can be programmed to run a certain speed at a certain time of day. To run a scheduled pump speed, press the Start button (LED on). The LCD screen will display “Running Schedules”... -
Seite 22: External Control
Programming for Constant Run When programming a schedule for a Speed, the Speed can not be programmed with the same start and stop times. However, it will run without stopping if it is programmed with the Start time set one minute after the stop time. Example: A single speed will run non stop if programmed with a Start Time of 8:00 AM and a Stop time of 7:59 AM. -
Seite 23: Features: Time Out
Quick Clean (Continued) To access the Quick Clean menu: 1. Check that the green power LED is on. 2. Press the Menu button. “Settings” is displayed. 3. Use the Down arrow button to scroll to “Features”. 5. Press the Select button. “Timeout” is displayed. 6. -
Seite 24: Priming
Priming The default setting for Priming is ENABLED. Enabling this feature allows the pump to use its “Flow Technology” to be sure the pump is primed for startup. This feature will not override the “Max Speed” setting. The priming feature ramps the pump to 1800 RPM and pauses for three (3) seconds. If there is sufficient water flow in the pump basket, the pump will go out of priming mode and run its commanded speed. -
Seite 25: Disable Priming Feature On The Pump
Priming (Continued) To access the Priming menu: 1. Check that the green power LED is on and press the Menu button. “Settings” is displayed. 2. Use the Down arrow button to scroll to “Priming”. 3. Press the Select button. The factory default is set to priming “Enabled“. 4. -
Seite 26: Antifreeze
AntiFreeze This feature allows you to set a speed (450 RPM -3450 RPM) that will run when the pump goes into anti freeze mode. The temperature level that you wish anti freeze mode to start can also be set. IMPORTANT NOTE: This feature is for protection of the pump. Do not depend on the antifreeze feature for freeze protection of the pool. -
Seite 27: Priming The Pump For The First Time, Or After Service
Priming the pump for the first time, or after service The IntelliFlo must be primed before starting the pump for the first time. To prime a pump ® means filling the pump and suction pipe with water. This process evacuates the air from all the suction lines and the pump. -
Seite 28: Priming The Pump
Priming the pump for the first time, or after service (Continued) Priming the Pump If you replace the o-ring with a non-lubricated o-ring, you may need to apply a silicone NOTICE: based lubricant. • Clean and inspect o-ring; reinstall on trap cover. •... -
Seite 29: External Control With Intellicomm Communication Center
Communication Center ® The IntelliFlo pump can be remotely controlled by the Pentair IntelliComm Communication ® Center using the RS-485 communications cable. The IntelliComm provides four pairs of input terminal connections. These inputs are actuated by either 15 - 240 VAC or 15 - 100 VDC. Using the device’s inputs, the programmed IntelliFlo... -
Seite 30: Connecting The Pump To An Intellipool System
Connecting the IntelliFlo pump to a IntelliPool System ® The IntelliFlo pump can be controlled by an IntelliPool system via the RS-485 communication ® cable. WARNING - Switch OFF main system power to the IntelliPool Control Center before making any connections. -
Seite 31: Section 4: User Maintenance
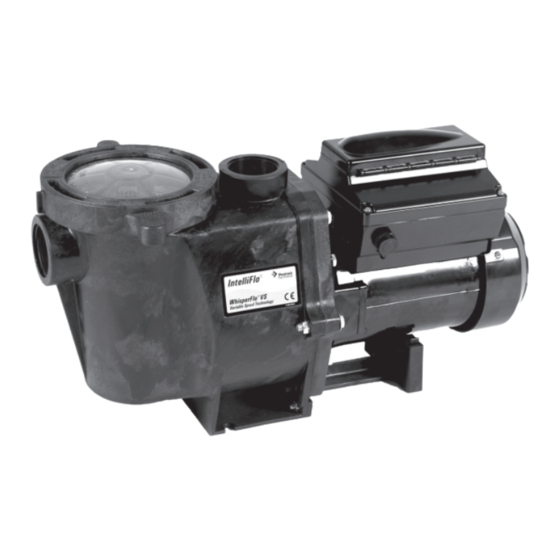
Section 4 User Maintenance The following information describes how to service and maintain the IntelliFlo VSD pump. ® Illustrations apply to WhisperFlo IntelliFlo VSD. Pump Strainer Basket The strainer, sometimes referred to as the “Hair and Lint Pot,” is in front of the of the pump. Inside there is a basket which must be kept clean of leaves and debris at all times. -
Seite 32: Motor Service
Pump Strainer Basket Service (Continued) 10. Be sure that the lid o-ring is properly placed. Seat the locking ring and lid then turn clockwise until the handles are horizontal as shown. 11. Reconnect the communication cable to the pump if required. 12. -
Seite 33: Winterizing
Winterizing To protect the IntelliFlo pump electronics from damage due to freezing conditions, the pump will ® switch itself on to generate internal heat when the air temperature drops below 4.4° C (40° F). The IntelliFlo pump “Anti Freeze” feature is not intended to protect the system plumbing from ®... -
Seite 34: Section 5: Installation And Removal
Section 5 Installation and Removal The following information describes how to install the IntelliFlo pump. ® Installing the IntelliFlo Pump ® Only a qualified service person should install the IntelliFlo pump. Refer to “Important Warning And ® Safety Instructions” on pages 4 to 6 for additional installation guidance and safety information. IntelliFlo Pump Kit Contents ®... -
Seite 35: Wiring The Intelliflo ® Vsd Pump
Wiring the IntelliFlo Pump ® To connect the IntelliFlo ® pump to an AC power source: 1. Be sure all electrical breakers and switches are turned off before wiring motor. 2. Be sure that the wiring voltage is 230 VAC ± 10%. 3. -
Seite 36: Pump Disassembly
Pump Disassembly Always disconnect power to the pool pump at the circuit breaker and disconnect the WARNING — communication cable before servicing the pump. Failure to do so could result in death or serious injury to serviceman, pool users or others due to electric shock. Read all servicing instructions before working on the pump. -
Seite 37: Shaft Seal Replacement
Pump Disassembly (Continued) Seal Plate to Housing Bolts (6X) Motor Mechanical Seal Bolt (4X) Impeller Lock Screw Gasket Seal Plate Gasket Clamp Diffuser O-Ring Motor Motor Shaft Seal Plate Impeller Impeller Lock Screw Diffuser Screws (2X) Diffuser Foot Insert Drain Plugs Foot Shaft Seal Replacement The Shaft Seal consists primarily of two parts, a rotating member and a ceramic seal. -
Seite 38: Drive Assembly Removal And Installation
Drive Assembly Removal and Installation To avoid dangerous or fatal electrical shock hazard, switch OFF power to motor before WARNING working on pump or motor. To avoid electrical hazard, do not remove the four tamper proof bits from the motor assembly. CAUTION To remove the IntelliFlo drive and control panel from the motor assembly:... -
Seite 39: Section 6: Troubleshooting
Section 6 Troubleshooting Before installing this product, read and follow all warning notices and instructions on page 4 - 6. CAUTION Alerts and Warnings The IntelliFlo VSD pump displays all alarms and warnings on the control panel display. When an ®... -
Seite 40: General Intelliflo Troubleshooting Problems
General IntelliFlo Troubleshooting Problems ® Use the following general troubleshooting information to resolve possible problems with your IntelliFlo pump. ® Note: Turn off power to unit prior to attempting service or repair. Problem Possible Cause Corrective Action Pump failure. Pump will not prime - Air leak in suction. Check suction piping and valve glands on any suction PRIME ERROR may be displayed. - Seite 41 General IntelliFlo Troubleshooting Problems (Continued) ® Problem Possible Cause Corrective Action Inadequate circulation. Filter or pump basket dirty. Check trap basket; if plugged, turn pump off and (For IntelliFlo alert display clean basket. ® messages, refer to Alerts and Check and clean pool filter. Warnings on page 37).
- Seite 42 Inhaltsverzeichnis Wichtige Warnhinweise und Sicherheitsanweisungen ..............42 Kapitel 1: Pumpe Überblick ..................45 IntelliFlo VSD-Pumpe ....................45 ® Externe Steuerung ....................45 Funktionen .......................45 Steuergerät-Baugruppe und Bedienfeld der IntelliFlo VSD ........46 ® Merkmale des Motors für die IntelliFlo VSD ............46 ® Kapitel 2: Bedienfeld ....................47 Bedienfeld IntelliFlo ....................47 ®...
- Seite 43 Inhaltsverzeichnis Kapitel 4: Wartung durch den Benutzer ....................67 Pumpensiebkorb ......................67 Wartung des Pumpensiebkorbs ................67 Motorwartung ......................68 Überwinterung ......................69 Vorfüllen der Pumpe nach der Wartung ..............69 Kapitel 5: Montage und Ausbau......................70 IntelliFlo VSD-Kit Inhalt ..................70 ® Montage der IntelliFlo .....................70 ®...
-
Seite 44: Wichtige Sicherheitsvorkehrungen
WICHTIGE SICHERHEITSVORKEHRUNGEN Wichtiger Hinweis für den Monteur: Dieses Handbuch enthält wichtige Informationen zur Montage, zum Betrieb und zur sicheren Benutzung dieses Produkts. Diese Unterlagen müssen an den Besitzer und/oder den Betreiber dieser Ausrüstung weitergegeben werden. ACHTUNG — Lesen und befolgen Sie alle darin enthaltenen Hinweise und Anweisungen, bevor Sie das Produkt starten. - Seite 45 WICHTIGE SICHERHEITSVORKEHRUNGEN (Forts.) ACHTUNG — Wassertemperaturen über 38 °C (100 °F) können gesundheitsgefährdend sein. Ein längerer Aufenthalt in heißem Wasser kann zu Hyperthermie führen. Zu Hyperthermie kommt es, wenn die Körperinnentemperatur über die normale Körpertemperatur von 37 °C (98,6 °F) steigt. Symptome für Hyperthermie sind u.a.: Benommenheit, Lethargie, Schwindel, Ohnmacht und ein Anstieg der Körperinnentemperatur.
-
Seite 46: Allgemeine Informationen Zur Montage
WICHTIGE SICHERHEITSVORKEHRUNGEN (Forts.) Allgemeine Informationen zur Montage ACHTUNG — Eine nicht vorschriftsmäßige Auslegung, Montage oder Verwendung der Pumpe für einen anderen als den vorgesehenen Zweck kann zu schweren Verletzungen oder sogar zum Tod führen. Gefahren können u.a. sein: Stromschlag, Brand, Überschwemmung, Ansaugung oder schwere Verletzungen oder Sachschäden durch einen strukturellen Fehler an der Pumpe oder anderen Systemkomponenten. -
Seite 47: Kapitel 1: Pumpe Überblick
Kapitel 1 Pumpe - Überblick Einführung Die IntelliFlo -VSD-Pumpe ist bestens geeignet für alle Ihre Pool-, Spa-, Reiniger-, Wasserfall- und ® anderen Wasseranwendungen. Die IntelliFlo kann am Bedienfeld auf eine von vier wählbaren Drehzahlen ® eingestellt werden oder die Drehzahl kann so eingestellt werden, dass die Pumpe mit einer spezifischen Drehzahl läuft. -
Seite 48: Steuergerät-Baugruppe Und Bedienfeld Der Intelliflo ® Vsd
Merkmale (Forts.) LCD-Anzeige Leistung und Drehzahl Textalarme Frostschutz Einstellbare Drehzahl Einstellbare Temperaturen Aktivierung und Deaktivierung im Stand-alone-Modus Zusätzliche Merkmale: Uhr und Timer Max. und min. Drehzahlen QuickClean-Modus TimeOut-Modus Steuergerät-Baugruppe und Bedienfeld der IntelliFlo ®... -
Seite 49: Kapitel 2: Bedienfeld
Kapitel 2 Bedienfeld In diesem Kapitel werden die Bedienersteuerungen und die LEDs der IntelliFlo -Pumpe mit variabler ® Drehzahl beschrieben. Bedienfeld der IntelliFlo ® ® Aktuelle Uhrzeit 12:15 Zeile 1: Symbol Schlüsselsperre 750 RPM Zeile 2: Aktuelle Drehzahl T 0.00 150 WATT Zeile 3: Countdown-Zeit Aktueller Energieverbrauch... - Seite 50 Steuerungen und LEDs (Forts.) ® 12:15 Zeile 1 750 RPM Zeile 2 T 0.00 150 WATT Zeile 3 Drehzahl 1 Aktiv Zeile 4 Speed Speed Speed Speed Time Quick Clean Pfeiltasten: • Aufwärtspfeil: Wechselt im Menübaum in die nächsthöhere Ebene oder erhöht einen Wert bei der Bearbeitung einer Einstellung.
-
Seite 51: Kapitel 3: Betrieb Der Pumpe
Kapitel 3 Betrieb der Pumpe In diesem Kapitel wird der Betrieb der IntelliFlo- -Pumpe mit Hilfe der Tasten am Bedienfeld und den ® Menüfunktionen beschrieben. Starten der Pumpe Um die Pumpe zu starten, gehen Sie wie folgt vor: 1. Vergewissern Sie sich, dass die Pumpe eingeschaltet ist und die grüne Power- LED leuchtet. 2. -
Seite 52: Pumpenbetriebsarten
Pumpenbetriebsarten Die IntelliFlo -VSD-Pump kann auf drei verschiedene Arten programmiert werden: ® 1. Manueller Betrieb: Die Drehzahltasten 1-4 können für manuellen Betrieb programmiert werden. D.h., Sie müssen die Drehzahltaste und anschließend die Starttaste drücken, damit die Pumpe dann mit einer programmierten Drehzahl läuft. Die Drehzahlen 5-8 können nicht für den manuellen Betrieb programmiert werden, da ihnen keine Tasten zugeordnet sind. -
Seite 53: Intelliflo -Vsd-Pumpenmenüs
IntelliFlo -VSD-Pumpenmenüs ® Tast e M ENÜ dr ücken, um di e di e M enüs auf zur uf en HAUPTBI LDSCHI RM EI NSTELLUNG EN Pum penadr esse ( 1- 16) St d. : ADRESSE 1 ( Sei t e 52) Zei t ei nst el l en ( hh: m m ) St d. -
Seite 54: Einstellungen: Pumpenadresse
IntelliFlo -VSD-Pumpenmenüs ® Nachstehend folgt die Beschreibung des IntelliFlo -Pumpenmenüs: ® Einst.: Pumpenadresse Die Einstellung "Pumpenadresse" wird verwendet, wenn die IntelliFlo -Pumpe über den RS-485 COM- ® Port an das IntelliPool- oder IntelliComm -System angeschlossen wird. Die Standard-Pumpenadresse ist ® 1. -
Seite 55: Einstellungen: Am/Pm Oder 24 Stunden Einstellen
Einstellungen: AM/PM oder 24 Stunden einstellen Mit dieser Einstellung kann die Pumpenuhr von der normalen Zeit (AM/PM) auf das 24-Stunden- System umgestellt werden. Beispiel: Mitternacht (12:00 AM) ist 00:00 Uhr, 8:00 AM ist 08:00 Uhr und 11:00 PM ist 23:00 Uhr. So rufen Sie das Menü... -
Seite 56: Einstellungen: Sprache
Einstellungen: Sprache So rufen Sie das Menü "Sprache" auf: 1. Vergewissern Sie sich, dass die grüne Power-LED leuchtet. 2. Die Menü-Taste drücken. "Einst." wird angezeigt. 3. Die Taste Wählen drücken. Die "Pumpenadresse" wird angezeigt. 4. Mit der Aufwärts- oder Abwärts-Pfeiltaste zu "Sprache" scrollen. 5. -
Seite 57: Einstellungen: Passwort
Einstellungen: Passwort Wenn die Passwortfunktion aktiviert wird, geht die Pumpe nach der letzten Tastenbetätigung für eine vorprogrammierte Zeit in den passwortgeschützten Modus. Das eingegebene Passwort besteht aus einer beliebigen vier(4)-stelligen Zahlenkombination. So rufen Sie das Menü "Passwort" auf: 1. Vergewissern Sie sich, dass die grüne Power-LED leuchtet. 2. - Seite 58 Symbol Schlüsselsperre Passworteingabe • Wenn der Passwortschutz aktiviert ist, eine beliebige Taste (außer der Drehzahl-Taste) drücken, um die Aufforderung zur Passworteingabe anzuzeigen. • Mit den Tasten Pfeil-nach-Links und Pfeil-nach-Rechts den Cursor versetzen und mit den Aufwärts- und Abwärts-Pfeiltasten durch die Ziffern scrollen und dann zum Bestätigen die Eingabetaste drücken.
-
Seite 59: Drehzahl 1-8 (Einstellung Einer Zeit Für Den Pumpenbetrieb)
Drehzahl 1-8 (Einstellung einer Zeit für den Pumpenbetrieb) Durch Einstellen einer Startzeit und einer Stoppzeit können die Drehzahlen 1-8 so programmiert werden, dass die Pumpe zu einer bestimmten Tageszeit mit einer bestimmten Drehzahl läuft. Die Starttaste drücken (LED leuchtet), um die Pumpe mit einer vorgegebenen Drehzahl laufen zu lassen. Auf der LCD-Anzeige erscheint "Zeitplan Aktiv", wenn die Pumpe für den Betrieb mit einer vorgegebenen Drehzahl bereit ist. -
Seite 60: Externe Steuerung
Programmierung für Dauerlauf Wenn ein Zeitplan für eine Drehzahl programmiert wird, kann für diese Drehzahl nicht die gleiche Ein- und Ausschaltzeit programmiert werden. Die Pumpe läuft jedoch ohne Unterbrechung, wenn die Einschaltzeit auf eine Minute nach der Ausschaltzeit eingestellt wird. Beispiel: Die Pumpe läuft ununterbrochen mit einer einzigen Drehzahl, wenn die Einschaltzeit auf 8:00 Uhr und die Ausschaltzeit auf 7:59 Uhr programmiert wird. -
Seite 61: Funktionen: Timeout
QuickClean (Forts.) So rufen Sie das Menü "QuickClean" auf: 1. Vergewissern Sie sich, dass die grüne Power-LED leuchtet. 2. Die Menü-Taste drücken. "Einst." wird angezeigt. 3. Mit der Abwärts-Pfeiltaste zu "Funktionen" scrollen. 5. Die Taste Wählen drücken "TimeOut" wird angezeigt. 6. -
Seite 62: Ansaugen
Ansaugen Die Werkseinstellung für das Ansaugen ist AKTIVIERT. Durch die Aktivierung dieser Funktion kann die Pumpe ihre "Strömungstechnologie" nutzen, um sicherzustellen, dass sie für den Start vorgefüllt ist. Die Einstellung "Max. Drehzahl" wird durch diese Funktion nicht aufgehoben. Die Ansaugfunktion bewirkt, dass die Pumpe mit 1800 RPM läuft und für die Dauer von drei (3) Sekunden anhält. -
Seite 63: Deaktivierung Der Ansaugfunktion An Der Pumpe
Ansaugen (Forts.) So rufen Sie das Menü "Ansaugen" auf: 1. Vergewissern Sie sich, dass die grüne Power-LED leuchtet und drücken Sie die Menü-Taste. "Einst." wird angezeigt. 2. Mit der Abwärts-Pfeiltaste zu "Ansaugen" scrollen. 3. Die Taste Wählen drücken Die werkseitige Einstellung für die Ansaugung ist "Aktiv". 4. -
Seite 64: Frostschutz
Frostschutz Mit dieser Funktion können Sie eine Pumpendrehzahl (450 - 3450 RPM) für den Frostschutzbetrieb einstellen. Die Temperatur, bei der der Frostschutzbetrieb starten soll, kann ebenfalls eingestellt werden. WICHTIGER HINWEIS: Diese Funktion dient zum Schutz der Pumpe. Verlassen Sie sich nicht auf die Frostschutzfunktion, wenn es darum geht, Ihren Pool vor Frost zu schützen. -
Seite 65: Vorfüllen Der Pumpe Für Die Erstinbetriebnahme Oder Nach Einer Wartung
Befüllen der Pumpe für die Erstinbetriebnahme oder nach einer Wartung Die IntelliFlo -Pumpe muss vorgefüllt werden, bevor sie erstmalig in Betrieb genommen wird. ® Eine Pumpe vorfüllen heißt, die Pumpe und die Saugleitung mit Wasser füllen. Dadurch wird die Luft aus allen Saugleitungen und aus der Pumpe entfernt. Das Vorfüllen kann je nach Wassertiefe, Rohrdurchmesser und Rohrlänge mehrere Minuten in Anspruch nehmen. -
Seite 66: Vorfüllen Der Pumpe
Vorfüllen der Pumpe für die Erstinbetriebnahme oder nach einer Wartung (Forts.) Vorfüllen der Pumpe Wenn Sie den O-Ring durch einen nicht gefetteten O-Ring ersetzen, müssen Sie eventuell HINWEIS: Fett auf Silikonbasis auftragen. • O-Ring reinigen und prüfen und wieder in den Abscheiderdeckel einlegen. •... -
Seite 67: Externe Steuerung Über Das Intellicomm®-Communication Center
Externe Steuerung über das IntelliComm -Communication Center ® Die IntelliFlo -Pumpe kann vom Pentair IntelliComm-Communication Center, über das ® RS-485-Kommunikationskabel, ferngesteuert werden. Das IntelliComm verfügt über vier Eingangsklemmenpaare. Diese Eingänge werden mit 15 - 240 VAC oder 15 - 100 VDC gespeist. Über diese Eingänge können die programmierten Drehzahlen der IntelliFlo... -
Seite 68: Anschließen Der Intelliflo®-Pumpe An Ein Intellipool-System
Anschließen der IntelliFlo -Pumpe an ein IntelliPool System ® Die IntelliFlo -Pumpe kann mit dem RS-485-Kommunikationskabel von einem IntelliPool-System ® aus gesteuert werden. ACHTUNG - Vor dem Anschließen Netzstromversorgung für das IntelliPool Control Center ausschalten. So schließen Sie das RS-485-Kommunikationskabel für die IntelliFlo -Pumpe an die ®... -
Seite 69: Kapitel 4: Wartung Durch Den Benutzer
Kapitel 4 Wartung durch den Benutzer Nachstehend folgt eine Beschreibung der Wartung und Pflege der IntelliFlo -VSD-Pumpe. Die ® Abbildungen beziehen sich auf die WhisperFlo und die IntelliFlo VSD. Pumpensiebkorb Das Sieb, zuweilen auch als "Haar- und Flusentopf" bezeichnet, befindet sich vorne an der Pumpe. Im Sieb befindet sich ein Korb, der jederzeit frei von Blättern und Schmutz gehalten werden muss. -
Seite 70: Motorwartung
Wartung des Pumpensiebkorbs (Forts.) 10. Sicherstellen, dass der O-Ring richtig im Deckel eingelegt ist. Sicherungsring und Deckel auflegen und im Uhrzeigersinn drehen, bis die Griffe waagerecht sind, wie in der Abbildung dargestellt. 11. Ggf. Kommunikationskabel wieder an die Pumpe anschließen. 12. -
Seite 71: Überwinterung
Überwinterung Um die Elektronik der IntelliFlo- Pumpe vor Schäden durch Frost zu schützen, schaltet sich die Pumpe ® automatisch ein, um intern Wärme zu erzeugen, wenn die Lufttemperatur unter °C (40 °F) fällt. Die "Frostschutz"-Funktion der IntelliFlo -Pumpe ist nicht dafür gedacht, die Rohrleitungen vor dem ®... -
Seite 72: Kapitel 5: Montage Und Ausbau
Kapitel 5 Montage und Ausbau Nachstehend folgt eine Beschreibung der Montage der IntelliFlo -Pumpe. ® Montage der IntelliFlo -Pumpe ® Die IntelliFlo -Pumpe darf nur von einem qualifizierten Servicetechniker montiert werden. Weitere ® Montageanweisungen und Sicherheitsinformationen finden Sie auf den Seiten 42 bis 44 unter "Wichtige Warnhinweise und Sicherheitsanweisungen". -
Seite 73: Verdrahtung Der Intelliflo ® Vsd-Pumpe
Verdrahtung der IntelliFlo -Pumpe ® Anschließen der IntelliFlo ® -Pumpe an eine Wechselspannungsquelle: 1. Vor dem Verdrahten des Motors sicherstellen, dass alle elektrischen Unterbrecher und Schalter ausgeschaltet sind. 2. Sicherstellen, dass die Verdrahtung für eine Spannung von 230 VAC ± 10 % ausgelegt ist. 3. -
Seite 74: Zerlegung Der Pumpe
Zerlegung der Pumpe Vor Wartungsarbeiten an der Pumpe immer die Netzspannung zur Poolpumpe am Leistungsschalter ACHTUNG — ausschalten und das Kommunikationskabel abziehen. Die Nichtbeachtung dieser Anweisung könnte zum Tod oder zu schweren Verletzungen von Service-Technikern, Poolbenutzern oder anderen Personen durch Stromschlag führen. Lesen Sie alle Wartungsanweisungen, bevor Sie Arbeiten an der Pumpe ausführen. -
Seite 75: Auswechseln Der Wellendichtung
Zerlegung der Pumpe (Forts.) Schrauben Dichtungsplatte Motor zum Gehäuse (6 x) Schraube Mechanische Dichtung (4X) Dichtung Laufradsicherungsschraube Dichtung Dichtungsplatte Deckel Schelle Diffusor O-Ring Motor Motorwelle Dichtungsplatte Laufrad Laufradsicherungs- Diffusorschrauben (2X) schraube Diffusor Fuß Einsatz Ablassstopfen Fuß Auswechseln der Wellendichtung Die Wellendichtung besteht hauptsächlich aus zwei Teilen, einem drehenden Teil und einer Keramikdichtung. -
Seite 76: Ausbau Und Installation Der Steuergerät-Baugruppe
Ausbau und Installation der Steuergerät-Baugruppe Schalten Sie die Spannungsversorgung des Motors vor der Durchführung von Arbeiten an der ACHTUNG Pumpe oder am Motor AUS, um die Gefahr eines gefährlichen oder tödlichen Stromschlags zu vermeiden . Um elektrische Gefahren zu vermeiden, dürfen die vier manipulationssicheren Schrauben an der VORSICHT Motorbaugruppe nicht entfernt werden Ausbau der IntelliFlo... -
Seite 77: Kapitel 6 Fehlerbeseitigung
Kapitel 6 Fehlerbeseitigung Lesen und befolgen Sie alle Hinweise und Anweisungen auf Seite 42 - 44, bevor Sie dieses ACHTUNG — Produkt installieren. Alarme und Warnhinweise Bei der IntelliFlo -VSD-Pumpe werden alle Alarme und Warnhinweise auf der Anzeige des Bedienfelds ®... -
Seite 78: Behebung Allgemeiner Probleme Bei Der Intelliflo
Behebung allgemeiner Probleme bei der IntelliFlo ® Benutzen Sie die nachstehenden Informationen zur Fehlerbehebung, um mögliche Probleme mit Ihrer IntelliFlo -Pumpe ® zu lösen. Hinweis: Schalten Sie die Stromversorgung für die Pumpe aus, bevor Sie mit Wartungs- oder Reparaturarbeiten beginnen. Problem Mögliche Ursache Korrekturmaßnahme... - Seite 79 Behebung allgemeiner Probleme bei der IntelliFlo (Forts.) ® Problem Mögliche Ursache Korrekturmaßnahme Unzureichende Zirkulation. Filter oder Pumpenkorb verschmutzt. Abscheiderkorb kontrollieren; wenn verstopft, Pumpe (Für die Anzeige von Alarm- ausschalten und Korb reinigen. meldungen auf der Anzeige der Pool-Filter kontrollieren und reinigen. IntelliFlo siehe "Alarme und ®...
- Seite 80 Inhoud Belangrijke waarschuwingen en veiligheidsinstructies ..............80 Sectie 1: Overzicht van de pomp ................83 IntelliFlo VSD pomp ....................83 ® Externe regeling .......................83 Kenmerken ......................83 IntelliFlo VSD aandrijving en bedieningspaneel .............84 ® IntelliFlo VSD motorkenmerken ................84 ® Sectie 2: Bedieningspaneel ..................85 IntelliFlo bedieningspaneel ..................85 ®...
- Seite 81 Inhoud Sectie 4: Onderhoud door de gebruiker ..................... 105 Pompzeefmand ......................105 Onderhoud pompzeefmand ..................105 Motoronderhoud ......................106 Overwinteren ......................107 De pomp na een onderhoudsbeurt vullen..............107 Sectie 5: Installeren en verwijderen ...................... 108 Inhoud IntelliFlo VSD Kit ..................108 ® De IntelliFlo installeren ..................108 ®...
-
Seite 82: Belangrijke Veiligheidsvoorzorgen
BELANGRIJKE VEILIGHEIDSVOORZORGEN Belangrijk: T.a.v. de installateur: Deze handleiding bevat belangrijke informatie over de installatie, de werking en het veilige gebruik van dit product. Deze informatie dient altijd aan de eigenaar en/of bediener van deze uitrusting gegeven te worden. WAARSCHUWING — Vooraleer dit product te installeren, dient u alle waarschuwingen en instructies in de handleiding te lezen en op te volgen. - Seite 83 BELANGRIJKE VEILIGHEIDSVOORZORGEN (vervolg) WAARSCHUWING — Een watertemperatuur van 38 °C (100 °F) of meer kan uw gezondheid schaden. Een langdurige onderdompeling in heet water kan hyperthermie veroorzaken. Hyperthermie (sterk verhoogde lichaamstemperatuur) komt voor wanneer de inwendige temperatuur van het lichaam meerdere graden boven de normale lichaamstemperatuur van 37 °C (98,6 °F) uitstijgt.
-
Seite 84: Algemene Waarschuwingen
BELANGRIJKE VEILIGHEIDSVOORZORGEN (vervolg) Algemene informatie over de installatie WAARSCHUWING — Pompen met een verkeerde grootte, slecht geïnstalleerde pompen, of pompen die gebruikt worden in andere toepassingen dan die waar ze voor bedoeld zijn, kunnen ernstige verwondingen of zelfs de dood tot gevolg hebben. Deze risico's kunnen de volgende zijn maar zijn er niet toe beperkt: elektrische schok, brand, overstroming, vastraken in de aanzuigopening, ernstige verwondingen of materiële schade als gevolg van een structureel defect van de pomp of van een... -
Seite 85: Sectie 1: Overzicht Van De Pomp
Sectie 1 Overzicht van de pomp Inleiding De IntelliFlo VSD pomp leent zich uitstekend voor uw zwembad, bubbelbad, reinigingssysteem, waterval of ® andere watertoepassingen. Met het bedieningspaneel kan de IntelliFlo op een van de vier vooraf ingestelde ® snelheden ingesteld worden of kan de pomp ingesteld worden om met een specifieke snelheid te werken. Vooruitstrevende, energiebesparende kenmerken zorgen voor een maximaal rendement van uw filtersysteem. -
Seite 86: Intelliflo Vsd Aandrijving En Bedieningspaneel
Kenmerken (vervolg) LCD-scherm Vermogen en snelheid Tekstmeldingen Vorstbeveiliging Aanpasbare snelheid Aanpasbare temperaturen In- en uitschakelen in stand alone Aanvullende kenmerken Klok en timer Maximum- en minimumsnelheden QuickClean modus TimeOut modus IntelliFlo VSD aandrijving en bedieningspaneel ® De IntelliFlo aandrijfeenheid bestaat uit een bedieningspaneel en de systeemelektronica die de motor ®... -
Seite 87: Sectie 2: Bedieningspaneel
Sectie 2 Bedieningspaneel Dit hoofdstuk beschrijft de bedieningselementen en LEDs van de IntelliFlo Variable Speed pomp. ® IntelliFlo VSD bedieningspaneel ® ® 12:15 Huidige tijd Regel 1: Pictogram 'toets vergrendeld' 750 RPM Regel 2: Huidig toerental T 0.00 150 WATT Regel 3: Afteltijd Huidig elektriciteitsverbruik Snelheid 1 Actief... - Seite 88 Bedieningselementen en LEDs (vervolg) ® 12:15 Regel 1 750 RPM Regel 2 T 0.00 150 WATT Regel 3 Snelheid 1 Actief Regel 4 Speed Speed Speed Speed Time Quick Clean Pijlen: • Pijl omhoog: Ga een niveau omhoog in de menuboom of verhoog met 1 bij het wijzigen van een instelling. •...
-
Seite 89: Sectie 3: De Pomp Bedienen
Sectie 3 De pomp bedienen Dit hoofdstuk beschrijft hoe u de IntelliFlo pomp met de knoppen op het bedieningspaneel en de menu's kunt ® bedienen. De pomp starten Om de pomp te starten 1. Controleer of de pomp ingeschakeld is en of de groene voeding-LED brandt. 2. -
Seite 90: Bedrijfsmodi Van De Pomp
Bedrijfsmodi van de pomp De IntelliFlo VSD pomp kan op drie manieren geprogrammeerd worden: ® 1. Manuele bediening: De knoppen Snelheid 1-4 kunnen voor een manuele bediening geprogrammeerd worden. Dat betekent dat de knop Snelheid en vervolgens de knop Start ingedrukt worden en de pomp met een geprogrammeerde snelheid draait. -
Seite 91: Intelliflo ® Vsd - Menu's Voor De Pompsnelheid
IntelliFlo VSD pomp - Menu's ® HO O FDSCHERM Dr uk de knop M ENU i n om t oegang t e kr i j gen t ot de m enu’ s Adr es pom p ( 1- 16) St andaar d: ADRES 1 I N STELLI N G EN ( pag. -
Seite 92: Instelling: Adres Pomp
IntelliFlo VSD pomp - Menu's ® De menubeschrijvingen voor de IntelliFlo pomp zijn de volgende: ® Instelling: Adres Pomp De instelling 'Adres Pomp' wordt gebruikt wanneer de IntelliFlo pomp met de RS-485 COM port op een systeem ® IntelliPool of IntelliComm aangesloten is. -
Seite 93: Instelling: Am/Pm Of 24 Uur Instellen
Instelling: AM/PM of 24 uur instellen Met die instelling wijzigt u de tijdsaanduiding van de klok van AM/PM naar 24 uur en omgekeerd. Bijv., middernacht (12:00 PM) is 00.00 uur, 8.00 AM is 08.00 uur en 11:00 PM is 23.00 uur. Om naar het menu 'AM/PM of 24 uur' te gaan: 1. -
Seite 94: Instelling: Taal
Instelling: Taal Om naar het menu 'Taal' te gaan: 1. Controleer of de groene voeding-LED brandt. 2. Druk op de knop Menu. Op het scherm verschijnt 'Instelling'. 3. Druk op de knop Select. Het 'Adres Pomp' verschijnt op het scherm. 4. -
Seite 95: Instelling: Paswoord
Instelling: Paswoord Wanneer de functie 'Paswoord' ingeschakeld is, gaat de pomp nadat er gedurende een vooraf geprogrammeerde tijdsduur geen toets meer ingedrukt werd, in de modus 'Bescherming paswoord'. Het ingevoerde paswoord is gelijk welke combinatie van vier (4) cijfers. Om naar het menu 'Paswoord' te gaan: 1. - Seite 96 Pictogram 'toets vergrendeld' Paswoord ingeven • Wanneer 'Bescherming paswoord' actief is, verschijnt de vraag om het paswoord in te geven zodra u op een knop (behalve de knop Speed) drukt. • Om het paswoord in te geven, gebruikt u de pijlen links en rechts om de cursor te bewegen en de pijlen omhoog en omlaag om door de cijfers te lopen.
-
Seite 97: Snelh. 1-8 (De Tijd Plannen Waarin De Pomp Moet Werken)
Snelh. 1-8 (de tijd plannen waarin de pomp moet werken) Door een start- en stoptijd in te stellen, kunnen snelheden 1-8 geprogrammeerd worden om op een bepaald moment van de dag met een bepaalde snelheid te werken. Om de pomp met een geprogrammeerde snelheid te laten werken, drukt u de knop Start in (LED aan). -
Seite 98: Externe Regeling
Continue bedrijfsmodus programmeren Wanneer een tijdschema voor een snelheid geprogrammeerd wordt, kan de snelheid niet met dezelfde start- en stoptijd geprogrammeerd worden. De pomp zal echter permanent werken als de starttijd één minuut na de stoptijd geprogrammeerd is. Voorbeeld: Eén enkele snelheid zal continu werken als ze geprogrammeerd is met de starttijd 08:00 uur en de stoptijd 07:59 uur. -
Seite 99: Kenmerken: Timeout
QuickClean (vervolg) Om naar het menu QuickClean te gaan: 1. Controleer of de groene voeding-LED brandt. 2. Druk op de knop Menu. Op het scherm verschijnt 'Instelling'. 3. Druk op de pijl omlaag om naar 'Kenmerken' te gaan. 5. Druk op de knop Select. Op het scherm verschijnt 'TimeOut'. 6. -
Seite 100: Aanzuiging
Aanzuiging De standaardinstelling voor aanzuiging is 'ACTIEF'. Wanneer dat kenmerk actief is, gebruikt de pomp de 'Flow Technology' zodat ze zeker gevuld is voor de start. Dat kenmerk heeft geen prioriteit op de instelling 'Maximumsnelheid'. De aanzuigfunctie doet de pomp versnellen tot 1800 RPM en stopt dan voor drie (3) seconden. Als er een voldoende debiet in de pompkorf is, gaat de pomp uit de aanzuigmodus en draait ze met de ingestelde snelheid. -
Seite 101: De Aanzuigfunctie Op De Pomp Uitschakelen
Aanzuiging (Vervolg) Om naar het menu 'Aanzuiging' te gaan: 1. Controleer of de groene voeding-LED brandt en druk op de knop Menu. Op het scherm verschijnt 'Instelling'. 2. Druk op de pijl omlaag om naar 'Aanzuiging' te gaan. 3. Druk op de knop Select. De standaardinstelling voor de aanzuiging is 'Actief'. 4. -
Seite 102: Antivries
Antivries Met dit kenmerk stelt u de snelheid van de pomp in (450 RPM - 3450 RPM) waarmee ze draait wanneer ze in de antivriesmodus gaat. U kunt ook de temperatuur instellen waarop u wilt dat de antivriesmodus van start gaat. -
Seite 103: De Pomp Voor De Eerste Keer, Of Na Een Onderhoudsbeurt, Vullen
De pomp voor de eerste keer, of na een onderhoudsbeurt, vullen De IntelliFlo moet gevuld worden voor de pomp voor de eerste keer gestart wordt. Een pomp voeden ® (prime) wil zeggen de pomp en de aanzuigingleiding met water vullen. Dit proces verwijdert de lucht uit alle aanzuigleidingen en de pomp. -
Seite 104: De Pomp Vullen
De pomp voor de eerste keer, of na een onderhoudsbeurt, vullen (Vervolg) De pomp vullen Als u de O-ring door een niet-gesmeerde O-ring vervangt, moet u wellicht een OPMERKING: smeermiddel op basis van siliconen aanbrengen. • Maak de O-ring schoon en inspecteer hem; monteer hem weer op het deksel van de vuilvanger. •... -
Seite 105: Externe Regeling Met Intellicomm Communication Center
RS-485 van op afstand gestuurd worden door het ® Pentair IntelliComm Communication Center. De IntelliComm biedt vier paar ingangaansluitingen. Die ingangen worden gestuurd door ofwel 15 - 240 VAC of 15 - 100 VDC. Via de ingangen van het toestel kunnen de geprogrammeerde snelheden van de IntelliFlo pomp geregeld worden. -
Seite 106: De Pomp Op Een Systeem Intellipool Aansluiten
De IntelliFlo pomp op een IntelliPool systeem aansluiten ® De IntelliFlo pomp kan via de RS 485 communicatiekabel door een IntelliPool systeem gestuurd worden. ® WAARSCHUWING - Schakel de stroomvoeding van het IntelliPool Control Center UIT voor u gelijk welke aansluiting maakt. Om de RS-485 communicatiekabel van de IntelliFlo pomp op de IntelliPool printplaat aan te sluiten: ®... -
Seite 107: Sectie 4: Onderhoud Door De Gebruiker
Sectie 4 Onderhoud door gebruiker De volgende informatie beschrijft hoe u de IntelliFlo VSD pomp moet onderhouden en repareren. De ® illustraties slaan op de WhisperFlo IntelliFlo VSD. Pompfiltermand De zeef, soms ook “haar- en pluisjesvanger” genoemd, bevindt zich langs de voorkant van de pomp. Binnenin is er een mand die altijd vrij gehouden moet worden van bladeren en afval. -
Seite 108: Motoronderhoud
Onderhoud van de pompzeefmand (Vervolg) 10. Zorg ervoor dat de O-ring van het deksel goed is geplaatst. Breng de borgring en het deksel aan en draai ze in wijzerzin tot de hendels horizontaal staan zoals getoond. 11. Verbind de communicatiekabel met de pomp indien van toepassing. 12. -
Seite 109: Overwinteren
Overwinteren Om de elektronica van de IntelliFlo pomp tegen vriesschade te beschermen, schakelt de pomp zichzelf in ® om intern warmte op te wekken. Dat gebeurt wanneer de luchttemperatuur onder 4,4° C (40° F) daalt. De 'antivriesfunctie' van de IntelliFlo pomp is niet bedoeld om het systeem tegen bevriezing te beschermen. -
Seite 110: Sectie 5: Installeren En Verwijderen
Sectie 5 Installatie en demontage De volgende algemene informatie beschrijft hoe de IntelliFlo -pomp te installeren. ® De IntelliFlo pomp installeren ® Alleen gekwalificeerd servicepersoneel mag de IntelliFlo pomp installeren. Raadpleeg 'Belangrijke waarschu- ® wingen en veiligheidsinstructies' op pag. 80 tot 82 voor bijkomende informatie over de installatie en de veilig- heid. -
Seite 111: De Bedrading Van De Intelliflo ® Vsd Pomp Aanbrengen
De kabels van de IntelliFlo pomp aanbrengen ® Om de IntelliFlo ® pomp aan een wisselstroombron aan te sluiten: 1. Schakel alle automatische uitschakelaars en schakelaars uit alvorens de motor te bedraden. 2. Vergewis u ervan dat de netspanning 230 VAC ± 10% is. 3. -
Seite 112: De Pomp Demonteren
De pomp demonteren WAARSCHUWING — Alvorens de zwembadpomp te onderhouden, moet u haar altijd via de automatische uitschakelaar spanningsloos maken en de communicatiekabel loskoppelen. Als u dit niet doet, kan dit de dood of ernstige verwondingen van de monteur, zwembadgebruikers of anderen tot gevolg hebben wegens een elektrisch schok. -
Seite 113: De Asafdichting Vervangen
Demontage van de pomp (vervolg) Dichtingsplaat Naar bouten van behuizing (6 x) Motor Mechanische dichting Bout (4 x) Grendel schoepenrad Pakkingsschroef Pakking dichtingsplaat Deksel Klem Diffusor O-ring Motor Motoras Dichtingsplaat Schoepenrad Borgschroef Diffusorschroeven schoepenrad (2 x) Diffusor Voet Inzetstuk Aftappluggen Voet De asafdichting vervangen De asafdichting bestaat hoofdzakelijk uit twee onderdelen: een draaiend element en een keramische... -
Seite 114: Aandrijving Verwijderen En Aanbrengen
Aandrijving verwijderen en aanbrengen WAARSCHUWING — Om gevaarlijke of dodelijke elektrische schokken te vermijden, schakelt u de motor UIT vooraleer u aan de motor of de pomp werkt. OPGELET — Om elektrische risico's te vermijden, mag u de vier stukjes die duidelijk maken dat er niet met de motor geknoeid is, niet van het motorgeheel verwijderen. -
Seite 115: Sectie 6: Problemen Oplossen
Sectie 6 Fouten opsporen en verhelpen OPGELET — Vooraleer dit product te installeren, dient u alle waarschuwingen en instructies op pagina 80-82 te lezen en op te volgen. Meldingen en waarschuwingen De IntelliFlo VSD pomp toont alle alarmmeldingen en waarschuwingen op het display van het ®... -
Seite 116: Problemen Met Intelliflo Opsporen En Verhelpen
Problemen met IntelliFlo opsporen en verhelpen ® Gebruik de volgende algemene informatie om fouten op te sporen en mogelijke problemen met uw IntelliFlo pomp ® op te lossen. Opmerking: Schakel de elektrische voeding uit alvorens een onderhoud of reparatie te doen. Probleem Mogelijke oorzaak Remedie / Wat te doen? - Seite 117 Problemen met IntelliFlo opsporen en verhelpen (Vervolg) ® Probleem Mogelijke oorzaak Remedie / Wat te doen? Onvoldoende circulatie. De filter of de pompkorf is vuil. Controleer de opvangmand; indien die verstopt is, zet u de (Voor IntelliFlo pomp uit en maakt u de mand schoon. ®...
- Seite 118 Table des matières Avertissements et consignes de sécurité importants ................118 Section 1 : Description de la pompe .................121 Pompe IntelliFlo VSD ....................121 ® Contrôle externe ......................121 Caractéristiques ......................121 Panneau de commande et mécanisme d'entraînement de la pompe IntelliFlo VSD ..122 ®...
- Seite 119 Table des matières Section 4 : Maintenance utilisateur ....................... 143 Panier de pré-filtre de la pompe ..................143 Entretien de pré-filtre de la pompe .................143 Entretien du moteur ......................144 Hivérisation ........................145 Amorçage de la pompe après entretien .................145 Section 5 : Montage et démontage ......................146 Contenu du kit de la pompe IntelliFlo VSD ..............146 ®...
-
Seite 120: Précautions De Sécurité Importantes
PRÉCAUTIONS DE SÉCURITÉ IMPORTANTES Remarque importante : À l'attention de l'installateur : Ce manuel contient des informations importantes concernant l'installation, le fonctionnement et l'utilisation en toute sécurité de ce produit. Ces informations doivent être données au propriétaire et/ou à l'utilisateur de cet équipement. AVERTISSEMENT —... - Seite 121 PRÉCAUTIONS DE SÉCURITÉ IMPORTANTES (suite) AVERTISSEMENT — Une température de l'eau supérieure à 38° C (100 °F) peut être dangereuse pour la santé. Une immersion prolongée dans l'eau chaude peut entraîner de l'hyperthermie. L'hyperthermie se produit lorsque la température interne du corps atteint un niveau dépassant de plusieurs degrés à...
-
Seite 122: Avertissements Généraux
PRÉCAUTIONS DE SÉCURITÉ IMPORTANTES (suite) Informations d'installation générales AVERTISSEMENT — Les pompes mal dimensionnées ou installées, ou utilisées dans des applications autres que celles pour lesquelles la pompe a été conçue, peuvent entraîner des blessures graves, voire la mort. De façon non exhaustive, ces risques peuvent inclure un choc électrique, un incendie, une inondation, une prise au piège dans les sorties d'aspiration, des blessures graves ou des dégâts aux biens provoqués par une défaillance structurelle... -
Seite 123: Section 1 : Description De La Pompe
Section 1 Description Introduction La pompe IntelliFlo VSD est parfaitement adaptée à votre piscine, spa, épurateur, cascade et autre ® application aquatique. Le panneau de commande de l'IntelliFlo permet d'utiliser une des quatre sélections ® de vitesse préréglée. Il est également possible de régler la vitesse de la pompe sur une valeur spécifique. Des caractéristiques de pointe en matière d'économie d'énergie garantissent une efficacité... -
Seite 124: Panneau De Commande Et Mécanisme D'entraînement De La Pompe Intelliflo Vsd
Caractéristiques (suite) Écran LCD Puissance et vitesse Alertes textuelles Protection antigel Vitesse réglable Températures réglables Activation et désactivation en mode autonome Caractéristiques supplémentaires Horloge et minuteur Limites de vitesse maximum et minimum Mode Quick Clean Mode Timeout Panneau de commande et mécanisme d'entraînement de la pompe IntelliFlo ®... -
Seite 125: Section 2 : Panneau De Commande De L'opérateur
Section 2 Panneau de commande de l'opérateur Cette section décrit les commandes et les LED du panneau de commande de la pompe IntelliFlo ® Panneau de commande de l'opérateur de la pompe IntelliFlo ® ® Ligne 1 : Icône de 12:15 Heure actuelle verrouillage des touches... - Seite 126 Commandes et voyants LED (suite) ® 12:15 Ligne 1 750 RPM Ligne 2 T 0.00 150 WATT Ligne 3 Vitesse 1 Actif Ligne 4 Speed Speed Speed Speed Time Quick Clean Flèches : • Flèche vers le haut : Monte d'un niveau dans l'arborescence du menu ou augmente d'un chiffre lors de l'édition d'un réglage.
-
Seite 127: Section 3 : Fonctionnement De La Pompe
Section 3 Fonctionnement de la pompe Cette section décrit le fonctionnement de la pompe IntelliFlo à l'aide des boutons du panneau de commande ® et des caractéristiques du menu. Mise en marche de la pompe Pour mettre la pompe en marche 1. -
Seite 128: Modes De Fonctionnement De La Pompe
Modes de fonctionnement de la pompe : La pompe IntelliFlo VSD peut être programmée de trois manières : ® 1. Fonctionnement manuel : Il est possible de programmer les boutons de vitesse 1-4 pour le fonctionnement manuel. Appuyer sur le bouton de vitesse puis sur le bouton Start et la pompe fonctionne à... -
Seite 129: Vsd
Menus de la pompe IntelliFlo ® Appuyez sur le bout on MENU pour accéder aux m enus ÉCRAN PRI NCI PAL RÉG LAG ES Adr esse pom pe ( 1- 16) Par déf aut : ADRESSE 1 ( page 127) Régl er l ' heur e ( hr : m m ) Par déf aut : 12: 00 AM AM / PM... -
Seite 130: Réglages : Adresse Pompe
Menus de la pompe IntelliFlo ® Les descriptions du menu de la pompe IntelliFlo sont les suivantes : ® Réglages : Adresse pompe Le réglage « Adresse pompe » est utilisé si la pompe IntelliFlo est connectée via le port de communication ®... -
Seite 131: Réglages : Définir Le Format D'affichage Am/Pm Ou 24 H De L'horloge
Réglages : Définir le format d'affichage AM/PM ou 24 h de l'horloge Ce réglage permet de modifier le format d'affichage de l'horloge de la pompe : soit l'horloge 12 h standard (AM/PM), soit l'horloge 24 h. Par exemple, minuit (12:00 AM) est représentée par 0000 h, 8:00 AM par 0800 h et 11:00 PM par 2300 h. -
Seite 132: Réglages : Langue
Réglages : Langue Pour accéder au menu Langue : 1. Vérifier que la LED d'alimentation verte est allumée. 2. Appuyer sur le bouton Menu. « Réglages » s'affiche. 3. Appuyer sur le bouton Select. « Adresse pompe » s'affiche. 4. Utiliser les flèches haut ou bas pour naviguer jusqu'à « Langue ». 5. -
Seite 133: Réglages : Mot De Passe
Réglages : Mot de passe Si la fonction Mot de passe est activée, la pompe entre en mode de protection par mot de passe pour une durée préprogrammée, une fois le dernier bouton enfoncé. Le mot de passe saisi est une combinaison de quatre (4) chiffres. - Seite 134 Icône de verrouillage des touches Entrer le mot de passe • Si le mode de protection par mot de passe est activé, appuyer sur n'importe quel bouton (autre que le bouton de vitesse) pour afficher l'écran de saisie du mot de passe. •...
-
Seite 135: Vitesse 1-8 (Programmer L'heure De Fonctionnement De La Pompe)
Vitesse 1-8 (programmer l'heure de fonctionnement de la pompe) En réglant une heure de démarrage et une heure d'arrêt, vous pouvez programmer la vitesse 1-8 pour fonctionner à une certaine heure de la journée. Pour faire fonctionner la pompe à une vitesse programmée, appuyer sur le bouton Start (Démarrage). -
Seite 136: Contrôle Externe
Programmer un fonctionnement constant En programmant un horaire pour la vitesse, il sera impossible de programmer la vitesse avec les mêmes heures de démarrage et d'arrêt. La pompe fonctionnera néanmoins sans arrêt si vous programmez l'heure de démarrage une minute après l'heure d'arrêt. Exemple : La pompe fonctionnera à vitesse unique sans interruption si son démarrage est programmé... -
Seite 137: Caractéristiques : Time Out
Quick Clean (suite) Pour accéder au menu QuickClean : 1. Vérifier que la LED d'alimentation verte est allumée. 2. Appuyer sur le bouton Menu. « Réglages » s'affiche. 3. Utiliser la flèche Bas pour naviguer jusqu'à « Caractéristiques ». 5. Appuyer sur le bouton Select. « Timeout » s'affiche. 6. -
Seite 138: Amorçage
Amorçage Le réglage par défaut de l'amorçage est ACTIVÉ. Activer cette fonction permet à la pompe d'utiliser la « Technologie du débit » avec laquelle elle est conçue pour s'assurer qu'elle est amorcée pour le démarrage. Cette fonction ne supplantera pas le réglage « Vitesse maxi » L'amorçage accélère le régime de la pompe à... -
Seite 139: Désactiver La Fonction Amorçage De La Pompe
Amorçage (suite) Pour accéder au menu Amorçage : 1. Vérifier que la LED d'alimentation verte est allumée et appuyer sur le bouton Menu. « Réglages » s'affiche. 2. Utiliser la flèche Bas pour naviguer jusqu'à « Amorçage ». 3. Appuyer sur le bouton Select. L'amorçage est activé par défaut. 4. -
Seite 140: Antigel
Antigel Cette fonction permet de régler la vitesse (450 - 3450 RPM) de la pompe quand elle passera en mode antigel. Il est possible de régler le niveau de température qui initiera l'activation du mode antigel. REMARQUE IMPORTANTE : Cette fonction permet de protéger la pompe. Ne pas dépendre de la fonction antigel pour protéger la piscine du gel. -
Seite 141: Amorcer La Pompe Pour La Première Fois Ou Après Un Entretien
Amorcer la pompe pour la première fois ou après un entretien Il faut amorcer la pompe IntelliFlo avant de la démarrer pour la première fois. Amorcer une pompe ® signifie remplir d'eau la pompe et le tuyau d'aspiration. Ce processus évacue l'air de toutes les conduites d'aspiration et de la pompe. -
Seite 142: Amorcer La Pompe
Amorcer la pompe pour la première fois ou après un entretien (Suite) Amorcer la pompe Si vous remplacez le joint torique avec un joint non lubrifié, appliquez un lubrifiant au REMARQUE : silicone. • Nettoyez et inspectez le joint torique, réinstallez le couvercle. •... -
Seite 143: Contrôle Externe Avec Centre De Communication Intellicomm
Contrôle externe avec centre de communication IntelliComm ® La pompe IntelliFlo peut être contrôlée à distance par le centre de communication Pentair ® IntelliComm via le câble de communication RS-485. Le centre de communication IntelliComm est équipé de quatre paires de connexions de borne d'entrée. Ces entrées sont actionnées soit par une tension CA de 15 - 240 V soit une tension CC de 15 - 100 V. -
Seite 144: Connecter La Pompe Au Système Intellipool
Connecter la pompe IntelliFlo au système IntelliPool ® La pompe IntelliFlo peut être contrôlée à distance par un système IntelliPool via le câble de ® communication RS-485. AVERTISSEMENT - Couper le courant alimentant le centre de commande IntelliPool avant de procéder aux connexions. -
Seite 145: Section 4 : Maintenance Utilisateur
Section 4 Maintenance utilisateur L'information suivante décrit la manière d'entretenir la pompe IntelliFlo VSD. Les illustrations ® s'appliquent au modèle de pompe WhisperFlo IntelliFlo VSD. Panier de pré-filtre de la pompe Le pré-filtre, parfois appelé « cuvette à cheveux et à charpie », se situe à l'avant de la pompe. Il contient un panier qui doit rester propre et à... -
Seite 146: Entretien Du Moteur
Entretien du panier de pré-filtre de la pompe (suite) 10. Vérifier que le joint torique du couvercle est bien en place. Placer la bague de retenue et le couvercle, puis tourner dans le sens des aiguilles d'une montre jusqu'à ce que les poignées soient horizontales, comme illustré. -
Seite 147: Hivérisation
Hivérisation Pour protéger l'électronique de la pompe IntelliFlo des dommages dus au gel, la pompe se mettra ® automatiquement sur tension pour générer une chaleur interne si la température extérieure est inférieure à 4,4° C (40 °F). La fonction « Antigel » de la pompe IntelliFlo n'a pas pour but de protéger la tuyauterie ®... -
Seite 148: Section 5 : Montage Et Démontage
Section 5 Montage et démontage Les informations générales suivantes expliquent comment installer la pompe IntelliFlo ® Installation de la pompe IntelliFlo ® Seul un technicien qualifié doit installer la pompe IntelliFlo . Se référer à « AVERTISSEMENTS ET ® CONSIGNES DE SÉCURITÉ IMPORTANTS » en pages 118 à 120 pour des consignes d'installation supplémentaires et les informations de sécurité. -
Seite 149: Câblage De La Pompe Intelliflo ® Vsd
Câblage de la pompe IntelliFlo ® Pour raccorder la pompe IntelliFlo ® à l'alimentation électrique CA : 1. Vérifier que tous les interrupteurs et disjoncteurs électriques sont coupés avant de raccorder le moteur. 2. Vérifier que la tension sur le câblage est bien de 230 V CA ± 10 %. 3. -
Seite 150: Démontage De La Pompe
Démontage de la pompe Toujours débrancher le courant de la pompe de piscine au niveau du disjoncteur et AVERTISSEMENT — déconnecter le câble de communication avant d'intervenir sur la pompe. Le non-respect de cette consigne risque d'entraîner la mort ou des blessures graves au technicien, aux utilisateurs de la piscine ou à... -
Seite 151: Remplacement Des Joints D'arbre
Démontage de la pompe (suite) Plaque d'étanchéité Moteur vers les boulons du boitier (x6) Boulons Joint mécanique (x4) Joint de la vis de blocage de la turbine Joint de la plaque d'étanchéité Couvercle Joint torique Collier Moteur du diffuseur Arbre du moteur Plaque d'étanchéité... -
Seite 152: Démontage Et Remontage Du Mécanisme D'entraînement
Démontage et remontage du mécanisme d'entraînement Pour éviter le chocs électriques dangereux ou mortels, couper le courant du moteur avant AVERTISSEMENT d'intervenir sur la pompe ou le moteur. Pour éviter un risque électrique, ne pas retirer les quatre vis inviolables de l'ensemble moteur. AVERTISSEMENT Pour enlever le mécanisme d'entraînement IntelliFlo et le panneau de commande de l'ensemble... -
Seite 153: Section 6 : Dépannage
Section 6 Dépannage ATTENTION - Avant d'installer ce produit, lire et suivre toutes les notices d'avertissement et instructions en page 118-120. Alertes et avertissements La pompe IntelliFlo VSD affiche toutes les alarmes et avertissements sur l'écran du panneau de ® commande. Lorsqu'une situation d'alarme ou d'avertissement existe, la LED correspondante s'allume à l'écran. -
Seite 154: Problèmes De Dépannage Généraux De La Pompe Intelliflo
Problèmes de dépannage généraux de la pompe IntelliFlo ® Utiliser les informations de dépannage générales suivantes pour résoudre les problèmes éventuels de la pompe IntelliFlo ® Remarque : Couper le courant de l'appareil avant de tenter un entretien ou une réparation. Problème Cause probable Solution... - Seite 155 Problèmes de dépannage généraux de la pompe IntelliFlo (suite) Problème Cause probable Solution Circulation inadéquate. Filtre ou panier de la pompe sales. Vérifier le panier, si la pompe est branchée, la dé- (Pour les messages d'alerte de brancher et nettoyer le panier. la pompe IntelliFlo , se reporter Vérifier et nettoyer le filtre de piscine.
- Seite 156 Índice Avisos importantes e instrucciones de seguridad ................156 Sección 1: Descripción general de la bomba ...............159 Bomba IntelliFlo VSD .....................159 ® Control externo ......................159 Características ......................159 Grupo controlador y panel de control de la bomba IntelliFlo VSD ......160 ® Características del motor de la bomba IntelliFlo VSD ..........160 ®...
- Seite 157 Índice Sección 4: Mantenimiento del usuario ....................181 Colador de prefiltro de la bomba ................181 Mantenimiento del colador de prefiltro de la bomba ..........181 Mantenimiento del motor ..................182 Hibernación ......................183 Cebado de la bomba después del mantenimiento ..........183 Sección 5: Instalación y desmontaje..................... 184 Contenido del kit IntelliFlo VSD ................184 ®...
-
Seite 158: Medidas De Seguridad Importantes
MEDIDAS DE SEGURIDAD IMPORTANTES Aviso importante: A la atención del instalador: este manual contiene información importante sobre la instalación, el funcionamiento y el uso seguro de este producto. Esta información debe entregarse al propietario y/u operador de este equipo. AVISO — Antes de instalar este producto, lea y cumpla todos los avisos e instrucciones incluidos. El incumplimiento de los avisos e instrucciones de seguridad puede causar lesiones graves, muerte o daños a la propiedad. - Seite 159 MEDIDAS DE SEGURIDAD IMPORTANTES (continuación) AVISO — Una temperatura del agua superior a 38° C (100° F) puede resultar peligrosa para su salud. Una inmersión prolongada en agua caliente puede causar hipertermia. La hipertermia se produce cuando la temperatura corporal alcanza un nivel de varios grados por encima de la temperatura normal del cuerpo de 37°...
-
Seite 160: Avisos Generales
MEDIDAS DE SEGURIDAD IMPORTANTES (continuación) Información general de instalación AVISO — Las bombas dimensionadas o instaladas inadecuadamente, o utilizadas en aplicaciones no previstas para las mismas, pueden causar graves daños personales o muerte. Estos riesgos pueden incluir, sin limitación, descargas eléctricas, incendio, inundación, atrapamiento por succión, o heridas graves, o daños a la propiedad causados por un fallo estructural de la bomba o por otros componentes del sistema AVISO —... -
Seite 161: Sección 1: Descripción General De La Bomba
Sección 1 Descripción general de la bomba Introducción La bomba IntelliFlo VSD es adecuada para piscinas, spas, sistemas de limpieza, cascadas y otras ® aplicaciones acuáticas. A través del panel de control, la bomba IntelliFlo puede utilizar una de las ®... -
Seite 162: Grupo Controlador Y Panel De Control De La Bomba Intelliflo ® Vsd
Características (continuación) Pantalla LCD Potencia y velocidad Alertas de texto Protección anticongelación Velocidad ajustable Temperaturas ajustables Activación y desactivación independiente Características adicionales Reloj y temporizador L ímites de velocidad máximos y mínimos Modo de limpieza rápida Modo timeout Grupo controlador y panel de control de la bomba IntelliFlo ®... -
Seite 163: Sección 2: Panel De Control Del Operador
Sección 2 Panel de control del operador En esta sección se describen los controles del operador y las luces LED de la bomba de velocidad variable IntelliFlo ® Panel de control de operador de la bomba IntelliFlo ® ® 12:15 Hora actual. - Seite 164 Controles y LEDs (Continuación) ® 12:15 Linea 1 750 RPM Linea 2 T 0.00 150 WATT Linea 3 Velocidad 1 activa Linea 4 Speed Speed Speed Speed Time Quick Clean Botones de Flecha: • Flecha arriba: Sube un nivel en el árbol del menú o aumenta una cifra cuando se edita un parámetro. •...
-
Seite 165: Sección 3: Funcionamiento De La Bomba
Sección 3 Funcionamiento de la bomba En esta sección se describe el funcionamiento de la bomba IntelliFlo a través de los botones del panel ® de control y los elementos del menú. Puesta en marcha de la bomba Para arrancar la bomba 1. -
Seite 166: Modos De Funcionamiento De La Bomba
Modos de funcionamiento de la bomba La bomba IntelliFlo VSD puede programarse de tres formas: ® 1. Funcionamiento manual: Los botones de velocidad 1-4 se pueden programar para el funcionamiento manual. Esto significa que el botón de velocidad está pulsado, se pulsa también el botón Start y la bomba funciona a la velocidad programada. -
Seite 167: Vsd
Menús de la bomba IntelliFlo ® Pul se el bot ón M ENU par a acceder a l os m enús PANTALLA PRI NCI PAL AJUSTES Di r ecci ón bom ba ( 1- 16) Pr edet er m i nado: PO SI CI Ó N 1 (página 166) Aj ust ar hor a ( hr : m m ) Pr edet er m i nado: 12: 00 AM... -
Seite 168: Ajustes: Posición De La Bomba
Menús de la bomba IntelliFlo ® Las descripciones de los menús de la bomba IntelliFlo son las siguientes: ® Ajustes: Posición de la bomba El ajuste "Posición de la bomba" se utiliza cuando la bomba IntelliFlo está conectada a través del ®... -
Seite 169: Ajustes: Configuración En Formato Am/Pm O 24 Horas
Ajustes: Configuración de formato AM/PM o 24 horas Este ajuste es para cambiar el reloj de la bomba de formato AM/PM a formato 24 horas. Por ejemplo, medianoche (12:00 AM) es 0000 h., las 8:0 AM son las 0800 h, y las 11:00 PM son las 2300 h. Para acceder al menú... -
Seite 170: Ajustes: Idioma
Ajustes: Idioma Para acceder al menú Idioma: 1. Asegúrese que el LED verde está encendido. 2. Pulse el botón Menú. Aparece la pantalla "Ajustes". 3. Pulse el botón Seleccionar. Aparece la pantalla "Posición de bomba". 4. Utilice el botón de flecha Arriba o Abajo para desplazarse hasta "Idioma". 5. -
Seite 171: Ajustes: Clave De Acceso
Ajustes: Clave de acceso Cuando se activa la función Clave de acceso, la bomba entra en modo de protección con clave de acceso durante un período de tiempo predeterminado después de pulsar el último botón. La clave de acceso introducida es cualquier combinación de cuatro (4) cifras. Para acceder al menú... - Seite 172 Icono de bloqueo de teclado Introducción de la clave de acceso • Si la protección con clave de acceso está activada, pulse cualquier botón (excepto el botón de velocidad) para que la pantalla solicite una clave de acceso. • Para introducir la clave de acceso, utilice los botones de flecha izquierda y derecha para mover el cursor y el botón de flecha Arriba y Abajo para desplazarse por las cifras;...
-
Seite 173: Velocidad 1-8 (Programar Una Hora Para Poner En Marcha La Bomba)
Velocidad 1-8 (programar una hora para poner en marcha la bomba) Configurando una hora de inicio y una hora de parada, las velocidades 1-8 se pueden programar para que la bomba funcione a una velocidad determinada a una hora del día concreta. Para que la bomba funcione a una velocidad programada, pulse el botón Start (LED encendido). -
Seite 174: Control Externo
Programación de funcionamiento constante Cuando se programa un horario para la velocidad, esta no puede programarse para que empiece y termine a la misma hora. Sin embargo, la bomba funcionará sin detenerse si la hora de arranque se configura un minuto después de la hora de parada. Ejemplo: la bomba funcionará a una velocidad determinada sin parar si se programa una hora de arranque de 8:00 AM y una hora de parada de 7:59 AM. -
Seite 175: Funciones: Desconexión Automática
Limpieza rápida (continuación) Para acceder al menú Limpieza rápida: 1. Asegúrese que el LED verde está encendido. 2. Pulse el botón Menú. Aparece la pantalla "Ajustes". 3. Utilice el botón de flecha Abajo para desplazarse hasta "Caracterís". 5. Pulse el botón Seleccionar. Aparece la pantalla "Timeout". 6. -
Seite 176: Cebado
Cebado El ajuste predeterminado para la opción de cebado es ACTIVADO. La activación de esta función permite a la bomba utilizar su "Tecnología de flujo" para garantizar que la bomba se ceba para la puesta en marcha. Esta función no anulará el ajuste "Velocidad máx.". Con la función de cebado activada la bomba funciona a 1800 RPM y se para durante tres (3) segundos. -
Seite 177: Desactivación De La Función De Cebado De La Bomba
Cebado (continuación) Para acceder al menú Cebado: 1. Compruebe que la luz LED verde está encendida y pulse el botón Menú. Aparece la pantalla "Ajustes". 2. Utilice el botón de flecha Abajo para desplazarse hasta "Cebado". 3. Pulse el botón Seleccionar. El ajuste de fábrica para la opción de cebado es "Activada". 4. -
Seite 178: Anticongelación
Anticongelación Esta función le permite configurar una velocidad (450 RPM-3450 RPM) que será la que se alcance cuando la bomba entre en modo anticongelación. También puede configurar la temperatura a partir de la que desea que se active el modo anticongelación. AVISO IMPORTANTE: Esta función sirve para proteger la bomba. -
Seite 179: Primer Cebado De La Bomba O Cebado Después Del Mantenimiento
Primer cebado de la bomba o cebado después del mantenimiento La bomba IntelliFlo debe cebarse antes de ponerla en marcha por primera vez. “Cebar” una ® bomba significa llenar la bomba y el tubo de succión con agua. Este proceso expulsa el aire de todas las líneas de succión y de la bomba. -
Seite 180: Cebado De La Bomba
Primer cebado de la bomba o cebado después del mantenimiento (continuación) Cebado de la bomba Si sustituye la junta tórica por una junta tórica no lubricada, es posible que tenga que AVISO: aplicar un lubricante con base de silicona. • Limpie e inspeccione la junta tórica;... -
Seite 181: Control Externo Con El Centro De Comunicación Intellicomm
Control externo con el centro de comunicación IntelliComm ® La bomba IntelliFlo puede ser controlada de forma remota por el centro de comunicación ® IntelliComm utilizando el cable de comunicaciones RS-485. El centro IntelliComm dispone de cuatro pares de conexiones para terminales de entrada. Estas entradas son activadas por 15 - 240 V CA o 15 - 100 V CC. -
Seite 182: Conexión De Bomba A Un Sistema Intellipool
Conexión de la bomba IntelliFlo a un sistema IntelliPool ® La bomba IntelliFlo puede ser controlada por un sistema IntelliPool a través del cable de ® comunicación RS-485. ADVERTENCIA - Desconecte la alimentación principal del centro de control IntelliPool antes de realizar cualquier conexión. -
Seite 183: Sección 4: Mantenimiento Del Usuario
Sección 4 Mantenimiento del usuario La información siguiente describe como cuidar y mantener la bomba IntelliFlo VSD. Las ilustraciones ® se aplican a la bomba WhisperFlo IntelliFlo VSD. Colador de prefiltro de la bomba El prefiltro, algunas veces denominado "colector de residuos,” se encuentra en la parte frontal de la bomba. -
Seite 184: Mantenimiento Del Motor
Mantenimiento del colador del prefiltro de la bomba (continuación) 10. Asegúrese que la junta tórica de la tapa esté colocada correctamente. Ajuste el anillo de bloqueo y la tapa, luego gírela en sentido horario hasta que las asas queden horizontales, como se muestra. 11. -
Seite 185: Hibernación
Hibernación Para proteger los componentes electrónicos de la bomba IntelliFlo de daños por congelación, la ® bomba se activará automáticamente para generar calor interno cuando la temperatura del aire sea inferior a 4,4° C. La función de anticongelación de la bomba IntelliFlo no está... -
Seite 186: Sección 5: Instalación Y Desmontaje
Sección 5 Instalación y desmontaje La información general siguiente describe como instalar la bomba IntelliFlo ® Instalación de la bomba IntelliFlo ® Solo debe instalar la bomba IntelliFlo un técnico cualificado. Consulte la sección "Avisos importantes ® e instrucciones de seguridad" en las página 156 a 158 para obtener más información sobre la instalación y la seguridad. -
Seite 187: Cableado De La Bomba Intelliflo ® Vsd
Cableado de la bomba IntelliFlo ® Para conectar la bomba IntelliFlo ® a una fuente de alimentación de CA: 1. Asegúrese que todos los interruptores y conectores eléctricos estén desconectados antes de instalar los cables para el motor. 2. Asegúrese que el voltaje de la red es 230 V CA ± 10%. 3. -
Seite 188: Desensamblaje De La Bomba
Desensamblaje de la bomba Desconecte siempre la electricidad de la bomba de la piscina mediante el disyuntor y desconecte el AVISO — cable de comunicación antes de cualquier intervención en la bomba. De no hacerlo podría causar la muerte o heridas graves al personal de mantenimiento, a los usuarios de la piscina o a otros, debido a descarga eléctrica. -
Seite 189: Sustitución De La Junta De Estanqueidad Del Eje
Desmontaje de la Bomba (continuación) Placa de estanqueidad a los pernos del alojamiento (6 unidades) Motor Perno Junta de estanqueidad mecánica (4 unidades) Bloqueo del propulsor Junta del tornillo Junta de la placa de estanqueidad Junta tórica del difusor Motor Tapa Sujeción Eje del motor... -
Seite 190: Desmontaje E Instalación Del Grupo Controlador
Desmontaje e instalación del grupo controlador Para evitar riesgos de descarga eléctrica, desconecte la alimentación del motor antes de ADVERTENCIA trabajar en la bomba o en el motor. Para evitar riesgos eléctricos, no extraiga los tornillos a prueba de manipulación del grupo motor. PRECAUCIÓN Para separar el controlador y el panel de control IntelliFlo del grupo motor:... -
Seite 191: Sección 6: Localización Y Resolución De Problemas
Sección 6 Localización y resolución de problemas Antes de instalar este producto, lea y observe todos los avisos y las instrucciones de la PRECAUCIÓN página 156 - 158. Alertas y avisos La bomba IntelliFlo muestra todas las alarmas y avisos en la pantalla del panel de control. Cuando ®... -
Seite 192: Localización Y Resolución De Problemas Generales De La Bomba Intelliflo
Localización y resolución de problemas generales de la bomba IntelliFlo ® Use la siguiente información general para solucionar los problemas posibles problemas con su bomba IntelliFlo ® Nota : Desconecte la corriente antes de llevar a cabo operaciones de mantenimiento o de reparación. Problema Causa posible Acción Correctiva... - Seite 193 Localización y resolución de problemas generales de la bomba IntelliFlo (continuación) ® Problema Causa posible Acción Correctiva Circulación inadecuada. Filtro o colador de la bomba sucios. Compruebe la rejilla del colador; si está atascada, (Para los mensajes de alerta pare la bomba y limpie el colador. en la pantalla de IntelliFlo Compruebe y limpie el filtro de la piscina.
- Seite 194 Sommario Precauzioni importanti per la sicurezza ....................194 Sezione 1: Panoramica sulla pompa ................197 Pompa IntelliFlo VSD .....................197 ® Controllo esterno .....................197 Funzioni ........................197 Pannello di controllo e unità IntelliFlo VSD ............198 ® Caratteristiche del motore di IntelliFlo ..............198 ® Sezione 2: Pannello di controllo .................199 Pannello di controllo di IntelliFlo ................199...
- Seite 195 Sommario Sezione 4: Manutenzione da parte dell'utente ................. 219 Cestello del prefiltro della pompa ................219 Manutenzione del cestello del prefiltro ..............219 Manutenzione del motore ..................220 Rimessaggio invernale ....................221 Adescamento della pompa a seguito di manutenzione ...........221 Sezione 5: Installazione e rimozione ....................222 Contenuto del kit IntelliFlo VSD ................222 ®...
-
Seite 196: Precauzioni Importanti Per La Sicurezza
PRECAUZIONI IMPORTANTI PER LA SICUREZZA Avvertenza importante: Avvertenza per l'installatore: Questo manuale contiene informazioni importanti per l'installazione, il funzionamento e l'uso sicuro del prodotto. Tali informazioni devono pertanto essere consegnate al proprietario e/o all'utente di questa apparecchiatura. ATTENZIONE — Prima di installare il prodotto, leggere attentamente e rispettare tutte le istruzioni e le avvertenze contenute nel presente manuale. - Seite 197 PRECAUZIONI IMPORTANTI PER LA SICUREZZA (segue) ATTENZIONE — Una temperatura dell'acqua superiore a 38 °C può costituire un pericolo per la salute dell'utente. Un'immersione prolungata in acqua calda può provocare ipertermia. L'ipertermia si verifica quando la temperatura interna del corpo supera di diversi gradi la normale temperatura del corpo umano, pari a circa 37 °C (98,6 °F).
-
Seite 198: Istruzioni Generali Per L'installazione
PRECAUZIONI IMPORTANTI PER LA SICUREZZA (segue) Istruzioni generali per l'installazione ATTENZIONE — Se la pompa non è dimensionata in modo corretto, o se viene installata e utilizzata per applicazioni diverse da quelle per cui è stata progettata, può provocare gravi lesioni personali o morte. I possibili rischi in queste situazioni includono: folgorazione, incendio, allagamento, intrappolamento da aspirazione, gravi infortuni e danni alle cose provocati dal cedimento strutturale della pompa o di altri componenti del sistema. -
Seite 199: Sezione 1: Panoramica Sulla Pompa
Sezione 1 Panoramica sulla pompa Introduzione La pompa a velocità variabile IntelliFlo è perfetta per piscine, spa, sistemi di pulizia, cascate e altre ® applicazioni per il trattamento delle acque. Tramite il pannello di controllo, IntelliFlo consente di ® selezionare una delle 4 velocità preimpostate o di regolare la velocità della pompa su un valore specifico. Funzionalità... -
Seite 200: Pannello Di Controllo E Unità Intelliflo Vsd
Funzioni (continua) Display LCD Potenza e velocità Messaggi d'allarme Protezione antigelo Velocità regolabile Temperature regolabili Abilita e Disabilita in maniera indipendente (stand-alone) Funzionalità aggiuntive Orologio e timer Limite di velocità massimo e minimo QuickClean Modalità Timeout Pannello di controllo e unità... -
Seite 201: Sezione 2: Pannello Di Controllo
Sezione 2 Pannello di controllo operatore Questa sezione descrive i controlli dell'operatore e i LED della pompa a velocità variabile IntelliFlo ® Pannello di controllo operatore di IntelliFlo ® ® 12:15 Ora attuale Riga 1: Icona chiave di blocco 750 RPM Riga 2: Velocità... -
Seite 202: Tasti E Led
Tasti e LED (segue) ® 12:15 Riga 1 750 RPM Riga 2 T 0.00 150 WATTS Riga 3 Velocità 1 attiva Riga 4 Speed Speed Speed Speed Time Quick Clean Tasti freccia: • Freccia Su: passa al livello superiore nella gerarchia dei menu o incrementa di un'unità il valore visualizzato durante l'impostazione. -
Seite 203: Sezione 3: Funzionamento Della Pompa
Sezione 3 Funzionamento della pompa Questa sezione spiega come utilizzare la pompa IntelliFlo tramite i tasti del pannello di controllo e il ® menu “Caratter.”. Avvio della pompa Per avviare la pompa 1. Accertarsi che la pompa sia accesa e che il LED di colore verde sia illuminato. 2. -
Seite 204: Modalità Operative Della Pompa
Modalità operative della pompa La pompa IntelliFlo VSD può essere programmata in tre modalità: ® 1. Funzionamento manuale: per il funzionamento manuale è possibile programmare i tasti Speed 1-4. È sufficiente premere il tasto della velocità e successivamente il tasto Start per avviare la pompa alla velocità... -
Seite 205: Vsd
Menu della pompa IntelliFlo ® Pr em er e i l t ast o M ENU per acceder e ai m enu SCHERM ATA PRI NCI PALE I M PO STAZI O NI I ndi r i zzo pom pa ( 1- 16) Def aul t : I NDI RI ZZO 1 ( pag. -
Seite 206: Impostazioni: Indirizzo Pompa
Menu della pompa IntelliFlo ® Le descrizioni del menu della pompa IntelliFlo sono le seguenti: ® Impostazioni: Indirizzo Pompa L'impostazione relativa all'indirizzo pompa viene impiegata quando la pompa IntelliFlo è collegata tramite ® porta RS-485 COM a un sistema IntelliPool o IntelliComm . -
Seite 207: Impostazioni: Am/Pm O Orologio 24 Ore
Impostazioni: AM/PM o orologio 24 ore Questa impostazione consente di modificare il sistema orario della pompa da 12 (AM/PM) a 24 ore. Ad esempio, mezzanotte (12:00 AM) diventerà 0000 hr., 08:00 AM diventerà 0800 hr. e 11:00 PM diventerà 2300 hr. Per accedere al menu del sistema orario AM/PM oppure 24 hr.: 1. -
Seite 208: Impostazioni: Lingua
Impostazioni: Lingua Per accedere al menu “Lingua”: 1. Verificare che il LED di alimentazione verde sia acceso. 2. Premere Menu. Sul display compare “Impost.”. 3. Premere Select. Sul display compare “Indirizzo Pompa”. 4. Con i tasti freccia Su o Giù scorrere fino alla voce “Lingua”. 5. -
Seite 209: Impostazioni: Password
Impostazioni: Password Quando la funzione Password è attiva, la pompa entra in modalità di protezione con password per un intervallo di tempo predefinito da quando viene premuto l'ultimo pulsante. La password inserita consiste in una combinazione di quattro (4) cifre. Per accedere al menu “Password”: 1. -
Seite 210: Inserimento Della Password
Icona chiave di blocco Inserimento della password • Se la protezione della password è attiva, premere qualunque tasto (eccetto il tasto Speed) per richiamare la schermata di inserimento della password. • Per inserire la password, usare le frecce Destra e Sinistra per muovere il cursore e i tasti freccia Su e Giù... -
Seite 211: Velocità 1-8 (Programmare L'orario Di Avvio/Arresto Della Pompa)
Velocità 1-8 (programmare l'orario di avvio/arresto della pompa) Impostando l'orario di avvio e di arresto, è possibile programmare le velocità da 1 a 8 in modo tale da attivare la velocità desiderata a una certa ora del giorno. Per avviare la pompa alla velocità programmata, premere il tasto Start (LED acceso). -
Seite 212: Controllo Esterno
Programmazione del funzionamento continuo Durante la programmazione di una velocità, non è possibile impostare lo stesso orario di inizio e fine. Tuttavia, se l'orario di inizio viene impostato un minuto dopo l'orario di fine, la pompa funzionerà alla stessa velocità senza interruzione. Esempio: una singola velocità funziona in continuo se l'orario di inizio programmato è... -
Seite 213: Funzioni: Timeout
QuickClean (segue) Per accedere al menu “QuickClean”: 1. Verificare che il LED di alimentazione verde sia acceso. 2. Premere Menu. Sul display compare “Impost.”. 3. Con il tasto freccia Giù scorrere fino alla voce “Caratter.”. 5. Premere Select. Sul display compare “Timeout”. 6. -
Seite 214: Adescamento
Adescamento L'impostazione predefinita della funzione di Adescamento è “Abilitato”. Attivando la funzione, la pompa sfrutta la tecnologia Flow per indurre l'adescamento prima della messa in esercizio La funzione non esclude l'impostazione “Vel. Massima”. e accelera la pompa a 1800 giri/min. Segue una pausa di tre (3) secondi. Se la portata d'acqua nel cestello della pompa è... -
Seite 215: Disattivare La Funzione Adescamento Sulla Pompa
Adescamento (segue) Per accedere al menu “Adescam.”: 1. Verificare che il led di alimentazione verde sia acceso e premere il tasto Menu. Sul display compare “Impost.”. 2. Con il tasto freccia Giù scorrere fino alla voce “Adescam.”. 3. Premere Select. L'impostazione predefinita di fabbrica per la modalità Adescamento è “Abilitato”. 4. -
Seite 216: Antigelo
Antigelo Questa funzione consente di impostare la velocità (450 giri/min - 3450 giri/min) associata alla modalità Antigelo. La funzione Antigelo viene innescata al livello di temperatura impostato dall'utente. NOTA IMPORTANTE: Questa funzione è progettata per proteggere la pompa. Non affidarsi alla funzione Antigelo per proteggere la piscina dal freddo. -
Seite 217: Adescamento Della Pompa Per Il Primo Utilizzo O A Seguito Di Manutenzione
Adescamento della pompa per il primo utilizzo o a seguito di manutenzione Prima della messa in funzione iniziale, la pompa IntelliFlo deve essere adescata. Questa operazione ® consiste nel riempire d'acqua la pompa e il tubo di aspirazione. L'adescamento libera dall'aria le tubature di aspirazione e la pompa. -
Seite 218: Adescamento Della Pompa
Adescamento della pompa per il primo utilizzo o a seguito di manutenzione (segue) Adescamento della pompa In caso di sostituzione dell'O-ring con un O-ring senza lubrificante, potrebbe essere AVVERTENZA: necessaria l'applicazione di un lubrificante a base di silicone. • Pulire e controllare l'O-ring; reinstallarlo nel coperchio del trattenitore. •... -
Seite 219: Controllo Esterno Con Il Centro Di Comunicazione Intellicomm
® IntelliComm Pentair, collegando l'apposito cavo RS-485. IntelliComm offre quattro coppie di morsetti d'ingresso, con tensioni di 15 - 240 Vca o 15 - 100 Vcc. Utilizzando gli ingressi del dispositivo, è... -
Seite 220: Collegare La Pompa Al Sistema Intellipool
Collegamento della pompa IntelliFlo al sistema IntelliPool ® La pompa IntelliFlo può essere comandata tramite il sistema IntelliPool collegando un cavo di ® comunicazione RS-485. ATTENZIONE - DISATTIVARE l'alimentazione l'interruttore principale e interrompere la comunicazione con il centro di controllo IntelliPool prima di effettuare la connessione. Per collegare il cavo RS-485 della pompa IntelliFlo RS-485 al circuito stampato di ®... -
Seite 221: Sezione 4: Manutenzione Da Parte Dell'utente
Sezione 4 Manutenzione da parte dell'utente Questa sezione descrive le procedure di manutenzione e pulizia della pompa IntelliFlo VSD. Le ® illustrazioni si riferiscono alla pompa WhisperFlo IntelliFlo VSD. Cestello del prefiltro della pompa Il prefiltro, detto anche “scatola di raccolta di capelli e lanugine”, è posto sulla parte frontale della pompa. -
Seite 222: Manutenzione Del Motore
Manutenzione del prefiltro della pompa (continua) 10. Assicurarsi che l'O-ring del coperchio sia in posizione corretta. Sistemare l'anello di fermo e il coperchio e farli girare in senso orario fino a portare le maniglie in posizione orizzontale, come in figura. 11. -
Seite 223: Rimessaggio Invernale
Rimessaggio invernale Per difenderei componenti elettronici della pompa IntelliFlo dai danni provocati dal gelo, la pompa si ® accende automaticamente e genera calore internamente quando la temperatura ambiente è inferiore ai °C (40 °F). La funzione Antigelo della pompa IntelliFlo non è... -
Seite 224: Sezione 5: Installazione E Rimozione
Sezione 5 Installazione e rimozione Di seguito viene illustrata la procedura di installazione della pompa IntelliFlo ® Installazione di IntelliFlo ® È necessario che l'installazione della pompa IntelliFlo sia eseguita esclusivamente da personale ® qualificato. Consultare le “Precauzioni importanti per la sicurezza” a pag. 194-196 per ulteriori istruzioni e informazioni sulla sicurezza in fase di installazione. -
Seite 225: Vsd
Collegamento elettrico di IntelliFlo ® Per collegare IntelliFlo ® a una sorgente di corrente elettrica alternata: 1. Accertarsi che tutti gli interruttori e i commutatori siano staccati prima di allacciare il motore alla rete elettrica. 2. Accertarsi che la tensione di cablaggio sia di 230 Vca ± 10%. 3. -
Seite 226: Smontaggio Della Pompa
Smontaggio della pompa Scollegare sempre la pompa dal circuito di alimentazione mediante l'interruttore principale, prima ATTENZIONE — di iniziare qualsiasi intervento di riparazione sulla pompa. Il mancato rispetto di questa norma espone tecnici, utenti della piscina e terzi al rischio di gravi lesioni o morte per folgorazione. Leggere tutte le istruzioni relative alla riparazione prima di intervenire sulla pompa. -
Seite 227: Sostituzione Della Guarnizione Dell'albero
Smontaggio della pompa (continua) Piastra sigillante per i bulloni del corpo (x 6) Motore Bul- Guarnizione meccanica lone (x 4) Blocco girante Guarnizione vite Guarnizione della piastra sigillante Coperchio Solenoide O-ring diffusore Motore Albero motore Piastra sigillante Girante Vite di blocco girante Viti diffusore (x 2) Diffusore Inserto piedino... -
Seite 228: Rimozione E Installazione Dell'unità
Rimozione e installazione dell'unità Per evitare pericoli di natura elettrica, di entità anche letale, SPEGNERE il motore prima di ATTENZIONE intervenire sulla pompa o sul motore. Per evitare pericoli di natura elettrica, non rimuovere i quattro morsetti a prova di IMPORTANTE manomissione dall'unità... -
Seite 229: Sezione 6: Individuazione E Correzione Dei Guasti
Sezione 6 Individuazione e correzione dei guasti Prima di installare il prodotto, leggere attentamente e rispettare tutte le istruzioni e le IMPORTANTE avvertenze a pag. 194-196 del presente manuale. Allarmi e messaggi di allerta IntelliFlo VSD visualizza tutti gli allarmi e i messaggi di allerta sul display del pannello di controllo. ®... -
Seite 230: Individuazione E Correzione Generale Dei Guasti Di Intelliflo
Individuazione e correzione dei guasti di IntelliFlo ® Utilizzare le informazioni contenute nelle seguenti tabelle per individuare e risolvere i problemi di funzionamento della pompa IntelliFlo ® Nota: disinserire l'alimentazione prima di intervenire sull'unità. Problema Probabile causa Soluzione Guasto della pompa. La pompa non adesca - perdita d'aria nel circuito di aspirazione. - Seite 231 Individuazione e correzione generale dei guasti di IntelliFlo (segue) ® Problema Probabile causa Soluzione Circolazione insufficiente. Filtro o cestello della pompa sporchi. Controllare il cestello del filtro della pompa; se intasato, (Per le segnalazioni dei pro- spegnere la pompa e pulirlo. blemi della pompa IntelliFlo Controllare e pulire il filtro della piscina.
-
Seite 232: Section 7: Technical Information
Section 7 Technical Data ® ® IntelliFlo WhisperFlo VSD Pump Dimensions ® ® IntelliFlo UltraFlow VSD Pump Dimensions... -
Seite 233: Intelliflo ® Flow And Power Vs Flow Pump Curve
SW5P6R ™ VSD Pump Dimensions ® IntelliFlo ® IntelliFlo WhisperFlo-VSD / UltraFlow-VSD / SW5P6R-VSD Performance Curve 3450 RPM 3110 RPM 2350 RPM 1560 RPM 750 RPM m³/hr... - Seite 234 ® IntelliFlo 5PXF VSD Pump Dimensions ® IntelliFlo 5PXF VSD Performance Curve IntelliFlo® 5PXF™ VSD 3450 rpm 3110 rpm 2350 rpm 1560 rpm 750 rpm m³/hr...
- Seite 235 NOTES...
- Seite 236 NOTES...
- Seite 237 NOTES...
- Seite 238 NOTES...
- Seite 239 NOTES...
- Seite 240 NOTES...
- Seite 241 NOTES...
- Seite 242 NOTES...