Herunterladen Inhalt Inhalt Diese Seite drucken
Inhaltsverzeichnis

Werbung

Verfügbare Sprachen
  • DE

Verfügbare Sprachen

  • DEUTSCH, seite 1

Werbung

Inhaltsverzeichnis
loading

Inhaltszusammenfassung für auna Microstar Sing

  • Seite 3: Inhaltsverzeichnis

    Sehr geehrter Kunde, wir gratulieren Ihnen zum Erwerb Ihres Gerä- tes. Lesen Sie die folgenden Hinweise sorgfäl- tig durch und befolgen Sie diese, um möglichen Schäden vorzubeugen. Für Schäden, die durch Missachtung der Hinweise und unsachgemäßen Gebrauch entstehen, übernehmen wir keine Haf- tung.
  • Seite 4: Technische Daten

    TECHNISCHE DATEN Artikelnummer 10035303 Stromversorgung AC/DC adapter (Included) ⎓ Eingang AC 230 – 240 V ~ 50/60Hz Ausgang DC 5 V 1.5 A Verbrauch im Standby 0,4 W Lautsprecher RMS 2 W x 2 W (RMS) Videoausgang PAL-Komposit (Cinch) USB-Speichermedium- Max 32 GB (formatiert auf FAT32) Unterstützung Microfonausgang (x2) je 6,35 mm (Mono)
  • Seite 5: Erklärung Der Symbole Auf Dem Gerät

    ERKLÄRUNG DER SYMBOLE AUF DEM GERÄT CAUTION RISK OF ELECTRIC SHOCK DO NOT OPEN VORSICHT: DAS GEHÄUSE NICHT ÖFFNEN, UM EINEN STROMSCHLAG UND ERNSTE PERSONENVERLETZUNGEN ZU VERMEIDEN. IM INNEREN KEINE VOM KUNDEN ZU WARTENDEN KOMPONENTEN. WENDEN SIE SICH AUSSCHLIESSLICH AN QUALIFIZIERTE FACHLEUTE. WARNUNG: UM DIE GEFAHR EINES BRANDS ODER EINES STROMSCHLAGS ZU VERRINGERN, DAS GERÄT NICHT IN WASSER, REGEN ODER FEUCHTIGKEIT AUSZUSETZEN.
  • Seite 6: Sicherheitshinweise

    SICHERHEITSHINWEISE Lesen Sie die Anleitung. Alle Anwendungshinweise müssen vor der Verwendung des Geräts gelesen werden. • Kinder ab 8 Jahren, psychisch, sensorisch und körperlich eingeschränkte Menschen dürfen das Gerät nur benutzen, wenn sie vorher von einer für sie verantwortlichen Aufsichtsperson ausführlich mit den Funktionen und den Sicherheitsvorkehrungen vertraut gemacht wurden und die damit verbundenen Risiken verstehen.
  • Seite 7 Erwärmen Sie den Raum allmählich und lassen das Gerät vor dem Gebrauch trocken werden. Bei Problemen ziehen Sie den Netzstecker und wenden sich an den Kundendienst. Möbelschutz • Dieses Gerät ist mit rutschfesten Gummifüßen ausgestattet, damit das Gerät sich beim Benutzen der Bedienelemente nicht bewegt. Diese Füße bestehen aus abriebfestem Gummi, das speziell dafür entwickelt wurde, um auf den Möbeln keine Spuren zu hinterlassen.
  • Seite 8: Einführung

    EINFÜHRUNG Die Karaokeanlage Dieses Grafik-CD-Karaokesystem versorgt Sie mit Jahren Spaß und Unterhaltung. Werden Sie ein Star, wenn Sie indem Sie zu Ihren liebsten Karaoke-CDs mitsingen und Ihre Stimme über die Lautsprecher hören. Das Karaokesystem hat ein kompaktes Design und ist trotz seiner vielen Funktionen leicht zu benutzen.
  • Seite 9 CD+G Dies ist ein Akronym für Compact Disc plus Graphics . Sie begegnen auch den Varianten CD+G und CD-Graphics . Hier handelt es sich um reguläre CDs mit Informationen auf einer zusätzlichen Datenspur. Die CD+G beinhaltet auch einfache Grafikfunktionen (keine Vollformatvideos). Für Karaoke wird die Grafik genutzt, um die Liedtexte synchron mit der Musik anzuzeigen.
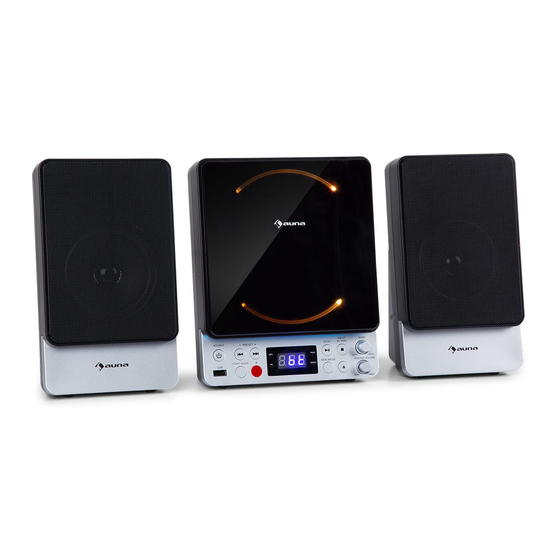
  • Seite 10: Geräteübersicht

    GERÄTEÜBERSICHT Vorderansicht Draufsicht...
  • Seite 11 Linker Lautsprecher CD-Fach Rechter Lautsprecher Standby / Wahl der Quelle USB-Anschluss Titel zurück/Suche rückwärts Programmspeicher - AVC, Lichteffekte Titel vor/Suche vorwärts Programmspeicher + IR-Sensor (Fernbedienung) 10 FM-Anzeige CDG -Anzeige 12 LED-Anzeige 13 Programmanzeige 14 Anzeige Wiederholgungsmodus 15 Wiedergabe/Pause/FM-Sendersuche 16 Memory, Wiedergabemodus 17 BT-Kopplung / FM Stereo / Stopp 18 CD-Fach öffnen/schließen 19 Mikrofonlautstärke...
  • Seite 12 Fernbedienung Standby Zufallswiedergabe Wiedergabe/Pause Lichtshow Titel zurück/Suche rückwärts Stopp Stumm Lautstärke - 10 CD-Fach Öffnen/Schließen Modus 12 Wiederholungsmodus/ BT-Kopplung 13 Memory/Programmspeicher 14 FM-Sendersuche 15 Titel vor / Suche vorwärts 16 Echo (Halleffekt) 17 Speicher - 18 Speicher + 19 Lautstärke +...
  • Seite 13: Batterie Im Lieferumfang

    Einlegen der Batterien in die Fernbedienung Die Fernbedienung wird mit einer CR2025-Batterie (im Lieferumfang enthalten) betrieben. Um die Fernbedienung zu benutzen, entfernen Sie die in das Batteriefach eingelegte Isolierlasche. Ersetzen Sie die Originalbatterie durch eine neue CR2025-Lithiumbatterie, wenn der Betrieb der Fernbedienung intermittierend oder unbefriedigend wird.
  • Seite 14: Einrichtung

    EINRICHTUNG Anschluss Schließen Sie das dabeiliegende Netzgerät auf der Rückseite des Gerätes an und stecken Sie es in eine Steckdose mit einer Stromversorgung von 220-240 V~ 50/60 Hz. Hinweis: Wenn das Gerät lange benutzt wird, trennen Sie das Netzgerät vom Gerät und von der Steckdose. Wandsteckdose Netzadapter Gleichstrom-...
  • Seite 15 2. Das Videokabel (gelb) in den Vidoanschluss (VIDEO OUT) auf der Rückseite der Karaokeanlage stecken. 3. Das andere Ende des Videokabels (gelb) an den Video/AV-Eingang ihres Fernsehers stecken. Wenn Ihr Fernseher nicht über den erforderlichen Videoeingang verfügt, brauchen Sie einen RF-Modulator, der eine Verbindung über den Antenneneingang herstellt.
  • Seite 16 Einrichtung korrekt abgeschlossen haben, sehen Sie den Liedtext auf dem Fernsehbildschirm. • Die Einrichtung Ihres Fernsehers ist der schwierigste Teil der Herstellung der Verbindung für die Anzeige Ihrer Liedtexte. In den meisten Haushalten hat das Fernsehgerät entweder einen Kabelanschluss oder eine Antenne in Gebrauch. Sobald Sie Ihr Karaoke- System an den Fernseher angeschlossen haben, müssen Sie Ihrem Fernseher "sagen", dass er den Eingang vom Karaoke-System anstelle des üblichen Eingangs vom Kabel oder der Antenne anzeigen soll.
  • Seite 17: Bedienung Der Funktionen

    BEDIENUNG DER FUNKTIONEN Einschalten und Wiedergabe 1. Funktionswahl • Drücken Sie die Taste SOURCE am Gerät oder MODE auf der Fernbedienung, um CD/USB auszuwählen. • Drücken Sie SOURCE am Gerät in die Position USB, um MP3 von einem USB-Stick wiederzugeben. •...
  • Seite 18 Programmfunktion Mit dieser Funktion können die Titel in einer programmierten Reihenfolge abgespielt werden. Dazu muss die Wiedergabe angehalten sein ( drücken). 1. Die PROGRAM-Taste drücken. Die Programmnummer 01 erscheint im Display und die Programm-LED blinkt. 2.  oder  drücken, um vor- oder zurückzublättern und den zu programmierenden Titel auszuwählen.
  • Seite 19 Abspielen der Programmliste Wenn die Programmierung abgeschlossen ist, zur Bestätigung die -Taste drücken und die Wiedergabe des Programms starten, die Programm-LED im Display leuchtet auf. Während der Wiedergabe können Sie die Tasten  oder  drücken, um zum gewünschten Titel der Programmliste zu springen.
  • Seite 20: Master Volume

    Karaokefunktionen • MASTER VOLUME: Drehen Sie an diesem Regler, um die gewünschte Lautstärke für den eingebauten Lautsprecher einzustellen. • AVC (automatische Sprachsteuerung): Wenn die automatische Sprachsteuerung eingeschaltet ist, wird die Gesangsstimme auf einer Mulitplex-Aufnahme ausgeblendet, sobald jemand ins Mikrofon singt. Wenn der Sänger mit dem Singen aufhört, wird die Stimme der Mulitplexaufnahme wieder einblendet.
  • Seite 21 Falls Sie selbstgebrannte CD-R/CD-RW oder MP3-Dateien via USB abspielen wird dieser Bildschirm angezeigt. • In der obersten Menüzeile sehen Sie die Anzeige [T: 011/118]. Das bedeutet: Titel 11 von insgesamt 118 Titeln wird abgespielt. • Falls sie das Gerät an Ihren Fernseher angeschlossen haben, wird der komplette Inhalt angezeigt.
  • Seite 22 So singen Sie zu Musik von AUX-Geräten Das Gerät ermöglicht es, zu Musik von externen AUX-Geräten, wie iPod, MP3-Player oder anderen digitalen Ausgabegeräten zu singen. 1. Verbinden Sie den Kopfhörer-Ausgang ihres externen Geräts mit dem AUX-Eingang an der Karaokeanlage. HINWEIS: Das benötigte Kabel ist nicht im Lieferumfang enthalten.
  • Seite 23: Fm-Radio

    FM-RADIO Autoabstimmung (SCAN) Sie können die Suchfunktion (Auto-Abstimmung) verwenden, um automatisch nach neuen digitalen Radiosendern zu suchen und inaktive Sender zu entfernen. 1. Halten Sie die PLAY/SCAN-Taste 2 Sekunden lang auf der Haupteinheit oder der Fernbedienung SCAN-Taste gedrückt, um "P-xx" zu wählen. Die Anzahl der gefundenen Sender wird während des automatischen Sendersuchlaufs angezeigt.
  • Seite 24: Bt-Modus

    BT-MODUS Die drahtlose Bluetooth-Technologie ist eine Funktechnologie mit kurzer Reichweite, die eine drahtlose Kommunikation zwischen verschiedenen Arten von digitalen Geräten wie Mobiltelefonen oder Computern ermöglicht. Sie funktioniert innerhalb einer Reichweite von etwa 10 Metern (30 Fuß), ohne dass diese Geräte mühsam mit Kabeln verbunden werden müssen.
  • Seite 25 Pairing mit anderen Bluetooth-Quellgeräten. 4. Führen Sie den Kopplungsvorgang am Quellgerät durch, um diese Einheit zu erkennen. "MICROSTAR Sing" erscheint in der Liste der erkannten Geräte (falls verfügbar) im Quellgerät. (Einzelheiten finden Sie in der Bedienungsanleitung des Quellgeräts).
  • Seite 26: Das Gerät Als Lautsprecher Benutzen

    Fernbedienung, um die Bluetooth-Funktion auszuwählen. 3. Starten Sie die Bluetooth-Verbindung vom Bluetooth-Stereo-Audio- Quellgerät aus. 4. Drücken Sie die PLAY/PAUSE-Taste (auf der Haupteinheit, der Fernbedienung oder dem Quellgerät). HINWEIS: Wenn das Quellgerät über eine zusätzliche Bassfunktion oder Equalizer-Funktion verfügt, stellen Sie diese auf aus. Wenn diese Funktionen eingeschaltet sind, wird der Ton möglicherweise verzerrt.
  • Seite 27: Fehlerbehebung

    FEHLERBEHEBUNG Problem Mögliche Ursache Lösung Das Gerät geht beim Das Netzgerät ist nicht Schließen Sie das Netzgerät an Drücken der Ein/Aus- angeschlossen oder der Stecker und stecken Sie den Stecker in die Taste nicht an. ist nicht an die Steckdose Steckdose.
  • Seite 28 Problem Mögliche Ursache Lösung Es erscheinen keine Das Videokabel ist nicht Verbinden Sie das Videokabel Songtexte auf dem richtig am TV angebracht. mit dem Video-Ausgang der TV-Bildschirm. Karaokeanlage und dem Video- Eingang am TV. Als Quelle wurde am TV nicht Stellen Sie am TV als der Video- oder AV-Eingang Eingangsquelle den Video- oder...
  • Seite 29: Reinigung Und Pflege

    REINIGUNG UND PFLEGE • Reinigen Sie Ihr Gerät mit einem feuchten (niemals nassen) Tuch. Lösungs- oder Reinigungsmittel sollten niemals verwendet werden. • Lassen Sie Ihr Gerät nicht an heißen, feuchten oder staubigen Orten stehen. • Halten Sie Ihr Gerät von Heizgeräten und elektrischen Geräuschquellen wie Leuchtstofflampen oder Motoren fern.
  • Seite 30: Hinweise Zur Entsorgung

    HINWEISE ZUR ENTSORGUNG Befindet sich die linke Abbildung (durchgestrichene Mülltonne auf Rädern) auf dem Produkt, gilt die Europäische Richtlinie 2012/19/EU. Diese Produkte dürfen nicht mit dem normalen Hausmüll entsorgt werden. Informieren Sie sich über die örtlichen Regelungen zur getrennten Sammlung elektrischer und elektronischer Gerätschaften.
  • Seite 31 Dear Customer, Congratulations on purchasing this equipment. Please read this manual carefully and take care of the following hints to avoid damages. Any failure caused by ignoring the items and cautions men- tioned in the instruction manual are not covered by our warranty and any liability.
  • Seite 32: Specifications

    SPECIFICATIONS Item number 10035303 AC Operation AC/DC adapter (Included) ⎓ Input AC 230 – 240 V ~ 50/60Hz Output DC 5 V 1.5 A Power stand-by 0.4 W Speaker Output 2 W x 2 W (rms) Video Output PAL composite (RCA) USB Flash Drive Support Max 32 GB (FAT32 formatted) Microphone Jacks (x2) Each 6.35 mm (mono)
  • Seite 33 EXPLANATION OF THE WARNING SYMBOLS CAUTION RISK OF ELECTRIC SHOCK DO NOT OPEN AUTION: TO REDUCE THE RISK OF ELECTRIC SHOCK AND SERIOUS PERSONAL INJURY, DO NOT REMOVE ANY COVER. NO USER-SERVICABLE PARTS INSIDE. REFER SERVICING TO QUALIFIED SERVICE PERSONNEL ONLY. WARNING.
  • Seite 34: Safety Instructions

    SAFETY INSTRUCTIONS Read these instructions. All uses guidelines must be read before using the device. Keep the instructions for future use. • Children over the age of 8 and persons with reduced physical, sensory or mental capabilities or those with a lack of experience and knowledge may only use the device if they are instructed on how to do so by a person responsible for their safety, or if they are supervised and understand the hazards associated with the use of the device.
  • Seite 35 Should any trouble occur, remove the power source and refer servicing to qualified personnel. Protect your furniture • This system is equipped with non-skid rubber ‘feet’ to prevent the product from moving when you operate the controls. These ‘feet’ are made from non-migrating rubber material specially formulated to avoid leaving any marks or stains on your furniture.
  • Seite 36: Introduction

    INTRODUCTION Introduction Your CD+Graphics Karaoke System will provide you with many years of fun and entertainment. It makes you a "star" as you sing along with your favourite karaoke discs and hear your voice with the music through the system's speakers. This Karaoke System has a compact design and is full of features yet it is easy to use.
  • Seite 37 Automatic Voice Control (AVC): When the AVC function is activated, the vocals on a multiplex recording are eliminated as soon as the singer begins singing into the microphone. When the singer stops singing, the vocals on the multiplex recording are automatically re-activated.
  • Seite 38: Product Description

    PRODUCT DESCRIPTION Front view Top view...
  • Seite 39 L-SPEAKER CD DOOR R-SPEAKER STAND BY BUTTON / SOURCE BUTTON USB JACK SKIP/SEARCH BACKWARD, PRESET- BUTTON AVC BUTTON, LIGHT SHOW SKIP/SEARCH FORWARD PRESET+ BUTTON REMOTE SENSOR 10 FM INDICATOR CDG INDICATOR 12 LED DISPLAY 13 PROGRAM INDICATOR 14 REPEAT INDICATOR 15 PLAY/PAUSE, FM SCAN BUTTON 16 MEMORY BUTTON, PLAY MODE BUTTON 17 BT PAIR BUTTON / FM ST BUTTON / STOP...
  • Seite 40: Open/Close Button

    Remtoe Control STANDBY BUTTON RANDOM BUTTON PLAY/PAUSE BUTTON LIGHT SHOW BUTTON SKIP/SEARCH BACKWARD BUTTON STOP BUTTON AVC BUTTON MUTE BUTTON VOL - BUTTON 10 OPEN/CLOSE BUTTON MODE BUTTON 12 REPEAT/ BT PAIR BUTTON 13 MEMORY/PROG. BUTTON 14 SCAN BUTTON 15 SKIP/SEARCH FORWARD BUTTON 16 ECHO BUTTON 17 PRESET - BUTTON 18 PRESET+ BUTTON...
  • Seite 41 Installing batteries into the remote control The remote control operates on one CR2025 battery (included). To activate the remote control, remove the insulation tab inserted in the battery compartment. When the operation of the remote control becomes intermittent or unsatisfactory, replace the original battery with a new CR2025 lithium battery.
  • Seite 42: Setting Up For Operation

    SETTING UP FOR OPERATION Connecting power Plug the supplied AC adapter into the DC jack on the rear side of the unit and connect to a standard AC wall socket with 220-240V~ 50/60Hz continuous power supply. Note: When the unit is not operated for long periods of time, unplug the AC adapter from the unit and wall outlet.
  • Seite 43 3. Connect the other end of the video cable (Yellow) to the VIDEO/AV INPUT on your TV. If your television does not have the required Video Input, you will need a RF modulator (Radio Frequency Modulator), which connects through your TV Antenna or cable line and serves as your Video Input.
  • Seite 44 Common ways to configure your TV 1. You karaoke system is designed to connect to your TV. The karaoke system is constantly sending the video and audio signals to the 'VIDEO OUT' and 'AUDIO OUT' jacks whenever you play a CD+G disc. So, load a CD+G into your karaoke system before you start making these connections.
  • Seite 45: Control Functions

    CONTROL FUNCTIONS Power and playback functions 1. Functions selector • Press the SOURCE button on main unit or remote control the MODE button Select CD/USB • Press the SOURCE Button to USB position to playback MP3 files on a USB flash drive. •...
  • Seite 46 PROGRAM function This function allows music tracks to be played in a programmed sequence. Program function can only be set in STOP mode 1. Press the PROGRAM button once. Program Number 01 will display and PROGRAM INDICATOR will flash. 2. Press the SKIP FORWARD or SKIP BACKWARD button to select the track to be programmed.
  • Seite 47 Program Play mode When finished programming, tap PLAY BUTTON to confirm and start program play. The PROG INDICATOR in the LED DISPLAY will light. While playing, you may tap the NEXT or PREV BUTTON to skip to a desired song in the program list.
  • Seite 48: Master Volume

    (included) to this jack and the other end to the VIDEO/AV INPUT of your • AUDIO OUT JACKS (L/R): Connect the white coded RCA plug (L) and red coded plug (R) of the A/V cable (included) to these jacks and the other end to the audio inputs of your TV.
  • Seite 49 INDICATOR in the LED DISPLAY will light. 3. Press PLAY/PAUSE BUTTON to play the disc. If a CD+G track is being played, the following TV screen will appear. If you try to play a self-compiled CD-R/RW disc or USB flash drive with MP3 songs (both are not included), you will see the following menu instead.
  • Seite 50 Notes on CDs • CD mechanisms used in devices like this are designed to fully read all commercial CDs. They will also read self-compiled CD-R/CD-RW discs but it may take up to 10 seconds for playback to start. If playback does not start, it is likely due to the quality of the CD-R/CD-RW disc and/or the compatibility of the CD compilation software.
  • Seite 51: Fm Radio Operation

    FM RADIO OPERATION AUTO Scan (SCAN) You can use the scan (auto tune) function to automatically scan for new digital radio stations and remove inactive ones. 1. Press hold the PLAY/SCAN Button for 2 seconds the on main unit or remote control SCAN button to choose “P-xx”.
  • Seite 52: Bt Operation

    BT OPERATION Bluetooth wireless technology is a short-range radio technology that enables wireless communication between various types of digital devices, such as mobile phone or computer. It operates within a range of about 10meters (30 feet) without the hassle of having to use cables to connect these devices.
  • Seite 53 5. Select “MICROSTAR Sing” from the source list. If Pass code* is required, enter “0000”. * Pass code may be called PIN Code, Passkey, PIN number or Password.
  • Seite 54: Using The Unit As A Public Address System

    device. 4. Press PLAY/PAUSE button (on main unit, remote control or source device). NOTE: If the source device has an extra bass function or equalizer function, set them to off. If these functions are on, sound may be distorted. USING THE UNIT AS A PUBLIC ADDRESS SYSTEM This unit can also be used as a PA (Public Address System).
  • Seite 55: Troubleshooting Guide

    TROUBLESHOOTING GUIDE Problem Possible Cause Solution No power when DC plug of the AC adapter is Re-insert the DC plug of the AC POWER ON/OFF not plugged into the DC JACK adapter properly. BUTTON is pressed properly. No power when The AC outlet may not have Check the outlet with a working plugged in...
  • Seite 56 Problem Possible Cause Solution No song lyrics Video cable is not Connect the video cable to the VIDEO appear on the TV connected properly to the OUT of the unit and to the TV’s Video screen In jack. Source selector on TV is not Use your TV Remote to select VIDEO set to VIDEO or A/V IN.
  • Seite 57: Care And Maintenance

    CARE AND MAINTENANCE • Clean your unit with a damp (never wet) cloth. Solvent or detergent should never be used. • Avoid leaving your unit in hot, humid or dusty places. • Keep your unit away from heating appliances and sources of electrical noise such as fluorescent lamps or motors.
  • Seite 58: Disposal Considerations

    DISPOSAL CONSIDERATIONS According to the European waste regulation 2012/19/ EU this symbol on the product or on its packaging indicates that this product may not be treated as household waste. Instead it should be taken to the appropriate collection point for the recycling of electrical and electronic equipment.
  • Seite 61 Cher client, Toutes nos félicitations pour l’acquisition de ce nouvel appareil. Veuillez lire attentivement les instructions suivantes de branchement et d’utilisation afin d’éviter d’éventuels dommages. Le fabricant ne saurait être tenu pour responsa- ble des dommages dus au non-respect des con- signes de sécurité...
  • Seite 62: Fiche Technique

    FICHE TECHNIQUE Numéro d'article 10035303 Alimentation AC/DC adaptateur (Inclus) ⎓ Entrée AC 230 – 240 V ~ 50/60Hz Sortie DC 5 V 1.5 A Consommation en veille 0,4 W Enceinte RMS 2 W x 2 W (RMS) Sortie vidéo Entrée composite PAL (RCA) Prise en charge du Max 32 GB (formatage FAT32) support de stockage USB...
  • Seite 63: Explication Des Symboles Sur L'appareil

    EXPLICATION DES SYMBOLES SUR L'APPAREIL CAUTION RISK OF ELECTRIC SHOCK DO NOT OPEN ATTENTION : N'OUVREZ PAS LE BOÎTIER POUR ÉVITER LES CHOCS ÉLECTRIQUES ET LES BLESSURES GRAVES. PAS DE COMPOSANTS INTERNES À ENTRETENIR PAR LE CLIENT. NE CONTACTER QUE DES PROFESSIONNELS QUALIFIÉS.
  • Seite 64: Consignes De Sécurité

    CONSIGNES DE SÉCURITÉ Lisez les instructions. Toutes les consignes d'utilisation doivent être lues avant d'utiliser l'appareil. • Les enfants à partir de 8 ans ainsi que les personnes aux capacités physiques, mentales ou sensorielles réduites ne doivent utiliser l’appareil qu'après avoir été familiarisés par une personne responsable de leur sécurité...
  • Seite 65 • Réchauffez la pièce progressivement et laissez l'appareil sécher avant utilisation. En cas de problème, débranchez la fiche d'alimentation et contactez le service client. Protection des meubles • Cet appareil est équipé de pieds en caoutchouc antidérapants pour empêcher l'appareil de bouger pendant le fonctionnement. Ces pieds en caoutchouc résistant à...
  • Seite 66: Introduction

    INTRODUCTION La chaîne karaoké Cette chaîne karaoké CD graphique offre des années de plaisir et de divertissement. Devenez une star en chantant vos CD de karaoké préférés et en écoutant votre voix sur les enceintes. La chaîne karaoké a un design compact et est facile à utiliser malgré ses nombreuses fonctions.
  • Seite 67 CD+G Ceci est un acronyme pour Compact Disc plus Graphics. Vous rencontrerez également les variantes CD +G et CD-Graphics. Ce sont des CD ordinaires avec des informations sur une piste de données supplémentaire. Le CD +G comprend également des fonctions graphiques simples (pas de vidéos plein format).
  • Seite 68: Aperçu De L'appareil

    APERÇU DE L'APPAREIL Vue de face Vue de haut...
  • Seite 69 Enceinte gauche Lecteur CD Enceinte droite Veille / choix de la source Port USB Titre précédent /recherche arrière mémorisation de programme - AVC, effets d'éclairage Titre suivant /recherche avant mémorisation de programme + Capteur IR (télécommande) 10 Affichage FM Témoin CDG 12 Affichage LED 13 Affichage du programme 14 Témoin de mode de répétition...
  • Seite 70 Télécommande Veille / choix de la source Lecture aléatoire Lecture Spectacle de lumière Titre précédent /recherche arrière Stop Sourdine Volume 10 Ouverture / fermeture du lecteur CD Mode 12 Mode de répétition / appairage BT 13 Memory/mise en mémoire du programme 14 Recherche de stations FM 15 Titre suivant / recherche avant 16 Écho (effet Hall)
  • Seite 71: Changement De Pile

    Insertion des piles dans la télécommande La télécommande est alimentée par une pile CR2025 (incluse). Pour utiliser la télécommande, retirez-la languette isolante du compartiment à piles. Remplacez la pile d'origine par une nouvelle pile au lithium CR2025 si le fonctionnement de la télécommande devient intermittent ou insatisfaisant. 1.
  • Seite 72: Einrichtung

    EINRICHTUNG Branchement Branchez le bloc d'alimentation fourni à l'arrière de l'appareil puis branchez l'autre extrémité dans une prise avec une alimentation de 220-240 V ~ 50/60 Hz. Remarque : Si l'appareil a été utilisé pendant une longue période, débranchez le bloc d'alimentation de l'appareil et de la prise. Prise murale Bloc d'alimentation...
  • Seite 73 2. Branchez le câble vidéo (jaune) dans la prise vidéo (VIDEO OUT) à l'arrière du système de karaoké. 3. Branchez l'autre extrémité du câble vidéo (jaune) dans l'entrée vidéo / AV de votre téléviseur. Si votre téléviseur ne dispose pas de l'entrée vidéo requise, vous aurez besoin d'un modulateur RF à...
  • Seite 74 karaoké au téléviseur, vous devez "dire" à votre téléviseur d'afficher l'entrée de la chaîne karaoké au lieu de l'entrée habituelle du câble ou de l'antenne. • Reportez-vous au manuel d'utilisation de votre téléviseur pour connaître la manière la plus simple de configurer votre système de divertissement particulier.
  • Seite 75: Utilisation Des Fonctions

    UTILISATION DES FONCTIONS Allumage et lecture 1. Funktionswahl • Appuyez sur SOURCE sur l'appareil ou MODE sur la télécommande pour sélectionner CD / USB. • Appuyez sur SOURCE sur l'appareil en position USB pour lire des MP3 à partir d'une clé USB. •...
  • Seite 76 Fonction programme Cette fonction vous permet de lire les titres dans un ordre programmé. Pour cela vous devez d'abord arrêter la lecture (appuyez sur ). 1. Appuyez sur PROGRAM. Le numéro de programme 01 apparaît à l'écran et la LED de programme clignote. 2.
  • Seite 77 Lecture de la liste programmée Lorsque la programmation est terminée, appuyez sur la touche  pour confirmer et démarrer la lecture du programme, la LED du programme s'allume. Pendant la lecture, vous pouvez appuyer sur  ou  pour passer à...
  • Seite 78: Cd+G, Usb, Aux-In

    • Prise AUDIO-OUT (L/R): branchez la fiche RCA blanche (L) et rouge (R). Fonctions karaoké • VOLUME MASTER : Tournez cette commande pour régler le volume souhaité pour l'enceinte intégrée. • AVC (commande vocale automatique): Si la commande vocale automatique est activée, la voix chantée sur un enregistrement multiplex s'éteint dès que vous chantez dans le micro.
  • Seite 79 Si vous reproduisez des fichiers CD-R/CD-RW ou MP3 gravés à la maison via USB, cet écran apparaîtra. • Dans la ligne supérieure du menu, vous voyez l'affichage [T : 011/118]. Cela signifie que le titre 11 sur un total de 118 titres sera joué. •...
  • Seite 80 Comment chanter sur la musique des appareils AUX L'appareil vous permet de chanter avec la musique d'appareils AUX externes tels que iPod, lecteur MP3 ou autres appareils de sortie numérique. 1. Connectez la sortie casque de votre appareil externe à l'entrée AUX du système de karaoké.
  • Seite 81: Radio Fm

    RADIO FM Recherche automatique (SCAN) Vous pouvez utiliser la fonction de recherche (recherche automatique) pour rechercher automatiquement de nouvelles stations de radio numériques et supprimer les stations inactives. 1. Maintenez la touche PLAY / SCAN de l'unité principale ou la touche SCAN de la télécommande pendant 2 secondes pour sélectionner "P-xx".
  • Seite 82: Mode Bt

    MODE BT La technologie sans fil Bluetooth est une technologie radio à courte portée qui permet une communication sans fil entre différents types d'appareils numériques tels que les téléphones portables ou les ordinateurs. Il fonctionne dans une portée d'environ 10 mètres (30 pieds) sans avoir à connecter des câbles à...
  • Seite 83 Couplage avec d'autres appareils source Bluetooth 1. Appuyez sur POWER sur l'appareil principal ou la télécommande pour allumer l'appareil. 2. Appuyez sur la touche SOURCE de l'unité principale ou de la télécommande pour sélectionner la fonction Bluetooth. (Le témoin BT- PAIR clignote.) 3.
  • Seite 84: Utilisation De L'appareil Comme Enceinte

    2. Appuyez sur SOURCE sur l'unité principale ou la télécommande pour sélectionner la fonction Bluetooth. 3. Démarrez la connexion Bluetooth à partir de l'appareil source audio stéréo Bluetooth. 4. Appuyez sur la touche PLAY/PAUSE (sur l'unité principale, la télécommande ou le dispositif source). REMARQUE : si l'appareil source a une fonction de basse supplémentaire ou une fonction d'égalisation, réglez-la sur off.
  • Seite 85: Résolution Des Problèmes

    RÉSOLUTION DES PROBLÈMES Problème Cause possible Solution L'appareil ne Le bloc d'alimentation n'est pas Branchez le bloc d'alimentation et démarre pas connecté ou la fiche n'est pas insérez la fiche dans la prise. lorsqu'on appuie sur connectée à la prise. la touche de marche/ arrêt.
  • Seite 86 Problème Cause possible Solution Aucun texte de Le câble vidéo n'est pas bien Connectez le câble vidéo à la chanson ne s'affiche branché sur le téléviseur. sortie vidéo de la chaîne karaoké sur l'écran du et à l'entrée vidéo du téléviseur. téléviseur.
  • Seite 87: Nettoyage Et Entretien

    NETTOYAGE ET ENTRETIEN • Nettoyez votre appareil avec un chiffon humide (jamais mouillé). N'utilisez jamais de solvants ou détergents. • Ne laissez pas votre appareil dans des endroits chauds, humides ou poussiéreux. • Éloignez votre appareil des radiateurs et des sources de bruit électrique comme les lampes fluorescentes ou les moteurs.
  • Seite 88: Informations Sur Le Recyclage

    INFORMATIONS SUR LE RECYCLAGE Vous trouverez sur le produit l’image ci-contre (une poubelle sur roues, barrée d‘une croix), ce qui indique que le produit se trouve soumis à la directive européenne 2012/19/UE. Renseignez-vous sur les dispositions en vigueur dans votre région concernant la collecte séparée des appareils électriques et électroniques.
  • Seite 89 Estimado cliente: Le felicitamos por la adquisición de este produc- to. Lea atentamente el siguiente manual y siga cuidadosamente las instrucciones de uso con el fin de evitar posibles daños. La empresa no se responsabiliza de los daños ocasionados por un uso indebido del producto o por haber desa- tendido las indicaciones de seguridad.
  • Seite 90: Datos Técnicos

    DATOS TÉCNICOS Número de artículo 10035303 Alimentación eléctrica Adaptador AC/DC (Incluido) ⎓ Entrada AC 230 – 240 V ~ 50/60Hz Salida DC 5 V 1.5 A Consumo en Standby 0,4 W Altavoces RMS 2 W x 2 W (RMS) Salida de vídeo Entrada compuesta PAL (RCA) Soporte para dispositivos Máximo 32 GB (formateado a FAT32)
  • Seite 91 EXPLICACIÓN SÍMBOLOS DEL DISPOSITIVO CAUTION RISK OF ELECTRIC SHOCK DO NOT OPEN ATENCIÓN: PARA REDUCIR EL RIESGO DE DESCARGAS ELÉCTRICAS Y LESIONES PERSONALES, NO ABRA LA CARCASA. NO HAY PIEZAS QUE PUEDAN SER REPARADAS POR EL USUARIO DENTRO DE LA UNIDAD. EN CASO DE REPARACIÓN, CONTACTE SÓLO CON PERSONAL CUALIFICADO.
  • Seite 92: Instrucciones De Seguridad

    INSTRUCCIONES DE SEGURIDAD Lea las instrucciones. Todas las instrucciones de uso deben ser leídas antes de usar la máquina. • Los niños a partir de los 8 años de edad y las personas con discapacidades mentales, sensoriales y físicas sólo podrán utilizar el dispositivo si un supervisor responsable les ha familiarizado a fondo con las funciones y las precauciones de seguridad y comprenden los riesgos que conlleva.
  • Seite 93 En caso de problemas, desenchufe el cable de alimentación y póngase en contacto con el representante del servicio técnico. Protector de muebles • Esta unidad está equipada con bases de goma antideslizantes para evitar que la unidad se mueva cuando se utilizan los controles. Estos pies están hechos de goma resistente a la abrasión que ha sido especialmente diseñada para no dejar marcas en los muebles.
  • Seite 94: Introducción

    INTRODUCCIÓN Instalación del karaoke Este sistema gráfico de karaoke en CD le proporcionará años de diversión y entretenimiento. Conviértase en una estrella cantando en sus CDs de karaoke favoritos y escuchando su voz a través de los altavoces. El sistema de karaoke tiene un diseño compacto y es fácil de usar a pesar de sus muchas características.
  • Seite 95 CD+G Es un acrónimo de Compact Disc plus Graphics. También encontrará las variantes CD+G y CD-Graphics. Estos son CDs regulares con información sobre una pista de datos adicional. CD+G también incluye funciones gráficas sencillas (no vídeos de formato completo). En el Karaoke, los gráficos se usan para mostrar las letras de las canciones en sincronía con la música.
  • Seite 96: Descripción Del Aparato

    DESCRIPCIÓN DEL APARATO Vista frontal Vista superior...
  • Seite 97 Altavoz izquierdo Bandejas de CD Altavoz derecho Standby / selección de fuentes Conexión USB Pista hacia atrás/búsqueda hacia atrás Memoria de programa - AVC, efectos de iluminación Pista adelante/búsqueda adelante / Memoria de programa + Sensor IR (control remoto) 10 Pantalla FM Pantalla CDG 12 Pantalla LED 13 Visualización del programa...
  • Seite 98 Mando a distancia En espera / selección de la fuente Reproducción aleatoria Reproducción Espectáculo de luces Título atrás/ Buscar atrás Stop Silencio Nivel de volumen 10 Bandeja de CD abierta/cerrada Modo 12 Modo de repetición/ Acoplamiento BT 13 Memoria/Memoria de programa 14 Búsqueda de emisoras FM 15 Título adelante / Búsqueda adelante 16 Eco (reverberación)
  • Seite 99 Insertar las pilas en el mando a distancia El mando a distancia funciona con una pila CR2025 (incluida). Para usar el control remoto, retire la lengüeta aislante insertada en el compartimento de la batería. Sustituya la pila original por una nueva pila de litio CR2025 si el funcionamiento del mando a distancia se vuelve intermitente o insatisfactorio.
  • Seite 100: Configuración

    CONFIGURACIÓN Conexión del dispositivo Conecte la fuente de alimentación adjunta en la parte posterior de la unidad y enchúfela a una toma de corriente con una tensión de alimentación de 220-240 V~ 50/60 Hz. Nota: Si se va a utilizar la unidad durante un largo período de tiempo, desconecte la fuente de alimentación de la unidad y de la toma de corriente.
  • Seite 101 1. Tenga listos los cables de conexión con el código de colores. 2. Enchufe el cable de vídeo (amarillo) en el conector VIDEO OUT de la parte posterior del sistema de karaoke. 3. Conecte el otro extremo del cable de vídeo (amarillo) en la toma de entrada de vídeo/aviso de su televisor.
  • Seite 102 la conexión para mostrar tus letras. En la mayoría de los hogares tienen una conexión de cable o una antena en uso. Una vez que haya conectado el sistema de karaoke al televisor, deberá "decirle" al televisor que muestre la entrada del sistema de karaoke en lugar de la entrada habitual del cable o la antena.
  • Seite 103: Uso De Las Funciones

    USO DE LAS FUNCIONES Encender y reproducir 1. Selección de funciones • Pulse el botón SOURCE de la unidad o MODE del mando a distancia para seleccionar CD/USB. • Presione SOURCE en la unidad en la posición USB para reproducir MP3 desde una memoria USB.
  • Seite 104 Función del programa Esta función permite que las pistas se reproduzcan en un orden programado. Para ello, la reproducción debe ser pausada ( presione ). 1. Presiona el botón PROGRAMA. El número de programa 01 aparece en la pantalla y el LED de programa parpadea. 2.
  • Seite 105 Reproducir la lista de canales Cuando la programación se haya completado, pulse el botón  para confirmar y empezar a reproducir el programa, el LED de programa en la pantalla se iluminará. Durante la reproducción, puede pulsar las teclas  o ...
  • Seite 106: Cd+G, Usb, Aux-In

    • Conector de salida de audio (L/R): Conecte los enchufes RCA blanco (L) y rojo (R). Funciones karaoke • VOLUME MASTER : Gire este control para ajustar el volumen deseado para el altavoz incorporado. • AVC (control automático de voz): Si se activa el control automático de voz, la voz cantada en una grabación multiplex se apaga tan pronto como se canta en el micrófono.
  • Seite 107 Si reproduce archivos CD-R/CD-RW o MP3 grabados en casa a través de USB, aparecerá esta pantalla. • En la línea superior del menú se ve la pantalla [T: 011/118]. Esto significa que se jugará el título 11 de un total de 118 títulos. •...
  • Seite 108 Cómo cantar con la música de los dispositivos AUX La unidad le permite cantar junto con la música de los dispositivos externos AUX como el iPod, el reproductor MP3 u otros dispositivos de salida digital. 1. Conecte la salida de auriculares de su dispositivo externo a la entrada AUX del sistema de karaoke.
  • Seite 109: Radio Fm

    RADIO FM Sintonización automática (SCAN) Puede utilizar la función de búsqueda (Sintonización automática) para buscar automáticamente nuevas emisoras de radio digitales y eliminar las emisoras inactivas. 1. Mantenga pulsado el botón PLAY/SCAN durante 2 segundos en la unidad principal o el botón SCAN del mando a distancia para seleccionar “P-xx".
  • Seite 110: Modo Bt

    MODO BT La tecnología inalámbrica Bluetooth es una tecnología de radio de corto alcance que permite la comunicación inalámbrica entre diferentes tipos de dispositivos digitales como teléfonos móviles o computadoras. Funciona dentro de un rango de alrededor de 10 metros sin la necesidad de conectar estos dispositivos con cables.
  • Seite 111 5. Selecciona "MICROSTAR Sing" de la lista de fuentes. Si se requiere una clave de acceso*, introduzca "0000". * La clave de acceso puede llamarse código PIN, clave de acceso, número PIN o contraseña.
  • Seite 112: Uso De La Unidad Como Altavoz

    1. Pulse el botón POWER de la unidad principal o del mando a distancia para encender la unidad. 2. Pulse el botón SOURCE de la unidad principal o del mando a distancia para seleccionar la función Bluetooth. 3. Inicie la conexión Bluetooth desde el dispositivo de fuente de audio estéreo Bluetooth 4.
  • Seite 113: Solución De Problemas Y Corrección De Errores

    SOLUCIÓN DE PROBLEMAS Y CORRECCIÓN DE ERRORES Problema Posible causa Solución La unidad no se El adaptador de CA no está Enchufe el adaptador de CA e inserte enciende cuando se conectado o el enchufe no está el enchufe en la toma de corriente. pulsa el botón de conectado a la toma de corriente.
  • Seite 114 Problema Posible causa Solución No aparece ninguna El cable de vídeo no está Conecta el cable de vídeo a la imagen en la bien conectado al televisor. salida de vídeo del sistema de pantalla del televisor. karaoke y a la entrada de vídeo del televisor.
  • Seite 115: Limpieza Y Mantenimiento

    LIMPIEZA Y MANTENIMIENTO • Limpie su dispositivo con un paño húmedo (nunca mojado). Nunca deben utilizarse disolventes o agentes de limpieza. • No deje su dispositivo en lugares calientes, húmedos o polvorientos. • Mantenga su dispositivo alejado de calentadores y fuentes de ruido eléctrico como luces fluorescentes o motores.
  • Seite 116: Retirada Del Aparato

    RETIRADA DEL APARATO Si la ilustración de la izquierda (cubo de basura con ruedas tachadas) está en el producto, se aplica la Directiva Europea 2012/19/EU. Estos productos no deben eliminarse con los residuos domésticos normales. Consulte la normativa local para la recogida selectiva de residuos eléctricos y electrónicos.
  • Seite 117 Gentile cliente, La ringraziamo per aver acquistato il dispositivo. La preghiamo di leggere attentamente le segu- enti istruzioni per l’uso e di seguirle per evitare possibili danni tecnici. Non ci assumiamo alcuna responsabilità per danni scaturiti da una mancata osservazione delle avvertenze di sicurezza e da un uso improprio del dispositivo.
  • Seite 118: Dati Tecnici

    DATI TECNICI Codice articolo 10035303 Alimentazione Adattatore AC/DC (incluso) ⎓ Ingresso AC 230 – 240 V ~ 50/60Hz Uscita DC 5 V 1.5 A Consumo in standby 0,4 W Altoparlanti RMS 2 W x 2 W (RMS) Uscita video Ingresso composito PAL (RCA) Dispositivo di Max 32 GB (formattato su FAT32) memorizzazione USB...
  • Seite 119 SPIEGAZIONE DEI SIMBOLI DEL DISPOSITIVO CAUTION RISK OF ELECTRIC SHOCK DO NOT OPEN ATTENZIONE: NON APRIRE L’ALLOGGIAMENTO ONDE EVITARE SCOSSE ELETTRICHE E GRAVI LESIONI PERSONALI. IL PRODOTTO NON CONTIENE COMPONENTI CHE NECESSITANO DI ASSISTENZA DA PARTE DEL CLIENTE. RIVOLGERSI ESCLUSIVAMENTE A TECNICI QUALIFICATI.
  • Seite 120: Avvertenze Di Sicurezza

    AVVERTENZE DI SICUREZZA Leggere tutte le istruzioni per l’uso prima di utilizzare il dispositivo. • Questo dispositivo può essere utilizzato dai bambini maggiori di 8 anni e dalle persone con limitate capacità fisiche, sensoriali o mentali o da persone con esperienza e conoscenze insufficienti, solo se sono stati informati sulle funzioni del dispositivo e sono consapevoli dei rischi e dei pericoli connessi.
  • Seite 121 Riscaldare gradualmente il locale e lasciare che il dispositivo si asciughi prima dell’uso. Come proteggere i mobili • Il dispositivo è attrezzato con piedini di gomma antiscivolo in modo tale da non spostarsi quando si usano gli elementi di comando. I piedini sono fatti di gomma resistente all’abrasione progettata apposta per non lasciare tracce sui mobili.
  • Seite 122: Introduzione

    INTRODUZIONE Installazione del karaoke Con l’impianto karaoke CD+Graphics avrai molti anni di divertimento e intrattenimento assicurati. Ti sentirai come una star mentre canterai insieme ai tuoi CD preferiti ascoltando la tua voce tramite gli altoparlanti. L’impianto karaoke ha un design compatto ed è semplice da usare, nonostante le sue svariate funzioni.
  • Seite 123 CD+G E’ un acronimo per Compact Disc plus Graphics. Si incontrano anche le variazioni CD+G e CD+Graphics. Nel presente impianto si tratta di CD tradizionali con informazioni su una traccia di file simultanea alla musica. Il CD+G contiene anche semplici funzioni grafiche (nessun video in full motion).
  • Seite 124: Descrizione Del Dispositivo

    DESCRIZIONE DEL DISPOSITIVO Vista frontale Vista dall´alto...
  • Seite 125 Altoparlante sinistro Vano CD Altoparlante destro Standby / Selezione della fonte Collegamento USB Brano indietro/ricerca indietro / Memoria programma - AVC, spettacolo di luci Brano avanti/ricerca avanti / Memoria programma + Sensore IR (telecomando) 10 Spia FM Spia CD-G 12 Spia LED 13 Spia programma 14 Spia modalità...
  • Seite 126 Telecomando Standby / Selezione della fonte Riproduzione casuale Play Effetti di luce Brano indietro/Ricerca indietro Stop Mute Volume - 10 Aprire/Chiudere il vano CD Modalità 12 Modalità di ripetizione / Accoppiamento BT 13 Memory/Memoria programma 14 Ricerca stazione FM 15 Brano avanti / Ricerca avanti 16 Eco (effetto salone) 17 Memoria - 18 Memoria +...
  • Seite 127 Come inserire le pile nel telecomando Il telecomando funziona con una pila CR2025 (contenuta nel volume di consegna). Per usare il telecomando rimuovere la linguetta di isolamento posta nel vano pile. Sostituire la pila originale con una CR2025 al litio quando il funzionamento del telecomando è...
  • Seite 128: Configurazione

    CONFIGURAZIONE Collegamento del dispositivo Collegare l’alimentatore incluso al retro del dispositivo e inserirlo in una presa con un’alimentazione di 220-240 V~ 50/60 Hz. Nota: se il dispositivo viene utilizzato a lungo, scollegare l’alimentatore dal dispositivo e dalla presa. Presa Adattatore di rete Collegamento a corrente...
  • Seite 129 2. Inserire il cavo video (giallo) nel collegamento video (VIDEO OUT) sul retro dell’impianto karaoke. 3. Inserire l’altra estremità del cavo video (giallo) nell’ingresso video/AV del televisore Se la propria televisione non dispone dell’ingresso video necessario, bisognerà procurarsi un modulatore RF per instaurare un collegamento tramite l’antenna.
  • Seite 130 • L’installazione della televisione è la parte più difficile del collegamento per visualizzare i testi canori. Nella maggior parte delle case il televisore ha un cavo di collegamento o un’antenna. Dopo aver collegato l’impianto karaoke alla televisione, bisogna “dirle” che deve visualizzare l’ingresso dell’impianto karaoke al posto del solito ingresso del cavo o dell’antenna.
  • Seite 131: Utilizzo Delle Funzioni

    UTILIZZO DELLE FUNZIONI Accensione e riproduzione 1. Selezione di funzioni • Premere il tasto SOURCE sul dispositivo oppure MODE sul telecomando per selezionare CD/USB. • Premere SOURCE sul dispositivo in posizione USB per riprodurre gli MP3 da una chiavetta USB. •...
  • Seite 132 Funzione programma Con questa funzione è possibile riprodurre i brani in sequenza programmata. Per fare ciò però bisogna fermare la riproduzione (premere ). 1. Premere il tasto PROGRAM. Sul display appare il numero 01 e il LED lampeggia. 2. Premere  o  per scrollare avanti o indietro e selezionare il brano programmato.
  • Seite 133 Riproduzione dell’elenco dei programmi Dopo aver concluso la programmazione premere il tasto  per confermare e avviare la riproduzione. Sul display lampeggia il LED del programma. Durante la riproduzione è possibile premere i tasti  o  per saltare al brano desiderato nell’elenco dei programmi.
  • Seite 134: Cd+G, Usb, Aux-In

    • Collegamento AUDIO-OUT (S/D): collegare la spina RCA bianca (S) e rossa (D). Funzione karaoke • MASTER VOLUME: ruotare la manopola per ottenere il volume desiderato dagli altoparlanti incorporati. • AVC (controllo vocale automatico): quando è attivato il controllo vocale automatico, la voce su una registrazione multiplex viene eliminata quando qualcuno canta al microfono.
  • Seite 135 Se si riproducono file CD-R/CD-RW o MP3 registrati a casa tramite USB, verrà visualizzata questa schermata. • Nella riga superiore del menù viene visualizzato il display [T: 011/118]. Ciò significa che verrà riprodotto il titolo 11 su un totale di 118 titoli. •...
  • Seite 136 Cantare con musica proveniente da dispositivi AUX Il dispositivo consente di cantare sulla base di musiche provenienti da dispositivi AUX esterni quali iPod, lettori MP3 o altri dispositivi di uscita esterni. 1. Collegare l’uscita cuffie del dispositivo esterno all’ingresso AUX sull’impianto karaoke.
  • Seite 137: Radio Fm

    RADIO FM Sintonizzazione automatica (SCAN) È possibile utilizzare la funzione di ricerca (sintonizzazione automatica) per cercare automaticamente nuove stazioni radio digitali e rimuovere quelle inattive. 1. Tenere premuto per 2 secondi il tasto PLAY/SCAN sul dispositivo oppure il tasto SCAN sul telecomando per selezionare “P-xx”. Viene visualizzata la quantità...
  • Seite 138: Modalità Bt

    MODALITÀ BT La tecnologia bluetooth senza fili è una tecnologia radiofonica con un raggio d’azione breve che consente la comunicazione wireless tra i diversi tipi di dispositivi digitali come i telefoni cellulari o i computer. Funziona entro un raggio di 10 m senza dover collegare il dispositivo con i cavi. Dato che la tecnologia bluetooth non richiede un collegamento visivo tra i dispositivi comunicanti, non è...
  • Seite 139 Accoppiamento con altri dispositivi sorgente bluetooth 1. Premere il tasto POWER sul dispositivo o sul telecomando per accendere l’apparecchio. 2. Premere il tasto SOURCE sul dispositivo o sul telecomando per selezionare la funzione bluetooth. (La luce BT-PAIRING lampeggia.) 3. Tenere premuto per almeno 3 secondi il tasto BT PAIR sul dispositivo o sul telecomando.
  • Seite 140: Utilizzare Il Dispositivo Come Altoparlante

    accendere l’apparecchio.para encender la unidad. 2. Premere il tasto SOURCE sul dispositivo o sul telecomando per selezionare la funzione bluetooth. 3. Avviare il collegamento bluetooth dal dispositivo sorgente audio bluetooth. 4. Premere il tasto PLAY/PAUSE (sul dispositivo, sul telecomando o sull’apparecchio sorgente).
  • Seite 141: Correzione Degli Errori

    CORREZIONE DEGLI ERRORI Problema Causa possibile Soluzione Il dispositivo non si L’alimentatore non è collegato Collegare l’alimentatore e inserire la accende quando si oppure la spina non è inserita nella spina nella presa. preme il tasto on/off. presa. Il dispositivo non si La presa non porta corrente.
  • Seite 142 Problema Causa possibile Soluzione Sullo schermo TV Il cavo video non è collegato Collegare il cavo video all’uscita non appaiono i testi bene alla TV. video dell’impianto karaoke e delle canzoni. all’ingresso audio della TV. Sulla TV non è stato Impostare sulla TV l’ingresso selezionato l’ingresso video video o AV come sorgente di...
  • Seite 143: Pulizia E Manutenzione

    PULIZIA E MANUTENZIONE • Pulire il dispositivo con un panno umido (non bagnato). Non usare mai detergenti o solventi. • Non sistemare il dispositivo in luoghi caldi, umidi o polverosi. • Tenere lontano il dispositivo da caloriferi e fonti elettriche di rumore come lampade fluorescenti o motori.
  • Seite 144: Smaltimento

    SMALTIMENTO Se sul prodotto è presente la figura a sinistra (il cassonetto dei rifiuti sbarrato), si applica la direttiva europea 2012/19/UE. Questi prodotti non vanno smaltiti con i rifiuti generici urbani. Informarsi sulle disposizioni vigenti in merito alla raccolta differenziata di dispositivi elettrici ed elettronici.

Diese Anleitung auch für:

10035303

Inhaltsverzeichnis