Herunterladen Inhalt Inhalt Diese Seite drucken

Werbung

Verfügbare Sprachen
  • DE

Verfügbare Sprachen

  • DEUTSCH, seite 1

Werbung

Inhaltsverzeichnis
loading

Inhaltszusammenfassung für auna StarMaker 2.0

  • Seite 3: Inhaltsverzeichnis

    Sehr geehrter Kunde, wir gratulieren Ihnen zum Erwerb Ihres Geräts. Lesen Sie die folgenden Hinweise sorgfältig durch und befolgen Sie diese, um möglichen Schäden vorzubeugen. Für Schäden, die durch Missachtung der Hinweise und unsachgemäßen Gebrauch entstehen, übernehmen wir keine Haftung. Scannen Sie den QR-Code, um Zugriff auf die aktuellste Bedienungsanleitung und weitere Informationen rund um das Produkt zu erhalten.
  • Seite 4: Sicherheitshinweise

    SICHERHEITSHINWEISE Allgemeine Hinweise • Blitzschlag - Wenn Sie das Gerät länger nicht benutzen oder es ein Gewitter gibt, ziehen Sie den Stecker aus der Steckdose oder trennen Sie das Gerät vom Antennenanschluss. Dadurch werden Schäden am Gerät durch Blitzschlag und Überspannung vermieden. •...
  • Seite 5 Besondere Hinweise zur Bedienung • Kinder ab 8 Jahren, psychisch, sensorisch und körperlich eingeschränkte Menschen dürfen das Gerät nur benutzen, wenn sie vorher von einer für sie verantwortlichen Aufsichtsperson ausführlich mit den Funktionen und den Sicherheitsvorkehrungen vertraut gemacht wurden und die damit verbundenen Risiken verstehen.
  • Seite 6: Bedienfeld

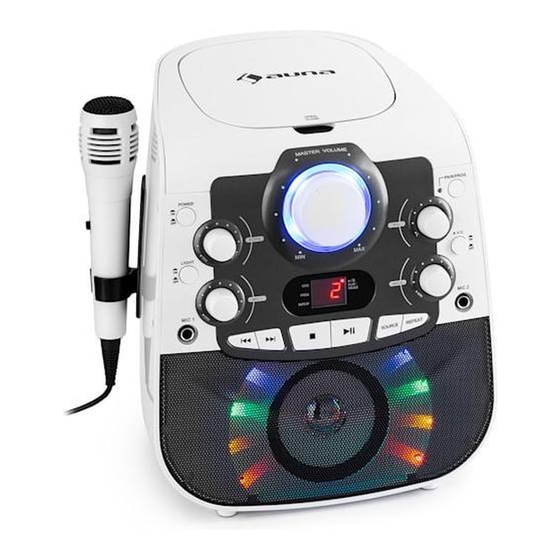
    BEDIENFELD Vorderansicht Rückansicht...
  • Seite 7 CD-Tür Tür öffnen/schließen Hauptlautstärkeregler Ein-/ Ausschalten Echoregler Lautsprecherbeleuchtung an/ aus Lautstärkeregler Mikrofon Mikrofonhalterung Mikrofonanschluss ⏮ ⏭ 10 Überspringen/ Suchtasten CD Stopptaste ⏹ 12 LED-Bildschirm 13 BT-/ CD-Programmtaste 14 BT-Anzeige 15 Balancekontrolle 16 AVC an/ aus 17 Lautstärkeregler Mikrofon 2 18 Mikrofonanschluss 2 19 Wiederholungstaste CD 20 Quelle ⏯...
  • Seite 8: Inbetriebnahme Und Bedienung

    INBETRIEBNAHME UND BEDIENUNG Stromversorgung 1. Stecken Sie den im Lieferumfang enthaltenen Netzstecker in eine Standardsteckdose. 2. Stecken Sie das schmale Ende des Netzkabels in den DC-Eingang des Geräts. 3. Drücken Sie nach der Verbindungsherstellung die Taste ON/OFF. 4. Der LED-Bildschirm und der Hauptlautstärkeregler leuchten auf. 5.
  • Seite 9: Bt-Verbindung Herstellen

    8. Drücken Sie zum Stoppen der Wiedergabe die Taste ⏹ Hinweis: Die Funktionen Schnellvorlauf / Schnellrücklauf funktionieren bei CDG-Discs nicht. Repeat Function 1. Befolgen Sie zunächst die Schritte im Abschnitt „CD einlegen“. 2. Drücken Sie während der CD-Wiedergabe einmal die Taste REPEAT, um den aktuellen Titel in Dauerschleife zu wiederholen.
  • Seite 10: Audioeingang

    4. Wählen Sie aus der Geräteliste „StarMaker 2.0“ aus. 5. Sobald die BT-Verbindung zwischen den beiden Geräten erfolgreich hergestellt wurde, leuchtet die Anzeige „PAIR/PROG“ am Gerät auf. Die Musik kann nun über Ihr externes Wiedergabegerät abgespielt werden. ⏯ 6. Drücken Sie nun zum Starten der Wiedergabe entweder die Taste Ihres Geräts oder starten Sie die Wiedergabe auf Ihrem externen Gerät.
  • Seite 11: Avc/Echo/Balance

    AVC/ECHO/BALANCE Schalten Sie das Gerät ein und verbinden Sie das Mikrofon. Passen Sie den AVC-Regler (Automatische Spachsteuerung) an, um die Lautstärke des Geräts an die variierende Lautstärke des angeschlossenen Mikrofons anzupassen. Drehen Sie den Regler, um einzustellen, inwieweit die automatische Sprachsteuerung Lautstärkeschwankungen ausgleicht. Echo Schalten Sie das Gerät ein und schließen Sie das Mikrofon an.
  • Seite 12: Hinweise Zur Entsorgung

    HINWEISE ZUR ENTSORGUNG Wenn es in Ihrem Land eine gesetzliche Regelung zur Entsorgung von elektrischen und elektronischen Geräten gibt, weist dieses Symbol auf dem Produkt oder auf der Verpackung darauf hin, dass dieses Produkt nicht im Hausmüll entsorgt werden darf. Stattdessen muss es zu einer Sammelstelle für das Recycling von elektrischen und elektronischen Geräten gebracht werden.
  • Seite 13: Contents

    Dear Customer, Congratulations on purchasing this equipment. Please read this manual carefully and take care of the following hints to avoid damages. Any failure caused by ignoring the items and cautions men- tioned in the instruction manual are not covered by our warranty and any liability.
  • Seite 14: Safety Instructions

    SAFETY INSTRUCTIONS General instructions • Lightning - If you are not going to use the unit for a longer period of time or if there is a thunderstorm, pull the plug out of the socket or disconnect the unit from the antenna connection. This will prevent damage to the unit due to lightning and overvoltage.
  • Seite 15 Special notes on operation • Children from the age of 8, mentally, sensory and physically impaired persons may only use the appliance if they have been familiarised in detail with the functions and safety precautions by a supervisor responsible for them beforehand and understand the risks involved. •...
  • Seite 16: Control Overview

    CONTROL OVERVIEW Front view Rear view...
  • Seite 17 CD door Door open/close Master volume control Power on/off button Echo control Speaker light on/off button Microphone volume control Microphone holder Microphone jack 1 ⏮ ⏭ 10 Skip / search button CD stop button ⏹ 12 LED display 13 BT pair / CD program button 14 BT pair indicator 15 Balance control 16 AVC on/off button...
  • Seite 18: Getting Started And Use

    GETTING STARTED AND USE Setup power 1. Plug the included AC adapter into the standard AC power outlet to power your Karaoke System. 2. Connect small end to DC INPUT JACK of your Karaoke System. 3. After adapter connection, press POWER ON/OFF button to turn on your Karaoke System.
  • Seite 19: Bt Connection

    3. On your Smartphone / Tablet, turn on BT function and enable device scanning. 4. When "StarMaker 2.0" shows on the BT scan, select it to connect it to your device. 5. When both devices are successfully connected and PAIR/PROG indicator will be light up, you are ready to play music wirelessly from your device.
  • Seite 20: Using Audio Input

    previous of your external BT device to play the next / previous music. 8. To disconnect your external BT device or press POWER ON/OFF button to turn off your Karaoke System for stop playing. USING AUDIO INPUT 1. Press POWER ON/OFF switch to turn on the Karaoke System. 2.
  • Seite 21: Connecting To External Devices

    Balance Turn on your Karaoke system, play with a CDG format disc and rotate BALANCE button to select to hear only the music or only vocals. During CD playback, rotate BALANCE button to select the left and right channel for RCA output. CONNECTING TO EXTERNAL DEVICES RCA Audio Output Requires RCA audio cables (Red/white colour) included.
  • Seite 22: Disposal Considerations

    DISPOSAL CONSIDERATIONS If there is a legal regulation for the disposal of electrical and electronic devices in your country, this symbol on the product or on the packaging indicates that this product must not be disposed of with household waste. Instead, it must be taken to a collection point for the recycling of electrical and electronic equipment.
  • Seite 23: Sommaire

    Chère cliente, cher client, Toutes nos félicitations pour l’acquisition de ce nouvel appareil. Veuillez lire attentivement et respecter les instructions de ce mode d’emploi afin d’éviter d’éventuels dommages. Le fabricant ne saurait être tenu pour responsable des dommages dus au non-respect des consignes de sécurité et à...
  • Seite 24: Consignes De Sécurité

    CONSIGNES DE SÉCURITÉ Consignes générales • Foudre - Si vous n‘utilisez pas l‘appareil pendant une longue période ou s‘il y a de l‘orage, débranchez la fiche de la prise et débranchez l‘antenne de l‘appareil. Cela évite d‘endommager le produit à cause de la foudre et des surtensions.
  • Seite 25 Consignes d'utilisation particulières • Les enfants à partir de 8 ans et les personnes souffrant de handicaps mentaux, sensoriels et physiques ne peuvent utiliser l'appareil que s'ils ont été parfaitement familiarisés avec les fonctions et les précautions de sécurité par une personne responsable et s'ils comprennent les risques associés.
  • Seite 26: Panneau De Commande

    PANNEAU DE COMMANDE Vue de face Vue de dos...
  • Seite 27 Tiroir CD Ouvrir / fermer le tiroir Réglage du volume principal Marche / arrêt Réglage de l'écho Éclairage des enceintes marche/ arrêt Volume du micro Support du micro Prise micro ⏮ ⏭ 10 Touches saut / recherche Touche stop CD ⏹ 12 Écran LED 13 Touche de programmation BT/ CD 14 Voyant BT...
  • Seite 28: Mise En Marche Et Utilisation

    MISE EN MARCHE ET UTILISATION Alimentation 1. Insérez la fiche d‘alimentation fournie dans une prise standard. 2. Branchez la petite extrémité du cordon d‘alimentation dans l‘entrée CC de l‘appareil. 3. Une fois la connexion établie, appuyez sur ON / OFF. 4.
  • Seite 29: Établissement D'une Connexion Bt

    Remarque : Les fonctions d‘avance / retour rapide ne fonctionnent pas avec les disques CDG. Fonction répétition 1. Commencez par suivre les étapes de la section „Insertion d‘un CD“. 2. Pendant la lecture d‘un CD, appuyez une fois sur REPEAT pour répéter la piste actuelle en boucle.
  • Seite 30: Entrée Audio

    ⏮ 6. Pour passer à la piste suivante / précédente, appuyez sur les touches ⏭ de l‘appareil ou sur les touches correspondantes de votre appareil de lecture externe. 7. Pour arrêter la lecture, appuyez sur POWER ON / OFF ou désactivez la fonction BT de votre appareil de lecture externe.
  • Seite 31: Branchement D'appareils Externes

    Écho Allumez l‘appareil et connectez le micro. Tournez la commande ÉCHO pour régler l‘effet de réverbération souhaité. Balance Allumez l‘appareil. Lorsque vous lisez un CD-G, vous pouvez tourner la commande BALANCE pour lire seulement la musique ou les voix. Lors de la lecture d‘un CD normal, les canaux gauche et droit de la sortie RCA peuvent être sélectionnés en tournant la commande BALANCE.
  • Seite 32: Conseils Pour Le Recyclage

    CONSEILS POUR LE RECYCLAGE S‘il existe une réglementation pour l‘élimination ou le recyclage des appareils électriques et électroniques dans votre pays, ce symbole sur le produit ou sur l‘emballage indique que cet appareil ne doit pas être jeté avec les ordures ménagères. Vous devez le déposer dans un point de collecte pour le recyclage des équipements électriques et électroniques.
  • Seite 33: Datos Técnicos

    Estimado cliente: Le felicitamos por la adquisición de este producto. Lea atentamente el siguiente manual y siga cuidadosamente las instrucciones de uso con el fin de evitar posibles daños. La empresa no se responsabiliza de los daños ocasionados por un uso indebido del producto o por haber desatendido las indicaciones de seguridad.
  • Seite 34: Indicaciones De Seguridad

    INDICACIONES DE SEGURIDAD Indicaciones generales • Relámpago - Si no va a utilizar el aparato durante un periodo largo de tiempo o si hay una tormenta eléctrica, desenchufe el aparato de la toma de corriente y desconecte el conector de antena. De este modo, protegerá...
  • Seite 35 Indicaciones importantes sobre el uso • Los niños mayores de 8 años y las personas con discapacidad física, sensorial o psíquica pueden utilizar el aparato si han sido previamente instruidos por su tutor o supervisor sobre el funcionamiento del mismo y conocen las funciones, las indicaciones de seguridad y los riesgos asociados.
  • Seite 36: Panel De Control

    PANEL DE CONTROL Parte frontal Parte posterior...
  • Seite 37 Unidad lectora de CD Abrir/cerrar la unidad lectora de CD Regulador del volumen principal Encender/Apagar Regulador del efecto «Eco» Encender o apagar la iluminación de altavoces Regulador de volumen de micrófono Soporte para micrófono Conexión para micrófono ⏮ ⏭ 10 Omitir/Botones de búsqueda Botón de detención de CD ⏹...
  • Seite 38: Puesta En Funcionamiento

    PUESTA EN FUNCIONAMIENTO Alimentación 1. Introduzca el cable de alimentación suministrado en la toma de corriente. 2. Conecte un extremo del cable de alimentación a la entrada DC del aparato. 3. A continuación, pulse el botón «ON/OFF». 4. La pantalla led y el regulador de volumen principal se iluminan. 5.
  • Seite 39: Establecer Conexión Bluetooth

    3. Active la función BT en su dispositivo BT externo (teléfono inteligente, tableta, etc.) y abra la lista de dispositivos. Seleccione en la lista «StarMaker 2.0». 4. Una vez que la conexión BT entre los dos aparatos se haya establecido con éxito, el indicador «PAIR/PROG»...
  • Seite 40: Entrada De Audio

    externo. ⏯ 5. Ahora pulsa el botón del equipo de karaoke para iniciar la reproducción o inicie la reproducción desde su dispositivo externo. ⏮ ⏭ 6. Para pasar a la pista siguiente/anterior, pulse los botones equipo de karaoke o los botones correspondientes en el dispositivo de reproducción externo.
  • Seite 41: Conectar Dispositivos Externos

    variable del micrófono conectado. Gire el regulador para ajustar el grado en que el control automático de voz compensa las variaciones de volumen. Encienda el aparato y conecte un micrófono. Gire el regulador «Echo» para configurar el efecto deseado. Balance Encienda el aparato.
  • Seite 42: Retirada Del Aparato

    INDICACIONES SOBRE LA RETIRADA DEL APARATO Si en su país existe una disposición legal relativa a la eliminación de aparatos eléctricos y electrónicos, este símbolo estampado en el producto o en el embalaje advierte que no debe eliminarse como residuo doméstico. En lugar de ello, debe depositarse en un punto de recogida de reciclaje de aparatos eléctricos y electrónicos.
  • Seite 43: Dati Tecnici

    Gentile cliente, La ringraziamo per aver acquistato il dispositivo. La preghiamo di leggere attentamente le seguenti istruzioni per l’uso e di seguirle per evitare possibili danni tecnici. Non ci assumiamo alcuna responsabilità per danni scaturiti da una mancata osservazione delle avvertenze di sicurezza e da un uso improprio del dispositivo.
  • Seite 44: Avvertenze Di Sicurezza

    AVVERTENZE DI SICUREZZA Avvertenze generali • Colpo di fulmine – Se il dispositivo non viene utilizzato o c’è un temporale, staccare la spina dalla presa di corrente e scollegare il dispositivo dalla connessione dell’antenna. In questo modo si evitano danni al dispositivo dovuti a colpi di fulmine o sovratensione. •...
  • Seite 45 Avvertenze particolari per l’utilizzo • Questo dispositivo può essere utilizzato dai bambini maggiori di 8 anni e dalle persone con limitate capacità fisiche, sensoriali o mentali o da persone con esperienza e conoscenze insufficienti, solo se sono stati informati sulle funzioni del dispositivo e sono consapevoli dei rischi e dei pericoli connessi.
  • Seite 46: Pannello Di Controllo

    PANNELLO DI CONTROLLO Parte frontale Parte posteriore...
  • Seite 47 Sportello CD Aprire/Chiudere lo sportello Manopola volume principale Accensione/Spegnimento Manopola eco Illuminazione altoparlante on/off Manopola volume microfono Attacco microfono Spina microfono ⏮ ⏭ 10 Tasti skip/search Tasto stop CD ⏹ 12 Schermo a LED 13 Tasto programma BT/CD 14 Spia BT 15 Controllo balance 16 AVC on/off 17 Manopola volume microfono 2...
  • Seite 48: Messa In Funzione E Utilizzo

    MESSA IN FUNZIONE E UTILIZZO Alimentazione 1. Inserire la spina contenuta nel volume di consegna in una presa elettrica standard. 2. Inserire l’estremità sottile del cavo nell’ingresso DC del dispositivo. 3. Premere il tasto ON/OFF dopo aver instaurato un collegamento. 4.
  • Seite 49: Come Instaurare Un Collegamento Bt

    3. Attivare sul proprio dispositivo BT esterno (smartphone, tablet, ecc.) la funzione BT e aprire la lista dei dispositivi. Selezionare dall’elenco dei dispositivi “StarMaker 2.0”. 4. Non appena si instaura un collegamento BT tra i due dispositivi, sull’impianto karaoke lampeggia la spia “PAIR/PROG”. Ora è possibile riprodurre la musica dal proprio dispositivo esterno.
  • Seite 50: Ingresso Audio

    oppure avviare la riproduzione sul dispositivo esterno. ⏮ ⏭ 6. Per arrivare al brano precedente/successivo premere i tasti del dispositivo o i tasti corrispondenti del dispositivo di riproduzione esterno. 7. Per fermare la riproduzione premere il tasto POWER ON/OFF o disattivare la funzione BT del proprio dispositivo di riproduzione esterno.
  • Seite 51: Collegamento Dei Dispositivi Esterni

    impostare il livello sul quale il controllo automatico del volume compensa le oscillazioni del volume. Accendere il dispositivo e collegare il microfono. Girare la manopola ECO per impostare l’effetto sala desiderato. Balance Accendere il dispositivo. Quando si riproduce un CD-G, si può decidere se riprodurre solo la musica oppure solo il canto girando la manopola BALANCE.
  • Seite 52: Dichiarazione Di Conformità

    AVVISO DI SMALTIMENTO Se nel proprio paese si applicano le regolamentazioni inerenti lo smaltimento di dispositivi elettrici ed elettronici, questo simbolo sul prodotto o sulla confezione segnala che questi prodotti non possono essere smaltiti con i rifiuti normali e devono essere portati a un punto di raccolta di dispositivi elettrici ed elettronici.

Diese Anleitung auch für:

1003582210035823

Inhaltsverzeichnis