Herunterladen Inhalt Inhalt Diese Seite drucken
Dimplex Ignite 50 Bedienungsanleitung
Vorschau ausblenden Andere Handbücher für Ignite 50:

Werbung

Verfügbare Sprachen
  • DE

Verfügbare Sprachen

  • DEUTSCH, seite 17
EN
EN : This product is only suitable for well insulated rooms or occasional use. DE :
Dieses Produkt ist nur für gut isolierte Bereiche oder gelegentliche Verwendung
geeignet. FR : Ce produit convient uniquement à des endroits bien isolés ou pour un
usage occasionnel. IT : Questo prodotto è adatto solo per spazi ben isolati o per uso
occasionale. ES : Este producto sólo es adecuado para espacios bien aislados o un
uso ocasional. NL : Dit product is uitsluitend geschikt voor goed geïsoleerde ruimten
egnet til velisolerede rum eller lejlighedsvis brug. PT : Este produto somente é adequado
para espaços bem isolados ou uso ocasional. SE : Denna produkt är endast avsedd för
välisolerade utrymmen eller tillfällig användning. FI : Tämä tuote soveltuu ainoastaan
terekhez vagy eseti használatra alkalmas. SV : Denna produkt är endast lämplig för
användning i väl isolerade utrymmen eller enstaka användning.
The product complies with the European Safety Standards EN60335-2-30 and the European Standard
Electromagnetic Compatibility (EMC) EN55014, EN60555-2 and EN60555-3. These cover the essential
requirements of EEC Directives 2006/95/EC and 2004/108/EC
Owner's Manual
Ignite 50" / XLF50-EU
Ignite 74" / XLF74-EU
Ignite 100" / XLF100-EU
DE
NL
Model's
RO
FR
IT
PL
08/53801/0
OCN
ES
Iss 2
10886

Werbung

Inhaltsverzeichnis
loading

Inhaltszusammenfassung für Dimplex Ignite 50

  • Seite 1 Owner’s Manual Model's Ignite 50" / XLF50-EU Ignite 74" / XLF74-EU Ignite 100" / XLF100-EU EN : This product is only suitable for well insulated rooms or occasional use. DE : Dieses Produkt ist nur für gut isolierte Bereiche oder gelegentliche Verwendung geeignet.
  • Seite 2: Inhaltsverzeichnis

    Table of Contents Welcome & Congratulations ....3 IMPORTANT INSTRUCTIONS ....4 Quick Reference Guide .
  • Seite 3: Welcome & Congratulations

    Welcome & Congratulations Dimplex. Please take note of the location of the Model & Serial for this product it is important to be able to locate it in the event of requiring technical support. Model and Serial Number Label Please carefully read and save these instructions.
  • Seite 4: Important Instructions

    IMPORTANT INSTRUCTIONS Important Safety Advice When using electrical appliances, basic precautions should If the appliance is damaged, check immediately with the supplier before installation and operation. Do not use this appliance in the immediate surroundings of a bath, shower or swimming pool. Do not use outdoors.
  • Seite 5 IMPORTANT INSTRUCTIONS without supervision. Children of less than 3 years should be kept away unless continuously supervised. Children aged from 3 years and less than 8 years shall only switch on/off the appliance provided that it has been placed or installed in its intended normal operating position and they have been given supervision or instruction concerning use of the appliance in a safe way and understanding the hazards involved.
  • Seite 6: Quick Reference Guide

    Quick Reference Guide 1. The electrical information regarding the operation of your can be found on the rating label service contact the relavent located on the top of the unit. customer service as listed on your warrenty card. 2. If you have any technical 3.
  • Seite 7: Fireplace Installation

    Fireplace Installation are ready to install it. CAUTION: Ensure installation direct contact with building vapor dry and dust free location until barrier or insulation and meets all you are ready to install the local building code. NOTE: A dedicated, properly Installation fused 13 Amp circuit is required, CAUTION: Two people will be...
  • Seite 8 Fireplace Installation hole drilled for electrical wire removing the securing screws routing. and the 4 trim pieces. NOTE: It is recommended that the bottom of the unit be mounted and the handles located on the between 30 in. (76.2 cm) and 40 back, and insert into opening to in.
  • Seite 9: Final Assembly

    Fireplace Installation Figure 3 Retaining Bracket Glass Openings Media Tray To prevent electrical shock this the front glass and the partially unit is an electrical appliance that is NOT watertight and must Particles can be removed by be installed as to prevent water dusting lightly with a clean dry from entering unit.
  • Seite 10 Fireplace Installation Fixed Wiring 6. Evenly space the large media in the media tray along the back of the media tray (for optimum is supplied without a plug this is to media effect), then carefully comply with the local regulations. pour and evenly distribute the In such instances this appliance smaller media into the Media...
  • Seite 11: Operation

    Operation General Operation Remote Operation WARNING: This electric firebox must be properly installed before it multi-function remote control. is used. ! NOTE: To operate correctly, the This firebox operates with remote control must be pointed towards the front of the unit. Comfort$aver technology, Controls...
  • Seite 12 Operation Figure 5 Figure 6 Display Heat ON/OFF Turns the heater On and Off. button on the remote. • Indicated by the icon and the on the display, then the intake of internal heater parts and will not temperature will be displayed occur again.
  • Seite 13: Eco Operation Runs The Heater In A Reduced

    Operation the corresponding button on the r e p e a t e d l y p r e s s i n g t h e remote.* corresponding button on the remote. • Indicated by the setpoint on the Display increasing and the •...
  • Seite 14 Operation repeatedly, until the desired time • Cycles through the different is displayed. preset light settings of the unit, this includes different • The Display will display the combinations of colors of the Once the timer has begun, ! NOTE: Two of the themes in pressing the button will display the cycle are a prism where the...
  • Seite 15: Maintenance

    Operation Maintenance R e m o t e C o n t r o l B a t t e r y WARNING: Disconnect power Replacement and allow heater to cool before attempting any maintenance or cleaning to reduce the risk of 1.
  • Seite 16 Maintenance Fireplace Surface Cleaning number is located on your warrenty card. It would assist us if you can Use only a damp cloth to clean quote the model number, series, date of purchase, and nature of the Do not use abrasive cleaners. fault at the time of your call.
  • Seite 17 Inhaltsverzeichnis Willkommen und herzlichen Glückwunsch ..18 WICHTIGE ANWEISUNGEN ....19 Kurzanleitung ......21 Montage des Kamins .
  • Seite 18: Willkommen Und Herzlichen Glückwunsch

    Willkommen und herzlichen Glückwunsch Danke und herzlichen Glückwunsch, dass Sie sich für einen Elektrokamin von Dimplex entschieden haben. Bitte beachten Sie, wo Modell- und Seriennummer dieses Produkts angegeben werden. Sie müssen diese Modell- und Seriennummernschild Bitte lesen Sie diese Anleitung sorgfältig durch und bewahren Sie sie sicher auf.
  • Seite 19: Wichtige Anweisungen

    WICHTIGE ANWEISUNGEN Wichtige Sicherheitshinweise Bei der Benutzung von elektrischen Anwendungen sollten die grundlegenden Sicherheitsmaßnahmen befolgt werden, um das Risiko für Feuer, Stromschlag oder die Verletzung von Ist das Gerät beschädigt, sprechen Sie unverzüglich mit dem Zulieferer vor der Montage und Inbetriebnahme. Dieses Gerät nicht in der unmittelbaren Nähe eines Bades, einer Dusche oder eines Schwimmbeckens benutzen.
  • Seite 20 WICHTIGE ANWEISUNGEN Gerät spielen. Die Reinigung und Wartung darf nicht von Kindern ohne Aufsicht erfolgen. Kinder unter 3 Jahren sollten von dem Gerät ferngehalten werden, es sei denn, sie sind stets beaufsichtigt. Kinder ab 3 Jahre und weniger als 8 Jahre dürfen das Gerät nur an- und ausschalten, wenn es in seiner vorgesehenen Betriebsposition aufgestellt und montiert wurde und wenn sie die Aufsicht für den sicheren Betrieb eines Gerätes oder...
  • Seite 21: Kurzanleitung

    Kurzanleitung 1. Die elektrischen Informationen haben oder eine Wartung benötigen, kontaktieren Sie den Sie auf dem Typenschild oben entsprechenden Kundenservice, auf dem Gerät. Ihrer Garantiekarte angegeben ist. 2. Sollten Sie technische Fragen oder Bedenken hinsichtlich des Betriebs Ihres Elektrokamins Sie in Abbildung 1. Technische Informationen Wärmeleistung 230V...
  • Seite 22: Montage Des Kamins

    Montage des Kamins HINWEIS: Lassen VORSICHT: Gehen Sie bei der Montage sicher, dass der Kamin Glas sicher in der Kiste, bis es zu nicht direkt mit der Dampfsperre montieren ist. oder Isolierung des Gebäudes in Kontakt kommt und alle örtlichen 3.
  • Seite 23 Montage des Kamins dahinter laufen lässt, oder dass 2. Das Gerät wird einer sie bündig an der Hinterseite eingebauten ¾ Zierleiste von des Geräts sitzt. In diesem Fall (2,0 cm) geliefert. Je nach muss ein Loch gebohrt werden, Montageart kann diese Zierleiste um die elektrischen Leitungen abgebaut werden, indem die hindurchzuführen.
  • Seite 24 Montage des Kamins Abbildung 3 Halterung Glasöffnungen Medienschale Um Stromschläge zu vermeiden, dem Hohlraum im Inneren des handelt es sich bei diesem Gerät Geräts (nur bei den Geräten NICHT wasserdichtes XLF74 und XLF100). Elektrogerät, und es muss so 3. Gehen Sie vor der Montage montiert werden, dass kein Wasser sicher, dass das Frontglas und in das Gerät eintreten kann.
  • Seite 25 Montage des Kamins 5. Senken Sie das Glas in das Gerät den Inbusschlüssel, um es zu und nutzen Sie die entfernten befestigen. (Abbildung 4). Schrauben, um das Glas mit HINWEIS: Gehen Sie sicher, beigefügten Halterung dass der Saugnapf und der an dem Gerät zu befestigen Inbusschlüssel für eventuelle (Abbildung 3).
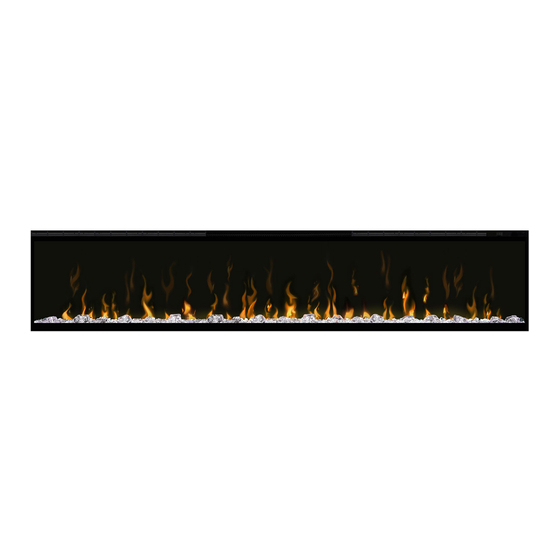
  • Seite 26: Betrieb

    Betrieb Allgemeiner Betrieb Fernsteuerung VORSICHT: Diese Elektro- Der Kamin wird mit einer IR- Feuerkammer muss vor der Nutzung Fernbedienung, mehrere korrekt montiert werden. Funktionen umfasst, geliefert. Diese Feuerkammer HINWEIS: Damit funktioniert Comfort$aver Fernbedienung richtig funktioniert, Technologie, die automatisch die muss sie auf die Vorderseite des Ventilatorengeschwindigkeit Geräts gerichtet werden.
  • Seite 27 Betrieb Abbildung 5 Abbildung 6 Anzeige Wärmefunktion AN / AUS Schaltet die Heizung An und Aus. auf der Fernbedienung aktiviert. • Angezeigt durch das Symbol und die Solltemperatur blinkt auf dem Display. Vor dem Ausschalten der inneren Heizteile. Er wird nicht wird die Eintrittstemperatur wieder auftreten.
  • Seite 28 Betrieb Fernbedienung angepasst.* Fernbedienung aktiviert und angepasst. • A n g e z e i g t d u r c h d i e s i c h erhöhende Solltemperatur auf dem • Angezeigt durch die Heizung, die Display und das Schnellerwerden für eine vom Nutzer bestimmte des Ventilators, um die Hitze, die Zeit auf höchster Temperatur läuft,...
  • Seite 29: Helligkeit

    Betrieb • Durchläuft die verschiedenen der Fernbedienung wiederholt bis v o r e i n g e s t e l l t e n die gewünschte Zeit angezeigt Lichtfarbenoptionen des Geräts, wird, um den Timer einzustellen. einschließlich Farbkombinationen der Flammenbasis und der •...
  • Seite 30: Austausch Der Batterien Der Fernbedienung

    Betrieb Wartung kontaktieren Sie den technischen VORSICHT: Trennen Support. Heizgerät Austausch der Batterien der Stromversorgung lassen Sie es abkühlen, bevor Sie Fernbedienung irgendwelche Wartungs- oder Reinigungsarbeiten durchführen, 1. Nehmen Sie die Batteriefach- um so das Brandrisiko und Abdeckung der Fernbedienung eine Stromschlag- oder...
  • Seite 31 Wartung sollte mit einem fusselfreien Tuch D i e R e c h t e u n t e r d i e s e r vollständig getrocknet werden, Garantiegewährleistung verstehen sich zusätzliche zu den gesetzlichen UmKratzern vorzubeugen, Nutzen Rechten, die wiederum nicht durch Sie keine Scheuermittel.
  • Seite 32 Inhoudsopgave Welkom & gefeliciteerd ..... 33 BELANGRIJKE INSTRUCTIES ....34 Beknopte referentiehandleiding .
  • Seite 33: Welkom & Gefeliciteerd

    Welkom & gefeliciteerd van Dimplex. Noteer de locatie van het model en het serienummer u technische ondersteuning nodig heeft. Label van het model en serienummer Lees deze instructies zorgvuldig door en bewaar ze goed. VOORZICHTIG: Lees voor u begint met de installatie alle instructies en waarschuwingen zorgvuldig door.
  • Seite 34: Belangrijke Instructies

    BELANGRIJKE INSTRUCTIES Belangrijke veiligheidsmededeling basisvoorzorgmaatregelen in acht genomen te worden om het risico op brand, elektrische schokken en verwondingen Neem als het apparaat beschadigd is voor installatie en gebruik direct contact op met de leverancier. Dit apparaat niet in de directe omgeving van een bad, douche of zwembad gebruiken.
  • Seite 35 BELANGRIJKE INSTRUCTIES van het apparaat mag niet zonder toezicht door kinderen worden uitgevoerd. aan/uit zetten op voorwaarde dat deze in de normale functioneringspositie is geplaatst of geïnstalleerd en ze begeleiding of instructie hebben gekregen ten aanzien van het veilige gebruik van het apparaat en de betreffende gevaren de stekker van het apparaat niet in het stopcontact steken, hem instellen en reinigen of onderhoudswerkzaamheden uitvoeren.
  • Seite 36: Beknopte Referentiehandleiding

    Beknopte referentiehandleiding 1. De elektrische informatie met vermeld als u technische vragen betrekking tot uw elektrische hebt of vragen hebt over de haard staat op het informatielabel bediening van uw elektrische bovenop de eenheid. haard of als u service nodig hebt. 2.
  • Seite 37: Installatie Van De Haard

    Installatie van de haard 3. Bewaar de haard op een veilige, WAARSCHUWING: installatie voor dat de haard niet in haard gaat installeren. direct contact komt met dampbarrière of isolatie van het gebouw en aan Installatie WAARSCHUWING: voldoet. twee personen nodig voor OPMERKING: Er is een speciaal verschillende stappen van deze...
  • Seite 38 Installatie van de haard gat kunnen lopen dat geboord is voor elektrische bedrading. door de bevestigingsschroeven randstukken OPMERKING: Aanbevolen wordt dat de onderkant van eenheid tussen 30 in. (76,2 cm en 40 in. 3. Til de haard aan de onderkant en (102 cm) van de grond zit voor een de hendels aan de achterkant op optimaal zicht op de vlam.
  • Seite 39 Installatie van de haard Afbeelding 3 Beugel Openingen in het glas Madiatray elektrische schokken 3. Zorg er voor de installatie voor voorkomen deze eenheid is een elektrisch apparaat NIET Waterdicht is en moet zodanig geïnstalleerd worden dat er geen worden door licht af te nemen met een schone, droge doek.
  • Seite 40 Installatie van de haard Vaste bedrading aan in de madiatray aan de achterkant van de mediatray toepassing zonder stekker geleverd. (voor optimaal mediaeffect), giet daarna voorzichtig de kleinere media Mediatray gevallen moet het apparaat door een geschikte, bevoegde 7. Plaats het glazen voorpaneel in installateurd geïnstalleerd worden en het middel om het apparaat uit van de haard.
  • Seite 41: Werking

    Werking Algemene werking als de verwarmingsfunctie wordt uitgeschakeld. WAARSCHUWING: Deze elektrische haard dient voorafgaand Bediening van afstand gebruik zorgvuldig De haard is voorzien van een IR- geïnstalleerd te worden. afstandsbediening met meerdere Deze haard werkt functies. Comfort$aver technologie die de OPMERKING: goed snelheid van de fan en het wattage...
  • Seite 42 Werking Afbeelding 5 Afbeelding 6 Tonen Warmte AAn/UIT Schakelt de verwarming Aan en Uit. knop op de afstandsbediening. • Aangegeven door de icoon en de ingestelde temperatuur knippert op de display, daarna Temperatuur omlaag De temperatuurinstelling verlagen O P M E R K I N G : N a d a t d e verwarming is uitgeschakeld, is er op de betreffende knop op de een vertraging van 2 seconden van...
  • Seite 43 Werking • Aangegeven doordat de ingestelde knop op de afstandsbediening te t e m p e r a t u u r o p d e d i s p l a y drukken. toeneemt en de snelheid van de •...
  • Seite 44 Werking • Roteert door de verschillende weergegeven. ingestelde lichtinstellingen van de eenheid, dit omvat verschillende • De display geeft verschillende combinaties van kleuren van de vlambasis en de mediaverlichting. aangepast. Als de timer Loopt, OPMERKING: Twee van de kan door op knop te drukken prisma waar de eenheid door een worden voordat de eenheid wordt...
  • Seite 45: Onderhoud

    Werking Onderhoud Vervangen batterij van de WAARSCHUWING: Haal afstandsbediening stekker stopcontact zodat verwamring afkoelen alvorens reparatiewerkzaamheden uit te voeren of schoon te maken om afstandsbediening open. het risico op brand, elektrische schokken schade 3 Volt (CR2032 [langere personen te voorkomen. levensduur] of CR2025) OPMERKING: haard...
  • Seite 46 Onderhoud voorkomen. krassente Uw rechten volgens deze garantie voorkomen geen schuurmiddelen gebruiken. rechten die op hun beurt niet door deze garantie worden beïnvloed. Schoonmaken van het oppervlakte Indien u after sales service nodig van de haard heeft dient u contact op te nemen met Gebruik een vochtige doek om onze klantenservice waarvan u het de geverfde oppervlakken van de...
  • Seite 47 Table des matières ....48 INSTRUCTIONS IMPORTANTES ....49 .
  • Seite 48 Bienvenue et félicitations de le localiser si vous avez besoin d'assistance technique. Étiquette du modèle et du n° de série Veuillez lire attentivement ces consignes et les conserver. MISE EN GARDE : Lisez avec attention toutes les consignes Le non-respect de ces consignes pourrait entraîner un risque...
  • Seite 49: Instructions Importantes

    INSTRUCTIONS IMPORTANTES Conseils de sécurité importants le fournisseur avant de l'installer et de l'utiliser. baignoire, douche ou piscine. raccordement. AVERTISSEMENT couvrir ». Ne pas couvrir ni obstruer en aucune façon la grille recouvrez par accident, l'appareil peut surchauffer. Ne pas placer l'air autour, par exemple avec des rideaux ou des meubles.
  • Seite 50 INSTRUCTIONS IMPORTANTES l'appareil. Son nettoyage et son entretien ne doivent pas être reçu des consignes sur la façon d'utiliser l'appareil en toute MISE EN GARDE MISE EN GARDE devenir très chauds et provoquer des brûlures. Il faut faire particulièrement attention lorsque des enfants et personnes MISE EN GARDE RISQUE DE CHOC ÉLECTRIQUE NE PAS OUVRIR...
  • Seite 51 Guide de référence rapide concernant votre foyer contactez le service à la clientèle de l'appareil. 2. Pour toute question technique 3. Voir la Figure 1 pour obtenir les Informations techniques Production de chaleur 230V 240V Production de chaleur nominale Production de chaleur minimale max,c En mode veille avec régulation de température ambiante électronique.
  • Seite 52: Installation Du Foyer

    Installation du foyer NOTE : Laisser la vitre frontale et MISE EN GARDE : Veiller à ce contact direct avec un pare-vapeur qu'il soit temps de les installer. ou un isolant de la maison, et qu'il 3. Ranger le foyer dans un endroit locaux.
  • Seite 53 Installation du foyer 2. Une garniture de 2 cm (¾ po) l'arrière du foyer ; un trou doit foyer. Selon le type d'installation, NOTE : 3. Soulever le foyer par le dessous d'installer le bas du foyer à une distance entre 76,2 (30 po) et 102 cm (40 po) à...
  • Seite 54 Installation du foyer Figure 3 Vitre partiellement Ouvertures pour la vitre Plateau d'accessoires propre et sec. Pour enlever les traces de doigts et autres loin des douches, baignoires, etc. marques, nettoyer la vitre avec un chiffon humide. S'assurer que la vitre est complètement sèche tomber dans une baignoire ou dans avant de l'installer.
  • Seite 55 Installation du foyer Dans certains pays, cet appareil est accessoires dans le plateau. bas de l'ouverture du foyer. foyer et la fixer à l'aide des vis (Figure 4). NOTE : S'assurer que la ventouse Figure 4...
  • Seite 56: Utilisation

    Utilisation Utilisation générale refroidissement de 2 minutes, le AVERTISSEMENT Utilisation de la télécommande correctement avant son utilisation. Le foyer est fourni avec une fonctions. Comfort$aver adapte automatiquement vitesse NOTE : Pour qu'elle fonctionne ventilateur et la puissance de l'appareil de chauffage en fonction Commandes Lorsque l'appareil de chauffage a foyer ou à...
  • Seite 57 Utilisation Figure 5 Figure 6 Activation/désactivation de la chaleur chauffage. • l ' i c ô n e ; i n o f f e n s i v e . C e t t e s i t u a t i o n , clignote sur l'afficheur, puis la des composants internes du foyer, d'admission s'affiche...
  • Seite 58 Utilisation Augmentation de la température c o r r e s p o n d a n t e • l'appareil de chauffage à pleine sur la touche correspondante de • ou un endroit froid. Cette fonction ventilateur permettant d'augmenter de 20 minutes, par tranches de 5 minutes.
  • Seite 59 Utilisation • • d i v e r s e s c o m b i n a i s o n s d e couleurs des flammes et des minuterie se met en marche, accessoires. appuyer sur la touche pour NOTE : Deux des thèmes du cycle que l'appareil ne s'arrête.
  • Seite 60: Entretien

    Utilisation Entretien Remplacement de la pile de la AVERTISSEMENT : télécommande l'alimentation et laisser l'appareil chauffage refroidir avant 1. Ouvrir le compartiment à pile les risques d'incendie, de choc 2. Installer correctement une pile de 3 volts (CR2032 [longue corporelles. NOTE : Le foyer ne doit le compartiment à...
  • Seite 61 Entretien droits statutaires, lesquels ne sont utiliser nettoyants abrasifs. Si vous avez besoin d'un service après-vente, veuillez contacter notre Nettoyage des surfaces du foyer Ne pas utiliser autre chose qu'un chiffon humide pour nettoyer les surfaces peintes du foyer. Ne pas modèle, la gamme, la date d'achat utiliser de nettoyants abrasifs.
  • Seite 62 Cuprins ..... . . 63 ....64 .
  • Seite 63 Eticheta cu...
  • Seite 64 Pentru a se reduce riscul de incendiu, electrocutare A nu se folosi în aer liber. Acest aparat nu trebuie amplasat direct deasupra AVERTISMENT pericol de incendiu. mari de timp. Cablul de alimentare trebuie pus pe partea de sub aparat.
  • Seite 65 accesibil. În cazul în care cablul de alimentare este deteriorat, acesta orice pericol. acest aparat nu trebuie alimentat printr-un dispozitiv de - Unele piese ale acestui produs pot deveni foarte PERICOL DE ELECTROCUTARE POT FI REPARATE DE UTILIZATOR...
  • Seite 66 230V 240V 1.6 - 1.6 kW 1.6 - 1.6 kW 1.6 - 1.6 kW max,c Consum auxiliar de electricitate 0.47 - 0.49 W cu controlul electronic al temperaturii camerei Figura 1 XLF50 50.31 in [1278 mm] XLF74 74.31 in [1887 mm] XLF100 100.31 in [2548 mm] 4.34 in.
  • Seite 67 montate. în vigoare la nivel local. loc sigur, uscat si ferit de praf Este necesar Instalarea (230-240 V). Pentru anumite etape Pentru a preveni riscul de incendiu, electrocutare , montare la nivel sau normele locale specifice de aplicabile. trebuie limitat la ½ in. Pentru a reduce riscul (12 mm), pentru a se asigura de incendiu, electrocutare sau...
  • Seite 68 cablurilor electrice. piese ale ramei. Pentru a se podea. reduce riscul de incendiu, electrocutare necesar. autorizat. de montare furnizate prin cele Este necesar ca (Figura 2). Figura 2 Panou...
  • Seite 69 Figura 3 Pentru a preveni electrocutarea, cu suportul furnizat (Figura 3). XLF100). a acesteia (pentru un efect...
  • Seite 70 Inbus furnizate. (Figura 4). în conexiunile fixe, conform cu electrice în vigoare la nivel local. Figura 4...
  • Seite 71 Operarea înainte de a fi utilizat. baza tehnologiei Comfort$aver Pentru Comenzi temperatura camerei atinge valoarea comenzile manuale, situate în partea • Unitatea este timp de 7 secunde. este pornit radiatorul. Elementul butonului...
  • Seite 72 Operarea Figura 5 Figura 6 butonului • temperatura de admisie, radiatorului, iar acest fapt nu se va mai repeta. Reducerea temperaturii Reduce valoarea temperaturii setate. apoi se va opri. U n i t a t e a repetat a butonului corespondent •...
  • Seite 73 Operarea • repetat a butonului corespondent radiatorului la maximum, un timp • minute, în trepte de 5 minute. sezon, radiatorul, cu care este în acest manual. butonul de pe butoanelor de pe unitate, în timp de 2 secunde temperaturii din °C în °F sau invers. apare „---”.
  • Seite 74 Operarea • pornirea cronometrului, prin temele ciclului sunt prisme, în care unitatea parcurge ciclic o varietate Cronometrul butonului în mod repetat în mod Resetarea disjunctorului de Luminozitate luminilor din unitate. pe unitate. de pe unitate, pe • a reporni unitatea. Cronometru cu oprire de timp prestabilit (de la 30 de minute la 8 ore).
  • Seite 75 Operarea Înlocuirea bateriei telecomenzii Pentru a reduce riscul de incendiu, electrocutare sau CR2025) în suportul de baterie. mizerie sau praf pe unitate sau în interiorul acesteia, deoarece poate comerciantul. intervale de minimum un an. degetelor sau alte urme, sticla...
  • Seite 76 acestea nu sunt afectate de prezenta abrazivi. Reciclarea Pentru aparatele electrice c o m e r c i a l i z a t e î n piese de schimb. exploatare a aparatului produsele defecte, deoarece acestea locale sau distribuitorul. Service post-vânzare În cadrul acestei perioade, ne...
  • Seite 77 Indice Benvenuti e congratulazioni....78 ISTRUZIONI IMPORTANTI ....79 Guida di riferimento rapido .
  • Seite 78: Benvenuti E Congratulazioni

    Benvenuti e congratulazioni Vi ringraziamo e vi porgiamo le nostre congratulazioni per avere acquistato un camino elettrico Dimplex. Vi preghiamo di prendere nota dell'ubicazione dell'etichetta indicante il modello e il numero di serie di questo prodotto, in quanto sarà importante individuarla nel caso si necessiti di assistenza tecnica.
  • Seite 79: Istruzioni Importanti

    ISTRUZIONI IMPORTANTI Importanti informazioni sulla sicurezza Quando si utilizzano apparecchiature elettriche, è necessario attenersi sempre alle precauzioni fondamentali per ridurre i rischi d'incendio, scossa elettrica e lesioni personali, compreso Se l'apparecchiatura è danneggiata, consultare immediatamente il fornitore prima dell'installazione e l'utilizzo. Non utilizzare questa apparecchiatura nelle immediate vicinanze di bagno, doccia o piscina.
  • Seite 80 ISTRUZIONI IMPORTANTI I bambini di età inferiore ai 3 anni devono essere tenuti lontani, salvo se supervisionati costantemente. I bambini di età compresa fra i 3 e gli 8 anni possono soltanto accendere/spegnere l'apparecchiatura, a condizione che siano supervisionati o che siano state fornite loro le istruzioni riguardanti l'uso sicuro dell'apparecchiatura e siano consapevoli dei pericoli connessi e che l'apparecchiatura sia collocata o installata nella posizione...
  • Seite 81: Guida Di Riferimento Rapido

    Guida di riferimento rapido 1. Le informazioni elettriche relative del camino elettrico o qualora al camino elettrico si trovano necessiti assistenza, nell'etichetta dei dati nominali contattare servizio clienti situata nella parte superiore indicato nella scheda di garanzia. dell'unità. 3. Per le dimensioni del camino, 2.
  • Seite 82: Installazione Del Camino

    Installazione del camino ATTENZIONE: Assicurarsi al momento dell'installazione. che l'installazione rispetti tutte le 3. Conservare il camino in un normative edilizie locali ed eviti che il camino entri a contatto diretto con il posto sicuro, asciutto e privo materiale isolante o la barriera contro dell'installazione.
  • Seite 83 Installazione del camino dell'unità e con un foro passante praticato consentire 3. Sollevare camino, NOTA: raccomanda sostenendolo dalla parte installare la parte inferiore dell'unità a inferiore e dalle maniglie situate un'altezza compresa fra 30 in. (76,2 nel retro e inserirlo nell'apertura cm) e 40 in.
  • Seite 84 Installazione del camino Figura 3 Vassoio per il materiale Aperture per il vetro Vetro parzialmente 3. Prima dell'installazione, elettriche, si ricorda che l'unità assicurarsi che il vetro anteriore è un'apparecchiatura elettrica che NON è impermeabile; pertanto deve siano puliti. Rimuovere essere installata in modo da evitare particelle spolverando...
  • Seite 85 Installazione del camino 6. Distribuire uniformemente materiale grande nella In alcuni paesi, quest'apparecchiatura parte posteriore dell'apposito è fornita senza spina, in conformità vassoio (per avere un ottimo alle normative locali. In tali casi, effetto visivo), quindi versare l'apparecchiatura deve essere cautela distribuire e prevedere un dispositivo di...
  • Seite 86: Funzionamento

    Funzionamento Funzionamento generale prima che la ventola si arresti completamente. AVVERTENZA: Questo camino Funzionamento con elettrico deve essere installato correttamente prima di poter essere telecomando utilizzato. camino è fornito Questo camino funziona utilizzando telecomando multifunzione a raggi tecnologia Comfort$aver infrarossi. regola automaticamente NOTA:...
  • Seite 87 Funzionamento Figura 5 Figura 6 Display ACCENSIONE/ SPEGNIMENTO del riscaldamento Serve per accendere e spegnere il riscaldatore. sul telecomando. • È indicato dal simbolo e dal innocuo. Questo odore è una fatto che la temperatura impostata condizione normale causata dal lampeggerà...
  • Seite 88 Funzionamento Fa operare l'unità alla massima Aumento della temperatura potenza nominale. Serve per aumentare l'impostazione della temperatura. r i p e t u t a m e n t e i l p u l s a n t e corrispondente sul telecomando.
  • Seite 89: Timer Di Spegnimento

    Funzionamento un intervallo di tempo prestabilito (da 30 minuti a 8 ore). r i p e t u t a m e n t e i l p u l s a n t e corrispondente sul telecomando o sull'unità. ripetutamente il relativo pulsante •...
  • Seite 90: Manutenzione

    Funzionamento Manutenzione ATTENZIONE: Se il riscaldatore AVVERTENZA: Scollegare r i c h i e d e s s e c o n t i n u a m e n t e l'alimentazione lasciar il ripristino, spegnere l'unità dal raffreddare il riscaldatore prima pannello del sezionatore principale di eseguire qualsiasi intervento di e rivolgersi all'assistenza tecnica.
  • Seite 91 Manutenzione I diritti del cliente ai sensi della completamente con un panno privo presente garanzia sono aggiuntivi di lanugine per evitare macchie rispetto ai diritti statutari, che a loro volta non sono pregiudicati dalla usare detergenti abrasivi. presente garanzia. Nel caso si richieda un intervento di assistenza post-vendita, contattare Utilizzare esclusivamente un panno il nostro servizio clienti ai numeri...
  • Seite 92 ....93 ......94 .
  • Seite 93 Witamy i gratulujemy zakupu! Etykieta z numerem modelu i numerem seryjnym PRZESTROGA:...
  • Seite 94 wanny, prysznica lub basenu.
  • Seite 95 PRZESTROGA PRZESTROGA PRZESTROGA INSTRUKCJE...
  • Seite 96 podane na Rysunku nr 1. Informacje techniczne Moc grzewcza 230 V 240 V Minimalna moc grzewcza grzewcza maks.,c W trybie spoczynku Rysunek nr 1 XLF50 50.31 in [1278 mm] XLF74 74.31 in [1887 mm] XLF100 100.31 in [2548 mm] 4.34 in. XLF50 51.41 in [1306 mm] 110 mm XLF74 75.41 in [1941 mm]...
  • Seite 97 UWAGA: PRZESTROGA: wszystkie wymagania lokalnych przepisów budowlanych. bezpiecznym, suchym UWAGA: elektryczny z bezpiecznikiem Instalacja PRZESTROGA: Do wykonania (230-240 V). dwie osoby. zgodne z lokalnymi przepisami b u d o w l a n y m i o r a z i n n y m i w niszy, czy urazami.
  • Seite 98 4 elementy ramki. otwór przepustowy dla kabli. UWAGA: kominek przygotowanego 30 cali (76,2 cm) i 40 cali (102 cm) uprawnieniami. Rysunek 2 Panel...
  • Seite 99 Rysunek nr 3 Otwory na szyby Korytko na media elektrycznym, które od prysznica, wanny, itp. Nie wolno i XLF100).
  • Seite 100 (dla uzyskania optymalnego efektu), czym starannie bez wtyczki, w celu zapewnienia drobne media. wykwalifikowanego instalatora, lokalnymi. Rysunek 4. UWAGA: d l a p o t r z e b w y k o n y w a n i a Rys.
  • Seite 101 eksploatacji Przed Praca w trybie sterowania zdalnego Comfort$aver , która automatycznie UWAGA: pilota wymaga skierowania Sterowanie pomieszczenia, oparciu lub pilotem (rys. 5 i 6). Oczekiwanie na niskim poziomie mocy, celem przycisku oczekiwanie (standby) w pomieszczeniu. W przypadku • U W A G A : UWAGA: przez 7 sekund.
  • Seite 102 RYSUNEK 5 Rysunek 6 Pokaz przycisku na pilocie. • Wskazanie w postaci ikony oraz zostanie temperatura UWAGA: Zmniejszenie temperatury UWAGA: Trybie Heat Only • (sam grzejnik) UWAGA: emitowanego do pomieszczenia.**...
  • Seite 103 odpowiedniego przycisku na • pilocie. • emitowanego do pomieszczenia. nagrzania zimnego pomieszczenia maksymalny okres 20 minut, w krokach co 5 minut. przez 2 sekundy. zakresie od 5°C do 37°C (od 41°F do 99°F). U WA G A : przytrzymanie przycisków na i odwrotnie.
  • Seite 104 • czasu. • UWAGA: Dwa z motywów w cyklu c z a s o w e g o przycisku wybrany motyw kolorystyczny, UWAGA: Bieg czasu ustawionego wielo bezpiecznika temperatury pilocie. • przycisku na PRZESTROGA: W przypadku ustawionego czasu (w zakresie od 30 minut do 8 godzin).
  • Seite 105: Konserwacja

    Konserwacja Wymiana baterii w pilocie Przed urazu. UWAGA: Kominka nie wolno nagromadzonym kurzem raz w roku. Czyszczenie szyby Odciski palców i inne zabrudzenia...
  • Seite 106 Konserwacja Czyszczenie powierzchni kominka czyszczenia powierzchni czyszczenia powierzchni Recykling sprzedawanych na terenie z odpadami domowymi. przekazanie do recyklingu. Aby poziomie. Prosimy o zachowanie dowodu zakupu. od daty zakupu.
  • Seite 107 Índice Bienvenida y felicitaciones....108 INSTRUCCIONES IMPORTANTES ... . 109 Guía de consulta rápida....111 Instalación de la chimenea .
  • Seite 108: Bienvenida Y Felicitaciones

    Bienvenida y felicitaciones Le recomendamos que tome nota de la ubicación del modelo y número de serie de este producto; es importante poder localizarlo si necesitara Etiquetas de modelo y número de serie Le recomendamos que lea atentamente estas instrucciones y las conserve. PRECAUCIÓN: Lea atentamente todas las instrucciones y advertencias antes de comenzar la instalación.
  • Seite 109: Instrucciones Importantes

    INSTRUCCIONES IMPORTANTES Aviso importante sobre segurida Si el aparato está dañado, consulte al proveedor antes de la instalación y puesta en funcionamiento. No utilice el aparato cerca de un baño, ducha o piscina. No lo utilice en exteriores. Este aparato no se debe ubicar inmediatamente encima ADVERTENCIA que indica que no se debe cubrir o cuenta con la etiqueta salida de calor situada en la parte superior del aparato.
  • Seite 110 INSTRUCCIONES IMPORTANTES realizar tareas de limpieza y mantenimiento sin supervisión. 3 años sin supervisión continua. Los niños de entre 3 y 8 años de edad solo deberán encender/apagar el aparato si este se ha colocado o instalado en su posición normal de funcionamiento y el niño está...
  • Seite 111: Guía De Consulta Rápida

    Guía de consulta rápida asistencia, comuníquese con el puede encontrar servicio de atención al cliente en la parte superior de la unidad. garantía. 2. Si tiene alguna pregunta 3. Para conocer las dimensiones de su chimenea, consulte la funcionamiento Figura 1. Salida de calor 230V 240V...
  • Seite 112: Instalación De La Chimenea

    PRECAUCIÓN: Asegúrese de que la instalación no permita instalarlos. directo con la barrera de vapor 3. Guarde la chimenea en un lugar seguro, seco y libre de polvo o el aislamiento del edificio y de que cumpla con todos los códigos la chimenea.
  • Seite 113 fuente de alimentación puedan 2. La unidad está provista de un correr o quedar al ras con la borde instalado de ¾ pulg. parte posterior de la unidad y (2.0 cm). Dependiendo la instalación, este borde puede eliminarse quitando los tornillos NOTA: Se recomienda que la la moldura.
  • Seite 114 Figura 3 Soporte de retención Aberturas de vidrio Vidrio parcialmente que NO pueden eliminarse limpiando instalarse de manera que se evite ligeramente con un paño limpio que el agua entre en la unidad. y seco. Para quitar las huellas dactilares otras marcas, bañeras, etc.
  • Seite 115 de medios a lo largo de la de medios (para un efecto de aparato se suministra sin enchufe medios óptimo), luego vierta para cumplir con las regulaciones cuidadosamente distribuya locales. En tales casos este aparato uniformemente los medios más debe ser instalado por un instalador a d e c u a d a m e n t e c u a l i f i c a d o medios.
  • Seite 116: Funcionamiento

    Funcionamiento Funcionamiento general ventilador se apague por completo, cuando la función de calefacción se ADVERTENCIA: Este apaga. correctamente antes de ser utilizada. Funcionamiento remoto Este hogar funciona La chimenea se suministra con un tecnología Comfort $aver , que mando a distancia de IR multifunción. NOTA: Para utilizarlo...
  • Seite 117 Funcionamiento Figura 5 Figura 6 Monitor Calor apagado/encendido Enciende y apaga el calefactor. en el mando a distancia. • Indicado por el icono y la parpadeará en la pantalla, luego se mostrará la temperatura de Bajar la temperatura entrada antes de apagarse. Disminuye la configuración de NOTA: temperatura.
  • Seite 118: Funcionamiento Eco

    Funcionamiento correspondiente en el mando a r e p e t i d a m e n t e e l b o t ó n distancia. correspondiente en el mando • Se indica por el calentador adistancia.* funcionando a pleno calor, durante un tiempo establecido •...
  • Seite 119 Funcionamiento • La pantalla mostrará los diferentes la unidad, que incluyen diferentes combinaciones de colores de la Una vez que el temporizador ha base de la llama y de iluminación de los medios. comenzado, al pulsar el botón NOTA: Dos de los temas en se mostrará...
  • Seite 120: Mantenimiento

    Funcionamiento Mantenimiento ADVERTENCIA: Antes mando a distancia intentar cualquier tarea mantenimiento limpieza, desconecte el calentador de la 1. Deslice la tapa de la batería abierta en el mando a distancia. enfríe y se reduzca el riesgo de 2. Instale correctamente una batería de 3 voltios lesiones a personas.
  • Seite 121 Mantenimiento paño sin pelusa para evitar manchas Sus derechos según esta garantía de agua. Para prevenir arañazos, son adicionales a sus derechos no use limpiadores abrasivos. legalmente establecidos, que, a su vez, no se ven afectados por esta garantía. chimenea Si necesita recurrir al servicio Utilice solamente un paño húmedo postventa, póngase en contacto con...

Inhaltsverzeichnis