Grundig DKR 1000 Bedienungsanleitung
Inhaltsverzeichnis
Verfügbare Sprachen
Verfügbare Sprachen
Quicklinks
- 1 Grundig Kundenberatungszentrum
- 2 Speichern von Dab-Radiosen- Dern zu den Voreinstellungen
- 3 Programmierung von Dab- Radiosendern - Manuell
- 4 Direktes Speichern als Voreinstellung
- 5 Dab-Sender Anzeigen Information
- 6 Allgemeine Kontrolle
- 7 Zeiteinstellungen
- 8 Software-Version Aufrufen
- Diese Anleitung herunterladen
Inhaltsverzeichnis

Verwandte Anleitungen für Grundig DKR 1000


Inhaltszusammenfassung für Grundig DKR 1000
- Seite 1 Kitchen Radio User Manual DKR 1000 DE - EN 01M-GKR1010-4620-04 01M-GKR1040-4620-04...
-
Seite 2: Grundig Kundenberatungszentrum
GRUNDIG-Kundenberatungszentrum Haben Sie Fragen? MontagbisFreitag von8.00bis18.00Uhr Unser Kundenberatungszentrum steht Ihnen werk- Deutschland: 0911 / 59 059 730 tags stets von 8.00 – 18.00 Uhr zur Verfügung. Österreich: 0820 / 220 33 22 * * gebührenpflichtig (0,145 €/Min. aus dem Festnetz, Mobilfunk: max. 0,20 €/Min.) - Seite 3 ----------------------------------------------------------------------------------------------------------------------------------------------------------------------------- DEUTSCH 02-22 ENGLISH 23-39 3...
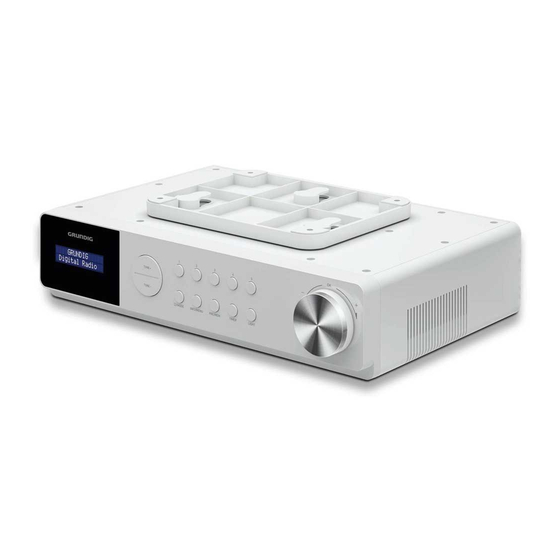
- Seite 4 GERÄTEÜBERSICHT___________________________ Back View Rückansicht Front View Vorderansicht Bottom View Unteransicht 4 DEUTSCH...
- Seite 5 GERÄTEÜBERSICHT___________________________ Arti- Beschreibung Montageplatte für Wandschrankmontage Hauptgerät Drahtantenne für DAB/UKW Gleichspannungseingang für DC 6V, 1,5A - Netzteilanschluss Micro USB nur für „Service Updates“ im Produktionsbetrieb Anzeige Anzeige des aktuellen Status TUNE - Im DAB-Modus: Zur Senderauswahl drücken Sie kurz die „TUNE +“...
- Seite 6 GERÄTEÜBERSICHT___________________________ Drehen Sie den Knopf: Stellen Sie die Lautstärke ein - / + Bestätigt die Einstellung: Im DAB/UKW-Modus: Drücken Sie kurz, um die Lautstärke stumm zu schalten bzw. zu deaktivieren. Drücken Sie lang, um in den ATS/AMS-Modus zu wechseln. Im Bluetooth-Modus: Drücken Sie kurz, um die Wiedergabe zu starten oder anzuhalten.
-
Seite 7: Wichtige Hinweise Zu Hochfre- Quenzausstrahlungen
WICHTIGESICHERHEITSHINWEISE_____________ Dieses Gerät dient der Wiedergabe von Audiosignalen. Gewitter stellen für alle elektrischen Geräte eine Ge- Jeglicher anderer Einsatz ist ausdrücklich untersagt. fahr dar. Selbst wenn das Hi-Fi-System ausgeschaltet Achten Sie darauf, das Gerät vor Tropf- und Spritzwas- ist, kann es durch einen Blitzschlag in das Stromnetz ser zu schützen. - Seite 8 MONTAGEDESGERÄTES______________________ Das Gerät ist für die Montage an der Unterseite eines Wandschranks oder Regals vorgesehen. Sie benötigen die vier mitgelieferten Schrauben zur Montage des Gerätes. Wählen Sie einen Standort in der Nähe einer Steckdose, die Installationshöhe des Gerätes sollte weniger als 2 m betragen.
- Seite 9 Scannen der gesamten die Stromversorgung startet das Gerät im DAB-Bandbreite. Das Gerät scannt dann den Standby-Modus. UKW-Wellenbereich. Die Uhrzeit wird automa- Anzeige: Logo <GRUNDIG > und < tisch aktualisiert. DigitalRadio >, und dann < 00:00:00 Sobald die Stromquelle angeschlossen ist, startet (blinkend) >...
-
Seite 10: Speichern Von Dab-Radiosen- Dern Zu Den Voreinstellungen
GERÄTE-NETZANSCHLUSSUNDEINSTELLUNGEN Speichern von DAB-Radiosen- den Hörfunksender direkt im Voreinstellung- Speicher zu speichern. dern zu den Voreinstellungen Voreinstellung(Nummer) Anzeige: < Nach der automatischen Sendersuche wer- gespeichert >. den alle Radiosender in der Programmliste Sie können diese Funktion jederzeit verwen- gespeichert. Sie können Ihre bevorzugten den, jedoch wird der vorherige Datensatz DAB-Radiosender im Voreinstellung-Speicher überschrieben, wenn sie verwendet wird. - Seite 11 GERÄTE-NETZANSCHLUSSUNDEINSTELLUNGEN stoppt bei dem nächsten Sender mit einem Einstellung und Speicherung starken Signal. von UKW-Radiosendern oder Drücken Sie im UKW-Modus lang »OK«, Drücken Sie kurz die Taste »TUNE « oder um das Auto Tuning System (AMS) direkt zu »TUNE «, bis Sie die gewünschte Frequenz starten.
-
Seite 12: Dab-Sender Anzeigen Information
RADIOMODE________________________________ Allgemeine Funktionen Anzeige: Die folgende Anzeigen erscheinen nacheinander: Informationen des Anbieters Ein- und ausschalten (z.B. Titel des Songs, E-Mail-Adresse), die Signalstärke, das Genre, das Ensemble Drücken Sie die Taste » /MODUS« 3 EIN/AUS (z.B. BR Bayern), der aktuelle Kanal und die Sekunden lang, um das Gerät schalten (Standby). -
Seite 13: Anzeigen Von Rds-Senderinfor- Mationen
Informationssystem, das von den meisten UKW-Sendern zusätzlich übertragen wird. Hinweise: Es kann einige Zeit dauern, bis alle RDS- Informationen verfügbar sind. GRUNDIG hat keinen Einfluss auf die Richtigkeit dieser Informationen. 1. Um Informationen über den aktuellen UKW- Sender anzuzeigen, drücken Sie wiederholt kurz die Taste »INFO/MENU«. -
Seite 14: Bt-Modus Auswählen
Informationen finden Sie in der Anleitung Anzeige: < Bluetooth-Suche>. Ihres externen Geräts. Der Name dieses Jetzt können Sie das Küchenradio mit einem Gerätesystems lautet »GrundigDKR anderen externen Gerät koppeln, wie Sie es 1000«. wünschen. Der Kopplungsvorgang ist nun abgeschlossen Hinweis: Im Bluetooth-Modus schaltet der und das externe Gerät kann nun mit dem... - Seite 15 TIMER-MODUS_______________________________ Küchentimer (Countdown) es zu einer voreingestellten Zeit ausschaltet. Die Abschaltzeit kann in einem Intervall von Das Gerät verfügt über eine 15 bis 90 Minuten eingestellt werden oder Kochtimerfunktion, die eine Countdown- ausgeschaltet. Zeit von bis zu 300 Minuten bis zur Alarmauslösung ermöglicht.
-
Seite 16: Alarm Unterbrechen (Snooze)
TIMER-MODUS_______________________________ Wählen Sie die Option < Alarm >, indem Sie Voreinstellungen 1 bis 30 gespeichert), indem die Taste »TUNE « oder »TUNE « kurz Sie die Taste »TUNE « kurz drücken, oder »TUNE «, oder wählen und drücken Sie drücken, oder drehen Sie den Knopf »OK« »OK«... -
Seite 17: Den Alarm Ausschalten
TIMER-MODUS_______________________________ Alarm2einstellen Gesamtzahl wählen, wenn Sie die Taste Anzeige: < >. »OK« drücken. Drehen Sie wiederholt den Knopf »OK« , um Drücken Sie die Taste einmal kurz, um 5 die Option »Ein und Aus« aufzurufen und den Minuten Intervalle einzustellen. Alarm einzustellen Drücken Sie die Taste zweimal kurz, um 10 AlarmAus... -
Seite 18: Sprache Ändern
SPEZIELLEFUNKTIONEN______________________ Beleuchtung Schlaf Anzeige: < >. Wählen Sie die Option Ein- und Ausschalten der < Hintergrundbeleuchtung >, indem Sie die Beleuchtung Taste »TUNE « oder »TUNE « kurz drü- Drücken Sie kurz die Taste cken oder drehen Sie den Knopf »OK« und »BELEUCHTUNG«, um die integrierte drücken Sie kurz »OK«... -
Seite 19: Software-Version Aufrufen
SPEZIELLEFUNKTIONEN______________________ - Anzeige: < Dimmwert> und < Niedrig, oder drehen Sie den Knopf »OK« und drücken MitteloderHoch>. Sie kurz »OK« zur Bestätigung. (Wählen Sie < 9Wählen Sie die gewünschte Option (Niedrig, Nein > zum Abbrechen) Anzeige: < Neustart> erscheint für einige Mittel oder Hoch), indem Sie die Taste »TUNE «... -
Seite 20: Einstellen Des Datumsformats
SPEZIELLEFUNKTIONEN______________________ Anzeige: < Uhrzeit/Datumeinstellen>. wird. Sie können wählen, aus welcher Quelle 12/24Stunden (DAB und/oder UKW) das Update startet oder Wählen Sie die Option < einstellen >, indem Sie die Taste »TUNE « Sie können diese Funktion deaktivieren. oder »TUNE « kurz drücken, oder drehen Sie Drücken Sie im eingeschalteten Zustand lang die Taste »INFO/MENU«, um das Menü... - Seite 21 PROBLEMLÖSUNG___________________________ Wenn ein Fehler auftritt, prüfen Sie zunächst, ob Sie das Problem selbst lösen können. Diese Übersicht könnte Ihnen nützlich sein. VORSICHT! Verletzungsgefahr! Das Öffnen des Gerätes kann zu Verletzungen führen. Fehler MöglicheUrsachen/Behebungen Keine Funktion - Wenn das Gerät durch ein Gewitter, eine statische Aufladung oder einen anderen externen Faktor gestört wurde, befolgen Sie diese Vorgehensweise, um das Problem zu...
-
Seite 22: Konformität Mit Der Rohs-Richt- Linie
übernimmt keine Haftung für Schäden aufgrund un- sachgemäßer Handhabung. 10 - 40° C Die CE-Konformitätserklärung für das Gerät finden Sie in Form einer PDF-Datei auf der Grundig Homepage AbmessungenundGewicht: www.grundig.com/downloads/downloads/doc. B x H x T: 296 x 77 x 202.5 mm Das Typenschild befindet sich an der Unterseite des Gewicht ca.: 1,08 kg... - Seite 40 Beko Grundig Deutschland GmbH Thomas-Edison-Platz 3 D-63263 Neu-Isenburg www.grundig.com...