Herunterladen Inhalt Inhalt Diese Seite drucken
testo 623 Bedienungsanleitung

testo 623 Bedienungsanleitung

Ambient condition recorder
Vorschau ausblenden Andere Handbücher für 623:
Inhaltsverzeichnis

Werbung

Verfügbare Sprachen

Verfügbare Sprachen

testo 623 · Ambient Condition Recorder
Bedienungsanleitung
testo 623 · Ambient Condition Recorder
Instruction manual
testo 623 · Enregistreur de confort ambiant
Mode d'emploi
testo 623 · Registrador de Condiciones Ambientales
Manual de instrucciones
GlobalTestSupply
www.
.com
nd Quality Products Online at:
sales@GlobalTestSupply.co

Werbung

Inhaltsverzeichnis
loading

Inhaltszusammenfassung für testo 623

  • Seite 1 623 · Ambient Condition Recorder Bedienungsanleitung testo 623 · Ambient Condition Recorder Instruction manual testo 623 · Enregistreur de confort ambiant Mode d’emploi testo 623 · Registrador de Condiciones Ambientales Manual de instrucciones GlobalTestSupply www. .com nd Quality Products Online at:...
  • Seite 2 German ......................3 English ......................25 French ......................45 Spanish ......................67 GlobalTestSupply www. .com nd Quality Products Online at: sales@GlobalTestSupply.co...
  • Seite 3: Inhaltsverzeichnis

    1 Inhalt Pos: 1 /TD/Überschriften/1. Inhalt @ 0\mod_1177587817070_6.doc @ 1241 @ 1 Inhalt Inhalt ......................3 Sicherheit und Umwelt ................4 2.1. Zu diesem Dokument ..............4 2.2. Sicherheit gewährleisten ..............5 2.3. Umwelt schützen ................5 Leistungsbeschreibung ................6 3.1.
  • Seite 4: Sicherheit Und Umwelt

    Bedarf nachschlagen zu können. > Geben Sie diese Dokumentation an spätere Nutzer des Produktes weiter. Pos: 5 /TD/Sicherheit und Umwelt/Zu diesem Dokument/Symbole und Schreibkonventionen/Symbole und Schreibkonv. [testo622/623 @ 4\mod_1249373225894_6.doc @ 47073 @ 5 Symbole und Schreibkonventionen Darstellung Erklärung Warnhinweis, Gefahrenstufe entsprechend des Signalworts: Warnung! Schwere Körperverletzungen sind...
  • Seite 5: Sicherheit Gewährleisten

    > Führen Sie das Produkt nach Ende der Nutzungszeit der getrennten Sammlung für Elektro- und Elektronikgeräte zu (lokale Vorschriften beachten) oder geben Sie das Produkt an Testo zur Entsorgung zurück. Pos: 13 /TD/Überschriften/3. Leistungsbeschreibung @ 0\mod_1173774791554_6.doc @ 299 @ 1 GlobalTestSupply www.
  • Seite 6: Leistungsbeschreibung

    3 Leistungsbeschreibung Leistungsbeschreibung Pos: 14 /TD/Überschriften/3.2 Technische Daten @ 0\mod_1176211088437_6.doc @ 702 @ 2 3.1. Technische Daten Pos: 15 /TD/Leistungsbeschreibung/Technische Daten/testo 623 Technische Daten @ 3\mod_1241080825243_6.doc @ 32274 @ Eigenschaft Werte Messgrößen Temperatur / Feuchte Einheiten °C/°F %rH, td, wb Auflösung...
  • Seite 7: Produktbeschreibung

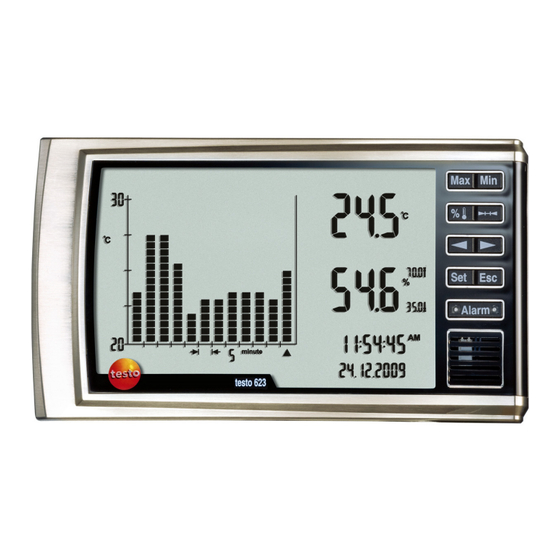
    Pos: 16 /TD/Überschriften/4. Produktbeschreibung @ 0\mod_1173774846679_6.doc @ 308 @ 1 Produktbeschreibung Pos: 17 /TD/Überschriften/4.1 Übersicht @ 0\mod_1176379946003_6.doc @ 731 @ 2 4.1. Übersicht Pos: 18 /TD/Produktbeschreibung/Übersicht/testo 623/testo 623 Bedienelemente @ 3\mod_1241078190938_6.doc @ 32253 @ ① Tastatur Taste Funktion Max.-Wert anzeigen Min.-Wert anzeigen...
  • Seite 8: Grundlegende Eigenschaften

    Aufstellclip und Wandbefestigung (im Gehäuse integriert) Pos: 19 /TD/Überschriften/4.2 Grundlegende Eigenschaften @ 0\mod_1176380399692_6.doc @ 740 @ 2 4.2. Grundlegende Eigenschaften Pos: 20 /TD/Produktbeschreibung/Grundlegende Eigenschaften/testo 622/testo 622 Stromversorgung @ 3\mod_1233922706909_6.doc @ 23761 @ 5 Stromversorgung Die Stromversorgung des Gerätes erfolgt wahlweise über: •...
  • Seite 9: Erste Schritte

    5 Erste Schritte Erste Schritte Pos: 23 /TD/Erste Schritte/testo 622/testo 622 Schutzfolie entfernen @ 3\mod_1233927965698_6.doc @ 23800 @ 5 Schutzfolie entfernen > Schutzfolie vom Display abziehen. Pos: 24 /TD/Erste Schritte/testo 622/testo 622 Batterie einlegen @ 3\mod_1233927372010_6.doc @ 23781 @ 5 Batterie / Akku einlegen 1.
  • Seite 10: Produkt Verwenden

    6 Produkt verwenden Produkt verwenden Pos: 26 /TD/Produkt verwenden/testo623/testo 623 Inbetriebnahme @ 4\mod_1254827956852_6.doc @ 51412 @ 2 6.1. Inbetriebnahme Bei Inbetriebnahme müssen Datum und Uhrzeit eingestellt werden. 1. Mit [Set] gewünschte Funktion auswählen. Wird >30 sec. keine Taste betätigt, wechselt das testo 623 in den Messmodus.
  • Seite 11: Grenzwerte Einstellen

    Bei Wechsel der Feuchteeinheit (%, td, wb) werden die eingestellten Grenzwerte nicht umgerechnet. Die Grenzwerte müssen über das Setup-Menü neu eingestellt werden. Pos: 28 /TD/Produkt verwenden/testo623/testo 623 Einstellungen vornehmen neu @ 4\mod_1248956306675_6.doc @ 46622 @ 2 6.3. Einstellungen vornehmen [Set] 2s gedrückt halten.
  • Seite 12: Ablaufdiagramm

    6 Produkt verwenden Pos: 29 /TD/Produkt verwenden/testo623/testo 623 Ablauf_Ablaufdiagramm @ 4\mod_1254828714890_6.doc @ 51476 @ 2 6.4. Ablaufdiagramm      Detaillierte Beschreibungen der Punkte  siehe folgende Seiten. GlobalTestSupply www. .com nd Quality Products Online at: sales@GlobalTestSupply.co...
  • Seite 13 6 Produkt verwenden Displayanzeige Funktion Einstellmöglichkeit/ Wert Anzeige für Alarm- deaktivieren: °C/°F ① Obergrenze leuchtet, aktivieren: Temperatur oder blinkt aktivieren oder deaktivieren Nur wenn Wert für Alarm- gewählt Obergrenze Temperatur Oberer Grenz- einstellen wert blinkt Anzeige für Alarm- deaktivieren: °C/°F Untergrenze leuchtet, aktivieren:...
  • Seite 14 6 Produkt verwenden Displayanzeige Funktion Einstellmöglichkeit/ Wert Nur wenn Jahr einstellen 2009 - 2099 gewählt Calibration! leuchtet, Jahr blinkt Nur wenn Monat einstellen 01 - 12 gewählt Calibration! leuchtet, Monat blinkt Reset Memory Speicher löschen deaktivieren: ③ blinkt aktivieren: Update date & Datum und Zeit wählen ④...
  • Seite 15 6 Produkt verwenden Displayanzeige Funktion Einstellmöglichkeit/ Wert Nur wenn gewählt oder Zeitformat 24H/12H (AM/PM) blinkt einstellen Nur wenn gewählt Stunde blinkt Stundenwert 00 - 23 oder 01 - 12 einstellen Nur wenn gewählt Minute blinkt Minutenwert 00 - 59 einstellen Nur wenn gewählt Sekunde blinkt...
  • Seite 16: Messungen Durchführen

    Pos: 30 /TD/Überschriften/6.3 Messungen durchführen @ 0\mod_1184584650078_6.doc @ 1870 @ 2 6.5. Messungen durchführen Pos: 31 /TD/Produkt verwenden/testo623/testo 623-Funktionen @ 3\mod_1241426519726_6.doc @ 32435 @ 5555555 Bei Max/Min wird der Zeitpunkt des Auftretens und der korrespondierende Wert (°C/%rH) angezeigt. Max-Werte anzeigen >...
  • Seite 17 6 Produkt verwenden Min-Werte anzeigen > [Min] drücken. ◄ ► Wenn Min blinkt können mit ]oder die vergangenen Min- Werte betrachtet werden. Wenn der Min.-Temperaturwert angezeigt wird kann durch Betätigen von der Min.-Feuchtewert angezeigt werden. Wird die Taste [Min] >5 min. nicht betätigt erfolgt automatischer Sprung zurück zur aktuellen Anzeige Histogramm ①...
  • Seite 18 6 Produkt verwenden ⑦ Manual Scale: Manuell eingestellte obere und untere Anzeigewerte, die sich nicht verändern. Auto Scale: Die Autoskalierung wird so berechnet, dass alle angezeigten Messwerte innerhalb der Skalierung liegen. • Bei einer Änderung der Skalierung blinken der obere und untere Anzeigewert und das Symbol Auto Scale.
  • Seite 19 6 Produkt verwenden Durchschnittsmesswert anzeigen: ◄ ► > oder drücken gewählten Balken bzw. gewähltes Balkenelement blinkt und die dazugehörigen Messwerte, Startzeit und Startdatum werden angezeigt. Max-Temperatur-Wert und Max-Feuchte-Wert anzeigen: > drücken Min-Temperatur-Wert und Min-Feuchte-Wert anzeigen: > [Min] drücken. Verlauf anzeigen: ◄...
  • Seite 20: Produkt Instand Halten

    7 Produkt instand halten Pos: 32 /TD/Überschriften/7. Produkt instand halten @ 0\mod_1173789831362_6.doc @ 395 @ 1 Produkt instand halten Pos: 33 /TD/Produkt instand halten/testo 622/testo 622 Batteriewechsel @ 3\mod_1235383272827_6.doc @ 26542 @ 5 Batterien / Akkus wechseln ACHTUNG Falsch eingelegte Batterien / Akkus können das Gerät beschädigen!
  • Seite 21: Tipps Und Hilfe

    25°C Pos: 38 /TD/Überschriften/8.1 Fragen und Antworten @ 0\mod_1177402017078_6.doc @ 1091 @ 2 8.2. Fragen und Antworten Pos: 39 /TD/Tipps und Hilfe/Fragen und Antworten/testo 622 Fragen un d Antworten @ 4\mod_1254486946825_6.doc @ 51137 @ Frage Mögliche Ursachen Gerät zeigt -20 °C unterschritten Gerät zeigt...
  • Seite 22 GlobalTestSupply www. .com nd Quality Products Online at: sales@GlobalTestSupply.co...
  • Seite 23 623 Ambient Condition Recorder Instruction manual GlobalTestSupply www. .com nd Quality Products Online at: sales@GlobalTestSupply.co...
  • Seite 24 GlobalTestSupply www. .com nd Quality Products Online at: sales@GlobalTestSupply.co...
  • Seite 25: Contents

    1 Contents Pos: 1 /TD/Überschriften/1. Inhalt @ 0\mod_1177587817070_79.doc @ 1243 @ 1 Contents Contents ....................25 Safety and the environment ..............26 2.1. About this document ..............26 2.2. Ensure safety ................. 27 2.3. Protecting the environment ............27 Specifications ..................27 3.1.
  • Seite 26: Safety And The Environment

    > Keep this document to hand so that you can refer to it when necessary. > Hand this documentation on to any subsequent users of the product. Pos: 5 /TD/Sicherheit und Umwelt/Zu diesem Dokument/Symbole und Schreibkonventionen/Symbole und Schreibkonv. [testo622/623 @ 4\mod_1249373225894_79.doc @ 47075 @ 5 Symbols and writing standards Representa- Explanation...
  • Seite 27: Ensure Safety

    Pos: 13 /TD/Überschriften/3. Leistungsbeschreibung @ 0\mod_1173774791554_79.doc @ 301 @ 1 Specifications Pos: 14 /TD/Überschriften/3.2 Technische Daten @ 0\mod_1176211088437_79.doc @ 704 @ 2 3.1. Technical data Pos: 15 /TD/Leistungsbeschreibung/Technische Daten/testo 623 Technische Daten @ 3\mod_1241080825243_79.doc @ 32275 @ Characteristic Values Parameters Temperature / Humidity Units °C/°F...
  • Seite 28: Product Description

    Pos: 16 /TD/Überschriften/4. Produktbeschreibung @ 0\mod_1173774846679_79.doc @ 310 @ 1 Product description Pos: 17 /TD/Überschriften/4.1 Übersicht @ 0\mod_1176379946003_79.doc @ 733 @ 2 4.1. Overview Pos: 18 /TD/Produktbeschreibung/Übersicht/testo 623/testo 623 Bedienelemente @ 3\mod_1241078190938_79.doc @ 32254 @ ① Keypad Function Display max. value Display min.
  • Seite 29 4 Product description Function Select time interval Change settings / select bar Change settings / select bar Confirm settings Cancel input Acknowledging an alarm ② Sensors ③ Attachment device ④ Battery compartment and instrument interface ⑤ Mounting clip and wall fixture (integrated into housing) Pos: 19 /TD/Überschriften/4.2 Grundlegende Eigenschaften @ 0\mod_1176380399692_79.doc @ 742 @ 2 GlobalTestSupply www.
  • Seite 30: Basic Properties

    The distance between the upper and lower drill hole is 63 mm. Pos: 22 /TD/Überschriften/5. Erste Schritte @ 0\mod_1173774895039_79.doc @ 319 @ 1 First steps Pos: 23 /TD/Erste Schritte/testo 622/testo 622 Schutzfolie entfernen @ 3\mod_1233927965698_79.doc @ 23802 @ 5 Removing the protective film > Remove the protective film from the display Pos: 24 /TD/Erste Schritte/testo 622/testo 622 Batterie einlegen @ 3\mod_1233927372010_79.doc @ 23783 @ 5...
  • Seite 31: Using The Product

    Commissioning The date and time must be set on commissioning. 1. Select the required function with [Set]. If no button is pressed > 30 sec, the testo 623 changes to Measuring Mode. To perform additional settings, press and hold [Set] for 2 sec.
  • Seite 32: Setting The Limits

    When changing the humidity unit (%, td, wb), the set limit values are not converted. The limit values must be reset via the Setup menu. Pos: 28 /TD/Produkt verwenden/testo623/testo 623 Einstellungen vornehmen neu @ 4\mod_1248956306675_79.doc @ 46623 @ 2 6.3. Performing settings 1.
  • Seite 33: Flowchart

    6 Using the product Pos: 29 /TD/Produkt verwenden/testo623/testo 623 Ablauf_Ablaufdiagramm @ 4\mod_1254828714890_79.doc @ 51477 @ 2 6.4. Flowchart       A detailed description of the points be found on the following pages. GlobalTestSupply www. .com nd Quality Products Online at:...
  • Seite 34 6 Using the product Display Function Setting option/value Activate or Deactivate: °C/°F ① deactivate display light up, Activate: for upper flashes temperature limit alarm Only if Set value for upper selected temperature limit alarm Upper limit value flashes Activate or Deactivate: °C/°F deactivate display...
  • Seite 35 6 Using the product Display Function Setting option/value Only if Set year 2009 - 2099 selected Calibration! lights up, Year flashes Only if Set month 01 - 12 selected Calibration! lights up, Month flashes Reset Memory Deleting memory Deactivate: ③ flashes Activate: Update date &...
  • Seite 36 6 Using the product Display Function Setting option/value Only if selected Set time format 24H/12H (AM/PM) flash Only if selected Hour flashes Set hour value 00 - 23 or 01 - 12 Only if selected Minute flashes Set minute value 00 - 59 Only if selected...
  • Seite 37: Measuring

    Pos: 30 /TD/Überschriften/6.3 Messungen durchführen @ 0\mod_1184584650078_79.doc @ 1872 @ 2 6.5. Measuring Pos: 31 /TD/Produkt verwenden/testo623/testo 623-Funktionen @ 3\mod_1241426519726_79.doc @ 32436 @ 5555555 With max./min., the time that it occurred and the corresponding value (°C/% RH) is shown. Displaying max. values >...
  • Seite 38 6 Using the product Displaying min. values > Press [Min]. ◄ If Min. flashes, the past min. values can be viewed with ► If the min. temperature value is shown, press display the min. humidity value. If the [Min] key is not pressed for > 5 min, the screen automatically reverts to the current display Histogram ①...
  • Seite 39 6 Using the product ⑦ Manual Scale: Manually set upper and lower limit values that do not change. Auto Scale: The auto scale is calculated in such a way that all shown readings lie within the scale. • Upon changing the scaling, the upper and lower display value and the Auto Scale symbol flash.
  • Seite 40 6 Using the product To display the mean reading: ◄ ► > Press The selected bar or bar element flashes and the relevant readings, start time and start date are displayed. To display the max. temperature value and max. humidity value: >...
  • Seite 41: Maintaining The Product

    7 Maintaining the product Maintaining the product Pos: 33 /TD/Produkt instand halten/testo 622/testo 622 Batteriewechsel @ 3\mod_1235383272827_79.doc @ 26544 @ 5 Changing batteries/rechargeable batteries CAUTION Incorrectly inserted batteries / rechargeable batteries can damage the instrument! > Observe the polarity when inserting the batteries / rechargeable batteries.
  • Seite 42: Tips And Assistance

    11.3 % RH and 75.3 % RH at 25 °C Pos: 38 /TD/Überschriften/8.1 Fragen und Antworten @ 0\mod_1177402017078_79.doc @ 1093 @ 2 8.2. Questions and answers Pos: 39 /TD/Tipps und Hilfe/Fragen und Antworten/testo 622 Fragen un d Antworten @ 4\mod_1254486946825_79.doc @ 51139 @ Question Possible causes Instrument displays Below -20 °C...
  • Seite 43 623 Enregistreur de confort ambiant Mode d’emploi GlobalTestSupply www. .com nd Quality Products Online at: sales@GlobalTestSupply.co...
  • Seite 44 GlobalTestSupply www. .com nd Quality Products Online at: sales@GlobalTestSupply.co...
  • Seite 45: Sommaire

    1 Sommaire Pos: 1 /TD/Überschriften/1. Inhalt @ 0\mod_1177587817070_79.doc @ 1243 @ 1 Sommaire Sommaire ....................45 Sécurité et environnement ..............46 2.1. Concernant ce document .............. 46 2.2. Garantie de sécurité ..............47 2.3. Protection de l’environnement ............47 Spécifications ..................47 3.1.
  • Seite 46: Sécurité Et Environnement

    > Maintenez ce document à portée de main afin de pouvoir y recourir si nécessaire. > Remettez cette notice aux utilisateurs ultérieurs de cet appareil. Pos: 5 /TD/Sicherheit und Umwelt/Zu diesem Dokument/Symbole und Schreibkonventionen/Symbole und Schreibkonv. [testo622/623 @ 4\mod_1249373225894_79.doc @ 47075 @ 5 Symboles et règles d’écriture Représenta-...
  • Seite 47: Garantie De Sécurité

    Pos: 13 /TD/Überschriften/3. Leistungsbeschreibung @ 0\mod_1173774791554_79.doc @ 301 @ 1 Spécifications Pos: 14 /TD/Überschriften/3.2 Technische Daten @ 0\mod_1176211088437_79.doc @ 704 @ 2 3.1. Caractéristiques techniques Pos: 15 /TD/Leistungsbeschreibung/Technische Daten/testo 623 Technische Daten @ 3\mod_1241080825243_79.doc @ 32275 @ Caractéristiques Valeurs Paramètres Température / humidité...
  • Seite 48: Description Du Produit

    Pos: 16 /TD/Überschriften/4. Produktbeschreibung @ 0\mod_1173774846679_79.doc @ 310 @ 1 Description du produit Pos: 17 /TD/Überschriften/4.1 Übersicht @ 0\mod_1176379946003_79.doc @ 733 @ 2 4.1. Vue d’ensemble Pos: 18 /TD/Produktbeschreibung/Übersicht/testo 623/testo 623 Bedienelemente @ 3\mod_1241078190938_79.doc @ 32254 @ ① Clavier GlobalTestSupply www.
  • Seite 49: Touche Fonction

    4 Description du produit Touche Fonction Affichage de la valeur maximale Affichage de la valeur minimale Sélection de l’histogramme pour la température ou l’humidité Sélection de l’intervalle de temps Modification des réglages / bar de sélection Modification des réglages / bar de sélection Confirmation des réglages Annulation des entrées Accusé...
  • Seite 50: Propriétés De Base

    Retirer le film de protection > Retirez le film de protection de l’écran. Pos: 24 /TD/Erste Schritte/testo 622/testo 622 Batterie einlegen @ 3\mod_1233927372010_79.doc @ 23783 @ 5 Insérez des piles / piles rechargeables 1. Ouvrez le compartiment à piles à l’arrière de l’appareil.
  • Seite 51: Utilisation Du Produit

    6 Utilisation du produit Utilisation du produit Pos: 26 /TD/Produkt verwenden/testo623/testo 623 Inbetriebnahme @ 4\mod_1254827956852_79.doc @ 51413 @ 2 6.1. Mise en service La date et l’heure doivent être configurées. 1. Sélectionnez la fonction requise via [Set]. Si vous n’appuyez sur aucun bouton pendant plus de 30 secondes, le testo 623 passe en mode de mesure.
  • Seite 52: Paramétrage Des Limites

    Si vous changez l’unité d’humidité (%, td, wb), les valeurs limites réglées ne sont pas converties. Les valeurs limites doivent être réinitialisées via le menu de configuration (setup). Pos: 28 /TD/Produkt verwenden/testo623/testo 623 Einstellungen vornehmen neu @ 4\mod_1248956306675_79.doc @ 46623 @ 2 6.3. Paramétrages 1. Maintenez la touche [Set] enfoncée pendant deux secondes.
  • Seite 53: Diagramme

    Si vous n’appuyez sur aucune touche dans les 30 secondes, l’écran retourne automatiquement à l’affichage des données actuelles. Aucun réglage n’est sauvegardé. L’appareil passe à la fonction d’affichage suivante. Pos: 29 /TD/Produkt verwenden/testo623/testo 623 Ablauf_Ablaufdiagramm @ 4\mod_1254828714890_79.doc @ 51477 @ 2 6.4. Diagramme ...
  • Seite 54 6 Utilisation du produit N° Ecran Fonction Option de réglage / valeur Activation ou Désactiver : °C/°F ① désactivation de s’allument, Activer : l’écran pour la limite clignote supérieure de température (alarme) Si seulement Réglage de la valeur pour la limite sélectionné, supérieure de température...
  • Seite 55 6 Utilisation du produit N° Ecran Fonction Option de réglage / valeur Si seulement Réglage de la valeur pour la limite sélectionné, inférieure d’humidité (alarme) la valeur limite inférieure clignote Calibration! Activation ou Désactiver : ② s’allume, désactivation de la Activer : fonction de rappel de l’étalonnage...
  • Seite 56 6 Utilisation du produit N° Ecran Fonction Option de réglage / valeur Si seulement sélectionné, Réglage du format DD.MM.YYYY DD.MM.YYYY de la date jour, mois, année clignote MM.DD.YYYY MM.DD.YYYY mois, jour, année clignote Si seulement sélectionné, Réglage de l’année 2009 - 2099 «...
  • Seite 57 6 Utilisation du produit N° Ecran Fonction Option de réglage / valeur Si seulement sélectionné, Réglage des 00 - 59 « Second » secondes clignote °C clignote Réglage de l’unité °C/°F ⑤ pour la température clignote Réglage de l’unité %, td, wb pour l’humidité...
  • Seite 58: Mesure

    6 Utilisation du produit 6.5. Mesure Pos: 31 /TD/Produkt verwenden/testo623/testo 623-Funktionen @ 3\mod_1241426519726_79.doc @ 32436 @ 5555555 Avec max. / min., l’heure à laquelle la mesure a été réalisée et la valeur correspondante (°C/% HR) sont affichées. Affichage des valeurs maximales >...
  • Seite 59 6 Utilisation du produit Histogramme ① Barre ② Segment d’une barre ③ Intervalle de temps ④ Valeur d’affichage inférieure ⑤ Unité affichée (température ou humidité) ⑥ Valeur d’affichage supérieure ⑦ Echelle manuelle : Réglage manuel des valeurs limites supérieures et inférieures qui ne changent pas.
  • Seite 60 6 Utilisation du produit • Lors du changement d’échelle, la valeur d’affichage supérieure et inférieure et le symbole Auto Scale clignotent. • L’histogramme affiche 12 barres de 20 segments chacune. • La mémoire interne peut sauver des données jusqu'à 90 jours. Quand la mémoire est pleine, les valeurs de mesure les plus anciennes sont automatiquement écrasées.
  • Seite 61 6 Utilisation du produit Pour afficher la valeur moyenne : ◄ ► > Appuyez sur La barre sélectionnée ou l’élément de la barre clignote et les valeurs pertinentes, l’heure et la date du début s’affichent. Pour afficher la valeur de température max. et la valeur de l’humidité...
  • Seite 62: Entretien Du Produit

    7 Entretien du produit Entretien du produit Pos: 33 /TD/Produkt instand halten/testo 622/testo 622 Batteriewechsel @ 3\mod_1235383272827_79.doc @ 26544 @ 5 Changement des accus / piles rechargeables AVERTISSEMENT Des accus / piles rechargeables mal insérés peuvent endommager l’appareil. > Respectez la polarité lorsque vous insérez les accus / piles rechargeables.
  • Seite 63: Conseils Et Dépannage

    Pos: 38 /TD/Überschriften/8.1 Fragen und Antworten @ 0\mod_1177402017078_79.doc @ 1093 @ 2 8.2. Questions et réponses Pos: 39 /TD/Tipps und Hilfe/Fragen und Antworten/testo 622 Fragen un d Antworten @ 4\mod_1254486946825_79.doc @ 51139 @ Question Causes possibles L’appareil affiche Au-dessous de -20 °C L’appareil affiche...
  • Seite 64 GlobalTestSupply www. .com nd Quality Products Online at: sales@GlobalTestSupply.co...
  • Seite 65 623 Registrador de Condiciones Ambientales Manual de instrucciones GlobalTestSupply www. .com nd Quality Products Online at: sales@GlobalTestSupply.co...
  • Seite 66 GlobalTestSupply www. .com nd Quality Products Online at: sales@GlobalTestSupply.co...
  • Seite 67: Índice

    1 Índice Pos: 1 /TD/Überschriften/1. Inhalt @ 0\mod_1177587817070_79.doc @ 1243 @ 1 Índice Índice ...................... 67 Seguridad y eliminación ............... 68 2.1. Acerca del manual ................. 68 2.2. Evitar daños personales/daños al producto ........69 2.3. Protección del medio ambiente ............. 69 Especificaciones ..................
  • Seite 68: Seguridad Y Eliminación

    > Tenga este manual a mano de forma que le resulte fácil consultarlo cuando sea necesario. > Entregue el manual a posteriores usuarios del producto. Pos: 5 /TD/Sicherheit und Umwelt/Zu diesem Dokument/Symbole und Schreibkonventionen/Symbole und Schreibkonv. [testo622/623 @ 4\mod_1249373225894_79.doc @ 47075 @ 5 Convenciones Símbolo Significado Señal de advertencia, el nivel de riesgo viene...
  • Seite 69: Evitar Daños Personales/Daños Al Producto

    Pos: 13 /TD/Überschriften/3. Leistungsbeschreibung @ 0\mod_1173774791554_79.doc @ 301 @ 1 Especificaciones Pos: 14 /TD/Überschriften/3.2 Technische Daten @ 0\mod_1176211088437_79.doc @ 704 @ 2 3.1. Datos técnicos Pos: 15 /TD/Leistungsbeschreibung/Technische Daten/testo 623 Technische Daten @ 3\mod_1241080825243_79.doc @ 32275 @ Características Valores Parámetros Temperatura / Humedad Unidades °C/°F...
  • Seite 70 Clase de protección IP 30 Peso aprox. 240 g (sin pilas) Medidas 185x105x36 (LxAnxAl nº mm) 185x112x47 (soporte sobremesa desplegado) Garantía 2 años, condiciones: ver el sitio web www.testo.com/warranty Directriz CE 2004/108/EC GlobalTestSupply www. .com nd Quality Products Online at: sales@GlobalTestSupply.co...
  • Seite 71: Descripción Del Producto

    Pos: 16 /TD/Überschriften/4. Produktbeschreibung @ 0\mod_1173774846679_79.doc @ 310 @ 1 Descripción del producto Pos: 17 /TD/Überschriften/4.1 Übersicht @ 0\mod_1176379946003_79.doc @ 733 @ 2 4.1. Visión global Pos: 18 /TD/Produktbeschreibung/Übersicht/testo 623/testo 623 Bedienelemente @ 3\mod_1241078190938_79.doc @ 32254 @ ① Teclas Tecla Función Visualización del valor máx.
  • Seite 72 4 Descripción del producto ③ Orificio para montaje mural ④ Compartimento de las pilas e interfaz del instrumento ⑤ Clip de soporte sobremesa y montaje mural (integrado en la caja) Pos: 19 /TD/Überschriften/4.2 Grundlegende Eigenschaften @ 0\mod_1176380399692_79.doc @ 742 @ 2 GlobalTestSupply www.
  • Seite 73: Características Básicas

    Pos: 22 /TD/Überschriften/5. Erste Schritte @ 0\mod_1173774895039_79.doc @ 319 @ 1 Primeros pasos Pos: 23 /TD/Erste Schritte/testo 622/testo 622 Schutzfolie entfernen @ 3\mod_1233927965698_79.doc @ 23802 @ 5 Extracción del plástico protector > Quite el plástico de protección que cubre el visualizador Pos: 24 /TD/Erste Schritte/testo 622/testo 622 Batterie einlegen @ 3\mod_1233927372010_79.doc @ 23783 @ 5...
  • Seite 74: Utilización Del Producto

    Antes de medir con el instrumento se debe configurar la fecha y la hora. 1. Seleccionar la función requerida con [Set]. Si no se pulsa ninguna tecla > 30 seg, el testo 623 pasa al Modo Medición. Para efectuar otros ajustes, se debe presionar la tecla [Set] durante 2 seg.
  • Seite 75: Ajuste De Límites

    Cuando se cambia la unidad de humedad (%, td, wb), los valores límite configurados no se convierten a la nueva unidad, se deber reconfigurar mediante el menú correspondiente. Pos: 28 /TD/Produkt verwenden/testo623/testo 623 Einstellungen vornehmen neu @ 4\mod_1248956306675_79.doc @ 46623 @ 2 6.3. Configuraciones 1.
  • Seite 76: Esquema De Funcionamiento

    6 Utilización del producto Pos: 29 /TD/Produkt verwenden/testo623/testo 623 Ablauf_Ablaufdiagramm @ 4\mod_1254828714890_79.doc @ 51477 @ 2 6.4. Esquema de funcionamiento En las siguientes páginas se detallan en produndidad los puntos       GlobalTestSupply www. .com nd Quality Products Online at:...
  • Seite 77 6 Utilización del producto Visualización Function Opción de ajuste/valor Activar o desactivar Desactivar: °C/°F ① la visualización del iluminan, Activar: límite de alarma parpadea superior para temperatura Sólo si se ha Ajustar el valor seleccionado límite superior para temperatura Parpadea el valor límite superior Activar o desactivar...
  • Seite 78 6 Utilización del producto Visualización Function Opción de ajuste/valor Sólo si se ha Ajustar el valor seleccionado límite inferior para humedad Parpadea el valor límite inferior Calibration! Activar o desactivar Desactivar: ② ilumina, la función de Activar: recordatorio de calibración parpadea Sólo si se ha Ajustar el año...
  • Seite 79 6 Utilización del producto Visualización Function Opción de ajuste/valor Solo si se ha seleccionado Ajustar el año 2009 - 2099 Parpadea el año Solo si se ha seleccionado Ajustar el mes 01 - 12 Parpadea el Solo si se ha seleccionado Ajustar el día 01 - 31...
  • Seite 80: Mediciones

    Pos: 30 /TD/Überschriften/6.3 Messungen durchführen @ 0\mod_1184584650078_79.doc @ 1872 @ 2 6.5. Mediciones Pos: 31 /TD/Produkt verwenden/testo623/testo 623-Funktionen @ 3\mod_1241426519726_79.doc @ 32436 @ 5555555 En la función máx./mín., se muestran el valor correspondiente (°C/% RH) y la hora en la que se midió.
  • Seite 81 6 Utilización del producto Visualización de valores mín. > Pulsar [Min]. Si parpadea Min., se pueden ver los últimos valores min. con las ◄ ► teclas Si se muestra el valor mín. de temperatura, pulsar para visualizar el valor máx. de humedad. Si no se pulsa la tecla [Min] >...
  • Seite 82 6 Utilización del producto ⑦ Escala manual: Ajustar manualmente los valores superior e inferior, valores fijos. Escala Automática: La escala se reconfigura de tal forma que las lecturas visualizadas siempre se encuentran dentro de la escala. • Cuando se modifica la escala, los valores inferior y superior y el símbolo Auto Scale parpadean.
  • Seite 83 6 Utilización del producto Para mostrar la lectura promedio: ◄ ► > Pulsar La barra seleccionada o el elemento de la barra parpadea y se muestran las lecturas relevantes, la fecha y la hora de inicio. Para visualizar los valores máx. de temperatura y humedad: >...
  • Seite 84: Mantenimiento Del Producto

    7 Mantenimiento del producto Mantenimiento del producto Pos: 33 /TD/Produkt instand halten/testo 622/testo 622 Batteriewechsel @ 3\mod_1235383272827_79.doc @ 26544 @ 5 Reemplazar las pilas/pilas recargables PRECAUCIÓN Unas pilas / pilas recargables mal insertadas podrían dañar el instrumento. > Respetar la polaridad al insertar las pilas / pilas recargables.
  • Seite 85: Consejos Y Ayuda

    25 °C Pos: 38 /TD/Überschriften/8.1 Fragen und Antworten @ 0\mod_1177402017078_79.doc @ 1093 @ 2 8.2. Mensajes de error Pos: 39 /TD/Tipps und Hilfe/Fragen und Antworten/testo 622 Fragen un d Antworten @ 4\mod_1254486946825_79.doc @ 51139 @ Mensaje Causa posible Instrumento muestra Tª...
  • Seite 86 AG Postfach 1140, 79849 Lenzkirch Testo-Straße 1, 79853 Lenzkirch Telefon: (07653) 681-0 Fax: (07653) 681-100 E-Mail: info@testo.de Internet: http://www.testo.com 0970 6230 de en fr es 03 V01.00 GlobalTestSupply www. .com nd Quality Products Online at: sales@GlobalTestSupply.co...

Inhaltsverzeichnis