Inhaltsverzeichnis
Werbung
Verfügbare Sprachen
Verfügbare Sprachen
Libretto Istruzioni
Instruction Booklet
(Translation of original instructions)
Livret d'instructions
(Traduction des instructions d'origine)
Bedienungsanleitung
(Übersetzung der Originalanleitung)
Libro De Instructiones
(Traduccion de las instrucciones originales)
Italiano
(Istruzioni originali)
English
Français
Deutsch
Español
F18
F18 TALL
Werbung
Kapitel
Inhaltsverzeichnis

Verwandte Anleitungen für Sanremo F18


Inhaltszusammenfassung für Sanremo F18
- Seite 1 Libretto Istruzioni Italiano (Istruzioni originali) F18 TALL Instruction Booklet English (Translation of original instructions) Livret d’instructions Français (Traduction des instructions d’origine) Bedienungsanleitung Deutsch (Übersetzung der Originalanleitung) Libro De Instructiones Español (Traduccion de las instrucciones originales)
- Seite 3 SANREMO creation. SANREMO, think about it. Nous vous félicitions d’avoir acheté un produit SANREMO : chacun de nos article est le fruit d’une recherche attentive, en collaboration permanente avec les amateurs de café du monde entier. Voilà pourquoi votre opinion est extrêmement importante pour nous : grâce à...
-
Seite 5: Übersichtsdaten
COSTRUTTORE BUILDER FABRICANT HERSTELLER CONSTRUCTOR SANREMO coffe machines s.r.l. Via Giacomo Bortolan, 52 31050 Vascon di Carbonera (Treviso) ITALY Tel. +39.0422.498900 - Fax.+39.0422.448935 www.sanremomachines.com - E-mail: info@sanremomachines.com RÉFÉRENCES DE LA DATI RIEPILOGATIVI SUMMARY DATA MACHINE Si consiglia di trascrivere nella tabella sot-... - Seite 6 ITALIANO ENGLISH FRANÇAIS DEUTSCH ESPAÑOL Potenza Power Puissance Leistung Potencia Modello Model Modèle Modell Modelo Tensione di Tension Tensión de Supply voltage Versorgungsspannung alimentazione d’alimentation alimentación Identificazione Identification Código de Machine identification configurazione configuration de la Maschinenidentifikationsnummer identificación de la code macchina machine...
-
Seite 7: Inhaltsverzeichnis
Indice generale INDICE GENERALE NORME E AVVERTENZE GENERALI ........12 AVVERTENZE GENERALI ............12 RIFERIMENTI NORMATIVI ............13 DESCRIZIONE SIMBOLOGIE ............13 PREDISPOSIZIONI A CARICO DELL’ACQUIRENTE....13 OPERAZIONI DI EMERGENZA IN CASO DI INCENDIO ..... 14 RISCHIO DI ESPLOSIONE............14 LIVELLO DI PRESSIONE ACUSTICA .......... 14 VIBRAZIONI .................. - Seite 8 Indice generale SOLLEVAMENTO MACCHINA ............. 24 POSIZIONAMENTO DELLA MACCHINA ........24 IDENTIFICAZIONE COMPONENTI .........25 TARGHETTA IDENTIFICATIVA ............. 25 COLLEGAMENTI ..............28 ALLACCIAMENTO IDRICO ............28 AVVERTENZE PER UN CORRETTO UTILIZZO DELLE POMPE ROTATIVE ............29 ALLACCIAMENTO ELETTRICO ........... 31 MESSA IN FUNZIONE .............34 PRIMO AVVIAMENTO ..............
- Seite 9 Indice generale ACCENSIONE/ SPEGNIMENTO GRUPPI .......52 ALLARMI ..................52 MALFUNZIONAMENTI CAUSE - SOLUZIONI ......54 MESSA FUORI SERVIZIO TEMPORANEA ......58 15.1 RIMESSA IN SERVIZIO MACCHINA ..........58 VERIFICHE E CONTROLLI DOPO UNA LUNGA INATTIVITÀ ................58 PULIZIA ..................60 17.1 AVVERTENZE GENERALI DI PULIZIA ........60 17.2 MANUTENZIONE ORDINARIA ............
- Seite 10 Indice generale...
- Seite 11 Norme e avvertenze generali NORME E AVVERTENZE GENERALI NORME E AVVERTENZE GENERALI ........12 AVVERTENZE GENERALI ............12 RIFERIMENTI NORMATIVI ............13 DESCRIZIONE SIMBOLOGIE ............13 PREDISPOSIZIONI A CARICO DELL’ACQUIRENTE....13 OPERAZIONI DI EMERGENZA IN CASO DI INCENDIO ..... 14 RISCHIO DI ESPLOSIONE............14 LIVELLO DI PRESSIONE ACUSTICA ..........
-
Seite 12: Norme E Avvertenze Generali
Norme e avvertenze generali NORME E AVVERTENZE GENERALI “OFF” (O) , in modo da togliere l’alimentazione elettrica alla macchina durante l’intervento AVVERTENZE GENERALI dell’operatore. - Il presente manuale è parte integrante della - L’impianto di alimentazione elettrica, macchina e deve essere conservato con cura dell’acquirente, deve essere provvisto di per ogni ulteriore consultazione. -
Seite 13: Riferimenti Normativi
Norme e avvertenze generali buona tecnica, secondo le direttive in vigore e in questo manuale sono stati usati i seguenti nel rispetto delle norme riguardanti la salute e simboli: sicurezza dei lavoratori indicate nelle leggi vigenti nel paese di utilizzo. Pericolo dovuto ad elettricità... -
Seite 14: Operazioni Di Emergenza In Caso Di Incendio
DICHIARAZIONE PER I MATERIALI IN altro utilizzo è da considerarsi uso improprio e CONTATTO CON ALIMENTI quindi pericoloso. Con la presente il costruttore SANREMO S.r.l. dichiara che i materiali impiegati nei suoi prodotti sono conformi al regolamento CE n° 1935/2004. - Seite 15 Sicurezze SICUREZZE SICUREZZE ................16 TARGHETTE DI SICUREZZA ............16 PROTEZIONI DI SICUREZZA............16 ZONE OPERATORE ..............16 ZONE A PERICOLO RESIDUO ............ 16 ZONE PERICOLOSE ..............17...
-
Seite 16: Sicurezze
Sicurezze SICUREZZE - valvola di sovrapressione posta sulla caldaia; - valvola di non ritorno posta sul circuito idrico. TARGHETTE DI SICUREZZA Sicurezze elettriche/elettroniche In tutte le zone pericolose per l’operatore o per il tecnico sono presenti delle targhette di avvertenza Le sicurezze elettriche/elettroniche sono le con pittogrammi esplicativi. -
Seite 17: Zone Pericolose
Sicurezze 2.5 ZONE PERICOLOSE Le zone pericolose sono tutte le zone poste all’interno della macchina, sotto ai ripari di sicurezza, dove il tecnico può operare durante le operazioni di riparazione. Queste sono zone di esclusiva competenza del tecnico. - Seite 19 Descrizione macchina- dati tecnici DESCRIZIONE MACCHINA- DATI TECNICI DESCRIZIONE MACCHINA .............20 DATI TECNICI................20...
-
Seite 20: Descrizione Macchina
Descrizione macchina- dati tecnici DESCRIZIONE MACCHINA La macchina è realizzata per la preparazione di caffè espresso e bevande calde. Di seguito vengono elencate le principali Tramite gli appositi comandi posizionati sulla caratteristiche della macchina per caffè espresso parte frontale della macchina avviene l’erogazione automatica. - Seite 21 Descrizione macchina- dati tecnici GRUPPI 2- 2 TALL 3 - 3 TALL Capacita caldaia Litri Peso netto Peso lordo Tensione di alimentazione 220-240 1N~ / 380-415 3N~ Potenza resistenza caldaia (230V) 3,5 / 4,5 3,5 / 4,5 (caldaia 1) Potenza resistenza caldaiette (230V) (caldaia 2) Potenza resistenza gruppi Potenza resistenza scaldatazze...
- Seite 23 Trasporto, disimballo e componenti TRASPORTO, DISIMBALLO E COMPONENTI DISIMBALLO E POSIZIONAMENTO........24 DISIMBALLO DELLA MACCHINA..........24 SOLLEVAMENTO MACCHINA ............. 24 POSIZIONAMENTO DELLA MACCHINA ........24 IDENTIFICAZIONE COMPONENTI ........25 TARGHETTA IDENTIFICATIVA ............. 25...
-
Seite 24: Disimballo E Posizionamento
Trasporto, disimballo e componenti DISIMBALLO E POSIZIONAMENTO La comunicazione di eventuali danneggiamenti o anomalie e IMPORTANTE: le operazioni di di non conformità deve essere disimballo e di posizionamento tempestiva e comunque deve della macchina devono essere pervenire entro 8 giorni dalla effettuate da un tecnico data di ricevimento della specializzato ed autorizzato. -
Seite 25: Identificazione Componenti
Trasporto, disimballo e componenti IDENTIFICAZIONE COMPONENTI MADE IN ITALY Via G. Bortolan, 52 31050 VASCON (TV) ITALY type S.N. boiler 1: P.max: boiler 2: water supply: Legenda 6.1 TARGHETTA IDENTIFICATIVA 1) Macchina caffè I dati presenti nella targhetta identificativa sono i 2) Manuale istruzioni seguenti: 3) Dichiarazione di conformità... - Seite 26 Trasporto, disimballo e componenti...
- Seite 27 Collegamenti COLLEGAMENTI COLLEGAMENTI ..............28 ALLACCIAMENTO IDRICO ............28 AVVERTENZE PER UN CORRETTO UTILIZZO DELLE POMPE ROTATIVE ..............29 ALLACCIAMENTO ELETTRICO ........... 31...
-
Seite 28: Collegamenti
Collegamenti 7 COLLEGAMENTI Carico Carico (per versione con pompa incorporata) - Collegare il tubo di carico (7) ad un addolcitore (8) interponendo il filtro per le impurità (9) in IMPORTANTE: le operazioni dotazione di allacciamento devono - Installare prima dell’addolcitore (8) un rubinetto essere effettuate da un tecnico di parzializzazione (10) per separare l’impianto specializzato ed autorizzato. -
Seite 29: Avvertenze Per Un Corretto Utilizzo Delle Pompe Rotative
Collegamenti - Collegare il tubo (7) che fuoriesce dalla 7.2 AVVERTENZE PER UN CORRETTO macchina al raccordo di mandata della pompa UTILIZZO DELLE POMPE ROTATIVE (12). 1) Corretto allineamento tra pompa e motore - Collegare il tubo (11) in dotazione al raccordo A volte la rumorosità... - Seite 30 Collegamenti funzionare a secco solo per brevi periodi di 7) Colpi d’ariete tempo (pochi secondi), in caso di funzionamento L’apertura dell’elettrovalvola, se prevista prolungato senz’acqua la tenuta, non essendo dopo la mandata della pompa, deve avvenire, raffreddata adeguatamente, raggiunge per evitare colpi d’ariete, in anticipo rispetto temperature molto elevate fino alla rottura all’accensione della pompa.
-
Seite 31: Allacciamento Elettrico
Collegamenti 7.3 ALLACCIAMENTO ELETTRICO - Verificare che tutti gli interruttori siano in posizione OFF prima di collegare elettricamente la macchina. - È assolutamente obbligatorio il collegamento di messa a terra, nonché la corrispondenza dell’impianto con le normative vigenti nel paese di installazione. - Controllare la tensione dell’alimentazione (vedi targa segnaletica);... - Seite 32 Collegamenti...
-
Seite 33: Messa In Funzione
Messa in funzione MESSA IN FUNZIONE MESSA IN FUNZIONE .............34 PRIMO AVVIAMENTO ..............34 REGOLAZIONE FUNZIONI ............35 REGOLAZIONE DEL MACINADOSATORE ........35 PROVE DI EROGAZIONE CAFFÈ ..........35 CONSEGNA FINALE ..............35... -
Seite 34: Primo Avviamento
Messa in funzione MESSA IN FUNZIONE - Attendere il raggiungimento della temperatura impostata del vapore “122°C” e dell’acqua caffè 8.1 PRIMO AVVIAMENTO “93°C” indicate rispettivamente sul display (4) e (12) di ogni gruppo di erogazione controllare sul display (4) che la pressione in caldaia sia di circa 1 - 1,2 bar (0,1 - 0,12 MPa) e che la IMPORTANTE: le operazioni di pressione di alimentazione idrica di rete non... -
Seite 35: Regolazione Funzioni
Messa in funzione tazzine sotto, e effettuare alcune erogazioni 9.1 REGOLAZIONE DEL MACINADOSATORE abilitando di volta in volta i tre tipi di estrazioni tramite i relativi pulsanti della tastiera (10). Installare, regolare e preparare il Controllare la corretta erogazione dell’acqua in macinadosatore come indicato tazza. - Seite 36 Messa in funzione...
-
Seite 37: Uso Della Macchina
Uso della macchina USO DELLA MACCHINA USO DELLA MACCHINA ............38 10.1 DESCRIZIONE COMPONENTI ............ 38 10.2 DESCRIZIONE COMANDI ............39 10.3 PREPARAZIONE DEL CAFFÈ ............40 10.4 PREPARAZIONE DEL CAPPUCCINO.......... 42 10.5 RISCALDAMENTO DI UNA BEVANDA ......... 43 10.6 PREPARAZIONE DEL THE, CAMOMILLA ECC ......43... -
Seite 38: Descrizione Componenti
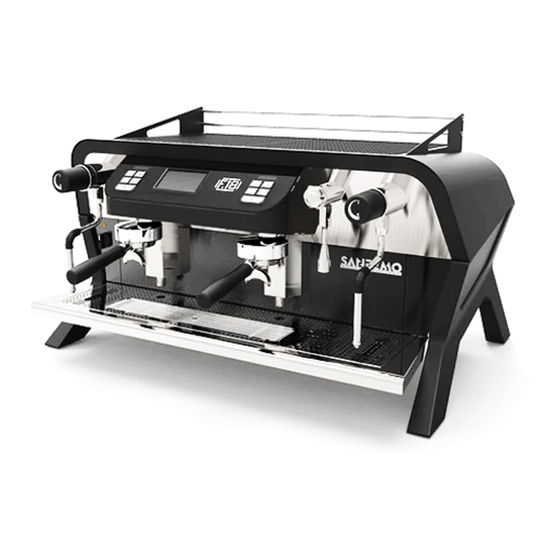
Uso della macchina 10 USO DELLA MACCHINA 10.1 DESCRIZIONE COMPONENTI LEGENDA 1.Bacinella 7.Display funzioni generali 2.Gruppo con porta filtro 8.Lancia acqua 3.Lancia vapore 9.Interruttore On/Off 4.Manopola rubinetto vapore 10.Piano scalda tazze 5.Tastiera 6.Display gruppo... -
Seite 39: Descrizione Comandi
Uso della macchina 10.2 DESCRIZIONE COMANDI Tastiera 7 tasti (opzionale) (3) Manopola rubinetto vapore (1) Ruotata in senso antiorario eroga vapore dalla lancia vapore (2). Per bloccare l’erogazione del vapore ruotare la manopola in senso orario chiudendo il rubinetto. Tasto per caffé espresso Tasto per caffé... -
Seite 40: Preparazione Del Caffè
Uso della macchina Tasto tazza grande singola Tasto erogazione doppio caffè espresso (C) Posizionare una tazzina sotto il porta filtro singolo quindi premere il tasto per avviare l’erogazione del Posizionare due tazzine sotto il portafiltro doppio caffè. quindi premere il tasto per avviare l’erogazione dei Il tasto selezionato rimane illuminato per tutta la due caffè. -
Seite 41: Preparazione Del Caffè
Uso della macchina Display necessaria per l’immediato fabbisogno; il caffè macinato lasciato per parecchio tempo perde Il display è di tipo “touch”. le sue qualità aromatiche e le sostanze grasse Durante il funzionamento normale della macchina contenute irrancidiscono. si visualizza la seguente videata, in fase di Erogazione del caffè... -
Seite 42: Preparazione Del Cappuccino
Uso della macchina 10.4 PREPARAZIONE DEL CAPPUCCINO Per preparare un cappuccino in modo professionale occorre “montare” latte fresco (± 65 ÷ 70 °C Max) fino ad ottenere una schiuma che verrà versata su di un caffè espresso precedentemente erogato. ATTENZIONE: Fare attenzione che la lancia (2) è... -
Seite 43: Riscaldamento Di Una Bevanda
Uso della macchina 10.5 RISCALDAMENTO DI UNA BEVANDA La quantità di latte per un cappuccino è di circa 125 cc (1/4 di litro). - Posizionare la lancia (2) sulla griglia e tramite - Tenere il beccuccio della lancia vapore (3) la manopola (1) erogare vapore per uno/due appena sotto la superficie del latte;... - Seite 44 Uso della macchina...
- Seite 45 Programmazione PROGRAMMAZIONE PROGRAMMAZIONE ...............46 11.1 PROGRAMMAZIONE DOSI ............46 11.2 PROGRAMMAZIONE TRAMITE DISPLAY ........47 ACCENSIONE/ SPEGNIMENTO GRUPPI .......52 ALLARMI ..................52...
-
Seite 46: Programmazione
Programmazione 11 PROGRAMMAZIONE È possibile programmare la macchina sia tramite il PROGRAMMAZIONE PREMERE TASTI IN 30 sec display con la funzione Touch, che con le tastiere dei gruppi. • Entro 30 secondi premere il tasto di erogazione 11.1 PROGRAMMAZIONE DOSI che si desidera programmare ad esempio il tasto (A) (caffè... -
Seite 47: Programmazione Tramite Display
Programmazione 11.2 PROGRAMMAZIONE TRAMITE DISPLAY Accensione e spegnimento Premendo il tasto (1) si visualizzerà la seguente Per accedere alla fase di programmazione schermata: premere per 2 secondi il tasto menù indicato dal simbolo presente sul display. Si visualizzano le seguenti videate: Premere CONFERMA per spegnere la macchina, oppure “←”... - Seite 48 Programmazione il giorno della settimana e confermare con il tasto “√”. Premere il tasto “>” per accedere alla modifica dell’ora e confermare con il tasto “√”. Premere il tasto “←” per uscire dalla fase di programmazione. Cambio password Agendo sulla freccia (C) e modificando i valori con i tasti “+”...
- Seite 49 Programmazione può impostare l’orario di auto spegnimento. Visualizzazione contatori Premendo il tasto (3) si visualizzeranno le IMPORTANTE: impostata l’ora seguenti videate: nella videata di autoaccensione la macchina all’orario stabilito si accende in modo che all’arrivo dell’operatore la macchina sia pronta ad erogare caffè;...
- Seite 50 Programmazione per confermare la scelta e premere il tasto “←” per ritornare alla videata principale di programmazione. Impostazioni scaldatazze Premendo il tasto (5) è possibile abilitare o disabilitare il funzionamento dello scaldatazze; si visualizza la seguente videata: Sulla parte superiore del display è visualizzato il gruppo selezionato, per variare la temperatura premere i tasti “+”...
- Seite 51 Programmazione Funzione autosteamer (opzionale) L’autosteamer permette la schiumatura del latte con controllo della temperatura e compressore ad aria inclusi nella lancia vapore. Premendo il tasto (13) si visualizzerà la seguente videata: IMPORTANTE: Non è possibile attivare la preinfusione sul tasto “E”. È...
-
Seite 52: Accensione/ Spegnimento Gruppi
Programmazione 12 ACCENSIONE/ SPEGNIMENTO GRUPPI È possibile impostare l’accensione o lo spegnimento del riscaldamento di uno o più gruppi. Per spegnere il gruppo premere contemporaneamente i tasti (E) e (C) sulla tastiera corrispondente . Quando il gruppo è spento si vedrà la seguente videata sul display del gruppo corrispondente: Per riaccendere il gruppo premere contemporaneamente i tasti (E) e (C). - Seite 53 Malfunzionamento: cause e soluzioni MALFUNZIONAMENTO: CAUSE E SOLUZIONI MALFUNZIONAMENTI CAUSE - SOLUZIONI ......54...
- Seite 54 Malfunzionamento: cause e soluzioni 14 MALFUNZIONAMENTI CAUSE - SOLUZIONI Di seguito elenchiamo alcuni degli inconvenienti che possono verificarsi durante l’uso della macchina. Per tutti gli inconvenienti non compresi nelle presente tabella, rivolgersi al Servizio di Assistenza Tecnica. PROBLEMI CAUSE SOLUZIONI Il rubinetto della rete idrica o i rubinetti del depuratore sono Aprire il rubinetto...
- Seite 55 Malfunzionamento: cause e soluzioni La granulometria del caffe’ Controllare il tempo di macinato non è corretta macinazione e/o regolare la (grana troppo fine o troppo Sfruttamento insufficiente macinatura grossa) del caffe’ Doccia e filtri parzialmente Chiamare il servizio otturati assistenza Durante l’erogazione si Guarnizione sottocoppa Chiamare il servizio...
- Seite 56 Malfunzionamento: cause e soluzioni...
-
Seite 57: Messa Fuori Servizio,Verifiche E E Controlli
Messa fuori servizio,verifiche e e controlli MESSA FUORI SERVIZIO,VERIFICHE E E CONTROLLI MESSA FUORI SERVIZIO TEMPORANEA ......58 15.1 RIMESSA IN SERVIZIO MACCHINA ..........58 VERIFICHE E CONTROLLI DOPO UNA LUNGA INATTIVITÀ ................58... -
Seite 58: Messa Fuori Servizio Temporanea
Messa fuori servizio,verifiche e e controlli 15 MESSA FUORI SERVIZIO TEMPORANEA 16 VERIFICHE E CONTROLLI DOPO UNA LUNGA INATTIVIT Se si prevede di non utilizzare la macchina per lungo periodo è necessario effettuare le seguenti operazioni: ATTENZIONE: le verifiche e - Effettuare le operazioni di manutenzione. - Seite 59 Pulizia PULIZIA PULIZIA ..................60 17.1 AVVERTENZE GENERALI DI PULIZIA ........60 17.2 MANUTENZIONE ORDINARIA ............. 60 17.3 MANUTENZIONE PROGRAMMATA(TECNICO) ......62 17.4 MANUTENZIONE SECONDO NECESSITÀ (TECNICO) ..... 62...
-
Seite 60: Pulizia
Pulizia 17 PULIZIA - Sganciare il portafiltro e svuotarlo. - Rimuovere il filtro (1) ed inserire il filtro cieco 17.1 AVVERTENZE GENERALI DI PULIZIA (2),versare nel filtro cieco del detergente E vietato: specifico per macchine da caffè; per la quantità attenersi alle indicazioni riportare sulla - usare getti d’acqua per la pulizia della macchina;... - Seite 61 Pulizia Rimuovere la griglia e lavarla con acqua corrente IMPORTANTE: il lavaggio dei e detergenti specifici. gruppi deve essere effettuato per tutti i gruppi che compongono la Dopo averla lavata asciugarla completamente con macchina un panno morbido e rimontarla. Controllare le lance vapore che non siano 17.2.b PULIZIA MACCHINA GIORNALIERA incrostate se necessario pulirle utilizzando detergenti specifici.
-
Seite 62: Manutenzione Programmata(Tecnico)
Pulizia 17.3 - MANUTENZIONE PROGRAMMATA(TECNICO) La manutenzione programmata elenca tutte le operazioni che devono essere effettuate con scadenza fissa per garantire il corretto funzionamento della macchina IMPORTANTE: tutte le operazioni di manutenzione programmate devono essere effettuate da un centro di assistenza tecnica. - Seite 63 Assistenza e demolizione ASSISTENZA E DEMOLIZIONE ASSISTENZA TECNICA E RICAMBI ........64 DEMOLIZIONE DELLA MACCHINA ........64 19.1 SMALTIMENTO DELLE SOSTANZE NOCIVE ......64...
-
Seite 64: Demolizione Della Macchina
Assistenza e demolizione 18 ASSISTENZA TECNICA E RICAMBI IMPORTANTE: Per quanto - Per tutti i problemi relativi alla macchina e per concerne lo smaltimento di qualsiasi fabbisogno di ricambi rivolgersi solo sostanze nocive (lubrificanti, alla rete di vendita autorizzata. solventi, prodotti verniciati, etc.) consultare il paragrafo - In caso di riparazioni usare esclusivamente successivo... - Seite 65 General index GENERAL INDEX IMPORTANT SAFEGUARDS ...........70 GENERAL WARNINGS ..............70 REFERENCE STANDARDS ............71 DESCRIPTION OF THE SYMBOLS ..........71 PREPARATION BY THE PURCHASER ........71 EMERGENCY OPERATIONS IN CASE OF FIRE ......72 RISK OF EXPLOSION ..............72 SOUND PRESSURE LEVEL ............
- Seite 66 General index IDENTIFICATION OF COMPONENTS ........81 RATING PLATE ................81 CONNECTIONS ...............84 WATER CONNECTION..............84 WARNING – CORRECT USE OF ROTARY PUMPS....85 ELECTRICAL CONNECTION ............86 COMMISSIONING ..............90 FIRST START-UP ................90 ADJUSTING THE FUNCTIONS ..........91 ADJUSTING THE GRINDER DOSER .......... 91 TESTING COFFEE DELIVERY ............
- Seite 67 General index TROUBLESHOOTING ............110 TEMPORARY DECOMMISSIONING ........114 15.1 STARTING UP THE MACHINE AGAIN ........114 CONTROLLING THE MACHINE AFTER PROLONGED ..114 CLEANING ................116 17.1 GENERAL CLEANING WARNINGS ........... 116 17.2 ROUTINE MAINTENANCE ............116 17.2.a AUTOMATIC WASHING OF THE GROUPS ......116 17.2.b DAILY CLEANING ..............117 17.3 SCHEDULED MAINTENANCE (TECHNICIAN)......
- Seite 68 General index...
- Seite 69 Important safeguards IMPORTANT SAFEGUARDS IMPORTANT SAFEGUARDS ...........70 GENERAL WARNINGS ..............70 REFERENCE STANDARDS ............71 DESCRIPTION OF THE SYMBOLS ..........71 PREPARATION BY THE PURCHASER ........71 EMERGENCY OPERATIONS IN CASE OF FIRE ......72 RISK OF EXPLOSION ..............72 SOUND PRESSURE LEVEL ............
-
Seite 70: Important Safeguards
Important safeguards IMPORTANT SAFEGUARDS disconnection specifications for Over voltage Category III and an adequate earth system 1.1 GENERAL WARNINGS complying with all the requirements of accident prevention standards and regulations. - This instruction booklet is an integral part of the machine and must be kept carefully for future - Do not use adaptors, multiple sockets and/or consultation. -
Seite 71: Reference Standards
Important safeguards or the manufacturer for further instructions To identify operations that must be performed and solutions. exclusively by an technician, we used the symbol: - THESE SAFETY RULES COMPLETE, OR SUPPLEMENT, THE SAFETY STANDARDS AND REGULATIONS IN FORCE LOCALLY. 1.4 PREPARATION BY THE PURCHASER - IF IN DOUBT, ALWAYS REQUEST THE INTERVENTION OF SPECIALISED... -
Seite 72: Emergency Operations In Case Of Fire
DECLARATION FOR MATERIALS IN steam. CONTACT WITH FOOD Only professional operators with adequate The manufacturer, SANREMO s.r.l. hereby knowledge of hygiene and safety standards and declares that the materials used in its products regulations may use the coffee machine. comply with EC regulation 1935/2004. - Seite 73 Safety SAFETY SAFETY ..................74 SAFETY LABELS ................74 SAFETY DEVICES ................ 74 OPERATOR AREAS ..............74 AREAS WITH RESIDUAL RISK ............ 74 DANGEROUS AREAS ..............74...
-
Seite 74: Safety
Safety SAFETY Electrical/electronic safety devices The electrical/electronic safety devices consist of SAFETY LABELS the following: Safety labels with descriptive symbols are present - thermal breakers on the motors; in all areas representing a hazard for operators or technicians. - safety thermostats to control overheating. 2.3 OPERATOR AREAS Labels giving safety instructions The machine is operated by a single operator... - Seite 75 Technical specification TECHNICAL SPECIFICATION DESCRIPTION OF THE MACHINE .........76 TECHNICAL SPECIFICATION ..........76...
-
Seite 76: Description Of The Machine
Technical specification DESCRIPTION OF THE MACHINE machine, coffee is delivered from the group heads and hot water or steam is produced. The main characteristics of the automatic There is a cup warmer on top of the machine. espresso coffee machine are described below. The machine consists of a frame on which all the - Professional 2 or 3 group espresso coffee components are mounted, enclosed with screw-... - Seite 77 Technical specification 2 - 2 TALL 3 - 3 TALL GROUPS Boiler capacity Litri Net weight Gross weight Power supply voltage 220-240 1N~ / 380-415 3N~ Boiler heating element power (230V) 3,5 / 4,5 3,5 / 4,5 Small boiler heating element power (230V) Group heating element power Cup warmer heating element power 0,25...
- Seite 79 Transport, unpacking and components TRANSPORT, UNPACKING AND COMPONENTS UNPACKING AND POSITIONING ...........80 UNPACKING THE MACHINE ............80 LIFTING THE MACHINE ............... 80 MACHINE POSITIONING ............. 80 IDENTIFICATION OF COMPONENTS ........81 RATING PLATE ................81...
-
Seite 80: Unpacking And Positioning
Transport, unpacking and components UNPACKING AND POSITIONING Possible damage, faults or non-conformities must be WARNING: unpacking and communicated rapidly, within positioning operations must be 8 days from receipt of the performed by a specialized and machine. Otherwise the goods authorized technician. are deemed accepted. -
Seite 81: Identification Of Components
Transport, unpacking and components IDENTIFICATION OF COMPONENTS MADE IN ITALY Via G. Bortolan, 52 31050 VASCON (TV) ITALY type S.N. boiler 1: P.max: boiler 2: water supply: Legend 6.1 RATING PLATE Coffee machine The rating plate gives the following data: Instruction booklet A. - Seite 82 Transport, unpacking and components...
- Seite 83 Connections CONNECTIONS CONNECTIONS ...............84 WATER CONNECTION..............84 WARNING – CORRECT USE OF ROTARY PUMPS....85 ELECTRICAL CONNECTION ............86...
-
Seite 84: Connections
Connections 7 CONNECTIONS IMPORTANT: the machine must be connected by a specialised authorised technician. WATER CONNECTION Drain Near the machine there must be a drain (1) with siphon. Connect the end of the drain hose (2) to the fitting (3) on the drain tray and fix with the hose clips. Connect the other end of the drain hose (2) to the drain (1) prepared previously. -
Seite 85: Warning - Correct Use Of Rotary Pumps
For potential lack of feed from city water line SANREMO recommend the 7.2 WARNING – CORRECT USE OF ROTARY installation of a minimum pressure safety switch PUMPS upstream from the pump. -
Seite 86: Electrical Connection
Machines without an equipotential connection To minimize this problem SANREMO suggest to terminal may not be installed in use pumps with flow rate matching the hydraulic kitchens. - Seite 87 Connections 220-240V 385-415V G = Green B = Black W = White Y/G = Yellow/Green BL = Blue BR = Brown...
- Seite 88 Connections...
- Seite 89 Commissioning COMMISSIONING COMMISSIONING ..............90 FIRST START-UP ................90 ADJUSTING THE FUNCTIONS ..........91 ADJUSTING THE GRINDER DOSER .......... 91 TESTING COFFEE DELIVERY ............ 91 FINAL CONSIGNMENT ..............91...
-
Seite 90: Commissioning
Commissioning COMMISSIONING reached, indicated on the display (4) and (12) respectively. On the display (4), check that boiler 8.1 FIRST START-UP pressure is about 1 - 1.2 bars (0.1 - 0.12 MPa) and that the mains water pressure does not exceed 6 bars (0.6 MPa). -
Seite 91: Adjusting The Functions
Commissioning Check correct delivery of water into the cup. 9.1 ADJUSTING THE GRINDER DOSER Install, adjust and prepare the IMPORTANT: We recommend the grinder doser as described in the following maximum quantities: relative manual. • 100 cc maximum continuous delivery of coffee for each group 9.2 TESTING COFFEE DELIVERY •... - Seite 92 Commissioning...
- Seite 93 Operating the machine OPERATING THE MACHINE OPERATING THE MACHINE ...........94 10.1 DESCRIPTION OF THE COMPONENTS ........94 10.2 DESCRIPTION OF CONTROLS ........... 95 10.3 MAKING COFFEE................. 96 10.4 MAKING CAPPUCCINO ............... 98 10.5 HEATING DRINKS ................ 99 10.6 MAKING TEA, CHAMOMILE, ETC..........99...
-
Seite 94: Description Of The Components
Operating the machine 10 OPERATING THE MACHINE 10.1 DESCRIPTION OF THE COMPONENTS LEGEND 1. Tray 7. General function display 2. Group with portafilter 8. Water wand 3. Steam wand 9. ON/OFF switch 4. Steam tap knob 10. Cup warmer 5. Button panel 11. -
Seite 95: Description Of Controls
Operating the machine 10.2 DESCRIPTION OF CONTROLS 7 Button panel (Optional) (3) Steam tap knob (1) When turned anti-clockwise, the knob dispenses steam from the steam tap (2). To stop dispensing steam, turn the knob clockwise to close the tap. Button for espresso coffee B. - Seite 96 Operating the machine Place a cup under the single filter holder, then press the button to start dispensing long black Place 2 cups under the double filter holder, then coffee. press the button to start dispensing double short The selected button remains illuminated for the espresso coffee.
-
Seite 97: Making Coffee
Operating the machine - remote connection (optional) - auto turn on activated - maintenance alarm - generic alarm 5)Date 6)Clock 7)Pressure pump value 10.3 MAKING COFFEE General rules for making good coffee - The cup must be warm and should therefore be taken from the cup warmer. -
Seite 98: Making Cappuccino
Operating the machine left for long periods loses its aroma and the fat becomes rancid. Delivering coffee - Remove the portafilter (1) from the group head by turning it in the direction of the arrow, turn it upside down and knock it on the knock box (2) to empty the grounds . -
Seite 99: Heating Drinks
Operating the machine - Remove the steam wand from the jug, tap the the knob (1) to begin steam delivery. bottom of the jug gently to stabilise the bubbles, - When the drink is hot, stop steam delivery by then with an undulating movement, pour the froth positioning the lever (2) in the central position. - Seite 100 Operating the machine...
- Seite 101 Programming PROGRAMMING PROGRAMMING ..............102 11.1 PROGRAMMING DOSES ............102 GROUP ON/OFF ..............108 ALARMS .................108...
-
Seite 102: Programming
Programming 11 PROGRAMMING - Within 30 seconds, press the dispensing button to be programmed, for example the button (A) The machine can be programmed on the display (single espresso coffee). with the Touch function or with the button panel of While dispensing, the button (A) remains on, the groups. -
Seite 103: Programming On The Display
Programming 1) Machine ON/OFF The screen shows the time and date; in this case the machine is off but powered, all dispensing 2) Program auto-on, auto-off, and the day off units and all functions are disabled, with the 3) Counter display exception of the automatic start-up function. - Seite 104 Programming Date and time The screen displays hour “A” and minutes “B”; press the “+” or “-” buttons to change the value then press the “C” button to confirm the selection and move on to set the minutes. After setting the minutes, press the “√” button to confirm the time for automatic start-up and press the button “>”...
- Seite 105 Programming Counter display Set the cup heating plate Press button (3) to display the following screen: Press button (5) to enable or disable the activation of the cup heating plate; the following screen is displayed: It is possible to enable or disable the heating element of cup heater by pressing the buttons “+”...
- Seite 106 Programming The upper zone of display shows the selected Fine tuning doses group. To modify the temperature press the button Press button (10) to display the following screen: “+” or “-” and press the button “√” to confirm; move to the next screen to set the temperature of following group by pressing the button “>”.
-
Seite 107: Group On/ Off
Programming GROUP ON/ OFF the autosteamer wand will heat and froth the milk to a specific programmed temperature. To program Heating of one or more groups can be set to be on this temperature proceed as follows: or off. - Press button “E” for at least 5 seconds until the If you want to turn heating of one group off, press button turns on flashing. - Seite 108 Programming...
- Seite 109 Troubleshooting TROUBLESHOOTING TROUBLESHOOTING ............110...
-
Seite 110: Troubleshooting
Troubleshooting 14 TROUBLESHOOTING Below is a list of faults and malfunctions which could arise while using the machine. For all problems not included in this table, contact technical assistance. PROBLEM CAUSES REMEDY The mains water or purifying Open the tap filter taps are closed Turn off power for at least 5 The boiler fill level display... - Seite 111 Troubleshooting Coffee leaks from between Faulty group head gasket or the group head and Call technical assistance uneven filter edge portafilter during delivery Dirt in the portafilter prevents coffee from being delivered Clean from the spout Coffee leaks from the edges of the portafilter Worn group gasket Replace...
- Seite 112 Troubleshooting...
- Seite 113 Decomissioning and check DECOMISSIONING AND CHECK TEMPORARY DECOMMISSIONING ........114 15.1 STARTING UP THE MACHINE AGAIN ........114 CONTROLLING THE MACHINE AFTER PROLONGED ..114...
-
Seite 114: Temporary Decommissioning
Decomissioning and check 15 TEMPORARY DECOMMISSIONING Before using the machine, the If you will not be using the machine for a long following operations must be period, proceed as follows: performed: - Perform maintenance. - Clean the machine thoroughly. - Disconnect the water and electricity supplies. - Deliver water from the splitter - Empty the water in the boiler by proceeding as tap upstream of the machine... - Seite 115 Cleaning CLEANING CLEANING ................116 17.1 GENERAL CLEANING WARNINGS ........... 116 17.2 ROUTINE MAINTENANCE ............116 17.2.a AUTOMATIC WASHING OF THE GROUPS ......116 17.2.b DAILY CLEANING ............... 117 17.3 SCHEDULED MAINTENANCE (TECHNICIAN)......118 17.4 EXCEPTIONAL MAINTENANCE (TECHNICIAN) ....... 118...
-
Seite 116: Cleaning
Cleaning 17 CLEANING and add specific detergent for coffee machines. For quantities, follow the instructions on the 17.1 GENERAL CLEANING WARNINGS detergent pack. The following is prohibited: - Cleaning the machine with water jets; - Using alcohol or ammonia based detergents or abrasive pads to clean the machine use detergents specifically for cleaning coffee machines or crockery only. -
Seite 117: Daily Cleaning
Cleaning 17.2.b DAILY CLEANING Check there are no encrustations on the steam wands (2), if necessary clean with specific detergents. IMPORTANT: NEVER use corrosive or abrasive detergents; use detergent specifically for cleaning coffee machines or crockery only. NEVER use water jets to clean the machine. -
Seite 118: Scheduled Maintenance (Technician)
Cleaning 17.3 - SCHEDULED MAINTENANCE (TECHNICIAN) Scheduled maintenance includes all the operations which must be carried out at regular intervals to guarantee correct operation of the machine. IMPORTANT: All scheduled maintenance operations must be carried out by technical assistance. We recommended signing a maintenance agreement with your local technical assistance service to... - Seite 119 Technical assistance and demolition TECHNICAL ASSISTANCE AND DEMOLITION TECHNICAL ASSISTANCE AND SPARE PARTS ....120 SCRAPPING THE MACHINE ..........120 19.1 DISPOSAL OF HARMFUL SUBSTANCES ......... 120...
-
Seite 120: Technical Assistance And Spare Parts
Technical assistance and demolition 18 TECHNICAL ASSISTANCE AND SPARE PARTS IMPORTANT: For information on the disposal of harmful - For spare parts and all problems regarding the substances (lubricants, solvents, machine, contact an authorised dealer only. paints, etc.) please consult the - If repairs are required, use original spare parts following paragraph. - Seite 121 Index général INDEX GÉNÉRAL NORMES ET AVERTISSEMENTS GÉNÉRAUX ....126 AVERTISSEMENTS GÉNÉRAUX ..........126 NORMES DE RÉFÉRENCE ............127 DESCRIPTION DES SYMBOLES..........127 PRÉPARATIONS À LA CHARGE DE L’ACHETEUR ....127 OPÉRATIONS D’URGENCE EN CAS D’INCENDIE ....128 RISQUE D’EXPLOSION ............. 128 NIVEAU DE PRESSION ACOUSTIQUE ........
- Seite 122 Index général SOULÈVEMENT DE LA MACHINE ..........138 POSITIONNEMENT DE LA MACHINE ........138 IDENTIFICATION DES COMPOSANTS ........139 PLAQUE SIGNALÉTIQUE ............139 COLLEGAMENTI ..............142 RACCORDEMENT HYDRIQUE ..........142 CONSEILS POUR UNE UTILISATION CORRECTE DES POMPES ROTATIVES ............... 143 RACCORDEMENT ÉLECTRIQUE ..........145 MISE EN SERVICE ..............145 PREMIER DÉMARRAGE ............
- Seite 123 Index général ALLUMAGE/ARRÊT DES GROUPES ........166 ALARMES ................166 DYSFONCTIONNEMENTS CAUSES - SOLUTIONS ....168 MISE HORS SERVICE TEMPORAIRE ........172 15.1 REMISE EN SERVICE DE LA MACHINE ........172 VÉRIFICATIONS ET CONTRÔLES APRÈS UNE INACTIVITÉ PROLONGÉE ............172 NETTOYAGE ................174 17.1 AVERTISSEMENTS GÉNÉRAUX CONCERNANT LE NETTOYAGE ................
- Seite 124 Index général...
- Seite 125 Normes et avertissements généraux NORMES ET AVERTISSEMENTS GÉNÉRAUX NORMES ET AVERTISSEMENTS GÉNÉRAUX ....126 AVERTISSEMENTS GÉNÉRAUX ..........126 NORMES DE RÉFÉRENCE ............127 DESCRIPTION DES SYMBOLES..........127 PRÉPARATIONS À LA CHARGE DE L’ACHETEUR ....127 OPÉRATIONS D’URGENCE EN CAS D’INCENDIE ....128 RISQUE D’EXPLOSION .............
-
Seite 126: Normes Et Avertissements Généraux
Normes et avertissements généraux NORMES ET AVERTISSEMENTS s’assurer que l’interrupteur général soit sur la position « OFF » (O) afin de couper GÉNÉRAUX l’alimentation électrique à la machine pendant 1.1 AVERTISSEMENTS GÉNÉRAUX l’intervention de l’opérateur. - Ce livret d’utilisation fait partie intégrante de la - L’installation électrique principale de l’acheteur machine et doit être conservé... -
Seite 127: Normes De Référence
Normes et avertissements généraux pratique, en conformité avec les directives et les Danger électrique normes en vigueur dans le pays d’utilisation en matière de santé et de sécurité des travailleurs. - L’inobservance des normes de sécurité et des instructions fournies dans ce livret Danger général ou informations dégage le fabricant de toute responsabilité... -
Seite 128: Opérations D'urgence En Cas D'incendie
Cette zone doit être utilisée seulement ALIMENTAIRES pour cette fonction. Tout emploi différent est considéré incorrect et, par conséquent, Le fabricant, SANREMO S.r.l., par la présente, dangereux. déclare que les matériaux utilisés dans ses produits sont conformes au règlement CE 1935/2004. - Seite 129 Sécurité SÉCURITÉ SÉCURITÉ ................130 ÉTIQUETTES DE SÉCURITÉ............. 130 DISPOSITIFS DE SÉCURITÉ ............. 130 ZONES OPÉRATEUR ..............130 ZONES À RISQUE RÉSIDUEL ........... 130 ZONES DANGEREUSES ............131...
-
Seite 130: Sécurité
Sécurité SÉCURITÉ - soupape de surpression située sur la chaudière ; - clapet anti-retour placé dans le circuit d’eau. ÉTIQUETTES DE SÉCURITÉ Dispositifs de sécurité électriques/ Les étiquettes de sécurité avec des pictogrammes électroniques descriptifs sont présentes sur toutes les surfaces Les dispositifs de sécurité... -
Seite 131: Zones Dangereuses
Sécurité 2.5 ZONES DANGEREUSES Les zones dangereuses sont toutes les zones situées à l’intérieur de la machine, sous les protections de sécurité, où le technicien peut intervenir lors des opérations de réparation. Seul le technicien autorisé peut intervenir dans ces zones. - Seite 133 Description de la machine - données techniques DESCRIPTION DE LA MACHINE - DONNÉES TECHNIQUES DESCRIPTION DE LA MACHINE ..........134 DONNÉES TECHNIQUES ............134...
-
Seite 134: Description De La Machine
Description de la machine - données techniques DESCRIPTION DE LA MACHINE La machine est réalisée et fabriquée pour la préparation de café expresso et de boissons Les caractéristiques principales de la machine à chaudes. café expresso automatique sont décrites ci-après. Le café... - Seite 135 Description de la machine - données techniques GROUPES 2- 2 TALL 3 - 3 TALL Capacité de la chaudière Litres Poids net Poids brut Tension d’alimentation 220-240 1N~ / 380-415 3N~ Puissance de la résistance de la chaudière (230V) 3,5 / 4,5 3,5 / 4,5 (chaudière 1) Puissance de la résistance des petites...
- Seite 137 Transport, déballage et composants TRANSPORT, DÉBALLAGE ET COMPOSANTS DÉBALLAGE ET POSITIONNEMENT ........138 DÉBALLAGE DE LA MACHINE ..........138 SOULÈVEMENT DE LA MACHINE ..........138 POSITIONNEMENT DE LA MACHINE ........138 IDENTIFICATION DES COMPOSANTS ........139 PLAQUE SIGNALÉTIQUE ............139...
-
Seite 138: Déballage Et Positionnement
Transport, déballage et composants DÉBALLAGE ET POSITIONNEMENT La communication de dommages éventuels, défauts IMPORTANT : les opérations de ou non-conformités doit être déballage et de positionnement envoyée rapidement, dans de la machine doivent être les 8 jours à partir de la date effectuées par un technicien de réception de la machine. -
Seite 139: Identification Des Composants
Transport, déballage et composants IDENTIFICATION DES COMPOSANTS MADE IN ITALY Via G. Bortolan, 52 31050 VASCON (TV) ITALY type S.N. boiler 1: P.max: boiler 2: water supply: Légende 6.1 PLAQUE SIGNALÉTIQUE 1) Machine à café La plaque signalétique fournit les informations 2) Livret d’instructions suivantes : 3) Déclaration de conformité... - Seite 140 Transport, déballage et composants...
- Seite 141 Raccordements RACCORDEMENTS RACCORDEMENTS ...............142 RACCORDEMENT HYDRIQUE ..........142 CONSEILS POUR UNE UTILISATION CORRECTE DES POMPES ROTATIVES ............143 RACCORDEMENT ÉLECTRIQUE ..........144...
-
Seite 142: Raccordement Hydrique
Raccordements 7 COLLEGAMENTI Remplissage Remplissage (pour la version avec pompe incorporée) - Connecter le tuyau de remplissage (7) à un IMPORTANT : les opérations adoucisseur d’eau (8), en interposant le filtre de de raccordement doivent être purification de l’eau (9) fourni effectuées par un technicien - Installer un robinet diviseur (10) devant spécialisé... - Seite 143 Raccordements à 100 cm, en laissant au moins 5 cm entre 7.2 CONSEILS POUR UNE UTILISATION celle-ci et les parois extérieures pour éviter la CORRECTE DES POMPES ROTATIVES transmission de vibrations et permettre une 1) Alignement correct entre pompe et moteur recirculation d’air correcte.
- Seite 144 Raccordements 3) Fonctionnement à sec des filetages autres que ceux conseillés et, dans ce cas, pour assurer l’étanchéité d’un raccord Les pompes rotatives à palettes peuvent disposant d’un nombre de filets insuffisant, on doit fonctionner à sec seulement pendant un utiliser de la pâte à...
-
Seite 145: Raccordement Électrique
Raccordements 7.3 RACCORDEMENT ÉLECTRIQUE - S’assurer que tous les interrupteurs soient sur la position OFF avant de procéder au raccordement électrique de la machine. - Il est absolument obligatoire d’effectuer le raccordement au système de mise à la terre, il faut en outre veiller à... - Seite 146 Raccordements...
-
Seite 147: Mise En Service
Mise en service MISE EN SERVICE MISE EN SERVICE ..............148 PREMIER DÉMARRAGE ............148 RÉGLAGE DES FONCTIONS ..........149 RÉGLAGE DU MOULIN-DOSEUR ..........149 ESSAIS DISTRIBUTION CAFÉ ..........149 LIVRAISON FINALE ..............149... -
Seite 148: Premier Démarrage
Mise en service MISE EN SERVICE sorte correctement en déchargeant les bulles d’air éventuelles présentes dans le circuit. 8.1 PREMIER DÉMARRAGE Pour arrêter la distribution, appuyer de nouveau sur la touche enfoncée. - Attendre que la température configurée de IMPORTANT : les opérations de la vapeur «... -
Seite 149: Réglage Des Fonctions
Mise en service robinet de la vapeur en agissant sur le bouton 9.1 RÉGLAGE DU MOULIN-DOSEUR (1) en le déplaçant dans le sens inverse des aiguilles d’une montre et essayer de chauffer Installer, régler et préparer le l’eau. Répéter la même opération avec le bec de moulin-doseur comme décrit dans distribution sur l’autre côté... - Seite 150 Mise en service...
-
Seite 151: Utilisation De La Machine
Utilisation de la machine UTILISATION DE LA MACHINE UTILISATION DE LA MACHINE ..........152 10.1 DESCRIPTION DES COMPOSANTS ......... 152 10.2 DESCRIPTION DES COMMANDES .......... 153 10.3 PRÉPARATION DU CAFÉ ............154 10.4 PRÉPARATION DU CAPPUCCINO ..........156 10.5 RÉCHAUFFEMENT D’UNE BOISSON ........156 10.6 PRÉPARATION DU THÉ, CAMOMILLE, ETC. -
Seite 152: Description Des Composants
Utilisation de la machine 10 UTILISATION DE LA MACHINE 10.1 DESCRIPTION DES COMPOSANTS LÉGENDE 1. Cuvette 7. Écran fonctions générales 2. Groupe avec porte-filtre 8. Buse à eau 3. Buse à vapeur 9. Interrupteur On/Off 4. Bouton robinet vapeur 10. Plan Chauffe-tasses 5. -
Seite 153: Description Des Commandes
Utilisation de la machine 10.2 DESCRIPTION DES COMMANDES Clavier 7 boutons (optionnel) (3) Bouton robinet vapeur (1) En le tournant dans le sens inverse des aiguilles d’une montre, on distribue de la vapeur de la buse vapeur (2). Pour bloquer la distribution, tourner le bouton dans le sens des aiguilles d’une montre en fermant le robinet. - Seite 154 Utilisation de la machine Bouton tasse grande simple Bouton distribution double café expresso (C) Positionner une tasse sous le porte-filtre simple puis appuyer sur le bouton pour faire commencer Positionner deux tasses sous le porte-filtre double la distribution du café. puis appuyer sur le bouton pour faire commencer la La touche sélectionnée reste allumée tout au distribution des deux cafés.
-
Seite 155: Préparation Du Café
Utilisation de la machine Écran Les informations suivantes sont montrées sur l’écran : L’écran est de type tactile. 1) Niveau de l’eau dans la chaudière Pendant le fonctionnement normal de la machine, la page-écran suivante est affichée : lors de la 2) Température chaudière programmation, les pages-écrans qui seront 3) Valeur de pression dans la chaudière à... -
Seite 156: Préparation Du Cappuccino
Utilisation de la machine moulu « brûlerait » dans le groupe et l’expresso - Accrocher le porte-filtre (1) sur le groupe en le obtenu résulterait très amer. tournant dans la direction indiquée par la flèche jusqu’en butée. - Nous recommandons de moudre seulement la quantité... -
Seite 157: Préparation Du Thé, Camomille, Etc
Utilisation de la machine 10.5 RÉCHAUFFEMENT D’UNE BOISSON - Ouvrir la vapeur en agissant sur le bouton (1), à l’intérieur du pot on aura un tourbillon qui formera - Placer la buse (2) sur la grille et à l’aide du bouton une crème compacte. - Seite 158 Utilisation de la machine...
- Seite 159 Programmation PROGRAMMATION PROGRAMMATION ...............160 11.1 PROGRAMMATION DOSES ............. 160 11.2 PROGRAMMATION SUR L’ÉCRAN .......... 161 ALLUMAGE/ARRÊT DES GROUPES ........166 ALARMES ................166...
-
Seite 160: Programmation Doses
Programmation 11 PROGRAMMATION PROGRAMMATION APPUYER SUR LES Il est possible de programmer la machine aussi BOUTONS EN 30 sec bien à travers l’écran avec la fonction tactile qu’avec le clavier des groupes. • Dans les 30 secondes, appuyer sur le bouton de 11.1 PROGRAMMATION DOSES distribution que l’on souhaite programmer, par exemple le bouton (A) (café... - Seite 161 Programmation 11.2 PROGRAMMATION PAR Allumage et arrêt L’INTERMÉDIAIRE DE L’ÉCRAN Beim Drücken vom Knopf (1) sieht man die folgende Bildschirmseite: Pour accéder à la phase de programmation, appuyer sur le bouton menu indiqué par le symbole présent sur l’écran. On affiche les pages-écrans suivantes : Appuyez sur CONFIRM pour éteindre la machine our «...
- Seite 162 Programmation Appuyer sur les boutons « + » et « - » pour régler la date et l’heure de la semaine et confirmer avec le bouton « √ ». Appuyer sur le bouton « > » pour accéder à la modification de l’heure et confirmer avec le bouton «...
- Seite 163 Programmation bouton « √ » pour confirmer l’heure d’allumage automatique. Appuyer sur le bouton « > » et COUNTERS passer à la page-écran suivante où l’on peut configurer l’heure d'arrêt automatique. IMPORTANT : une fois que l’heure est réglée sur la page- écran d’allumage automatique, la machine s’allume à...
- Seite 164 Programmation Configurations chauffe-tasses Configurations température de l’eau pour le café En appuyant sur le bouton (5), il est possible d’activer ou de désactiver le fonctionnement du chauffe- En appuyant sur le bouton (8), on affiche la page- tasses ; la page-écran suivante est affichée : écran suivante : Il est possible d’«...
- Seite 165 Programmation Fonction Autosteamer (en option) L’autosteamer permet d’obtenir le lait avec mousse avec contrôle de la température et compresseur à air inclus dans la buse vapeur. En appuyant sur le bouton (13), on affiche la page- écran suivante : IMPORTANT : iI n’est pas possible d’activer la pré- infusion sur le bouton «...
- Seite 166 Programmation Pour rallumer le groupe, appuyer en même temps sur les boutons (E) et (C). 13 ALARMES Le café n’est pas distribué / l’eau ne sort pas du groupe - Si le groupe ne distribue pas le café ou même en enlevant le porte-filtre l’eau n’est pas distribuée non plus, l’alarme est signalée par l’éclairage clignotant du bouton sélectionné...
- Seite 167 Dysfonctionnement : causes et solutions DYSFONCTIONNEMENT : CAUSES ET SOLUTIONS DYSFONCTIONNEMENTS CAUSES - SOLUTIONS ....168...
- Seite 168 Dysfonctionnement : causes et solutions 14 DYSFONCTIONNEMENTS CAUSES - SOLUTIONS Vous trouverez ci-dessous une liste des inconvénients qui peuvent se vérifier pendant l’utilisation de la machine. Pour des problèmes qui ne sont pas contenus dans ce tableau, contacter le Service d’assistance technique.
- Seite 169 Dysfonctionnement : causes et solutions Il y a une fuite de vapeur Appeler l’assistance sous le bouton du robinet Joint axe robinet défectueux technique pendant l’ouverture La granulométrie du café Vérifier le temps de mouture moulu n’est pas correcte et/ou régler la mouture du Utilisation du café...
- Seite 170 Dysfonctionnement : causes et solutions...
- Seite 171 Mise hors service, vérifications et contrrles MISE HORS SERVICE, VÉRIFICATIONS ET CONTRÔLES MISE HORS DE SERVICE TEMPORAIRE ......172 15.1 REMISE EN SERVICE DE LA MACHINE ........172 VÉRIFICATIONS ET CONTRÔLES APRÈS UNE INACTIVITÉ PROLONGÉE ............172...
-
Seite 172: Mise Hors Service Temporaire
Mise hors service, vérifications et contrrles 15 MISE HORS SERVICE TEMPORAIRE 16 VÉRIFICATIONS ET CONTRÔLES APRÈS UNE Si on prévoit de ne pas utiliser la machine pendant INACTIVITÉ PROLONGÉE une longue période, il faut effectuer les opérations suivantes : ATTENTION : les vérifications et - Effectuer les opérations d’entretien. - Seite 173 Nettoyage NETTOYAGE NETTOYAGE ................174 17.1 AVERTISSEMENTS GÉNÉRAUX CONCERNANT LE NETTOYAGE ................174 17.2 ENTRETIEN ORDINAIRE ............174 17.2.a LAVAGE AUTOMATIQUE DES GROUPES ......174 17.2.b NETTOYAGE QUOTIDIEN DE LA MACHINE ......175 17.3 ENTRETIEN PROGRAMMÉ (TECHNICIEN)......176 17.4 ENTRETIEN EXCEPTIONNEL (TECHNICIEN) ......176...
-
Seite 174: Nettoyage
Nettoyage 17 NETTOYAGE - Décrocher le porte-filtre et le vider. - Enlever le filtre (1) et insérer le filtre aveugle (2), 17.1 AVERTISSEMENTS GÉNÉRAUX verser du détergent spécifique pour machine à CONCERNANT LE NETTOYAGE café dans le filtre aveugle ; suivre les indications Il est interdit : sur l’emballage du détergent pour la quantité... -
Seite 175: Nettoyage Quotidien De La Machine
Nettoyage Enlever la grille et la laver à l’eau courante et avec IMPORTANT : le lavage des des détergents spécifiques. groupes doit être effectué pour tous les groupes qui composent Après le nettoyage, la sécher complètement avec la machine un chiffon doux et la remonter. Vérifier qu’il n’y ait pas d’incrustations sur les 17.2.b NETTOYAGE QUOTIDIEN DE LA buses de la vapeur, les nettoyer si nécessaire... -
Seite 176: Entretien Programmé (Technicien)
Nettoyage 17.3 - ENTRETIEN PROGRAMMÉ (TECHNICIEN) L’entretien programmé comprend toutes les opérations qui doivent être effectuées régulièrement pour garantir le fonctionnement correct de la machine IMPORTANT : toutes les opérations d’entretien programmées doivent être effectuées par un centre d'assistance technique. Il est recommandé... - Seite 177 Assistance et démantèlement ASSISTANCE ET DÉMANTÈLEMENT ASSISTANCE TECHNIQUE ET PIÈCES DE RECHANGE..178 DÉMANTÈLEMENT DE LA MACHINE ........178 19.1 ÉLIMINATION DES SUBSTANCES NOCIVES ......178...
-
Seite 178: Démantèlement De La Machine
Assistance et démantèlement 18 ASSISTANCE TECHNIQUE ET PIÈCES IMPORTANT : Pour avoir des DE RECHANGE informations concernant - Pour des pièces de rechange et pour tous les l’élimination des substances problèmes concernant la machine, contacter nocives (lubrifiants, solvants, seulement le réseau de vente agréé. peintures etc.), consulter le paragraphe suivant - Si des réparations sont nécessaires, utiliser... - Seite 179 Allgemeiner index ALLGEMEINER INDEX WICHTIGE SCHUTZKLAUSELN ...........184 ALLGEMEINE WARNUNGEN ............ 184 REFERENZSTANDARDS ............185 BESCHREIBUNG DER SYMBOLE..........185 VORBEREITUNGEN VON SEITEN DES KÄUFERS ....185 NOTFALLMASNAHMEN IM BRANDFALL ......... 186 EXPLOSIONSGEFAHR .............. 186 SCHALLDRUCKPEGEL .............. 186 VIBRATIONEN ................186 VERWENDUNGSZWECK ............186 1.10 UNSACHGEMÄSSER GEBRAUCH ...........
- Seite 180 Allgemeiner index ANHEBEN DER MASCHINE ............196 AUFSTELLUNG DER MASCHINE..........196 BESTANDTEILE IDENTIFIZIEREN........197 LEISTUNGSSCHILD ..............197 ANSCHLÜSSE ...............200 WASSERANSCHLUSS ............... 200 HINWEIS ZUM KORREKTEN GEBRAUCH DER ZELLENPUMPEN ..............201 ELEKTRISCHE ANSCHLÜSSE ..........203 INBETRIEBSETZUNG ............206 ERSTINBETRIEBNAHME ............206 FUNKTIONEN EINSTELLEN ..........207 MAHLDOSIERER EINSTELLEN..........
- Seite 181 Allgemeiner index SIEBTRÄGER AN/ AUS MACHEN ........224 ALARME .................224 STÖRUNGSBEHEBUNG ............226 VORÜBERGEHENDE AUSSERBETRIEBSETZUNG ...230 15.1 DAS GERÄT ERNEUT ANSCHALTEN ........230 KONTROLLIEREN DER MASCHINE NACH LÄNGERER STILLSTANDSZEIT ..........230 REINIGUNG ................232 17.1 ALLGEMEINE REINIGUNGSWARNHINWEISE ......232 17.2 ROUTINE INSTANDHALTUNGSARBEITEN ......232 17.2.a AUTOMATISCHES REINIGEN DER SIEBTRÄGER ....
- Seite 182 Allgemeiner index...
- Seite 183 Wichtige schutzklauseln WICHTIGE SCHUTZKLAUSELN WICHTIGE SCHUTZKLAUSELN ...........184 ALLGEMEINE WARNUNGEN ............ 184 REFERENZSTANDARDS ............185 BESCHREIBUNG DER SYMBOLE..........185 VORBEREITUNG VON SEITEN DES KÄUFERS ...... 185 NOTFALLMASNAHMEN IM BRANDFALL ........185 EXPLOSIONSGEFAHR .............. 186 SCHALLDRUCKPEGEL .............. 186 VIBRATION ................. 186 VERWENDUNGSZWECK ............186 1.10 UNSACHGEMÄSSER GEBRAUCH ...........
-
Seite 184: Wichtige Schutzklauseln
Wichtige schutzklauseln WICHTIGE SCHUTZKLAUSELN Position „OFF“ (O) befindet, um die Stromzufuhr von der Maschine zu beenden, während der ALLGEMEINE WARNUNGEN Bediener daran arbeitet. - Diese Anleitung ist ein wesentlicher Teil der - Die Netzstromversorgung des Käufers muss Maschine und muss sorgsam aufbewahrt werden einen automatischen Leistungsschalter vor für zukünftige Beratungen. -
Seite 185: Referenzstandards
Wichtige schutzklauseln im Ausgabeland festgelegt sind, benutzt werden. Hitzegefahr (Verbrennungen) - Die Nichtbeachtung der Sicherheitsnormen und der Anweisungen in dieser Anleitung, spricht den Hersteller von jeglicher Haftung für eventuelle Unfälle oder Schäden an Personen Beschädigungsgefahr der Maschine. frei. Eine andere als die in dieser Anleitung angegebene Verwendung ist als unsachgemäß... -
Seite 186: Notfallmasnahmen Im Brandfall
ERKLÄRUNG FÜR MATERIALIEN IM aufgewärmt werden. Diese darf nur für diesen KONTAKT MIT NAHRUNGSMITTELN Zweck verwendet werden. Jeder andere gilt als Der Hersteller, SANREMO s.r.l. erklärt hiermit, dass unsachgemäß und daher gefährlich. die in ihren Produkten verwendeten Materialien mit der EG-Verordnung 1935/2004 übereinstimmen. -
Seite 187: Sicherheit
Sicherheit SICHERHEIT SICHERHEIT ................188 SICHERHEITSKENNZEICHNUNGEN ........188 SICHERHEITSEINRICHTUNGEN ..........188 BEDIENERBEREICHE..............188 BEREICHE MIT WEITEREN RISIKEN ........188 GEFÄHRLICHE BEREICHE ............189... -
Seite 188: Sicherheitskennzeichnungen
Sicherheit SICHERHEIT - Bedienelemente auf der Oberseite der Maschine oberhalb der Ausgabebereiche; SICHERHEITSKENNZEICHNUNGEN - Ablassventil am Boiler; Sicherheitsetiketten mit beschreibenden Symbolen - Rückschlagventil im Wasserkreislauf. sind in allen Bereichen vorhanden, die eine Gefahr für Bediener oder Techniker darstellen. Elektrische/elektronische Sicherheitseinrichtungen Etiketten, die Die elektrischen/elektronischen Sicherheitshinweise geben, sind... -
Seite 189: Gefährliche Bereiche
Sicherheit 2.5 GEFÄHRLICHE BEREICHE Gefährliche Bereiche sind alle Bereiche innerhalb der Maschine, geschützt durch die Schutzeinrichtungen, wo der Techniker bei der Reparatur der Maschine arbeiten kann. Auf diese Bereiche darf nur von Technikern zugegriffen werden. -
Seite 191: Beschreibung Der Maschine
Beschreibung der maschine - technische spezifiiation BESCHREIBUNG DER MASCHINE - TECHNISCHE SPEZIFIKATION BESCHREIBUNG DER MASCHINE ........192 TECHNISCHE SPEZIFIKATION..........192... -
Seite 192: Technische Spezifikation
Beschreibung der maschine - technische spezifiiation BESCHREIBUNG DER MASCHINE Die Maschine ist entworfen und gebaut, um Espressokaffee und heiSe Getränke zu machen. Die Hauptmerkmale der automatischen Mit Hilfe von Bedienelementen auf der Vorderseite Espressomaschine sind nachfolgend beschrieben. der Kaffeemaschine wird Kaffee von den - Professionelle 2 oder 3 gruppige Siebträger- Siebträgern ausgegeben und heiSes Wasser oder Espresso Kaffeemaschine in der Version „Tall“... - Seite 193 Beschreibung der maschine - technische spezifiiation SIEBTRÄGER 2- 2 TALL 3 - 3 TALL Boilerkapazität Liter Nettogewicht Bruttogewicht Versorgungsspannung 220-240 1N~ / 380-415 3N~ Boilerheizleistung (230 V) 3,5 / 4,5 3,5 / 4,5 (Boiler 1) Kleine Boilerheizleistung (230V) (Boiler 2) Siebträgerheizleistung Tassenwärmerheizleistung 0,25...
-
Seite 195: Transport, Auspacken Und Bestandteile
Transport, auspacken und bestandteile TRANSPORT, AUSPACKEN UND BESTANDTEILE AUSPACKEN UND AUFSTELLUNG ........196 AUSPACKEN DER MASCHINE ..........196 ANHEBEN DER MASCHINE ............196 AUFSTELLUNG DER MASCHINE..........196 BESTANDTEILE IDENTIFIZIEREN........197 TYPENSCHILD ................197... -
Seite 196: Auspacken Und Aufstellung
Transport, auspacken und bestandteile AUSPACKEN UND AUFSTELLUNG Mögliche Schäden, Störungen oder Nichtkonformitäten WICHTIG: Die Kaffeemaschine müssen innerhalb von 8 Tagen muss von einem autorisierten nach Erhalt der Maschine Fachmann ausgepackt und schnell mitgeteilt werden. positioniert werden. Andernfalls gilt die Ware als Um mögliche Hygiene- Risiken angenommen. -
Seite 197: Bestandteile Identifizieren
Transport, auspacken und bestandteile BESTANDTEILE IDENTIFIZIEREN MADE IN ITALY Via G. Bortolan, 52 31050 VASCON (TV) ITALY type S.N. boiler 1: P.max: boiler 2: water supply: Legende 6.1 LEISTUNGSSCHILD 1) Kaffeemaschine Das Leistungsschild gibt folgende Daten an: 2) Gebrauchsanleitung A. Leistung 3) Konformitätserklärung B. - Seite 198 Transport, auspacken und bestandteile...
-
Seite 199: Anschlüsse
Anschlüsse ANSCHLÜSSE ANSCHLÜSSE ...............200 WASSERANSCHLUSS ............... 200 HINWEIS ZUM KORREKTEN GEBRAUCH DER ZELLENPUMPEN ..............201 ELEKTRISCHE ANSCHLÜSSE ..........203... -
Seite 200: Wasseranschluss
Anschlüsse 7 ANSCHLÜSSE Füllen Füllen (für Ausführung mit eingebauter Pumpe) - Ansaugschlauch (7) an einen Wasserenthärter (8) anschlieSen, wobei der mitgelieferte WICHTIG: Die Kaffeemaschine Wasserreinigungsfilter (9) eingefügt wird. muss von einem spezialisierten - Einen Spalthahn (10) vor dem Wasserspender Techniker angeschlossen einbauen (8), um die Kaffeemaschine von der werden Wasserversorgung zu trennen... - Seite 201 Anschlüsse - Verbinden Sie den Schlauch (7), der aus der 7.2 HINWEIS ZUM KORREKTEN GEBRAUCH Kaffeemaschine kommt mit der Förderkupplung an DER ZELLENPUMPEN der Pumpe (12). 1) Korrekte Ausrichtung zwischen Pumpe und - Verbinden Sie ein Ende des Schlauches (11) Motor mit der Ansaugkupplung an der Pumpe und das Gelegentlich kann ein geräuschvoller Betrieb des...
- Seite 202 Anschlüsse 3) Trockenlauf nur wenigen Gewindeumdrehungen gewährleisten. Wenn der Anschluss belastet wird besteht die Die Flügelzellenpumpen können nur für kurze Gefahr, dass ein Span erzeugt wird, wenn zu viel Zeit (wenige Sekunden) trocken laufen. Bei Dichtmasse verwendet wird kann es passieren, einem längeren Betrieb ohne Wasser erreicht die dass davon etwas in die Pumpe eindringt.
-
Seite 203: Elektrische Anschlüsse
Anschlüsse 7.3 ELEKTRISCHE ANSCHLÜSSE - Vergewissern Sie sich, dass alle Schalter in der OFF-Position sind, bevor Sie mit dem elektrischen Anschluss der Kaffeemaschine fortfahren. - Die Kaffeemaschine muss an eine Erdung angeschlossen werden, die den in dem betreffenden Land geltenden Normen und Vorschriften entspricht - Prüfen Sie, ob die Maschinenspannung (siehe... - Seite 204 Anschlüsse...
-
Seite 205: Inbetriebsetzung
Inbetriebsetzung INBETRIEBSETZUNG INBETRIEBSETZUNG ............206 ERSTINBETRIEBNAHME ............206 FUNKTIONEN EINSTELLEN ..........207 DOSIERER EINSTELLEN............207 DIE KAFFEEABGABE TESTEN ..........207 FINALE KONSIGNATION ............207... - Seite 206 Inbetriebsetzung INBETRIEBSETZUNG - Warten Sie, bis die auf dem Display (4) und (12) der jeweiligen Siebträger jeweils eingestellte 8.1 ERSTINBETRIEBNAHME Temperatur für Dampf "122 °C" und Kaffee- Wasser "93 °C" angezeigt wird, und überprüfen Sie auf dem Display (4), dass der Druck im Boiler etwa 1 - 1,2 bar (0,1 - 0,12 MPa) beträgt und der WICHTIG: Die Maschine muss Druck der Wasserversorgung 6 bar (0,6 MPa)
-
Seite 207: Funktionen Einstellen
Inbetriebsetzung - Befestigen Sie den Filter-Halter an den 9.1 MAHLDOSIERER EINSTELLEN Siebträgerköpfen, positionieren Sie die Tassen darunter und führen Sie einige Abgaben durch, Der Dosierer muss wir im so dass die drei Brüheinstellungen mit den Handbuch beschrieben entsprechenden Tasten am Bedienfeld (10) installiert, eingestellt und ausgeführt werden. - Seite 208 Inbetriebsetzung...
-
Seite 209: Betrieb Der Kaffeemaschine
Betrieb der kaffeemaschine BETRIEB DER KAFFEEMASCHINE BETRIEB DER MASCHINE ...........210 10.1 BESCHREIBUNG DER KOMPONENTEN ........210 10.2 BESCHREIBUNG DER BEDIENUNGSELEMENTE ....211 10.3 KAFFEE MACHEN ..............212 10.4 CAPPUCCINO MACHEN ............214 10.5 GETRÄNKE ERHITZEN.............. 215 10.6 TEE MACHEN ................215... -
Seite 210: Beschreibung Der Komponenten
Betrieb der kaffeemaschine 10 BETRIEB DER KAFFEEMASCHINE 10.1 BESCHREIBUNG DER KOMPONENTEN LEGENDE 1.Tablett 7. Display der allgemeinen Funktionen 2. Siebträger mit Filter-Halter 8. Wasserstab 3. Dampfstab 9. Ein/Aus Schalter 4. Aufwärmdrehknopf 10. Tassenwärmer 5.Tastenfeld 6. Siebträgerdisplay... -
Seite 211: Beschreibung Der Bedienungselemente
Betrieb der kaffeemaschine 10.2 BESCHREIBUNG DER Tastenfeld 7 Taste (Optional) (3) BEDIENUNGSELEMENTE Aufwärmdrehknopf(1) Wenn er entgegen dem Uhrzeigersinn gedreht wird, tritt Dampf aus dem Dampfstab (2) aus. Um die Dampfzufuhr zu stoppen, drehen Sie den Drehknopf im Uhrzeigersinn, um den Hahn zu schlieSen. - Seite 212 Betrieb der kaffeemaschine während der anderen ausgehen. Doppelter Espresso- Kaffeetaste (C) Am Ende des Vorgangs leuchten alle Tasten des Bedienfelds. Positionieren Sie beide Tassen unter dem Taste größe Tasse doppelt Filter-Halter, dann drücken Sie Taste, um die Kaffeeabgabe der beiden Kaffee zu starten. Positionieren Sie beide Tassen unter dem Filter-Halter, dann drücken Sie Taste, um die Die gewählte Taste bleibt während dem Vorgang an,...
-
Seite 213: Kaffee Machen
Betrieb der kaffeemaschine 5) Datum 6) Uhrzeit 7) Pumpendruck 10.3 KAFFEE MACHEN Allgemeine Regeln, um guten Kaffee zu machen - Die Tasse muss warm sein und sollte daher aus dem Tassenwärmer genommen werden. Wenn kalt, mit heiSem Wasser abspülen. - Wenn die Tasse kalt ist, würde der plötzliche Temperaturwechsel den Geschmack des Espresso verändern. -
Seite 214: Cappuccino Machen
Betrieb der kaffeemaschine Kaffeeausgabe - Entfernen Sie den Filter-Halter (1) aus dem Siebträgerkopf, indem Sie ihn in Pfeilrichtung drehen, dann umdrehen und klopfen sie ihn auf den Klopfkasten (2). WICHTIG: Klopfen Sie den Filter-Halter niemals auf eine ungeschützte Oberfläche, da dies den Filter beschädigen und die Dichtung beeinträchtigen könnte Verwenden Sie den Filter für einen Kaffee (3) oder... -
Seite 215: Tee Machen
Betrieb der kaffeemaschine 10.5 GETRÄNKE ERHITZEN ist, beenden Sie die Dampfzufuhr, indem der Drehknopf (1) in die Mittelstellung gebracht wird. - Positionieren Sie den Stab (2) über dem Gitter und - Entfernen Sie den Dampfstab aus dem Krug, betätigen Sie den Dampfdrehknopf (1) für ein/zwei klopfen Sie sanft auf den Boden des Kruges, um Sekunden, um den Stab zu entleeren. - Seite 216 Betrieb der kaffeemaschine...
-
Seite 217: Programmierung
Programmierung PROGRAMMIERUNG PROGRAMMIERUNG ............218 11.1 PROGRAMMIERUNG DER MENGE .......... 218 11.2 PROGRAMMIERUNG ÜBER DAS DISPLAY ......219 SIEBTRÄGER AN/ AUS MACHEN ........224 ALARME .................224... -
Seite 218: Programmierung Der Menge
Programmierung 11 PROGRAMMIERUNG PROGRAMMIERUNG TASTEN IN 30 Sek Die Maschine kann über das Display mit der Funktion DRÜCKEN Touch sowie mit den Tastenfeldern der Siebträger programmiert werden. • Drücken Sie innerhalb von 30 Sekunden die 11.1 PROGRAMMIERUNG DER MENGE Taste entsprechend der Art des Kaffees, die Sie programmieren möchten (z. -
Seite 219: Programmierung Über Das Display
Programmierung 11.2 PROGRAMMIERUNG ÜBER DAS DISPLAY Ein- und Ausschalten Beim Drücken vom Knopf (1) sieht man die Um auf die Phase der Programmierung zuzugreifen, folgende Bildschirmseite: die Menü-Taste, die mit dem Symbol dem Display gekennzeichnet ist, drücken für zwei Sekunden. Es werden die folgenden Bildschirme angezeigt: Drücken Sie BESTÄTIGEN um die Maschine auszumachen, oder “←”... - Seite 220 Programmierung Stellen Sie mit den Tasten "+" und "-" Datum und Geben Sie mit dem Pfeil (C) und durch Ändern der Wochentag ein und bestätigen Sie mit der Taste "√". Werte mit den Tasten "+" und "-" das Passwort "3 3 3 3 3"...
- Seite 221 Programmierung -- : -- Der Ruhetag wird durch die Tasten “+” oder “-” Auf dem Bildschirm werden die Stunde "A" und die eingestellt und mit der Taste „√” bestätigt. Minuten "B" angezeigt, die Stunden "A" blinken. Nach der Programmierung des Ruhetags, die Um den Wert zu ändern, drücken Sie die Tasten "+"...
- Seite 222 Programmierung Drücken der Taste "RESET" zurückgesetzt werden WICHTIG: Bereiten Sie vor Vorderlichter Drücken der Taste (6) die Durch Drücken der Taste (4) wird der folgende Maschine auf die automatische Bildschirm angezeigt: Wäsche vor, wie im Kapitel „AUTOMATISCHES WASCHEN DER SIEBTRÄGER“ beschrieben wird.
- Seite 223 Programmierung Bildschirm angezeigt: Durch Drücken der Taste (10) wird der folgende Bildschirm angezeigt: Sie können die Funktion der Pre-Infusion "AKTIVIEREN" oder "DEAKTIVIEREN", indem Sie Die für die gewählte Menge eingestellte Kaffeemenge die Tasten "+" oder "-" drücken und dann die Taste wird in ml auf dem Bildschirm angezeigt.
-
Seite 224: Siebträger An/ Aus Machen
Programmierung heiSes Wasser und Dampf zugeführt wird. Der Durch Drücken der Taste (12) wechseln Sie Reinigungszyklus muss durchgeführt werden, zwischen den beiden Programmierseiten. nachdem der Dampfstab mit Milch verwendet wurde. 12 SIEBTRÄGER AN/ AUS MACHEN Drücken Sie die Taste "√", um die Auswahl zu Das Aufwärmen von einem oder mehreren bestätigen, und dann die Taste "←", um die Siebträgern kann ein- und ausgeschaltet werden. - Seite 225 Störungsbehebung STÖRUNGSBEHEBUNG STÖRUNGSBEHEBUNG ............226...
- Seite 226 Störungsbehebung 14 STÖRUNGSBEHEBUNG Im Folgenden finden Sie eine Liste der Fehler und Störungen, die bei der Benutzung der Maschine auftreten können. Für alle Probleme, die nicht in dieser Tabelle enthalten sind, wenden Sie sich an den technischen Kundendienst. PROBLEME URSACHEN ABHILFEN Die Wasser- oder Reinigungsfilterhähne sind...
- Seite 227 Störungsbehebung Der gemahlene Kaffee ist zu Mahlzeit prüfen und / oder die fein oder zu grob Grobheit einstellen Es wird nicht genügend Kaffee verwendet Duschwand und Filter Rufen Sie technische teilweise verstopft Unterstützung an Kaffee tritt während des Fehlerhafte Vorgangs zwischen dem Rufen Sie technische Siebträgerkopfdichtung oder Siebträgerkopf und dem...
- Seite 228 Störungsbehebung...
-
Seite 229: Außerbetriebnahme, Überprüfungen Und Kontrollen
Außerbetriebnahme, überprüfungen und kontrollen AUßERBETRIEBNAHME, ÜBERPRÜFUNGEN UND KONTROLLEN VORÜBERGEHENDE AUSSERBETRIEBSETZUNG ...230 15.1 DAS GERÄT ERNEUT ANSCHALTEN ........230 KONTROLLIEREN DER MASCHINE NACH LÄNGERER STILLSTANDSZEIT ...........230... -
Seite 230: Vorübergehende Ausserbetriebsetzung
Außerbetriebnahme, überprüfungen und kontrollen 15 VORÜBERGEHENDE 16 KONTROLLIEREN DER AUSSERBETRIEBSETZUNG MASCHINE NACH LÄNGERER STILLSTANDSZEIT Wenn Sie die Maschine längere Zeit nicht benutzen, gehen Sie wie folgt vor: WICHTIG: Nach einer - Wartungsarbeiten durchführen. verlängerten Inaktivität muss die - Trennen Sie die Wasser- und Stromversorgung. Maschine von einem Fachmann kontrolliert werden - Entleeren Sie das Wasser im Kessel, indem Sie... -
Seite 231: Reinigung
Reinigung REINIGUNG REINIGUNG ................232 17.1 ALLGEMEINE REINIGUNGSWARNHINWEISE ......232 17.2 ROUTINE INSTANDHALTUNGSARBEITEN ......232 17.2.a AUTOMATISCHES REINIGEN DER SIEBTRÄGER ......232 17.2.b TÄGLICHE REINIGUNG ..............233 17.3 PLANMÄSSIGE WARTUNG (TECHNIKER) ....... 234 17.4 AUSNAHMEWARTUNG (TECHNIKER) ........234... -
Seite 232: Allgemeine Reinigungswarnhinweise
Reinigung 17 REINIGUNG - Entfernen und entleeren Sie den Filter-Halter. - Entfernen Sie Filter (1), und setzen Sie 17.1 ALLGEMEINE den Blindfilter (2) ein und fügen Sie für REINIGUNGSWARNHINWEISE Kaffeemaschinen spezielles Waschmittel hinzu. Folgendes ist verboten: Für die Mengen folgen Sie den Anweisungen auf dem Waschmittelpaket. -
Seite 233: Tägliche Reinigung
Reinigung Entfernen Sie das Gitter und waschen Sie WICHTIG: Der Waschvorgang es mit fließendem Wasser und spezifischem muss mit allen Siebträgern der Reinigungsmittel. Maschine durchgeführt werden Trocknen Sie es nach dem Waschen gründlich mit einem weichen Tuch ab und legen Sie es dann 17.2.b TÄGLICHE REINIGUNG wieder in die Maschine. -
Seite 234: Ausserordentliche Wartung (Techniker)
Reinigung 17.3 - PLANMÄSSIGE WARTUNG (TECHNIKER) Die planmäSige Wartung umfasst alle Vorgänge, die in regelmäSigen Abständen durchgeführt werden müssen, um einen ordnungsgemäSen Betrieb der Maschine zu gewährleisten. WICHTIG: Alle geplanten Wartungsarbeiten müssen von einer technischen Unterstützung durchgeführt werden. Wir empfehlen Ihnen, eine Wartungsvereinbarung mit Ihrem örtlichen technischen Kundendienst zu unterzeichnen,... -
Seite 235: Technische Unterstützung Und Ausbau
Technische unterstützung und ausbau TECHNISCHE UNTERSTÜTZUNG UND AUSBAU TECHNISCHE UNTERSTÜTZUNG UND ERSATZTEILE..236 VERSCHROTTUNG DER MASCHINE ........236 19.1 ENTSORGUNG SCHÄDLICHER SCHADSTOFFE ....236... -
Seite 236: Technische Unterstützung Und Ersatzteile
Technische unterstützung und ausbau 18 TECHNISCHE UNTERSTÜTZUNG UND ERSATZTEILE WICHTIG: Informationen über die Entsorgung von Schadstoffen - Für Ersatzteile und alle Probleme der Maschine (Schmierstoffe, Lösungsmittel, wenden Sie sich bitte an einen autorisierten Lacie usw.) finden Sie im Fachhändler. folgenden Absatz. - Wenn Reparaturen erforderlich sind, verwenden Sie nur Originalersatzteile, um sicherzustellen, 19.1... - Seite 237 Índice general ÍNDICE GENERAL NORMAS Y ADVERTENCIAS GENERALES ......242 ADVERTENCIAS GENERALES ..........242 ESTÁNDARES DE REFERENCIA ..........243 DESCRIPCIÓN DE LOS SÍMBOLOS ......... 243 PREPARACIÓN A CARGO DEL COMPRADOR......243 OPERACIONES DE EMERGENCIA EN CASO DE INCENDIO ................244 RIESGO DE EXPLOSIÓN............244 NIVEL DE PRESIÓN DE SONIDO ..........
- Seite 238 Índice general ELEVACIÓN DE LA MÁQUINA ........... 254 POSICIONAMIENTO DE LA MÁQUINA ........254 IDENTIFICACIÓN DE LOS COMPONENTES .......255 PLACA DE IDENTIFICACIÓN ............. 255 CONEXIONES ................258 CONEXIÓN HÍDRICA..............258 ADVERTENCIAS PARA UN CORRECTO USO DE LAS BOMBAS ROTATIVAS ............259 CONEXIÓN ELÉCTRICA ............
- Seite 239 Índice general ENCENDIDO/APAGADO DE LOS GRUPOS ......282 ALARMAS ................282 SOLUCIÓN DE PROBLEMAS ..........284 DESMONTAJE TEMPORAL ..........288 15.1 PUESTA EN SERVICIO NUEVAMENTE DE LA MÁQUINA ..288 CONTROLES DE LA MÁQUINA DESPUÉS DE INACTIVIDAD PROLONGADA ..........288 LIMPIEZA ................290 17.1 ADVERTENCIAS GENERALES DE LIMPIEZA ......290 17.2 MANTENIMIENTO DE RUTINA ..........
- Seite 240 Índice general...
- Seite 241 Normas y advertencias generales NORMAS Y ADVERTENCIAS GENERALES NORMAS Y ADVERTENCIAS GENERALES ......242 ADVERTENCIAS GENERALES ..........242 ESTÁNDARES DE REFERENCIA ..........243 DESCRIPCIÓN DE LOS SÍMBOLOS ......... 243 PREPARACIÓN A CARGO DEL COMPRADOR......243 OPERACIONES DE EMERGENCIA EN CASO DE INCENDIO..244 RIESGO DE EXPLOSIÓN............
-
Seite 242: Normas Y Advertencias Generales
Normas y advertencias generales NORMAS Y ADVERTENCIAS máquina mientras el operador está trabajando. GENERALES - La instalación de la red de alimentación del comprador debe incluir un interruptor de circuito ADVERTENCIAS GENERALES automático aguas arriba del interruptor principal - Este manual de instrucciones es parte de la máquina con una distancia de apertura de integrante de la máquina y debe conservarse los contactos conforme a las especificaciones... -
Seite 243: Estándares De Referencia
Normas y advertencias generales trabajadores vigentes en el país de uso. Peligro de electricidad - El incumplimiento de las normas de seguridad y las instrucciones contenidas en este manual de instrucciones exime al fabricante de toda responsabilidad por Información general sobre peligros posibles accidentes o daños a personas o varios cosas. -
Seite 244: Operaciones De Emergencia En Caso De Incendio
EN CONTACTO CON LOS ALIMENTOS normas de higiene y seguridad pueden utilizar la máquina de café. El fabricante, SANREMO s.r.l. declara que los materiales utilizados en sus productos cumplen Se incluye un área para precalentar las tazas. con el Reglamento CE n.º 1935/2004. -
Seite 245: Seguridad
Seguridad SEGURIDAD SEGURIDAD ................246 ETIQUETAS DE SEGURIDAD ............ 246 DISPOSITIVOS DE SEGURIDAD..........246 ÁREAS DEL OPERADOR ............246 ÁREAS CON RIESGO RESIDUAL ..........246 ÁREAS PELIGROSAS ..............247... -
Seite 246: Etiquetas De Seguridad
Seguridad SEGURIDAD - válvula de alivio en la caldera; - válvula de retención en el circuito hídrico. ETIQUETAS DE SEGURIDAD Dispositivos eléctricos y electrónicos de Las etiquetas de seguridad con símbolos seguridad descriptivos están presentes en todas las áreas que representan un peligro para los operadores o Los dispositivos eléctricos/electrónicos de técnicos. -
Seite 247: Áreas Peligrosas
Seguridad 2.5 ÁREAS PELIGROSAS Las áreas peligrosas son todas las áreas dentro de la máquina resguardadas por las protecciones donde el técnico puede trabajar durante las intervenciones de reparación. Solo los técnicos tienen acceso a estas áreas. - Seite 249 Descripción de la máquina - datos técnicos DESCRIPCIÓN DE LA MÁQUINA - DATOS TÉCNICOS DESCRIPTIÓN DE LA MÁQUINA ..........250 ESPECIFICACIONES TÉCNICAS .........250...
-
Seite 250: Descripción De La Máquina
Descripción de la máquina - datos técnicos DESCRIPCIÓN DE LA MÁQUINA La máquina ha sido diseñada y fabricada para la preparación de café espresso y bebidas calientes. A continuación, se describen las principales Mediante los relativos mandos situados en la características de la máquina automática de café... - Seite 251 Descripción de la máquina - datos técnicos GRUPOS 2- 2 TALL 3 - 3 TALL Capacidad de la caldera Litros Peso neto Peso bruto Tensión de alimentación 220-240 1N~ / 380-415 3N~ Tensión del elemento de calentamiento de la caldera (230V) 3,5 / 4,5 3,5 / 4,5 (caldera 1)
- Seite 253 Transporte, desembalaje y componentes TRANSPORTE, DESEMBALAJE Y COMPONENTES DESEMBALAJE Y POSICIONAMIENTO ......254 DESEMBALAJE DE LA MÁQUINA ..........254 ELEVACIÓN DE LA MÁQUINA ........... 254 POSICIONAMIENTO DE LA MÁQUINA ........254 IDENTIFICACIÓN DE LOS COMPONENTES ......255 PLACA DE CARACTERÍSTICAS ..........255...
-
Seite 254: Desembalaje Y Posicionamiento
Transporte, desembalaje y componentes DESEMBALAJE Y POSICIONAMIENTO Los posibles daños, averías o no conformidades deben IMPORTANTE: la máquina debe comunicarse rápidamente, en ser desembalada y colocada un plazo de 8 días a partir de por un técnico autorizado y la recepción de la máquina. De especializado. -
Seite 255: Identificación De Los Componentes
Transporte, desembalaje y componentes IDENTIFICACIÓN DE LOS COMPONENTES MADE IN ITALY Via G. Bortolan, 52 31050 VASCON (TV) ITALY type S.N. boiler 1: P.max: boiler 2: water supply: Leyenda 6.1 PLACA DE IDENTIFICACIÓN 1) Cafetera La placa de identificación incluye los siguientes 2) Manual de instrucciones datos: 3) Declaración de conformidad... - Seite 256 Transporte, desembalaje y componentes...
- Seite 257 Conexiones CONEXIONES CONEXIONES ................258 CONEXIÓN HÍDRICA..............258 ADVERTENCIAS PARA UN CORRECTO USO DE LAS BOMBAS ROTATIVAS........... 259 CONEXIÓN ELÉCTRICA ............261...
-
Seite 258: Conexión Hídrica
Conexiones 7 CONEXIONES Carga Carga (para la versión con bomba incorporada) - Conectar la manguera de carga (7) a un descalcificador (8), interponiendo el filtro IMPORTANTE: la máquina debe purificador de agua (9) suministrado estar conectada por un técnico autorizado especializado. - Instalar un grifo de distribución (10) antes del descalcificador de agua (8), para separar la máquina del sistema hídrico. - Seite 259 Conexiones - Conectar la manguera (7) que sale de la 7.2 ADVERTENCIAS PARA UN CORRECTO máquina al acoplamiento de entrega de la USO DE LAS BOMBAS ROTATIVAS bomba (12). 1) Correcta alineación entre la bomba y el - Conectar un extremo de la manguera (11) motor suministrado al acoplamiento de admisión en A veces, el ruido del grupo es causado...
- Seite 260 Conexiones aspirador sumergido algún centímetro por encima utilizan bridas y niples con roscas diferentes de las recomendadas delegando a la masilla del fondo. impermeable o al teflón una estanqueidad 3) Funcionamiento en seco realizada solo con pocas vueltas de rosca. Si se fuerza la unión, hay riesgo de que se produzca Las bombas rotativas de paletas pueden una viruta;...
-
Seite 261: Conexión Eléctrica
Conexiones 7.3 CONEXIÓN ELÉCTRICA - Asegurarse de que todos los interruptores estén en la posición OFF antes de proceder a la conexión eléctrica de la máquina. - La máquina debe estar conectada a una instalación de tierra conforme a las normas y reglamentaciones vigentes en el país de uso. - Seite 262 Conexiones...
-
Seite 263: Puesta En Funcionamiento
Puesta en funcionamiento PUESTA EN FUNCIONAMIENTO PUESTA EN FUNCIONAMIENTO ..........264 PRIMER ARRANQUE ..............264 AJUSTE DE LAS FUNCIONES ..........265 AJUSTE DEL MOLINILLO DOSIFICADOR ........ 265 SUMINISTRO DE CAFÉ - PRUEBAS ......... 265 ENVÍO FINAL ................265... -
Seite 264: Primer Arranque
Puesta en funcionamiento PUESTA EN FUNCIONAMIENTO - Esperar hasta que se alcance la temperatura del vapor programada “122 °C” y del agua 8.1 PRIMER ARRANQUE café “93 °C” indicadas en la pantalla (4) y (12) respectivamente de cada grupo de suministro. Controlar en la pantalla (4) que la presión en la caldera sea aprox. -
Seite 265: Ajuste De Las Funciones
Puesta en funcionamiento activando los tres tipos de extracción usando los 9.1 AJUSTE DEL MOLINILLO DOSIFICADOR botones correspondientes del panel de botones (10). Controlar el correcto suministro del agua Instalar, ajustar y preparar el en la taza. molinillo dosificador como se describe en el manual ADVERTENCIA: Se recomiendan correspondiente. - Seite 266 Puesta en funcionamiento...
-
Seite 267: Uso De La Máquina
Uso de la máquina USO DE LA MÁQUINA FUNCIONAMIENTO DE LA MÁQUINA .........268 10.1 DESCRIPCIÓN DE LOS COMPONENTES ........ 268 10.2 DESCRIPCIÓN DE LOS MANDOS ..........269 10.3 PREPARACIÓN DEL CAFÉ ............270 10.4 PREPARACIÓN DEL CAPPUCCINO.......... 272 10.5 CALENTAMIENTO DE BEBIDAS ..........273 10.6 PREPARACIÓN TÉ, CAMOMILA, ETC. -
Seite 268: Descripción De Los Componentes
Uso de la máquina 10 FUNCIONAMIENTO DE LA MÁQUINA 10.1 DESCRIPCIÓN DE LOS COMPONENTES LEYENDA 1.Bandeja 7.Visualización funciones generales 2.Grupo con portafiltro 8.Varilla de agua 3.Varilla de vapor 9.Interruptor on/off 4.Manilla del grifo de vapor 10.Calentador de tazas 5.Panel de botones 6.Visualización grupo... -
Seite 269: Descripción De Los Mandos
Uso de la máquina 10.2 DESCRIPCIÓN DE LOS MANDOS Panel de7 botones (Opcional) (3) Manilla grifo vapor (1) Si está girada en sentido antihorario, suministra vapor de la varilla vapor (2). Para bloquear el suministro del vapor girar la manilla en sentido horario cerrando el grifo. Botón de café... - Seite 270 Uso de la máquina presionar el botón para iniciar el suministro del café. Botón de café espresso doble (C) El botón seleccionado permanece encendido durante el suministro, mientras que los demás se apagan. Colocar dos tazas debajo del portafiltro doble, luego presionar el botón para iniciar el suministro de los Al final del suministro, todos los botones del panel dos cafés.
- Seite 271 Uso de la máquina 10.3 PREPARACIÓN DEL CAFÉ Reglas generales para preparar un buen café - La taza debe estar tibia y, por lo tanto, debe tomarse del calentador de taza. Si está fría, enjuagar con agua caliente. - Si la taza está fría, un cambio repentino de la temperatura cambiaría el sabor del espresso.
-
Seite 272: Preparación Del Cappuccino
Uso de la máquina portafiltro ADVERTENCIA: no golpear - Elegir el tipo de café deseado. El botón nunca el portafiltro sobre una presionado se enciende y en la pantalla se superficie desprotegida, ya que visualiza el tiempo de extracción podría dañar el filtro, afectando - Al final del suministro, dejar el portafiltro unido al al sello. - Seite 273 Uso de la máquina y después de cada suministro usando un paño específico para este propósito y reemplazarlo regularmente ADVERTENCIA: Prestar atención ya que cuando la varilla (2) se calienta y pueda causar quemaduras. Para moverla, sostenerla solo de la parte cubierta de goma (4).
- Seite 274 Uso de la máquina...
-
Seite 275: Programación
Programación PROGRAMACIÓN PROGRAMACIÓN ..............276 11.1 PROGRAMACIÓN DE DOSIS ............ 276 11.2 PROGRAMACIÓN DESDE LA PANTALLA ......... 277 ENCENDIDO/APAGADO DE LOS GRUPOS ......282 ALARMAS ................282... - Seite 276 Programación programar (por ejemplo, el botón (A) para un solo café espresso). Durante el suministro, el botón (A) permanece encendido, los otros botones se apagan y el botón (E) parpadea. • Cuando la cantidad necesaria de café haya sido suministrada en la taza, presionar el botón (A) para detener el suministro.
- Seite 277 Programación Dar CONFIRMA para apagar la máquina o, “←” para volver al menú de usuario. En caso de que no se elija ninguna opción dentro de 5 segundos, se vuelve automáticamente a la ventana del menú general. Si se elige apagar la máquina, aparece la ventana a continuación: 1) Encendido y apagado 2) configuración encendido o apagado automático...
- Seite 278 Programación botón “√”. Presionar el botón “>” para acceder a la modificación de la hora y confirmar con el botón “√”. Presionar el botón “←” para salir de la fase de programación. Cambio de contraseña Con la flecha (C) y modificando los valores con los botones “+”...
- Seite 279 Programación IMPORTANTE: una vez COUNTERS ajustada la hora en la pantalla de encendido automático, la máquina se encenderá automáticamente a la hora programada, lista para suministrar el café cuando llegue el operador. Para desactivar la función de encendido automático, ajustar la hora en “--:--”...
- Seite 280 Programación Configuración calentador de tazas Presionar el botón (5) para habilitar o inhabilitar el funcionamiento del calentador de tazas; se visualiza la siguiente pantalla: En la parte superior de la pantalla se visualiza el grupo seleccionado, para cambiar la temperatura presionar los botones “+”...
- Seite 281 Programación IMPORTANTE: no se puede activar la preinfusión en el botón "E". Se puede modificar la duración de la preinfusión para cada botón con los botones “+” y “-”. Para confirmar la elección, presionar el botón “√” Una vez efectuada la programación de la preinfusión, para volver a la pantalla principal de programación, presionar el botón “←”.
- Seite 282 Programación Para volver a encender el grupo, pulsar los botones (E) y (C) juntos. 13 ALARMAS No suministra café/no sale agua del grupo - Si el grupo no suministra café e incluso al quitar el portafiltro no sale agua, el botón seleccionado parpadea y AL7 en la pantalla del grupo correspondiente indican la alarma .
-
Seite 283: Solución De Problemas
Solución de problemas SOLUCIÓN DE PROBLEMAS SOLUCIÓN DE PROBLEMAS ..........284... - Seite 284 Solución de problemas 14 SOLUCIÓN DE PROBLEMAS A continuación se muestra una lista de anomalías que podrían surgir durante el uso de la máquina. Para todos los problemas no incluidos en esta tabla, contactar con la asistencia técnica. PROBLEMAS CAUSAS SOLUCIONES El grifo de la red hídrica o los grifos del filtro de purificación...
- Seite 285 Solución de problemas Comprobar el tiempo de El café molido es demasiado molido o la rugosidad de fino o demasiado grueso Las cantidad de café molienda utilizada no es suficiente Pantalla de ducha y filtros Llamar a la asistencia técnica parcialmente obstruidos El café...
- Seite 286 Solución de problemas...
- Seite 287 Desmontaje, controles y verificaciones DESMONTAJE, CONTROLES Y VERIFICACIONES DESMONTAJE TEMPORAL ..........288 15.1 PUESTA EN FUNCIONAMIENTO NUEVAMENTE DE LA MÁQUINA................. 288 CONTROLES DE LA MÁQUINA DESPUÉS DE INACTIVIDAD PROLONGADA ..........288...
- Seite 288 Desmontaje, controles y verificaciones 15 DESMONTAJE TEMPORAL 16 CONTROLES DE LA MÁQUINA DESPUÉS DE INACTIVIDAD Si no se va a utilizar la máquina durante un PROLONGADA período prolongado, seguir las indicaciones a continuación: ADVERTENCIA: después de - realizar el mantenimiento; una inactividad prolongada, la - desconectar el suministro hídrico y eléctrico;...
- Seite 289 Limpieza LIMPIEZA LIMPIEZA ................290 17.1 ADVERTENCIAS GENERALES DE LIMPIEZA ......290 17.2 MANTENIMIENTO DE RUTINA ..........290 17.2.a LAVADO AUTOMÁTICO DE LOS GRUPOS ......290 17.2.b LIMPIEZA DIARIA ..............291 17.3 MANTENIMIENTO PROGRAMADO (TÉCNICO) ....... 292 17.4 MANTENIMIENTO EXCEPCIONAL (TÉCNICO) ......292...
-
Seite 290: Mantenimiento De Rutina
Limpieza 17 LIMPIEZA - Retirar y vaciar el portafiltro. - Retirar el filtro (1), introducir el filtro ciego 17.1 ADVERTENCIAS GENERALES DE (2) y agregar detergente específico para las LIMPIEZA máquinas de café. Para las cantidades, seguir Se prohíbe lo siguiente: las instrucciones indicadas en el envase del detergente. -
Seite 291: Limpieza Diaria
Limpieza IMPORTANTE: se deben limpiar retirar la rejilla y lavar con agua corriente y todos los grupos que forman detergente específico; parte de la máquina después del lavado, secar completamente con un paño suave, luego volver a colocar en la máquina; 17.2.b LIMPIEZA DIARIA comprobar que no haya incrustaciones en las varillas de vapor, si es necesario limpiar con... - Seite 292 Limpieza 17.3 - MANTENIMIENTO PROGRAMADO (TÉCNICO) El mantenimiento programado incluye todas las operaciones que deben realizarse en intervalos regulares para garantizar el correcto funcionamiento de la máquina. IMPORTANTE: todas las operaciones de mantenimiento programadas deben realizarse mediante asistencia técnica. Se recomienda firmar un acuerdo de mantenimiento con su servicio de asistencia técnica local para...
- Seite 293 Asistencia y desguace ASISTENCIA Y DESGUACE ASISTENCIA TÉCNICA Y RECAMBIOS .......294 DESGUACE DE LA MÁQUINA ..........294 19.1 ELIMINACIÓN DE SUSTANCIAS NOCIVAS ......294...
-
Seite 294: Desguace De La Máquina
Asistencia y desguace 18 ASISTENCIA TÉCNICA Y RECAMBIOS IMPORTANTE: En cuando a - Para piezas de recambio y todos los problemas la eliminación de sustancias relacionados con la máquina, contactar con un nocivas (lubricantes, distribuidor autorizado. disolventes, productos pintados, etc.) consultar el capítulo - Si se requieren reparaciones, utilizar piezas de siguiente recambio originales únicamente para garantizar...