Pfannenberg DTS Serie Betriebsanleitung
Anbau-und einbau-kühlgeräte
Vorschau ausblenden
Andere Handbücher für DTS Serie:
- Betriebsanleitung (409 Seiten) ,
- Betriebs- und montageanleitung (24 Seiten) ,
- Betriebsanleitung (360 Seiten)

Verwandte Anleitungen für Pfannenberg DTS Serie


Inhaltszusammenfassung für Pfannenberg DTS Serie
- Seite 1 Betriebsanleitung Anbau-und Einbau-Kühlgeräte Serie DTS und DTI 6201 / 6301 Standard-Controller (SC) – 400 V 2~ Originalanleitung – Version 1.4, Oktober 2020...
-
Seite 2: Inhaltsverzeichnis
Zu dieser Anleitung ................................5 Nutzung und Aufbewahrung ............................5 Haftungsausschluss ............................... 5 Erläuterung der Hinweise ............................... 6 Auszeichnung von Inhalten ............................7 1.4.1 Handlungsanweisungen ............................7 1.4.2 Links und Querverweise ............................7 Sicherheit ................................... 8 Bestimmungsgemäße Verwendung ..........................8 2.1.1 Zulässige Einsatzbedingungen .......................... - Seite 3 Montage und Erstinbetriebnahme ..........................22 Sicherheitshinweise ..............................22 Transport ..................................23 4.2.1 Kühlgerät transportieren ............................23 4.2.2 Krantransport................................24 Lagerung ..................................25 Auspacken ................................... 25 Montage ..................................26 4.5.1 Allgemeines ................................26 4.5.2 Montage DTS-Kühlgerät (Seitenanbau) ......................... 27 4.5.3 Montage DTI-Kühlgerät (Einbau)..........................29 Elektrischer Anschluss ..............................
- Seite 4 Außerbetriebnahme ................................. 55 Vorübergehende Außerbetriebnahme .......................... 55 Endgültige Außerbetriebnahme ........................... 55 Demontage und Entsorgung ............................56 Sicherheitshinweise ..............................56 Demontage .................................. 57 Entsorgung .................................. 57 Ersatzteile und Zubehör ..............................58 Stichwortindex ................................. 59 Betriebsanleitung | Anbau-und Einbau-Kühlgeräte | Standard-Controller (SC) – 400 V 2~ | 086100003d 4/60...
-
Seite 5: Zu Dieser Anleitung
Abbildungen in dieser Anleitung dienen dem grundsätzlichen Verständnis und können von der tatsächlichen Ausführung abweichen. Haftungsausschluss Pfannenberg haftet nicht für etwaige Fehler in dieser Dokumentation. Eine Haftung für mittelbare und unmittelbare Schäden, die im Zusammenhang mit der Lieferung oder dem Gebrauch dieser Dokumentation entstehen ist ausgeschlossen, soweit dies gesetzlich zulässig ist. -
Seite 6: Erläuterung Der Hinweise
Erläuterung der Hinweise Die Warnhinweise werden durch Signalworte eingeleitet, die das Ausmaß der Gefährdung zum Ausdruck bringen. Die Warnhinweise unbedingt einhalten, um Unfälle, Personen- und Sachschäden zu vermeiden. Erläuterung der Warnhinweise in dieser Anleitung: GEFAHR Kurzbeschreibung der Gefahr Das Signalwort GEFAHR kennzeichnet eine unmittelbar drohende Gefahr. Die Nichtbeachtung führt zu schwersten Verletzungen oder zum Tod. -
Seite 7: Auszeichnung Von Inhalten
Auszeichnung von Inhalten 1.4.1 Handlungsanweisungen Handlungsanweisungen werden in dieser Anleitung wie folgt ausgezeichnet: Voraussetzungen Voraussetzungen und zusätzliche Warnhinweise. Benötigtes Werkzeug und Material Für die Handlung benötigtes Werkzeug und Material Vorgehensweise <Handlungsschritte> … – <Zwischenergebnis / Weitere Hinweise> … <Endergebnis> 1.4.2 Links und Querverweise Links und Querverweise werden in dieser Anleitung wie folgt ausgezeichnet. -
Seite 8: Sicherheit
Sicherheit Bestimmungsgemäße Verwendung Die Pfannenberg Anbau- und Einbau-Kühlgeräte, der Serie DTS und DTI, sind stationäre Kühlgeräte zur Wärmeableitung aus Schaltschränken. Sie sind in zwei Ausführungen verfügbar: • Die DTI-Kühlgeräte werden teilversenkt in die Seite oder in die Tür eingebaut. •... -
Seite 9: Vorhersehbare Fehlanwendung
Vorhersehbare Fehlanwendung Die folgenden Punkte beschreiben eine vorhersehbare Fehlanwendung des Gerätes: • Nutzung des Gerätes als Ablageplatz, Arbeitsbühne. • Anbringen von Transporthilfen. • Aufstellung an ungeeigneten Standorten. • Betrieb im Freien. • Betrieb bei einem Überschreiten der zulässigen technischen Daten. Siehe Kapitel "Technische Daten". •... -
Seite 10: Gewährleistungsbestimmungen
Dem Austausch von Teilen durch nicht autorisiertes Personal. 2.4.1 Rücksendung von Geräten Zur Erhaltung von Gewährleistungsansprüchen und zur Rücksendung des Gerätes folgendes beachten: • Dem Kühlgerät eine genaue Beschreibung des Defektes und die von Pfannenberg vergebene SRO (RMA) Nummer beilegen. • Bezugsnachweis (Lieferschein- oder Rechnungskopie) beilegen. •... -
Seite 11: Gerätebeschreibung
Gerätebeschreibung Einsatzbeschreibung Die Pfannenberg Anbau- und Einbau-Kühlgeräte der Serie DTS und DTI sind für die Wärmeableitung aus Schaltschränken konzipiert. Empfindliche Bauteile im Schaltschrank werden geschont. Kondensat, das bei der Kühlung entsteht, wird durch ein eingebautes System abgeführt. • Die Kühlgeräte funktionieren mit Kältemittel, dass sehr schwer entzündet und für die Ozonschicht unschädlich ist. -
Seite 12: Filteradapter (Option)
3.3.1 Filteradapter (Option) G00052 Abb. 1: Filteradapter am Kühlgerät Zum dauerhaften Schutz des externen Luftkreislaufs vor Verschmutzungen kann der optionale Filteradapter (1) mit einer Filtermatte (2) am Lufteinlass (3) des Kühlgerätes montiert werden. Der Filteradapter (1) wird einfach am Lufteinlass (3) eingeklipst. Der Filteradapter wird nur einmal pro Gerät benötigt. Alle Filtertypen sind für den Adapter geeignet. -
Seite 13: Funktionsbeschreibung
Funktionsbeschreibung 3.4.1 Luftkreislauf VORSICHT Verbrennungsgefahr Verbrennungsgefahr durch hohe Temperaturen am Umgebungsluft-Austritt. Abhängig von der Umgebungstemperatur kann der Luftaustritt sehr warm werden. • Keine Körperteile unmittelbar vor den Umgebungsluft-Austritt (A) halten. "Kältekreis", Seite 20 G00001 Frontansicht Seitenansicht Abb 2: Luftkreislauf Schaltschrank DTI/DTS Umgebungsluft-Austritt DTI-Gerätehaube Umgebungsluft-Eintritt... -
Seite 14: Controller
3.4.2 Controller Die Controller sind Regeleinheiten zum Einstellen von kältetechnischen Funktionen und Betriebsdaten. Sie ermöglichen das Auslesen von Systemmeldungen und Diagnosedaten. Die Controller verfügen über eine Serviceschnittstelle, an der unterschiedliche Konfigurationen möglich sind. Außerdem existiert ein Anschluss für Sammelstörmeldungen. G00002 Abb. -
Seite 15: Kältekreislauf
3.4.3 Kältekreislauf G00004 Abb. 5: Kältekreislauf Verdichter Verflüssiger-Ventilator (extern) Verflüssiger Verdampfer-Ventilator (intern) Expansionsventil Elektronische Steuerung mit Temperaturfühler Verdampfer Die Kühlgeräte bestehen aus unterschiedlichen Komponenten, siehe Abb. 5. • Der Verdichter (1) verdichtet das Kältemittel mit hohem Druck. Die Temperatur steigt an. •... -
Seite 16: Sicherheitskonzept
3.4.4 Sicherheitskonzept WARNUNG Verletzungsgefahr durch veränderte Sicherheitseinrichtungen. Nicht funktionierende, veränderte oder mangelhafte Sicherheitseinrichtungen führen zu schweren Unfällen. • Jegliche Veränderungen am Gerät, insbesondere der Sicherheitseinrichtungen, sind verboten. • Bei defekten Sicherheitseinrichtungen das Gerät sofort stilllegen und außer Betrieb nehmen. 3.4.4.1 Sicherheitseinrichtungen •... -
Seite 17: Kondensatbehandlung
3.4.5 Kondensatbehandlung ACHTUNG Beschädigung der Schaltschrank-Komponenten durch Kondensatbildung Schaltschrank-Innentemperaturen unter dem Taupunkt der Umgebungsluft oder beschädigten Schaltschrankdichtungen können zu übermäßiger Kondensatbildung führen. • Die Schaltschrankdichtungen regelmäßig prüfen, um übermäßige Kondensatbildung durch eindringende Umgebungsluft zu vermeiden. • Einen Türkontaktschalter einbauen, um die Kondensatbildung bei geöffnetem Schaltschrank zu vermindern. G00025 Ansicht schräg von unten Abb. -
Seite 18: Typenschild
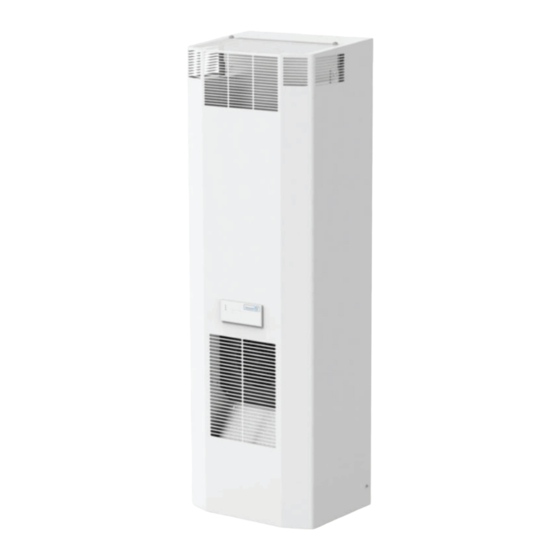
Typenschild WARNUNG Verletzungsgefahr Verletzungsgefahr durch die Nichtbeachtung der Typenschild-Angaben. • Bei Installation und Wartung der Geräte immer die Angaben auf dem Typenschild beachten. HINWEIS • Das Typenschild befindet sich auf der Gehäuserückseite des Kühlgerätes. • Die Abbildung zeigt die standardmäßige Ausführung der EU-Mitgliedsländer. In anderen Ländern kann die Ausführung des Typenschilds abweichen. -
Seite 19: Schilder Und Symbole Am Gerät
Schilder und Symbole am Gerät Die am Gerät angebrachten Schilder und Symbole müssen unbedingt beachtet werden. Die am Gerät angebrachten Schilder und Symbole dürfen nicht entfernt werden und sind in vollständig lesbarem Zustand zu halten. Beschädigte oder unlesbare Schilder und Symbole müssen ersetzt werden. Schild / Symbol Position Beschreibung... -
Seite 20: Technische Daten
Technische Daten 3.7.1 Kältekreis Bezeichnung Model DTI / DTS 6201 Model DTI / DTS 6301 Kälteleistung bei A35 / A35 */** 1000 W 1500 W Kälteleistung bei A50 / A35 */** 780 W 1200 W Kältemittel-Typ * R134A Kältemittelmenge * 600 g Solltemperatur (werkseitig eingestellt) +35 °C (+95 °F) -
Seite 21: Abmessungen
3.7.3 Abmessungen Bezeichnung Model DTI / DTS 6201 Model DTI / DTS 6301 Höhe DTI: 1536 mm DTS: 1539 mm Breite 485 mm Tiefe mit Haube (Standard) 218 mm Einbautiefe DTI 60 mm Gewicht DTI: 58 kg DTI: 60 kg DTS: 61 kg DTS: 64 kg Einbaulage... -
Seite 22: Montage Und Erstinbetriebnahme
Montage und Erstinbetriebnahme Sicherheitshinweise GEFAHR Lebensgefahr durch Stromschlag! Teile können bei geöffnetem Gerät unter Spannung stehen und bei Berührung zum Stromschlag führen. Bei Arbeiten am geöffneten Gerät folgende Punkte beachten: • Arbeiten am elektrischen System dürfen nur von autorisierten Elektrofachkräften durchgeführt werden. •... -
Seite 23: Transport
Transport Zur Vermeidung von Personen- und Sachschäden folgendes beachten: • Arbeiten dürfen nur durch qualifiziertes Fachpersonal erfolgen. • Sicherheitshinweise beachten. WARNUNG Verletzungsgefahr für Personen! Erhöhte Verletzungsgefahr durch unsachgemäßen Transport. • Der Transport des Gerätes darf nur von Personen durchgeführt werden, die hiermit vertraut und über die Gefahren unterrichtet sind sowie die nötige Qualifikation aufweisen. -
Seite 24: Krantransport
4.2.2 Krantransport GEFAHR Lebensgefahr durch schwebende Lasten Kippende oder abstürzende Lasten können zu schweren bis tödlichen Verletzungen führen. • Niemals unter schwebende Lasten treten. • Nur zugelassene Hebezeuge und Anschlagmittel verwenden, die für das Gesamtgewicht der angehängten Last ausgelegt sind. •... -
Seite 25: Lagerung
Lagerung ACHTUNG Verlust der Gewährleistung! Die Nichtbeachtung der Lagerbedingungen führt zum Verlust der Gewährleistung. Bei der Lagerung des Gerätes die folgenden Punkte beachten: • Das Gerät während der Lagerung keinen Temperaturen über +70 °C aussetzen. • Das Gerät immer in Gebrauchslage lagern. Auspacken WARNUNG Verletzungsgefahr! -
Seite 26: Montage
Montage 4.5.1 Allgemeines Für einen sicheren und zuverlässigen Betrieb der Kühlgeräte, folgende allgemeinen Anforderungen sicherstellen: • Den Aufstellungsort des Schaltschrankes so wählen, dass eine ausreichende Be- und Entlüftung des Kühlgerätes gewährleistet ist. Der Mindestabstand von Geräten zueinander oder zur Wand muss 200 mm betragen. •... -
Seite 27: Montage Dts-Kühlgerät (Seitenanbau)
4.5.2 Montage DTS-Kühlgerät (Seitenanbau) 4.5.2.1 Ausschnitte für DTS-Kühlgerät herstellen G00007 Montagebohrungen Montageausschnitte Abb. 9: Außenansicht Schaltschrank, Montagebohrungen und -ausschnitte Bohrungen Montageausschnitte Gerätekontur Voraussetzungen GEFAHR – Lebensgefahr durch Stromschlag. Sicherstellen, dass das Gerät spannungsfrei ist. • Alle Allgemeinen Anforderungen sind erfüllt, siehe "Allgemeines", Seite 26. Benötigtes Werkzeug und Material •... -
Seite 28: Profildichtung Anbringen
4.5.2.2 Profildichtung anbringen ACHTUNG Beschädigung des Schaltschrankes und des Kühlgerätes! Unsachgemäß angebrachte Dichtungen können zu übermäßiger Kondensatbildung im Schaltschrank und dadurch zu Kurzschlüssen und Beschädigungen durch Kondensat führen. • Dichtung so verlegen, dass sie zum Schaltschrank hin abdichtet. • Sicherstellen, dass die Stoßenden der Dichtungen sauber voreinander liegen und das sich der Dichtungsstoß mittig unten im Ausschnitt befindet. -
Seite 29: Montage Dti-Kühlgerät (Einbau)
4.5.3 Montage DTI-Kühlgerät (Einbau) 4.5.3.1 Ausschnitte für DTI-Kühlgerät herstellen G00009 Abb. 11: Außenansicht Schaltschrank, Montageausschnitte Lufteintritt Gerätekontur Luftaustritt Montageausschnitt Voraussetzungen GEFAHR – Lebensgefahr durch Stromschlag. Sicherstellen, dass das Gerät spannungsfrei ist. • Alle Allgemeinen Anforderungen sind erfüllt, siehe "Allgemeines", Seite 26. Benötigtes Werkzeug und Material •... -
Seite 30: Schaltschrank-Montage Dti-Kühlgerät (Einbau)
4.5.3.2 Schaltschrank-Montage DTI-Kühlgerät (Einbau) G00010 Abb. 12: Kühlgerät montieren Schnappfeder Gehäuseausschnitt für Befestigungsfeder Befestigungsfeder (6×) Gehäuseausschnitt für Befestigungsfeder DTI-Kühlgerät Schaltschrankwand / Schaltschranktür HINWEIS Für das Montagevideo der DTI-Kühlgeräte einfach den nebenstehenden QR-Code scannen oder anklicken. Betriebsanleitung | Anbau-und Einbau-Kühlgeräte | Standard-Controller (SC) – 400 V 2~ | 086100003d 30/60... - Seite 31 Voraussetzungen GEFAHR – Lebensgefahr durch Stromschlag. Sicherstellen, dass das Gerät spannungsfrei ist. • Der Ausschnitt für das DTI-Kühlgerät ist angebracht, siehe "Ausschnitte für DTI-Kühlgerät herstellen", Seite 29. Benötigtes Werkzeug und Material • Montagewerkzeug, Befestigungsfedern (Beipack). Vorgehensweise Das Kühlgerät von außen in den Ausschnitt setzen, siehe Abb. 12. Das Kühlgerät in den Schaltschrank bis zum Anliegen der Gerätedichtung durchschieben.
-
Seite 32: Elektrischer Anschluss
Elektrischer Anschluss GEFAHR Lebensgefahr durch Stromschlag! Teile können bei geöffnetem Gerät unter Spannung stehen und bei Berührung zum Stromschlag führen. Bei Arbeiten am geöffneten Gerät folgende Punkte beachten: • Arbeiten am elektrischen System dürfen nur von autorisierten Elektrofachkräften durchgeführt werden. •... -
Seite 33: Elektrischer Schaltplan - Standard-Controller (Sc)
4.6.2 Elektrischer Schaltplan – Standard-Controller (SC) 1,2 - Störmeldung / failure indication / Tür offen / door open / porte ouvert contact sec de défaut Tür geschlossen / door closed / porte fermé 4,5 - Türkontakt / door contact / contact de porte TK TK 1 2 3 4... -
Seite 34: Dip-Schalter Einstellen
4.6.3 DIP-Schalter einstellen OFF 1 G00011 Abb. 14: DIP-Schalter einstellen Befestigungsschrauben Ventilator Untere Schraube (Platinen-Träger) Obere Schraube (Platinen-Träger) Controller Platinen-Träger DIP-Schalter Der DIP-Schalter auf dem Controller ermöglicht das Einstellen von Sollwerten und Grenzwerten für Temperaturen. Im Auslieferzustand ist die werkseitige Grundeinstellung der Werte wie folgt: Parameter Werkseinstellung Sollwert der Schaltschranktemperatur... -
Seite 35: Dip-Schalter Einstellmöglichkeiten
4.6.3.1 Temperaturbereich am DIP-Schalter einstellen Voraussetzungen GEFAHR – Lebensgefahr durch Stromschlag. Sicherstellen, dass das Gerät spannungsfrei ist. • Entladungsphase von 5 Minuten für die elektrischen Komponenten abwarten. Erst danach Gerät öffnen. Vorgehensweise Den Ventilator demontieren, dazu die vier Befestigungsschrauben (1) lösen, siehe Abb. 14 (A). Alle Leitungen vom Ventilator abziehen und Ventilator entfernen. -
Seite 36: Türkontaktschalter
4.6.4 Türkontaktschalter ACHTUNG Beschädigung des Gerätes! Beschädigung des Gerätes und des Controllers durch anlegen von Fremdspannung an Türkontakt-Eingang. • Keine Fremdspannung an den Türkontakt-Eingang anlegen. • Der Türkontakt-Eingang stellt für den Türkontaktschalter eine Kleinspannung (< 20 V, 20 mA) zur Verfügung. Das Anbringen eines Türkontaktschalters erhöht die Sicherheit und verhindert einen erhöhten Kondensatanfall. -
Seite 37: Sammelstörmeldung
4.6.5 Sammelstörmeldung Das Gerät ist mit einem potenzialfreien Wechselkontakt für die Sammelstörmeldung ausgestattet. Klemmen Spannung Strombelastbarkeit Ausführung X54:1 Wurzelkontakt Maximal 230 V maximal 1 A Potenzialfreier Wechselkontakt X54:2 Öffner (NC) X54:3 Schließer (NO) Tab. 6: Sammelstörmeldung Für den Anschluss der Sammelstörmeldung sind drei Anschlüsse vorgesehen. Die Klemmen sind mit der Betriebsmittelkennzeichnung SK markiert. -
Seite 38: Netzanschluss
4.6.6 Netzanschluss GEFAHR Lebensgefahr durch Stromschlag! Nicht angeschlossene oder fehlerhaft angebrachte Schutzleitersysteme können gefährliche Spannungen und Stromschläge erzeugen und schwere Unfälle verursachen. • Arbeiten dürfen nur von qualifiziertem Fachpersonal vorgenommen werden. • Schutzleitersysteme gemäß DIN EN 60204-1, Kap.8.2 ausführen. • Jeder Körper eines elektrischen Betriebsmittels muss mit dem Schutzleitersystem verbunden sein. -
Seite 39: Kühlgerät Elektrisch Anschließen
4.6.6.1 Kühlgerät elektrisch anschließen Um einen sicheren und zuverlässigen Betrieb der Kühlgeräte zu gewährleisten, folgende allgemeinen Anforderungen sicherstellen: • Die Vorschaltung einer einspeiseseitigen Temperaturregelung ist verboten. • Als Leitungsschutz die auf dem Typenschild angegebene Sicherung vorschalten, siehe Kapitel "Typenschild", Seite 18 und "Gerät an die Netzspannung anpassen", Seite 40. -
Seite 40: Gerät An Die Netzspannung Anpassen
4.6.7 Gerät an die Netzspannung anpassen G00024 Werkseinstellungen Vorschalttransformator Eingangswicklung Vorschalttransformator Abb. 16: Netzspannung am Vorschalttransformator anpassen Geräte mit einer Nennspannung von 400 / 460 V können optional an eine andere Netzspannung angeschlossen werden. Dazu muss am Vorschalttransformator die Netzspannung angepasst werden. •... -
Seite 41: Potenzialausgleichsanschlüsse
4.6.8 Potenzialausgleichsanschlüsse Funktionspotenzialausgleich (M8-Gewinde), für einen störungsarmen Signalbezug zwischen Gerät und Schaltschrank. Schutzpotenzialausgleich für metallene Komponenten und Berührungsspannung. G00023 Abb. 17: Pontenzialausgleich / Sicherungen Betriebsanleitung | Anbau-und Einbau-Kühlgeräte | Standard-Controller (SC) – 400 V 2~ | 086100003d 41/60... -
Seite 42: Bedienung
Bedienung Allgemeine Funktionen ACHTUNG Beschädigung des Gerätes Der Betrieb ohne Gerätehaube verhindert ausreichende Luftzufuhr zum Verflüssiger und führt zur Einschränkung der vorgesehenen Kühlfunktion. • Kühlgerät nur mit aufgesetzter Gerätehaube betreiben. G00015 Abb. 18: Funktion elektronische Steuerung Der Standard-Controller (SC) besitzt eine Anzeigeeinheit mit einer grünen LED-Leuchte (1). Über den DIP-Schalter (5) sind verschiedene Schaltschrank-Solltemperaturen sowie obere Grenztemperaturen einstellbar. -
Seite 43: Betrieb Des Kühlgerätes
Das Kühlgerät nur so einsetzen, dass die angegebene Kälteleistung den tatsächlichen Bedarf decken kann. – Es darf nur das angegebene Kältemittel verwendet werden. HINWEIS Die Pfannenberg-Teilenummern für Ersatzteile, siehe Kapitel "Ersatzteile und Zubehör", Seite 58. Betriebsanleitung | Anbau-und Einbau-Kühlgeräte | Standard-Controller (SC) – 400 V 2~ | 086100003d 43/60... -
Seite 44: Serviceschnittstelle
Verfügung. Alternativ einfach den nebenstehenden QR-Code scannen. • Die zugehörige Betriebsanleitung für die ECoolPLANT-Software steht als Download unter My Pfannenberg zur Verfügung HINWEIS Für eine ausführliche Beschreibung der Fehlermeldungen und Hinweise zur Fehlerbehebung siehe Kapitel "Fehlermeldungen", Seite 53. -
Seite 45: Instandhaltung Und Wartung
Instandhaltung und Wartung Sicherheitshinweise GEFAHR Lebensgefahr durch Stromschlag! Teile können bei geöffnetem Gerät unter Spannung stehen und bei Berührung zum Stromschlag führen. Bei Arbeiten am geöffneten Gerät folgende Punkte beachten: • Arbeiten am elektrischen System dürfen nur von autorisierten Elektrofachkräften durchgeführt werden. •... -
Seite 46: Allgemeines
Richtwert von zwei bis sechs Monaten zwischen den Wartungsintervallen. • Die Funktionen der Pfannenberg-Filter sind optimal auf die Kühlgeräte abgestimmt. Deshalb hat der Einsatz von Pfannenberg-Filter positive Auswirkungen auf den Umfang der Wartungsarbeiten. Betriebsanleitung | Anbau-und Einbau-Kühlgeräte | Standard-Controller (SC) – 400 V 2~ | 086100003d... -
Seite 47: Wartungsplan
Wartungsplan Wartungsintervall: Alle zwölf Monate durchführen. Alle zwei bis sechs Monate, in ölhaltiger und staubiger Umgebungsluft, durchführen. Typ: ______________________________________________________________________ Seriennummer: ______________________________________________________________________ Datum der Wartung: ______________________________________________________________________ Ausführende Fachkraft (Name): ______________________________________________________________________ Bezeichnung Gerätebereich / Sicht- To Do Ergebnis Nötige Wartungsarbeiten prüfung Aggregat vor der Wartung Allgemeine Sichtprüfung des Aggregates Prüfung auf Korrosionsschäden Kältekreislauf... -
Seite 48: Wartungsarbeiten
Wartungsarbeiten 6.4.1 Reinigung WARNUNG Unfallgefahr und Bauteilbeschädigungen Unfallgefahr und Bauteilbeschädigungen durch unsachgemäße Reinigung. Das Reinigen der Kühlgeräte mit Wasserstrahl, Dampfstrahl- oder Hochdruckreinigern oder spitzen Gegenständen kann zu Schäden an den elektrischen und elektronischen Baugruppen führen. Fehlfunktionen können Unfälle verursachen. • Kein Reinigen mit Wasserstrahl, Hochdruckreiniger und entzündlichen Reinigungsmitteln. -
Seite 49: Gerätehaube Demontieren
6.4.1.1 Gerätehaube demontieren VORSICHT Quetschgefahr beim Ausbau der Gerätehaube Beim Ausbau und Neueinsetzen der Gerätehaube können Hände und andere Körperteile quetschen. • Keine Körperteile zwischen Rahmen, Federn und dem Geräte-Ausschnitt bringen. • Umsichtig arbeiten und schnittfeste Handschuhe tragen. Voraussetzung GEFAHR – Lebensgefahr durch Stromschlag. Sicherstellen, dass das Gerät spannungsfrei ist. -
Seite 50: Wärmetauscher Reinigen
6.4.1.2 Wärmetauscher reinigen ACHTUNG Beschädigung von Bauteilen Beschädigung der Wärmetauscher-Lamellen durch unsachgemäße Reinigung. • Wärmetauscher-Lamellen mit einer weichen Bürste, mit Druckluft oder mit einem Staubsauger mit Bürstenaufsatz reinigen. HINWEIS Die Zeitintervalle für die Reinigung sind stark abhängig von der Luftverschmutzung der Umgebung. Voraussetzungen GEFAHR –... -
Seite 51: Filtermatten Reinigen
6.4.1.3 Filtermatten reinigen ACHTUNG Beschädigung von Bauteilen Beschädigung der Filtermatten durch unsachgemäße Reinigung. • Wasserstrahl mit hohem Druck vermeiden. • Filtermatte nicht auswringen. • Filtermatten, die verölt oder verfettet sind, sofort austauschen. HINWEIS Die Zeitintervalle für die Reinigung oder den Austausch der Filtermatten sind stark abhängig von der Luftverschmutzung der Umgebung. -
Seite 52: Beheben Von Betriebsstörungen
Beheben von Betriebsstörungen Allgemeines HINWEIS Das Blinken der roten LED-Leuchte auf der Controller-Platine ist keine Störungsanzeige oder Fehlermeldung. Die rote LED-Leuchte zeigt an, dass das Kühlgerät Spannung führt. Störung Mögliche Ursachen Abhilfemaßnahmen Gerät kühlt nicht, Verdampfer-Ventilator Temperatureinstellung zu hoch Temperatureinstellung prüfen. (intern) läuft eingestellt. -
Seite 53: Fehlermeldungen
7.1.1 Fehlermeldungen Bei Geräten mit Standard-Controllern werden die Fehlernummern nicht angezeigt: Mit Hilfe der ECoolPLANT-Software ist es möglich, die Fehlernummern auf dem Computer auszulesen. HINWEIS Das Blinken der roten LED-Leuchte auf der Controller-Platine ist keine Störungsanzeige oder Fehlermeldung. Die rote LED-Leuchte zeigt an, dass das Kühlgerät Spannung führt. Fehler- Nr. - Seite 54 Fehler- Nr. Störung / Geräteverhalten Mögliche Ursachen Abhilfemaßnahmen Er08 LED: Blinkt Sensor 2 (TS2) defekt. Entsprechend dem Gerätetyp, Sensor 2 Verdichter: tauschen. Verdampfer-Ventilator (intern): Sensor 2 ist auf die Platine aufgesteckt, nicht fest Verflüssiger-Ventilator (extern): eingelötet. Störmeldekontakt: Offen Er15 LED: Blinkt Antifreeze (Option): Betriebsneustart, nachdem...
-
Seite 55: Außerbetriebnahme
Werden Kühlgeräte endgültig außer Betrieb genommen oder entsorgt, die Hinweise in Kapitel "Demontage und Entsorgung", Seite 56beachten! HINWEIS Altgeräte werden ebenfalls von Pfannenberg fachgerecht entsorgt. Die Anlieferung an eines unserer Herstellwerke hat kostenfrei zu erfolgen. Betriebsanleitung | Anbau-und Einbau-Kühlgeräte | Standard-Controller (SC) – 400 V 2~ | 086100003d... -
Seite 56: Demontage Und Entsorgung
Demontage und Entsorgung Nachdem das Ende der Nutzungsdauer erreicht ist, muss das Gerät demontiert und umweltgerecht entsorgt werden. Sicherheitshinweise Jegliche Arbeiten dürfen nur durch nachweislich geschultes Personal erfolgen, unter Berücksichtigung: • der Mindestqualifikation • dieser Anleitung • der geltenden örtlichen Vorschriften und Gesetze •... -
Seite 57: Demontage
Gerät in die verschiedenen trennbaren Werkstoffe zerlegen. • Geltende örtliche Arbeitsschutz- und Umweltschutzvorschriften beachten. Entsorgung HINWEIS Altgeräte werden ebenfalls von Pfannenberg fachgerecht entsorgt. Die Anlieferung an eines unserer Herstellwerke hat kostenfrei zu erfolgen. Sofern keine Rücknahme- oder Entsorgungsvereinbarung getroffen wurde, zerlegte Bestandteile der Wiederverwertung zuführen: •... -
Seite 58: 10 Ersatzteile Und Zubehör
10 Ersatzteile und Zubehör HINWEIS • Bei der Bestellung von Ersatz- und Zubehörteilen immer die Pfannenberg-Teilenummer angeben. • Die Pfannenberg-Teilenummer für den Controller befindet sich auf dem Transformator des Controllers. Bezeichnung Bezeichnung 18811100065 Verdampfer Ventilator (intern) 18811100065 Verflüssiger Ventilator (extern) 18810200104 Gerätehaube DTI 62/6301 RAL... -
Seite 59: 11 Stichwortindex
11 Stichwortindex DTS-Kühlgerät (Seitenanbau) ........26 Auspacken ............... 24 Profildichtung ..............27 Außerbetriebnahme ............54 Netzanschluss ..............37 Bestelloptionen ..............10 Netzspannung anpassen ..........39 Betrieb ................42 Betriebsstörungen ............51 Potenzialausgleich............40 Reinigung ................. 47 Demontage ..............55 DIP-Schalter ..............33 Einstellung .............. - Seite 60 Haftungsausschluss: Alle enthaltenen Informationen wurden 2020 sorgfältig geprüft. Wir übernehmen jedoch keine Gewähr in Bezug auf die Vollständigkeit und Richtigkeit der Angaben. Impressum: Pfannenberg GmbH Werner-Witt-Straße 1 21035 Hamburg Tel. +49 40 734 12-0 www.pfannenberg.com © Pfannenberg 2020...
- Seite 61 Operating Manual Attachment and Installation Cooling Units DTS and DTI series 6201 / 6301 Standard Controller (SC) – 400 V, 2~ Original instruction manual – Version 1.4, November 2020...
- Seite 62 About this manual ................................5 Use and safekeeping ..............................5 Exclusion of liability ................................ 5 Explanation of the notes ..............................6 Marking of contents ................................ 7 1.4.1 Handling instructions ..............................7 1.4.2 Links and cross references ............................7 Safety ....................................8 Intended use ..................................
- Seite 63 Assembly and initial commissioning ..........................22 Safety information ................................ 22 Transport ..................................23 4.2.1 Transporting the cooling unit ..........................23 4.2.2 Crane transport ..............................24 Storage ..................................25 Unpacking ..................................25 Assembly ..................................26 4.5.1 General .................................. 26 4.5.2 DTS cooling unit assembly (side attachment) ......................27 4.5.3 DTI cooling unit assembly (installation) ........................
- Seite 64 Decommissioning ................................55 Temporary decommissioning ............................55 Final decommissioning ..............................55 Dismantling and disposal ............................... 56 Safety information ................................ 56 Dismantling .................................. 57 Disposal ..................................57 Spare parts and accessories ............................58 Index ....................................59 Operating Manual | Attachment and Installation Cooling Units | Standard Controller (SC) – 400 V, 2~ | 086100003d 4/60...
-
Seite 65: About This Manual
Pfannenberg reserves the right to change this document, including the exclusion of liability, at any time without notice and is not liable for any consequences of this change. -
Seite 66: Explanation Of The Notes
Explanation of the notes The warnings are indicated by signal words which express the degree of danger. The warnings must be heeded to avoid accidents, injuries and property damages. Explanation of the warnings in this manual: DANGER Brief description of the danger The signal word DANGER indicates an imminent danger. -
Seite 67: Marking Of Contents
Marking of contents 1.4.1 Handling instructions Handling instructions are indicated in this manual as follows: Requirements Requirements and additional warnings Required tools and materials Tools and materials required for handling Procedure <Handling steps> … – <Intermediate result / Further instructions> …... -
Seite 68: Safety
Safety Intended use The Pfannenberg add-on and built-in cooling units of the DTS and DTI series are stationary cooling units for heat dissipation from switch cabinets. They are available in two versions: • The DTI cooling units are installed partly sunken into the side or door. -
Seite 69: Foreseeable Misuse
Foreseeable misuse The following points describe a foreseeable misuse of the unit: • Use of the unit as a storage place, work platform. • Attachment of transport aids. • Installation in unsuitable locations. • Outdoor operation. • Operation outside of the permissible technical data. See section "Technical data". •... -
Seite 70: Terms Of Warranty
The following must be observed to assert warranty claims and to return the unit: • Attach a precise description of the defect and the SRO (RMA) number assigned by Pfannenberg to the cooling unit. • Enclose proof of purchase (copy of delivery note or invoice). -
Seite 71: Unit Description
Unit description Description of use The Pfannenberg add-on and built-in cooling units of the DTS and DTI series are designed for heat dissipation from switch cabinets. Sensitive components in the switch cabinet are protected. Condensate produced during cooling is discharged through a built-in system. -
Seite 72: Filter Adapter (Option)
3.3.1 Filter adapter (option) G00052 Fig. 1: Filter adapter on the cooling unit For permanent protection of the external air circuit from contamination, the optional filter adapter (1) can be fitted with a filter mat (2) at the air inlet (3) of the cooling unit. The filter adapter (1) is simply clipped into the air inlet (3). -
Seite 73: Functional Description
Functional description 3.4.1 Air circuit CAUTION Risk of burns Risk of burns due to high temperatures at the ambient air outlet. The air outlet can get very hot depending on the ambient temperature. • Do not hold any parts of the body directly in front of the ambient air outlet (A). "Refrigeration circuit", Page 20 G00001 Front view... -
Seite 74: Controller
3.4.2 Controller The controllers are control units for setting refrigeration functions and operating data. They allow readouts of system messages and diagnostic data. The controllers have a service interface at which different configurations are possible. They also have a connection for collective fault signals. G00002 Fig. -
Seite 75: Refrigeration Circuit
3.4.3 Refrigeration circuit G00004 Fig. 5: Refrigeration circuit Compressor Condenser (external) Condenser Evaporator fan (internal) Expansion valve Electronic control with temperature sensor Evaporator The cooling units consist of different components, see Fig. 5. • The compressor (1) compresses the refrigerant with high pressure. The temperature rises. •... -
Seite 76: Safety Concept
3.4.4 Safety concept WARNING Risk of injury due to modified safety devices. Non-functional, modified or defective safety devices lead to serious accidents. • All modifications to the unit and especially the safety devices are prohibited. • In case of defective safety devices, shut down the unit immediately and take it out of operation. 3.4.4.1 Safety devices •... -
Seite 77: Condensate Treatment
3.4.5 Condensate treatment ATTENTION Damage to the switch cabinet components by formation of condensate Switch cabinet interior temperatures below the dew point of the ambient air or damaged switch cabinet seals can lead to excessive formation of condensate. • Check the switch cabinet seals regularly to avoid excessive condensate from penetrating ambient air. •... -
Seite 78: Type Plate
Type plate WARNING Risk of injury Risk of injury due to failure to heed the type plate specifications. • Always observe the information on the type plate when installing and maintaining the units. NOTE • The type plate is on the back of the cooling unit housing. •... -
Seite 79: Signs And Symbols On The Unit
Signs and symbols on the unit The signs and symbols attached to the unit must be observed. The signs and symbols attached to the unit must not be removed and must be kept in a fully legible condition. Damaged or illegible signs and symbols must be replaced. -
Seite 80: Technical Data
Technical data 3.7.1 Refrigeration circuit Designation Model DTI / DTS 6201 Model DTI / DTS 6301 Cooling capacity at A35 / A35 */** 1000 W 1500 W Cooling capacity at A50 / A35 */** 780 W 1200 W Refrigerant type * R134A Refrigerant quantity * 600 g... -
Seite 81: Dimensions
3.7.3 Dimensions Designation Model DTI / DTS 6201 Model DTI / DTS 6301 Height DTI: 1536 mm DTS: 1539 mm Width 485 mm Depth with cover (standard) 218 mm Installation depth DTI 60 mm Weight DTI: 58 kg DTI: 60 kg DTS: 61 kg DTS: 64 kg Installation attitude... -
Seite 82: Assembly And Initial Commissioning
Assembly and initial commissioning Safety information DANGER Danger of fatal injury due to electric shock! Parts may be under voltage when the unit is opened and can cause an electric shock if touched. Observe the following points when working on the open unit: •... -
Seite 83: Transport
Transport Observe the following to avoid personal injury and property damage: • Work may only be performed by qualified specialists. • Observe the safety information. WARNING Risk of injury for persons! Increased risk of injury due to improper transport. • The unit may only be transported by persons who are familiar with the procedure and aware of the risks as well as having the necessary qualifications. -
Seite 84: Crane Transport
4.2.2 Crane transport DANGER Danger of death from suspended loads Tipping or falling loads can cause severe to fatal injuries. • Never stand beneath suspended loads. • Only use approved lifting gear and slings which are designed for the total weight of the attached load. •... -
Seite 85: Storage
Storage ATTENTION Loss of warranty! Failure to observe the storage conditions will lead to loss of warranty. Note the following points for storage of the unit: • Do not expose the cooling unit to temperatures above +70 °C during storage. •... -
Seite 86: Assembly
Assembly 4.5.1 General Ensure that the following general requirements are met for safe and reliable operation of the cooling units: • Choose an installation site for the switch cabinet that ensures adequate ventilation of the cooling unit. The minimum distance of units from each other and from the wall is 200 mm. •... -
Seite 87: Dts Cooling Unit Assembly (Side Attachment)
4.5.2 DTS cooling unit assembly (side attachment) 4.5.2.1 Making cut-outs for DTS cooling unit G00007 Assembly holes Assembly cut-outs Fig. 9: External view of switch cabinet, assembly bores and cut-outs Holes Assembly cut-outs Device contour Requirements DANGER – Danger to life due to electric shock. Make sure that the unit is voltage-free. •... - Seite 88 4.5.2.2 Fitting the profile seal ATTENTION Damage to the switch cabinet and the cooling unit! Incorrectly fitted seals can lead to excessive formation of condensate in the switch cabinet and thus to short-circuits and damage due to condensate. • Fit the seal so that it provides sealing against the switch cabinet. •...
-
Seite 89: Dti Cooling Unit Assembly (Installation)
4.5.3 DTI cooling unit assembly (installation) 4.5.3.1 Making cut-outs for DTI cooling unit G00009 Fig. 11: External view switch cabinet, assembly cut-outs Air inlet Device contour Air outlet Assembly cut-out Requirements DANGER – Danger to life due to electric shock. Make sure that the unit is voltage-free. •... - Seite 90 4.5.3.2 DTI cooling unit switch cabinet assembly (installation) G00010 Fig. 12: Assembling the cooling unit Catch spring Housing cut-out for fastening spring Fastening spring (6×) Housing cut-out for fastening spring DTI cooling unit Switch cabinet wall/switch cabinet door NOTE Just scan or click the QR code opposite to watch the assembly video for DTI cooling units. Operating Manual | Attachment and Installation Cooling Units | Standard Controller (SC) –...
- Seite 91 Requirements DANGER – Danger to life due to electric shock. Make sure that the unit is voltage-free. • The cut-out for the DTI cooling unit has been made, see "Making cut-outs for DTI cooling unit", Page 29. Required tools and materials •...
-
Seite 92: Electrical Connection
Electrical connection DANGER Danger of fatal injury due to electric shock! Parts may be under voltage when the unit is opened and can cause an electric shock if touched. Observe the following points when working on the open unit: • Work on the electrical system may only be carried out by authorized electricians. -
Seite 93: Electrical Circuit Diagram - Standard-Controller (Sc)
4.6.2 Electrical circuit diagram – Standard-Controller (SC) 1,2 - Störmeldung / failure indication / Tür offen / door open / porte ouvert contact sec de défaut Tür geschlossen / door closed / porte fermé 4,5 - Türkontakt / door contact / contact de porte TK TK 1 2 3 4... -
Seite 94: Setting The Dip-Switch
4.6.3 Setting the DIP-switch OFF 1 G00011 Fig. 14: Setting the DIP-switch Fan fastening screws Lower screw (card cage) Upper screw (card cage) Controller Card cage DIP-switch The DIP-switch on the controller facilitates the setting of the target and limit values for temperatures. The default factory setting of the values in the delivery condition is as follows: Parameters Factory setting... - Seite 95 4.6.3.1 Setting the temperature range on the DIP-switch Requirements DANGER – Danger to life due to electric shock. Make sure that the unit is voltage-free. • Wait for the discharge phase of 5 minutes for the electrical components. The unit should only be opened afterwards. Procedure Dismantle the fan by loosening the four fixing screws (1), see Fig.
-
Seite 96: Door Contact Switch
4.6.4 Door contact switch ATTENTION Damage to the unit! Damage to the unit and the controller by applying external voltage to the door contact input. • Do not apply external voltage to the door contact input. • The door contact input provides a low voltage (< 20 V, 20 mA) for the door contact switch. Fitting a door contact switch increases the safety and prevents excessive formation of condensate. -
Seite 97: Collective Fault Signal
4.6.5 Collective fault signal The unit is equipped with a potential-free changeover contact for the collective fault signal. Terminals Voltage Current rating Version X54:1 root contact Maximum 230 V maximum 1 A Potential-free changeover contact X54:2 normally closed (NC) X54:3 normally open (NO) Tab. -
Seite 98: Mains Connection
4.6.6 Mains connection DANGER Danger of fatal injury due to electric shock! Unconnected or incorrectly installed protective conductor systems can generate hazardous voltages and cause electrical shocks resulting in serious accidents. • Work may only be carried out by qualified specialists. •... - Seite 99 4.6.6.1 Electrical connection of the cooling unit Ensure that the following general requirements are met for safe and reliable operation of the cooling units: • It is prohibited to connect an upstream temperature control on the supply side. • Connect the fuse specified on the type plate upstream as a line protection, see section "Type plate", Page 18and "Adapting the unit to the mains voltage", Page 40.
-
Seite 100: Adapting The Unit To The Mains Voltage
4.6.7 Adapting the unit to the mains voltage G00024 Factory settings upstream transformer Input winding upstream transformer Fig. 16: Adapting the mains voltage on the upstream transformer Units with a rated voltage of 400 / 460 V can be optionally connected to another mains voltage. The mains voltage on the upstream transformer must be adapted for this. -
Seite 101: Equipotential-Bonding Connections
4.6.8 Equipotential-bonding connections Functional equipotential-bonding (M8 thread), for a signal reception with low interference between the unit and the switch cabinet. Protective equipotential bonding for metal components and touch voltage. G00023 Fig. 17: Equipotential-bonding/fuses Operating Manual | Attachment and Installation Cooling Units | Standard Controller (SC) – 400 V, 2~ | 086100003d 41/60... -
Seite 102: Operation
Operation General functions ATTENTION Damage to the unit Operation without the unit cover prevents sufficient air supply to the condenser and restricts the intended cooling function. • Only operate the cooling unit with the unit cover in place. G00015 Fig. 18: Electronic control function The Standard-Controller (SC) has an indicator unit with a green LED light (1). -
Seite 103: Operation Of The Cooling Unit
Only the specified refrigerant may be used. NOTE For the Pfannenberg part numbers for spare parts, see section "Spare parts and accessories", Page 58. Operating Manual | Attachment and Installation Cooling Units | Standard Controller (SC) – 400 V, 2~ | 086100003d... -
Seite 104: Service Interface
Continuous operation is forbidden. NOTE • The ECoolPLANT software is available as a free download on the website www.pfannenberg.com/. Alternatively, simply scan the QR code opposite. • The appropriate operating manual for the ECoolPLANT software is available for downloading under... -
Seite 105: Service And Maintenance
Service and maintenance Safety information DANGER Danger of fatal injury due to electric shock! Parts may be under voltage when the unit is opened and can cause an electric shock if touched. Observe the following points when working on the open unit: •... -
Seite 106: General
A shorter guide value of two to six months applies between the maintenance intervals. • The functions of the Pfannenberg filters are optimally adapted to the cooling units. Therefore, the use of Pfannenberg filters has positive effects on the scope of the maintenance work. -
Seite 107: Maintenance Schedule
Maintenance schedule Maintenance interval: Perform every twelve months. Every two to six months, in ambient air containing oil and dust. Type: ______________________________________________________________________ Serial number: ______________________________________________________________________ Date of maintenance: ______________________________________________________________________ Executing specialist (name): ______________________________________________________________________ Unit area designation / Visual To do Result necessary maintenance work inspection... -
Seite 108: Maintenance Work
Maintenance work 6.4.1 Cleaning WARNING Danger of accident and component damage Danger of accident and component damage due to improper cleaning. Cleaning the cooling units using water jets, steam jet cleaners or high-pressure cleaners or sharp objects may damage the electrical and electronic components. - Seite 109 6.4.1.1 Unit cover removal CAUTION Risk of crushing when removing the unit cover Hands and other body parts may be crushed when removing and reinserting the unit cover. • Do not place any body parts between the frame, springs and the unit cut-out. •...
-
Seite 110: Cleaning The Heat Exchanger
6.4.1.2 Cleaning the heat exchanger ATTENTION Damage to components Damage to the heat exchanger fins due to improper cleaning. • Clean heat exchanger fins with a soft brush, with compressed air or with a vacuum cleaner with brush attachment. NOTE The time intervals for cleaning depend strongly on the contamination of the ambient air. - Seite 111 6.4.1.3 Cleaning filter mats ATTENTION Damage to components Damage to the filter mats due to improper cleaning. • Avoid high-pressure water jets. • Do not wring out filter mats. • Replace oily or greasy filter mats immediately. NOTE The time intervals for cleaning or replacing the filter mats depend strongly on the contamination of the ambient air. Requirements •...
-
Seite 112: Rectification Of Operating Faults
Rectification of operating faults General NOTE Flashing of the red LED light on the controller card is not a fault indication or error message. The red LED light indicates that the cooling unit is carrying voltage. Fault Possible causes Remedial measures Unit does not cool, evaporator fan Temperature setting too high. -
Seite 113: Error Messages
7.1.1 Error messages The error numbers are not displayed in units with Standard Controllers. Using the ECoolPLANT software, it is possible to read out the error numbers on the computer. NOTE Flashing of the red LED light on the controller card is not a fault indication or error message. The red LED light indicates that the cooling unit is carrying voltage. - Seite 114 Error no. Fault/unit behavior Possible causes Remedial measures Er08 LED: flashes Sensor 2 (TS2) defective. Replace sensor 2 according to the unit type. Compressor: Sensor 2 is plugged to the Evaporator fan (internal): card, not permanently soldered. Condenser fan (external): Fault signal contact: Open Er15...
-
Seite 115: Decommissioning
Page 56! NOTE Old units are also professionally disposed of by Pfannenberg. Delivery to one of our manufacturing facilities shall be free of charge. Operating Manual | Attachment and Installation Cooling Units | Standard Controller (SC) – 400 V, 2~ | 086100003d... -
Seite 116: Dismantling And Disposal
Dismantling and disposal The unit must be dismantled and disposed of in an environmentally friendly way at the end of its useful life. Safety information All work may only be performed by persons with certified qualifications under consideration of: • the minimum qualification •... -
Seite 117: Dismantling
Observe the valid work safety and environmental protection regulations. Disposal NOTE Old units are also professionally disposed of by Pfannenberg. Delivery to one of our manufacturing facilities shall be free of charge. Dismantled components should be recycled unless return or disposal agreements have been made: •... -
Seite 118: 10 Spare Parts And Accessories
10 Spare parts and accessories NOTE • Always state the Pfannenberg part number when ordering spare parts and accessories. • The Pfannenberg part number for the controller is on the controller transformer. Designation Designation 18811100065 Evaporator fan (internal) 18811100065 Condenser fan (external) - Seite 119 11 Index About this document Mains connection ............. 38 Handling instructions ............7 Maintenance schedule............47 Accessories ..............58 Maintenance work ............48 Adapt mains voltage ............40 Cleaning ................ 48 Assembly Misuse ................9 DTI cooling unit (installation) ........29 DTS cooling unit (side attachment) ......
- Seite 120 All information present was carefully checked in 2020. However, we shall assume no liability with regard to the completeness and accuracy of the information. Company details: Pfannenberg GmbH Werner-Witt-Strasse 1 21035 Hamburg Tel. +49 40 734 12-0 www.pfannenberg.com © Pfannenberg 2020...
-
Seite 121: Instruction D'utilisation
Instruction d’utilisation Climatiseurs montés par encastrement et en saillie verticale Série DTS et DTI 6201 / 6301 Contrôleur standard (SC) – 400 V, 2~ Notice d'origine – Version 1.4, Novembre 2020... - Seite 122 À propos des présentes instructions ..........................5 Utilisation et conservation .............................. 5 Exclusion de responsabilité ............................5 Légende des indications ..............................6 Mise en surbrillance des contenus ..........................7 1.4.1 Instructions à suivre ..............................7 1.4.2 Liens hypertexte et renvois ............................7 Sécurité...
- Seite 123 Montage et première mise en service ..........................22 Indications de sécurité ..............................22 Transport ..................................23 4.2.1 Transport du climatiseur ............................23 4.2.2 Transport par grue ..............................24 Stockage ..................................25 Déballage ..................................25 Installation ..................................26 4.5.1 Généralités ................................26 4.5.2 Installation de climatiseur DTS (pose latérale) .......................
- Seite 124 Mise hors service ................................55 Mise hors service temporaire ............................55 Mise hors service définitive ............................55 Démontage et mise au rebut ............................56 Indications de sécurité ..............................56 Démontage .................................. 57 Mise au rebut ................................57 Pièces de rechange et accessoires ..........................58 Index des mots-clés ................................
-
Seite 125: Propos Des Présentes Instructions
L’entreprise Pfannenberg se réserve le droit de modifier le présent document, y compris l’exclusion de responsabilité, sans préavis et décline toute responsabilité pour les éventuelles conséquences de cette modification. -
Seite 126: Légende Des Indications
Légende des indications Les mentions d’avertissement sont précédées de mots d’alerte, qui soulignent la gravité du danger. Impérativement respecter les mentions d’avertissement afin d’éviter les accidents et les dommages corporels ou matériels. Légende des mentions d’avertissement dans les présentes instructions : DANGER Description succincte du danger Le mot d’alerte DANGER accompagne un danger imminent. -
Seite 127: Mise En Surbrillance Des Contenus
Mise en surbrillance des contenus 1.4.1 Instructions à suivre Dans les présentes instructions, les instructions à suivre sont identifiées de la manière suivante : Conditions préalables Conditions préalables et mentions d’avertissement supplémentaires. Outillage et matériel requis Outillage et matériel requis pour l’action Procédure à... -
Seite 128: Sécurité
Utilisation conforme Les climatiseurs à encastrer ou en applique de la marque Pfannenberg des séries DTS et DTI sont des climatiseurs stationnaires destinés à la dissipation de la chaleur dégagée par les armoires de distribution. Ils sont disponibles en deux versions : •... -
Seite 129: Utilisation Incorrecte Prévisible
Utilisation incorrecte prévisible Les points suivants décrivent une utilisation incorrecte prévisible de l’appareil : • Utilisation de l’appareil comme emplacement de rangement, plateforme de travail. • Montage d’aides au transport. • Installation à des emplacements inappropriés. • Exploitation en plein air. •... -
Seite 130: Dispositions De La Garantie Légale
Afin de conserver les droits à la garantie légale et en vue du retour de l’appareil, observer les points suivants : • Joindre une description détaillée du défaut et le numéro SRO (RMA) fourni par Pfannenberg au climatiseur. • Joindre un justificatif d’achat (bon de livraison ou copie de la facture). -
Seite 131: Descriptif De L'appareil
Descriptif d’utilisation Les climatiseurs à encastrer ou en applique de la marque Pfannenberg des séries DTS et DTI sont destinés à la dissipation de la chaleur dégagée par les armoires de distribution. Cela protège les composants sensibles à l’intérieur de l’armoire de distribution. -
Seite 132: Filtre-Adaptateur (Option)
3.3.1 Filtre-adaptateur (option) G00052 Fig. 1 : filtre-adaptateur sur le climatiseur Pour la protection durable du circuit d’air externe contre les impuretés, il est possible de monter le filtre-adaptateur (1) optionnel avec une natte filtrante (2) sur l’entrée d’air (3) du climatiseur. Le filtre-adaptateur (1) se clipse simplement sur l’entrée d’air (3). -
Seite 133: Description Du Fonctionnement
Description du fonctionnement 3.4.1 Circuit d’air PRUDENCE Danger de brûlures Danger de brûlures en raison des hautes températures à la sortie d’air ambiant. En fonction de la température ambiante, la sortie d’air peut être très chaude. • Ne pas tenir de membres du corps directement en face de la sortie d’air ambiant (A). «... -
Seite 134: Contrôleur
3.4.2 Contrôleur Les contrôleurs sont des unités de réglage dédiées au réglage de fonctions et de paramètres d’exploitation spécifiques au système frigorifique. Ils permettent de lire les messages système et autres informations de diagnostic. Les contrôleurs possèdent une interface de service, qui permet de réaliser différentes configurations. De plus, un raccord est disponible pour les listes de signalement des défauts. -
Seite 135: Circuit Frigorifique
3.4.3 Circuit frigorifique G00004 Fig. 5: circuit frigorifique Compresseur Ventilateur du condenseur (externe) Condenseur Ventilateur de l’évaporateur (interne) Soupape de détente Commande électronique avec capteur de température Évaporateur Les climatiseurs abritent différents composants, voir Fig. 5. • Le compresseur (1) comprime le fluide frigorigène sous haute pression. La température augmente. •... -
Seite 136: Concept De Sécurité
3.4.4 Concept de sécurité AVERTISSEMENT Danger de blessures en cas de modification des dispositifs de sécurité. Les dispositifs de sécurité, qui ne fonctionnent pas, qui ont été modifiés ou qui sont défectueux, provoquent de graves accidents. • Toute modification de l’appareil, en particulier des dispositifs de sécurité, est interdite. •... -
Seite 137: Traitement Du Condensat
3.4.5 Traitement du condensat ATTENTION Détérioration des composants de l’armoire de distribution en cas de formation de condensation Les températures intérieures de l’armoire de distribution inférieures au point de rosée de l’air ambiant ou une détérioration des joints de l’armoire de distribution peuvent provoquer une formation de condensation excessive. •... -
Seite 138: Plaque De Fabrication
Plaque de fabrication AVERTISSEMENT Danger de blessures Danger de blessures en cas de non-respect des informations sur la plaque de fabrication. • Pendant l’installation et de la maintenance des appareils, toujours observer les informations sur la plaque de fabrication. REMARQUE •... -
Seite 139: Panneaux Et Symboles Sur L'appareil
Panneaux et symboles sur l’appareil Impérativement observer les panneaux et symboles apposés sur l’appareil. Il est interdit de retirer les panneaux et symboles apposés sur l’appareil. Toujours veiller à ce qu’ils restent bien lisibles. Les panneaux et symboles endommagés ou illisibles doivent être remplacés. Panneau / symbole Position Description... -
Seite 140: Données Techniques
Données techniques 3.7.1 Circuit frigorifique Description Modèle DTI / DTS 6201 Modèle DTI / DTS 6301 Puissance de refroidissement A35 / A35*/** 1000 W 1500 W Puissance de refroidissement A50 / A35*/** 780 W 1200 W Type de fluide frigorigène* R134A Volume de fluide frigorigène* 600 g... -
Seite 141: Dimensions
3.7.3 Dimensions Description Modèle DTI / DTS 6201 Modèle DTI / DTS 6301 Hauteur DTI : 1536 mm DTS : 1539 mm Largeur 485 mm Profondeur avec le capot (standard) 218 mm Profondeur de montage DTI 60 mm Poids DTI : 58 kg DTI : 60 kg DTS : 61 kg DTS : 64 kg... -
Seite 142: Montage Et Première Mise En Service
Montage et première mise en service Indications de sécurité DANGER Danger de mort par électrocution ! Lorsque l’appareil est ouvert, des pièces peuvent être sous tension et provoquer une électrocution en cas de contact. Durant les travaux sur l’appareil ouvert, observer les points suivants : •... -
Seite 143: Transport
Transport Afin d’éviter les dommages corporels et matériels, observer les points suivants : • Les travaux sont strictement réservés au personnel qualifié. • Observer les consignes de sécurité. AVERTISSEMENT Danger de blessures pour les personnes ! Danger de blessures accru en cas de transport non conforme. •... -
Seite 144: Transport Par Grue
4.2.2 Transport par grue DANGER Danger de mort émanant des charges suspendues En cas de renversement ou de chute, les charges peuvent provoquer des blessures graves, voire mortelles. • Ne jamais se tenir au-dessous de charges suspendues. • Uniquement employer des engins de levage et moyens de fixation agréés, conçus pour supporter le poids total de la charge suspendue. -
Seite 145: Stockage
Stockage ATTENTION Perte de la garantie légale ! Le non-respect des conditions de stockage provoque une perte de la garantie légale. Pendant le stockage de l’appareil, observer les points suivants : • Pendant le stockage, ne pas exposer l’appareil à des températures supérieures à +70 °C. •... -
Seite 146: Installation
Installation 4.5.1 Généralités Afin de garantir un fonctionnement fiable et sûr des climatiseurs, remplir les exigences suivantes : • Choisir l’emplacement de l’armoire de distribution en veillant à garantir une aération et une ventilation suffisante du climatiseur. La distance minimale à observer entre les appareils entre eux et par rapport aux murs s’élève à 200 mm. •... -
Seite 147: Installation De Climatiseur Dts (Pose Latérale)
4.5.2 Installation de climatiseur DTS (pose latérale) 4.5.2.1 Réalisation de découpes pour le climatiseur DTS G00007 Perçages de montage Découpes de montage Fig. 9: vue extérieure armoire de distribution, perçages et découpes de montage Perçages Découpes de montage Contour de l’appareil Conditions préalables DANGER –... - Seite 148 4.5.2.2 Installation du joint de profilé ATTENTION Détérioration de l’armoire de distribution et du climatiseur ! En cas de montage incorrect, les joints peuvent occasionner une formation de condensation excessive dans l’armoire de distribution et la condensation peut ainsi provoquer des courts-circuits et des détériorations. •...
-
Seite 149: Installation De Climatiseur Dti (Par Encastrement)
4.5.3 Installation de climatiseur DTI (par encastrement) 4.5.3.1 Réalisation de découpes pour le climatiseur DTI G00009 Fig. 11: Vue extérieure armoire de distribution, découpes de montage Entrée d’air Contour de l’appareil Sortie d’air Découpe de montage Conditions préalables DANGER – Danger de mort par électrocution. S’assurer que l’appareil est hors tension. •... - Seite 150 4.5.3.2 Installation de l’armoire de distribution du climatiseur DTI (par encastrement) G00010 Fig. 12: montage du climatiseur Ressort à déclic Découpe dans le boîtier pour ressort de fixation Ressorts de fixation (6×) Découpe dans le boîtier pour ressort de fixation Climatiseur DTI Paroi / porte de l’armoire de distribution REMARQUE...
- Seite 151 Conditions préalables DANGER – Danger de mort par électrocution. S’assurer que l’appareil est hors tension. • La découpe est réalisée pour le climatiseur DTI, voir « Réalisation de découpes pour le climatiseur DTI », Page 29. Outillage et matériel requis •...
-
Seite 152: Branchement Électrique
Branchement électrique DANGER Danger de mort par électrocution ! Lorsque l’appareil est ouvert, des pièces peuvent être sous tension et provoquer une électrocution en cas de contact. Durant les travaux sur l’appareil ouvert, observer les points suivants : • Les travaux sur le système électrique sont strictement réservés aux électriciens qualifiés dûment autorisés. •... -
Seite 153: Plan De Branchement Électrique - Contrôleur Standard (Sc)
4.6.2 Plan de branchement électrique – contrôleur standard (SC) 1,2 - Störmeldung / failure indication / Tür offen / door open / porte ouvert contact sec de défaut Tür geschlossen / door closed / porte fermé 4,5 - Türkontakt / door contact / contact de porte TK TK 1 2 3 4... -
Seite 154: Réglage Des Commutateurs Dip
4.6.3 Réglage des commutateurs DIP OFF 1 G00011 Fig. 14: Réglage des commutateurs DIP Vis de fixation ventilateur Vis du bas (porte-platine) Vis du haut (porte-platine) Contrôleur Porte-platine Commutateurs DIP Le commutateur DIP sur le contrôleur permet de définir les valeurs de consigne et les valeurs limites pour les températures. Lors de la livraison, les réglages d’usine des valeurs sont les suivants : Paramètre Réglage d’usine... - Seite 155 4.6.3.1 Réglage de la plage de température sur le commutateur DIP Conditions préalables DANGER – Danger de mort par électrocution. S’assurer que l’appareil est hors tension. • Attendre la fin de la phase de décharge de 5 minutes pour les composants électriques. L’appareil peut ensuite être ouvert.
-
Seite 156: Contacteur De Porte
4.6.4 Contacteur de porte ATTENTION Détérioration de l’appareil ! Détérioration de l’appareil et du contrôleur en cas d’application d’une tension d’origine extérieure sur l’entrée du contact de porte. • Ne pas appliquer de tension d’origine extérieure sur l’entrée du contact de porte. •... -
Seite 157: Liste De Signalement Des Défauts
4.6.5 Liste de signalement des défauts L’appareil est équipé d’un contact bidirectionnel sans potentiel pour la liste de signalement des défauts. Bornes Tension Intensité maximale Version admissible X54:1 Contact commun Max. 230 V max. 1 A Contact bidirectionnel sans potentiel X54:2 Contact à... -
Seite 158: Branchement Secteur
4.6.6 Branchement secteur DANGER Danger de mort par électrocution ! Les systèmes de conducteur de protection non raccordés ou défectueux peuvent générer des tensions dangereuses et provoquer des électrocutions et de graves accidents. • Les travaux sont strictement réservés au personnel qualifié. •... - Seite 159 4.6.6.1 Branchement électrique du climatiseur Afin de garantir un fonctionnement fiable et sûr des climatiseurs, remplir les exigences suivantes : • Il est interdit d’installer en amont une régulation de la température côté alimentation. • Comme protection de ligne, monter en amont le fusible indiqué sur la plaque de fabrication, voir chapitre « Plaque de fabrication », Page 18et «...
-
Seite 160: Adaptation De L'appareil À La Tension De Réseau
4.6.7 Adaptation de l’appareil à la tension de réseau G00024 Réglages d’usine transformateur additionnel Bobinage d’entrée transformateur additionnel Fig. 16 : adaptation de la tension de réseau sur le transformateur additionnel Les appareils avec une tension nominale de 400 / 460 V peuvent, en option, être raccordés à une autre tension de réseau. À... -
Seite 161: Raccords De Liaison Équipotentielle
4.6.8 Raccords de liaison équipotentielle Liaison équipotentielle fonctionnelle (filetage M8), pour une référence de signal antiparasite entre l’appareil et l’armoire de distribution. Liaison équipotentielle de protection pour composants métalliques et tension de contact. G00023 Fig. 17 : liaison équipotentielle / fusibles Instruction d’utilisation | Climatiseurs montés par encastrement et en saillie verticale | Contrôleur standard (SC) –... -
Seite 162: Utilisation
Utilisation Fonctions générales ATTENTION Détérioration de l’appareil Un fonctionnement sans capot de l’appareil empêche une alimentation en air suffisante du condenseur et limite la fonction de refroidissement escomptée. • Uniquement utiliser le climatiseur avec capot de l’appareil monté. G00015 Fig. 18 : fonctionnement de la commande électronique Le contrôleur standard (SC) possède une unité... -
Seite 163: Fonctionnement Du Climatiseur
REMARQUE Numéros de pièce Pfannenberg pour pièces de rechange, voir chapitre « Pièces de rechange et accessoires », Page 58. Instruction d’utilisation | Climatiseurs montés par encastrement et en saillie verticale | Contrôleur standard (SC) – 400 V, 2~ | 086100003d... -
Seite 164: Interface De Service
REMARQUE • Le logiciel ECoolPLANT peut être téléchargé gratuitement sur le site web www.pfannenberg.com/. De manière alternative, il suffit de scanner le code QR ci-contre. • Les instructions de service du logiciel ECoolPLANT peuvent être téléchargés sous la rubrique... -
Seite 165: Nettoyage Et Entretien
Nettoyage et entretien Indications de sécurité DANGER Danger de mort par électrocution ! Lorsque l’appareil est ouvert, des pièces peuvent être sous tension et provoquer une électrocution en cas de contact. Durant les travaux sur l’appareil ouvert, observer les points suivants : •... -
Seite 166: Généralités
• Les fonctions des filtres Pfannenberg sont adaptées de manière optimale aux climatiseurs. C’est la raison pour laquelle l’utilisation de filtres Pfannenberg se répercute de manière positive sur l’étendue des travaux de maintenance. Instruction d’utilisation | Climatiseurs montés par encastrement et en saillie verticale | Contrôleur standard (SC) – 400 V, 2~ | 086100003d... -
Seite 167: Calendrier De Maintenance
Calendrier de maintenance Intervalle de maintenance : Exécuter tous les douze mois. Exécuter tous les deux à six mois, en présence d’air ambiant huileux ou poussiéreux. Type : ______________________________________________________________________ Numéro de série : ______________________________________________________________________ Date de la maintenance : ______________________________________________________________________ Technicien compétent (nom) : ______________________________________________________________________ Description zone de l’appareil /... -
Seite 168: Travaux De Maintenance
Travaux de maintenance 6.4.1 Nettoyage AVERTISSEMENT Danger d’accidents et détérioration des composants Danger d’accidents et détérioration des composants en cas de nettoyage non conforme. Le nettoyage des climatiseurs à l’aide de nettoyeurs haute pression, à jet d’eau ou à jet de vapeur ou d’objets pointus peut provoquer des dommages sur les sous-groupes électriques et électroniques. - Seite 169 6.4.1.1 Démontage du capot de l’appareil PRUDENCE Danger d’écrasement pendant le démontage du capot de l’appareil Pendant le démontage et le remontage du capot de l’appareil, il y a un risque d’écrasement des mains et d’autres membres du corps. • Ne pas introduire les membres du corps entre le châssis, les ressorts et la découpe de l’appareil.
- Seite 170 6.4.1.2 Nettoyage des échangeurs de chaleur ATTENTION Détérioration de composants Détérioration des lamelles de l’échangeur de chaleur en cas de nettoyage non conforme. • Nettoyer les lamelles de l’échangeur de chaleur à l’aide d’une brosse souple, à l’air comprimé ou à l’aide d’un aspirateur muni d’un embout brosse.
- Seite 171 6.4.1.3 Nettoyage des nattes filtrantes ATTENTION Détérioration de composants Détérioration des nattes filtrantes en cas de nettoyage non conforme. • Éviter l’utilisation de jets d’eau à haute pression. • Ne pas essorer la natte filtrante. • Immédiatement remplacer les nattes filtrantes huileuses ou grasses. REMARQUE Les intervalles pour le nettoyage ou le remplacement des nattes filtrantes dépendent fortement de la pollution de l’air ambiant.
-
Seite 172: Dépannage
Dépannage Généralités REMARQUE Le clignotement de la DEL rouge sur la platine du contrôleur ne signalise pas une panne ou un message d’erreur. La DEL rouge signalise que le climatiseur est sous tension. Panne Causes possibles Mesures de dépannage L’appareil ne refroidit pas, le ventilateur Le réglage de la température est trop Contrôler le réglage de la température. -
Seite 173: Messages D'erreur
7.1.1 Messages d’erreur Sur les appareils équipés d’un contrôleur standard, les numéros des erreurs ne sont pas affichés : le logiciel ECoolPLANT permet de lire les numéros des erreurs sur l’ordinateur. REMARQUE Le clignotement de la DEL rouge sur la platine du contrôleur ne signalise pas une panne ou un message d’erreur. La DEL rouge signalise que le climatiseur est sous tension. - Seite 174 N° d’erreur Panne / comportement de l’appareil Causes possibles Mesures de dépannage Er08 DEL : clignote Capteur 2 (TS2) En fonction du type défectueux. d’appareil, remplacer le Compresseur : MARCHE capteur 2. Ventilateur de l’évaporateur MARCHE Le capteur 2 est emboîté (interne) : sur la platine, il n’est pas soudé...
-
Seite 175: Mise Hors Service
», Page 56 ! REMARQUE Les appareils usagés sont également éliminés par Pfannenberg dans les règles de l’art. La livraison à l’une de nos usines de fabrication doit être gratuite. Instruction d’utilisation | Climatiseurs montés par encastrement et en saillie verticale | Contrôleur standard (SC) – 400 V, 2~ | 086100003d... -
Seite 176: Démontage Et Mise Au Rebut
Démontage et mise au rebut Après avoir atteint la fin de la durée d’utilisation, l’appareil doit être démonté et mis au rebut de manière écologique. Indications de sécurité Tous les travaux sont strictement réservés au personnel dûment formé, justificatifs à l’appui, en tenant compte : •... -
Seite 177: Démontage
Mise au rebut REMARQUE Les appareils usagés sont également éliminés par Pfannenberg dans les règles de l’art. La livraison à l’une de nos usines de fabrication doit être gratuite. À moins qu’un accord de reprise ou de mise au rebut n’ait été signé, recycler les pièces démontées : •... -
Seite 178: 10 Pièces De Rechange Et Accessoires
• En cas de commande de pièces de rechange ou d’accessoires, merci de toujours préciser le numéro de pièce Pfannenberg. • Le numéro de pièce Pfannenberg pour le contrôleur se trouve sur le transformateur des contrôleurs. N° Description N° Description 18811100065 Ventilateur de l’évaporateur (interne) - Seite 179 11 Index des mots-clés Fonctionnement ..............43 À propos du présent document Instructions à suivre ............7 Indications de sécurité .......... 22, 45, 56 Accessoires ..............58 Installation Adaptateur USB ............... 44 Climatiseur DTI (par encastrement) ......29 Adaptation de la tension de réseau ......... 40 Climatiseur DTS (pose latérale) ........
- Seite 180 Toutes les informations fournies ont été contrôlées 2020 avec le plus grand soin. Cependant, nous n’assumons aucune responsabilité sur l’intégralité et l’exactitude des données. Mentions légales : Pfannenberg GmbH Werner-Witt-Straße 1 21035 Hambourg Tél. +49 40 734 12-0 www.pfannenberg.com © Pfannenberg 2020...
- Seite 181 Istruzioni per l'uso Condizionatori eseternie da incasso Serie DTS e DTI 6201 / 6301 Standard-Controller (SC) – 400 V, 2~ Istruzioni originali – Versione 1.4, Novembre 2020...
- Seite 182 Informazioni su questo manuale ............................5 Utilizzo e conservazione ..............................5 Esclusione di responsabilità ............................5 Spiegazione delle note ..............................6 Distinzione di contenuti ..............................7 1.4.1 Istruzioni di comportamento ............................. 7 1.4.2 Link e riferimenti incrociati ............................7 Sicurezza .................................... 8 Utilizzo conforme alle disposizioni ..........................
- Seite 183 Montaggio e prima messa in esercizio .......................... 22 Istruzioni di sicurezza ..............................22 Trasporto ..................................23 4.2.1 Trasporto di condizionatori ............................. 23 4.2.2 Trasporto con gru ..............................24 Tenuta a magazzino ..............................25 Disimballaggio ................................25 Montaggio ..................................26 4.5.1 Generale ................................26 4.5.2 Montaggio condizionatore DTS (montaggio laterale) .....................
- Seite 184 Messa fuori servizio ................................ 55 Messa fuori servizio temporanea ..........................55 Messa fuori servizio definitiva ............................55 Smontaggio e rottamazione ............................56 Istruzioni di sicurezza ..............................56 Smontaggio .................................. 57 Rottamazione ................................57 Ricambi e accessori ................................ 58 Indice delle parole chiave ............................... 59 Istruzioni per l'uso | Condizionatori eseternie da incasso | Standard-Controller (SC) –...
-
Seite 185: Informazioni Su Questo Manuale
Esclusione di responsabilità Pfannenberg non risponde di eventuali errori nella presente documentazione. Per quanto consentito dalla legge, è esclusa una responsabilità per danni indiretti o indiretti, insorti in rapporto con la fornitura o l'uso di questa documentazione. Pfannenberg si riserva il diritto di modificare questo documento, inclusa l'esclusione della responsabilità, in qualsiasi momento senza preavviso e non è... -
Seite 186: Spiegazione Delle Note
Spiegazione delle note Gli avvisi di pericolo sono introdotte da parole di segnalazione, che esprimono la misura del pericolo. È essenziale attenersi alle avvertenze per evitare incidenti, lesioni personali e danni materiali. Spiegazione delle avvertenze in questo manuale: PERICOLO Breve descrizione del pericolo La parola segnaletica PERICOLO indica un pericolo imminente. -
Seite 187: Distinzione Di Contenuti
Distinzione di contenuti 1.4.1 Istruzioni di comportamento In questo manuale le istruzioni di comportamento sono contrassegnate come segue: Requisiti Requisiti e avvertenze aggiuntive. Attrezzature e materiale necessari Strumenti e materiali necessari per operare Procedura <Sequenza delle azioni> … – <Risultato intermedio/ulteriori informazioni> …... -
Seite 188: Sicurezza
Sicurezza Utilizzo conforme alle disposizioni I condizionatori a montaggio annesso e ad incasso Pfannenberg delle serie DTS e DTI sono condizionatori fissi per la dissipazione del calore dai quadri elettrici. Sono disponibili in due versioni: • I condizionatori DTI sono parzialmente incassati nel lato o nella porta. -
Seite 189: Prevedibile Uso Improprio
Prevedibile uso improprio I seguenti punti descrivono un prevedibile uso improprio dell'apparecchio: • Utilizzo dell'apparecchio come superficie di appoggio o di lavoro. • Applicazione di ausili per il trasporto. • Installazione in luoghi non idonei. • Funzionamento all'aperto. • Funzionamento in caso di superamento dei dati tecnici ammessi. Vedere il capitolo "Dati tecnici". •... -
Seite 190: Disposizioni Relative Alla Garanzia
Al fine di conservare i diritti derivanti dalla garanzia e per la restituzione dell’apparecchio, osservare quanto segue: • Allegare al condizionatore una precisa descrizione del difetto e il numero SRO (RMA) assegnato da Pfannenberg. • Allegare una prova d'acquisto (bolla di consegna o copia della fattura). -
Seite 191: Descrizione Dell'apparecchio
Descrizione dell’impiego I condizionatori Pfannenberg a montaggio annesso e ad incasso delle serie DTS e DTI sono progettati per la dissipazione del calore dai quadri elettrici. Essi proteggono parti delicate all’interno del quadro elettrico. La condensa che si forma nel raffreddamento viene fatta defluire attraverso un tubo flessibile integrato. -
Seite 192: Adattatore Del Filtro (Opzione)
3.3.1 Adattatore del filtro (opzione) G00052 Fig.1: Adattatore del filtro del condizionatore L'adattatore del filtro opzionale (1) con una stuoia filtrante (2) può essere installato sull'ingresso dell'aria (3) del condizionatore per proteggere in modo permanente il circuito dell'aria esterna dalla sporcizia. L'adattatore del filtro (1) viene semplicemente applicato con un clip all'ingresso dell'aria (3). -
Seite 193: Descrizione Del Funzionamento
Descrizione del funzionamento 3.4.1 Circuitodi ventilazione PRUDENZA Pericolo di ustioni Pericolo di ustioni a causa di alte temperature all'uscita dell'aria ambiente. A seconda della temperatura ambiente, l'uscita aria può diventare molto calda. • Non avvicinare parti del corpo all'uscita dell'aria ambiente (A). "Circuito di refrigerazione", Pagina 20 G00001 Vista frontale... -
Seite 194: Controller
3.4.2 Controller I controller sono unità di controllo per l'impostazione delle funzioni tecniche di refrigerazione e dei dati di funzionamento. Essi consentono la lettura dei messaggi di sistema e dei dati diagnostici. I controller dispongono di un'interfaccia di assistenza, che consente diverse configurazioni. È... -
Seite 195: Circuito Frigorifero
3.4.3 Circuito frigorifero G00004 Fig. 5: Circuito frigorifero Compressore Ventola del condensatore (esterno) Condensatore Ventola dell'evaporatore (interno) Valvola di espansione Comando elettronico con sensore di temperatura Evaporatore I condizionatori sono costituiti da diversi componenti, vedere Fig. 5. • Il compressore (1) comprime il refrigerante ad alta pressione. La temperatura aumenta. •... -
Seite 196: Concetto Di Sicurezza
3.4.4 Concetto di sicurezza AVVERTENZA Pericolo di lesioni a causa di dispositivi di sicurezza modificati. I dispositivi di sicurezza non funzionanti, modificati o difettosi provocano gravi incidenti. • Sono vietate le modifiche di qualsiasi genere all'apparecchio, in particolare ai dispositivi di sicurezza. •... -
Seite 197: Trattamento Della Condensa
3.4.5 Trattamento della condensa ATTENZIONE Danneggiamento dei componenti del quadro elettrico a causa di condensa Temperature interna del quadro elettrico al di sotto del punto di rugiada dell'aria ambiente o guarnizioni danneggiate del quadro elettrico possono portare a un'eccessiva formazione di condensa. •... -
Seite 198: Targa Identificativa
Targa identificativa AVVERTENZA Pericolo di lesioni Pericolo di lesioni a causa d'inosservanza delle indicazioni sulla targa identificativa. • Durante l'installazione e manutenzione dell’apparecchio rispettare sempre le indicazioni sulla targa identificativa. NOTA • La targa identificativa è applicata a tergo del condizionatore. •... -
Seite 199: Targhe E Simboli Sul Dispositivo
Targhe e simboli sul dispositivo È indispensabile osservare le targhe ed i simboli applicati all'apparecchio. Le targhe ed i simboli applicati all'apparecchio non devono essere rimossi e devono essere mantenuti in condizioni di completa leggibilità. Targhe e simboli danneggiati o illeggibili devono essere sostituiti. Targa / Simbolo Posizione Descrizione... -
Seite 200: Dati Tecnici
Dati tecnici 3.7.1 Circuito di refrigerazione Denominazione Modello DTI / DTS 6201 Modello DTI / DTS 6301 Potenza di raffreddamento in A35 / A35 */** 1000 W 1500 W Potenza di raffreddamento in A50 / A35 */** 780 W 1200 W Tipo di refrigerante * R134A Quantità... -
Seite 201: Dimensioni
3.7.3 Dimensioni Denominazione Modello DTI / DTS 6201 Modello DTI / DTS 6301 Altezza DTI: 1536 mm DTS: 1539 mm Larghezza 485 mm Profondità con coperchio (standard) 218 mm Profondità di montaggio DTI 60 mm Peso DTI: 58 kg DTI: 60 kg DTS: 61 kg DTS: 64 kg Posizione di montaggio... -
Seite 202: Montaggio E Prima Messa In Esercizio
Montaggio e prima messa in esercizio Istruzioni di sicurezza PERICOLO Pericolo di morte da scossa elettrica! Quando il dispositivo è aperto possono esservi parti sotto tensione che, se toccate, possono provocare scosse elettriche. Nel lavoro sull'apparecchio aperto osservare i punti seguenti: •... -
Seite 203: Trasporto
Trasporto Per evitare lesioni personali e danni materiali, osservare quanto segue: • I lavori devono essere eseguiti solo da personale specializzato qualificato. • Osservare le istruzioni di sicurezza. AVVERTENZA Pericolo di lesioni per persone! Elevato pericolo di lesioni a causa di un trasporto improprio. •... -
Seite 204: Trasporto Con Gru
4.2.2 Trasporto con gru PERICOLO Pericolo di morte da carichi sospesi Il ribaltamento o la caduta di carichi può causare lesioni gravi o mortali. • Non passare mai sotto carichi sospesi. • Utilizzare solo dispositivi di sollevamento e imbracatura progettati per il peso totale del carico sospeso. •... -
Seite 205: Tenuta A Magazzino
Tenuta a magazzino ATTENZIONE Perdita della garanzia! L'inosservanza delle condizioni di stoccaggio è causa di cessazione della garanzia. In caso di tenuta a magazzino dell'apparecchio osservare i punti seguenti: • Durante la tenuta a magazzino non esporre l'apparecchio a temperature superiori a +70 °C . •... -
Seite 206: Montaggio
Montaggio 4.5.1 Generale Per un funzionamento sicuro e affidabile dei condizionatori accertarsi che siano soddisfatti i seguenti requisiti: • Scegliere il luogo di installazione del quadro elettrico in modo da garantire una ventilazione sufficiente del condizionatore. La distanza minima tra gli apparecchi o rispetto alla parete deve essere di 200 mm. •... -
Seite 207: Montaggio Condizionatore Dts (Montaggio Laterale)
4.5.2 Montaggio condizionatore DTS (montaggio laterale) 4.5.2.1 Praticare le aperture per il condizionatore DTS G00007 Fori di montaggio Aperture di montaggio Fig. 9: Vista esterna del quadro elettrico, fori di montaggio e aperture Fori Aperture di montaggio Contorno apparecchio Requisiti PERICOLO –... - Seite 208 4.5.2.2 Applicare la guarnizione del profilo ATTENZIONE Danni al quadro elettrico e al condizionatore! Le guarnizioni montate in modo errato possono causare un'eccessiva formazione di condensa nel quadro elettrico e di conseguenza cortocircuiti e danni da condensa. • Applicare la guarnizione in modo da sigillare rispetto al quadro elettrico. •...
-
Seite 209: Montaggio Del Condizionatore Dti (Incasso)
4.5.3 Montaggio del condizionatore DTI (incasso) 4.5.3.1 Praticare le aperture per il condizionatore DTI G00009 Fig. 11: Vista esterna del quadro elettrico, aperture di montaggio Ingresso aria Contorno apparecchio Uscita aria Apertura di montaggio Requisiti PERICOLO – Scosse elettriche letali. Verificare che l'apparecchio sia privo di tensione. •... - Seite 210 4.5.3.2 Montaggio condizionatore DTI (incasso) su quadro elettrico G00010 Fig. 12: Montare il condizionatore Molla a scatto Apertura nell'alloggiamento per molla di fissaggio Molle di fissaggio (6×) Apertura nell'alloggiamento per molla di fissaggio Condizionatore DTI Parete del quadro elettrico / porta del quadro elettrico NOTA Per vedere il video di montaggio di condizionatori DTI basta eseguire la scansione del codice QR qui accanto o cliccarlo.
- Seite 211 Requisiti PERICOLO – Scosse elettriche letali. Verificare che l'apparecchio sia privo di tensione. • L'apertura per il condizionatore DTI è stata praticata, vedere "Praticare le aperture per il condizionatore DTI", Pagina 29. Attrezzature e materiale necessari • Attrezzi di montaggio, molle di fissaggio (kit di accessori). Procedura Posizionare dall'esterno il condizionatore nell'apertura, vedere Fig.
-
Seite 212: Collegamento Elettrico
Collegamento elettrico PERICOLO Pericolo di morte da scossa elettrica! Quando il dispositivo è aperto possono esservi parti sotto tensione che, se toccate, possono provocare scosse elettriche. Nel lavoro sull'apparecchio aperto osservare i punti seguenti: • L'esecuzione di lavori al sistema elettrico è consentita solo a elettricisti autorizzati. •... -
Seite 213: Schema Elettrico - Standard-Controller (Sc)
4.6.2 Schema elettrico – Standard-Controller (SC) 1,2 - Störmeldung / failure indication / Tür offen / door open / porte ouvert contact sec de défaut Tür geschlossen / door closed / porte fermé 4,5 - Türkontakt / door contact / contact de porte TK TK 1 2 3 4... -
Seite 214: Impostare Il Dip-Switch
4.6.3 Impostare il DIP-switch OFF 1 G00011 Fig. 14: Impostare il DIP-switch Viti di fissaggio della ventola Vite inferiore (supporto scheda) Vite superiore (supporto scheda) Controller Supporto scheda DIP-switch L'interruttore DIP sul controller permette di impostare i valori nominali e i valori limite delle temperature. Alla consegna sono attive le impostazioni di fabbrica: Parametri Impostazione di fabbrica... - Seite 215 4.6.3.1 Impostare l’intervallo di temperatura sul DIP-switch Requisiti PERICOLO – Scosse elettriche letali. Verificare che l'apparecchio sia privo di tensione. • Attendere 5 minuti affinché i componenti elettrici siano privi di tensione. Solo allora aprire l'apparecchio. Procedura Smontare la ventola allentando le quattro viti di fissaggio (1), vedere Fig. 14 (A). Scollegare tutti i cavi della ventola e rimuovere la ventola.
-
Seite 216: Commutatore Di Contatto Sulla Porta
4.6.4 Commutatore di contatto sulla porta ATTENZIONE Danni all'apparecchio! Danni all'apparecchio e al controller causati dall'applicazione di una tensione esterna all'ingresso del contatto porta. • Non applicare tensioni esterne all'ingresso del contatto porta. • L'ingresso del contatto porta fornisce una bassa tensione (<20 V, 20 mA) per il commutatore di contatto sulla porta. L'applicazione di un commutatore di contatto sulla porta aumenta la sicurezza e previene l'aumento della formazione di condensa. -
Seite 217: Messaggio Di Segnalazione Guasti Centralizzato
4.6.5 Messaggio di segnalazione guasti centralizzato L'apparecchio è dotato di un contatto di scambio a potenziale zero per il messaggio di segnalazione guasti centralizzato. Terminali Tensione Carico di corrente Versione ammesso X54:1 Contatto principale Massimo 230 V massimo 1 A Contatto di scambio a potenziale zero X54:2... -
Seite 218: Collegamento Alla Rete
4.6.6 Collegamento alla rete PERICOLO Pericolo di morte da scossa elettrica! I conduttori di protezione non collegati o installati in modo errato possono generare tensioni pericolose o folgorazioni causando gravi infortuni. • I lavori devono essere eseguiti solo da personale tecnico qualificato. •... - Seite 219 4.6.6.1 Collegamento elettrico del condizionatore Per garantire un funzionamento sicuro e affidabile dei condizionatori, accertarsi che siano soddisfatti i seguenti requisiti generali: • È vietato installare a monte una regolazione di temperatura sul lato alimentazione. • Collegare a monte il fusibile specificato sulla targa identificativa come protezione della linea, vedere il capitolo "Targa identificativa", Pagina 18e "Adattare l'apparecchio alla tensione di rete", Pagina 40.
-
Seite 220: Adattare L'apparecchio Alla Tensione Di Rete
4.6.7 Adattare l'apparecchio alla tensione di rete G00024 Impostazioni di fabbrica per il trasformatore a monte Avvolgimento di ingresso trasformatore a monte Fig. 16: Adattare la tensione di rete al trasformatore a monte Gli apparecchi con una tensione nominale di 400 / 460 V possono essere collegati in via opzionale a una diversa tensione di rete. -
Seite 221: Connessioni Equipotenziale
4.6.8 Connessioni equipotenziale Collegamento equipotenziale funzionale (filettatura M8) in modo che il segnale tra apparecchio e quadro elettrico non sia disturbato. Collegamento equipotenziale di protezione componenti metallici e tensione di contatto. G00023 Fig. 17: Compensazione di pontenziale / fusibili Istruzioni per l'uso | Condizionatori eseternie da incasso | Standard-Controller (SC) – 400 V, 2~ | 086100003d 41/60... -
Seite 222: Utilizzo
Utilizzo Funzioni generali ATTENZIONE Danni all'apparecchio Il funzionamento senza coperchio impedisce un'adeguata alimentazione d'aria per il condensatore e limita la funzione di raffreddamento prevista. • Utilizzare il condizionatore solo con il coperchio dell'apparecchio montato. G00015 Fig. 18: Funzione di controllo elettronico Lo Standard-Controller (SC) dispone di un visualizzatore con una lampada a LED verde (1). -
Seite 223: Funzionamento Del Condizionatore
È possibile utilizzare solo il refrigerante specificato. NOTA Per le matricole Pfannenberg dei pezzi di ricambio, vedere il capitolo "Ricambi e accessori", Pagina 58. Istruzioni per l'uso | Condizionatori eseternie da incasso | Standard-Controller (SC) – 400 V, 2~ | 086100003d... -
Seite 224: Interfaccia Di Assistenza
È vietato il funzionamento permanente. NOTA • Il software ECoolPLANT è disponibile come download gratuito dal sito Web www.pfannenberg.com/. In alternativa scansionare semplicemente il codice QR qui accanto. • Le relative istruzioni per l'uso per il software ECoolPLANT possono essere scaricate da My Pfannenberg NOTA Per una descrizione dettagliata dei messaggi di errore e delle note sulla risoluzione dei problemi, vedere il capitolo "Messaggi... -
Seite 225: Riparazione E Manutenzione
Riparazione e manutenzione Istruzioni di sicurezza PERICOLO Pericolo di morte da scossa elettrica! Quando il dispositivo è aperto possono esservi parti sotto tensione che, se toccate, possono provocare scosse elettriche. Nel lavoro sull'apparecchio aperto osservare i punti seguenti: • L'esecuzione di lavori al sistema elettrico è consentita solo a elettricisti autorizzati. •... -
Seite 226: Generale
• Le funzioni dei filtri Pfannenberg sono adattate in modo ottimale ai condizionatori. L'uso di filtri Pfannenberg ha quindi un effetto positivo sull'entità dei lavori di manutenzione. Istruzioni per l'uso | Condizionatori eseternie da incasso | Standard-Controller (SC) – 400 V, 2~ | 086100003d... -
Seite 227: Programma Di Manutenzione
Programma di manutenzione Intervallo di manutenzione: Esecuzione ogni dodici mesi. Esecuzione da due a sei mesi in ambiente con olio o polveri. Tipo: ______________________________________________________________________ Numero di serie: ______________________________________________________________________ Data della manutenzione: ______________________________________________________________________ Tecnico esecutore (nome): ______________________________________________________________________ Denominazione area dell'apparecchio / Ispezione To Do Risultato... -
Seite 228: Lavori Di Manutenzione
Lavori di manutenzione 6.4.1 Pulizia AVVERTENZA Pericolo di incidenti e danni ai componenti Pericolo di incidenti e danni ai componenti a causa di una pulizia non appropriata. La pulizia dei condizionatori con getto d'acqua, getto di vapore, pulitori ad alta pressione o con oggetti appuntiti può danneggiare i componenti elettrici ed elettronici. - Seite 229 6.4.1.1 Smontaggio del coperchio PRUDENZA Pericolo di schiacciamento durante la rimozione del coperchio Durante la rimozione e il rimontaggio del coperchio è possibile che le mani o altre parti del corpo restino schiacciate. • Non mettere nessuna parte del corpo tra il telaio, le molle e l'apertura dell'apparecchio. •...
- Seite 230 6.4.1.2 Pulire lo scambiatore di calore ATTENZIONE Danni ai componenti Danneggiamento delle alette dello scambiatore di calore a causa di una pulizia impropria. • Pulire le alette dello scambiatore di calore con una spazzola morbida, aria compressa o un aspirapolvere con spazzola.
- Seite 231 6.4.1.3 Pulire le stuoie filtranti ATTENZIONE Danni ai componenti Danneggiamento delle stuoie filtranti a causa di una pulizia impropria. • Evitare getti d'acqua ad alta pressione. • Non strizzare la stuoia filtrante. • Sostituire immediatamente le stuoie filtranti che sono sporche di olio o di grasso. NOTA Gli intervalli di tempo per la pulizia o la sostituzione delle stuoie filtranti dipendono notevolmente dall'inquinamento dell'aria nell'ambiente.
-
Seite 232: Eliminazione Di Anomalie Di Funzionamento
Eliminazione di anomalie di funzionamento Generale NOTA Il lampeggiamento della lampada a LED rossa sulla scheda del controller non indica un guasto o un messaggio di errore. La lampada a LED rossa indica che il condizionatore è sotto tensione. Problema Cause possibili Soluzioni L'apparecchio non raffredda, la ventola... -
Seite 233: Messaggi Di Errore
7.1.1 Messaggi di errore I numeri di errore non vengono visualizzati sugli apparecchi dotati di controller standard: Con l'aiuto del software ECoolPLANT è possibile leggere i numeri di errore sul computer. NOTA Il lampeggiamento della lampada a LED rossa sulla scheda del controller non indica un guasto o un messaggio di errore. La lampada a LED rossa indica che il condizionatore è... - Seite 234 Errore n° Errore / comportamento del dispositivo Cause possibili Soluzioni Er08 LED: Lampeggia Sensore 2 (TS2) difettoso. Sostituire il sensore 2 in base al tipo di apparecchio. Compressore: Il sensore 2 è collegato alla Ventola dell'evaporatore scheda del circuito, non (interno): saldato fisso.
-
Seite 235: Messa Fuori Servizio
"Smontaggio e rottamazione", Pagina 56! NOTA È inoltre possibile affidare lo smaltimento a regola d'arte a Pfannenberg. La consegna a uno dei nostri stabilimenti è gratuita. Istruzioni per l'uso | Condizionatori eseternie da incasso | Standard-Controller (SC) – 400 V, 2~ | 086100003d... -
Seite 236: Smontaggio E Rottamazione
Smontaggio e rottamazione Dopo la fine della sua vita utile, l'apparecchio deve essere smontato e smaltito nel rispetto dell'ambiente. Istruzioni di sicurezza Tutti i lavori devono essere eseguiti solo da personale documentatamente addestrato, tenendo presente: • la minima qualificazione • questo manuale •... -
Seite 237: Smontaggio
Osservare le vigenti norme locali per la tutela del lavoro e dell'ambiente. Rottamazione NOTA È inoltre possibile affidare lo smaltimento a regola d'arte a Pfannenberg. La consegna a uno dei nostri stabilimenti è gratuita. Se non sono stati presi accordi di restituzione o smaltimento, avviare i componenti smontati al riciclaggio: •... -
Seite 238: 10 Ricambi E Accessori
10 Ricambi e accessori NOTA • In ogni ordinazione di ricambi e accessori indicare sempre la matricola di articolo Pfannenberg . • La matricola di articolo Pfannenberg per il controller si trova sul trasformatore del controller. N° Denominazione N° Denominazione... - Seite 239 11 Indice delle parole chiave Pulizia ................48 Accessori ................. 58 Adattare la tensione di rete ..........40 Messa fuori servizio ............55 Adattatore del filtro ............12 Messaggi di errore ............53 Adattatore USB ..............44 Messaggio di segnalazione guasti centralizzato ....37 Anomalie di funzionamento ..........
- Seite 240 Tutte le informazioni contenute nel presente documento sono 2020 state oggetto di accurata verifica. Tuttavia non ci assumiamo alcuna responsabilità per la completezza e la correttezza delle informazioni. Colophon: Pfannenberg GmbH Werner-Witt-Straße 1 21035 Amburgo Tel. +49 40 734 12-0 www.pfannenberg.com © Pfannenberg 2020...
- Seite 241 Instrucciones de servicio Acondicionadores para montaje y empotrado Series DTS y DTI 6201 / 6301 Controlador estándar (SC) – 400 V, 2~ Manual de instrucciones original – Versión 1.4, Noviembre 2020...
- Seite 242 Acerca de este manual ..............................5 Uso y conservación ................................ 5 Exclusión de responsabilidad ............................5 Explicación de las indicaciones............................6 Distinción de contenidos ..............................7 1.4.1 Instrucciones de manejo ............................7 1.4.2 Enlaces y referencias cruzadas..........................7 Seguridad ................................... 8 Empleo según uso previsto ............................
- Seite 243 Montaje y primera puesta en marcha ..........................22 Indicaciones de seguridad ............................22 Transporte ................................... 23 4.2.1 Transporte del climatizador ............................ 23 4.2.2 Transporte con grúa ............................... 24 Almacenamiento ................................25 Desembalaje ................................25 Montaje ..................................26 4.5.1 Generalidades ................................ 26 4.5.2 Montaje climatizadores DTS (colocación lateral)....................
- Seite 244 Puesta fuera de servicio ..............................55 Puesta fuera de servicio temporal ..........................55 Puesta fuera de servicio definitiva ..........................55 Desmontaje y eliminación............................... 56 Indicaciones de seguridad ............................56 Desmontaje .................................. 57 Eliminación .................................. 57 Piezas de repuesto y accesorios ........................... 58 Índice de palabras clave ..............................
-
Seite 245: Acerca De Este Manual
Pfannenberg se reserva el derecho de modificar este documento, incluida la exclusión de responsabilidad, en cualquier momento sin previo aviso y no se responsabilizará de las posibles consecuencias de esta modificación. -
Seite 246: Explicación De Las Indicaciones
Explicación de las indicaciones Las indicaciones de advertencia se introducen mediante palabras de señal, que expresan la magnitud del peligro. Cumpla imprescindiblemente las indicaciones de advertencia para evitar accidentes, daños personales y daños materiales. Explicación de las indicaciones de advertencia en este manual: PELIGRO Descripción abreviada del peligro La palabra de señal PELIGRO indica una amenaza de peligro inminente. -
Seite 247: Distinción De Contenidos
Distinción de contenidos 1.4.1 Instrucciones de manejo Las instrucciones de manejo de este manual se distinguen del siguiente modo: Prerrequisitos Prerrequisitos e indicaciones de advertencia adicionales. Herramientas y materiales necesarios Herramientas y materiales necesarios para el manejo Procedimiento <Pasos de operación> …... -
Seite 248: Seguridad
Seguridad Empleo según uso previsto Los climatizadores para montaje superficial e integrado Pfannenberg de las series DTS y DTI son climatizadores fijos para la disipación del calor desde armarios eléctricos. Estos se suministran en dos versiones: • Los climatizadores DTI se integran parcialmente hundidos en el lateral o en la puerta. -
Seite 249: Uso Previsiblemente Incorrecto
Uso previsiblemente incorrecto Los siguientes puntos describen un uso previsiblemente erróneo de la unidad: • uso de la unidad como puesto de almacenamiento, plataforma de trabajo, • colocación de medios auxiliares de transporte, • instalación en emplazamientos inadecuados, • funcionamiento al aire libre, •... -
Seite 250: Disposiciones De Garantía
Para preservar los derechos de garantía y devolver la unidad tenga en cuenta lo siguiente: • Adjunte al climatizador una descripción exacta del daño y número SRO (RMA) asignado por Pfannenberg. • Adjunte el comprobante de compra (copia del albarán o de la factura). -
Seite 251: Descripción De La Unidad
Descripción del empleo Los climatizadores para montaje superficial e integrado Pfannenberg de las series DTS y DTI se han diseñado para la disipación del calor desde armarios eléctricos. De este modo, se protegen los componentes sensibles del armario eléctrico. El condensado producido durante la refrigeración se drena a través de un sistema integrado. -
Seite 252: Adaptador De Filtro (Opcional)
3.3.1 Adaptador de filtro (opcional) G00052 Fig. 1: Adaptador de filtro en el climatizador Para la protección continua del circuito de aire externo frente a suciedad puede montarse el adaptador de filtro opcional (1) con una estera filtrante (2) en la entrada de aire (3) del climatizador. El adaptador de filtro (1) se fija mediante clips fácilmente en la entrada de aire (3). -
Seite 253: Descripción Del Funcionamiento
Descripción del funcionamiento 3.4.1 Circuito de aire PRECAUCIÓN Peligro de sufrir quemaduras Peligro de sufrir quemaduras debido a altas temperaturas en la salida de aire ambiente. En función de la temperatura ambiente, la salida de aire puede estar muy caliente. •... -
Seite 254: Controlador
3.4.2 Controlador Los controladores son unidades de regulación para ajustar funciones de la técnica de refrigeración y datos operativos. Permiten la lectura de mensajes de sistema y datos de diagnóstico. Los controladores disponen de una interfaz de servicio en la que son posibles distintas configuraciones. Además, hay una conexión para señal de fallo general. -
Seite 255: Circuito De Refrigeración
3.4.3 Circuito de refrigeración G00004 Fig. 5: Circuito de refrigeración Compresor Ventilador del condensador (externo) Condensador Ventilador del evaporador (interno) Válvula de expansión Control electrónico con sensor de temperatura Evaporador Los climatizadores constan de distintos componentes, véase Fig. 5. • El compresor (1) comprime el refrigerante a alta presión. -
Seite 256: Plan De Seguridad
3.4.4 Plan de seguridad ADVERTENCIA Peligro de sufrir lesiones debido a la modificación de dispositivos de seguridad. Los dispositivos de seguridad que no funcionan, modificados o defectuosos provocan accidentes graves. • Se prohíbe cualquier modificación en la unidad, especialmente de los dispositivos de seguridad. •... -
Seite 257: Tratamiento Del Condensado
3.4.5 Tratamiento del condensado ATENCIÓN Daños en componentes del armario eléctrico debido a la formación de condensado Las temperaturas en el interior del armario eléctrico por debajo del punto de rocío del aire ambiente o juntas del armario eléctrico dañadas pueden provocar una formación de condensado excesiva. •... -
Seite 258: Placa De Características
Placa de características ADVERTENCIA Peligro de sufrir lesiones Peligro de sufrir lesiones debido al incumplimiento de las indicaciones de la placa de características. • Al instalar y llevar a cabo los trabajos de mantenimiento de las unidades, tenga en cuenta los datos de la placa de características. -
Seite 259: Rótulos Y Símbolos En La Unidad
Rótulos y símbolos en la unidad Los rótulos y símbolos colocados en la unidad deben tenerse en cuenta imprescindiblemente. Los rótulos y símbolos colocados en la unidad no deben retirarse y deben mantenerse en estado completamente legible. Los rótulos y símbolos dañados o ilegibles deben sustituirse. Rótulo/símbolo Posición Descripción... -
Seite 260: Datos Técnicos
Datos técnicos 3.7.1 Circuito de refrigerante Denominación Modelo DTI/DTS 6201 Modelo DTI/DTS 6301 Potencia frigorífica con A35/A35 */** 1000 W 1500 W Potencia frigorífica con A50/A35 */** 780 W 1200 W Tipo de refrigerante * R134A Cantidad de refrigerante * 600 g Temperatura nominal (ajustada de fábrica) +35 °C (+95 °F) -
Seite 261: Dimensiones
3.7.3 Dimensiones Denominación Modelo DTI/DTS 6201 Modelo DTI/DTS 6301 Altura DTI: 1536 mm DTS: 1539 mm Ancho 485 mm Profundidad con protector (estándar) 218 mm Profundidad de instalación DTI 60 mm Peso DTI: 58 kg DTI: 60 kg DTS: 61 kg DTS: 64 kg Posición de instalación vertical... -
Seite 262: Montaje Y Primera Puesta En Marcha
Montaje y primera puesta en marcha Indicaciones de seguridad PELIGRO ¡Peligro de muerte producido por descargas eléctricas! Con la unidad abierta, las piezas pueden hallarse bajo tensión y provocar una descarga eléctrica en caso de contacto. Al trabajar con la unidad abierta, observe los siguientes puntos: •... -
Seite 263: Transporte
Transporte Para evitar daños personales y materiales tenga en cuenta lo siguiente: • Los trabajos solo debe realizarlos personal especializado cualificado. • Observe las indicaciones de seguridad. ADVERTENCIA ¡Peligro de sufrir lesiones para las personas! Elevado peligro de sufrir lesiones debido a un transporte inadecuado. •... -
Seite 264: Transporte Con Grúa
4.2.2 Transporte con grúa PELIGRO Peligro de muerte debido a cargas suspendidas El vuelco o la caída de cargas pueden provocar lesiones graves hasta mortales. • Nunca se detenga bajo cargas suspendidas. • Utilice solo dispositivos de elevación y medios de sujeción autorizados diseñados para el peso total de la carga suspendida. -
Seite 265: Almacenamiento
Almacenamiento ATENCIÓN ¡Pérdida de la garantía! El incumplimiento de las condiciones de almacenamiento provoca la pérdida de la garantía. Al almacenar la unidad observe los puntos siguientes: • No exponga la unidad a temperaturas superiores a +70 °C durante el almacenamiento. •... -
Seite 266: Montaje
Montaje 4.5.1 Generalidades Para garantizar un funcionamiento seguro y eficaz de los climatizadores, asegúrese de que se cumplan los siguientes requisitos generales: • Elija el lugar de instalación del armario eléctrico de modo que se garantice una ventilación y aireación suficientes del climatizador. -
Seite 267: Montaje Climatizadores Dts (Colocación Lateral)
4.5.2 Montaje climatizadores DTS (colocación lateral) 4.5.2.1 Realización de recortes para el climatizador DTS G00007 Orificios de montaje Recortes de montaje Fig. 9: Vista exterior del armario eléctrico, orificios y recortes de montaje Perforaciones Recortes de montaje Contorno de la unidad Prerrequisitos PELIGRO –... - Seite 268 4.5.2.2 Colocación del sellado del perfil ATENCIÓN ¡Daños en el armario eléctrico y el climatizador! Las juntas mal instaladas pueden generar una formación excesiva de condensación en el armario eléctrico y con ello provocar cortocircuitos y daños debidos a la condensación. •...
-
Seite 269: Montaje Climatizadores Dti(Empotrado)
4.5.3 Montaje climatizadores DTI(empotrado) 4.5.3.1 Realización de recortes para el climatizador DTI G00009 Fig. 11: Vista exterior del armario eléctrico, recortes de montaje Entrada de aire Contorno de la unidad Salida de aire Recorte de montaje Prerrequisitos PELIGRO – Peligro de muerte por electrocución. Asegúrese de que la unidad se halla sin tensión. •... - Seite 270 4.5.3.2 Montaje del armario eléctrico en el climatizador DTI (empotrado) G00010 Fig. 12: Montaje del climatizador Resortes elásticos Recorte de la carcasa para resortes de fijación Resortes de fijación (6×) Recorte de la carcasa para resortes de fijación Climatizador DTI Pared del armario eléctrico/puerta del armario eléctrico NOTA...
- Seite 271 Prerrequisitos PELIGRO – Peligro de muerte por electrocución. Asegúrese de que la unidad se halla sin tensión. • El recorte para el climatizador DTI se ha realizado, véase «Realización de recortes para el climatizador DTI», Página 29. Herramientas y materiales necesarios •...
-
Seite 272: Conexión Eléctrica
Conexión eléctrica PELIGRO ¡Peligro de muerte producido por descargas eléctricas! Con la unidad abierta, las piezas pueden hallarse bajo tensión y provocar una descarga eléctrica en caso de contacto. Al trabajar con la unidad abierta, observe los siguientes puntos: • Los trabajos en el sistema eléctrico solo deben realizarlos técnicos electricistas autorizados. - Seite 273 4.6.2 Esquema de conexiones eléctrico – Controlador estándar (SC) 1,2 - Störmeldung / failure indication / Tür offen / door open / porte ouvert contact sec de défaut Tür geschlossen / door closed / porte fermé 4,5 - Türkontakt / door contact / contact de porte TK TK 1 2 3 4...
-
Seite 274: Ajuste Del Interruptor Dip
4.6.3 Ajuste del interruptor DIP OFF 1 G00011 Fig. 14: Ajuste del interruptor DIP Tornillos de fijación del ventilador Tornillo inferior (soporte de placas de circuito impreso) Tornillo superior (soporte de placas de circuito Controlador impreso) Interruptor DIP Soporte de placas de circuito impreso El conmutador DIP del controlador permite ajustar los valores nominales y los valores límite de las temperaturas. - Seite 275 4.6.3.1 Ajuste del rango de temperaturas del interruptor DIP Prerrequisitos PELIGRO – Peligro de muerte por electrocución. Asegúrese de que la unidad se halla sin tensión. • Espere 5 minutos para que se descarguen los componentes eléctricos. Solo entonces podrá abrir la unidad. Procedimiento Desmonte el ventilador.
-
Seite 276: Interruptor De Contacto De Puerta
4.6.4 Interruptor de contacto de puerta ATENCIÓN ¡Daños en la unidad! Daños en la unidad y el controlador debido a la aplicación de tensión ajena en la entrada del contacto de la puerta. • No aplicar tensión ajena en la entrada del contacto de la puerta. •... -
Seite 277: Señal De Fallo General
4.6.5 Señal de fallo general La unidad está equipada con un contacto inversor libre de potencial para la señal de fallo general. Bornes Tensión Corriente máxima Versión X54:1 Contacto radicular Máximo 230 V Máximo 1 A Contacto inversor libre de potencial X54:2 Contacto... -
Seite 278: Conexión De Red
4.6.6 Conexión de red PELIGRO ¡Peligro de muerte producido por descargas eléctricas! Los conductores de protección no conectados o montados de manera errónea pueden causar tensiones y descargas eléctricas peligrosas y producir accidentes graves. • Los trabajos solo debe realizarlos personal especializado cualificado. •... - Seite 279 4.6.6.1 Conexión eléctrica del climatizador Para garantizar un funcionamiento seguro y eficaz de los climatizadores, asegúrese de que se cumplan los siguientes requisitos generales: • Queda prohibido instalar un regulador de temperatura en el lado de la alimentación. • Instale el fusible indicado en la placa de características a modo de disyuntor, véase el capítulo «Placa de características», Página 18y «Adaptación de la unidad a la tensión de red», Página 40.
-
Seite 280: Adaptación De La Unidad A La Tensión De Red
4.6.7 Adaptación de la unidad a la tensión de red G00024 Ajustes de fábrica del transformador de balastro Devanado de entrada del transformador de balastro Fig. 16: Adaptación de la tensión de red en el transformador de balastro Las unidades con una tensión asignada de 400/460 V se pueden conectar opcionalmente a otra tensión de red. Para ello, debe adaptarse la tensión de red en el transformador de balastro. -
Seite 281: Conexiones Equipotenciales
4.6.8 Conexiones equipotenciales Conexión equipotencial funcional rosca (rosca M8), para una referencia de señal sin interferencias entre la unidad y el armario eléctrico. Conexión equipotencial de protección para componentes metálicos y tensiones de contacto. G00023 Fig. 17: Conexión equipotencial/fusibles Instrucciones de servicio | Acondicionadores para montaje y empotrado | Controlador estándar (SC) – 400 V, 2~ | 086100003d 41/60... -
Seite 282: Funciones Generales
Manejo Funciones generales ATENCIÓN Daños en la unidad El funcionamiento sin el protector de la unidad evita una alimentación de aire suficiente al condensador y provoca una limitación de la función de refrigeración prevista. • Opere el climatizador solo con el protector de la unidad montado. G00015 Fig. -
Seite 283: Manejo Del Climatizador
Solo debe utilizarse el refrigerante indicado. NOTA Para los números de referencia de las piezas de repuesto de Pfannenberg, consulte el capítulo «Piezas de repuesto y accesorios», Página 58. Instrucciones de servicio | Acondicionadores para montaje y empotrado | Controlador estándar (SC) – 400 V, 2~ | 086100003d... -
Seite 284: Interfaz De Servicio
Se prohíbe el funcionamiento continuo. NOTA • El software ECoolPLANT está disponible como descarga gratuita en la página web www.pfannenberg.com/. Alternativamente, puede escanear el código QR adjunto. • Las instrucciones de servicio correspondientes para el software ECoolPLANT están disponibles como descarga en... -
Seite 285: Conservación Y Mantenimiento
Conservación y mantenimiento Indicaciones de seguridad PELIGRO ¡Peligro de muerte producido por descargas eléctricas! Con la unidad abierta, las piezas pueden hallarse bajo tensión y provocar una descarga eléctrica en caso de contacto. Al trabajar con la unidad abierta, observe los siguientes puntos: •... - Seite 286 Los intervalos de mantenimiento se reducirán y pasarán a ser cada dos o seis meses. • Las funciones de los filtros Pfannenberg están adaptados de forma óptima a los climatizadores. Por este motivo, el uso de filtros Pfannenberg tiene efectos positivos en el alcance de los trabajos de mantenimiento.
-
Seite 287: Plan De Mantenimiento
Plan de mantenimiento Intervalo de mantenimiento: Llevar a cabo cada doce meses. Llevar a cabo cada dos o seis meses en ambientes oleosos y polvorientos. Modelo: ______________________________________________________________________ Número de serie: ______________________________________________________________________ Fecha del mantenimiento: ______________________________________________________________________ Técnico especialista encargado (nombre): ______________________________________________________________________ Denominación del área de la unidad/ Inspección Pendiente Resultado... -
Seite 288: Trabajos De Mantenimiento
Trabajos de mantenimiento 6.4.1 Limpieza ADVERTENCIA Peligro de accidente y daños en componentes Peligro de accidente y daños en componentes a causa de una limpieza inadecuada. Se pueden producir daños en los grupos constructivos eléctricos y electrónicos, si los climatizadores se limpian con chorros de agua, limpiadores por chorro de vapor o hidrolimpiadoras u objetos punzantes. - Seite 289 6.4.1.1 Desmontaje del protector de la unidad PRECAUCIÓN Riesgo de sufrir aplastamientos al retirar el protector de la unidad Al retirar y volver a colocar el protector de la unidad, se pueden producir aplastamientos en las manos y otras partes del cuerpo.
- Seite 290 6.4.1.2 Limpieza del intercambiador de calor ATENCIÓN Daños en componentes Daños en las aletas del intercambiador de calor debido a una limpieza inadecuada. • Limpie las aletas del intercambiador de calor con un cepillo blando, con aire comprimido o con un aspirador de polvo con inserto de cepillo.
- Seite 291 6.4.1.3 Limpieza de las esteras filtrantes ATENCIÓN Daños en componentes Daños en las esteras filtrantes debido a una limpieza inadecuada. • Evite chorros de agua con alta presión. • No escurra la estera filtrante. • Sustituya inmediatamente las esteras filtrantes con aceite o grasa. NOTA Los intervalos de tiempo para la limpieza o la sustitución de las esteras filtrantes dependen mucho de la suciedad del aire del entorno.
-
Seite 292: Solución De Fallos De Funcionamiento
Solución de fallos de funcionamiento Generalidades NOTA El parpadeo de la luz LED roja en la placa de circuito impreso del controlador no es una indicación de avería ni un mensaje de error. Esta luz LED roja indica que el climatizador conduce tensión. Avería Posibles causas Medidas correctivas... -
Seite 293: Mensajes De Error
7.1.1 Mensajes de error En unidades con controladores estándar, los números de error no se muestran. Mediante el software ECoolPLANT es posible leer los números de error en el ordenador. NOTA El parpadeo de la luz LED roja en la placa de circuito impreso del controlador no es una indicación de avería ni un mensaje de error. - Seite 294 N.º error Avería/comportamiento de la unidad Posibles causas Medidas correctivas Er08 LED: intermitente Sensor 2 (TS2) Según el modelo de la defectuoso. unidad, sustituya el sensor Compresor: Ventilador del evaporador El sensor 2 está insertado (interno): en la placa de circuito impreso, pero no soldado Ventilador del condensador de forma fija.
-
Seite 295: Puesta Fuera De Servicio
Página 56! NOTA Pfannenberg se encargará también de eliminar correctamente las unidades antiguas. El envío a una de nuestras fábricas deberá realizarse sin costes. Instrucciones de servicio | Acondicionadores para montaje y empotrado | Controlador estándar (SC) – 400 V, 2~ | 086100003d... -
Seite 296: Desmontaje Y Eliminación
Desmontaje y eliminación Una vez se ha alcanzado el final de la vida útil, la unidad debe desmontarse y eliminarse de forma respetuosa con el medio ambiente. Indicaciones de seguridad Los trabajos solo debe realizarlos personal formado de manera demostrable teniendo en cuenta lo siguiente: •... - Seite 297 Eliminación NOTA Pfannenberg se encargará también de eliminar correctamente las unidades antiguas. El envío a una de nuestras fábricas deberá realizarse sin costes. Siempre que no se haya llegado a ningún acuerdo de devolución o eliminación, los componentes desmontados deberán derivarse para su reciclaje: •...
-
Seite 298: 10 Piezas De Repuesto Y Accesorios
10 Piezas de repuesto y accesorios NOTA • Al pedir piezas de repuesto y accesorios, indique siempre el número de referencia de Pfannenberg. • Encontrará el número de referencia de Pfannenberg para el controlador en el transformador del controlador. N.°... - Seite 299 11 Índice de palabras clave Funcionamiento ..............43 Accesorios ............... 58 Acerca de este documento Indicaciones de seguridad ........22, 45, 56 Instrucciones de manejo ..........7 Interfaz de servicio ............44 Adaptador de filtro ............12 Interruptor de contacto de puerta ........36 Adaptador USB ..............
- Seite 300 Toda la información aquí contenida fue cuidadosamente revisada en 2020. Sin embargo, no asumimos ninguna responsabilidad por la integridad y exactitud de los contenidos. Aviso legal: Pfannenberg GmbH Werner-Witt-Straße 1 21035 Hamburgo Tel. +49 40 734 12-0 www.pfannenberg.com © Pfannenberg 2020...
-
Seite 301: Руководство По Эксплуатации
Руководство по эксплуатации Навесные и встраиваемые устройства охлаждения Серия DTS и DTI 6201 / 6301 Стандартный контроллер (SC) – 400 B, 2~ Оригинальная инструкция по эксплуатации | Версия 1.4, ноябрь 2020... - Seite 302 О данном Руководстве по эксплуатации ........................5 Использование и хранение ............................5 Исключение ответственности ............................. 5 Объяснение примечаний ............................. 6 Маркировка содержаний .............................. 7 1.4.1 Инструкции по выполнению действий ........................7 1.4.2 Ссылки и перекрестные ссылки ..........................7 Безопасность ................................... 8 Применение...
- Seite 303 Монтаж и первый ввод в эксплуатацию ........................22 Правила техники безопасности ..........................22 Транспортировка ................................ 23 4.2.1 Транспортировка устройства охлаждения ......................23 4.2.2 Транспортировка краном ............................. 24 Хранение ..................................25 Распаковка .................................. 25 Монтаж ..................................26 4.5.1 Общие положения ..............................26 4.5.2 Монтаж...
- Seite 304 Вывод из эксплуатации ..............................55 Временный вывод из эксплуатации .......................... 55 Окончательный вывод из эксплуатации ........................55 Демонтаж и утилизация ..............................56 Правила техники безопасности ..........................56 Демонтаж ..................................57 Утилизация ................................. 57 Запчасти и дополнительные принадлежности ......................58 Указатель ключевых слов ............................59 Руководство...
-
Seite 305: Данном Руководстве По Эксплуатации
прямой или косвенный ущерб, понесенный в связи с поставкой или использованием данной документации, исключается в пределах, допустимых законом. Компания Pfannenberg оставляет за собой право в любое время без предварительного уведомления изменять этот документ, в том числе заявление об ограничении ответственности, и не несет ответственности за любые последствия... -
Seite 306: Объяснение Примечаний
Объяснение примечаний Эти предупреждения поясняются сигнальными словами, которые подчёркивают величину опасности. Предупреждения следует соблюдать обязательно для предотвращения несчастных случаев, травм и материального ущерба. Значение символов, используемых в данном руководстве: ОПАСНОСТЬ Краткое описание опасности Сигнальное слово ОПАСНО указывает на непосредственную опасность. Несоблюдение... -
Seite 307: Маркировка Содержаний
Маркировка содержаний 1.4.1 Инструкции по выполнению действий Инструкции в данном руководстве отмечаются следующим образом: Условия Условия и дополнительные предупреждения. Требующиеся инструменты и материалы Необходимые инструменты и материалы Порядок действий <Handlungsschritte> … – <Zwischenergebnis / Weitere Hinweise> … <Endergebnis> 1.4.2 Ссылки... -
Seite 308: Безопасность
Безопасность Применение по назначению Навесные и встраиваемые устройства охлаждения компании Pfannenberg, серии DTS и DTI, являются стационарными устройствами охлаждения для отвода тепла из распределительных шкафов. Они выпускаются в двух вариантах: • Устройства охлаждения DTI встраиваются частично утопленными в боковую часть или в дверь. -
Seite 309: Предсказуемые Нарушения В Применении
Предсказуемые нарушения в применении В следующих пунктах описываются предсказуемые нарушения при использовании устройства: • Использование устройства как места складирования, как рабочей площадки. • Закрепление транспортировочных приспособлений. • Установка в неподходящих местах. • Эксплуатация вне помещения. • Работа при превышении допустимых технических данных. См. раздел «Технические данные». •... -
Seite 310: Гарантийные Обязательства
Замена деталей неуполномоченным персоналом. 2.4.1 Возврат устройств Для сохранения гарантии и возврата устройства необходимо учитывать следующее: • Приложить к устройству охлаждения точное описание дефекта и присвоенный компанией Pfannenberg номер SRO (RMA). • Приложить подтверждение приобретения (копия накладной или счета). •... -
Seite 311: Описание Устройства
Описание устройства Описание применения Навесные и встраиваемые устройства охлаждения компании Pfannenberg серии DTS и DTI предусмотрены для отвода тепла из распределительных шкафов. Чувствительные детали в распределительном шкафу не портятся. Конденсат, образующийся при охлаждении, отводится с помощью встроенной системы. • Устройства охлаждения работают с хладагентом, который очень трудно воспламеняется и безвреден для... -
Seite 312: Адаптер Фильтра (Опция)
3.3.1 Адаптер фильтра (опция) G00052 Рис. 1: Адаптер фильтра устройства охлаждения Для постоянной защиты контура внешнего воздуха от загрязнения можно устанавливать дополнительный адаптер фильтра (1) с фильтр-матом (2) на вводе воздуха (3) в устройство охлаждения. Адаптер фильтра (1) просто вставляется перед воздухозаборником (3). Адаптер фильтра требуется в устройстве только... -
Seite 313: Описание Принципа Действия
Описание принципа действия 3.4.1 Циркуляциявоздуха ВНИМАНИЕ Опасность ожога Опасность ожогов под воздействием высоких температур на выходе окружающего воздуха. В зависимости от окружающей температуры воздух из выходного отверстия может становиться очень горячим. • Не держать части тела непосредственно перед выходом окружающего воздуха (A). «Холодильный... -
Seite 314: Контроллер
3.4.2 Контроллер Контроллеры являются блоками регулирования для настройки холодильных функций и рабочих параметров. Они позволяют считывать системные сообщения и диагностические данные. Контроллеры имеют сервисный интерфейс, на котором возможны различные конфигурации. Кроме того, имеется подключение для сводного отчета об ошибках. G00002 Рис. -
Seite 315: Холодильный Контур
3.4.3 Холодильный контур G00004 Рис. 5.: Холодильный контур Компрессор Вентилятор конденсатора (внешний) Конденсатор Вентилятор испарителя (внутренний) Расширительный клапан Электронное управление с температурным датчиком Испаритель Устройства охлаждения состоят из различных компонентов, смотри Рис. 5.. • Компрессор (1) сжимает хладагент с высоким давлением. Температура повышается. •... -
Seite 316: Концепция Обеспечения Безопасности
3.4.4 Концепция обеспечения безопасности ПРЕДОСТЕРЕЖЕНИЕ Опасность травмирования от измененных предохранительных устройств. Не функционирующие или дефектные предохранительные устройства ведут к тяжелым авариям. • Любые изменения на устройстве охлаждения, в частности, предохранительных устройств, запрещены. • В случае дефектных предохранительных устройств необходимо сразу же остановить и вывести устройство охлаждения... -
Seite 317: Обращение С Конденсатом
3.4.5 Обращение с конденсатом ВНИМАНИЕ Повреждение компонентов распределительного шкафа образованием конденсата Внутренние температуры распределительного шкафа ниже точки росы окружающего воздуха или поврежденные уплотнения шкафа могут привести к чрезмерной конденсации. • Уплотнения распределительного шкафа должны регулярно проверяться, чтобы избежать чрезмерного образования конденсата из-за проникновения окружающего воздуха. •... -
Seite 318: Заводская Табличка
Заводская табличка ПРЕДОСТЕРЕЖЕНИЕ Опасность травмирования Опасность травмирования из-за несоблюдения данных на заводской табличке. • При установке и техническом обслуживании устройств следует всегда учитывать данные на заводской табличке. ПРИМЕЧАНИЕ • Заводская табличка находится на задней стенке корпуса устройства охлаждения. • На рисунке показано стандартное исполнение в странах-членах ЕС. В других странах исполнение заводской таблички... -
Seite 319: Таблички И Символы На Устройстве
Таблички и символы на устройстве Прикрепленные на устройстве заводские таблички и символы должны обязательно соблюдаться. Прикрепленные на устройстве заводские таблички и символы не могут быть удалены и должны содержаться в полностью разборчиво читаемом состоянии. Поврежденные или потерянные таблички и символы должны быть заменены. -
Seite 320: Технические Данные
Технические данные 3.7.1 Холодильный контур Обозначение Модель DTI / DTS 6201 Модель DTI / DTS 6301 Холодопроизводительность при A35 / A35 */** 1000 Вт 1500 Вт Холодопроизводительность при A50 / A35 */** 780 Вт 1200 Вт Тип хладагента* R134A Количество хладагента* 600 г... -
Seite 321: Габаритные Размеры
3.7.3 Габаритные размеры Обозначение Модель DTI / DTS 6201 Модель DTI / DTS 6301 Высота DTI: 1536 мм DTS: 1539 мм Ширина 485 мм Глубина с кожухом (стандарт) 218 мм Монтажная глубина DTI 60 мм Вес DTI: 58 кг DTI: 60 кг DTS: 61 кг... -
Seite 322: Монтаж И Первый Ввод В Эксплуатацию
Монтаж и первый ввод в эксплуатацию Правила техники безопасности ОПАСНОСТЬ Опасность для жизни при поражении электрическим током! При открытом устройстве его компоненты могут находиться под напряжением, при касании может случиться поражение электрическим током. При работах с открытым устройством следует иметь в виду: •... -
Seite 323: Транспортировка
Транспортировка Для предотвращения несчастных случаев, травм и материального ущерба следует соблюдать следующие правила: • Работы должны выполняться квалифицированным персоналом. • Соблюдать правила техники безопасности. ПРЕДОСТЕРЕЖЕНИЕ Опасность травмирования для людей! Повышенный риск травмы во время не правильной транспортировки. • Транспортировку устройства должны осуществлять лица, имеющие достаточную квалификацию и знакомые с функционированием... -
Seite 324: Транспортировка Краном
4.2.2 Транспортировка краном ОПАСНОСТЬ Опасность для жизни под подвешенным грузом Опрокидывание или падение груза может привести к серьезным травмам или смерти. • Категорически запрещается нахождение под висящим грузом. • Используйте только утвержденные грузоподъемные приспособления и стропы, рассчитанные на общий вес подвешенного... -
Seite 325: Хранение
Хранение ВНИМАНИЕ Утрата гарантийных обязательств! Несоблюдение условий хранения приводит к утрате гарантийных обязательств. При хранении устройства учитывать следующие моменты: • Не подвергать устройство охлаждения во время хранения воздействию температур выше +70°C. • Всегда храните устройство в положении для использования. Распаковка ПРЕДОСТЕРЕЖЕНИЕ... -
Seite 326: Монтаж
Монтаж 4.5.1 Общие положения Для безопасной и надежной эксплуатации устройств охлаждения обеспечить выполнение следующих общих требований: • Место установки распределительного шкафа выбрать так, чтобы обеспечивалась достаточная приточная и вытяжная вентиляция устройства охлаждения. Минимальное расстояние между устройствами или до стены должно составлять 200 мм. •... -
Seite 327: Монтаж Устройства Охлаждения Dts (Боковое Навешивание)
4.5.2 Монтаж устройства охлаждения DTS (боковое навешивание) 4.5.2.1 Выполнить вырезы для устройства охлаждения DTS G00007 Монтажные отверстия Монтажные вырезы Рис. 9.: Внешний вид распределительного шкафа, монтажные отверстия и вырезы Отверстия Монтажные вырезы Контур устройства Условия ОПАСНОСТЬ: Опасность для жизни в результате поражения электрическим током. Убедиться в том, что устройство... - Seite 328 4.5.2.2 Установить профильное уплотнение ВНИМАНИЕ Опасность повреждения распределительного шкафа и устройства охлаждения! Неправильно установленные уплотнения могут привести к чрезмерному образованию конденсата в распределительном шкафу и тем самым короткому замыканию и повреждению. • Прокладывать уплотнение так, чтобы оно уплотняло по отношению к распределительному шкафу. •...
-
Seite 329: Монтаж Устройства Охлаждения Dti (Установка)
4.5.3 Монтаж устройства охлаждения DTI (установка) 4.5.3.1 Выполнить вырезы для устройства охлаждения DTI G00009 Рис. 11.: Внешний вид распределительного шкафа, монтажные вырезы Забор воздуха Контур устройства Выход воздуха Монтажные вырезы Условия ОПАСНОСТЬ: Опасность для жизни в результате поражения электрическим током. Убедиться в том, что устройство... - Seite 330 4.5.3.2 Монтаж устройства охлаждения DTI в распределительном шкафу (встраивание) G00010 Рис. 12.: Монтаж устройства охлаждения Пружина с собачкой Вырез в корпусе для крепежной пружины Крепежная пружина (6×) Вырез в корпусе для крепежной пружины Устройство охлаждения DTI Стенка распределительного шкафа / дверь распределительного...
- Seite 331 Условия ОПАСНОСТЬ: Опасность для жизни в результате поражения электрическим током. Убедиться в том, что устройство обесточено. • Вырез для устройства охлаждения DTI сделан, см. «Выполнить вырезы для устройства охлаждения DTI», Страница 29. Требующиеся инструменты и материалы • Монтажный инструмент, крепежные пружины (дополнительный пакет) Порядок...
-
Seite 332: Подключение К Электросети
Подключение к электросети ОПАСНОСТЬ Опасность для жизни при поражении электрическим током! При открытом устройстве его компоненты могут находиться под напряжением, при касании может случиться поражение электрическим током. При работах с открытым устройством следует иметь в виду: • Работы на электрической системе могут выполняться только уполномоченными профессиональными электриками. - Seite 333 4.6.2 Электрическая схема – стандартного контроллера (SC) 1,2 - Störmeldung / failure indication / Tür offen / door open / porte ouvert contact sec de défaut Tür geschlossen / door closed / porte fermé 4,5 - Türkontakt / door contact / contact de porte TK TK 1 2 3 4...
-
Seite 334: Настройка Dip-Переключателя
4.6.3 Настройка DIP-переключателя OFF 1 G00011 Рис. 14.: Настройка DIP-переключателя Крепежные винты вентилятора Нижний винт (крепление панели) Верхний винт (крепление панели) Контроллер Крепление панели DIP-переключатель DIP-переключатель на контроллере позволяет регулировать заданные значения и управлять ими и предельными значениями температуры. В состоянии поставки заводская настройка базовых значений следующая: Параметры... - Seite 335 4.6.3.1 Настроить температурный диапазон на DIP-переключателе Условия ОПАСНОСТЬ: Опасность для жизни в результате поражения электрическим током. Убедиться в том, что устройство обесточено. • Выждать фазу разряда электрических компонентов длительностью в 5 минут. Лишь затем открывать устройство. Порядок действий Демонтировать вентилятор, для этого освободить четыре крепежных винта (1), см. Рис. 14. (A). Отсоединить...
-
Seite 336: Дверной Контактный Выключатель
4.6.4 Дверной контактный выключатель ВНИМАНИЕ Опасность повреждения устройства! Повреждение устройства и контроллера вследствие приложения внешнего напряжения ко входу дверного контакта. • Не подавайте внешнее напряжение на вход дверного контакта • Вход дверного контакта подает для дверного контактного выключателя малое напряжение (< 20В, 20мA). Установка... -
Seite 337: Сообщение Об Общей Неисправности
4.6.5 Сообщение об общей неисправности Устройство оснащено переключающим контактом без гальванической развязки для сообщения об общей неисправности. Зажимы Напряжение Допустимая нагрузка по Конструкция току X54:1 коренной контакт Максимально 230 В макс. 1 A Потенциальный переключающий контакт без X54:2 размыкающий гальванической развязки контакт... -
Seite 338: Сетевое Подключение
4.6.6 Сетевое подключение ОПАСНОСТЬ Опасность для жизни при поражении электрическим током! Неприсоединенные или неправильно установленные системы защитного заземления могут создавать опасные напряжения и удары электрическим током и вызывать тяжелые несчастные случаи. • Все работы должны производиться только специалистами! • Выполнять системы защитного заземления в соответствии с DIN EN 60204- 1, разд. 8.2. •... - Seite 339 4.6.6.1 Выполнить электрическое подключение устройства охлаждения Для обеспечения безопасной и надежной эксплуатации устройств охлаждения выполнить следующие общие требования: • Запрещается предвключение регулятора температуры со стороны подачи питания. • Для защиты кабелей подключить указанный на заводской табличке входной предохранитель, см. раздел «Заводская...
-
Seite 340: Настройка Устройства К Сетевому Напряжению
4.6.7 Настройка устройства к сетевому напряжению G00024 Заводские настройки для балластного трансформатора Входная обмотка балластного трансформатора Рис. 16: Настройка сетевого напряжения на балластном трансформаторе Только устройства охлаждения с номинальным напряжением 400 В / 460 В, могут по усмотрению присоединяться к другому... -
Seite 341: Подклюия Для Выравнивания Потенциалов
4.6.8 Подклюия для выравнивания потенциалов Функциональное выравнивание потенциалов (с резьбой M8), для обмена сигналами между устройством и распределительным шкафом с низким уровнем помех. Защитное выравнивание потенциалов для металлических компонентов и контактного напряжения. G00023 Рис. 17: Выравнивание потенциалов / предохранители Руководство по эксплуатации | Навесные и встраиваемые устройства охлаждения | Стандартный контроллер (SC) – 400 B, 2~ | 086100003d 41/60... -
Seite 342: Общие Функции
Управление Общие функции ВНИМАНИЕ Повреждение устройства Работа без крышки устройства препятствует достаточной подаче воздуха к конденсатору и ведет к ограничению предусмотренной функции охлаждения. • Эксплуатировать устройство охлаждения только с установленной крышкой устройства. G00015 Рис. 18: Функция электронного управления Стандартный контроллер (SC) имеет индикатор с зеленым светодиодом (1). С помощью DIP-переключателя (5) можно настраивать... -
Seite 343: Эксплуатация Устройства Охлаждения
– Разрешается использовать только указанный хладагент. ПРИМЕЧАНИЕ Номера запасных частей компании Pfannenberg приводятся в разделе «Запчасти и дополнительные принадлежности», Страница 58. Руководство по эксплуатации | Навесные и встраиваемые устройства охлаждения | Стандартный контроллер (SC) – 400 B, 2~ | 086100003d... -
Seite 344: Сервисный Интерфейс
для временного обмена данными, например, чтобы считать системные сообщения. Его постоянная работа запрещена. ПРИМЕЧАНИЕ • ПО ECoolPLANT можно получить в виде бесплатной загрузки с интернет-страницы www.pfannenberg.com/. В качестве альтернативы просто сканировать находящийся рядом QR-код. • Соответствующее руководство по эксплуатации программного обеспечения ECoolPLANT доступно для загрузки в... -
Seite 345: Текущий Ремонт И Техническое Обслуживание
Текущий ремонт и техническое обслуживание Правила техники безопасности ОПАСНОСТЬ Опасность для жизни при поражении электрическим током! При открытом устройстве его компоненты могут находиться под напряжением, при касании может случиться поражение электрическим током. При работах с открытым устройством следует иметь в виду: •... -
Seite 346: Общие Положения
• Функции фильтров компании Pfannenberg оптимально адаптированы к устройствам охлаждения. Поэтому применение фильтров компании Pfannenberg положительно сказывается на объеме работ по техническому обслуживанию. Руководство по эксплуатации | Навесные и встраиваемые устройства охлаждения | Стандартный контроллер (SC) – 400 B, 2~ | 086100003d... -
Seite 347: График Технического Обслуживания
График технического обслуживания Интервал проведения Проводить каждые двенадцать месяцев. Проводить каждые два - шесть месяцев технического обслуживания: на наружном воздухе, содержащем масло и пыль. Тип: ______________________________________________________________________ Серийный номер: ______________________________________________________________________ Дата технического обслуживания: ______________________________________________________________________ Специалист-исполнитель (ФИО): ______________________________________________________________________ Обозначение диапазона устройств / Визуальный... -
Seite 348: Работы По Техническому Обслуживанию
Работы по техническому обслуживанию 6.4.1 Очистка ПРЕДОСТЕРЕЖЕНИЕ Риск несчастных случаев и повреждения компонентов Риск несчастных случаев и повреждения компонентов из-за неправильной очистки. Очистка устройств охлаждения с помощью очистителей водяной струей, паровой струей или струйных аппаратов высокого давления или острых предметов может привести к повреждениям электрических и электронных узлов. Неисправности... - Seite 349 6.4.1.1 Демонтаж крышки устройства охлаждения ВНИМАНИЕ Опасность защемления при демонтаже крышки устройства При демонтаже и новой установке крышки устройства можно защемить руки и другие части тела. • Не помещать никакие части тела между рамой, пружинами и вырезом для устройства. • Работать...
- Seite 350 6.4.1.2 Очистка теплообменника ВНИМАНИЕ Возможность повреждения компонентов! Возможность повреждения ребер теплообменника в результате ненадлежащего выполнения работ по очистке. • Ребра теплообменника следует очищать мягкой щеткой, сжатым воздухом или пылесосом с насадкой-щеткой. ПРИМЕЧАНИЕ Интервалы времени для очистки сильно зависят от загрязнения воздуха окружающей среды. Условия...
- Seite 351 6.4.1.3 Очистка фильтр-матов ВНИМАНИЕ Возможность повреждения компонентов! Повреждение фильтр-мата в результате ненадлежащего выполнения работ по очистке. • Избегать водяной струи с высоким давлением. • Фильтр-мат не выжимать. • Незамедлительно заменять фильтр-маты, загрязненные маслом или консистентной смазкой. ПРИМЕЧАНИЕ Интервалы времени для чистки или замены фильт-матов сильно зависят от загрязненности окружающего воздуха. Условия...
-
Seite 352: Устранение Неисправностей В Процессе Эксплуатации
Устранение неисправностей в процессе эксплуатации Общие положения ПРИМЕЧАНИЕ Мигание красного светодиода на панели контроллера не является индикацией неисправности или сообщением об ошибке. Красный светодиод показывает, что устройство охлаждения находится под напряжением. Неисправность Возможные причины Меры по устранению Устройство не охлаждает, вентилятор Настроена... -
Seite 353: Сообщения Об Ошибках
7.1.1 Сообщения об ошибках В устройствах со стандартными контроллерами номера ошибок не отображаются: С помощью ПО ECoolPLANT можно считать номера ошибок на компьютере. ПРИМЕЧАНИЕ Мигание красного светодиода на панели контроллера не является индикацией неисправности или сообщением об ошибке. Красный светодиод показывает, что устройство охлаждения находится под напряжением. Ошибка... - Seite 354 Ошибка № Неисправность / Поведение устройства Возможные причины Меры по устранению Er08 Светодиод: Мигает Неисправен датчик 2 В соответствии с типом (TS2). устройства заменить Компрессор: ВКЛ датчик 2. Вентилятор испарителя ВКЛ Датчик 2 вставлен в (внутренний): панель, не припаян. Вентилятор конденсатора ВКЛ...
-
Seite 355: Вывод Из Эксплуатации
разделе «Демонтаж и утилизация», Страница 56! ПРИМЕЧАНИЕ Отслужившие свой срок устройства надлежащим образом утилизирует также компания Pfannenberg. Доставка на один из наших заводов должна осуществляться безвозмездно. Руководство по эксплуатации | Навесные и встраиваемые устройства охлаждения | Стандартный контроллер (SC) – 400 B, 2~ | 086100003d... -
Seite 356: Демонтаж И Утилизация
Демонтаж и утилизация После истечения срока службы устройство должно быть демонтировано и утилизировано экологически безопасным способом. Правила техники безопасности Все работы могут выполняться только квалифицированным персоналом. При этом должно быть учтено следующее: • минимальная квалификация • это Руководство • применимые местные правила и законы •... -
Seite 357: Демонтаж
Соблюдайте все действующие местные правила охраны труда и охраны окружающей среды. Утилизация ПРИМЕЧАНИЕ Отслужившие свой срок устройства надлежащим образом утилизирует также компания Pfannenberg. Доставка на один из наших заводов должна осуществляться безвозмездно. Если не было достигнуто соглашение о возврате и утилизации, то следует разобранные компоненты отправлять на... -
Seite 358: 10 Запчасти И Дополнительные Принадлежности
10 Запчасти и дополнительные принадлежности ПРИМЕЧАНИЕ • При заказе запасных деталей и принадлежностей всегда указывать номер детали компании Pfannenberg. • Номер детали компании Pfannenberg для контроллера находится на трансформаторе контроллера. № Обозначение № Обозначение 18811100065 Вентилятор испарителя (внутренний) 18811100065 Вентилятор конденсатора (внешний) 18810200104 Крышка... - Seite 359 11 Указатель ключевых слов П DIP-переключатель ............34 Подключение к электросети .......... 32 Настройка ..............35 Выравнивание потенциалов ........41 Сетевое подключение ..........38 ECoolPLANT ..............44 Сообщение об общей неисправности ......37 Электрическая схема ..........33 USB-адаптер..............44 Поперечное сечение кабеля .......... 32 А...
-
Seite 360: Выходные Данные
Исключение ответственности: Вся содержащаяся информация была тщательно 2020 проверена в году. Но мы не даем никакой гарантии в отношении полноты и правильности данных. Выходные данные: Pfannenberg GmbH Werner-Witt-Straße 1 21035 Hamburg Тел. +49 40 734 12-0 www.pfannenberg.com © Pfannenberg 2020...