Kindermann HDMI Control Basic 4K60 Inbetriebnahme- Und Bedienungsanleitung
Hdmi mediensteuerung zur automatischen display steuerung

Verwandte Anleitungen für Kindermann HDMI Control Basic 4K60

Inhaltszusammenfassung für Kindermann HDMI Control Basic 4K60
- Seite 1 HDMI Control Basic 4K60 HDMI Mediensteuerung zur automatischen Display Steuerung HDMI Auto-Sensing Display Control Art.-Nr. 5778000151 Ref.-No. 5778 000 151 Inbetriebnahme- und Bedienungsanleitung Commissioning and operating instructions 07.2020...
-
Seite 2: Inhaltsverzeichnis
Inhaltsverzeichnis Vorwort .............................. 3 Sicherheitshinweise und Vorsichtsmaßnahmen ................3 Gerätebeschreibung / Bestimmungsgemäße Verwendung ............. 4 3.1. Eigenschaften ..........................4 3.2. Lieferumfang .......................... 4 Bedien- und Anzeigekomponenten ....................5 - 6 4.1. Vorderseite ..........................5 4.2. Rückseite ........................... 6 Anschlussschema .......................... 7 Funktion der DIP-Schalter ...................... 8 - 9 6.1. EDID Management ........................ 8 6.1.1. Benutzerdefinierte EDID Einstellung ................... 9 6.2. HDCP Modus .......................... 9 Aktivieren der Mediensteuerungsfunktionen ................ 10 - 16 7.1. SYSTEM EIN ..........................10 7.2. SYSTEM AUS .......................... 1 0 7.3. RS232-Befehlseinstellung ......................10 7.3.1. Einstellung der Trigger-Methode ..................11 7.3.2. Einstellung der CEC-Steuerung .................. 12 7.3.3. Konfigurieren der RS232 Steuerung ................ 12 - 13 7.3.4. Einstellung der IR-Steuerung .................... 14 7.3.5. IR-Codes über die Empfangsdiode im Frontpanel anlernen .......... 15... -
Seite 3: Vorwort
Unterstützung bei der Wartung zu erhalten. Im ständigen Bemühen, das Produkt zu verbessern, behalten wir uns das Recht vor, Funktionen oder Parameter ohne vorherige Ankündigung oder Verpflichtung zu ändern. Die neuesten Informationen erhalten Sie von Ihrem Kindermann Fachhändler. Sicherheitshinweise und Vorsichtsmaßnahmen •... -
Seite 4: Gerätebeschreibung / Bestimmungsgemäße Verwendung
HDMI. Das Produkt eignet sich ideal für kleine Besprechungsräume, Mittelzonen, Klassenzimmer, etc. Die HDMI Control Basic 4K60 aktiviert automatisch die Medientechnik im Raum sobald sie entweder ein HDMI Signal (5V oder TMDS) oder das IR-Signal einer Fernbedienung erkennt. Die Mediensteuerung sendet dann vorab hinterlegte CEC-, RS232- und/oder IR-Befehle beispielsweise an ein Display oder einen Projektor. -
Seite 5: Bedien- Und Anzeigekomponenten
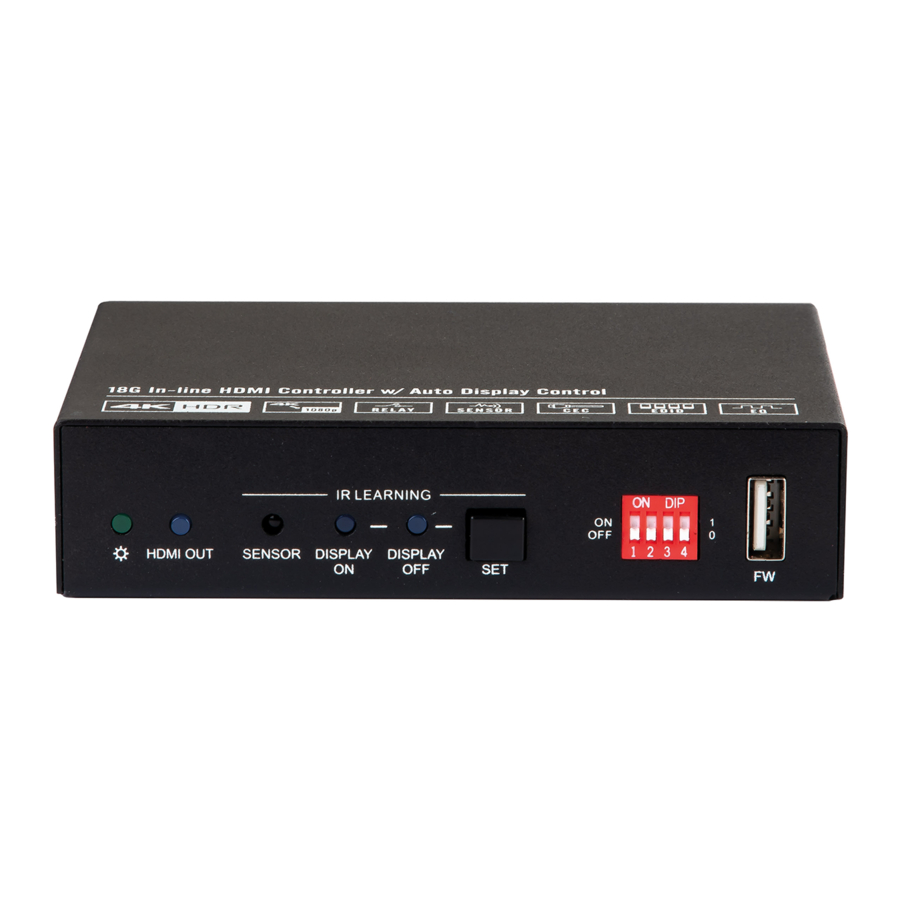
4. Bedien- und Anzeigekomponenten 4.1 Vorderseite Name Beschreibung Power LED Bei anliegender Spannung leuchtet die LED grün. HDMI OUT LED Wird ein HDMI Signal ausgegeben leuchtet die LED blau. SENSOR Eingebauter IR-Sensor zum Lernen/Empfang eines IR-Signals. Die LED blinkt im IR-Lernmodus und leuchtet blau, nachdem der IR-Befehl DISPLAY ON LED erfolgreich angelernt wurde. -
Seite 6: Rückseite
4.2 Rückseite Name Beschreibung HDMI IN HDMI-Eingang (Typ A) zum Anschluss eines HDMI-Quellgerätes, z. B. PC HDMI-Ausgang (Typ A) für den Anschluss eines Wiedergabegeräts, z. B. HDMI OUT/CEC Display/Projektor, unterstützt CEC 3,5 mm Klinkenbuchse zum Anschluss des IR-Senders um IR-Signale zu IR OUT senden 3-polig, zum Aufspielen der Programmierung (z. -
Seite 7: Anschlussschema
5. Anschlussschema Die folgende Skizze zeigt typische Ein- und Ausgangsgeräte, die mit dem HDMI Control Basic 4K60 gesteuert werden können: ⚫ ⚫ ⚫ ⚫ ⚫ ⚫ IR Detector ▼ ▼ ▼ ▼ Emitter ⚫ ⚫ � ⚫ ⚫ ⚫ Projektor... -
Seite 8: Funktion Der Dip-Schalter
6. Funktion der DIP-Schalter 6.1 EDID Management Die EDID (Extended Display Identifi cation Data) wird vom Quellgerät (z. B. Notebook) verwendet, um die Videoaufl ösung an den angeschlossenen Bildschirm anzupassen. Standardmäßig wird diese Information aus dem Speicher des Wiedergabegeräts (z. B. Bildschirm) ausgelesen. Mittels der DIP-Schalter auf der Vorderseite können auch die voreingestellten EDIDs genutzt werden, um beispielsweise die Kompatibilität der Videoaufl ösung sicherzustellen. -
Seite 9: Benutzerdefinierte Edid Speichern
Benennen Sie die benutzerdefinierte EDID Datei in EC_11.bin um. Schließen Sie den FW-Port des HDMI Control Basic 4K60 mit einem USB-Kabel an den PC an und schalten Sie die HDMI Control Basic 4K60 ein. Der PC erkennt automatisch eine virtuelle Festplatte namens "BOOTDISK". -
Seite 10: Aktivieren Der Mediensteuerungsfunktionen
7. Aktivieren der Mediensteuerungsfunktionen 7.1 SYSTEM EIN Wenn die HDMI Control Basic 4K60 ein Videosignal (TMDS, 5 V) oder ein IR-Signal erkennt (Trigger), startet das System und führt gleichzeitig die folgenden Aktionen automatisch aus: • Sendet "TV On" via CEC zum Einschalten des Anzeigegerätes •... -
Seite 11: Einstellung Der Trigger-Methode
7.3.1 Einstellung der Trigger-Methode Befehl Funktion Befehlsbeispiel einer Antwort Einstellung der Triggermethode bei System On Beschreibung SYSONMETH1. Empfangen eines IR Signals SYSONMETH[X]. Aktives HDMI video Signal am Eingang (Standard 5V, oder Ein aktives Video Signal oder ein TMDS) IR Signal fungiert als Trigger für Empfangen von IR oder System On. -
Seite 12: Einstellung Der Cec-Steuerung
Ausgabe der Verzögerungszeit von SYSTEM GNOIRDLY. OFF, wenn der Controller kein IR-Sensorsignal DETECT NO IR DELAY TIME 300S! erkennt. Ausgabe der Erkennungsmethode der Eingangs- G5VORTMDS. DETECT INPUT SOURCE USE 5V! quelle (5V/TMDS) 7.3.2 Einstellung der CEC-Steuerung Befehl Funktion Befehlsbeispiel einer Antwort CECON. - Seite 13 RS232OFF/+3:123abc Wenn kein Signal mehr anliegt, sende automa- Sendet den ASCII Befehl “123abc” RS232OFF/+[X]:XXX tisch den ASCII-Befehl xxx an das zu steuernde an das Fremdgerät (z. B. Projektor) Gerät (z. B. Projektor), dessen Baudrate x ist. mit der Baudrate 9600. RS232OFF/-3:30 31 32 Wenn kein Signal mehr anliegt, sende automa- RS232OFF/-[X]:XXX...
-
Seite 14: Einstellung Der Ir-Steuerung
7.3.4 Einstellung der IR-Steuerung Befehl Funktion Antwort Lernt den IR-Befehl von der IR-Fernbedienung. Beschreibung IRSTUDY0. Anlernen IR TV PWR Off IRSTUDY[X]. Anlernen IR TV PWR On Für die nächsten 10 Sekunden ist Anlernen IR User der Empfänger bereit den IR Befehl für Power Off des Fremdgerätes zu Bitte ca. -
Seite 15: Ir-Codes Über Die Empfangsdiode Im Frontpanel Anlernen
7.3.5 IR-Codes über die Empfangsdiode im Frontpanel anlernen Die IR-Befehle können auch mittels IR-Fernbedienung und SET-Taste auf der Frontplatte angelernt werden. Zum Erlernen der IR-Befehle von der IR-Fernbedienung gehen Sie bitte wie folgt vor: Schritt 1: SET-Taste drücken, um den Befehl DISPLAY ON oder DISPLAY OFF zu wählen. •... -
Seite 16: Beschreibung Des Relaisanschlusses
Bereiten Sie die neueste Upgrade-Datei (.bin) vor und benennen Sie diese in “FW_MERG.bin” um. Schließen Sie den HDMI Control Basic 4K60 per USB-Kabel an den PC an und schalten Sie das Gerät ein. Der PC erkennt automatisch eine USB-Festplatte mit dem Namen “BOOTDISK”. -
Seite 17: Technische Daten
9. Technische Daten Video Eingang Eingang 1x HDMI IN Eingangbuchse 1x HDMI type-A (19-Pin) Eingangs-Videoauflösung Bis zu 4Kx2K@60Hz 4:4:4 8bit Video Ausgang Ausgang 1x HDMI OUT/CEC Ausgangsbuchse 1x HDMI type-A (19-Pin) Ausgangs-Videoauflösung Bis zu 4Kx2K@60Hz 4:4:4 8bit Steuerung 1x SET Taste, 1x 4-Pin DIP Schalter, 1x IR OUT, Steuerung 1x RS232, 1x Sensor In, 2x Relais 1x USB Typ, 1x 3,5 mm Miniklinke,... -
Seite 18: Fehlerbehebung
Ihren Händler oder Händler vor Ort, um weitere Unterstützung zu erhalten. 11. CE-Konformitätserklärung Hinweis: Die aktuelle Inbetriebnahme- und Bedienungsanleitung kann von unserer Webseite heruntergeladen werden: www.kindermann.com Die aktuell gültige CE-Erklärung kann unter folgender URL eingesehen und heruntergeladen werden: https://shop.kindermann.de/erp/KCO/avs/5/5778/5778000151/12_Zertifizierungen/CE5778000151.pdf 12. Verfügbares Zubehör •... - Seite 36 5778 000 151 D/GB 2020-07 Änderungen vorbehalten Printed in Germany Kindermann GmbH · Mainparkring 3 · D-97246 Eibelstadt · E-Mail: info@kindermann.de · www.kindermann.com...