Herunterladen Inhalt Inhalt Diese Seite drucken
Inhaltsverzeichnis

Werbung

Verfügbare Sprachen

Verfügbare Sprachen

INSTRUCCIONES DE USO
INSTRUCTIONS FOR USE
GEBRAUCHSANLEITUNG
TELESCOPIO REFRACTOR
Aumento de 262,5 x
REFRACTOR TELESCOPE
262.5 times magnification
REFRAKTOR-TELESKOP
262,5-fache Vergrößerung

Werbung

Inhaltsverzeichnis
loading

Inhaltszusammenfassung für Globaltronics GT-Tel-02 REFRACTOR

  • Seite 1 INSTRUCCIONES DE USO INSTRUCTIONS FOR USE GEBRAUCHSANLEITUNG TELESCOPIO REFRACTOR Aumento de 262,5 x REFRACTOR TELESCOPE 262.5 times magnification REFRAKTOR-TELESKOP 262,5-fache Vergrößerung...
  • Seite 2: Inhaltsverzeichnis

    Este producto no es ningún juguete! PRECAUCIÓN: Colocar el aparato en lugar protegido. Un telescopio que cae al suelo puede causar grandes daños. ¡No mirar nunca directamente hacia el sol! ¡Peligro de graves lesiones oculares! Peligros para niños u otros colectivos • E ste aparato no es apto para su uso por personas, incluidos niños, con capacidades sensoriales o psicológicas limitadas o sin la debida experiencia o conocimientos, a menos que estas personas sean supervisadas por otra responsable de su seguridad o si estas personas han sido instruidas...
  • Seite 3 This product is not a toy! CAREFUL: Set the device up in a protected position. A falling telescope can cause significant damage. Never look directly at the sun. Danger of serious eye injuries! Hazards for children and other groups of persons • T his product is not suitable for use by persons, including children, with limited physical, senso- ry or mental abilities or lacking experience and/or knowledge, unless they are supervised by a person responsible for their safety or have received instructions for use of the device from this...
  • Seite 4: Gefahr Für Kinder Und Erweiterten Personenkreis

    Dieses Produkt ist kein Spielzeug! VORSICHT: Das Gerät geschützt aufstellen. Ein umstürzendes Teleskop kann großen Schaden verursachen. Nie direkt in die Sonne schauen. Starke Augenverletzung! Gefahr für Kinder und erweiterten Personenkreis • D ieses Gerät ist nicht dafür bestimmt, durch Personen (einschließlich Kinder) mit einge- schränkten physischen, sensorischen oder geistigen Fähigkeiten oder mangels Erfahrung und/oder mangels Wissen benutzt zu werden, es sei denn, sie werden durch eine für ihre Sicherheit zuständige Person beaufsichtigt oder erhielten von ihr Anweisungen, wie das...
  • Seite 6: Datos Técnicos

    DATOS TÉCNICOS Diámetro del objetivo ............60 mm Distancia focal ................700 mm Oculares de 31,7 de diámetro „K“ ........20 mm, 12,5 mm, 9 mm, 4 mm Aumento máximo ..............262,5 veces Buscador ..................6 x 25 mm Lente inversora ................1,5 x Trípode de aluminio con montura altacimutal, filtro lunar, prisma/espejo diagonal, bandeja de accesorios, control de precisión, instrucciones, mapa celeste (planisferio), brújula, maleta de transporte. Debido a que nuestros productos son sometidos a constantes procesos de perfeccionamiento y mejora, pueden darse modificaciones en el diseño y la técnica de los mismos. El telescopio refractor está prevista para su uso doméstico. No es apta para su uso comercia. SU TELESCOPIO CONSTA DE LAS SIGUENTES PIEZAS • E spejo diagonal 4 oculares intercambiables de 31,7 mm „Kellner“ de diámetro: 20 mm, 12,5 mm, 9 mm, 4 mm, asi como un filtro lunar de rosca (sin Fig.) – no utilizable como filtro solar. Aumentos (véase tabla).
  • Seite 7 • Brújula • Mapa celeste. Consejos de uso detrás del mapa • Este aparato va acompañado adicionalmente de una maleta de transporte, para su protección. • Lente inversora 1,5 x. En el telescopio astronómico, la imagen aparece erguida pero con los lados invertidos. La lente inversora se utiliza para corregir la inversión de la imagen. • Trípode de aluminio/Destornillador • Instrucciones de uso • Mapa celeste • Bandeja portaaccesorios • Montura acimutal de altura regulable • El telescopio está equipado con una montura acimutal de altura regulable.
  • Seite 8 Los siguientes aumentos se consiguen con los oculares intercambiables: Tabla de oculares y límites de aumento teóricos Ocular Aumentos con lente inversora 1,5 x 2 0 mm 3 5 veces 52 veces 1 2,5 mm 5 6 veces 84 veces 9 mm 7 8 veces 117 veces 4 mm 1 75 veces 262,5 veces Los valores señalados son aumentos teóricos, el resultado efectivo viene determinado por el objeto, la distancia del objeto y el poder de resolución.
  • Seite 9 A. Rueda de enfoque B. Tubo de enfoque de deslizamiento C. Espejo diagonal D. Ocular E. Soporte para el buscador F. Buscador G. Tubo del telescopio H. Pantalla de protección solar* I. Lente del objetivo (Fig. no detallada) J. Tornillo de sujeción de la horquilla (vertical) K. Horquilla L. Fijador acimutal M. Cabezal del trípode N. Bandeja de accesorios O. Soporte de bandeja P. Pata del trípode Q. Pie de goma R. Control fino de ajuste vertical S. Brújula *El aparato está equipado con una pantalla de protección solar desmontable y de una tapa protectora. La tapa protectora es de dos piezas y antes del uso del equipo hay que retirarla.
  • Seite 10: Instrucciones De Uso

    INSTRUCCIONES DE USO 1 . S aque las patas del trípode (P) hacia afuera hasta que tengan la longitud deseada y fíjelas con los asideros de fijación plegables (1). (Fig. 1) CONSEJO: Antes de montar las patas del trípode, asegúrese de que los asideros plegables de todas las patas del trípode estén dirigidos hacia adentro. La bandeja de accesorios (N) del trípode se sujeta a estos asideros. 2 . F ije las tres patas del trípode al cabezal del trípo- de (M) mediante las tuercas de ala y el tornillo. Antes de apretar las tuercas de ala, asegúrese de haber puesto las arandelas. 3 . A hora fije la bandeja de accesorios (N) a los soportes del trípode mediante las tuercas de ala y los tornillos incluídos. (Fig. 3) CONSEJO: Tras el montaje el soporte de la ban-...
  • Seite 11 6. S aque de la caja de embalaje el buscador (F) con su soporte (E). Destornille a continuación los dos tornillos fijadores del tubo del telescopio (G). Ubique el buscador encima del tubo del telescopio de tal manera que los agujeros en el pie del buscador coincidan con las ranuras del tubo del telescopio. Vuelva a colocar los tornillos de fijación pasándolos por agujeros y ranuras y apretándolos fijamente. (Fig. 5) 7. A cople el espejo diagonal (C) al tubo de enfoque de deslizamiento (B). Fije el espejo diagonal (C) con los tornillos de fijación correspondientes,...
  • Seite 12: Cómo Sacarle El Mejor Provecho A Su Telescopio

    CÓMO SACARLE EL MEJOR PROVECHO A SU TELESCOPIO Como los telescopios astronómicos presentan un gran aumento y un campo de visión reducido, es difícil encontrar con ellos una estrella entre muchas y seguir su movimiento. Para una obser- vación ventajosa, lo importante es el manejo correcto del telescopio astronómico. TRATO Trate su telescopio con cuidado. Sobre todo preste atención a no dejar caer el tubo del telescopio ni a someterlo a fuertes golpes. COMPROBACIÓN DEL MONTAJE Si se hace difícil „ atrapar“ una estrella y si cuando por fin se ha encontrado, ésta „ baila” de un lado a otro, es muy probable que el telescopio no haya sido montado correctamente. 1. C ompruebe detenidamente que todos los tornillos de fijación de las patas y del cabezal del trípode esten apretados. 2. Comprube que el tubo del telescopio esté balanceado entre el extremo posterior y el anterior. LUGAR DE OBSERVACIÓN Como la obsevación de una estrella precisa de un largo periodo de tiempo, el telescopio tiene que situarse en un lugar bien escogido. 1. E lija un lugar de fácil acceso, con la menor cantidad de luz y desde el que abarque una región del cielo lo más extensa posible. 2. D eposite las piezas, como los oculares, en la bandeja de accesorios (N) o manténgalas guar- dadas en una cajita.
  • Seite 13: Enfoque

    cabezal del trípode, para que el telescopio permanezca en esta posición (cuanto más alto se encuentre el objeto con respecto al horizonte tanto más fácil será el reglaje). 2 . M ire a continuación a través del buscador. Si el objeto visto a través del telescopio no apa- rece, afloje los tornillos fijadores y mueva el buscador suavemente de un lado para otrohasta que el objeto aparezca. Apriete a continuación los tornillos fijadores un poco, y man-tenga el objeto en el centro del buscador. Para simplificar este proceso, sírvase de los tornillos fijado- res para mantener el objeto centrado en el campo de visión. El buscador se mueve hacia el lado del tornillo que aprieta. Para finalizar, cuando el centro del buscador coincida con el del ocular apriete todos los tornillos. ENFOQUE Aunque el acto de enfocar parezca fácil, en la práctica resulta ser un poco complicado hasta que uno se acostumbra. Para entrenar su habilidad lo mejor es que, a la luz diurna, enfoque un objeto lejano y practique el procedimiento varias veces. 1 . E l enfoque se realiza girando la rueda de enfoque (A) en un sentido o en el otro, lo que a su vez accionará el movimiento deslizante del tubo de enfoque (B) . 2 . C omo las estrellas están en continuo movimiento, practique primero el enfoque de un letrero luminoso, o de una farola que esté a unos 1000 m. de distancia. Primero enfoque con el tubo de enfoque de deslizamiento (B) el objeto de forma aproximada para poder, a partir de allí, realizar ajustes hasta obtener una imagen nítida. Tras ello dirija el telescopio hacia una estrel-...
  • Seite 14: Indicaciones

    INDICACIONES Su telescopio es un instrumento óptico de precisión y como tal, tiene que mantenerse resguardado del polvo y de la humedad, ya que éstos son factores que afectan negativamente a cualquier sistema óptico. Si las lentes se ensucian, antes de limpiarlas, sople ligeramente para quitar de encima las pequeñas partículas de polvo. Después, limpie la lente cuidadosamente con un paño suave o un pañuelo limpiagafas humedecido. Las lentes no deben desmontarse y en su superficie no deben de haber huellas dactilares. Después de la observación mantenga su tele- scopio en un lugar seco y sin polvo. No someta el instrumento a grandes cambios de tempera- tura porque entonces la humedad se condensa en la lente del objetivo. Si esto fuese a ocurrir, acerque pero no demasiado, el objetivo a una fuente de calor para que la humedad pueda evaporarse. Ofreciéndole esta atención, su telescopio será un amigo para toda la vida.
  • Seite 15 5 . D espués de la exposición al aire libre se producen cambios de temperatura. El telescopio tiene que nivelarse a la temperatura ambiente y la humedad condensada tiene que evaporar- se. Coja la lente sólo cuando esto ya haya ocurrido. 6 . S ea metódico. Una buena idea es llevar registradas las observaciones en un diario. Un diario se ofrece como protocolo, como punto de discusión. Recuerde que muchos de los descu- brimientos fueron realizados por astrónomos aficionados. Una supernova (un suceso poco frecuente) fue una vez descubierta por un cartero que observaba la bóveda celeste. También a muchos cometas se les asignó el nombre de sus descubridores en su honor y entre ellos muchos eran astrónomos aficionados.
  • Seite 16: Objetos Observables Junto Con Los Aumentos Del Telescopio

    OBJETOS OBSERVABLES JUNTO CON LOS AUMENTOS DEL TELESCOPIO APROPIADOS PARA CADA UNO MERCURIO Mercurio es el planeta más próximo al sol. Aumento adecuado: 100 x JÚPITER La utilización de un aumento de 40 x permite la observación de la conocida luna „Galileo“. Para la observación de las franjas claras y oscuras de Júpiter, se precisa de mucha atención y de una atmósfera despejada. Aumentos adecuados: 80 x-100 x. SATURNO Los anillos de saturno, que son una imagen excepcional en todos los cielos, pueden ser observados con un aumento de 50 x. La observación de la forma elíptica y de las bandas del planeta precisa de un aumento de 100 x. En ocasiones no se pueden ver los anillos debido a su inclinación. VENUS Venus, que por su brillo se le llama „Estrella de la mañana“ o „Estrella vespertina”, está cubierto completamente por una densa atmósfera. Como no se puede ver su superficie, la observación se debería centrar en el seguimiento del crecer y menguar del planeta (parecido al de la luna).
  • Seite 17: Vista Telescópica De Los Planetas

    EL SOL Con un telescopio de una abertura de 40 mm podrán observarse las manchas solares, pero para observaciones más avanzadas es necesario el uso de un refractor de 60 mm de abertura. De todos modos se aconseja el uso de aumento de 60 x para ver el disco completo del sol. La observación del sol debería hacerse durante las dos horas contadas desde las 9 de la mañana, ya que las tranquilas condiciones atmosféricas durante este periodo de tiempo, sólo causan una mínima distorsión de la imagen. Si las condiciones atmosféricas son muy buenas se puede obtener la imagen de la granulación solar.
  • Seite 18: Tipos De Telescopios Y Sistemas Ópticos

    La caza de cometas puede proporcionar al aficionado mucha satisfacción. Un prismático lo suficientemente potente es ideal, ya que lo importante es un campo de visión lo más amplio posible. Cometas (que en la antiguedad se llamaban estrellas crinadas) eran consideradas presagios de malos tiempos. Durante el conflicto de Arabia -Israel se confundió un comenta con una arma bélica. En realidad un cometa tiene muy poca masa. Fueron descritos como „lo próximo que no es posible que exista y sin embargo algo es”. También fueron descritas como „...
  • Seite 19 La razón por la que los telescopios astronómicos invierten la imagen, es que al contrario a los de tierra no llevan adaptado un sistema de lentes de inversión. Aunque el sistema de lentes de inversión adiconal proporcione una imagen invertida, provoca a su vez una pérdida de luz. En los telescopios astronómicos utilizados para observar objetos muy ténues, es necesario mantener la pérdida de luz lo mínimo posible. Esto no significa que los telescopios terrestres no se puedan utilizar para observaciones astronómicas, solo que no son capaces de mostrar un objeto débil tan bien como el telescopio astronómico. Los telescopios astrónomicos se clasifican en dos categorias, dependiendo del tipo de configuración óptica. El refractor sólo utiliza lentes para aumentar mientras que el reflector en lugar de los objetivos usa dos espejos.
  • Seite 20: Oculares Y Aumentos

    OCULARES Y AUMENTOS Distancia focal del objetivo (espejo o lente) = Aumento Distancia focal del ocular Por ejemplo, un ocular de H-12.5 mm mostrará un aumento de 800 mm 700 mm = 64 x ó = 56 x H-12,5 mm H-12,5 mm Tabla de aumentos: Ocular 4 mm 8 mm 12.5 mm 20 mm 23 mm 175 x 85,5 x 56 x 35 x 30 x Lente de inversión 262,5 x 131 x 84 x 52,5 x 45 x El ocular se puede incorporar en el adaptador del ocular apretando el botón de fijación fina. La letra H impresa en el ocular hace referencia al tipo de ocular llamado „Huygeian”; por su parte las letras HM = Huygen Mittenzwey, OR = Ortoescopico, RS = Special Ramsden, AH = Huygeian acromático. El número que va detrás de la letra corresponde a la distancia focal del ocular . Si se acerca demasiado al ocular puede ocurrir que éste se ensucie por el contacto con sus pestañas o el párpado de su ojo, o bien que quede empañado por su aliento. Si esto ocurre limpie el ocular con cuidado con un paño suave.
  • Seite 21: Observación

    Se pueden realizar pequeñas comparaciones, utilizando unos prismáticos de un aumento de 8 ó 10 x. Orientando los prismáticos hacia un objeto cercano , p.ej. una pared a 20 m de distancia, el observador puede tomar nota de como cualquier movimiento del cuerpo, como p.e. la respiración, se traduce en una imagen inquieta. El efecto de inestabilidad se hace inmensamente mayor en un telescopio de distancia focal de 600/700/800mm con un gran aumento y una dis- tancia del objeto de miles de kilómetros. Un desvío de unos pocos mm, supone muchas veces perder estrellas enteras. Vibraciones del suelo, así como un ajuste deficiente del trípode pueden llegar a ser extremada- mente molestos. Para facilitar el manejo, muchos de los aparatos se dotan con controles de precisión adicional. Hoy en día, los telecopios de gran calidad vienen provistos desde con monturas regulables, horizontal y verticalmente, hasta con controles computerizados. A menudo la montura es mucho más cara que el telescopio.
  • Seite 22: Observación Solar

    OBSERVACIÓN SOLAR Mucha gente sabe lo peligroso que puede resultar mirar al sol. Las gafas de sol ofrecen una buena protección contra la radiación solar en nuestras latitudes. En Australia y en los Alpes la radiación es a menudo de valores mucho más elevados y las gafas de sol, que suelen obtenerse en el mercado, no ofrecen apenas protección. ¡Imagínese entonces lo que conlleva el que los rayos solares que atraviesan el telescopio (también el buscador) sean de 35 veces e incluso 350 veces más potentes, comparable con un rayo láser capaz de atravesar en pocos segundos una puerta blindada!. Por ello es imprescindible tomar las debidas precauciones: • Nunca mire directamente hacia el sol. ¡¡¡Peligro de lesiones oculares!!! • ¡¡¡Asegúrese de que los niños, no usen el telescopio sin estar acompañados!!! • ¡¡¡Aun usando un filtro solar no se pueden descartar por completo lesiones oculares!!! • Utilice un filtro en caso de estrellas muy reflejadas (por ejemplo, en observaciones lunares) • Atención: Realizar observaciones del sol siempre sin oculares ya que éstos pueden ser dañados debido a un calentamiento excesivo.
  • Seite 23: Mapa Lunar

    Ahora introduzca las pajitas en la pieza A sujetando ésta con la parte blanca orientada hacia la abertura de la pieza B. A continuación, coloque la pantalla de proyeccion confeccionada en el soporte del ocular. Moviéndola de un lado para otro, se enfoca la pantalla blanca hasta que se vea una imagen. Ahora tiene un protector bueno y seguro para su vista . Recuerde: nunca mire directamente hacia el sol. Siendo un hecho el que el láser pueda atravesar la puerta blindada también lo es el que usted pudiése perder su vista.
  • Seite 24: Cómo Guardar El Telescopio

    CÓMO GUARDAR EL TELESCOPIO...
  • Seite 26: Technical Data

    TECHNICAL DATA Lens diameter ..........60 mm Focal width ............700 mm 31.7mm eyepiece K ........20 mm, 12.5 mm, 9 mm, 4 mm Maximum magnification ......262.5 times Finder scope ............6 x 25 mm Erecting lens ............1.5 x Aluminium tripod with altazimuthal mounting, moon filter, deflection mirror, storage tray, vernier adjustment, instructions, star chart, carrying case, compass As our products are constantly being further developed and improved, design and technical changes are possible.
  • Seite 27 • Compass • Star chart Instructions for use on the reverse of the chart. • T his device is also equipped with a special carrying case for safekeeping. • 1.5 times corrective lens W ith an astronomical telescope, the image appears upright, but as a mirror image. The corrective lens is for the purpose of correcting the mirror image. • Aluminium tripod/screwdriver • Instructions for use • Accessory tray • Height-adjustable azimuthal mounting T he telescope is equipped with height-adjustable azimuthal mounting. “Height-adjustable” relates to the vertical movement of the telescope, while “azimuthal” refers to the horizontal movement. A height-adjustable azimuthal mounting with an azimuthal adjustment (L) enables observation of the entire night sky or of Earth objects, without needing to move the tripod itself.
  • Seite 28 The following magnifications can be achieved with the exchangeable eyepieces. Eyepiece overview and theoretical maximum magnifications Eyepiece Magnificationg With erecting lens 2 0 mm 3 5 times 52 times 1 2.5 mm 5 6 times 84 times 9 mm 7 8 times 117 times 4 mm 1 75 times 262.5 times The listed values are theoretical magnifications, i.e. the actual performance is determined by object, object distance and resolution.
  • Seite 29 A. Wheel for sharpness setting B. Tube drive for sharpness setting C. Deflection mirror D. Eyepiece E. Holder for the finder scope F. Finder scope G. Telescope tuber H. Sun visor* I. Objective lens (not shown) J. Fork screw (vertical) K. Fork L. Azimuthal adjuster M. Tripod head N. Accessory tray O. Tray bracket P. Tripod leg Q. Rubber tip R. Vernier vertical adjuster S. Compass * The device is equipped with a removable sun visor and a protective cap. The protective cap has two parts and is to be removed prior to using the device. You can obtain a smaller object section if the middle, smaller cap is removed, the larger cap remains attached.
  • Seite 30: Instructions For Use

    INSTRUCTIONS FOR USE 1 . P ull out the three tripod legs (P), and set these securely in the required position with the collapsible brackets (1). (Fig. 1). NOTE: Before assembling the tripod legs, ensure that the collapsible brackets on each tripod leg are pointed inwards. The accessory tray (N) of the tripod is attached to these brackets. 2 . F asten the three tripod legs with the wing nuts and the threaded bolts (2) to the tripod head (M). Before tightening the wing nuts, ensure that you have inserted a washer. (Fig. 2).
  • Seite 31 6. R emove the finder scope (F) with the bracket for the finder scope (E) from the packaging. Then unscrew the two knurled clamping screw from the telescope tube (G). Place the finder scope on to the telescope tube, such that the drillholes in the base of the finder scope over- lap with the open threaded drillholes. Insert the two knurled clamping screws and tighten these. (Fig. 6) 7. I nsert the deflection mirror (C) in den tube drive for setting the sharpness (B). Fit the deflection...
  • Seite 32: Optimum Use Of The Telescope

    OPTIMUM USE OF THE TELESCOPE As astronomical telescopes have strong magnification and a small field of view, it is relatively difficult to find a specific star among many and follow its movement. The crucial point for successful observation lies in correct handling of the astronomical telescope. HANDLING Handle the telescope with care. Particularly when carrying the telescope tube, ensure that you do not strike it against anything or drop it. CHECKING ASSEMBLY If a star it difficult to “catch” and when it is finally found, sometimes, “dances” back and forth and can barely be observed, this is often due to a telescope that has not been assembled properly.
  • Seite 33: Adjusting The Finder Scope

    ADJUSTING THE FINDER SCOPE As the telescope has only a limit field of view, finding a sought star or planet can be quite diffi- cult. For this reasons, the telescope is equipped with finder scope (F), which has a cross hair for orientation. It is recommended to carry out the following adjustments in daylight: 1. Insert the eyepiece (D) with the lowest magnification into den deflection mirror (C). 2. S earch for a non-moving, easily recognisable object at a distance of not more than 300 m. Orientate the telescope with the horizontal axis and then move the vertical axis, until the object is situated in the middle of the field of view. Sharpen the image. Now, tighten the locking screw on the telescope fork, so that the telescope remains in this position (the higher the object is above the horizon, the easier the adjusting will be).
  • Seite 34: Prior To Observation

    3. F irst carry out the sharpness setting using an eyepiece with low mit geringer magnification and then replace with the eyepiece with the required magnification. 4. E ach time after changing the eyepieces, carry out the sharp setting again through careful movement of the tube drive (B). 5. I t is not recommended to use the deflection mirror together with the erecting lens (quality loss). Recommendation: only use individually. PRIOR TO OBSERVATION Try to focus the telescope sharply. It is recommended to begin with an eyepiece with low magni- fication on a distant Earth object. The created image of the astronomical telescope appears upright, however, it is a mirror image. In order to obtain a true sided image, remove the deflec- tion mirror and insert the corrective lens.
  • Seite 35: Introduction To Astronomy

    INTRODUCTION TO ASTRONOMY Did you know that with the naked eye (under ideal viewing conditions) it is only possible to see 2000 to 3000 stars? With binoculars or a telescope, the number is endless. Before you begin with observations, you should know several things 1. F ind a dark, indisturbed area, away from bright windows and streetlamps. Close the curtains and switch off any unnecessary light. Familiarise yourself with your telescope, so that you can operate it in the dark. A standard torch covered with red plastic is helpful. 2. G ive your eye 15-30 minutes of time to become accustomed to the dark (this is known as Adjusting to the darkness). Your telescope will also need time to cool down to the night air. The important factor, the weather, will provide the amateur observer with a challenge, in relation to a sometime unclear, fogged eyepiece.
  • Seite 36: Objects To Be Observed And Suitable

    Today, we live in an age of science and we will soon be able to travel through the universe in spaceships. Whatever the case may be, the importance of the telescopes will never decline, as they are good guides through the universe. Have you assembled the telescope correctly? If so, let us begin with the observations. You can be disappointed by a cloudy image. Various reasons can be responsible for this, but if your telescope is correctly set up and you observe the following rules, you will never experience this problem. An exact setting is very Important, if you are carrying out telescopic observations. As a beginner, you should start by observe the moon, the nearest celestial body to us. It is approx. 380,000 km away from the Earth. As a beginner, you need half to one hour, in order to aim per- fectly at the moon. The first time that you see the moon in your telescope, it will be so beautiful, that it will take your breath away and you will never forget it. Do not look at the sun with the telescope or finder scope!!! EYE INJURIES! OBJECTS, TO BE OBSERVED AND SUITABLE ASTRONOMIC TELESCOPE MAGNIFICATION MERCURY...
  • Seite 37: The Sun

    MARS Mars comes near to the Earth every 26 months. Observing Mars is quite difficult. The use of a telescopes with an aperture diameter of 100 mm or more and with 100 times magnification allows observation of the Polar Cap. MULTIPLE STARS Several stars appear individually in front of the naked eye, but with telescopic observation, are comprised of two, three or more stars. Double stars are comprised of two components and triple stars are comprised of three stars. The use of a quite low magnification, around 40 times, is suitable. NEBULAS AND STAR CLUSTERS The large nebula in the Sword of Orion and the large spiral nebula in Andromeda can be seen with the naked eye. If you observe nebulas and star clusters, it is recommended to use a telescope with the largest possible aperture at the smallest magnification.
  • Seite 38: Telescopic Viewing Of Planets

    TELESCOPIC VIEW OF PLANETS Beginner astronomers tend to feel that the planet seen through the telescope is much small than they expect. The two photographs below show how planets appear when they are observed with a small, 60 mm, 50 x telescope, which is available everywhere in department stores. COMET HUNT Nucleus Nuclear membrane toward Comet tail the sun Nucleus edge Hydrogen Nebula The hunt for comets can offer great pleasure to the amateur. A large telescope is ideal, as a large field of view is important. Comets (described in ancient times as “hairy stars”) were often regarded as an evil omen. During the Arab-Israeli conflict, a comet was misinterpreted as a war weapon. In reality, a comet has very little mass. They have been described as “the next something that cannot exist, yet is something”. They have also been described as “dirty snowballs”. Both of these descriptions tell us a great deal about the true nature of the comets. The comet hunt provides a real challenge and an observer needs to know their way through the sky almost as well as their own back pocket. Many observers have had comets named after them.
  • Seite 39: Telescope Types And Optical Systems

    TELESCOPE TYPES AND OPTICAL SYSTEMS More than 3 centuries ago, Galileo Galilei directed a small telescope toward the stars, and the modern age of the science began. There are two main groups of telescopes: terrestrial tele- scopes and astronomical telescopes. The main difference is that the terrestrial telescope, which is intended for seeing objects on the Earth, provides an upright or normal image, while the astronomical telescope provides a rotated image that stands on its head. While it is important for Earth-bound objects, to see them in their normal position, for astronomical observations, this is not important.
  • Seite 40 EYEPIECE AND MAGNIFICATION OF THE TELESCOPE The power of a telescope’s magnification, whether it is a reflector or a refractor, is determines by the focal width of the lens and the eyepiece. The focal width is the distance of the lens, on which a sharp image or an image in the focal point is formed. The focal width of the lens is generally quite large in comparison with the focal width of the eyepiece. If you divide the focal width of the lens by the focal width of the eyepiece, the result will be the magnification of the telescope. Most astronomical telescopes need different focal width eyepieces for different strengths. The eyepieces with shorter focal widths provide a larger magnification. The strength of each individual eyepiece is directly related to the focal width of the objective mirror or the objective lens in the telescope. The formula is as follows: Focal width of the objective (mirror or lens) = magnification Focal width of the eyepiece For example, your H-1 2.5mm eyepiece will show a magnification of: 800 mm...
  • Seite 41: Magnification

    MAGNIFICATION By using the different eyepiece, with clear weather or at close range, you can identify sections in a larger size. The smaller the diameter of the lens, the stronger the magnification. Consider that strong magnification is not equivalent to “seeing more”. Therefore, choose the magnification, with which you can see best. • W ith the stronger magnification, the field of vision becomes smaller. You only see a section of the surface, but larger/closer. • T he resolution and strength of light decline significantly. Therefore, with a weak magnification, due to the light strength and resolution, frequently, observations can still be made at dusk. With full use of the strongest eyepieces only shadows are recognisable. Even bright start can frequently only be imprecise to observe. • The precise fixing on an object and adjustment of the mounting becomes much more difficult. • Through large distances, e.g. with stars, the required precision increases. With a telescope that has 8 times or 10 times magnification, an easy comparison can be made. If the telescope is aimed at a near object, e.g. a wall 2 metres away, the observer can ascertain how every body movement, e.g. by breathing, is transferred and the image shakes. With a telescope with a 600/700/800 mm focal width, a corresponding large magnification and a distance of many thousand kilometres, this shaking effect increases enormously. A millimetre deviation often means entire stars. Ground movements, tripods that are not fixed securely or a loosely set mounting can be very annoying. In order to make the setting easier, various devices are equipped with an additional vernier adjuster. Very high-quality telescopes are not equipped with vertically and horizontally adjusta- ble mounting, right up to computer-controlled vernier adjustment. Often, the mounting is more expensive than the actual telescope.
  • Seite 42: Observing

    OBSERVING For observing stars, it is unimportant whether the object is view in a true sided manner or upsi- de-down. If Earth observations are carried out, an inversion prism should be inserted between the eyepiece und deflection mirror (not included in all telescopes). Caution: There are no inversion prisms for finders. Instead, the finder has a special bonus: Look through the wrong side of the finder, fix it on your hand and change the distance, until the skin can be clearly recognised – you have a 5 times magnifying microscope. THIS IS HOW A TELESCOPE WORKS Objective lens Objective Eyepiece Transferred image Magni ed image Focal length Eyepiece adjuster SUN OBSERVATIONS Many have experience how harmful looking at the sun can be. Sunglasses are good protection against the sun’s rays in our degrees of latitude. In Australia and in the Alps, the radiation values are often significantly stronger, normal, commercially available sunglasses offer barely any pro- tection here. If one imagines that the sun’s rays through a telescope ( also searcher telescopes ) meet the sensitive eye at 35 x, yes, even up to 350 x stronger, this is comparable with a laser beam, which drills through an armoured door within seconds. Therefore the highest protective measures should be taken: • Never look directly at the sun, eye injuries!!!! • Ensure that children never use a telescope on their own!!! • Even when using a solar filter, eye injuries are not excluded!!!! • With strongly reflective stars, use a filter (e.g. when viewing the moon)
  • Seite 43 In order to be very sure and protect your vision, for viewing the moon and sun, use a projection screen. You can obtain these as accessories. For initial tests, it is certainly sufficient to build a projection screen, as per the following example: Take a box and cut out a 10 x 10 cm piece. Cut a circular hold in the size of the eyepiece bracket in the middle, and poke through two additional smaller holes ( 1 top right, 1 bottom left) approx. 2 cm from the edge (see Fig. Part B). Then, take 2 thick straws and affix them over the holes. Cut another piece (approx. 10 x 10 cm) out of the box, and paste white paper on one side. Poke 2 holes in the same positions as for the first part. Now place the 2nd part (A) onto the straws, with the white side facing toward the opening of B. Finally, place the self-built projection screen on the eyepiece bracket. By moving back and forth, you can focus the white projection screen, until you seen an image. You will have good and safe eye protection. Remember: Never look directly at the sun. Like a laser breaking through an armoured door, you can lose your sight. Caution: Sun observations always only without an eyepiece, as this can be damaged from intense heat development.
  • Seite 44: Moon Map

    MOON MAP This basic moon map shows most of the interesting features that can be seen through a tele- scope. The largest crater on the moon is Bailly (just under 300 km). A small telescope will show craters with a diameter of five and ten kilometres. The largest lunar crater is Tycho, while the brightest crater is Aristarchus. The largest detail can be seen when the moon is in the first or last quarter, when the sun’s rays touch on the moon at an angle and throws shadows, thereby providing more contrast. The moon always faces the Earth with the same side, as it rotates once on it axis, while it orbits the Earth once. In fact, we can see more than 50% of the moon, due to the libration. This expression would require detailed explanations. The reader is recommended to refer to a good reference book.
  • Seite 45: How Do I Pack My Telescope

    HOW DO I PACK MY TELESCOPE Tripod inward...
  • Seite 46: Technische Daten

    TECHNISCHE DATEN Objektiv Durchmesser ........60 mm Brennweite ............700 mm 31,7 mm Okulare K ........20 mm, 12,5 mm, 9 mm, 4 mm Maximale Vergrößerung......262,5-fach Sucherfernrohr..........6 x 25 mm Umkehrlinse .............1,5 x Aluminiumstativ mit Altazimutalmontierung, Mondfilter, Umlenkspiegel, Ablagetray, Feinjustierung, Anleitung, Sternenkarte, Tragekoffer, Kompass Da unsere Produkte ständig weiterentwickelt und verbessert werden, sind Design- und technische Änderungen möglich. Das Refraktor-Teleskop ist für die Verwendung im Privathaushalt konzipiert. Für den gewerblichen Einsatz ist es ungeeignet.
  • Seite 47 • Kompass • Sternenkarte Anwendungshinweise auf der Rückseite der Karte • Dieses G erät i st z usätzlich m it e inem s peziellen T ragekoffer zur sicheren Aufbewahrung ausgestattet. • 1,5-fach Korrekturlinse Bei einem astronomischen Teleskop erscheint das Bild aufrecht stehend, jedoch als seitenverkehrtes Bild. Die Korrekturlinse dient zur Korrektur des seitenverkehrten Bildes. • Alustativ/Schraubenzieher • Gebrauchsanweisung • Zubehörablage • Höhenverstellbare azimutale Montierung D as Teleskop ist mit einer höhenverstellbaren azimu- talen Montierung ausgerüstet. „Höhenverstellbar“ bezieht sich auf die vertikale Bewegung des Teleskopes, während unter „azimutal“ die horizontale Bewegung verstanden wird. Eine höhenverstellbare azimu- tale Montierung mit einer azimutalen Feststellung (L) ermöglicht die Beobachtung des gesamten Nachthimmels oder von Erdobjekten, ohne das Stativ...
  • Seite 48: Okular-Übersicht Und Theoretische Maximal-Vergrößerungen

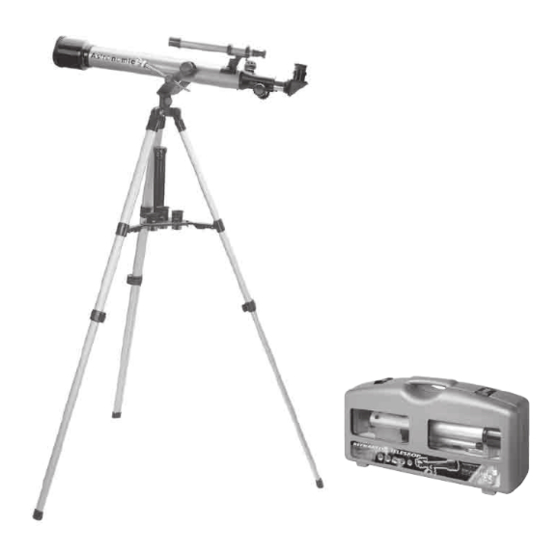
    Die folgenden Vergrößerungen lassen sich mit den austauschbaren Okularen erzielen. Okular-Übersicht und theoretische Maximal-Vergrößerungen Okular Vergrößerung Mit Umkehrlinse 1,5 x 2 0 mm 3 5-fach 52-fach 1 2,5 mm 5 6-fach 84-fach 9 mm 7 8-fach 117-fach 4 mm 1 75-fach 262,5-fach Die aufgeführten Werte sind theoretische Vergrößerungen, d.h. der tatsächliche Erfolg wird von Objekt, Objektentfernung und Auflösung bestimmt. Für Teleskope der Bauart 700/60 mm ist eine maximale Vergrößerung von 80 x sinnvoll (bzw. mit 9 mm Okular 78-fach). Höhere Vergrößerungen sind zwar möglich, eignen sich aber nicht für die Sternbeobachtung, da die Auflösung kaum ausreicht. Verwenden Sie deshalb höhere Vergrößerungen für die Erdbeobachtung, für den Nahbereich oder für Beobachtungen am Tage.
  • Seite 49 A. Rad zur Schärfeeinstellung B. Rohrtrieb zur Schärfeeinstellung C. Umlenkspiegel D. Okular E. Halterung für das Suchfernrohr F. Sucherfernrohr G. Teleskoprohr H. Sonnenblende* I. Objektivlinse (nicht dargestellt) J. Gabel-Sicherungsschraube (vertikal) K. Gabel L. Azimutale Feststellung M. Stativkopf N. Zubehörablage O. Ablagehalterung P. Stativbein Q. Gummispitze R. Feinjustierbare Vertikalverstellung S. Kompass * D as Gerät ist mit einer abnehmbaren Sonnenblende und einer Schutzkappe ausgestattet. Die Schutzkappe ist zweiteilig und vor Benutzung des Gerätes abzunehmen. Einen kleineren Objektausschnitt erhalten Sie, wenn nur die mittlere, kleinere Kappe abgenommen wird, die größere Kappe aufgesteckt bleibt.
  • Seite 50: Gebrauchsanweisung

    GEBRAUCHSANWEISUNG 1 . Z iehen Sie die drei Stativbeine (P) aus, und stellen Sie diese in der gewünschten Länge mit den klappbaren Halterungen (1) fest ein. (Abb. 1) HINWEIS: Bevor Sie die Stativbeine montieren, stellen Sie sicher, dass die klappbaren Halterungen an jedem Stativbein nach innen zeigen. Die Zubehörablage (N) des Stativs wird an diesen Halterungen befestigt.
  • Seite 51 6. N ehmen Sie das Sucherfernrohr (F) mit der Halterung für das Sucherfernrohr (E) aus der Verpackung. Schrauben Sie anschließend die zwei gerändelten Klemmschrauben aus dem Teleskoprohr (G). Legen Sie das Sucherfernrohr so auf das Teleskoprohr auf, dass die Bohrungen im Fußteil des Sucherfernrohres sich mit den offenen Gewindebohrungen im Teleskoprohr überlappen. Setzen Sie die zwei gerändelten Klemmschrauben ein und ziehen Sie diese fest an. (Abb. 6)
  • Seite 52: Optimaler Einsatz Des Teleskopes

    VORSICHT: Das Beobachten der Sonne kann zu dauerhaften Schädigungen der Augen führen. Sehen Sie nie mit dem Sucherfernrohr oder gar mit dem bloßen Auge in die Sonne. OPTIMALER EINSATZ DES TELESKOPES Da astronomische Teleskope eine starke Vergrößerung und ein kleines Gesichtsfeld aufweisen, ist es relativ schwierig, einen bestimmten Stern unter vielen aufzufinden und dessen Bewegung zu folgen. Der entscheidende Punkt für eine erfolgreiche Beobachtung liegt im richtigen Umgang mit dem astronomischen Teleskop. BEHANDLUNG Gehen Sie vorsichtig mit dem Teleskop um. Achten Sie vor allem beim Tragen des Teleskoprohres darauf, nicht anzustoßen und das Teleskoprohr nicht fallen zu lassen. MONTAGEPRÜFUNG Wenn ein Stern schwierig „ einzufangen“ ist und, wenn endlich gefunden, hin und her „ tanzt“ und sich kaum beobachten lässt, liegt das oft an einem nicht ordnungsgemäßen Zusammenbau des Teleskops. 1. Überprüfen Sie genau, ob die Klemmschrauben an den Stativbeinen und die Schrauben am S tativkopf fest angezogen sind. 2. Überprüfen Sie die Balance des Teleskoprohres, so dass ein Gewichtsausgleich zwischen d em vorderen und dem hinteren Ende besteht. BEOBACHTUNGSORT Da die Beobachtung eines Sterns eine längere Zeitspanne erfordert, sollte das Teleskop an einem wohlüberlegten Ort aufgestellt werden.
  • Seite 53: Einstellung Des Suchfernrohres

    EINSTELLUNG DES SUCHFERNROHRES Da das Teleskop nur ein begrenztes Gesichtsfeld aufweist, kann das Auffinden eines gesuchten Sterns oder Planeten recht schwierig sein. Aus diesem Grund ist das Teleskop mit einem Suchfernrohr (F) ausgestattet, das ein Fadenkreuz zur Ausrichtung besitzt. Es ist empfehlenswert, die fol- genden Einstellungen bei Tageslicht vorzunehmen: 1. Setzen Sie das Okular (D) mit der geringsten Vergrößerung in den Umlenkspiegel (C) ein. 2. S uchen Sie ein unbewegliches, leicht erkennbares Objekt in einer Entfernung von nicht mehr als 300 m aus. Richten Sie das Teleskop mit der horizontalen Achse aus und bewegen Sie dann die vertikale Achse, bis das Objekt sich in der Mitte des Gesichtsfeldes befindet. Stellen Sie das Bild scharf ein. Ziehen Sie jetzt die Arretierschraube an der Teleskopgabel fest an, so dass das Teleskop in dieser Position bleibt (je höher das Objekt über dem Horizont ist, desto leichter ist die Einstellung). 3. S ehen Sie jetzt durch das Sucherfernrohr. Wenn das durch das Teleskop gesehene Objekt nicht sichtbar ist, lockern Sie die Einstellschrauben und bewegen Sie das Sucherfernrohr hin und her, bis das Objekt auftaucht. Ziehen Sie die Einstellschrauben wieder etwas an und halten Sie das Objekt in der Mitte des Sucherfernrohres. Um diesen Vorgang zu vereinfachen,...
  • Seite 54: Vor Der Beobachtung

    rückwärts, bis das Bild scharf ist. Richten sie das Teleskop dann auf einen Stern, ohne dabei die Scharfeinstellung zu verändern. Normalerweise ist die Scharfeinstellung nun auch hier richtig. 3. N ehmen Sie die Scharfeinstellung zuerst mit einem Okular mit geringer Vergrößerung vor und wechseln Sie es dann gegen das Okular mit der benötigten Vergrößerung aus. 4. Nehmen Sie nach jedem Wechsel des Okulars erneut eine Scharfeinstellung durch vor- sichtiges Bewegen des Rohrtriebes zur Schärfeeinstellung (B) vor.
  • Seite 55: Einführung In Die Astronomie

    EINFÜHRUNG IN DIE ASTRONOMIE Wussten Sie, dass es mit dem bloßen Auge (unter idealen Sehverhältnissen) nur möglich ist, 2000 bis 3000 Sterne zu sehen? Mit einem Fernglas oder Teleskop ist die Anzahl endlos. Bevor Sie mit den Beobachtungen beginnen, sollten Sie einige Dinge wissen. 1. F inden Sie einen dunklen, ungestörten Ort fern von hellen Fenstern und Straßenlaternen. Schließen Sie die Vorhänge und schalten Sie jedes unnötige Licht aus. Lernen Sie Ihr Teleskop kennen, so dass Sie es im Dunkeln bedienen können. Eine Standard-Taschenlampe, die mit rotem Plastik verdeckt ist, ist hilfreich. 2. G eben Sie Ihrem Auge 15-30 Minuten Zeit, um sich an die Dunkelheit zu gewöhnen (dies ist bekannt als Anpassung an die Dunkelheit). Auch Ihr Teleskop wird Zeit benötigen, um in der Nachtluft abzukühlen und beständiger zu werden. Der wichtige Faktor, das Wetter, wird dem Amateur-Beobachter im Zusammenhang mit gelegentlich unklarem, vernebelten Okular eine Herausforderung liefern. 3. V ermeiden Sie Gebiete des Himmels nahe dem Horizont. Turbulenzen in der Atmosphäre werden genaue Beobachtungen schwierig machen. Merken Sie sich, dass mit dem Vorangehen der Zeit Objekte nahe dem östlichen Horizont höher in den Himmel aufsteigen werden. 4. P assen Sie auf Ihr Teleskop auf. Vermeiden Sie das Berühren der Linse oder der Spiegel (beson- ders der Spiegel). Benutzen Sie eine geeignete Bürste für die Linse, um Staub zu entfernen, wenn dies nötig ist, oder verwenden Sie ein Mikrofasertuch.
  • Seite 56: Objekte, Die Zu Beobachten Sind Und Geeignete Astronomische Teleskopvergrösserung

    5000 Jahren benannten mesopotamische Schäfer die Konstellationen, als sie Gruppen von Sternen Muster bilden sahen und verglichen sie mit den Gütern und Tieren der Griechen und Römer. Heute leben wir im Zeitalter der Wissenschaft, und wir werden bald fähig sein, mit Raumschiffen durch das Universum zu reisen. Wie auch immer, die Wichtigkeit der Teleskope wird nie sinken, denn sie sind gute Führer durch das Universum. Haben Sie das Teleskop richtig montiert? Wenn ja, lassen Sie uns mit den Beobachtungen beginnen. Sie könnten enttäuscht sein von einem trüben Bild. Verschiedene Gründe können dafür verantwortlich sein, doch wenn Ihr Teleskop korrekt aufge- stellt ist und Sie die folgende Regel beachten, werden Sie dieses Problem nie erleben. Eine exakte Einstellung ist sehr wichtig, wenn Sie teleskopische Beobachtungen durchführen. Als Anfänger sollten Sie beginnen, indem Sie den Mond, den uns am nächsten liegenden Himmelskörper, beobachten. Er ist ca. 380 000 km von der Erde entfernt. Als Anfänger benötigen Sie eine halbe bis eine Stunde, um das Teleskop perfekt auf den Mond zu richten. Das erste Mal, wenn Sie den Mond in Ihrem Teleskop sehen, wird so schön sein, dass Ihnen vor Bewunderung die Luft wegbleibt und Sie es niemals vergessen können. Nicht mit dem Teleskop- oder Sucherfernrohr in die Sonne sehen!!! AUGENVERLETZUNGEN! OBJEKTE, DIE ZU BEOBACHTEN SIND UND GEEIGNETE ASTRONOMISCHE TELESKOPVERGRÖSSERUNG...
  • Seite 57: Die Sonne

    VENUS Venus, die so leuchtend ist, dass sie Morgenstern oder Abendstern genannt wird, ist vollkom- men von einer dichten Atmosphäre bedeckt. Da man keine Gürtel sehen kann, sollte sich die Beobachtung auf das Skizzieren des mondähnlichen Abnehmens und Zunehmens des Planeten zentrieren. Geeignete Vergrößerung: 40 x. MARS Mars kommt der Erde alle 26 Monate nahe. Die Beobachtung des Mars ist ziemlich schwer. Der Gebrauch eines Teleskops mit einem Öffnungsdurchmesser von 100 mm oder mehr und mit einer100-fachen Vergrößerung erlaubt die Beobachtung der Polarkappe. MULTIPLE STERNE Einige Sterne erscheinen vor dem bloßen Auge einzeln, aber sind bei teleskopischer Beobachtung aus zwei, drei oder mehr Sternen zusammengesetzt. Doppelte Sterne bestehen aus zwei Komponenten und dreifache Sterne sind aus drei Sternen zusammengesetzt. Der Gebrauch einer ziemlich niedrigen Vergrößerung, etwa 40-fach, ist geeignet.
  • Seite 58: Teleskopische Sicht Von Planeten

    TELESKOPISCHE SICHT VON PLANETEN Anfangende Astronomen haben den Hang zu fühlen, dass der Planet durch das Teleskop gesehen viel kleiner ist als sie erwarteten. Die zwei Fotos unten zeigen, wie Planeten erscheinen, wenn sie mit einem kleinen 60 mm, 50 x Teleskop, welches überall in Kaufhäusern erhältlich ist, beobach- tet werden. KOMETENJAGD Die Kometenjagd kann dem Amateur viel Freude bieten. Ein großes Fernglas ist ideal, da ein großes Blickfeld von Wichtigkeit ist. Kometen (in der Antike als „haarige Sterne“ bezeichnet) wurden oft als Omen des Bösen betrachtet. Während des Arabien-Israel-Konfliktes wurde ein Komet als eine Kriegswaffe missgedeutet. In Wirklichkeit hat ein Komet sehr wenig Masse. Sie wurden beschrieben als „das nächste Etwas, das nicht existieren kann und doch etwas ist“. Sie wurden auch als „dreckige Schneebälle“ beschrieben. Diese beiden Beschreibungen erzählen uns viel über die wirkliche Natur der Kometen. Die Kometenjagd liefert eine richtige Herausforderung, und ein Beobachter muss ihren Weg durch den Himmel fast so gut kennen, wie seine eigene Westentasche. Viele Beobachter haben Kometen, die zu ihren Ehren benannt wurden.
  • Seite 59: Teleskoptypen Und Optische Systeme

    TELESKOPTYPEN UND OPTISCHE SYSTEME Vor über drei Jahrhunderten drehte Galileo Galilei ein kleines Teleskop den Sternen zu, und das moderne Zeitalter der Wissenschaft begann. Es gibt zwei Hauptgruppen von Teleskopen: terrestriale Teleskope und astronomische Teleskope. Der Hauptunterschied ist, dass das terrestriale Teleskop, welches für das Sehen von Objekten auf der Erde gedacht ist, ein aufrechtes oder normales Bild abgibt, während das astronomische Teleskop ein umgedrehtes, auf den Kopf gestelltes Bild liefert. Während es für erdgebundene Objekte wichtig ist, sie in ihrer normalen Position sehen zu können, ist es für astronomische Beobachtungen nicht wichtig.
  • Seite 60: Okular Und Vergrösserung Der Teleskope

    OKULAR UND VERGRÖSSERUNG DER TELESKOPE Die Kraft der Vergrößerung eines Teleskops, ob es nun ein Reflektor oder ein Refraktor ist, ist determiniert durch die Brennweite des Objektivs und des Okulars. Die Brennweite ist die Distanz der Linse, an der ein scharfes oder im Brennpunkt liegendes Bild geformt wird. Die Brennweite des Objektivs ist für gewöhnlich recht groß im Vergleich zu der Brennweite des Okulars. Wenn Sie die Brennweite des Objektivs durch die Brennweite des Okulars dividieren, wird das Ergebnis die Vergrößerung des Teleskops sein. Die meisten astronomischen Teleskope gebrauchen verschie- dene Brennweiten-Okulare für unterschiedliche Stärken. Die Okulare mit kürzeren Brennweiten ergeben eine größere Vergrößerung. Die Stärke jedes einzelnen Okulars steht in direktem Bezug zur Brennweite des Objektivspiegels oder der Objektivlinse im Teleskop. Die Formel lautet wie folgt: Brennweite des Objektivs (Spiegel oder Linse) = Vergrößerung Brennweite des Okulars Zum Beispiel wird Ihr H-12.5 mm Okular eine Vergrößerung zeigen von: 800 mm 700 mm = 64-fache Vergrößerung oder = 56-fache Vergrößerung H-12,5 mm H-12,5 mm Vergrößerungstabelle: Okular 4 mm 8 mm 12,5 mm...
  • Seite 61: Vergrösserung

    VERGRÖSSERUNG Durch den Einsatz der unterschiedlichen Okularstärken können Sie bei klarem Wetter oder im Nahbereich Ausschnitte größer erkennen. Je kleiner der Linsendurchmesser, umso stärker die Vergrößerung. Bedenken Sie, dass eine stärkere Vergrößerung nicht gleichzusetzen ist mit „ mehr sehen“. Wählen Sie deshalb die Vergrößerung, mit der Sie am besten sehen. • M it der stärkeren Vergrößerung verkleinert sich das Sehfeld. Sie sehen von der ursprünglichen Fläche nur noch einen Ausschnitt, diesen dafür entsprechend größer bzw. näher. • D ie Auflösung und die Lichtstärke lassen deutlich nach. So können mit einer schwachen Vergrößerung durch die höhere Lichtstärke und Auflösung oft noch in der Dämmerung Beobachtungen gemacht werden. Bei vollem Einsatz der stärksten Okulare sind nur noch Schatten erkennbar. Selbst leuchtende Sterne sind oft nur ungenau zu betrachten.
  • Seite 62: Betrachtung

    BETRACHTUNG Für die Sternbetrachtung ist es unwichtig, ob das Objekt seitenrichtig oder auf dem Kopf betrachtet wird. Werden Erdbeobachtungen vorgenommen, so ist ein Umkehrprisma zur sei- tenrichtigen Betrachtung zwischen Okular und Umlenkspiegel einzusetzen (nicht in allen Teleskopen enthalten). Achtung: Für Sucher gibt es kein Umkehrprisma. Dafür hat der Sucher einen besonderen Bonus: Schauen Sie durch die falsche Seite des Suchers, fixieren Sie ihn auf Ihre Hand und ändern Sie den Abstand, bis Sie die Haut scharf erkennen – Sie haben ein 5-fach vergrößerndes Mikroskop. SO FUNKTIONIERT EIN TELESKOP SONNENBEOBACHTUNGEN Wie schädlich ein Blick in die Sonne sein kann, haben viele erlebt. Sonnenbrillen sind in unseren Breitengraden ein guter Schutz gegen Sonneneinstrahlung. In Australien und in den Alpen sind die Strahlungswerte oft deutlich stärker, eine normale handelsübliche Sonnenbrille bietet hier kaum Schutz. Stellt man sich vor, dass die durch ein Teleskop ( auch Sucherteleskop ) auf das empfindliche Auge treffenden Sonnenstrahlen 35 x, ja bis zu 350 x stärker sind, so ist das ver- gleichbar mit einem Laserstrahl, der binnen Sekunden eine dicke Panzertür durchbohrt.
  • Seite 63 Um ganz sicher zu gehen und Ihr Augenlicht zu schützen, verwenden Sie zur Mond- und Sonnenbeobachtung einen Projektionsschirm. Diesen erhalten Sie als Zubehör. Für anfängliche Tests reicht es sicher aus, wenn Sie sich einen Projektionsschirm laut nachfolgendem Beispiel herstellen: Nehmen Sie einen Karton, und schneiden Sie ein 10 x 10 cm großes Stück aus. Schneiden Sie ein kreisrundes Loch in der Größe des Okularhalters in die Mitte, und stechen Sie zwei weitere kleine Löcher ( 1 rechts oben, 1 links unten) ca. 2 cm vom Rand entfernt hinein (s. Abb. Teil B). Dann nehmen Sie 2 dicke Strohhalme und stecken sie fixierend in die Löcher. Schneiden Sie ein weiteres Teil (ca. 10 x 10 cm groß) aus dem Karton, und bekleben Sie eine Seite mit weißem Papier. Stechen Sie an den gleichen Stellen wie bei dem ersten Teil 2 Löcher hinein.
  • Seite 64: Mondkarte

    MONDKARTE Diese einfache Mondkarte zeigt die meisten der interessanten Züge, die man durch ein Teleskop sehen kann. Der größte Krater auf dem Mond ist Bailly (knapp unter 300 km). Ein kleines Teleskop wird Krater im Durchmesser von fünf und zehn Kilometern zeigen. Der größte Strahlenkrater ist Tycho, während der hellste Krater Aristarchus ist. Das größte Detail kann gesehen werden, wenn sich der Mond im ersten oder letzten Viertel befindet, wenn die Sonnenstrahlen den Mond in einem schrägen Winkel streifen und auf diese Weise Schatten werfen und mehr Kontrast liefern. Der Mond behält immer dasselbe Gesicht der Erde zugewandt, da er einmal um seine Achse rotiert, während er eine Umdrehung um die Erde macht. Tatsächlich können wir mehr als 50 % des Mondes aufgrund der Libration sehen. Dieser Ausdruck würde ausführliche Erklärungen verlangen. Dem Leser wird geraten, ein gutes Nachschlagewerk hinzuzuziehen. Bemerkung: Die Orientierung eines Objektes, wie es durch ein Teleskop gesehen wird, könnte notwendiger- weise nicht die gleiche sein wie jene, die mit dem bloßen Auge gesehen wird. Der Mond ist ein gutes Beispiel. Konventionell definiert ist der nördliche Rand des Mondes derjenige, der dem...
  • Seite 65: Wie Verpacke Ich Mein Teleskop

    WIE VERPACKE ICH MEIN TELESKOP...

Inhaltsverzeichnis