Bticino HC4451 Bedienungsanleitung
Zeitthermostat
Vorschau ausblenden
Andere Handbücher für HC4451:
- Gebrauchsanweisungen (116 Seiten) ,
- Installation (8 Seiten) ,
- Installationsanweisungen (8 Seiten)

Verwandte Anleitungen für Bticino HC4451


Inhaltszusammenfassung für Bticino HC4451
- Seite 1 HC/HS/HD4451 L/N/NT4451 AM5721 Flush mounting chronothermostat Istruzioni d’uso • Instruction sheet...
- Seite 2 Flush mounting chronothermostat ITALIAN ENGLISH FRANÇAIS DEUTSCH ESPAÑOL NEDERLANDS PORTUGUÊS عربي...
-
Seite 3: Inhaltsverzeichnis
Indice 1 Introduzione e funzioni base 2.1.3 Imposta Data e Ora 2.1.4 Imposta Ora legale 1.1 Informazioni generali 2.1.5 Imposta l'unità di misura della temperatura 1.1.1 Il frontale 2.1.6 Abilita/disabilita il Controllo remoto 1.1.2 Il display 2.1.7 Regola il Contrasto del display 1.1.3 La simbologia 2.1.8 Seleziona lo Screen Saver 1.2 Il tuo Cronotermostato: usalo subito! -
Seite 4: Introduzione E Funzioni Base
1 Introduzione e funzioni base... - Seite 5 Flush mounting chronothermostat Descrizione Informazioni generali Il tuo Cronotermostato: usalo subito!
-
Seite 6: Informazioni Generali
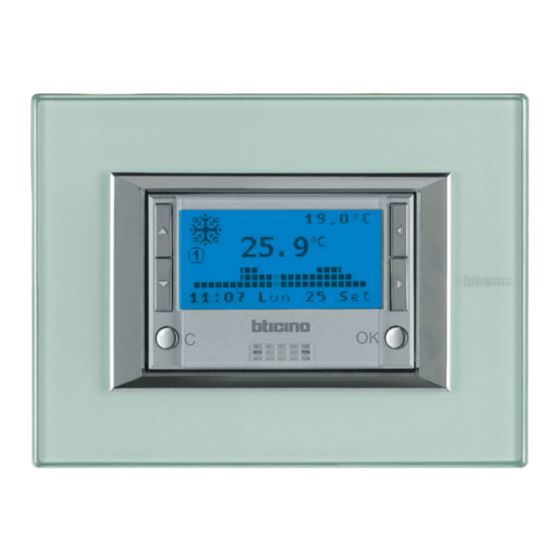
1 Introduzione e funzioni base 1.1 Informazioni generali 1.1.1 Il frontale Il Cronotermostato 4451 è un dispositivo da incasso utilizzabile per impianti di riscaldamento e di condizionamento, consente tramite diverse possibilità di programmazione di effettuare la regolazione della temperatura per ogni ora del giorno e, in modo differenziato, per tutti i giorni della settimana. -
Seite 7: Il Display
Flush mounting chronothermostat 1.1.2 Il display Durante il normale funzionamento il display grafico presenta le seguenti Manuale informazioni di base: Icona (mano) della modalità Manuale Carico Stato impianto Temperatura Ferie acceso Estate/Inverno prevista Icona modalità Antigelo o Protezione termica, ora e data di fine programma Ferie Temporizzato Temperatura Programma... -
Seite 8: Il Tuo Cronotermostato: Usalo Subito
1 Introduzione e funzioni base 1.2 Il tuo Cronotermostato: usalo subito! 1.2.2 I tasti di navigazione 1.2.1 Prima attivazione Quando sul display è visualizzata la schermata principale tramite i tasti di navigazione sono possibili le seguenti operazioni: Per rendere operativo il Cronotermostato: •... -
Seite 9: Scorri Le Modalità
Flush mounting chronothermostat 1.2.4 Scorri le modalità 1.2.6 Modifica la modalità Manuale Quando il display del Cronotermostato visualizza lo Screen saver (o è • Utilizza i tasti per selezionare la modalità "Manuale". spento), premendo un tasto qualsiasi viene visualizzare la modalità di •... -
Seite 10: Modifica La Modalità Temporizzato
1 Introduzione e funzioni base 1.2.8 Modifica la modalità Temporizzato 1.2.11 Sostituzione delle batterie • Utilizza i tasti per selezionare la modalità "Temporizzato". Quando, sul display viene visualizzato il seguente simbolo è • Utilizza i tasti per aumentare o diminuire il valore di temperatura necessario procedere alla sostituzione delle batterie. - Seite 11 Flush mounting chronothermostat Descrizione Menù impostazioni...
-
Seite 12: Personalizzazioni
2 Personalizzazioni 2.1 Menù Impostazioni • Premi il tasto OK per confermare Il menù Impostazioni ti consente di personalizzare alcuni parametri o modalità di funzionamento del Cronotermostato. • Con i tasti seleziona il livello di temperatura • Con i tasti imposta il valore di temperatura desiderato P R I N C I P A L E •... -
Seite 13: Imposta L'unità Di Misura Della Temperatura
Flush mounting chronothermostat 2.1.5 Imposta l'unità di misura della temperatura 2.1.8 Seleziona lo Screen Saver Imposta l'unità di misura della temperatura, selezionando tra gradi Seleziona cosa visualizzare sul display del Cronotermostato in condizioni Celsius o Fahrenheit (predefinita Celsius). di riposo (predefinito Temp/data/ora). •... -
Seite 14: Seleziona La Regolazione Della Temperatura
2 Personalizzazioni 2.1.10 Seleziona la Regolazione della temperatura 2.1.11 Taratura della sonda termica Questa impostazione ti permette di scegliere la tipologia di regolazione Questa impostazione ti permette di tarare la misurazione sia della sonda della temperatura in funzione del tipo d'impianto. interna che di quella esterna. -
Seite 15: Seleziona La Funzione Della Sonda Esterna
Flush mounting chronothermostat 2.1.12 Seleziona la funzione della Sonda esterna 2.1.13 Visualizza/azzera le Ore di accensione Seleziona la funzione della sonda esterna (predefinita Non attiva). Con questa funzione puoi visualizzare/azzerare le ore di funzionamento Puoi selezionare: dell'impianto. 1: Non attiva - la sonda non viene letta •... -
Seite 16: Programmazione
3 Programmazione... - Seite 17 Flush mounting chronothermostat Descrizione Menù programmazione...
-
Seite 18: Menù Programmazione
3 Programmazione 3.1 Menù Programmazione 3.1.1 Rinomina un programma Settimanale Consente di modificare/programmare i profili giornalieri dei 3 programmi Selezionando questa funzione puoi personalizzare il nome del settimanali per la modalità di funzionamento (Estate/Inverno) selezionata. programma (max 13 caratteri). All’interno dei programmi è possibile differenziare le temperature nell’arco •... -
Seite 19: Informazioni Visualizzate Sul Display
Flush mounting chronothermostat Strumenti di modifica profilo giornaliero Copia un profilo giornaliero Copiare la programmazione da un giorno ad un altro. Informazioni visualizzate sul display: • Con i tasti seleziona il giorno in cui copiare il profilo • Seleziona la funzione Copia da •... - Seite 20 3 Programmazione Sono presenti due modalità di lavoro: Crea un nuovo profilo giornaliero • SCORRIMENTO Ti consigliamo di seguire passo passo la procedura descritta in questo esempio, come utile strumento per familiarizzare con le modalità di Caratterizzato dal cursore a forma di “freccia”, ti consente utilizzan- do i tasti ...
- Seite 21 Flush mounting chronothermostat Procedura: L U N E D I ’ L U N E D I ’ L U N E D I ’ 0 0 : 0 0 7 . 0 ° C 0 0 : 0 0 T 1 1 8 .
- Seite 22 3 Programmazione L U N E D I ’ L U N E D I ’ L U N E D I ’ 2 2 : 0 0 2 2 . 0 ° C 1 6 : 3 0 2 0 . 0 ° C 1 6 : 3 0 T 3 2 2 .
-
Seite 23: Copia Un Programma Settimanale
Flush mounting chronothermostat 3.1.3 Copia un programma Settimanale 3.1.5 Elimina un programma Settimanale Questa funzione ti permette di copiare un programma settimanale in un Questa funzione ti permette di eliminare un programma personalizzato e altro. Per esempio, copiare il Programma 1 (preimpostato in fabbrica) in ripristinare le impostazioni predefinite. - Seite 25 Contents 1 Introduction et fonctions de base 2.1.3 Set the Date and Time 2.1.4 Set the Daylight saving time 1.1 General information 2.1.5 Set the measurement unit of the temperature 1.1.1 The front side 2.1.6 Enable/Disable the Remote control 1.1.2 The display 2.1.7 Adjust the Display contrast 1.1.2 Symbols 2.1.8 Select the Screen Saver...
-
Seite 26: Introduction Et Fonctions De Base
1 Introduction et fonctions de base... - Seite 27 Flush mounting chronothermostat Descrizione General information Your Chronothermostat: use it now!
-
Seite 28: General Information
1 Introduction and standard functions 1.1 General information 1.1.1 The front side The 4451 Chronothermostat is a flush-mounting device which can be used for heating and air-conditioning systems; it is possible – through several programming possibilities – to adjust the temperature at any time of the day and in a differentiated manner, every day of the week. -
Seite 29: The Display
Flush mounting chronothermostat 1.1.2 The display During normal operation, the graphic display shows the following Manual background information: Manual mode Icon (hand) System status Load On Expected Holidays Summer/Winter temperature Antifreeze or Thermal protection Icon, time and date of Holidays program end Timed Temperature Weekly... -
Seite 30: Your Chronothermostat: Use It Now
1 Introduction and standard functions 1.2 Your Chronothermostat: use it now! 1.2.2 Navigation keys 1.2.1 First activation When the main screen is displayed, the following operations can be executed with the navigation keys: To enable the Chronothermostat: • select the functioning Language •... -
Seite 31: Scroll The Modes
Flush mounting chronothermostat 1.2.4 Scroll the modes 1.2.6 Change the Manual mode When the Chronothermostat display shows the Screen saver (or when it • Use the keys to select the “Manual” mode. is off), the preset functioning mode will be displayed if any key is pressed. •... -
Seite 32: Change The Timed Mode
1 Introduction and standard functions 1.2.8 Change the Timed mode 1.2.11 Replacing the batteries • Use the keys to select the “Timed” mode. When the symbol below is displayed it is necessary to replace the batteries. If flashing, the device will not work, thus the batteries need to •... - Seite 33 Flush mounting chronothermostat Descrizione Setup menu...
-
Seite 34: Customizations
2 Customizations 2.1 Setup menu • Press OK to confirm The setup menu lets you customize some parameters or functioning modes of the Chronothermostat. • Use the keys to select the temperature level • Use the keys to set the value of the required temperature M A I N S C R E E N •... -
Seite 35: Set The Measurement Unit Of The Temperature
Flush mounting chronothermostat 2.1.5 Set the measurement unit of the temperature 2.1.8 Select the Screen Saver Sets the measurement unit of the temperature: Celsius or Fahrenheit Selects what you want to show on the Chronothermostat display when (default is Celsius). in idle condition (default is Temp/date/time). -
Seite 36: Select The Temperature Adjustment
2 Customizations 2.1.10 Select the Temperature adjustment 2.1.11 Calibrating the thermal probe This setting lets you choose the type of temperature adjustment accord- This setting lets you calibrate the measurement of the internal and ing to the type of system. external probe. -
Seite 37: Select The Function Of The External Probe
Flush mounting chronothermostat 2.1.12 Select the function of the external Probe 2.1.13 View/Reset the activation Hours Select the function of the external probe (default is Not active). This function enables you to display/reset the functioning hours of the system. You can select the following: 1: Not active - the probe will not be read •... -
Seite 38: Programming
3 Programming... - Seite 39 Flush mounting chronothermostat Descrizione Programming Menu...
-
Seite 40: Programming Menu
3 Programming 3.1 Programming menu 3.1.1 Rename a Weekly program Here, you will be able to change/program the weekly profiles of the 3 weekly When you select this function you can customize the name of the program programs for the selected functioning mode (Summer/Winter). (maximum 13 characters). - Seite 41 Flush mounting chronothermostat Copy a daily profile Daily profile modification tools Copy the program from one day to another. Information displayed: • Use the keys to select the day you want to copy the profile in • Select the function Copy from •...
- Seite 42 3 Programming There are two working modes: Create a new daily profile • SCROLLING It is recommended to follow the procedure described in this example The arrow-shaped cursor lets you move the cursor, using the step by step. It will be useful to get you acquainted with the “Modifying” keys, along the timeline without making any changes to the daily and “Scrolling”...
- Seite 43 Flush mounting chronothermostat Procedure: M O N D A Y M O N D A Y M O N D A Y 0 0 : 0 0 T 1 1 8 . 0 ° C 0 6 : 0 0 1 8 .
- Seite 44 3 Programming M O N D A Y M O N D A Y M O N D A Y 2 2 : 0 0 2 2 . 0 ° C 1 6 : 3 0 2 0 . 0 ° C 1 6 : 3 0 T 3 2 2 .
-
Seite 45: Copy A Weekly Program
Flush mounting chronothermostat 3.1.3 Copy a Weekly program 3.1.5 Remove a Weekly program This function lets you copy a weekly program into another one. For This function lets you to eliminate a customized program and restore the example, copy Program 1 (preset at factory) to WEEK. WINTER. default settings. - Seite 47 Table des matières 1 Introduction et fonctions de base 2.1.3 Réglage de Date et Heure 2.1.4 Réglage de l’Heure légale 1.1 Informations générales 2.1.5 Sélection de l’unité de mesurée de la température 1.1.1 La façade 2.1.6 Activation/désactivation du Contrôle à distance 1.1.2 Le moniteur 2.1.7 Réglage du contraste du moniteur graphique 1.1.3 Symboles utilisés...
-
Seite 48: Introduction Et Fonctions De Base
1 Introduction et fonctions de base... - Seite 49 Flush mounting chronothermostat Descrizione Informations générales Le Chronothermostat: utilisez-le dès maintenant!
-
Seite 50: Informations Générales
1 Introduction et fonctions de base 1.1 Informations générales 1.1.1 La façade Le Chronothermostat 4451 est un dispositif encastrable utilisable sur des installations de chauffage et de climatisation. Il permet, grâce à diverses possibilités de programmation, d’effectuer la régulation de la tempéra- ture pour chaque heure du jour et, de manière différenciée, pour tous les jours de la semaine. -
Seite 51: Le Moniteur
Flush mounting chronothermostat 1.1.2 Le moniteur Durant le fonctionnement normal, le moniteur graphique affiche les Manuel informations de base suivantes: Icône (main) du mode Manuel. Charge État installation Température Vacances allumée Été/Hiver prévue Icône mode Hors gel ou Protection thermique, heure et date de fin de programme. -
Seite 52: Le Chronothermostat: Utilisez-Le Dès Maintenant
1 Introduction et fonctions de base 1.2 Le Chronothermostat: utilisez-le dès maintenant! 1.2.2 Touches de navigation 1.2.1 Première activation Quand la page principale est affichée sur le moniteur, les touches de navigation permettent de procéder aux opérations suivantes: Pour rendre opératif le Chronothermostat: •... -
Seite 53: Défilement Des Modes
Flush mounting chronothermostat 1.2.4 Défilement des modes 1.2.6 Modification du mode Manuel Quand le moniteur du Chronothermostat est en mode veille (ou qu’il est • Utiliser les touches pour sélectionner le mode “Manuel”. éteint), en appuyant sur une quelconque touche, s’affiche le mode de •... -
Seite 54: Modification Du Mode Temporisé
1 Introduction et fonctions de base 1.2.8 Modification du mode Temporisé 1.2.11 Changement des piles • Utiliser les touches pour sélectionner le mode “Temporisé” Quand le moniteur affiche le symbole cela indique qu’il est néces- saire de changer les piles. Si elle clignote, cela indique que le dispositif ne •... - Seite 55 Flush mounting chronothermostat Descrizione Menu réglages...
-
Seite 56: Personnalisations
2 Personnalisations 2.1 Menu Réglages • Appuyer sur la touche OK pour confirmer. Le menu Réglages permet de personnaliser certains paramètres ou certains modes de fonctionnement du Chronothermostat. • À l’aide des touches sélectionner le niveau de température. • À l’aide des touches régler la valeur de température voulue. P R I N C I P A L •... -
Seite 57: Sélection De L'unité De Mesurée De La Température
Flush mounting chronothermostat 2.1.5 Sélection de l’unité de mesurée de la température 2.1.8 Sélection de l’économiseur d’écran Permet de sélectionner l’unité de mesurée de la température: en degrés Permet de sélectionner la donnée à visualiser sur le moniteur du Chronother- Celsius ou en degrés Fahrenheit (prédéfini Celsius). -
Seite 58: Sélection De La Régulation De La Température
2 Personnalisations 2.1.10 Sélection de la régulation de la température 2.1.11 Réglage de la sonde thermique Cette option permet de sélectionner le type de réglage de la température Cette option permet de calibrer les mesurées assurées par la sonde en fonction du type d’installation. intérieure et par la sonde extérieure. -
Seite 59: Sélection De La Fonction De La Sonde Extérieure
Flush mounting chronothermostat 2.1.12 Sélection de la fonction de la sonde extérieure 2.1.13 Visualisation/remise à zéro du temps de fonctionnement Permet de sélectionner la fonction de la sonde extérieure (prédéfinie Non active). Cette fonction permet de visualiser/remettre à zéro les heures de fonc- Il est possible de sélectionner: tionnement de l’installation. -
Seite 60: Programmation
3 Programmation... - Seite 61 Flush mounting chronothermostat Descrizione Menu programmation...
-
Seite 62: Menu Programmation
3 Programmation 3.1 Menu Programmation 3.1.1 Modifier le nom d’un programme hebdomadaire Permet de modifier/programmer les profils journaliers des 3 programmes hebdo- En sélectionnant cette fonction, il est possible de personnaliser le nom madaires pour le mode de fonctionnement (Été/Hiver) sélectionné. A l’intérieur du programme (13 caractères maximum). - Seite 63 Flush mounting chronothermostat Instruments de modification du profil journalier Copier un profil journalier Permet de copier la programmation d’un jour sur un autre. Informations affichées sur le moniteur: • À l’aide des touches sélectionner le jour sur lequel le profil doit être copié. •...
- Seite 64 3 Programmation Deux modes de travail sont présents: Créer un nouveau profil journalier • DÉFILEMENT Il est recommandé de suivre phase après phase la procédure décrite Dans cette mode, le curseur, en forme de “flèche”, peut être dans le présent exemple, qui constitue un instrument utile pour se déplacé, en utilisant les touches ...
- Seite 65 Flush mounting chronothermostat Procédure: L U N D I L U N D I L U N D I 0 0 : 0 0 7 . 0 ° C 0 0 : 0 0 T 1 1 8 . 0 ° C 0 6 : 0 0 1 8 .
- Seite 66 3 Programmation L U N D I L U N D I L U N D I 2 2 : 0 0 2 2 . 0 ° C 1 6 : 3 0 2 0 . 0 ° C 1 6 : 3 0 T 3 2 2 .
-
Seite 67: Copier Un Programme Hebdomadaire
Flush mounting chronothermostat 3.1.3 Copier un programme hebdomadaire 3.1.5 Supprimer un programme Hebdomadaire Cette fonction permet de copier un programme hebdomadaire sur un Cette fonction permet de supprimer un programme personnalisé et de autre. Par exemple, copier le Programme 1 (préétabli par défaut) sur rétablir les réglages prédéfinis. - Seite 69 Inhaltsverzeichnis 1 Einleitung und grundlegende Funktionen 2.1.3 Datum und Zeit einstellen 2.1.4 Standard Zeit einstellen 1.1 Allgemeine Informationen 2.1.5 Maßeinheit der Temperatur einstellen 1.1.1 Die Fronttafel 2.1.6 Fernsteuerung aktivieren/deaktivieren 1.1.2 Das Display 2.1.7 Displaykontrast regulieren 1.1.3 Die Symbole 2.1.8 Screen Saver wählen 1.2 Ihr Zeitthermostat: sofort einsatzbereit! 2.1.9 Sprache wählen 1.2.1 Erstmaliges Einschalten...
-
Seite 70: Einleitung Und Grundlegende Funktionen
1 Einleitung und grundlegende Funktionen... - Seite 71 Flush mounting chronothermostat Descrizione Allgemeine Informationen Ihr Zeitthermostat: sofort einsatzbereit!
-
Seite 72: Allgemeine Informationen
1 Einleitung und grundlegende Funktionen 1.1 Allgemeine Informationen 1.1.1 Die Fronttafel Der Zeitthermostat 4451 ist eine Vorrichtung für die UP-Montage die für Heiz- und Klimaanlagen verwendet werden kann und es über verschiedene Programmierungsmöglichkeit gestattet, die Temperatur für jede Tagesstunde und unterschiedlich auch für jeden Wochentag einzustellen. -
Seite 73: Das Display
Flush mounting chronothermostat 1.1.2 Das Display Während des normalen Betriebs zeigt das Display folgende grundlegende Manuell Informationen an: Symbol (Hand) des manuellen Modus Status der Anlage Vorgesehene Ferien Sommer/Winter Last ein Temperatur Symbol des Modus Frostschutz oder Wärmeschutz bis zum eingegebenen Ende (Datum und Zeit) des Ferienprogramms Zeitgesteuert Gemessene... -
Seite 74: Ihr Zeitthermostat: Sofort Einsatzbereit
1 Einleitung und grundlegende Funktionen 1.2 Ihr Zeitthermostat: sofort einsatzbereit! 1.2.2 Die Navigationstasten 1.2.1 Erstmaliges Einschalten Wenn am Display der Hauptschirm angezeigt ist, kann man über die Navigationstasten folgende Vorgänge durchführen: Um den Zeitthermostat zu aktivieren, folgendermaßen vorgehen: • Sprache des Betriebs wählen •... -
Seite 75: Modi Abrollen
Flush mounting chronothermostat 1.2.4 Modi abrollen 1.2.6 Manueller Modus bearbeiten Wenn das Display des Zeitthermostats den Screen Saver angezeigt (oder • Verwenden Sie die Tasten um den Modus „manuell“ zu wählen das Display ausgeschaltet ist), kann man durch Drücken einer beliebigen •... -
Seite 76: Zeitgesteuerter Modus Bearbeiten
1 Einleitung und grundlegende Funktionen 1.2.8 Zeitgesteuerter Modus bearbeiten 1.2.11 Batterien auswechseln • Verwenden Sie die Tasten um den Modus „zeitgesteuert“ zu Wenn am Display das Symbol angezeigt wird, müssen die Batterie wählen. ersetzt werden. Wenn es blinkt, ist eine Störung an der Vorrichtung aufge- treten;... - Seite 77 Flush mounting chronothermostat Descrizione Menü Setup...
-
Seite 78: Kundenspezifische Einstellungen
2 Kundenspezifische Einstellungen 2.1 Menü Setup Das Setup Menü ermöglicht es einige Parameter oder den Operationsmodus • Über die Tasten die Temperaturstufe wählen des Zeitthermostats den eigenen Bedürfnissen anzupassen. • Über die Tasten den Wert der gewünschten Temperatur wählen •... -
Seite 79: Maßeinheit Der Temperatur Einstellen
Flush mounting chronothermostat 2.1.5 Maßeinheit der Temperatur einstellen 2.1.8 Screen Saver wählen Hier kann angegeben werden in welcher Maßeinheit die Temperatur Hier kann angegeben werden, was am Display des Zeitthermostats an- angezeigt werden soll, ob in Grad Celsius oder Fahrenheit (werkseitig gezeigt werden soll, wenn dieser auf Ruhestand geschaltet ist (werkseitig Temp/Datum/Zeit voreingestellt). -
Seite 80: Temperaturregulierung Wählen
2 Kundenspezifische Einstellungen 2.1.10 Temperaturregulierung wählen 2.1.11 Einstellung des Temperaturfühlers Mit dieser Einstellung können Sie die Art der Temperaturregelung je Mit dieser Einstellung kann sowohl der interne als auch der externe nach Anlagentyp wählen. Fühler geeicht werden. 1: Standard voreingestellt (empfohlene Wahl) •... -
Seite 81: Funktion Des Externen Fühlers Wählen
Flush mounting chronothermostat 2.1.12 Funktion des externen Fühlers wählen 2.1.13 Einschaltzeit anzeigen/Reset Funktion des externen Fühlers wählen (auf nicht aktiv voreingestellt). Mit dieser Funktion können Sie die Betriebsstunden der Anlage anzeigen Sie können unter folgenden Möglichkeiten wählen: lassen oder auf Null zurückstellen. 1: Nicht aktiv –... -
Seite 82: Programmieren
3 Programmieren... - Seite 83 Flush mounting chronothermostat Descrizione Menü Programmieren...
-
Seite 84: Menü Programmieren
3 Programmieren 3.1 Menü Programmieren 3.1.1 Ein wöchentliches Programm umbenennen Hiermit können Sie die Tagesprofile der 3 wöchentlichen Programme für je- Indem Sie diese Funktion wählen, können Sie einen beliebigen Pro- den gewählten Operationsmodus (Sommer/Winter) ändern/programmieren. grammname eingeben (max. 13 Zeichen). Im Inneren der Programme können Sie die Temperatur über 24 Stunden für •... -
Seite 85: Ein Tägliches Profil Kopieren
Flush mounting chronothermostat Änderungsmöglichkeiten für das tägliche Profil Ein tägliches Profil kopieren Die Programmierung eines Tages kopieren und für einen anderen Tag verwenden. Am Display angezeigte Informationen: • Über die Tasten den Tag wählen dessen Profil kopiert werden soll •... -
Seite 86: Neues Tägliches Profil Erstellen
3 Programmieren Es stehen zwei Betriebsmöglichkeiten zur Verfügung: Neues tägliches Profil erstellen • VERSCHIEBEN Wir empfehlen Ihnen die in diesem Beispiel beschriebene Prozedur Hier kann man den “Pfeilcursor“ mit Hilfe der Tasten entlang Schritt für Schritt zu befolgen, um sich mit den Funktionen Ändern/ der Zeitachse verschieben ohne das tägliche Profil zu ändern. - Seite 87 Flush mounting chronothermostat Prozedur: M O N T A G M O N T A G M O N T A G 0 0 : 0 0 7 . 0 ° C 0 0 : 0 0 T 1 1 8 . 0 ° C 0 6 : 0 0 1 8 .
- Seite 88 3 Programmieren M O N T A G M O N T A G M O N T A G 2 2 : 0 0 2 2 . 0 ° C 1 6 : 3 0 2 0 . 0 ° C 1 6 : 3 0 T 3 2 2 .
-
Seite 89: Ein Wöchentliches Programm Kopieren
Flush mounting chronothermostat 3.1.3 Ein wöchentliches Programm kopieren 3.1.5 Ein wöchentliches Programm löschen Mit dieser Funktion kann man ein zuvor programmiertes wöchentliches Mit dieser Funktion kann man ein zuvor programmiertes wöchentliches Pro- Programm kopieren und in ein anderes einfügen. Beispielsweise das gramm löschen und die voreingegebenen Einstellungen wieder herstellen. - Seite 91 Índice 1 Introducción y funciones básicas 2.1.3 Establecer Fecha y Hora 2.1.4 Establecer la hora legal 1.1 Información general 2.1.5 Establecer la unidad de medida de la temperatura 1.1.1 El frontal 2.1.6 Habilitar/Deshabilitar el control remoto 1.1.2 La pantalla 2.1.7 Regular el contraste de la pantalla 1.1.3 La simbología 2.1.8 Seleccionar el Salvapantalla 1.2 Su Cronotermostato: ¡úselo ya!
-
Seite 92: Introducción Y Funciones Básicas
1 Introducción y funciones básicas... - Seite 93 Flush mounting chronothermostat Descrizione Información general Su Cronotermostato: ¡úselo ya!
-
Seite 94: Información General
1 Introducción y funciones básicas 1.1 Información general 1.1.1 El frontal El Cronotermostato Art. L4451 es un instrumento empotrable utilizable en sistemas de calefacción y acondicionamiento que permite mediante distintas opciones de programación, regular la temperatura de cada hora del día y, de manera diferenciada, de todos los días de la semana. Es posible seleccionar un programa estándar (ya memorizado pero que se puede modificar de acuerdo con las exigencias del usuario) o crear uno nuevo mediante un sencillo procedimiento de programación. -
Seite 95: La Pantalla
Flush mounting chronothermostat 1.1.2 La pantalla Durante el funcionamiento normal la pantalla gráfica presenta la siguiente Manual información básica: Icono (mano) de la modalidad Manual Carga Estado instalación Temperatura Vacaciones encendida Verano/Invierno prevista Icono modalidad Antihielo o Protección térmica, hora y fecha de fin programa Vacaciones Temporizado Temperatura... -
Seite 96: Su Cronotermostato: ¡Úselo Ya
1 Introducción y funciones básicas 1.2 Su Cronotermostato: ¡úselo ya! 1.2.2 Las teclas de navegación 1.2.1 Primera activación Cuando en la página principal se visualiza la página principal mediante las teclas de navegación es posible efectuar las siguientes operaciones: Para activar el Cronotermostato: •... -
Seite 97: Desplazar Las Modalidades
Flush mounting chronothermostat 1.2.4 Desplazar las modalidades 1.2.6 Modificar la modalidad Manual Cuando la pantalla del Cronotermostato visualiza el salvapantalla (o • Utilice las teclas para seleccionar la modalidad “Manual”. está apagado), pulsando cualquier tecla se visualiza la modalidad de •... -
Seite 98: Modificar La Modalidad Temporizado
1 Introducción y funciones básicas 1.2.8 Modificar la modalidad Temporizado 1.2.11 Cambio de las baterías • Utilice las teclas para seleccionar la modalidad “Temporizado”. Cuando en la pantalla se visualiza el siguiente símbolo es necesario cambiar las baterías. Si el dispositivo parpadea, significa que no funciona •... - Seite 99 Flush mounting chronothermostat Descrizione Menú Ajustes...
-
Seite 100: Personalizaciones
2 Personalizaciones 2.1 Menú Ajustes • Pulse la tecla OK para confirmar El menú Ajustes le permite personalizar algunos parámetros o modali- dades de funcionamiento del Cronotermostato. • Con las teclas seleccione el nivel de temperatura • Con las teclas establezca el valor de temperatura deseado P R I N C I P A L •... -
Seite 101: Establecer La Unidad De Medida De La Temperatura
Flush mounting chronothermostat 2.1.5 Establecer la unidad de medida de la temperatura 2.1.8 Seleccionar el Salvapantalla Establezca la unidad de medida de la temperatura, seleccionando entre Seleccione lo que desea visualizar en la pantalla del Cronotermostato en grados Celsius o Fahrenheit (predefinida Celsius). condiciones de reposo (predefinido Temp/Fecha/Hora). -
Seite 102: Seleccionar La Regulación De La Temperatura
2 Personalizaciones 2.1.10 Seleccionar la regulación de la temperatura 2.1.11 Calibrado de la sonda térmica Esta opción le permite seleccionar el tipo de regulación de la temperatura Este ajuste le permite calibrar la medida de la sonda interna y externa. en función de la instalación. -
Seite 103: Seleccionar La Función De La Sonda Externa
Flush mounting chronothermostat 2.1.12 Seleccionar la función de la sonda externa 2.1.13 Visualizar/restaurar las horas de encendido Seleccione la función de la sonda externa (predefinida desactivada). Con esta función puedes visualizar/restaurar las horas de funcionamiento de la instalación. Puede seleccionar: 1: Apagada - la sonda no se lee •... -
Seite 104: Programación
3 Programación... - Seite 105 Flush mounting chronothermostat Descrizione Menú Programación...
-
Seite 106: Menú Programación
3 Programación 3.1 Menú Programación 3.1.1 Renombrar un programa Semanal Permite modificar/programar los perfiles diarios de los 3 programas sema- Al seleccionar esta función, es posible personalizar el nombre del pro- nales para la modalidad de funcionamiento (Verano/Invierno) seleccionada. grama (máx. 13 caracteres). En los programas, es posible diferenciar las temperaturas a lo largo de las 24 •... - Seite 107 Flush mounting chronothermostat Herramientas de modificación del perfil diario Copiar un Perfil diario Copiar la programación de un día a otro. Información visualizada en la pantalla: • Con las teclas seleccione el día en que copiar el perfil • Seleccione con la función Copiar de •...
- Seite 108 3 Programación Están disponibles dos modalidades de trabajo: Crear un nuevo perfil diario • DESPLAZAMIENTO Le aconsejamos seguir paso a paso el procedimiento descrito en este Caracterizado por el cursor en forma de “flecha”, utilizando las te- ejemplo, ya que representa una herramienta útil para familiarizar con clas ...
- Seite 109 Flush mounting chronothermostat Procedimiento: L U N E S L U N E S L U N E S 0 0 : 0 0 7 . 0 ° C 0 0 : 0 0 T 1 1 8 . 0 ° C 0 6 : 0 0 1 8 .
- Seite 110 3 Programación L U N E S L U N E S L U N E S 2 2 : 0 0 2 2 . 0 ° C 1 6 : 3 0 2 0 . 0 ° C 1 6 : 3 0 T 3 2 2 .
-
Seite 111: Copiar Un Programa Semanal
Flush mounting chronothermostat 3.1.3 Copiar un programa Semanal 3.1.5 Eliminar un programa Semanal Esta función le permite copiar un programa semanal en otro. Por ejemplo, Esta función le permite eliminar un programa personalizado y restablecer la copiar el Programa 1 (predefinido en la fábrica) en SEM. INVIERNO. configuración predefinida. - Seite 113 Inhoud 1 Inleiding en basisfuncties 2.1.3 Stel Datum en Uur in 2.1.4 Stel de Officiële tijd in 1.1 Algemene inlichtingen 2.1.5 Stel de meeteenheid van de temperatuur in 1.1.1 Het voorpaneel 2.1.6 Activeer/deactiveer de Afstandsbediening 1.1.2 Het display 2.1.7 Regel het Contrast van het display 1.1.3 De symbolen 2.1.8 Selecteer de Screen Saver 1.2 Je Chronothermostaat: gebruik hem onmiddellijk!
-
Seite 114: Inleiding En Basisfuncties
1 Inleiding en basisfuncties... - Seite 115 Flush mounting chronothermostat Descrizione Algemene inlichtingen Je Chronothermostaat: gebruik hem onmiddellijk!
-
Seite 116: Algemene Inlichtingen
1 Inleiding en basisfuncties 1.1 Algemene inlichtingen 1.1.1 Het voorpaneel De Chronothermostaat 4451 is een inbouwinrichting die gebruikt kan worden voor installaties van verwarming en conditioning en die middels verschillende mogelijkheden van programmatie toestaat de regeling van de temperatuur uit te voeren voor ieder uur van de dag en, op een gedifferentieerde manier, voor alle dagen van de week. -
Seite 117: Het Display
Flush mounting chronothermostat 1.1.2 Het display Tijdens de normale werking geeft het grafisch display de volgende Manueel basisinlichtingen: Icoon (hand) van de modaliteit Manueel Lading Staat installatie Voorziene Vakantie Zomer/winter temperatuur Icoon van de modaliteit Antivries of Thermische beveiligin- guur en datum van einde programma Vakantie. Vertraagd Gemeten Wekelijks... -
Seite 118: Je Chronothermostaat: Gebruik Hem Onmiddellijk
1 Inleiding en basisfuncties 1.2 Je Chronothermostaat: gebruik hem onmiddellijk! 1.2.2 De surftoetsen 1.2.1 Eerste activering Wanneer op het display het hoofdscherm gevisualiseerd is, zijn met de surftoetsen de volgende operaties mogelijk: Om de Chronothermostaat operationeel te maken: • selecteer de Taal van werking •... -
Seite 119: Doorloop De Modaliteiten
Flush mounting chronothermostat 1.2.4 Doorloop de modaliteiten 1.2.6 Wijzig de modaliteit Manueel Wanneer het display van de Chronothermostaat de Screen saver visuali- • Gebruik de toetsen om de modaliteit “Manueel” te selecteren. seert (of uitgeschakeld is), wordt met een druk op een willekeurige toets •... -
Seite 120: Wijzig De Modaliteit Vertraagd
1 Inleiding en basisfuncties 1.2.8 Wijzig de modaliteit Vertraagd 1.2.11 Vervanging van de batterijen • Gebruik de toetsen om de modaliteit "Vertraagd" te selecteren Wanneer op het display het volgend symbool gevisualiseerd wordt, moet men overgaan tot de vervanging van de batterijen. Indien deze knip- •... - Seite 121 Flush mounting chronothermostat Descrizione Menu Instellingen...
-
Seite 122: Verpersoonlijkingen
2 Verpersoonlijkingen 2.1 Menu Instellingen • Op de toets OK drukken om te bevestigen Het menu Instellingen geeft je de mogelijkheid sommige parameters of werkwijzen van de Chronothermostaat te verpersoonlijken. • Met de toetsen het niveau van temperatuur • Met de toetsen de gewenste waarde van temperatuur in H O O F D M E N U •... -
Seite 123: Stel De Meeteenheid Van De Temperatuur In
Flush mounting chronothermostat 2.1.5 Stel de meeteenheid van de temperatuur in 2.1.8 Selecteer de Screen Saver Stel de meeteenheid van de temperatuur in en selecteer hierbij tussen Selecteer wat je wenst te visualiseren op het display van de Chronothermo- graden Celsius of Fahrenheit (vooringesteld Celsius). staat in de ruststand (vooringesteld Temp/datum/uur). -
Seite 124: Selecteer De Regeling Van De Temperatuur
2 Verpersoonlijkingen 2.1.10 Selecteer de Regeling van de temperatuur 2.1.11 Ijken van de thermische sonde Deze instelling geeft je de mogelijkheid de typologie van regeling van de Deze instelling geeft je de mogelijkheid het meten te kalibreren zowel temperatuur te kiezen in functie van het type van installatie. van de interne als van de externe sonde. -
Seite 125: Selecteer De Functie Van De Externe Sonde
Flush mounting chronothermostat 2.1.12 Selecteer de functie van de Externe sonde 2.1.13 Visualiseer en stel de Uren van inschakeling op nul af Selecteer de functie van de externe sonde (vooringesteld Niet actief). Met deze functie kun je de uren van werking van de installatie visuali- seren/op nul afstellen. - Seite 126 2 Verpersoonlijkingen...
- Seite 127 Flush mounting chronothermostat Descrizione Menu programmatie...
-
Seite 128: Programmatie
3 Programmatie 3.1 Menu Programmatie 3.1.1 Herbenoem een Wekelijks programma Staat toe de dagelijkse profielen van de 3 wekelijkse programma’s voor de Wanneer men deze functie selecteert kun je de naam van het programma geselecteerde werkwijze (Zomer/Winter) te wijzigen/programmeren. Binnen verpersoonlijken (max. - Seite 129 Flush mounting chronothermostat Instrumenten van wijziging dagelijks profiel Kopieer een dagelijks profiel De programmatie kopiëren van de ene op de andere dag. Inlichtingen gevisualiseerd op het display: • Selecteer met de toetsen de dag waarop het profiel moet geko- pieerd worden •...
- Seite 130 3 Programmatie Er zijn twee werkwijzen aanwezig: Creëer een nieuw dagelijks profiel • DOORLOPEN We raden je aan de in dit voorbeeld beschreven procedure stap voor stap Gekenmerkt door de cursor in de vorm van een “pijl”, geeft je de te volgen, als nuttig instrument om vertrouwd te raken met de werk- mogelijkheid, gebruikmakend van de toetsen ...
- Seite 131 Flush mounting chronothermostat Procedure: M A A N D A G M A A N D A G M A A N D A G 0 0 : 0 0 7 . 0 ° C 0 0 : 0 0 T 1 1 8 .
- Seite 132 3 Programmatie M A A N D A G M A A N D A G M A A N D A G 2 2 : 0 0 2 2 . 0 ° C 1 6 : 3 0 2 0 . 0 ° C 1 6 : 3 0 T 3 2 2 .
-
Seite 133: Kopieer Een Wekelijks Programma
Flush mounting chronothermostat 3.1.3 Kopieer een Wekelijks programma 3.1.5 Wis een Wekelijks programma Deze functie geeft je de mogelijkheid een wekelijks programma in Deze functie geeft je de mogelijkheid een verpersoonlijkt programma te een ander te kopiëren. Bijvoorbeeld, het Programma 1 (vooringesteld wissen en de vooringestelde instellingen te herstellen. - Seite 135 Índice 1 Introdução e funções de base 2.1.3 Configurar a Data e a Hora 2.1.4 Configurar a Hora Standard 1.1 Informações gerais 2.1.5 Configurar a unidade de medida da temperatura 1.1.1 O frontal 2.1.6 Activar/desactivar o Controlo remoto 1.1.2 O ecrã 2.1.7 Regular o Contraste do ecrã...
-
Seite 136: Introdução E Funções De Base
1 Introdução e funções de base... - Seite 137 Flush mounting chronothermostat Descrizione Informações gerais O seu Cronotermostato: use-o logo!
-
Seite 138: Informações Gerais
1 Introdução e funções de base 1.1 Informações gerais 1.1.1 O frontal O Cronotermostato 4451 é um dispositivo para encaixar que pode ser uti- lizado em instalações de aquecimento e de condicionamento, permite por intermédio de várias possibilidades de programação efectuar a regulação da temperatura para cada hora do dia e, de maneira diferenciada, para todos os dias da semana. -
Seite 139: O Ecrã
Flush mounting chronothermostat 1.1.2 O ecrã Durante o funcionamento normal o ecrã gráfico apresenta as seguintes Manual informações de base: Ícone (mão) do modo Manual. Carga Estado da instalação Temperatura Férias acesa Verão/Inverno prevista Ícone do modo Antigelo ou Protecção térmica, hora e data do fim do programa das Férias. -
Seite 140: O Seu Cronotermostato: Use-O Logo
1 Introdução e funções de base 1.2 O seu Cronotermostato: use-o logo! 1.2.2 As teclas de navegação 1.2.1 Primeira activação Quando fica visualizada a página principal no ecrã é possível por intermédio das teclas de navegação realizar as seguintes operações: Para que o seu Cronotermostato fique operativo: •... -
Seite 141: Deslocar Os Modos
Flush mounting chronothermostat 1.2.4 Deslocar os modos 1.2.6 Modificar o modo Manual Quando se estiver a visualizar o Screen saver (ou estiver desligado) no ecrã • Utilize as teclas para seleccionar o modo “Manual”. do Cronotermostato, se qualquer tecla for pressionada será visualizado •... -
Seite 142: Modificar O Modo Temporização
1 Introdução e funções de base 1.2.8 Modificar o modo Temporização 1.2.11 Substituição das pilhas • Utilize as teclas para seleccionar o modo “Temporização”. Quando se visualizar o seguinte símbolo no ecrã, será necessário substituir as pilhas. Se lampejar o dispositivo não está a funcionar e as •... - Seite 143 Flush mounting chronothermostat Descrizione Menu das Configurações...
-
Seite 144: Personalizações
2 Personalizações 2.1 Menu das Configurações • Pressione a tecla OK para confirmar. O menu das configurações permite-lhe personalizar alguns parâmetros ou modos de funcionamento do Cronotermostato. • Seleccione o nível da temperatura com as teclas • Programe o valor da temperatura desejado com as teclas P R I N C I P A L •... -
Seite 145: Configurar A Unidade De Medida Da Temperatura
Flush mounting chronothermostat 2.1.5 Configurar a unidade de medida da temperatura 2.1.8 Seleccionar o Screen Saver Configure a unidade de medida da temperatura, seleccionando entre Seleccione o que visualizar no ecrã do Cronotermostato em condições graus Celsius ou Fahrenheit (predefinido Celsius). de pausa (predefinido Temp/data/hora). -
Seite 146: Seleccionar A Regulação Da Temperatura
2 Personalizações 2.1.10 Seleccionar a Regulação da temperatura 2.1.11 Ajuste da sonda térmica Esta configuração permite-lhe escolher a tipologia de regulação da Esta configuração permite-lhe ajustar a medida quer da sonda interna temperatura em função do tipo de instalação. quer da sonda externa. 1: Standard predefinido (escolha aconselhada) •... -
Seite 147: Seleccionar A Função Da Sonda Externa
Flush mounting chronothermostat 2.1.12 Seleccionar a função da Sonda Externa 2.1.13 Visualizar/ restabelecer as Horas de ligação Seleccione a função da sonda externa (predefinida Desactivada). Com esta função pode visualizar/restabelecer as horas de funcionamento da instalação. Pode seleccionar: 1: Desactivada - a sonda não será lida •... -
Seite 148: Programação
3 Programação... - Seite 149 Flush mounting chronothermostat Descrizione Menu programação...
-
Seite 150: Menu Programação
3 Programação 3.1 Menu programação 3.1.1 Mudar o nome de um Programa Semanal Permite modificar /programar os perfis diários dos 3 programas semanais Com esta função pode personalizar o nome do programa (13 caracteres para o modo de funcionamento (Verão/Inverno) seleccionado. Dentro dos ao máximo) programas é... - Seite 151 Flush mounting chronothermostat Ferramentas de modificação do perfil diário Copiar um perfil diário Copiar a programação de um dia para o outro. Informações visualizadas no ecrã: • Seleccione o dia em que copiar o perfil com as teclas • Seleccione a função Copiar de com as teclas •...
- Seite 152 3 Programação Existem dois modos de funcionamento: Criar um perfil diário novo • DESLOCAMENTO Aconselhamos-lhe seguir passo a passo o método descrito neste Caracterizado pelo cursor em forma de “flecha”, permite-lhe, utili- exemplo, como instrumento útil para familiarizar com os modos de zando as teclas ...
- Seite 153 Flush mounting chronothermostat Método: S E G U N D A - F E I R A S E G U N D A - F E I R A S E G U N D A - F E I R A 0 0 : 0 0 7 .
- Seite 154 3 Programação S E G U N D A - F E I R A S E G U N D A - F E I R A S E G U N D A - F E I R A 2 2 : 0 0 2 2 .
-
Seite 155: Copiar Um Programa Semanal
Flush mounting chronothermostat 3.1.3 Copiar um programa Semanal 3.1.5 Eliminar um programa Semanal Esta função permite-lhe copiar um programa semanal em um outro. Por Esta função permite-lhe eliminar um programa personalizado e restabelecer exemplo, copiar o Programa 1 (configurado previamente na fábrica) as configurações predefinidas. - Seite 157 فهرس 1 المقدمة والوظائف األساسية 3.1.2 تعيين التاريخ والوقت 4.1.2تعيين التوقيت الصيفي 1.1 معلومات عامة 5.1.2 تعيين وحدة قياس درجة الحرارة 1.1.1 الواجهة األمامية 6.1.2 تمكين / إلغاء تمكين التحكم عن ب ُ عد 2.1.1شاشة العرض 7.1.2 ضبط تباين الشاشة 3.1.1 قائمة الرموز 8.1.2 اختيار شاشة التوقف ! 2.1 منظم الحرارة القابل للبرمجة الخاص بك: استخدمه على الفور 9.1.2 اختيار اللغة 01.1.2 اختيار ضبط درجة الحرارة 1.2.1 التنشيط ألول مرة 11.1.2 معايرة الحس َّ اس الحراري 2.2.1 أزرار التنقل 21.1.2 اختيار وظيفة الحس َّ اس الخارجي 31.1.2 عرض / إعادة ضبط أوقات التشغيل 3.2.1عرض وضع التشغيل 41.1.2 إعادة ضبط منظم الحرارة القابل للبرمجة 4.2.1 التمرير بين األوضاع 3 البرمجة 5.2.1 تعديل الوضع األسبوعي 1.3 قائمة البرمجة 6.2.1 تعديل الوضع اليدوي 1.1.3 إعادة تسمية برنامج أسبوعي 7.2.1 تعديل وضع اإلجازات 2.1.3 تعديل برنامج أسبوعي 8.2.1 تعديل الوضع الموقوت 3.1.3 نسخ برنامج أسبوعي 9.2.1 تعيين الوضع المضاد للتجمد...
- Seite 158 1 المقدمة والوظائف األساسية...
- Seite 159 Flush mounting chronothermostat Descrizione معلومات عامة !منظم الحرارة القابل للبرمجة الخاص بك: استخدمه على الفور...
- Seite 160 1 المقدمة والوظائف األساسية 1.1 معلومات عامة 1.1.1 الواجهة األمامية منظم الحرارة القابل للبرمجة 1544 هو جهاز مدمج مالئم لالستخدام في منظومات التدفئة والتكييف، ويسمح من خالل إمكانيات مختلفة للبرمجة بالقيام بضبط درجة الحرارة لكل ساعة من ساعات اليوم ولجميع أيام األسبوع .بطريقة مختلفة ي ُ مكن اختيار استخدام برنامج قياسي (محفوظ بالفعل ولكن قابل للتعديل وفقً ا .الحتياجات الم ُ ستخدم) أو خلق برنامج جديد من خالل إجراء برمجة بسيط تعرض شاشة كبيرة بإضاءة خلفية البرنامج الم ُ عد وحالة المنظومة ودرجة حرارة .المكان في أي وقت من األوقات منظم الحرارة القابل للبرمجة مكون من قاعدة للتوصيالت الكهربائية بالمنظومة، ومن واجهة أمامية قابلة لإلزالة للسماح للم ُ ستخدم بالقيام بعمليات .البرمجة واستبدال البطاريات بطريقة أكثر راحة 1 - شاشة عرض رسومية: تعرض الرسائل التي توجه عمليات البرمجة وحالة .المنظومة 2 - أزرار االختيار: عند عرض الصفحة الرئيسية، تسمح بالتمرير بين أوضاع القاعدة .التشغيل؛ وفي داخل القوائم، عند وجودها، تسمح باختيار الوظائف ": للدخول إلى القائمة الرئيسية وتأكيد االختيار المعروض أو البياناتOK" 3 - زر .التي تم إدخالها .4 - الحس َّ اس: يقوم بقياس درجة حرارة المكان الواجهة األمامية ": إللغاء االختيار والعودة إلى الصفحة السابقة؛ وعند االستمرار فيC" 5 - الزر القابلة لإلزالة .الضغط عليه، يتم الرجوع إلى صفحة البداية 6 - أزرار التمرير: عند عرض الصفحة الرئيسية، تسمح بتعديل درجة الحرارة المضبوطة؛ وداخل القوائم، تسمح بالتمرير داخل قائمة العناصر الموجودة...
- Seite 161 Flush mounting chronothermostat 2.1.1 شاشة العرض اليدوي :أثناء التشغيل المعتاد، تعرض الشاشة الرسومية المعلومات األساسية التالية أيقونة (اليد) الخاصة بالوضع اليدوي حالة منظومة اإلجازات الصيف / الشتاء الحمولة العاملة درجة الحرارة المحددة أيقونة الوضع المضاد للتجمد أو الحماية الحرارية ووقت .وتاريخ انتهاء برنامج اإلجازات الموقوت البرنامج درجة الحرارة األسبوعي الم ُ قاسة أيقونة الوضع اليدوي وعدد الساعات والدقائق الباقية حتى .نهاية البرنامج الموقوت النمط اليومي المضاد للتجمد أيقونة الوضع المضاد للتجمد (الشتاء) أو الحماية الحرارية .)(الصيف التاريخ الوقت إيقاف التشغيل .أيقونة وضع إيقاف التشغيل 3.1.1 قائمة الرموز إذا كان منظم الحرارة القابل للبرمجة متصال بحس َّ اس خارجي، والوظيفة المعدة :وفقً ا لوضع التشغيل الم ُ ختار، تتميز شاشة العرض بالرموز التالية هي "درجة الحرارة الخارجية"، يتم عرض األيقونة ذات الصلة على الشاشة. كل ثانيتين يتبدل (في نفس الموضع) عرض درجة الحرارة الخارجية مع درجة حرارة...
- Seite 162 1 المقدمة والوظائف األساسية 2.1 منظم الحرارة القابل للبرمجة الخاص بك: استخدمه 2.2.1 أزرار التنقل !على الفور عندما تعرض الشاشة الصفحة الرئيسية، ي ُ مكن استخدام أزرار التنقل للقيام :بالعمليات التالية 1.2.1 التنشيط ألول مرة :لتشغيل منظم الحرارة القابل للبرمجة .• قم باختيار لغة التشغيل .• قم بتعيين التاريخ / الوقت • يتم ضبط منظم الحرارة القابل للبرمجة بشكل تلقائي على التشغيل الشتوي .1 والوضع األسبوعي - البرنامج .يظهر على الشاشة االختيار الم ُ عد في الوقت الحالي (إعدادات المصنع هي اللغة اإليطالية .• باستخدام األزرار ##، ي ُ مكنك التنقل في القائمة واختيار اللغة . للتأكيدOK • اضغط على الزر بعد التأكيد، ينتقل منظم الحرارة القابل للبرمجة تلقائي ً ا إلى قائمة إعداد التاريخ . للدخول إلى القائمة الرئيسية - التأكيد O K الزر .والوقت . لإللغاء والعودة إلى الوضع السابق C الزر .• قم بتعيين الوقت والتاريخ باستخدام األزرار: ## لزيادة / خفض الرقم : وفقً ا للوضع الم ُ عد األزرار .بعد االختيار، يقوم ## بالتنقل بين أرقام الوقت والتاريخ األسبوعي - اليدوي - الموقوت: زيادة / خفض درجة الحرارة الحالية؛...
- Seite 163 Flush mounting chronothermostat 4.2.1 التمرير بين األوضاع 6.2.1 تعديل الوضع اليدوي عندما تعرض شاشة منظم الحرارة القابل للبرمجة شاشة التوقف (أو تكون غير ." الختيار الوضع "اليدوي • استخدم األزرار .عاملة) وبالضغط على أي زر، يتم عرض وضع التشغيل المضبوط . لزيادة أو خفض قيمة درجة الحرارة التي تم تعيينها • استخدام األزرار : لعرض األوضاع ا أل ُ خرى • استخدم األزرار .OK • قم بالتأكيد بالضغط على الزر .األسبوعي واليدوي واإلجازات والموقوت والمضاد للتجمد وإيقاف التشغيل أو يومض اسم الوضع الم ُ ختار لإلشارة إلى حالة التعديل: إذا لم يتم التأكيد ") ومرت 01 ثوان ٍ من عدم التنشيط بعد آخر ضغطة علىOK" (بالضغط على الزر . لإللغاء والعودة إلى الوضع السابقC استخدم الزر .الزر، يتم إلغاء العملية وعرض الصفحة الرئيسية بالوضع الحالي .يعمل منظم الحرارة القابل للبرمجة اآلن وفقً ا للوضع الجديد الذي تم تعيينه :لتعيين وضع التشغيل المعروض .OK • قم بالتأكيد بالضغط على الزر 7.2.1 تعديل وضع اإلجازات .يعمل منظم الحرارة القابل للبرمجة اآلن وفقً ا للوضع الجديد .وفقً ا للوضع الم ُ ختار، ي ُ مكن استخدام وظائف التعديل الموضحة أدناه ." الختيار الوضع "اإلجازات...
- Seite 164 1 المقدمة والوظائف األساسية 8.2.1 تعديل الوضع الموقوت 11.2.1 استبدال البطاريات ." الختيار الوضع "الموقوت • استخدم األزرار التالي، من الضروري القيام باستبدال عندما يظهر على الشاشة الرمز . لزيادة أو خفض قيمة درجة الحرارة التي تم تعيينها • استخدام األزرار .البطاريات. إذا كانت تومض، فالجهاز ال يعمل ويجب تغيير البطاريات .OK • قم بالتأكيد بالضغط على الزر .تظهر إشارة أن البطارية ضعيفة حوالي شهر قبل أن تفرغ البطاريات بالكامل بعد التأكيد، يتم عرض قائمة إعداد الوضع الموقوت؛ .أثناء استبدال البطاريات، تبقى البيانات التي تم إدخالها محفوظة في الذاكرة : لتعيين درجة الحرارة والساعات / الدقائق و • استخدام األزرار . لزيادة / خفض الرقم الم ُ ختار نوصي بعد استبدال البطاريات بالتأكد . لالنتقال من درجة الحرارة إلى الساعات / الدقائق من تاريخ ووقت منظم الحرارة القابل .OK • قم بالتأكيد بالضغط على الزر .للبرمجة تعرض الشاشة أيقونة الوضع اليدوي والوقت المتبقي حتى انتهاء البرنامج .الموقوت .يعمل منظم الحرارة القابل للبرمجة اآلن وفقً ا للوضع الجديد الذي تم تعيينه 9.2.1 تعديل الوضع المضاد للتجمد ." الختيار الوضع "المضاد للتجمد • استخدم األزرار .OK • قم بالتأكيد بالضغط على الزر تعرض الشاشة أيقونة الوضع المضاد للتجمد للتشغيل الشتوي، أو أيقونة وضع...
- Seite 165 Flush mounting chronothermostat Descrizione 1.2 قائمة اإلعدادات...
- Seite 166 2 التخصيصات 1.2 قائمة اإلعدادات تسمح لك قائمة اإلعدادات بتخصيص بعض القيم الثابتة أو أوضاع تشغيل ." قم باختيار عنصر "درجة الحرارة • باستخدام األزرار .منظم الحرارة القابل للبرمجة . للتأكيدOK • اضغط على الزر . قم باختيار مستوى درجة الحرارة • باستخدام األزرار M A I N S C R E E N . قم بتعيين قيمة درجة الحرارة المرغوب فيها • باستخدام األزرار M o d e للخروجC للتأكيد والعودة إلى الصفحة السابقة أو الزرOK • اضغط على الزر P r o g r a m m i n g .من القائمة والعودة إلى الصفحة السابقة الغي ً ا التعديل S e t u p 1.1.2 إعداد التشغيل الصيفي / الشتوي...
- Seite 167 Flush mounting chronothermostat 5.1.2 تعيين وحدة قياس درجة الحرارة 8.1.2 اختيار شاشة التوقف قم بتعيين وحدة قياس درجة الحرارة باالختيار بين الدرجة المئوية أو الفهرنهايت قم باختيار العناصر التي يتم عرضها على شاشة منظم الحرارة القابل للبرمجة .)(الوضع االفتراضي هو الدرجة المئوية .)في حاالت الراحة (الوضع االفتراضي درجة الحرارة / التاريخ / الوقت ." قم باختيار عنصر "الدرجات • باستخدام األزرار :ي ُ مكنك اختيار . للتأكيدOK • اضغط على الزر .1: فقط درجة الحرارة. - درجة الحرارة الم ُ قاسة .تعرض الشاشة الصفحة التي تشير إلى وحدة القياس التي تم تعيينها .2: درجة الحرارة / التاريخ / الوقت - درجة الحرارة الم ُ قاسة والتاريخ / الوقت . لتغيير وحدة القياسOK • اضغط على الزر .3: الرئيسية - الصفحة الرئيسية كاملة . للخروج من القائمة والعودة إلى الصفحة السابقةC • اضغط على الزر .4: غير عاملة - الشاشة غير عاملة بالكامل ." قم باختيار عنصر "شاشة التوقف • باستخدام األزرار . للتأكيدOK • اضغط على الزر 6.1.2 تمكين / إلغاء تمكين التحكم عن ب ُ عد .تعرض الشاشة االختيار الم ُ عد في الوقت الحالي . قم باختيار شاشة التوقف • باستخدام األزرار قم بتمكين / إلغاء تمكين التحكم عن ب...
- Seite 168 2 التخصيصات 01.1.2 اختيار ضبط درجة الحرارة 11.1.2 معايرة الحس َّ اس الحراري .يسمح لك هذا اإلعداد باختيار نوع ضبط درجة الحرارة وفقً ا لنوع المنظومة .يسمح لك هذا اإلعداد بمعايرة قياس سواء الحس َّ اس الداخلي أو الخارجي .)1: القياسي االفتراضي (االختيار الموصى به ." قم باختيار عنصر "المعايرة • باستخدام األزرار 2: التناسبي 5 دقائق للمنظومات ذات القصور الذاتي القليل (وحدة الملف . للتأكيدOK • اضغط على الزر .)المروحية ،إذا كان الحس َّ اس الخارجي م ُ ع د ً ا كحس َّ اس لألرضية أو لدرجة الحرارة الخارجية 3: التناسبي 01 دقائق للمنظومات ذات القصور الذاتي المتوسط (مشعات .يتم عرض اختيار الحس َّ اس .)األلومنيوم . قم باختيار الحس َّ اس • باستخدام األزرار 4: التناسبي 02 دقيقة للمنظومات ذات القصور الذاتي العالي (مشعات الحديد . للتأكيدOK • اضغط على الزر .)الصلب إذا كان الحس...
- Seite 169 Flush mounting chronothermostat 21.1.2 اختيار وظيفة الحس َّ اس الخارجي 31.1.2 عرض / إعادة ضبط أوقات التشغيل .)قم باختيار وظيفة الحس َّ اس الخارجي (الوضع االفتراضي هو الغير نشط .بهذه الوظيفة، ي ُ مكنك مشاهدة / إعادة ضبط أوقات تشغيل المنظومة :ي ُ مكنك اختيار ." قم باختيار عنصر "أوقات التشغيل • باستخدام األزرار .1: غير نشط - ال تتم قراءة الحس َّ اس . للتأكيدOK • اضغط على الزر 2: درجة حرارة المكان - يقيس درجة حرارة المكان بدال من الحس َّ اس الداخلي .تعرض الشاشة أوقات تشغيل المنظومة .لمنظم الحرارة القابل للبرمجة للتأكيد والعودة إلى الصفحة السابقة أو إلعادة ضبطOK • اضغط على الزر 3: األرضية - يقيس درجة حرارة األرضية ويوقف تشغيل الحمولة إذا تجاوزت القيمة ." الختيار وظيفة "إعادة الضبط الع د َّ اد استخدم األزرار .الم ُ عدة . للعودة إلى الصفحة السابقةC للتأكيد والزرOK • اضغط على الزر 4: درجة الحرارة الخارجية - يقيس درجة الحرارة الخارجية؛ وإذا تم اختيارها، يتبدل...
- Seite 170 3 البرمجة...
- Seite 171 Flush mounting chronothermostat Descrizione قائمة البرمجة...
- Seite 172 3 البرمجة 1.3 قائمة البرمجة 1.1.3 إعادة تسمية برنامج أسبوعي تسمح بتعديل / برمجة األنماط اليومي لثالثة من البرامج األسبوعي لوضع .)باختيار هذه الوظيفة، ي ُ مكنك تخصيص اسم البرنامج (حد أقصى 31 حر ف ًا التشغيل (الصيفي / الشتوي) الم ُ ختار. داخل البرامج، من الم ُ مكن ضبط درجات . قم باختيار البرنامج الم ُ راد إعادة تسميته • باستخدام األزرار .حرارة مختلفة على مدار الـ42 ساعة ولكل يوم من أيام األسبوع . للتأكيدOK • اضغط على الزر .الـ"الرنامج 1" هو االفتراضي، ولكن ي ُ مكن تعديله :• اكتب االسم الجديد الذي تريد تعيينه للبرنامج باستخدام األزرار :قم باختيار البرنامج األسبوعي الم ُ راد تخصيصه . لتحريك المؤشر . للتنقل بين األحرف . لإللغاءC للحفظ أو الزرOK • اضغط على الزر M A I N S C R E E N ) للتنقل بين األحرف األبجدية الرقمية (فقط األحرف الكبيرة...
- Seite 173 Flush mounting chronothermostat نسخ نمط يومي أدوات تعديل النمط اليومي .قم بنسخ البرمجة من يوم إلى آخر :المعلومات المعروضة على الشاشة . قم باختيار اليوم الم ُ راد نسخ النمط فيه • باستخدام األزرار . وظيفة النسخ من • اختر . للتأكيدOK • اضغط على الزر .يوم من أيام األسبوع . قم باختيار اليوم الم ُ راد نسخه • باستخدام األزرار . للتأكيدOK • اضغط على الزر M O N D A Y الساعة المرادفة لموضع 0 0 : 0 0 1 8 . 0 ° C .المؤشر...
- Seite 174 3 البرمجة :هناك طريقتان للعمل خلق نمط يومي جديد • التمرير نوصيك باتباع اإلجراء الموضح في هذا المثال خطوة بخطوة لكونه أداة مفيدة .للتعرف على طريقتي العمل "التعديل" و"التمرير" واستخدام أزرار التنقل بتحريك تتميز بمؤشر على شكل "سهم"، وتسمح لك مستخدم ً ا األزرار مثال: خلق نمط درجة الحرارة اليومي التالي ليوم "االثنين" لبرنامج "اإلعداد .المؤشر على طول المحور الزمني دون إجراء أي تعديل على النمط اليومي ."الشتوي M O N D A Y 0 0 : 0 0 1 8 . 0 ° C )18°C )T1 - 1 - من الساعة 00:00 م إلى الساعة 00:60 ص )22°C )T3 - 2 - من الساعة 00:60 ص إلى الساعة 00:90 ص .المؤشر السهم )20°C )T2 - 3 - من الساعة 00:90 ص إلى الساعة 03:40 م )22°C )T3 - 4 - من الساعة 03:40 م إلى الساعة 00:01 م )20°C )T2 - 5 - من الساعة 00:01 م إلى الساعة 00:21 ص مستويات درجات الحرارة الم ُ عدة • التعديل...
- Seite 175 Flush mounting chronothermostat :اإلجراء M O N D A Y M O N D A Y M O N D A Y 0 0 : 0 0 7 . 0 ° C 0 0 : 0 0 T 1 1 8 . 0 ° C 0 6 : 0 0 1 8 .
- Seite 176 3 البرمجة M O N D A Y M O N D A Y M O N D A Y 2 2 : 0 0 2 2 . 0 ° C 1 6 : 3 0 2 0 . 0 ° C 1 6 : 3 0 T 3 2 2 .
- Seite 177 Flush mounting chronothermostat 3.1.3 نسخ برنامج أسبوعي 5.1.3 حذف برنامج أسبوعي تسمح لك هذه الوظيفة بنسخ برنامج أسبوعي في برنامج آخر. على سبيل تسمح لك هذه الوظيفة بحذف برنامج م ُ خصص واستعادة اإلعدادات الم ُ حددة .المثال، قم بنسخ البرنامج 1 (الم ُ عد م ُ سبقً ا في المصنع) في اإلعداد الشتوي .م ُ سبقً ا . قم باختيار البرنامج الم ُ راد النسخ فيه • باستخدام األزرار . قم باختيار البرنامج الم ُ راد حذفه • باستخدام األزرار . قم باختيار وظيفة النسخ من باستخدام األزرار . قم باختيار وظيفة الحذف • باستخدام األزرار . للتأكيدOK • اضغط على الزر . للتأكيدOK • اضغط على الزر . قم باختيار البرنامج الم ُ راد نسخه • باستخدام األزرار...
- Seite 178 Note...
- Seite 179 Flush mounting chronothermostat Note...
- Seite 180 BTicino SpA reserves at any time the right to modify the contents of this booklet and to communicate, in any form and modality, the changes brought to the same.