Exsys EX-1412 Anleitung
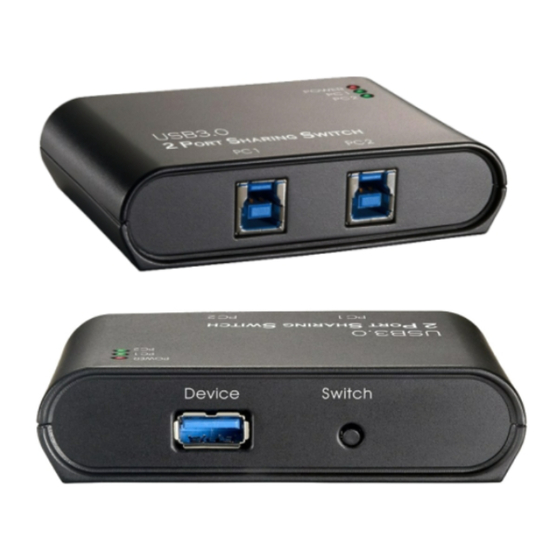
CONNECTORS
USB 3.0 A-Port:
USB 3.0 B-Port:
HARDWARE INSTALLATION
Please note the following installation instructions. Because there are large differences between the
PC's, we can give you only a general installation instructions for the EX-1412. Please refer your
computer's reference manual whenever in doubt.
1.
Connect the USB 3.0 cables to the USB B-Ports at the Hub.
2.
Now connect the other end from the USB 3.0 cables (A-Plug) to the A-Ports at your PC's.
3.
Now connect the USB device to the USB A-Port at the EX-1412.
4.
If you want to switch between the connected PC's, you need to press the switch on the
back at the EX-1412 or use the „Hot-Key Function" (see page 3) at your PC. The status
LED's shows which PC is currently actively connected.
DRIVER INSTALLATION
All Operating Systems
After the hardware installation the OS will recognize the device automatically and install the
drivers.
CHECK INSTALLED DRIVER
For the EX-1412 no drivers are required and therefore you can not check in Device Manager
whether the EX-1412 was installed correctly.
To check whether the EX-1412 has been correctly installed, please connect a USB device to
the EX-1412 and if this is correctly recognized, the EX-1412 are functional.
5
HOT-KEY FUNCTION
If you do not want to leave your PC to press the switch, you can also switch the EX-1412 by
using the "Hot-Key Function" from your PC. To do this, you must press the Scroll Lock button
on your PC within 2 seconds.
Attention!
Attention!
1. The „Hot-Key Function" will not work when the other PC is in sleep mode or turn off. The PC
Never plug in with
need to be fully available!
force or in wrong
2. If you want to switch and there is a hard disk or similar connected, first make sure that the
direction.
other PC currently has no access to the device!
CLEANING
For cleaning please use only a dry fluff less cloth and remove the dirt with gently pressure. In
the area of the connectors please make sure that no fibres from the cloth remain in the connect-
ors. Attention! Never use a moist or wet cloth for cleaning!
Attention!
Never plug in with
force or in wrong
direction.
AUFBAU
BESCHREIBUNG & TECHNISCHE DATEN
Die Die EX-1412 ist ein USB 3.0 Switch für 1 Endgerät. Die EX-1412 ist mit 1 Port für Endgerä-
te und 2 Ports für den Anschluss an die PC's ausgestattet. Er unterstützt alle USB Anschlüsse
von 1.1 bis 3.1. Mit der EX-1412 ist es auf einfachste Weise möglich mit 2 PC's auf ein USB
Endgerät zuzugreifen. Es kann ganz einfach und schnell zwischen den PC's gewechselt wer-
den, indem man den auf der Rückseite angebrachten Switch betätigt oder die „Hot-Key Funkti-
on" von seinem PC aus, betätigt. Die EX-1412 gewährleistet so eine sichere Datenübertragung
und exzellente Performance von bis zu 5Gbit/s! Er unterstützt Bus Powered Modus.
Kompatibilität:
Betriebssysteme:
Anschlüsse:
Lieferumfang:
Zertifikate:
6
Anleitung
Vers. 1.1 / 20.06.2018
Betriebs LED
1x USB 3.0 A-Buchse für Endgeräte
USB 1.1, 2.0, 3.0 & 3.1
Alle Betriebssysteme
1x USB 3.0 A-Buchse, 2x USB 3.0 B-Buchse
EX-1412, Anleitung
1
EX-1412
Status LED's
2x USB 3.0 B-Buchse
PC-Anschluss 1 & 2
Umschalter

Verwandte Anleitungen für Exsys EX-1412


Inhaltszusammenfassung für Exsys EX-1412
- Seite 1 EX-1412 CONNECTORS HOT-KEY FUNCTION If you do not want to leave your PC to press the switch, you can also switch the EX-1412 by USB 3.0 A-Port: Anleitung using the "Hot-Key Function" from your PC. To do this, you must press the Scroll Lock button on your PC within 2 seconds.
- Seite 2 PC‘s gibt, können wir Ihnen nur eine generelle Anleitung zum Einbau der EX-1412 geben. Bei provides 1 port for USB device and 2 uplink port for PC’s. With the EX-1412 it is possible to Unklarheiten halten Sie sich bitte an die Bedienungsanleitung Ihres Computersystems.