Herunterladen Inhalt Inhalt Diese Seite drucken
Inhaltsverzeichnis

Werbung

Verfügbare Sprachen
  • DE

Verfügbare Sprachen

  • DEUTSCH, seite 39
VIDEO SCALING SYSTEM
Informatics
User manUal
[ E N g l I s H ]

Werbung

Inhaltsverzeichnis
loading

Inhaltszusammenfassung für NDS ScaleOR

  • Seite 1 VIDEO SCALING SYSTEM Informatics User manUal [ E N g l I s H ]...
  • Seite 3 © 2013 NDS Surgical Imaging, LLC. All rights reserved. Information in this document has been carefully checked for accuracy; however, no guarantee is given to the correctness of the contents. This document is subject to change without notice. NDSsi provides this information as reference only.
  • Seite 5: Inhaltsverzeichnis

    Tab 5 Startup ----------------------------------------------------- 8 Tab 6 Control ----------------------------------------------------- 9 Menu Overview ----------------------------------------- 9 ScaleOR Setup ----------------------------------------- 10 DVI and SDI Picture Menu ----------------------- 10 VGA, RGBS, YPbPr, and SOG Menu ------------ 11 Color Menu------------------------------------------- 12 Setup Menu ------------------------------------------ 13...
  • Seite 6: Warnings And Cautions

    Warnings and Cautions This symbol alerts the user that important information regarding the installation and / or operation of this equipment follows. Information preceded by this symbol should be read carefully in order to avoid damaging the equipment. This symbol warns user that un-insulated voltage within the unit may have sufficient magnitude to cause electrical shock.
  • Seite 7: Declaration Of Conformity

    NDS neither assumes nor authorizes any person to assume for it any other liabilities in conjunction with and/or related to the sale and/or use of its products. To ensure proper use, handling and care of NDS products, customers should consult the product specific literature, instruction manual, and/or labeling included with the product or otherwise available.
  • Seite 8: About This Manual

    About This Manual This manual is designed to assist the user with installation, setup and operation of the ScaleOR and its associated displays. A list of displays that may be used with the ScaleOR is in the Compatible Displays section under General Information on the following page.
  • Seite 9: Scaleor Overview

    4). General Information Installation: ScaleOR units may be stacked on a equipment carrier, a surgical cart or mounted in a standard 19” rack. Ensure that the air vents are not blocked. Power Supply: The provided power supply, Ault and SL Power Electronic Corp Model: MENB1030A1200C02 12VDC, includes 4 interchangeable wall plug adapters.
  • Seite 10: Connector Panel

    The illustration shows the switch in its ON state. When the ScaleOR is turned on the blue ring flashes at the rate of 5 flashes per second for 15 seconds then, becomes steady if a video signal is detected. If a...
  • Seite 11: Output Mode Switch Settings

    1280x1024/60.02 SXGA 1280x1024/75.02 SXGA 1280x1024/85.02 SXGA 1360X768/60.01WXGA 1366X768/59.79 WXGA 1440X900/59.89 WXGA 1600X1200/60 UXGA 1680X1050/59.95 WSXGA 1920x1200/50 WUXGA 1920x1200/60 WUXGA Use Menu * Note: To set the output mode from the ScaleOR’s OSM, all switches must be set to Off .
  • Seite 12: Power Supply And Wall Adapters

    Power Supply and Wall Adapters The power supply is shown with the US wall adapter installed. To exchange the adapter, proceed as follows: Place the power supply on your work surface as shown. Press and hold the button labeled PUSH. Twist the adapter 1/8 turn toward the OPEN arrow, and lift it off the power supply.
  • Seite 13: Removable Input Modules

    OSM / RS-232 Module Removal and Installation The ScaleOR must be turned off prior to installing or replacing the input module. Input Module Removal: Use a number 1 Phillips screwdriver to loosen, but not remove, the screws located on the left and right sides of the module’s mounting plate.
  • Seite 14: System Configuration Example

    System Configuration Example ▲ ▲ DVI Out SDI Out ▲ ◄ ► SDI, DVI, VGA, or S-Video / Composite Source Optional PC control...
  • Seite 15: Startup

    ScaleOR’s input is displayed on the monitor. If the ScaleOR has been turned on for more than 15 seconds and a video signal is not detected the blue ring is will flash at the rate of 1 flash per second.
  • Seite 16: Control

    Control A 4 button keypad, located below and to the right of the ScaleOR logo, allows the user to make adjustments to various ScaleOR parameters using the On Screen Menu (OSM) system. Menu System Overview Press the MENU button once to open the OSM. The input and output resolution are shown at the top of the menu.
  • Seite 17: Scaleor Setup

    ScaleOR Setup DVI and SDI Picture Menu Sharpness: Press fi or fl to adjust the sharpness (focus) of the displayed image. Scaling (Graphics): This parameter is enabled when the input signal is not 16:9, not interlaced, and not 480P or 576P.
  • Seite 18: Vga, Rgbs, Ypbpr, And Sog Menu

    Select using fi or fl buttons. SmartSync™ / Alternative Modes On initialization NDS’ proprietary SmartSync technology examines the incoming signal and automatically displays the video image in its proper format. To run SmartSync highlight the SmartSync / Alternative Modes parameter and press the fi button.
  • Seite 19: Color Menu

    Color Menu Brightness: Press the fi or fl button to adjust brightness. Contrast: Press the fi or fl button to adjust contrast. Red, Green, Blue: Press the fi or fl button to increase or decrease the intensity of the selected color. Saturation (Video): This parameter is enabled only when the input is 16:9, 480P, 576P, or interlaced.
  • Seite 20: Setup Menu

    Notes: 1. This parameter is not available when a DVI or 3G - SDI input module is installed in the ScaleOR. 2. If this parameter is “grayed” out when the VGA module is installed, then the VGA module has been preconfigured to accept only the format that appears in blue.
  • Seite 21: Modes Menu

    Modes Menu The available output modes are shown when the Modes tab is selected. If the Modes tab is selected using the fl button, the tab’s legend changes to Modes 0-15 and modes 0 through 15 are displayed. Pressing the fl button a second time, changes the tab’s legend to Modes 16-31 and modes 16 through 31 are displayed.
  • Seite 22: Output Modes Table

    To restore the Factory Defaults turn the ScaleOR off, press and hold the MENU button. While holding the MENU button, turn the unit on. After approximately 10 seconds the “Restoring Factory Defaults” message appears on the monitor connected to the ScaleOR.
  • Seite 23: Serial Port Setup And Test

    Serial Port Setup and Test Hardware Setup Turn the ScaleOR on. Connect your PC to the ScaleOR using a USB to Mini 5 USB (NDS P/N 35Z0047) or equivalent cable. Device Manager Open the PC’s Device Manager, and select Ports (COM & LPT). Find the USB Serial Port (COMx) entry.
  • Seite 24: Troubleshooting And Test Section

    Wall socket: Some wall sockets have on / off switches built in. If the socket you are using has a built in switch, verify that is in the on position. Mitigation: Bypass the ScaleOR by connecting the output of the video source directly to a monitor. Confidence test...
  • Seite 25: Drawing And Dimensions

    Drawings and Dimensions...
  • Seite 26: Connectors And Pin Outs

    Connectors and Pin Outs Input Connectors DVI Input and Output Connectors DVI-D* Digital only. 1 RED 6 GND RED 11 N. C. * Compliant with DVI 1.0 2 GREEN 7 GND GREEN 12 DDC_SDA 3 BLUE 8 GND BLUE 13 HORIZ SYNC PIN# SIGNAL PIN# SIGNAL 4 N.C.
  • Seite 27: Specifications

    Operating Altitude 2,000 m (6,600 ft) Storage Temperature -20 to +50 C (-4 to +122 Storage Humidity 5 to 85% RH Storage Altitude 10,000 m (33,000 ft) Notes: a. Specifications are subject to change without notice. Contact NDS for recent specifications.
  • Seite 28 SDI Supported Resolutions DVI Supported Resolutions Horizontal Vertical Vertical Horizontal Vertical Vertical Signal Parameter Supported Range Resolution Resolution Frequency Resolution Resolution Frequency Active Resolution 640 x 480 min to 1920 x 1200 max (pixels) (lines) (Hz) (pixels) (lines) (Hz) (Horizontal x Vertical 480i 29.97 1280...
  • Seite 29: Cleaning And Disinfecting Instructions

    Ethanol 80 % by volume Unacceptable solvents: MEK (Methyl Ethyl Ketone) Toluene Acetone Note: The acceptable cleaning and disinfecting materials listed above have been tested on NDS products and, when used as directed, do not harm the product’s finish and or its plastic components.
  • Seite 30: Electromagnetic Compatibility (Emc) Tables

    Electromagnetic Compatibility (EMC) Tables All medical electronic devices must conform to the requirements of IEC 60601-1-2. Precautions, adherences to the EMC guideline information provided in this manual and verification of all medical devices in simultaneous operation are required to ensure the electromagnetic compatibility and co- existence of all other medical devices prior to a surgical procedure.
  • Seite 31: Emc Tables

    EMC Tables Guidance and manufacturer’s declaration – electromagnetic emissions The product is intended for use in the electromagnetic environment specified below. The customer or the user of the product should assure that it is used in such an environment. Emissions Compliance Electromagnetic environment-- guidance The product uses RF energy only for its internal function.
  • Seite 32 EMC Tables Guidance and manufacturer’s declaration – electromagnetic immunity The product is intended for use in the electromagnetic environment specified below. The customer or the user of the product should assure that it is used in such an environment. Immunity test IEC 60601 test level Compliance level Electromagnetic environment –...
  • Seite 33 EMC Tables Recommended separation distances between portable and mobile RF communications equipment and the product The product is intended for use in an electromagnetic environment in which radiated RF disturbances are controlled. The customer or the user of the product can help prevent electromagnetic interference by maintaining a minimum distance between portable and mobile RF communications equipment (transmitters) and the product as recommended below, according to the maximum output power of the communications equipment.
  • Seite 36 Corporate Headquarters Europe Asia Pacific GSI Group Japan Corporation 5750 Hellyer Avenue Nijverheidscentrum 28 East Square Omori, San Jose, CA 95138 (USA) 2761 JP Zevenhuizen (ZH) 6-20-14 Minamioi, Shinagawa-ku Tel: 408 776 0085 The Netherlands Tokyo 140-0013, Japan Toll Free: 866 637 5237 Tel: + 31 180 63 43 56 ISO 9001:2008 and ISO 13485:2003;...
  • Seite 37 VIDEO SCALING SYSTEM Informatics BENUTZERHANDBUCH [ D E U T S C H ]...
  • Seite 39 © 2013 NDS Surgical Imaging, LLC. Alle Rechte vorbehalten. Die Informationen in diesem Dokument wurden sorgfältig auf ihre Richtigkeit überprüft; es wird jedoch keine Garantie für die Richtigkeit der Inhalte übernommen. Dieses Dokument kann ohne vorherige Ankündigung geändert werden. NDSsi stellt diese Informationen nur als Referenz zur Verfügung. Verweise auf Produkte anderer Anbieter bedeuten keine Empfehlung oder Billigung.
  • Seite 41 Systemkonfiguration (Beispiel)---------------------- 7 Abschnitt 5 Inbetriebnahme ----------------------------------------- 8 Abschnitt 6 Steuerung ------------------------------------------------- 9 Menü-Übersicht ----------------------------------------- 9 Einrichtung des ScaleOR ---------------------------- 10 DVI- und SDI-Bildmenü --------------------------- 10 VGA-, RGBS-, YPbPr- und SOG-Menü --------- 11 Farbmenü -------------------------------------------- 12 Konfigurationsmenü ------------------------------ 13 Modus-Menü ---------------------------------------- 14 Tabelle der Ausgabemodi ----------------------- 15 Zurücksetzen auf Werkseinstellungen ------- 15...
  • Seite 42: Warn- Und Vorsichtshinweise

    Warn- und Vorsichtshinweise Dieses Symbol zeigt an, dass eine wichtige Information zur Installation und/oder zum Betrieb des Geräts folgt. Die auf dieses Symbol folgenden Informationen müssen sorgfältig gelesen werden, um Schäden am Gerät zu vermeiden. Dieses Symbol weist darauf hin, dass nicht isolierte, Spannung führende Teile einen elektrischen Schlag verursachen könnten.
  • Seite 43: Konformitätserklärung

    Bedienung des Systems auf die Leistung des Produkts auswirken. NDS-Produkte gelten zwar als mit vielen Systemen kompatibel, die spezielle funktionale Implementierung durch Kunden kann jedoch variieren. Aus diesem Grunde muss vom Endabnehmer ermittelt werden, ob sich das Produkt für einen bestimmten Zweck oder eine bestimmte Anwendung eignet; dies wird nicht von NDS gewährleistet.
  • Seite 44: Über Diese Gebrauchsanweisung

    Über diese Gebrauchsanweisung Dieses Handbuch soll Sie bei der Installation, Einrichtung und Bedienung des ScaleOR und der zugehörigen Monitore unterstützen. Eine Liste von Monitoren, die mit dem ScaleOR verwendet werden können, finden Sie im Abschnitt Kompatible Monitore unter Allgemeine Informationen auf der folgenden Seite.
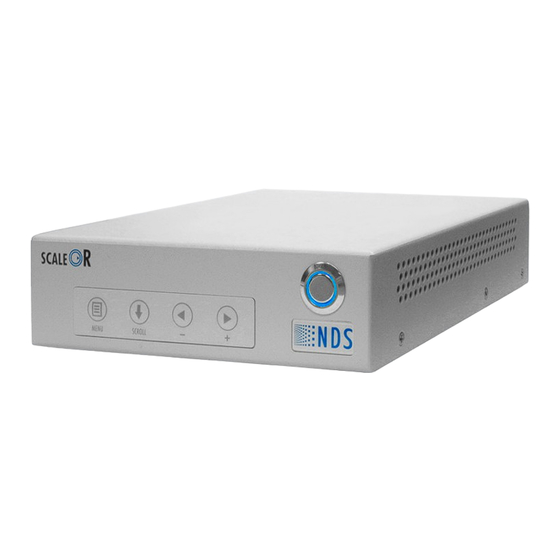
  • Seite 45: Übersicht Scaleor

    Ausstattungsmerkmal. Steuerung: Das ScaleOR lässt sich über folgende Elemente bedienen: 1. Die Tastatur an der Vorderseite des ScaleOR. Zur Benutzung der Tastatur muss das ScaleOR an einem Monitor angeschlossen sein. 2. PC über den ND-OS-Anschluss. Siehe Einrichten und Test der seriellen Schnittstelle auf Seite 16.
  • Seite 46: Anschlussfeld

    Stromeingang; nur das mitgelieferte Netzteil (12VDC) verwenden. Optionaler Glasfaserausgang Eingangsmodul, abgebildet ist das DVI-D-Modul. Auf Seite 6 sind alle Eingangsmodule abgebildet. Der ND-OS-Anschluss ermöglicht die Fernsteuerung des ScaleOR über serielle Befehle. Er wird außerdem für die Installation von BIOS-Upgrades verwendet. SDI- und DVI-Videoausgänge. Ausgabemodus-Schalter Ausgabemodus-Schalter Unterseite des Geräts ermöglichen die...
  • Seite 47: Einstellungen Ausgabemodus-Schalter

    1440X900/59,89 WXGA n. v. 1600X1200/60 UXGA n. v. 1680X1050/59,95 WSXGA n. v. 1920x1200/50 WUXGA n. v. 1920x1200/60 WUXGA n. v. Menü verwenden * Hinweis: Um den Ausgabemodus über das ScaleOR-OSM einstellen zu können, müssen alle Schalter auf Aus gestellt sein.
  • Seite 48: Netzteil Und Steckdosenadapter

    Netzteil und Steckdosenadapter Die Abbildung zeigt ein Netzteil mit montiertem Steckdosenadapter für die USA. Gehen Sie wie folgt vor, um den Adapter zu wechseln: Legen Sie das Netzteil wie abgebildet auf die Arbeitsfläche. Halten Sie die Taste mit der Aufschrift PUSH (DRÜCKEN) gedrückt. Drehen Sie den Adapter um eine 1/8 Umdrehung in Richtung OPEN (ÖFFNEN) und heben Sie ihn vom Netzteil ab.
  • Seite 49: Austauschbare Eingangsmodule

    Tabelle auf das Format des Eingangssignals ein. Aus- und Einbau des Moduls Das ScaleOR muss vor dem Einbau oder Austausch des Eingangsmoduls ausgeschaltet werden. Ausbau des Eingangsmoduls: Lösen Sie mit einem Kreuzschlitzschraubendreher PH1 die Schrauben auf der linken und der rechten Seite der Modul-Befestigungsplatte.
  • Seite 50: Systemkonfiguration (Beispiel)

    Systemkonfiguration (Beispiel) ▲ ▲ DVI-Ausgang SDI-Ausgang ▲ ◄ ► SDI, DVI, VGA oder S-Video/Composite-Quelle Optionale PC- Steuerung...
  • Seite 51: Inbetriebnahme

    Inbetriebnahme Schließen Sie einen kompatiblen Monitor an einen der Ausgänge des ScaleOR an. Schließen Sie eine Videoquelle an den Eingang des ScaleOR an. Drücken Sie den Netzschalter auf der Vorderseite des ScaleOR. Der blau beleuchtete Ring des Netzschalters blinkt 15 Sekunden lang und leuchtet dann durchgehend, sofern ein Videosignal erkannt wurde.
  • Seite 52: Steuerung

    Steuerung Über 4 Tasten unterhalb des ScaleOR-Logos kann der Benutzer verschiedene ScaleOR-Parameter im Bildschirmmenü (BSM) einstellen. Menü-Übersicht Drücken Sie die Taste MENU (MENÜ) einmal, um das zu öffnen. Oben im Menü ist die Eingangs- und die Ausgangs-Auflösung angegeben. Beim Öffnen des wird das Bildmenü...
  • Seite 53: Einrichtung Des Scaleor

    Einrichtung des ScaleOR DVI- und SDI-Bildmenü Schärfe: Drücken Sie fi bzw. fl, um die Schärfe (den Fokus) des angezeigten Bildes anzupassen. Skalierung (Grafik): Dieser Parameter ist aktiviert, wenn das Eingangssignal weder 16:9 noch interlaced noch 480P oder 576P ist. Vollbild = Vergrößert das Videobild, um den ganzen Bildschirm auszufüllen. Das Seitenverhältnis wird eventuell nicht korrekt dargestellt.
  • Seite 54 Taste fi bzw. fl. SmartSync™  / Alternative Modi Die spezielle NDS SmartSync-Technologie analysiert das Eingangssignal bei der Initialisierung und zeigt das Video automatisch im korrekten Format an. Um die SmartSync-Funktion zu aktivieren, markieren Sie den Parameter SmartSync / Alternative Modi und drücken Sie die Taste fi.
  • Seite 55: Farbmenü

    Farbmenü Helligkeit: Drücken Sie die Taste fi bzw. fl, um die Helligkeit einzustellen. Kontrast: Drücken Sie die Taste fi bzw. fl, um den Kontrast einzustellen. Rot, Grün, Blau: Drücken Sie die Taste fi bzw. fl, um die Intensität der ausgewählten Farbe einzustellen. Sättigung (Video): Dieser Parameter ist nur dann aktiviert, wenn das Eingangssignal 16:9, 480P, 576P oder interlaced ist.
  • Seite 56: Konfigurationsmenü

    Drücken Sie die Taste fi oder fl, um das Format an das Eingangssignal anzupassen. Hinweise: 1. Dieser Parameter ist nicht verfügbar, wenn ein DVI- oder 3G - SDI-Eingangsmodul im ScaleOR verbaut ist. 2. Wenn dieser Parameter bei installiertem VGA-Modul „ausgegraut" ist, wurde das VGA-Modul so vorkonfiguriert, dass es nur das blau angezeigte Format akzeptiert.
  • Seite 57: Modus-Menü

    Modus-Menü Die verfügbaren Ausgabemodi werden in der Registerkarte Modi angezeigt. Wenn die Registerkarte Modi über die Taste fl ausgewählt wird, ändert sich die Legende der Registerkarte in Modi 0-15 und die Modi 0 bis 15 werden angezeigt. Beim nochmaligen Drücken von fl ändert sich die Legende der Registerkarte in Modi 16-31 und die Modi 16 bis 31 werden angezeigt.
  • Seite 58: Tabelle Der Ausgabemodi

    Zurücksetzen auf Werkseinstellungen Um das System auf die Werkseinstellungen zurückzusetzen, schalten Sie das ScaleOR aus und drücken Sie die Taste MENU. Schalten Sie das Gerät bei gedrückter MENU-Taste ein. Nach ca. 10 Sekunden zeigt das ScaleOR am angeschlossenen Monitor die Meldung Zurücksetzen auf Werkseinstellungen"...
  • Seite 59: Einrichten Und Test Der Seriellen Schnittstelle

    Einrichten und Test der seriellen Schnittstelle Hardware-Einrichtung Schalten Sie das ScaleOR ein. Schließen Sie Ihren PC über ein USB-Mini-5-USB-Kabel ((NDS Artikelnr. 35Z0047) oder ein gleichwertiges Kabel an das ScaleOR an. Geräte-Manager Öffnen Sie den Geräte-Manager des PCs und wählen Sie „Anschlüsse (COM & LPT)". Suchen Sie den seriellen USB-Port (COMx).
  • Seite 60: Fehlerbehebung Und Tests

    Der Monitor sollte ca. 10 Sekunden nach Einschalten des ScaleOR das NDS-Logo anzeigen. Schalten Sie das ScaleOR aus, schließen Sie dann den Monitor an den SDI-Ausgang des Geräts an und wiederholen Sie den Test. Falls Ihr ScaleOR mit einem...
  • Seite 61: Diagramme Und Abmessungen

    Diagramme und Abmessungen GEWINDE 4-40 TIEFE 0,20"...
  • Seite 62: Anschlüsse Und Kontaktbelegungen

    Anschlüsse und Kontaktbelegungen Eingänge DVI-Eingang und -Ausgang DVI-D* Nur digital. 1 ROT 6 GND ROT 11 N. C. * Kompatibel mit DVI 1.0 2 GRÜN 7 GND GRÜN 12 DDC_SDA PIN- PIN- 3 BLAU 8 GND BLAU 13 HORIZ SYNC SIGNAL SIGNAL 4 N.C.
  • Seite 63: Spezifikationen

    C (-4 bis +122 Luftfeuchtigkeit bei Lagerung 5 bis 85% RH Höhe ü. d. M. bei Lagerung 10,000 m (33,000 Fuß) Hinweise: a. Diese Spezifikationen können ohne vorherige Ankündigung geändert werden. Wenden Sie sich an NDS, um aktuelle Spezifikationen zu erfragen.
  • Seite 64 SDI Unterstützte Auflösungen DVI Unterstützte Auflösungen Horizontale Vertikale Vertikale Horizontale Vertikale Vertikale Signalparameter Unterstützter Bereich Auflösung Auflösung Frequenz Auflösung Auflösung Frequenz Aktive Auflösung 640 x 480 min bis 1920 x 1200 max (Pixel) (Zeilen) (Hz) (Pixel) (Zeilen) (Hz) (horizontal x vertikal) 480i 29,97 1280...
  • Seite 65: Reinigungs- Und Desinfektionsanweisungen

    Geeignete Desinfektionsmittel: Ethanol 80 % Vol. Ungeeignete Lösungsmittel: MEK (Methylethylketon) Toluol Aceton Hinweis: Die vorstehend genannten geeigneten Reinigungs- und Desinfektionsmittel wurden an NDS-Produkten getestet und stellen bei ordnungsgemäßer Verwendung keine Gefahr für die Oberflächen und die Kunststoffteile des Produkts dar.
  • Seite 66: Tabellen Zur Elektromagnetischen Verträglichkeit (Emv)

    Tabellen zur elektromagnetischen Verträglichkeit (EMV) Alle medizinischen elektrischen Geräte müssen den Anforderungen der IEC-Norm 60601-1-2 entsprechen. Sicherheitsvorkehrungen, die Einhaltung der in dieser Gebrauchsanweisung bereitgestellten EMV- Leitlinien und die Überprüfung aller medizinischen Geräte im Simultanbetrieb sind erforderlich, um die elektromagnetische Verträglichkeit und Koexistenz aller anderen medizinischen Geräte vor einem chirurgischen Verfahren sicherzustellen.
  • Seite 67: Emv-Tabellen

    EMV-Tabellen Leitlinien und Herstellererklärung - Elektromagnetische Aussendung Das Produkt ist für den Einsatz in der nachstehend beschriebenen elektromagnetischen Umgebung vorgesehen. Der Käufer bzw. Anwender des Produkts muss sicherstellen, dass es in einer entsprechenden Umgebung eingesetzt wird. Emissionen Einhaltung Leitlinien zur elektromagnetischen Umgebung Das Produkt verwendet HF-Energie ausschließlich zu seiner internen HF-Aussendungen Funktion.
  • Seite 68 EMV-Tabellen Leitlinien und Herstellererklärung - Elektromagnetische Störfestigkeit Das Produkt ist für den Einsatz in der nachstehend beschriebenen elektromagnetischen Umgebung vorgesehen. Der Käufer bzw. Anwender des Produkts muss sicherstellen, dass es in einer entsprechenden Umgebung eingesetzt wird. IEC 60601 Störfestigkeits- Übereinstimmungs- Leitlinien zur elektromagnetischen Umgebung prüfung pegel...
  • Seite 69: Empfohlener Schutzabstand Zwischen Tragbaren Und Mobilen Hf-Kommunikationsgeräten Und Dem Produkt

    EMV-Tabellen Empfohlener Schutzabstand zwischen tragbaren und mobilen HF-Kommunikationsgeräten und dem Produkt Das Produkt ist für den Einsatz in einer elektromagnetischen Umgebung vorgesehen, in der Störungen durch abgestrahlte HF kontrolliert werden. Der Kunde oder Benutzer des Produkts kann zur Vermeidung elektromagnetischer Störungen beitragen, indem er einen Mindestabstand zwischen tragbaren und mobilen HF- Kommunikationsgeräten (Sendern) und dem Produkt wie nachstehend aufgeführt entsprechend der maximalen Ausgangsleistung des Kommunikationsgeräts einhält.
  • Seite 72 Corporate Headquarters Europe Asia Pacific GSI Group Japan Corporation 5750 Hellyer Avenue Nijverheidscentrum 28 East Square Omori, San Jose, CA 95138 (USA) 2761 JP Zevenhuizen (ZH) 6-20-14 Minamioi, Shinagawa-ku Tel: 408 776 0085 The Netherlands Tokyo 140-0013, Japan Toll Free: 866 637 5237 Tel: + 31 180 63 43 56 ISO 9001:2008 and ISO 13485:2003;...
  • Seite 73 VIDEO SCALING SYSTEM Informatics UTILISATEUR MANUELLE [ F R A N Ç A I S ]...
  • Seite 75 © 2013 NDS Surgical Imaging, LLC. Tous droits réservés. exactitude des informations contenues dans le présent document a été soigneusement vérifiée ; ’ toutefois, la justesse de ce contenu n est couverte par aucune garantie. Ce document peut faire l objet de ’...
  • Seite 77 Mentions légales --------------------------------------- iii Section 2 À propos de ce manuel -------------------------------- 1 Utilisation prévue et contre-indications ---------- 1 Présentation générale de ScaleOR ----------------- 2 Informations d’ordre général ------------------------ 2 Section 3 Panneau de connecteurs ----------------------------- 3 Commutateurs de mode de sortie ----------------- 3 Symboles électriques ---------------------------------- 3...
  • Seite 78: Avertissements Et Mises En Garde

    Avertissements et mises en garde Ce symbole informe l’utilisateur que des informations importantes relatives à l’installation et / ou l’utilisation de cet appareil suivent. Les informations précédées de ce symbole doivent être lues attentivement pour éviter tout endommagement de l’appareil. Ce symbole avertit l’utilisateur qu’une tension non isolée présente à...
  • Seite 79: Déclarations De Conformité

    éventuelles applicables offertes par cette entité. NDS exclut toute autre responsabilité et n’autorise personne à en assumer en son nom, que celle-ci soit relative ou liée à la vente et/ou à l’utilisation de ses produits. Pour garantir l’utilisation, la manipulation et la maintenance appropriées des produits NDS, les clients doivent consulter la documentation afférente, le manuel d’instructions et/ou les étiquettes fixées sur le produit ou livrées avec celui-ci.
  • Seite 80: À Propos De Ce Manuel

    À propos de ce manuel Ce manuel est destiné à aider l utilisateur à installer, régler et utiliser le système ScaleOR et ses écrans ’ associés. Une liste d écrans pouvant être utilisés avec le ScaleOR figure dans la section Écrans...
  • Seite 81: Présentation Générale De Scaleor

    Options de commande : Le ScaleOR peut être contrôlé à partir des éléments suivants : 1. Le clavier qui se trouve en façade du ScaleOR. Pour pouvoir utiliser le clavier, le ScaleOR doit être raccordé à un écran. 2. Un PC via le port ND-OS. Reportez-vous à...
  • Seite 82: Panneau De Connecteurs

    L’illustration représente l’interrupteur à l’état Marche. Lorsque le ScaleOR est mis sous tension, le cercle bleu clignote à une fréquence de 5 flashs par seconde pendant 15 secondes puis reste allumé de manière fixe si un signal vidéo est détecté.
  • Seite 83: Réglage Des Commutateurs De Mode De Sortie

    1600X1200/60 UXGA S.O. 1680X1050/59,95 WSXGA S.O. 1920x1200/50 WUXGA S.O. 1920x1200/60 WUXGA S.O. Utiliser le menu * Remarque : pour régler le mode de sortie à partir de l du ScaleOR , tous les commutateurs doivent ‘ être réglés sur Off.
  • Seite 84: Alimentation Et Adaptateurs Secteur

    Alimentation et adaptateurs secteur L’alimentation est illustrée avec l’adaptateur secteur US installé. Pour changer d’adaptateur, procédez comme suit : Posez l’alimentation sur la surface de travail comme indiqué. Appuyez sur le bouton marqué PUSH et maintenez-le enfoncé. Faites tourner l’adaptateur de 1/8 de tour dans le sens de la flèche OPEN et désolidarisez-le de l’alimentation.
  • Seite 85: Modules D'entrée Amovibles

    ’ Le ScaleOR doit être mis hors tension avant d’installer ou de changer le module d’entrée. Retrait du module d’entrée : Utilisez un tournevis cruciforme numéro 1 pour desserrer, sans les retirer, les vis qui se trouvent sur les côtés gauche et droit de la plaque de fixation du module.
  • Seite 86: Exemple De Configuration Système

    Exemple de configuration système ▲ ▲ Sortie Sortie ▲ ◄ ► Source SDI, DVI, VGA ou S-Video / Composite Commande optionnelle par...
  • Seite 87: Démarrage

    ’ du ScaleOR. Appuyez sur le bouton Marche / Arrêt en façade du ScaleOR. Le cercle bleu lumineux du bouton Marche / Arrêt clignote pendant 15 secondes puis, si un signal vidéo est détecté, s allume de manière ’...
  • Seite 88: Présentation Des Menus

    Contrôle Un pavé de 4 boutons, situé sous le logo ScaleOR sur la droite de ce dernier, permet à l utilisateur d ajuster ‘ ‘ divers paramètres du ScaleOR en utilisant le système Menu à l écran (OSM). ‘ Présentation des menus Appuyez une fois sur le bouton MENU pour ouvrir l OSM.
  • Seite 89: Configuration De Scaleor

    Configuration de ScaleOR Menu Picture (Image) DVI et SDI Menu Picture (Image) DVI et SDI Sharpness (Netteté) : Appuyez sur fi ou fl pour ajuster la netteté (mise au point) de l image affichée. ’ Scaling (Graphics) (Mise à l échelle (Graphiques)) :...
  • Seite 90: Menu Picture (Image) Vga, Rgbs, Ypbpr Et Sog

    Alternative Modes (SmartSync Modes alternatifs) ™  / ™  / À l initialisation, la technologie SmartSync exclusive de NDS examine le signal entrant et affiche ’ automatiquement l image vidéo au format approprié. Pour lancer SmartSync, mettez en surbrillance le ’...
  • Seite 91: Menu Color (Couleur)

    Menu Color (Couleur) Brightness (Luminosité) : Appuyez sur le bouton fi ou fl pour régler la luminosité. Contrast (Contraste) : Appuyez sur le bouton fi ou fl pour régler le contraste. Red/Green/Blue (Rouge/Vert/Bleu) : Appuyez sur le bouton fi ou fl pour augmenter ou diminuer l intensité...
  • Seite 92: Menu Setup (Configuration)

    émis, le ’ ’ ScaleOR sort du mode veille et active ses sorties. Appuyez sur le bouton fl pour activer le DPMS, appuyez sur le bouton fi pour désactiver le DPMS. Menu Lock (Verrouillage menu) : Désactive l accès au système de menu.
  • Seite 93: Menu Modes

    Menu Modes (Modes) modes de sortie disponibles s affichent lorsque l onglet Modes est sélectionné. Si l onglet Modes est ’ ’ ’ sélectionné au moyen du bouton fl, l intitulé de l onglet devient Modes 0-15 et les modes 0 à...
  • Seite 94: Tableau Des Modes De Sortie

    MENU et maintenez-le enfoncé. Tout en maintenant le bouton MENU enfoncé, mettez l unité ’ sous tension. Au bout de 10 secondes environ, le message « Restoring Factory Defaults » (Restauration des valeurs usine par défaut) s affiche sur le moniteur raccordé au ScaleOR. ’...
  • Seite 95: Configuration Et Test Du Port Série

    Configuration et test du port série Installation du matériel Mettez le ScaleOR sous tension. Connectez votre PC au ScaleOR en utilisant un câble USB à Mini 5 USB (NDS P/N 35Z0047) ou équivalent. Gestionnaire de périphériques Ouvrez le Device Manager (Gestionnaire de périphériques) du PC et sélectionnez Ports (COM & LPT). Localisez l’entrée USB Serial Port (COMx) (Port série USB (COMx)).
  • Seite 96: Section De Dépannage Et Test

    Pas d’affichage vidéo Si le cercle bleu du bouton Marche / Arrêt du ScaleOR clignote à une fréquence de 1 flash par seconde, l’unité ne détecte aucun signal vidéo. Vérifiez qu’un signal d’entrée est connecté à l’entrée de l’unité. S’il y a une connexion, essayez de changer le câble vidéo. Si la vidéo s’affiche, le câble est endommagé.
  • Seite 97: Schémas Et Dimensions

    Schémas et dimensions FILET 4-40 PROFONDEUR 0,20" COMMUTATEUR...
  • Seite 98: Connecteurs Et Sorties Des Broches

    Connecteurs et sorties des broches Connecteurs d entrée Connecteurs d entrée et de sortie DVI ‘ ‘ DVI-D* Numérique uniquement. 1 ROUGE 6 TERRE ROUGE 11 N. C. * Conforme à DVI 1.0 2 VERT 7 TERRE VERT 12 DDC_SDA 3 BLEU 8 TERRE BLEU 13 SYNC HORIZ...
  • Seite 99: Caractéristiques Techniques

    Humidité de stockage 5 à 85 % HR Altitude de stockage 10 000 m (33 000 pieds) Remarques : a. Ces caractéristiques peuvent faire l objet de modifications sans préavis. Pour les caractéristiques tech- ’ niques récentes, veuillez contacter NDS.
  • Seite 100 Résolutions supportées SDI Résolutions supportées DVI Pixels Pixels Pixels Pixels Pixels Pixels Paramètre de signal Plage prise en charge Résolution Résolution Fréquence Résolution Résolution Fréquence Résolution active 640 x 480 min à 1920 x 1200 max (pixels) (lignes) (Hz) (pixels) (lignes) (Hz) (horizontale x verticale)
  • Seite 101: Instructions De Nettoyage Et De Désinfection

    Solvants interdits : MEC (méthyle-éthyle-cétone) Toluène Acétone Remarque : Les produits détergents et désinfectants autorisés listés ci-dessus ont été testés sur les produits NDS et, utilisés suivant les instructions, n endommagent ni la finition du produit ni ses composants en plastique. ’...
  • Seite 102: Tableaux De Compatibilité Électromagnétique (Cem)

    Tableaux de compatibilité électromagnétique (CEM) Tous les appareils électroniques médicaux doivent être conformes aux exigences de la norme CEI 60601-1- 2. Les mesures de précaution, le respect des informations relatives à la CEM fournies dans ce manuel et la vérification de tous les appareils médicaux fonctionnant simultanément sont requis afin de garantir la compatibilité...
  • Seite 103 Tableaux CEM Lignes directrices et déclaration du fabricant – Émissions électromagnétiques ’ Le produit est conçu pour être utilisé dans l environnement électromagnétique spécifié ci-dessous. Il incombe au client ’ ’ ’ ou à l utilisateur du produit de s assurer qu il est utilisé...
  • Seite 104 Tableaux CEM Lignes directrices et déclaration du fabricant – Immunité électromagnétique ’ ’ Le produit est conçu pour être utilisé dans l environnement électromagnétique spécifié ci-dessous. Il incombe au client ou à l utilisateur ’ ’ du produit de s assurer qu il est utilisé...
  • Seite 105 Tableaux CEM Distances de séparation recommandées entre les équipements de communication RF portables et mobiles et le produit Le produit est prévu pour une utilisation dans un environnement dans lequel les perturbations radioélectriques par radiation sont contrôlées. Le client ou l’utilisateur du produit peut prévenir les perturbations électromagnétiques en respectant les distances minimales recommandées pour la séparation entre les équipements de communication RF portables et mobiles (émetteurs) et le produit comme recommandé...
  • Seite 108 Corporate Headquarters Corporate Headquarters Europe Europe Asia Pacific Asia Pacific 1F KDX Shiba-Daimon Bldg. GSI Group Japan Corporation 5750 Hellyer Avenue 5750 Hellyer Avenue Nijverheidscentrum 28 Nijverheidscentrum 28 2-10-12 Shiba-Daimon, Minato-Ku, East Square Omori, San Jose, CA 95138 (USA) San Jose, CA 95138 (USA) 2761 JP Zevenhuizen (ZH) 2761 JP Zevenhuizen (ZH) Tokyo 105-0012, Japan...
  • Seite 109 VIDEO SCALING SYSTEM Informatics OPERATORE MANUALE [ I T A l I A N O ]...
  • Seite 111 © 2013 NDS Surgical Imaging, LLC. Tutti i diritti riservati. Le informazioni contenute nel presente documento sono state attentamente controllate e ritenute accurate, tuttavia non viene fornita alcuna garanzia riguardo alla correttezza del loro contenuto. Questo documento è soggetto a modifica senza preavviso. Le informazioni in esso contenute sono riportate esclusivamente a titolo di riferimento.
  • Seite 113 Dichiarazione di conformità ------------------------ iii Informativa legale-------------------------------------- iii Scheda 2 Informazioni su questo manuale ------------------- 1 Uso previsto e controindicazioni ------------------- 1 Panoramica di ScaleOR -------------------------------- 2 Informazioni generali ---------------------------------- 2 Scheda 3 Pannello dei connettori ------------------------------- 3 Interruttori della modalità di uscita---------------- 3...
  • Seite 114: Avvertenze E Precauzioni

    Avvertenze e Precauzioni Questo simbolo avverte l'utente circa importanti informazioni per l'installazione e/o il funzionamento di questa apparecchiatura. Le informazioni precedute da questo simbolo devono essere lette attentamente al fine di evitare di danneggiare l'apparecchiatura. Questo simbolo segnala la presenza all’interno dell’unità di tensioni pericolose non isolate di intensità sufficiente a provocare scosse elettriche;...
  • Seite 115: Dichiarazione Di Conformità

    NDS vende i propri prodotti attraverso altri fabbricanti di dispositivi medicali, distributori e rivenditori, pertanto l’acquirente del presente prodotto NDS deve rivolgersi alla struttura tramite la quale il display è stato acquistato per la prima volta, per quanto concerne gli eventuali termini di garanzia applicabili al prodotto da essa previsti.
  • Seite 116: Informazioni Sul Presente Manuale

    ’ ’ del sistema ScaleOR e dei monitor ad esso associati. Un elenco dei monitor che è possibile utilizzare con il sistema ScaleOR è disponibile alla sezione Monitor compatibili al paragrafo Informazioni generali riportato nelle pagine seguenti.
  • Seite 117: Panoramica Di Scaleor

    4). Informazioni generali Installazione: Le unità ScaleOR possono essere impilate su un supporto dell'apparecchio, un carrello chirurgico o montate in un telaio di supporto standard da 19”. Accertarsi che le aperture per la circolazione dell'aria non siano ostruite. Alimentatore: L'alimentatore fornito in dotazione Ault &...
  • Seite 118: Pannello Dei Connettori

    è illuminato di colore blu. L'illustrazione mostra l'interruttore nello stato ON (Attivato). Quando il dispositivo ScaleOR è attivato, l'anello di colore blu lampeggia alla velocità di 5 lampeggi al secondo per 15 secondi, quindi, diventa stabile se viene rilevato un segnale video.
  • Seite 119: Impostazioni Degli Interruttori Della Modalità Di Uscita

    1280x1024/75.02 SXGA 1280x1024/85.02 SXGA 1360X768/60.01WXGA 1366X768/59.79 WXGA 1440X900/59.89 WXGA 1600X1200/60 UXGA 1680X1050/59.95 WSXGA 1920x1200/50 WUXGA 1920x1200/60 WUXGA Use Menu * Nota: Per impostare la modalità di uscita dai comandi ScaleOR OSM, tutti gli interruttori devono essere impostati su Off (Disattivato).
  • Seite 120: Alimentazione E Adattatori Da Parete

    Alimentazione e adattatori da parete L'alimentazione è mostrata con installato l'adattatore a parete per gli Stati Uniti. Per scambiare l'adattatore, procedere come segue: Posizionare l'alimentatore sulla superficie di lavoro, come illustrato. Premere e tenere premuto il tasto etichettato come PUSH (Premere). Ruotare l'adattatore di 1/8 di giro verso la freccia OPEN (Aprire) e sollevarlo ruotandolo lontano dall'alimentazione.
  • Seite 121: Moduli Di Ingresso Rimovibili

    1 e 2 per il formato del segnale in ingresso. Rimozione e installazione dei moduli Il dispositivo ScaleOR deve essere ruotato su Off (Disattivato) prima di installare o sostituire il modulo di ingresso. Rimozione del modulo di ingresso: Utilizzare un cacciavite Phillips n.
  • Seite 122: Esempio Di Configurazione Del Sistema

    Esempio di configurazione del sistema ▲ ▲ Uscita Uscita ▲ ◄ ► Sorgente SDI, DVI, VGA o S-Video / Composite Controllo PC opzionale...
  • Seite 123: Inizializzazione

    ScaleOR. Se il dispositivo ScaleOR è rimasto acceso per più di 15 secondi e non è stato rilevato alcun segnale video, l'anello di colore blu lampeggia a una velocità di 1 lampeggio al secondo.
  • Seite 124: Controllo

    Controllo Un tastierino a 4 numeri, situato in basso a destra del logo ScaleOR, permette all'utente di effettuare la regolazione dei vari parametri ScaleOR utilizzando il sistema di menu su schermo On Screen Menu (OSM). Presentazione del sistema di menu Premere il pulsante MENU una volta per aprire il sistema OSM.
  • Seite 125: Impostazione Di Scaleor

    Impostazione di ScaleOR Menu immagini da DVI ed SDI Sharpness (Nitidezza): Premere fi o fl per regolare la nitidezza (messa a fuoco) dell immagine visualizzata. ’ Scaling (Graphics) (Proporzioni (Grafica)): Questo parametro è abilitato quando il segnale di ingresso non è 16:9, non è interlacciato e non è 480P o 576P.
  • Seite 126: Menu Vga, Rgbs, Ypbpr E Sog

    Selezionare con i pulsanti fi o fl. Modalità SmartSync Alternative ™  / Durante la procedura di inizializzazione, la tecnologia brevettata SmartSync di NDS analizza il segnale in ingresso e visualizza automaticamente l immagine video nel formato appropriato. Per eseguire SmartSync ’...
  • Seite 127: Brightness (Luminosità)

    Menu Color (Colore) Brightness (Luminosità): Premere il pulsante fi o fl per impostare la luminosità. Contrast (Contrasto): Premere il pulsante fi o fl per impostare il contrasto. Red, Green, Blue (Rosso, Verde, Blu): Premere il pulsante fi o fl per aumentare o ridurre l'intensità del colore selezionato. Saturation (Video): Questo parametro è...
  • Seite 128 Disabilita l'accesso al sistema di menu. Ciò impedisce di apportare modifiche accidentali alle impostazioni del dispositivo ScaleOR. Per abilitare Menu Lock (Blocco Menu), premere il pulsante fl. Il messaggio MENU LOCKED (MENU BLOCCATO) appare quando viene premuto il pulsante fi. Per sbloccarlo, premere e tenere premuti contemporaneamente i pulsanti MENU e SCROLL sino alla comparsa del messaggio MENU UNLOCKED (MENU SBLOCCATO).
  • Seite 129: Menu Delle Modalità

    Menu delle modalità modalità di uscita disponibili sono mostrate quando viene selezionata la scheda Modes (Modalità). Se la scheda Modes (Modalità) viene selezionata utilizzando il pulsante fl, la legenda della scheda passa alle Modalità 0-15 (Modalità da 0 a 15) e vengono visualizzate le modalità...
  • Seite 130: Tabella Delle Modalità Di Uscita

    MENU. Continuando a tenere premuto il pulsante MENU, accendere l'unità. Dopo circa 10 secondi appare il messaggio Restoring Factory Defaults (ripristino delle “ ” impostazioni di fabbrica predefinite in corso) sul monitor collegato al dispositivo ScaleOR.
  • Seite 131: Impostazione E Prova Delle Porte Seriali

    Impostazione e prova delle porte seriali Hardware Setup (Impostazioni dell'hardware) Accendere il dispositivo ScaleOR. Collegare il PC al dispositivo ScaleOR utilizzando un cavetto per USB per chiavette della capacità massima di Mini 5 USB (NDS P/N 35Z0047) o un cavo equivalente.
  • Seite 132: Risoluzione Dei Problemi E Sezione Di Prove

    Disattivare il dispositivo ScaleOR e collegare la porta di uscita a un monitor attivato. Attivare il dispositivo ScaleOR, in modo che il logo NDS appaia sul monitor per circa 10 secondi dopo avere attivato il dispositivo ScaleOR. Disattivare il dispositivo ScaleOR, quindi collegare la rispettiva porta di uscita al monitor e ripetere la prova.
  • Seite 133: Disegni E Ingombri

    Disegni e ingombri FILETTATURA 4-40 PROFONDITÀ 0,20"...
  • Seite 134: Raggio Di Curvatura Cavo

    Schema delle funzioni circuitali di connettori e pin Connettori di ingresso Connettori di ingresso e uscita DVI DVI-D Solo digitale. 1 ROSSO 6 MASSA ROSSO 11 N. C. * Conforme a DVI 1.0 2 VERDE 7 MASSA VERDE 12 DDC_SDA 3 BLU 8 MASSA BLU 13 SINC ORIZ...
  • Seite 135: Specifiche

    Temperatura di stoccaggio -20 a +50 C (da -4 a +122 Umidità di stoccaggio 5-85% RH Altitudine di stoccaggio 10.000 m (33.000 pd) Note: 1. Le specifiche sono soggette a modifica senza preavviso. Contattare NDS per conoscere le specifiche attuali.
  • Seite 136 Risoluzioni SDI supportate Risoluzione DVI supportata Orizzontale Verticale Verticale Orizzontale Verticale Verticale Parametro del segnale Intervallo supportato Risoluzione Risoluzione Frequenza Risoluzione Risoluzione Frequenza Risoluzione attiva Min 640 x 480 - Max 1920 x 1200 (pixel) (linee) (Hz) Pixel (linee) (Hz) (orizzontale x verticale) 480i 29,97...
  • Seite 137: Istruzioni Di Pulizia E Disinfezione

    MEK (metiletilchetone) toluene acetone Nota: I materiali per la pulizia e la disinfezione accettabili sopra elencati sono stati testati su prodotti NDS e, se utilizzati secondo le prescrizioni, non nuocciono alla finitura del prodotto e ai rispettivi componenti di plastica.
  • Seite 138: Tabelle Di Compatibilità Elettromagnetica (Emc)

    Tabelle di compatibilità elettromagnetica (EMC) Tutti i dispositivi medici elettronici devono essere conformi ai requisiti della norma IEC 60601-1-2. Per garantire la compatibilità elettromagnetica (EMC) e la coesistenza di tutti gli altri dispositivi medicali prima di una procedura chirurgica, è necessario osservare tutte le precauzioni e le linee guida sulle emissioni elettromagnetiche fornite in questo manuale e verificare tutti i dispositivi medicali in funzionamento simultaneo.
  • Seite 139 Tabelle EMC Guida e dichiarazione del produttore - emissioni elettromagnetiche Il prodotto è destinato all'uso nell'ambiente elettromagnetico di seguito specificato. Il cliente o l'utente del prodotto deve accertarsi che venga utilizzato in tale ambiente. Emissioni Conformità Ambiente elettromagnetico -- orientamento Il prodotto utilizza energia a radiofrequenza solo per il funzionamento interno.
  • Seite 140 Tabelle EMC Guida e dichiarazione del produttore - immunità elettromagnetica Il prodotto è destinato all'uso nell'ambiente elettromagnetico di seguito specificato. Il cliente o l'utente del prodotto deve accertarsi che venga utilizzato in tale ambiente. Livello di test IEC Test di Livello di Ambiente elettromagnetico –...
  • Seite 141 Tabelle EMC Distanze di separazione consigliate tra apparecchiature di comunicazione RF portatili e mobili e il prodotto: Il prodotto è inteso per l'uso in un ambiente elettromagnetico in cui i disturbi RF irradiati sono controllati. Il cliente o l'utente del prodotto può prevenire le interferenze elettromagnetiche mantenendo una distanza minima tra apparecchiature RF portatili e mobili (trasmettitori) e il prodotto, come di seguito indicato, in base alla potenza massima di uscita dell'apparecchiatura di comunicazione.
  • Seite 144 Corporate Headquarters Europe Asia Pacific GSI Group Japan Corporation 5750 Hellyer Avenue Nijverheidscentrum 28 East Square Omori, San Jose, CA 95138 (USA) 2761 JP Zevenhuizen (ZH) 6-20-14 Minamioi, Shinagawa-ku Tel: 408 776 0085 The Netherlands Tokyo 140-0013, Japan Toll Free: 866 637 5237 Tel: + 31 180 63 43 56 ISO 9001:2008 and ISO 13485:2003;...
  • Seite 145 VIDEO SCALING SYSTEM Informatics USUARIO MANUAL [ E S P A Ñ O L ]...
  • Seite 147 © 2013 NDS Surgical Imaging, LLC. Todos los derechos reservados. Se ha comprobado detenidamente la precisión de la información de este documento; sin embargo, no se garantiza la exactitud del contenido. Este documento está sujeto a cambios sin previo aviso. NDSsi proporciona esta información solo a título de referencia.
  • Seite 149 Declaración legal--------------------------------------------iii Ficha 2 Acerca de este manual ------------------------------------ 1 Uso previsto y contraindicaciones --------------------- 1 Descripción general de ScaleOR ----------------------- 2 Información general --------------------------------------- 2 Ficha 3 Panel de conectores --------------------------------------- 3 Conmutadores de modo de salida -------------------- 3 Símbolos eléctricos----------------------------------------- 3...
  • Seite 150: Advertencias Y Precauciones

    Advertencias y precauciones Este símbolo indica al usuario que a continuación se ofrece información importante sobre la instalación o la utilización del equipo. La información destacada con este símbolo debe leerse con atención para evitar daños al equipo. Este símbolo avisa al usuario de que la tensión no aislada en el interior de la unidad puede causar una descarga eléctrica.
  • Seite 151: Declaración De Conformidad

    NDS vende sus productos por mediación de otros fabricantes, distribuidores y segundos vendedores de dispositivos médicos, por lo que los compradores de este producto NDS deben consultar a la entidad en que adquirieron el producto los términos de la garantía otorgada.
  • Seite 152: Acerca De Este Manual

    Acerca de este manual Este manual tiene el propósito de ayudar al usuario a instalar, configurar y utilizar el sistema ScaleOR y las pantallas asociadas. En el apartado Pantallas compatibles de la sección Información general, en la siguiente página, se enumeran las pantallas que pueden utilizarse con ScaleOR.
  • Seite 153: Descripción General De Scaleor

    Opciones de control: ScaleOR pueden controlarse desde: 1. Teclado del frontal de ScaleOR. Para utilizar el teclado es preciso que ScaleOR esté conectado a una pantalla. 2. PC a través del puerto ND-OS. Consulte Configuración y prueba del puerto serie en la página 16.
  • Seite 154: Panel De Conectores

    En la ilustración se muestra el interruptor en estado ENCENDIDO. Cuando se enciende ScaleOR, el anillo azul emite cinco destellos por segundo durante 15 segundos y, a continuación, queda encendido y fijo si el sistema detecta una señal de vídeo.
  • Seite 155: Ajuste De Conmutadores De Modo De Salida

    1366x768/59,79 WXGA N.A. 1440x900/59,89 WXGA N.A. 1600x1200/60 UXGA N.A. 1680x1050/59,95 WSXGA N.A. 1920x1200/50 WUXGA N.A. 1920x1200/60 WUXGA N.A. Usar menú * Nota: Para ajustar el modo de salida desde el de ScaleOR, todos los conmutadores deben estar en posición de apagado.
  • Seite 156: Fuente De Alimentación Y Adaptadores Murales

    Fuente de alimentación y adaptadores murales La fuente de alimentación se muestra con el adaptador mural estadounidense instalado. Para cambiar el adaptador, siga estos pasos: Coloque la fuente de alimentación en la superficie de trabajo, como se muestra. Pulse y mantenga pulsado el botón con el rótulo PUSH. Gire el adaptador 1/8 de vuelta hacia la flecha OPEN y tire de él para extraerlo de la fuente de alimentación.
  • Seite 157: Módulos De Entrada Desmontables

    Retirada e instalación de módulos ScaleOR debe estar apagado antes de instalar o sustituir el módulo de entrada. Retirada del módulo de entrada: Utilice un destornillador Phillips n.º 1 para aflojar (sin extraerlos) los tornillos de los lados izquierdo y derecho de la placa de montaje del módulo.
  • Seite 158: Ejemplo De Configuración Del Sistema

    Ejemplo de configuración del sistema ▲ ▲ Salida Salida ▲ ◄ ► Fuente SDI, DVI, VGA, o S-Vídeo/compuesto Control de PC opcional...
  • Seite 159: Arranque

    Arranque Conecte una de las salidas de ScaleOR a un monitor compatible. Conecte una fuente de vídeo a la entrada de ScaleOR. Pulse el botón de alimentación del panel frontal de ScaleOR. El anillo azul iluminado del botón de alimentación destella durante 15 segundos y, en caso de detectarse una señal de vídeo, permanece encendido y fijo.
  • Seite 160: Control

    Control Un teclado de cuatro botones situado debajo y a la derecha del logotipo de ScaleOR permite al usuario ajustar diversos parámetros de ScaleOR a través del menú en pantalla (OSM por sus siglas en inglés). Descripción general del sistema de menús Pulse una vez el botón MENU para abrir el OSM.
  • Seite 161: Configuración De Scaleor

    Configuración de ScaleOR Menú Picture (Imagen) de DVI y SDI Sharpness (Nitidez): Pulse fi o fl para ajustar la nitidez (enfoque) de la imagen mostrada. Scaling (Ajuste de escala, gráficos): Este parámetro está activado cuando la señal de entrada no es 16:9, no entrelazada y no 480P ni 576P.
  • Seite 162: Menú Picture (Imagen) De Vga, Rgbs, Ypbpr Y Sog

    Modos alternativos ™ / Durante la inicialización, la tecnología SmartSync propiedad de NDS examina la señal entrante y muestra automáticamente la imagen de vídeo en el formato correcto. Para ejecutar SmartSync, resalte el parámetro SmartSync/Alternative Modes (SmartSync/Modos alternativos) y pulse el botón fi.
  • Seite 163: Menú Color (Colores)

    Menú Color (Colores) Brightness (Brillo): Pulse el botón fi o fl para ajustar el brillo. Contrast (Contraste): Pulse el botón fi o fl para ajustar el contraste. Red, Green, Blue (Rojo, Verde, Azul): Pulse el botón fi o fl para aumentar o reducir la intensidad del color seleccionado. Saturation (Saturación, vídeo): Este parámetro solo está...
  • Seite 164: Menú Setup (Configuración)

    Pulse el botón fi o fl para adaptar el formato de la señal de entrada. Notas: 1. Este parámetro no está disponible si se instaló un módulo de entrada DVI o 3G - SDI en ScaleOR. 2. Si el parámetro aparece atenuado cuando el módulo instalado es VGA, dicho módulo está...
  • Seite 165: Menú Modes (Modos)

    Menú Modes (Modos) modos de salida disponibles se muestran al seleccionar la lengüeta de la ficha Modes. Si se selecciona la ficha Modes con el botón fl, el rótulo de la ficha cambia a Modes 0-15 y se muestran los modos del 0 al 15.
  • Seite 166: Tabla De Modos De Salida

    ScaleOR y pulse y mantenga pulsado el botón MENU. Sin dejar de pulsar MENU, encienda la unidad. Transcurridos unos 10 segundos, aparece el mensaje «Restoring Factory Defaults» (Restableciendo valores predeterminados de fábrica) en el monitor conectado a ScaleOR.
  • Seite 167: Configuración Y Prueba Del Puerto Serie

    Configuración y prueba del puerto serie Configuración de hardware Encienda ScaleOR. Conecte el PC a ScaleOR con un cable USB a Mini 5 USB (n.º ref. de NDS 35Z0047) o equivalente. Administrador de dispositivos Abra el Administrador de dispositivos del PC y seleccione Puertos (COM y LPT). Localice la entrada Puerto serie USB (COMx).
  • Seite 168: Solución De Problemas Y Pruebas

    No se ven imágenes Si el anillo azul del botón de alimentación de ScaleOR destella a razón de una vez por segundo, la unidad no detecta señal de vídeo. Compruebe que hay una señal de entrada conectada a la entrada de la unidad.
  • Seite 169: Esquema Y Dimensiones

    Esquemas y dimensiones ROSCA DE 4-40 0,20 PULG. PROF.
  • Seite 170: Conectores Y Correspondencia De Pines

    Conectores y correspondencia de pines Conectores de entrada Conectores de entrada y salida DVI DVI-D* Solo digital. 1 RED 6 GND RED 11 N. C. * Conforme con DVI 1.0 2 GREEN 7 GND GREEN 12 DDC_SDA 3 BLUE 8 GND BLUE 13 HORIZ SYNC SEÑAL SEÑAL...
  • Seite 171: Especificaciones

    C (de -4 a +122 Humedad de almacenamiento De 5 a 85% de humedad relativa Altitud de almacenamiento 10.000 m (33.000 pies) Notas: a. Las especificaciones están sujetas a cambios sin previo aviso. Póngase en contacto con NDS para conocer las especificaciones más recientes.
  • Seite 172 Resoluciones admitidas en SDI Resoluciones admitidas en DVI Resolución Resolución Frecuencia Resolución Resolución Frecuencia Parámetro de señal Intervalo admitido horizontal vertical vertical horizontal vertical vertical Resolución activa De 640x480 min. (píxeles) (líneas) (Hz) (píxeles) (líneas) (Hz) (horizontal y vertical) 480i 29,97 1280 720p...
  • Seite 173: Instrucciones De Limpieza Y Desinfección

    Etanol al 80% por volumen Disolventes no admitidos: MEK (metiletilcetona) Tolueno Acetona Nota: Los productos de limpieza y desinfección indicados arriba se han probado con productos de NDS y, siguiendo el uso indicado, no dañarán el acabado del producto ni sus componentes plásticos.
  • Seite 174: Tablas De Compatibilidad Electromagnética (Cem)

    Tablas de compatibilidad electromagnética (CEM) Todos los aparatos médicos eléctricos deben cumplir los requisitos de la norma IEC 60601-1-2. Es preciso tener precaución, respetar la información de las pautas sobre CEM del presente manual y verificar todos los aparatos médicos que estén en funcionamiento simultáneo, con el fin de garantizar la compatibilidad electromagnética y la coexistencia del resto de instrumentos antes de llevar a cabo intervenciones quirúrgicas.
  • Seite 175 Tablas de CEM Guía y declaración del fabricante: Emisiones electromagnéticas Este producto se ha diseñado para el uso en el entorno electromagnético indicado a continuación. El cliente o el usuario del producto deben garantizar su utilización en dicho entorno. Emisiones Cumplimiento Entorno electromagnético: Pautas Este producto utiliza energía de RF solo para su funcionamiento...
  • Seite 176 Tablas de CEM Guía y declaración del fabricante: Inmunidad electromagnética Este producto se ha diseñado para el uso en el entorno electromagnético indicado a continuación. El cliente o el usuario del producto deben garantizar su utilización en dicho entorno. Nivel de prueba IEC Prueba de Nivel de Entorno electromagnético: Pautas...
  • Seite 177 Tablas de CEM Distancias de separación recomendadas entre el producto y equipos de comunicación por RF portátiles y móviles El producto se ha diseñado para utilizarse en entornos electromagnéticos en los que las alteraciones debidas a radiaciones estén controladas. El cliente o usuario del producto puede evitar interferencias electromagnéticas si mantiene una distancia mínima entre los equipos de comunicación por RF portátiles o móviles (transmisores) y el producto, según las siguientes recomendaciones y de acuerdo con la potencia de salida máxima del equipo de comunicación correspondiente.
  • Seite 180 Corporate Headquarters Europe Asia Pacific GSI Group Japan Corporation 5750 Hellyer Avenue Nijverheidscentrum 28 East Square Omori, San Jose, CA 95138 (USA) 2761 JP Zevenhuizen (ZH) 6-20-14 Minamioi, Shinagawa-ku Tel: 408 776 0085 The Netherlands Tokyo 140-0013, Japan Toll Free: 866 637 5237 Tel: + 31 180 63 43 56 ISO 9001:2008 and ISO 13485:2003;...
  • Seite 181 VIDEO SCALING SYSTEM Informatics 用戶手冊      中文...
  • Seite 183 © 2013 NDS Surgical Imaging, LLC.版权所有保留所有权利。 本文档的信息准确性虽已经过仔细检查,但不能保证其内容完全正确。本文件如有更改, 恕不另行通 知。NDSsi 提供的这些信息仅供参考使用。本文件有提及其他供应商的产品,但并不代表 NDSsi 推荐或 认可这些产品。 本文件包含受版权保护的专有信息。未经 NDSsi 事先书面许可,不得利用机械、电子或其它任何方法以 任何形式复制本手册中的任何内容。 所有其它商标均为其各自所有者的财产。...
  • Seite 185 警告和警示 ------------------------------------------------------ ii 回收 --------------------------------------------------------------- ii 一致性声明 ------------------------------------------------------ iii 法律声明 --------------------------------------------------------- iii 标号2 关于本手册 ------------------------------------------------------- 1 用途和禁忌 ------------------------------------------------------- 1 ScaleOR 概述 ----------------------------------------------------- 2 一般信息 ---------------------------------------------------------- 2 标号3 连接器面板 ------------------------------------------------------ 3 输出模式开关 ---------------------------------------------------- 3 电气符号 --------------------------------------------------------- 3 输出模式开关设置 ----------------------------------------------- 4 电源供应器和壁上适配器 --------------------------------------- 5 可拆卸的输入模块...
  • Seite 186: 警告和警示

    警告和警示 此符号用于提醒用户,必须遵守有关安装和/或操作本设备的重要信息。应仔细阅读此符号前面的信息以避免损坏设 备。 本符号用于警告用户:本设备内部有未绝缘且足够产生电击的电压。因此,与本设备内部任何零件进行接触都会产生 危险。为降低电击的风险,严禁取下封盖(或后板)。用户不得私动内部零件。交由合格的维修人员进行维修。 此符号用于提醒用户,手册包含有关操作和/或维护本设备的重要信息。应仔细阅读此符号前面的信息以避免损坏设 备。 此符号标示制造商。 此符号标示制造商的欧洲共同体代表。 为了降低火灾或电击危险,请不要将本设备暴露在雨中或潮湿环境中。另外,除非插头片可以完全插入,请勿将本设备 的极性插头同延长电缆插座或其它插口一起使用。本产品的设计符合在患者附件使用设备的医疗安全要求。 本产品为 I 类医疗器械。不得进行改装。 本设备/系统仅可由医疗专家使用。 安全合规: 本产品经 TUV 认证,电击、火灾和机械危害仅符合 CAN/CSA C22.2 NO.60601-1 和 ANSI/AAMI ES60601-1 标 准。 安全合规: 本产品符合 EN60601-1 的安全要求,因而也符合医疗设备指令93/42/EEC 和 2007/47/EC(一般安全信息)要 求。 警告: I 级激光产品。请勿直视激光束 本产品仅当与所提供的医疗级电源产品一起使用时,才能符合上述标准。 电源供应器:奥尔特和 SL 电力电子有限公司型号:MENB1030A1200C02 12VDC 从交流电源拔下电源供应器。电源供应器是唯一认可的断开设备。...
  • Seite 187: 一致性声明

    • 咨询您的经销商或经验丰富的收音机/电视机技术人员。 与本产品相连接的辅助设备必须通过相关 IEC 标准认证,如数据处理设备应通过 IEC 60950-1 认证,医疗设备应通过 IEC 60601-1 认证。另外,所有配置要符合 IEC 60601-1-1 系统标准。将其它设备与信号输入部分或信号输出部分相连接时,须配置医疗系 统,且要确保该系统符合 IEC 60601-1-1 系统标准的要求。将本装置固定在系统上时,要保证本显示器中所用的固定设备符合 IEC 标准 60601-1。如有疑问,请咨询技术服务部门或您所在地的代表。 法律声明 NDS 通过其它医疗设备制造商、经销商和转销商售卖产品,因此,本 NDS 产品的购买者应向最初出售本产品商家咨询适用的产 品质量保证条款(如有)。 NDS 不承担也不授权他人承担与本产品销售和/或使用相联和/或相关的任何责任。若要恰当使用、处理并维护 NDS 产品,客户 应查阅本产品中附带或通过其它方式获得的产品具体说明、指导手册和/或标签。 客户需注意:产品性能会受包括系统配置、软件、应用程序、客户数据和操作人员对系统的控制及其它因素的影响。虽然据信 NDS 产品能与许多系统相兼容,但客户所使用的特定功能可能会有所不同。因此,必须由客户确定产品是否适合某种特定用途或 应用,而不能由 NDS 保证。 NDS 明确声明不作任何明示、暗示和/或法定担保,包括但不限于与所有 NDS 产品或服务相关的商业适销性、适合性和/或任何...
  • Seite 188: 关于本手册

    关于本手册 本手册旨在协助用户安装、设置和操作 ScaleOR 及其关联的显示器。在下一页的一般信息下,兼容显示器部分提供 了可配合 ScaleOR 使用的显示器的列表。 页面侧边的数字标号表示新一章节的开始。 本手册中包含功能描述语,含义如下: 部件号: 部件号如下表所示 固件: 58J0079 修订版 A。此版本仅支持 DVI 和 3G-SDI 输入模块。 58J0079 修订版 B。此版本新增 VGA 输入模块的支持。 58J0079 修订版 C。此版本新增 S-视频/复合视频输入模块的支持。 58J0079 修订版 D。新增 S-视频/复合视频模块的替代模式误差和自动选择。 手册部件号:60G0541 修订版 E 部件号 输入模块 光纤输出? 90T0009 否...
  • Seite 189: Scaleor 概述

    ScaleOR 概述 ScaleOR 可接受下列 4 种输入模块之一: DVI-D S-视频/复合视频 第 3 页的绘图显示固定输出连接器和输入模块的位置。 位于 ScaleOR 底部的 DIP 开关可用来选择输出模式(分辨率)(请参阅第 4 页的输出模式开关设置表)。 一般信息 安装: 可将 ScaleOR 装置堆叠在设备支架、手术车上或安装在标准的 19 英寸机架上。确保空气通风口没有被阻塞。 电源供应器: 随附的电源供应器,奥尔特和 SL 电力电子有限公司型号:MENB1030A1200C02 12VDC,包括 4 个可互换的壁上适 配器。第 5 页提供了电源供应器及其适配器的绘图和有关安装适配器的信息。 兼容显示器: 带有 输入的高清显示器。 HD-SDI 3G-SDI 带有...
  • Seite 190: 连接器面板

    显示的输入模块、DVI-D 模块,所有的输入模块在第 6 页显示。 ND-OS 连接器可通过串行命令远程控制 ScaleOR。它还可用于安装 BIOS 升级。 使用 和 视频输出。 输出模式开关 可从装置底部接触的输出模式开关,允许用户 选择 46 个输出模式之一。下一页的输出模式开 关设置表显示在选择给定的输出模式时,所需 (OSM) On Screen Menu 的开关设置。若要从 [屏幕菜单]设置输出模式,需要将所有的开关设 为关闭。 电气符号 电源开关: 电源开关符号显示于左侧。 电源开关是按开/按关式的,并显示在电源开关符号的下面。当开关处于关闭状态,中间部分周围 的环是白色的。当开关处于开启状态,中间部分将按下,并且环将亮起蓝光。该图显示开关处于 开启状态。开启 ScaleOR 时,蓝色的环将以每秒闪烁 5 次的速度闪烁 15 秒,然后在检测到视频 信号时稳定亮起。如果未检测到视频信号,环将以每秒闪烁 1 次的速度继续闪烁。...
  • Seite 191: 输出模式开关设置

    1280x960/75 SXGA 不适用 1280x960/85 SXGA 不适用 1280x1024/60.02 SXGA 不适用 1280x1024/75.02 SXGA 不适用 1280x1024/85.02 SXGA 不适用 1360X768/60.01WXGA 不适用 1366X768/59.79 WXGA 不适用 1440X900/59.89 WXGA 不适用 1600X1200/60 UXGA 不适用 1680X1050/59.95 WSXGA 不适用 1920x1200/50 WUXGA 不适用 1920x1200/60 WUXGA 不适用 用户菜单 * 注:若要从 ScaleOR的 设置输出模式,必须将所有的开关设为关闭。...
  • Seite 192: 电源供应器和壁上适配器

    电源供应器和壁上适配器 显示的电源供应器安装了美国壁上适配器。若要交换适配器,可执行以下操作: 将电源供应器放在您的工作表面,如图所示。 按住标有 PUSH 的按钮。 将适配器朝 OPEN 箭头转 1/8 圈,然后将它从电源供应器取出。 选择其中一个随附的壁上适配器。 将适配器底部的凸脚与电源供应器上的槽口对齐,然后将适配器放在电源供应器上。向下按压适配器并朝 LOCK 箭头转动直到它卡入定位。...
  • Seite 193: 可拆卸的输入模块

    态,开关 1 和 2 将会被禁用。 YPbPr 关闭 开启 关闭 若要手动选择输入格式,请将开关 3 设为 关闭。然后, 开启 关闭 关闭 使用左侧的表,将开关 1 和 2 设为输入信号的格式。 关闭 关闭 关闭 OSM / RS-232 关闭 关闭 开启 卸下和安装模块 安装或替换输入模块之前,必须关闭 ScaleOR。 卸下输入模块: 使用 1 号十字螺丝刀松开位于模块安装板左右两侧的螺丝,但不要将其取下。当螺丝脱离机箱,夹紧螺钉并拉出模 块以将其卸下。 安装: 将新的模块滑入机箱直到它接触连接器,然后,轻轻推入直到模块卡入定位。当模块的安装板与机箱的背面板齐 平,即表示模块已正确卡入定位。将模块的螺丝转入机箱直至碰到安装板,然后再转动每一颗螺丝四分之一圈将其 拧紧。...
  • Seite 194: 系统配置示例

    系统配置示例 ▲ ▲ DVI 输出 SDI 输出 ▲ ◄ ► SDI、DVI、VGA 或 S-视频/复合视频信号源 选配的 PC 控制...
  • Seite 195 启动 将 ScaleOR 的其中一个输出连接至兼容监视器。将一个视频信号源连接至 ScaleOR 的输入。 按下位于 ScaleOR 前面板上的电源按钮。电源按钮亮起蓝光的环将闪烁 15 秒,并在检测到视频信号时稳定亮 起。如果未检测到视频信号,环将继续闪烁。 标志将会显示在监视器上直到 ScaleOR 初始化完成。而此时亮起的环将停止闪烁时,并在检测到视频信号 时稳定亮起蓝光。这时,监视器上将会显示连接到 ScaleOR 输入的视频信号的图像。 如果 ScaleOR 已关闭超过 15 秒,而且未检测到视频信号,蓝色的环将以每秒闪烁 1 次的速度闪烁。 ScaleOR...
  • Seite 196 控制 (OSM)[屏幕菜单]系统调整各种 位于 ScaleOR 标志下方右侧的 4 按钮键盘,允许用户使用 On Screen Menu ScaleOR 参数。 菜单系统概述 按 MENU[菜单]按钮一次可打开 OSM。输入和输出分辨率显示在该菜单顶部。 当打开 时,将显示 Picture[画面]菜单。 按 fi 或 按钮选择需要的菜单,然后按 SCROLL[滚动] 按钮选择参数。按下 fi 或 按钮将参数设置为需要的 数值。按 MENU[菜单]按钮可保存您的更改并关闭 OSM。 注: 变灰的参数当前无法访问。...
  • Seite 197: Scaleor 设置

    ScaleOR 设置 DVI 和 SDI 画面菜单 Sharpness[锐度]: 按 fi 或 可调整所显示图像的锐度(焦点)。 Scaling[缩放-图像]: 当输入信号不是 16:9 形式、不是隔行扫描或不是 480P 或 576P 时,将启用该参数。 Fill = 扩展视频图像充满整个屏幕。因此可能无法准确显示纵横比。Aspect = 扩展视频图像直到最大维度充满屏幕。 图像的上下或左右可能出现黑条。1:1 = 以原始尺寸和纵横比显示视频数据。图像的上下和左右可能出现黑条。使用 fi 或 按钮选择。 Zoom[缩放-视频]: 当输入为 16:9 形式,480P、576P 或隔行扫描时,将启用该参数。 0 = 图像以不损失任何视频信息的尺寸在屏幕显示。显示器上的图像可能在周围带有黑色条带。 1、2、3、4、5 或 6 = 图像保持正中,以增量逐步线性增大。随着图像增大,视频信息将从上下和/或左右丢失。...
  • Seite 198: Vga、Rgbs、Ypbpr 和 Sog 菜单

    0 = 图像以不损失任何视频信息的尺寸在屏幕显示。显示器上的图像可能在周围带有黑色条带。 1、2、3、4、5 或 6 = 图像保持正中,以增量逐步线性增大。随着图像增大,视频信息将从上下和/或左右丢失。 使用 fi 或 fl 按钮选择。 SmartSync™ / Alternative Modes[备选模式] 启动时, NDS 专利技术 SmartSync 可检查输入信号并自动以正确格式显示视频图像。要运行 SmartSync,请高亮 显示 SmartSync / Alternative Modes [备选模式]参数并按下 fi 按钮。 要选择一种备选模式[格式],请高亮显示 SmartSync / Alternative Modes [备选模式]参数并按下 fl 按钮。每次按 下该按钮,模式增加,直至所选模式等于可用的最大值,下一次按下 fl,将恢复至第一种模式。Alternative...
  • Seite 199: Color[颜色]菜单

    Color[颜色]菜单 Brightness[亮度]: 按下 fi 或 按钮调整亮度。 Contrast[对比度]: 按下 fi 或 按钮调整对比度。 Red[红]、Green[绿]、Blue[蓝]: 按 fi 或 按钮增加或减小所选颜色的强度。 Saturation[饱和度-视频]: 该参数仅在输入为 16:9 形式,480P、576P 或隔行扫描时启用。 按 fi 或 调整显示图像的饱和度(色彩强度)。 Hue[色调-视频]: 该参数仅在输入为 16:9 形式,480P、576P 或隔行扫描时启用。 按 fi 或 调整显示图像的色调。...
  • Seite 200: Setup[设置]菜单

    Setup[设置]菜单 Input Format[输入格式]: 按 fi 或 fl 按钮匹配输入信号的格式。 注: 如果在 ScaleOR 中安装了 DVI 或 3G - SDI 输入模块,此参数将不可用。 如果此参数在安装 VGA 模块后“变灰”,VGA 模块将会预配置为仅接受显示为蓝色的格式。要选择其他输入格 式,或将 VGA 模块配置为允许从 OSM 或通过 RS-232 串行控制选择 输入格式,请参阅第 6 页的 VGA 模块开关 表。 当安装了 S-视频/复合视频模块,将提供三个输入格式参数选项:Auto*[自动]、S-Video[S-视频], 或Composite[复合视频]。若选择 Auto[自动],ScaleOR 将会在 S-Video[S-视频]和 Composite[复合视频]输入之...
  • Seite 201: Modes[模式]菜单

    Modes[模式]菜单 可用的输出模式会在选择了 Modes[模式]选项卡后显示。如果是使用 fl 按钮选择 Modes[模式]选项卡,该选项卡 的图例将变成 Modes 0-15[模式 0-15]并显示 0 至 15 模式。第二次按 fl 按钮时,会将选项卡的图例变成 Modes 16-31[模式 16-31]并显示 16 至 31 模式。如果第三次按下该按钮,选项卡的图例变成 Modes 32-47[模式 32-47]并 显示 32 至 47 模式。Mode 47[模式 47]尚未实施并将显示为 None[无]。最后,第四次按 fl 按钮时,选择 Picture [画面]菜单。如果是使用 fi 按钮选择 Modes[模式]选项卡,将发生与上述顺序相反的情况。下一页的表中显示了所 有可用的输出模式。...
  • Seite 202: 输出模式表

    仅 DVI 1920x1200@60Hz 仅 DVI 0015 DVI/SDI 1920x1080p@25Hz 0031 1152x864@75Hz 0047 仅 DVI 不适用 无 *注:如果模式包含“p/I”,则“p”(逐行扫描)将应用到 输出信号,“i”(隔行扫描)将应用到 输 [仅 DVI]模式将始终进行逐 SDI。DVI Only 出信号。仅包含“p”的模式将进行逐行扫描,不论输出是 或 行扫描,并且仅 端口将具有输出信号。 恢复出厂默认值 若要恢复出厂默认值,请关闭 ScaleOR,按住 MENU [菜单]按钮。在按住 MENU[菜单]按钮的同时,开启 装置电源。约 10 秒后,“Restoring Factory Defaults”[恢复出厂默认值]消息将会显示在连接至 ScaleOR 的 监视器上。...
  • Seite 203: 设置和测试串行端口

    设置和测试串行端口 硬件设置 开启 ScaleOR 电源。使用“USB 至 Mini 5 USB”(NDS 部件号:35Z0047)或等效电缆将您的 PC 连接至 ScaleOR。 Device Manager[设备管理器] 打开 PC 的 Device Manager[设备管理器]并选择 Ports (COM & LPT)[端口 (COM & LPT)]。查找 USB Serial Port (COMx)[USB 串行端 口 ((COMx)]条目。使用您在设置超级终端时,在 ( ) 中的端口号。 超级终端设置 下表显示了串行端口参数。 单击 Start[开始] 选择...
  • Seite 204: 故障排除和测试部分

    输出端口显示视频。如果来自 端口的视频可以显示,而来自 端口的视频无法显示,则可将 ScaleOR 的输出模式设为“仅 DVI”模式(请参阅第 15 页的 输出模 式表),用于将 端口连接至监视器的电缆可能出现故障,或 输出有缺陷。如果来自 端口的视频可以显示,而来自 端口的视频无法显示,即表示来自 端口的电缆可能出现 故障,或 端口有缺陷。 如果您确定其中一个输出端口有缺陷,请联系客户服务寻求援助。 USB 电缆松脱或有缺陷:确认 USB 电缆已完全插入 ScaleOR 的 USB 端口和 PC 的 USB 端口。 外部控制出现故障 控制程序出现故障:重新启动程序 控制 PC 出现故障:重新启动 PC 缓解: 从 ScaleOR 的前面板键盘对其进行控制...
  • Seite 205: 图纸和尺寸

    图纸和尺寸 4-40 线 .20" 深...
  • Seite 206: 连接器和针脚输出

    连接器和针脚输出 输入连接器 DVI 输入和输出连接器 DVI-D* 仅数字。 1 RED 6 GND RED 11 N. C. * 符合 DVI 1.0 2 GREEN 7 GND GREEN 12 DDC_SDA 3 BLUE 8 GND BLUE 13 HORIZ SYNC 针脚 针脚 信号 信号 4 N.C. 9 +5VDC 14 VERT SYNC.
  • Seite 207 交流功耗(额定) 系统重量 0.59 kg (1.3lbs) 环境 运行温度 至 C (+32 至 工作湿度 至 85% RH 2,000 m (6,600 工作海拔高度 英尺 存储温度 至 C (-4 至 +122 存储湿度 至 85% RH 10,000 m (33,000 英尺 存储海拔高度 注 a. 规格如有变更,恕不另行通知。现行规格请与 NDS 联系。...
  • Seite 208 SDI 支持的分辨率 DVI 支持的分辨率 水平 垂直 垂直 水平 垂直 垂直 信号参数 支持的范围 分辨率 分辨率 频率 分辨率 分辨率 频率 最小 640 x 480 至最大 1920 x 1200 活动分辨率 (Hz) (Hz) (像素) (线条) (像素) (线条) (水平 x 垂直 480i 29.97 1280 720p 483i 29.97 1280...
  • Seite 209: 清洁和消毒说明

    清洁和消毒说明 清洁和进行表面消毒之前,应关闭装置并将其从电源断开。 清洁: 用可接受清洁剂蘸湿的无绒布彻底擦拭所有外部表面。以下列出了可接受的清洁材料。用蒸馏水蘸湿的 无绒布擦拭所有外部表面,去除残留的洗涤剂。 消毒: 用 80% 乙醇蘸湿的无绒布擦拭所有外部表面,对装置进行消毒。允许装置风干。 注意: 请勿允许液体进入装置的内部,以及不要让外部表面接触如下所列的不可接受的溶剂,否则,可能会导 致装置严重损坏。 可接受的清洁材料: 醋(蒸馏白醋,5% 的酸度) 氨基玻璃清洁剂 可接受的消毒材料: 乙醇 80 % 按体积 不可接受的溶剂: MEK(甲乙酮) 甲苯 丙酮 注: 上面列出的可接受清洁和消毒材料已在 NDS 产品上进行测试,并且如果按照指示使用,将不会伤害产品 的磨光和/或其塑料部件。...
  • Seite 210: 电磁兼容性 (Emc) 表

    电磁兼容性 (EMC) 表 所有医疗电子装置必须符合 IEC 60601-1-2 的要求。需要慎待并遵守本指南中提供的 EMC 指导信息,并检 查同时运行的所有医疗装置,从而在外科手术之前确保所有其它医疗装置的电磁适应性和共存性。 接下来三页的 EMC 表供您参考。...
  • Seite 211 EMC 表 指南和制造商声明 - 电磁辐射 本产品设计用于以下规定的电磁环境。产品的客户或用户应确保在这类环境中使用。 电磁环境 - 指南 辐射 合规性 本产品只将射频能量用于其内部功能。因此,其射频辐射非常低,不太 RF(射频)辐射 组别 1 可能会对附近的电子设备造成任何干扰。 CISPR 11 本产品适合在以下设施之外的所有设施中使用,包括民用设施和直接连 RF(射频)辐射 A 级 CISPR 11 接到为民用建筑物供电的公共低压电网的设施。 谐波辐射 不适用 IEC 61000-3-2 电压波动/ 不适用 闪变辐射 IEC 61000 -3-3 指南和制造商声明 211;电磁抗扰度 本产品设计用于以下规定的电磁环境。产品的客户或用户应确保在这类环境中使用。 抗扰度测试 IEC 60601 测试级别 合规级别...
  • Seite 212 EMC 表 指南和制造商声明 - 电磁抗扰度 本产品设计用于以下规定的电磁环境。产品的客户或用户应确保在这类环境中使用。 电磁环境 - 指南 抗扰度测试 IEC 60601 测试级别 合规级别 使用便携式和移动 RF 通信设备时,其与本产品任何部分(包括电 3 Vrms 3 Vrms 传导射频 缆)之间的距离不小于根据发射机频率适用方程式计算出来的推 150 kHz 至 80 MHz IEC 61000-4-6 荐间隔距离。 建议的分离距离 3 V/m 3 V/m 辐射射频 80 MHz 至 2.5 GHz IEC 61000-4-3 P 是发射机制造商提供的发射机最大输出额定功率,以瓦特为单...
  • Seite 213 EMC 表 便携式和移动射频通信设备与产品之间的 建议分离距离 产品设计用于辐射 RF 干扰受到控制的电磁环境。 产品的客户或用户可根据通信设备的最大输出功率,按照以下建议使便携式和 移动 RF 通信设备(发射器)与产品之间保持最小的距离,帮助防止电磁干扰。 根据发射器频率的分离距离 发射器的额定最大输出功率 150 kHz 至 80 MHz 80 MHz 至 800 MHz 800 MHz 至 2.5 GHz 0.01 0.12 0.12 0.23 0.38 0.38 0.73 对于上面未列出其额定最大输出功率的发射器,可使用适用于该发射器频率的公式来估计以米 (m) 为单位的建议分离距离,其中 P 是根据发射器制造商、以瓦特 (W) 为单位的发射器最大输出功率额定值。 备注1 在...
  • Seite 216 Corporate Headquarters Europe Asia Pacific GSI Group Japan Corporation 5750 Hellyer Avenue Nijverheidscentrum 28 East Square Omori, San Jose, CA 95138 (USA) 2761 JP Zevenhuizen (ZH) 6-20-14 Minamioi, Shinagawa-ku Tel: 408 776 0085 The Netherlands Tokyo 140-0013, Japan Toll Free: 866 637 5237 Tel: + 31 180 63 43 56 ISO 9001:2008 and ISO 13485:2003;...

Inhaltsverzeichnis