Herunterladen Inhalt Inhalt Diese Seite drucken
Parkside PLLL 16 A2 Originalbetriebsanleitung

Parkside PLLL 16 A2 Originalbetriebsanleitung

Löt-arbeitsstation
Vorschau ausblenden Andere Handbücher für PLLL 16 A2:
Inhaltsverzeichnis

Werbung

Verfügbare Sprachen

Verfügbare Sprachen

LÖT-ARBEITSSTATION PLLL 16 A2
LÖT-ARBEITSSTATION
Originalbetriebsanleitung
STAZIONE DI SALDATURA
Traduzione delle istruzioni d'uso originali
IAN 275637
FER À SOUDER
Traduction des instructions d'origine
SOLDERING STATION
Translation of the original instructions

Werbung

Inhaltsverzeichnis
loading

Inhaltszusammenfassung für Parkside PLLL 16 A2

  • Seite 1 LÖT-ARBEITSSTATION PLLL 16 A2 LÖT-ARBEITSSTATION FER À SOUDER Originalbetriebsanleitung Traduction des instructions d’origine STAZIONE DI SALDATURA SOLDERING STATION Traduzione delle istruzioni d’uso originali Translation of the original instructions IAN 275637...
  • Seite 2 Klappen Sie vor dem Lesen die Seite mit den Abbildungen aus und machen Sie sich anschließend mit allen Funktionen des Gerätes vertraut. Avant de lire le mode d'emploi, ouvrez la page contenant les illustrations et familiarisez-vous ensuite avec toutes les fonctions de l'appareil. Prima di leggere aprire la pagina con le immagini e prendere confidenza con le diverse funzioni dell'apparecchio.
  • Seite 4: Inhaltsverzeichnis

    Importeur ............10 DE │ AT │ CH │ PLLL 16 A2    1...
  • Seite 5: Einleitung

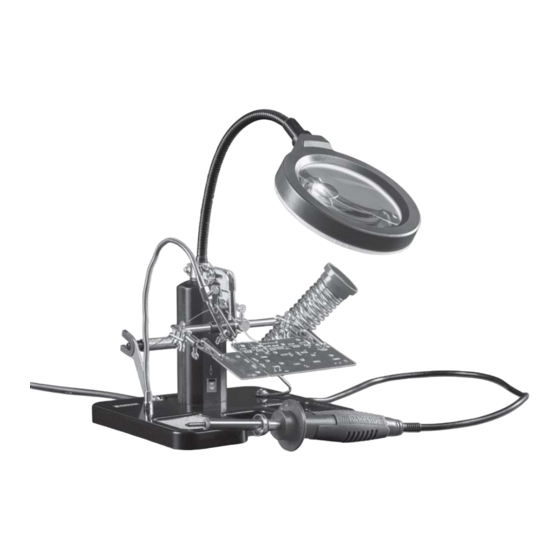
    Haushalt geeignet. Des Weiteren Lieferumfang verfügt das Gerät über einen Lötkolbenständer, eine Drahtspulenhalterung für Lötzinn, eine dreistufi- 1 Löt - Arbeitsstation PLLL 16 A2 ge Drahthalterung, sowie eine sog. 3. Hand zur 1 Lötkolben mit Lötspitze Hilfestellung bei Lötarbeiten.
  • Seite 6: Technische Daten

    Risiko eines elektrischen Schlages. b) Vermeiden Sie Körperkontakt mit geerdeten Oberflächen, wie von Rohren, Heizungen, Herden und Kühlschränken. Es besteht ein erhöhtes Risiko durch elektrischen Schlag, wenn Ihr Körper geerdet ist. DE │ AT │ CH │ PLLL 16 A2    3 ■...
  • Seite 7: Sicherheit Von Personen

    Andernfalls könnten an den Händen haftende oder unter dem Einfluss von Drogen, Alkohol Bleispuren über Lebensmittel oder Zigaretten in oder Medikamenten stehen. Ein Moment der den menschlichen Organismus gelangen. │ DE │ AT │ CH ■ 4    PLLL 16 A2...
  • Seite 8: Verwendung Und Behandlung Des Elektrowerkzeugs

    Der Gebrauch anderer als in der Bedienungs- Zweifel über die Arbeitsweise oder die Sicher- anleitung empfohlener Einsatzwerkzeuge oder heit des Produktes haben. anderen Zubehörs kann eine Verletzungsgefahr für Sie bedeuten. DE │ AT │ CH │ PLLL 16 A2    5 ■...
  • Seite 9: Vor Der Inbetriebnahme

    Stellen Sie den Lötkolben nach Gebrauch im- mer wieder zurück in den Lötkolbenständer ♦ Drücken Sie den Ein-/Ausschalter in die Position „OFF“. Ziehen Sie bei Nichtgebrauch den Netzstecker aus der Steckdose. │ DE │ AT │ CH ■ 6    PLLL 16 A2...
  • Seite 10: Led-Beleuchtung Ein-/ Ausschalten

    Bearbeitung des Werkstücks heiß werden. ♦ Klappen Sie die dritte Hand nach oben. ♦ Drehen Sie die Krokodilklemmen in die gewünschte Richtung. ♦ Klemmen Sie das Werkstück zwischen die beiden Krokodilklemmen. DE │ AT │ CH │ PLLL 16 A2    7 ■...
  • Seite 11: Löten

    Tücher. Vermeiden Sie eine über- triebene Reinigung und zu starken Druck. HINWEIS ► Vermeiden Sie es grundsätzlich, die Beleuch- tete Lupe mit Ihren Fingernägeln oder anderen scharfen Objekten zu berühren. │ DE │ AT │ CH ■ 8    PLLL 16 A2...
  • Seite 12: Entsorgung

    Dies gilt auch für ersetzte und reparierte Teile. Eventuell schon beim Kauf vorhan- dene Schäden und Mängel müssen sofort nach dem Auspacken gemeldet werden. Nach Ablauf der Garantiezeit anfallende Reparaturen sind kostenpflichtig. DE │ AT │ CH │ PLLL 16 A2    9 ■...
  • Seite 13: Abwicklung Im Garantiefall

    Ein als defekt erfasstes Produkt können Sie dann unter Beifügung des Kaufbelegs (Kassenbon) und der Angabe, worin der Mangel besteht und wann er aufgetreten ist, für Sie portofrei an die Ihnen mitgeteilte Service Anschrift übersenden. │ DE │ AT │ CH ■ 10    PLLL 16 A2...
  • Seite 14 Importateur ........... . . 20 FR │ CH │ PLLL 16 A2    11...
  • Seite 15: Introduction

    fixation pour bobine de fil à souder, Matériel livré un support pour trois calibres de fil différents ainsi 1 fer à souder PLLL 16 A2 qu'un dispositif dit "3e main" pour faciliter la réali- 1 fer à souder terminé par une pointe de soudage sation des soudures.
  • Seite 16: Caractéristiques Techniques

    à la terre telles que les tuyaux, les radiateurs, les cuisinières et les réfrigérateurs. Il existe un risque accru de choc électrique si votre corps est relié à la terre. FR │ CH │ PLLL 16 A2    13 ■...
  • Seite 17: Sécurité Des Personnes

    Un moment d'inattention en cours d'uti- trer dans l'organisme humain via les aliments ou lisation d'un outil peut entraîner des blessures les cigarettes. graves des personnes. │ FR │ CH ■ 14    PLLL 16 A2...
  • Seite 18: Utilisation Et Entretien De L'outil

    ■ S'adresser à un spécialiste en cas de doute quant au mode de travail ou à la sécurité du produit. FR │ CH │ PLLL 16 A2    15 ■...
  • Seite 19: Avant La Mise En Service

    Après usage, toujours replacer le fer à sou- dans le support de fer à souder ♦ Placez l'interrupteur Marche/Arrêt en position "OFF". En cas de non utilisation, débrancher immédiatement la fiche secteur de la prise secteur. │ FR │ CH ■ 16    PLLL 16 A2...
  • Seite 20: Mise En Marche / Mise Hors Service Éclairage Par Led

    ♦ Basculer la troisième main vers le haut. ♦ Tourner les pinces crocodiles dans la direc- tion voulue. ♦ Brider la pièce entre les deux pinces crocodiles. FR │ CH │ PLLL 16 A2    17 ■...
  • Seite 21: Souder

    Éviter un nettoyage trop intense et une pression excessive. REMARQUE ► Toujours éviter de toucher la loupe éclairée avec les ongles ou avec d'autres objets présen- tant des arêtes vives. │ FR │ CH ■ 18    PLLL 16 A2...
  • Seite 22: Élimination

    également aux pièces remplacées ou réparées. Les dommages et vices éventuellement déjà présents à l’achat doivent être signalés immédiatement après le déballage. Toute réparation survenant après la période sous garantie fera l’objet d’une facturation. FR │ CH │ PLLL 16 A2    19 ■...
  • Seite 23: Étendue De La Garantie

    ▯ Si des erreurs de fonctionnement ou d’autres vices venaient à apparaître, veuillez d’abord contacter le département service clientèle cité ci-dessous par téléphone ou par e-mail. │ FR │ CH ■ 20    PLLL 16 A2...
  • Seite 24 Importatore........... . . 30 IT │ CH │ PLLL 16 A2    21...
  • Seite 25: Introduzione

    Volume della fornitura di un supporto per saldatore, un sostegno per bobina filo per lo stagno di saldatura, un supporto 1 stazione di saldatura PLLL 16 A2 del filo a tre livelli nonché una cosiddetta terza 1 saldatore con punta del saldatore mano come ausilio nei lavori di saldatura.
  • Seite 26: Dati Tecnici

    Evitare il contatto corporeo con superfici col- legate a terra, come tubi, termosifoni, stufe e frigoriferi. Quando il corpo è a diretto contatto con la terra sussiste un maggiore pericolo di scosse elettriche. IT │ CH │ PLLL 16 A2    23 ■...
  • Seite 27: Sicurezza Delle Persone

    Un solo umano tramite i generi alimentari o le sigarette. momento di disattenzione nell'uso dell'elettrou- tensile può dare luogo a gravi lesioni. │ IT │ CH ■ 24    PLLL 16 A2...
  • Seite 28: Uso E Manipolazione Dell'elettro Utensile

    ■ Se sussistono dubbi in merito all'utilizzo, al cati nel manuale di istruzioni può comportare il funzionamento o alla sicurezza del prodotto, pericolo di lesioni. rivolgersi a uno specialista. IT │ CH │ PLLL 16 A2    25 ■...
  • Seite 29: Prima Della Messa In Funzione

    NOTA ► Dopo l'uso rimettere sempre il saldatore nell'apposito supporto ♦ Portare l'interruttore ON/OFF in posizione "OFF". In caso di mancato utilizzo staccare la spina dalla presa di corrente. │ IT │ CH ■ 26    PLLL 16 A2...
  • Seite 30: Accensione/Spegnimento Dell'illuminazione A Led

    ♦ Ribaltare la terza mano verso l'alto. ♦ Ruotare i morsetti a coccodrillo nella direzione desiderata. ♦ Bloccare il pezzo da lavorare tra i due morsetti a coccodrillo. IT │ CH │ PLLL 16 A2    27 ■...
  • Seite 31: Saldatura

    All'atto dell'acqui- sto informarsi sul tipo di applicazione e sulla ► Evitare assolutamente di toccare la lente illu- lega saldante adeguata. minata con le unghie o altri oggetti affilati. │ IT │ CH ■ 28    PLLL 16 A2...
  • Seite 32: Smaltimento

    Danni e vizi eventualmente già presenti al momento dell’acquisto devono venire segnalati immediatamente dopo che l’apparecchio è stato disimballato. Le riparazioni eseguite dopo la scadenza del periodo di garanzia sono a pagamento. IT │ CH │ PLLL 16 A2    29 ■...
  • Seite 33: Ambito Della Garanzia

    ▯ Qualora si presentassero malfunzionamenti o altri tipi di vizi, contatti innanzitutto il reparto assistenza clienti qui di seguito indicato telefoni- camente o via e-mail. │ IT │ CH ■ 30    PLLL 16 A2...
  • Seite 34 Importer ............40 │ PLLL 16 A2  ...
  • Seite 35: Introduction

    Package contents addition, the appliance has a soldering-iron stand, a wire-spool holder for solder, a three-stage wire 1 soldering station PLLL 16 A2 assembly, and also a so-called third hand as an 1 soldering iron with soldering tip aid during soldering work. The illuminated magnify-...
  • Seite 36: Technical Details

    Do not abuse the cord. Never use the cord for carrying, pulling or unplugging the power tool. Keep cord away from heat, oil, sharp edges or moving parts. Damaged or entangled cords increase the risk of electric shock. │ PLLL 16 A2    33 ■...
  • Seite 37: Personal Safety

    CAUTION! RISK OF FIRE! Use only the special multi-functional holder or another fireproof sur- face when putting down the soldering iron. ■ During breaks in work, the soldering iron must be placed in the multi-functional holder. │ ■    GB PLLL 16 A2...
  • Seite 38: Power Tool Use And Care

    ■ Consult a professional if you are in any doubt about the operation or the safety of this product. │ PLLL 16 A2    35 ■...
  • Seite 39: Before Use

    ► After use, always replace the soldering iron in the soldering iron stand ♦ Press the On/Off switch to the "OFF" position. Always remove the plug from the socket when not in use. │ ■    GB PLLL 16 A2...
  • Seite 40: Switching The Led Light On And Off

    The crocodile clips can get very hot during use. ♦ Fold the third hand upwards. ♦ Turn the crocodile clips in the desired direc- tion. ♦ Clamp the workpiece between the two crocodile clips. │ PLLL 16 A2    37 ■...
  • Seite 41: Soldering

    Do not use any acid, alcohol or other solvents or rough, linty cloths to clean the lens. Avoid excessive cleaning and pressure. NOTE ► Avoid touching the illuminated magnifying glass with your fingernails or other sharp objects. │ ■    GB PLLL 16 A2...
  • Seite 42: Disposal

    Any damage and defects present at the time of purchase must be reported immediately after unpacking. Repairs carried out after expiry of the warranty period shall be subject to a fee. │ PLLL 16 A2    39 ■...
  • Seite 43: Scope Of The Warranty

    You can return a defective product to us free of charge to the service address that will be provided to you. Ensure that you enclose the proof of purchase (till receipt) and information about what the defect is and when it occurred. │ ■    GB PLLL 16 A2...
  • Seite 44 KOMPERNASS HANDELS GMBH BURGSTRASSE 21 44867 BOCHUM DEUTSCHLAND / GERMANY www.kompernass.com Stand der Informationen · Version des informations Versione delle informazioni · Last Information Update: 03 / 2016 Ident.-No.: PLLL16A2-032016-1 IAN 275637...

Inhaltsverzeichnis