lamber A81-ek Installation Bedienung
Gemüsespülmaschine mit schleuder
Vorschau ausblenden
Andere Handbücher für A81-ek:
- Installation bedienung (10 Seiten) ,
- Installation bedienung (55 Seiten)
Inhaltsverzeichnis
Werbung
Verfügbare Sprachen
Verfügbare Sprachen
Quicklinks
Werbung
Inhaltsverzeichnis

Verwandte Anleitungen für lamber A81-ek


Inhaltszusammenfassung für lamber A81-ek
- Seite 1 Macchina lava-centrifuga verdure Laveuse-centrifugeuse à légumes Vegetable washing-drying machine Gemüsespülmaschine mit Schleuder Aparato lava y seca verduras A81-ek ISTRUZIONI D'USO INSTRUCTIONS D'EMPLOI INSTRUCTIONS MANUAL INSTALLATION-BEDIENUNG INSTALACION-UTILIZACION REV.15-2018...
- Seite 3 DECLARACIÓN DE CONFORMIDAD Nous soussignés - The following - Die Unterzeichnete Fa – Noi - Nosotros: LAMBER SRL– Via Italia 6 – 26855 Lodivecchio (LO) ITALY Attestons sous notre responsabilité que - Declare under our responsibility that: Erklärt auf eigene Verantwortung dass - Dichiariamo sotto la nostra responsabilità che Declaramos bajo nuestra exclusiva responsabilidad que el producto : Appareil –...
- Seite 4 Apparecchio - Appareil – Apparatus - Apparat –Producto: LAVAVERDURE CENTRIFUGA-LAVE ESSOREUSE A' LEGUMES- VEGETABLES WASHING DRYING MACHINE GEMÜSESPÜLMASCHINE MIT SCHLEUDER-APARATO LAVA Y SECA VERDURAS Marca - Marque - Trademark - Marke - Marca : LAMBER Fabbricante - Fabricant - Manufacturer - Fabrikant –Fabricante: LAMBER SRL A81-ek (Electronic) Type / Modèle - Model - Type / Model –Modello - Modelo...
- Seite 5 The directive mentioned above, to which make reference for further details, provides for punitive actions in case of illegal disposal of such waste. Lamber guarantees a percentage of recovery at least of 90% in medium weight for each equipment. The 80% - always as regards the medium weight- of recovered material is recycled or reused.
- Seite 6 INDICE ITALIANO Parte prima - Norme per l'Utilizzatore pag. 13 Fate conoscenza con l'apparecchio pag. 14 Preparazione della macchina, lavaggio verdure in foglia, lavaggio di tuberi o frutta, pag. 15 consigli utili Parte seconda - Istruzioni per l'Installatore pag. 45 Schema allacciamenti pag.
- Seite 7 NOTE GENERALI ITALIANO Vi ringraziamo per la scelta da Voi fatta nell'acquisto della Vostra Lavaverdure. Il perfetto funzionamento della macchina e risultati di lavaggio ottimali sotto il profilo igienico sanitario potranno essere garantiti solo se tutte le avvertenze del presente Manuale verranno rispettate. La macchina Lavaverdure deve essere utilizzata solo da personale addetto all'uso della stessa.
- Seite 8 INTRODUZIONE ITALIANO E NORME DI SICUREZZA OSSERVAZIONI PRELIMINARI Leggere attentamente le avvertenze contenute nel presente libretto di istruzioni, in quanto forniscono importanti indicazioni riguardanti la sicurezza d'installazione, d'uso e di manutenzione: Conservare con cura questo libretto per ogni ulteriore consultazione dei vari operatori; Le illustrazioni e i disegni che mostrano la macchina sono da intendersi solamente come riferimenti generici e non sono necessariamente accurati in ogni particolare;...
- Seite 9 INTRODUCTION FRANÇAIS ET NORMES DE SECURITE' REMARQUES PRELIMINAIRES Lisez attentivement les notices contenues dans ce mode d'emploi, car elles fournissent d'importantes indications concernant la sécurité d'installation, d'emploi et d'entretien. Gardez avec soin ce livret pour toute consultation ultérieure des divers opérateurs. Les illustrations et les dessins qui montrent l'appareil ne sont à...
- Seite 10 INTRODUCTION ENGLISH AND SAFETY NORMS PRELIMINARY OBSERVATION Carefully read the instructions reported in the present user manual, as it gives important indications about safety of installation, operation and maintenance: carefully keep the present manual for further consultations; the illustrations and drawings showing the machine are intended for general reference only and are not necessarily accurate in every instance;...
- Seite 11 EINFÜHRUNG DEUTSCH UND SICHEREITSNORMEN VORANMERKUNGEN Lesen Sie bitte aufmerksam die in vorliegendem Gebrauchshandbuch enthaltenen Anmerkungen, die Ihnen wichtige Hinweise zur Installationssicherheit, Bedienung und Wartung geben: Bewahren Sie das Gebrauchshandbuch gut auf, zum eventuellen Nachschlagen für weitere Bediener; die Abbildungen und Zeichnungen der Maschine sind nur als allgemeiner Bezug zu verstehen und nicht in jeder Einzelheit genau;...
- Seite 12 INTRODUCCIÓN ESPAÑOL Y NORMAS DE SEGURIDAD OBSERVACIONES PRELIMINARES Leer atentamente las advertencias del presente manual de instrucciones, ya que presenta indicaciones importantes, las cuales se refieren a la seguridad de instalación, uso y mantenimento de la máquina; -Conservar cuidadosamente este manual para cualquier consultación ulterior que tuvieran que efectuar los varios operadores;...
-
Seite 13: Instructions Pour L'utilisateur
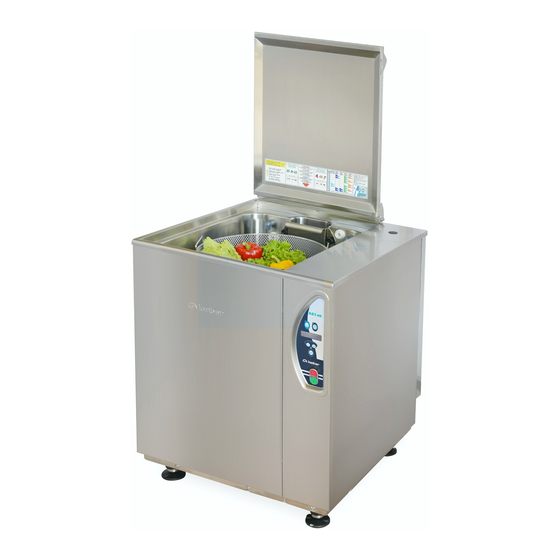
NORME PER L'UTENTE INSTRUCTIONS POUR L'UTILISATEUR INSTRUCTIONS FOR THE USER BEDIENUNGSANLEITUNG INSTRUCCIONES PARA EL USUARIO... - Seite 14 Fate conoscenza con l'apparecchio Learn to use the appliance Faites connaissance avec l'appareil Para conocer el aparato Wollen Sie den Apparat kennenlernen base A-81-ek special standard 1) Cestello rotante 2) Coperchio 3) Rubinetto 4) Doccia a innesto 5) Interruttore generale Pulsante scarico vasca Pulsante ciclo 8) Display...
-
Seite 15: Preparazione Della Macchina
ITALIANO Parte prima - NORME PER L'UTILIZZATORE PREPARAZIONE DELLA MACCHINA Dare corrente tramite l'interruttore a muro; Premere l'interruttore "A" (fig. 2) in posizione I (ACCESO). II display "D" si accende e avviene il riempimento della vasca fino al primo livello, raggiunto il quale la macchina è... -
Seite 16: Manutenzione Giornaliera
E’ comunque possibile modificare anche i programmi Per cambiare ciclo premere il tasto "C" e selezionare il standard presenti . Per cambiare i tempi di lavaggio (2 nuovo programma utilizzando i tasti “E” e “G” (+ -). minuti) e di centrifugazione (30 secondi) preselezionati Premere nuovamente il tasto “C”. -
Seite 17: Consigli Utili
ATTENZIONE! Non lavare la macchina e l’area circostante ad essa con idranti, getti di vapore o pulitori ad alta Il cestello è costruito in acciaio inossidabile. pressione; Durante pulizia sbatterlo Durante la pulizia del pavimento fare attenzione pavimento.Trattarlo cura controllare a non bagnare troppo il basamento della macchina, visivamente che non vi siano parti scheggiate. - Seite 18 I parametri modificabili sono i seguenti: Lavaggio 1 : 120” (modificabile da 0” a 900” secondi) Pompa: (SI – No) (No per lavaggio delicato) Risciacquo: (SI – No) Centrifuga: 30” (modificabile 0” a 360” secondi) Velocità Centrifuga: Vel. 1: 160 giri/min (Default 320 giri/min) Vel.
- Seite 19 INCONVENIENTI POSSIBILI - CAUSE - RIMEDI ANOMALIA CAUSA RIMEDIO Non si accende la macchina Interruttore generale disinserito Inserire l'interruttore Lavaggio insufficiente Pressione insufficiente Agire sul regolatore di flusso Tempo insufficiente Cambiare ciclo di lavaggio Filtro di lavaggio sporco Pulire accuratamente il Filtro La Fase di Lavaggio parte anche Sonde di livello sporche Pulire le Sonde di livello a vasca vuota...
-
Seite 20: Pulizia Giornaliera
CONSIGLI UTILI PER LA MANUTENZIONE DELL'ACCIAIO INOSSIDABILE L'acciaio inossidabile è così chiamato perché non subisce l'azione aggressiva dell'ossigeno dell'aria; esso deve la sua resistenza ad un sottile strato molecolare di ossigeno che si forma sulla sua superficie e che lo protegge da ulteriore ossidazione. -
Seite 21: Préparation De La Machine
FRANÇAIS Première partie - INSTRUCTIONS POUR L'UTILISATEUR PRÉPARATION DE LA MACHINE Brancher l'intérrupteur à mur; Tourner l'intérrupteur "A" (fig.2) en position I (ALLUME); L’écran "D" s’allume et le chargement de la cuve commence jusqu’au premier niveau, et à ce point-là la machine est prête pour le lavage, le rinçage et l’essorage (sur l’écran paraîtra l’inscription “Programme 1 Start) (voir tableau 1 pour les programmes). -
Seite 22: Entretien
Il est quand même possibile de modifier aussi les Pour arrêter l’opération momentanément presser de programmes standard qui sont présents. Pour changer nouveau le bouton "C" (sur l’écran paraîtra “pause”). les temps de lavage (2 minutes) et d’essorage (30 Afin de changer de cycle, appuyer sur la touche "C" et secondes) préséléctionnés, voir chapitre concernant la séléctionner le nouveau programme en utilisant les programmation. -
Seite 23: Conseils Utiles
-Couper le courant (bouton « A » en position « 0 ») et Ne pas laisser d’ustensiles ou d’autres objects débrancher l’interruptur général à mur. dans la machine, Enlever le panier de sa siège et le laver avec Vérifiez qu’il n’y a pas de corps étrangers soin. - Seite 24 - si l'on veut utiliser l'appareil pour d'autres sortes de Les paramètres modifiables sont les suivants: légumes, il vaut mieux procéder à un lavage soigneux Lavage1 : 120” (reglable de 0” a 900” de tout l’appareil. secondes) Pompe : (OUI – NON) (Non pour lavage délicat) Rinçage : (OUI–...
- Seite 25 INCONVENIENTS POSSIBLES - CAUSES - REMEDES PROBLÈMES CAUSES REMÈDES La machine ne demarre pas Interrupteur général débranché; Insérer l'interrupteur; Lavage insuffisant Pression insuffisante, Agir sur le régulateur de débit, Temps insuffisant ; Augmenter le temps de lavage; Filtre de lavage sale; Nettoyer soigneusement le filtre;...
- Seite 26 CONSEILS UTILES POUR L'ENTRETIEN DE L'ACIER INOXYDABLE L'acier inoxydable est ainsi appelé parce qu'il ne subit pas l'action agressive de l'oxygène contenu dans l'air. Sa résistance est due à une mince couche moléculaire d'oxyde qui se forme à la surface et le protège contre l'oxydation.
- Seite 27 ENGLISH First Section - FOR THE USER MACHINE SETTING Turn on the power by means of the wall switch; Turn switch "A" (fig.2) to position I (START UP); The display "D" turns on and the tank loading starts until the first level, at which the machine is ready for washing, rinsing, and drying (on the display you’ll see “Start Program 1”) ( see board 1 for the programs).
-
Seite 28: Maintenance
At the end of the cycle the display shows “End of Push button "C" to start the cycle (flashing led ). program” and the total time of the complete washing cycle. To repeat the same cycle you need to close the door e and push button “START”. -
Seite 29: Useful Advice
When clearing the floor be careful not to ATTENTION! saturate the base of the machine, in order to The basket for vegetables is made of stainless steel. avoid a prolonged stagnation of water; During its cleaning do not beat it against the floor. To clean the inside of the machine, use a Handle the basket with care and visually check that brush or a soft cloth;... - Seite 30 The modifiable parameters are the following: LIGHT VEGETABLES Washing 1 : 120” (setting from 0 to 900” seconds). Pump: (Yes – No) (No for soft washings) Rinse: (Yes – No) Max. load per cycle Production per hour Drying: 30 (setting from 0” to 360” seconds) Vel .
- Seite 31 POSSIBLE TROUBLES - CAUSES - SOLUTIONS PROBLEMS CAUSES SOLUTIONS The machine doesn't catch Main switch is switched off; Put ON the main switch; Insufficient Washing Insufficient pressure Act on flow regulator Insufficient time; Increase wash time; Dirty wash filter; Clean filter carefully; Wash phase starts up even Dirty level probe Clean the level probe...
- Seite 32 USEFUL HINTS FOR STAINLESS STEEL MAINTENANCE Stainless steel is so called because it is not affected by oxidation, this is due to a thin molecular layer of oxide on the surface which protects againts further oxidation. There are, however, substances which can modify or destroy this layer, giving rise to corrosion: besides preventing the protective film of oxide from reforming, these substances corrode the stainless steel itself and can cause irreparable damage.
-
Seite 33: Teil 1 - Für Den Benutzer
DEUTSCH Teil 1 - FÜR DEN BENUTZER INBETRIEBNAHME Gerät durch Betätigung des dazu bestimmten Wand-Hauptschalter unter Spannung setzen. Klappe zumachen und Drehschalter "A" (Abb.2) auf Stellung (EIN) drehen. Wenn Display "D" eingeschaltet ist erfolgt die Tankfüllung ein bis auf 1st. Niveau, damit ist die Maschine fertig zum Waschen, Nachspülen, und Schleudern (auf den Display kommt das Wort “Program 1 Start) (Schauen Sie Tafeln 1 für die Programmen). -
Seite 34: Waschen Von Knollenfrüchten Und Obst
Um der Zyklus auf null bringen (der aber schon Damit das Zyklus starten kann drücken Sie eingeschaltet wurde) auf Taste "C" drücken für 3 Taste "C" (Led leuchtet). Sekunden Um den selben Zyklus wiederholen können, bitte Tür Am ende der Zyklus der Display zeigt „Programm Ende“ wiederzumachen und auf Taste “START”... -
Seite 35: Nützliche Hinweise
Den Strom abstelle (Knopf „A“) und den hauptschalter ausschalten Maschine nicht Dauerluft oder Wasserstrahl, Dampfstrahl oder Hochdruckstrahl säubern; Bei Reinigung des Fußbodens, darauf achten, ACHTUNG! den Maschinensockel nicht zu stark zu wässern, damit DIE TÜR NICHT OFFENLASSEN AM ENDE DEN kein stehendes Wasser übrig bleibt. - Seite 36 Folgende Parameter können Sie ändern : LEICHTE GEMÜSE Waschung 1: 120“: (änderung möglich von 0” bis 900” Sekunden). Elektropumpe: (JA – NEIN) (Nicht für leichte Max. Laden je Zyklus Prod. pro Stunde Waschung) Nachspülung: (JA – NEIN) 2,5 - 3 50 - 60 kg/h Schleder 30: (änderung möglich von 0”...
- Seite 37 MÖGLICHE STÖRUNGEN - URSACHEN - ABHILFEN STORÜNG URSACHE ABHILFE Das Gerät läuft nicht an Hauptschalter wurde nicht in Hauptschalter drehen; Startposition gedreht; schlechtes Spülen unzureichender Druck; Wasserdruckventil regeln; unzureichende Spüldauer; Spüldauer verlängern; verschmutzer Spülfilter; Filter gründlich reinigen; Spülgang beginnt auch bei verschmutzte Wassersonde;...
-
Seite 38: Tägliche Reinigung
NÜTZLICHE HINWEISE ZUR WARTUNG VON NICHT OXYDIERENDEM EDELSTAHL Nicht oxydierender Edelstahl hat die Eigenschaft, der agressiven Wirkung von Sauerstoff zu widerstehen. Diese Eigenschaft beruht auf der Tatsache, daß sich auf dessen Oberfläche eine dünne Sauerstoffschicht bildet, die weitere Oxydationsprozesse verhindert. Es gibt jedoch Stoffe, die diese Sauerstoffschicht verändern oder beschädigen können, was Korrosionsprozesse, sowie unersätzliche Schäden zur Folge hat. - Seite 39 ESPAÑOL Primera parte - INSTRUCCIONES PARA EL USUARIO PREPARACION DE LA MÀQUINA Conectar el interruptor de pared; Pulsar el interruptor "A" (fig.2) a la posicìon I (ENCENDIDO); El display "D" se enciende, entonces, la cuba se llena de agua hasta el 1er. nivel, cuando se ha alcanzado este nivel, la máquina está...
- Seite 40 Pulsar nuevamente el botón “C”. Pulsa el pulsante "C" para comenzar el ciclo (led centelleante). Para acerar el ciclo ya en marcha, pulsa el botón “C” Para repetir el mismo ciclo hay que cerrar la puerta y sin dejarlo por 3 segundos. pulsar “START”.
-
Seite 41: Consejos Utiles
No lavar la máquina y el aire presente con hidrantes, chorros de agua o limpiadores de alta ATENCION! presión; DEJAR PUERTA ABIERTA FINALIZAR OPERACIONES Mientras se limpia el suelo tener cuidado a no MANUTENCIÓN. mojar mucho la base de la máquina, para evitar que se junte por mucho tiempo el agua;... - Seite 42 Los parámetros que se pueden modificar son los siguientes: Lavado 1 : 120” (modificable de 0” a 900” segundos) Bomba: (SI – No) (No para lavado delicado) Aclarado: (SI – No) Centrifuga: 30 (es posible modificar de 0” a 360” segundos) Velocidad Centrifugadora: Vel.
- Seite 43 INCONVENIENTES POSIBLES - CAUSAS - SOLUCIONES ANOMALIA CAUSA SOLUCION La máquina no funciona Interruptor general desactivado Conectar el interruptor Lavado insuficiente Presión insuficiente Actuar sobre el regulador de flujo Tiempo insuficiente Aumentar tiempo de lavado Filtro de lavado sucio Limpiar el filtro Lava con la cuba vacía Sondas de nivel sucias Limpiar las sondas de nivel...
- Seite 44 SOBRE EL MANTENIMIENTO DEL ACERO INOXIDABLE El acero inoxidable, es así llamado porque no sufre la acción agresiva del oxígeno del aire, debe su resistencia a una capa molecular de óxido que se forma sobre la superficie y que lo protege de una posterior oxidación.
- Seite 45 NORME PER L’INSTALLATORE Le istruzioni che seguono sono rivolte a personale qualificato, il solo autorizzato ad attuare le verifiche e le eventuali riparazioni. La Ditta declina ogni responsabilità nel caso di interventi effettuati dapersonale non qualificato e/o utilizzo di ricambi non originali. INSTRUCTIONS POUR L'INSTALLATEUR Les instructions suivantes sont adressées à...
- Seite 46 Schema allacciamenti Installation Installation Installationsblatt Esquema instalación A-81-ek START DOOR OPEN DOOR OPEN per macchine con pompa di scarico pour machines avec pompe de vidange for machines with drain pump für machinen mit Ablaufpumpe per macchine senza pompa di scarico pour machines sans pompe de vidange for machines without drain pump für machinen ohne Ablaufpumpe...
-
Seite 47: Collegamento Elettrico
ITALIANO Parte seconda - NORME PER L'INSTALLATORE L'allacciamento, la messa in funzione e l'eliminazione di inconvenienti deve essere eseguita da un installatore qualificato. L'impianto interno, come pure i locali in cui vengono installate apparecchiature per comunità, devono rispondere alle norme prevenzione infortuni ENPI e alle norme elettriche CEI. La Ditta declina ogni responsabilità... - Seite 48 1) Raccordare l'estremità del tubo di Tenendo sempre premuti i tasti “E“ e “G“ scarico "S" (fig.3 - pag.46) al pozzetto di (“+”e“-“), attendere 3 secondi finchè sul scarico. Lo scarico dovrà essere in pendenza per display apparirà la scritta “PARAMETRI favorire l'evacuazione dell'acqua;...
-
Seite 49: Branchement Electrique
FRANÇAIS Deuxième partie - INSTRUCTIONS POUR L'INSTALLATEUR Le branchement, la mise en service et l'élimination des inconvenients impliquent une exécution par un personnel compétent. Remarque: les installations à l'interieur et les locaux doivent correspondre aux normes de prevention des accidents. La Maison decline toute responsabilité... - Seite 50 Le tuyau de vidange devra pencher pour Toujours en pressant les boutons “E“ et favoriser l'evacuation des laitiers: le diamètre “G“ (“+” et “-“), attendre 3 seconds des tuyaux de vidange placés sous le plancher sera de 80-100 mm. jusqu’à quand sur le display va apparaître ‘’PARAMÈTRES USINE’’...
-
Seite 51: Electrical Connection
ENGLISH Second Section - FOR THE INSTALLER Connection, starting-up of the appliance and troubleshooting must be carried out by trained and qualified fitters. Caution: indoor electric network as well as ambient where the appliance is installed, must strictly comply with standards and safety regulations in force. The Manufacturer cannot assume any responsibility for any damage to persons or property deriving from the non-observance of the above-specified norms. -
Seite 52: Water Connections
Press at the same time buttons “E“ and WATER CONNECTIONS “G“ (“+” and “-“) and then give power to Water installation must have the following the machine by pressing button ‘’A’’ to characteristics: position On; Temperature: °C 10÷12 Always pressing buttons “E“ and “G“ Dynamic Pressure : 2 ÷... -
Seite 53: Teil 2 - Für Den Installateur
DEUTSCH Teil 2 - FÜR DEN INSTALLATEUR Der Anschluss, die Umstellung auf andere Stromarten, die erste Betriebsanschliessung, sowie das Beseitigen von Mängelnmuss entweder durch Personal, welches von uns geschult wurde, oder aber durch Fachleute, durchgeführt werden. Achtung: das interne Leitungssystem, sowie die Räume, wo Grossküchen Geräte aufgestellt werden, müssen den Unfallverhütung svorschriften und den VDE Bestimmugen entsprechen. -
Seite 54: Wasseranschluß - Ablauf
Einschalten, Taste “A” drucken auf WASSERANSCHLUß - ABLAUF Position On; 1) Das Abflußrohrende "S" (fig.3 - s:46) an den Tasten “E“ und “G“ (“+” und “-“) immer Ablußbrunnen anschließen. drucken lassen, warten Sie 3 Sekunden Abluß sollte einfacheren bis auf Display das Wort “... -
Seite 55: Conexion Electrica
ESPAÑOL Segunda parte - INSTRUCCIONES PARA EL INSTALADOR La instalación y eventuales intervenciones técnicas deben ser ejecutadas por personas con la debida experiencia o por un instalador cualificado. ATENCION: la instalación así como los locales donde se instale el aparato, deben se conforme a las normas en vigor. - Seite 56 Tener siempre apretados los botones “E“ Temperatura 10÷12° Presión dinámica : 2÷4 bar (200÷400 kPa); y “G“ (“+” y “-“) esperar 3 segundos hasta que en el display aparezca la frase 1) Conectar final tubo descarga "S" (fig.3 - pág.46) a la tubería ó “PARAMETROS FÁBRICA”...