Inhaltsverzeichnis
Werbung
Verfügbare Sprachen
Verfügbare Sprachen
Quicklinks
Cronotermostato Easy - da incasso
Easy timed-thermostat - flush mounting
Chronothermostat Easy - à encastrer
Cronotermostato Easy - de empotrar
Chrono-Thermostat Easy - für den Unterputz
GW 10 764
GW 12 764
GW 14 764
MANUALE DI INSTALLAZIONE
INSTALLATION MANUAL - MANUEL D'INSTALLATION
MANUAL DE INSTALACIÓN - INSTALLATIONSHANDBUCH
Werbung
Kapitel
Inhaltsverzeichnis

Verwandte Anleitungen für Gewiss GW 10 764


Inhaltszusammenfassung für Gewiss GW 10 764
- Seite 1 Cronotermostato Easy - da incasso Easy timed-thermostat - flush mounting Chronothermostat Easy - à encastrer Cronotermostato Easy - de empotrar Chrono-Thermostat Easy - für den Unterputz GW 10 764 GW 12 764 GW 14 764 MANUALE DI INSTALLAZIONE INSTALLATION MANUAL - MANUEL D'INSTALLATION...
- Seite 2 Ingresso per sensore di temperatura esterna LED di programmazione Input for external temperature sensor Programming LED - LED de programmation Entrée capteur de température externe LED de programación - Programmier-LED Entrada sensor de temperatura exterior Tasto di programmazione Eingang des Außentemperatur-Sensor Programming key Ingresso ausiliario per contatto libero da potenziale Touche de programmation...
-
Seite 3: Inhaltsverzeichnis
INDICE pag. AVVERTENZE GENERALI Contenuto della confezione ..........4 DESCRIZIONE GENERALE In breve . -
Seite 4: Avvertenze Generali
L’organizzazione di vendita GEWISS è a disposizione per chiarimenti e informazioni tecniche. Gewiss SpA si riserva il diritto di apportare modifiche al prodotto descritto in questo manuale in qualsiasi momento e senza alcun preavviso. Contenuto della confezione n. -
Seite 5: Descrizione Generale
DESCRIZIONE GENERALE In breve Il Cronotermostato Easy da incasso consente di gestire automaticamente, su base settimanale, la temperatura dell’ambiente in cui è installato o di altro ambiente in caso di utilizzo con un termostato Easy o con un sensore di temperatura esterna. La regolazione della temperatura viene effettuata comandando, su bus KNX, gli attuatori KNX che controllano gli elementi di riscaldamento o condizionamento, compresi i fan coil. -
Seite 6: Funzioni
DESCRIZIONE GENERALE DESCRIZIONE GENERALE Funzioni I canali di ingresso del cronotermostato possono essere configurati con Easy Controller per svolgere, a scelta, una delle seguenti funzioni: Ricezione comandi remoti Il cronotermostato è in grado di ricevere da altri dispositivi KNX (ad es: remotizzatore Easy) i comandi per impostare il tipo di funzionamento (riscaldamento o condizionamento) e la modalità... -
Seite 7: Posizione Dei Comandi
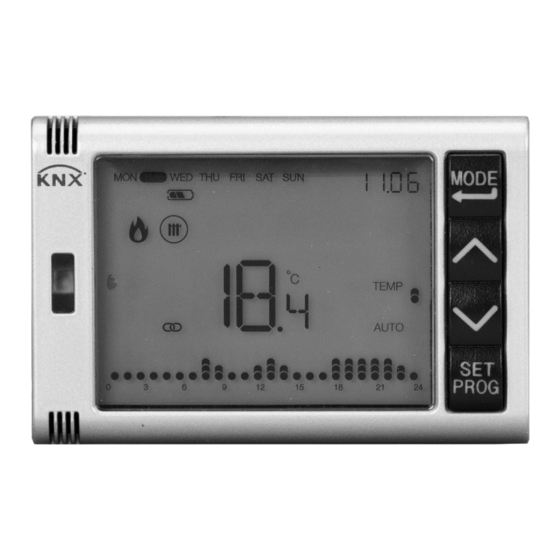
DESCRIZIONE GENERALE DESCRIZIONE GENERALE Posizione dei comandi Il cronotermostato è dotato di un display LCD retroilluminato e di quattro pulsanti di comando sempre accessibili. -
Seite 8: Descrizione Comandi
DESCRIZIONE GENERALE Descrizione comandi PULSANTI DI COMANDO Simbolo Selezione modalità funzionamento / Conferma Regolazione temperatura (+) / Visualizzazione pagine Regolazione temperatura (–) / Visualizzazione pagine Impostazione parametri / Programmazione profili SEGNALAZIONI A DISPLAY Ora del giorno / Valore variabile profilo orario / Temperatura in ingresso profilo orario Giorno della settimana Modalità... -
Seite 9: Istruzioni D'installazione
ISTRUZIONI D’INSTALLAZIONE SEGNALAZIONI A DISPLAY Simbolo Modalità programmatore orario - Valore 1 variabile profilo orario - Valore 2 variabile profilo orario - Valore 3 variabile profilo orario - Valore 4 variabile profilo orario Visualizzazione programma orario ATTENZIONE: l’installazione del dispositivo deve essere effettuata esclusivamente da personale qualificato, seguendo la normativa vigente e le linee guida per le installazioni KNX. -
Seite 10: Corretto Posizionamento
ISTRUZIONI D’INSTALLAZIONE Corretto posizionamento Per la corretta rilevazione della temperatura dell’ambiente controllare, cronotermostato non deve essere installato in nicchie, vicino a porte o finestre, accanto a termosifoni o condizionatori e non deve essere colpito da correnti d’aria e dall’illuminazione solare diretta. Avvertenze per l’installazione KNX 1. -
Seite 11: Istruzioni D'impiego
ISTRUZIONI D’IMPIEGO Inserimento/sostituzione batterie Prima di procedere, assicurarsi di aver rimosso la vite di fissaggio eventualmente utilizzata per bloccare il frontale alla parte fissa. Per accedere al vano batterie del cronotermostato, separare la parte rimovibile da quella fissa, tirando verso di sè il frontale. Inserire due pile da 1,5 V (tipo AA), iniziando dall'alloggiamento più... -
Seite 12: Comportamento Alla Caduta E Al Ripristino Dell'alimentazione Bus
Impostazione parametri e programmazione con Easy Controller Informazioni dettagliate sull'impostazione dei parametri del cronotermostato e sulla programmazione con Easy Controller sono contenute nel Manuale di Programmazione (www.gewiss.com). Programmazione con ETS Il dispositivo può essere configurato con il software ETS. Informazioni dettagliate sui parametri di configurazione e sui loro valori sono contenute nel Manuale Tecnico (www.gewiss.com). -
Seite 13: Dati Tecnici
DATI TECNICI Comunicazione Bus KNX Alimentazione Tramite bus KNX, 29 V dc SELV + 2 pile alcaline 1,5 V AA (non incluse) per mantenimento di data/ora in caso di assenza tensione bus. Assorbimento corrente dal bus 10 mA Cavo bus KNX TP1 Elementi di comando 4 tasti frontali... - Seite 15 CONTENTS page GENERAL WARNINGS Pack contents ............12 GENERAL DESCRIPTION Briefly .
-
Seite 16: General Warnings
IEC 60364, or the European harmonization document HD 60364. Gewiss sales organization is ready to provide full explanations and technical data on request. Pack contents... -
Seite 17: General Description
GENERAL DESCRIPTION Briefly The Easy flush-mounting timed thermostat is used to automatically manage the temperature of the environment where it is installed (or of another environment when used with an Easy thermostat or with an outdoor temperature sensor) on a weekly basis. The temperature is adjusted by commanding - on a KNX BUS - the KNX actuators that control the heating or air conditioning elements, including the fan coils. -
Seite 18: Functions
GENERAL DESCRIPTION GENERAL DESCRIPTION Functions The timed thermostat input channels can be configured with Easy Controller to implement your choice of one of the following functions: Reception of remote commands The timed thermostat can receive from other KNX devices (e.g. Easy remote control) the commands for setting the type of operation (heating or air-conditioning) and the HVAC mode (OFF, Economy, Pre-comfort, Comfort or Auto). -
Seite 19: Position Of The Commands
GENERAL DESCRIPTION GENERAL DESCRIPTION Position of the commands The timed thermostat is equipped with a backlit LCD display and four command push- buttons that can always be accessed. -
Seite 20: Description Of The Commands
GENERAL DESCRIPTION Description of the commands COMMAND PUSH-BUTTONS Symbol Select operating mode / Confirm Adjust temperature (+) / Visualise pages Adjust temperature (-) / Visualise pages Set parameters / Program profiles INFORMATION ON THE DISPLAY Time / Variable value of hourly profile / Hourly profile of input temperature Day of the week Programming mode Settings menu... -
Seite 21: Installation Instructions
INSTALLATION INSTRUCTIONS INFORMATION ON THE DISPLAY Symbol Hourly programmer mode - Variable value 1 of hourly profile - Variable value 2 of hourly profile - Variable value 3 of hourly profile - Variable value 4 of hourly profile Visualise hourly program ATTENTION: the device must only be installed by qualified personnel, observing the current regulations and guidelines for KNX installations. -
Seite 22: Correct Positioning
INSTALLATION INSTRUCTIONS Correct positioning To correctly measure the controlled ambient temperature, the timed thermostat must not be installed in niches, near doors or windows, or next to radiators or air-conditioning units, and it must not be in the line of draughts or direct sunlight. -
Seite 23: User Instructions
USER INSTRUCTIONS Inserting/replacing the batteries Before proceeding, make sure you have removed the fixing screw that might be holding together the front and the fixed part. To access the timed thermostat battery compartment, separate the removable part from the fixed part by pulling the front towards you. -
Seite 24: Behaviour Upon The Failure And Resetting Of The Bus Power Supply
Setting the parameters and programming with Easy Controller Detailed information about how to set the timed thermostat parameters and how to program with Easy Controller is given in the Programming Manual (www.gewiss.com). Programming with ETS The device can be configured with the ETS software. Detailed information about the configuration parameters and their values is given in the Technical Manual (www.gewiss.com). -
Seite 25: Technical Data
TECHNICAL DATA Communication KNX BUS Power supply Via KNX BUS, 29 V DC SELV + two + 2 1,5AA alkaline batteries (not included) for maintaining the date and time in the event of a BUS voltage failure. Current absorbed by BUS 10 mA BUS cable KNX TP1... - Seite 27 SOMMAIRE page CONSIGNES GÉNÉRALES Contenu de la confection ..........28 DESCRIPTION GÉNÉRALE En synthèse .
-
Seite 28: Consignes Générales
électriques à basse tension CEI 60364, ou le document d'harmonisation européen HD 60364. Le réseau de vente de Gewiss est prêt à fournir des explications complètes et des données techniques sur demande. Contenu de la confection n. -
Seite 29: Description Générale
DESCRIPTION GÉNÉRALE En synthèse Le thermostat programmable Easy à encastrer permet de gérer automatiquement, sur une base hebdomadaire, la température de l'ambiance dans laquelle il est installé ou d'une autre ambiance en cas d'utilisation d'un thermostat Easy ou d'un capteur de température extérieure. -
Seite 30: Fonctions
DESCRIPTION GÉNÉRALE DESCRIPTION GÉNÉRALE Fonctions Les canaux d'entrée du thermostat programmable peuvent être configurés avec l'Easy Controller pour exécuter, au choix, l'une des fonctions suivantes : Réception de commandes à distance Le thermostat programmable est en mesure de recevoir, d'autres dispositifs KNX (par exemple : transmetteur Easy), les commandes d'imposition du type de fonctionnement (chauffage ou climatisation) et de la modalité... -
Seite 31: Position Des Commandes
DESCRIPTION GÉNÉRALE DESCRIPTION GÉNÉRALE Position des commandes Le thermostat programmable est équipé d'un afficheur LCD rétro-éclairé et de quatre boutons-poussoirs de commande toujours accessibles. Ç... -
Seite 32: Description Des Commandes
DESCRIPTION GÉNÉRALE Description des commandes BOUTONS-POUSSOIRS DE COMMANDE Symbole Sélection de la modalité de fonctionnement / Confirmation Réglage de la température (+) / Visualisation des pages Réglage de la température (–) / Visualisation des pages Configuration des paramètres / Programmation des profils SIGNALISATIONS SUR L'AFFICHEUR Heure du jour / Valeur variable du profil horaire / Température en entrée du profil horaire Jour de la semaine... -
Seite 33: Instructions D'installation
INSTRUCTIONS D'INSTALLATION SIGNALISATIONS SUR L'AFFICHEUR Symbole Modalité du programmateur horaire - Valeur 1 variable du profil horaire - Valeur 2 variable du profil horaire - Valeur 3 variable du profil horaire - Valeur 4 variable du profil horaire Visualisation du programme horaire ATTENTION : l’installation du dispositif doit uniquement être réalisée par un personnel qualifié, en suivant la réglementation en vigueur et les lignes directrices relatives aux installations KNX. -
Seite 34: Positionnement Correct
INSTRUCTIONS D'INSTALLATION Positionnement correct Pour le relevé de la température de l’ambiance à contrôler, le thermostat programmable ne doit pas être installé dans des niches, près dune porte ou d'une fenêtre, près d'un radiateur ou d'un climatiseur et il ne doit pas se trouver dans un courant d'air ou à... -
Seite 35: Instructions D'utilisation
INSTRUCTIONS D'UTILISATION Insertion / remplacement des batteries Avant de continuer, s'assurer d'avoir retiré la vis de fixation éventuellement utilisée pour bloquer la façade sur la partie fixe. Pour accéder au logement des batteries du thermostat programmable, séparer la partie mobile de la partie fixe, en tirant vers soi la façade. -
Seite 36: Comportement À La Coupure Et Au Réarmement De L'alimentation Du Bus
De plus amples informations sur l'imposition des paramètres du thermostat programmable et sur la programmation avec l'Easy Controller sont contenues dans le manuel de programmation (www.gewiss.com). Programmation avec l'ETS Le dispositif peut être configuré à l'aide du logiciel ETS. De plus amples informations sur les paramètres de configuration et sur leurs valeurs sont contenues dans le manuel... -
Seite 37: Données Techniques
DONNÉES TECHNIQUES Communication Bus KNX Alimentation Par bus KNX, 29 VCC SELV + 2 piles alcalines 1,5 V AA (non incluses) pour le maintien de la date et de l'heure en cas de coupure de la tension du bus. Consommation de courant sur le bus 10 mA Ç... - Seite 39 ÍNDICE pág. ADVERTENCIAS GENERALES Contenido del embalaje ..........40 DESCRIPCIÓN GENERAL En síntesis .
-
Seite 40: Advertencias Generales
CEI 60364 o a la norma europea armonizada HD 60364. La organización de ventas de Gewiss está a disposición para proporcionar aclaraciones y datos técnicos si se solicitan. Contenido del embalaje n. -
Seite 41: Descripción General
DESCRIPCIÓN GENERAL En síntesis El Cronotermostato Easy de empotrar permite gestionar automáticamente, con base semanal, la temperatura del ambiente en el que está instalado o de otro ambiente en caso de uso con un termostato Easy o con un sensor de temperatura externa. La regulación de la temperatura se efectúa accionando, en el bus KNX, los accionadores KNX que controlan los elementos de calefacción y aire acondicionado, incluidos los ventiloconvectores. -
Seite 42: Funciones
DESCRIPCIÓN GENERAL DESCRIPCIÓN GENERAL Funciones Los canales de entrada del cronotermostato se pueden configurar con Easy Controller para desempeñar, a voluntad, una de las siguientes funciones: Recepción de mandos remotos El cronotermostato es capaz de recibir de otros dispositivos KNX (por ej.: módulo telefónico Easy) los mandos para configurar el tipo de funcionamiento (calefacción o aire acondicionado) y la modalidad HVAC (OFF, Economy, Precomfort, Comfort o Auto). -
Seite 43: Posición De Los Mandos
DESCRIPCIÓN GENERAL DESCRIPCIÓN GENERAL Posición de los mandos El cronotermostato está dotado de una pantalla LCD retroiluminada y de cuatro pulsadores de mando siempre accesibles. Ñ... -
Seite 44: Descripción Mandos
DESCRIPCIÓN GENERAL Descripción mandos PULSADORES DE MANDO Símbolo Selección modalidad funcionamiento / Confirmar Regulación temperatura (+) / Visualización páginas Regulación temperatura (–) / Visualización páginas Configuración parámetros / Programación perfiles SEÑALIZACIONES EN PANTALLA Hora del día / Valor variable perfil horario / Temperatura en entrada perfil horario Día de la semana Modalidad programación Menú... -
Seite 45: Instrucciones De Instalación
INSTRUCCIONES DE INSTALACIÓN SEÑALIZACIONES EN PANTALLA Símbolo Modalidad programador horario - Valor 1 variable perfil horario - Valor 2 variable perfil horario - Valor 3 variable perfil horario - Valor 4 variable perfil horario Visualización programa horario ATENCIÓN: la instalación del dispositivo debe efectuarla exclusivamente personal cualificado, siguiendo la normativa vigente y las directrices para las instalaciones KNX. -
Seite 46: Colocación Correcta
INSTRUCCIONES DE INSTALACIÓN Colocación correcta Para la detección correcta de la temperatura del ambiente que se debe controlar, el cronotermostato no debe estar instalado en nichos, cerca de puertas o ventanas, al lado de termosifones o aires acondicionados y no debe recibir corrientes de aire ni la iluminación directa del sol. -
Seite 47: Instrucciones De Uso
INSTRUCCIONES DE USO Inserción/sustitución baterías Antes de proceder, asegurarse de haber quitado el tornillo de fijación eventualmente utilizado para bloquear el frontal en la parte fija. Para acceder al compartimento de las baterías del cronotermostato, separar la parte desplazable de la fija, tirando hacia sí del frontal. -
Seite 48: Comportamiento En La Caída Y En El Restablecimiento De La Alimentación Del Bus
Easy Controller en el Manual de Programación (www.gewiss.com). Programación con ETS El dispositivo se puede configurar con el software ETS. En el Manual Técnico (www.gewiss.com) se detalla la información relativa a los parámetros de configuración y sus valores. -
Seite 49: Datos Técnicos
DATOS TÉCNICOS Comunicación Bus KNX Alimentación Mediante bus KNX, 29 V cc SELV + 2 pilas alcalinas 1,5 V AA (no incluidas) para el mantenimiento de fecha/hora en caso de ausencia de tensión de bus. Absorción de corriente del bus 10 mA Cable de bus KNX TP1... - Seite 51 INHALT ALLGEMEINE HINWEISE Packungsinhalt ............52 ALLGEMEINE BESCHREIBUNG Kurzbeschreibung .
-
Seite 52: Allgemeine Hinweise
Niederspannungsanlagen geregelt werden. Falls solche nicht vorgesehen sind, muss man die internationale Norm für Niederspannungsanlagen, IEC 60364, oder den Europäischen Harmonisierungsdokument HD 60364 beachten. Für genauere Informationen und technische Daten wenden Sie sich bitte an den Vertrieb von Gewiss. Packungsinhalt 1 Easy-Chronothermostat für den Unterputz 1 Busklemme... -
Seite 53: Allgemeine Beschreibung
ALLGEMEINE BESCHREIBUNG Kurzbeschreibung Das Easy-Chronothermostat für den Unterputz gestattet die automatische Verwaltung der Temperatur des Raums, indem es installiert ist, oder eines anderen Raums, falls es mit einem Easy-Thermostat oder einem Außentemperatursensor benutzt wird, durch Wochenprogrammierung. Die Temperaturregelung erfolgt durch die Steuerung der KNX- Schaltgeber, die die Elemente der Heiz- oder Klimaanlage einschließlich Gebläsekonvektoren steuern, über den KNX-Bus. -
Seite 54: Funktionen
ALLGEMEINE BESCHREIBUNG ALLGEMEINE BESCHREIBUNG Funktionen Die Eingangskanäle des Chronothermostats können mit Easy Controller konfiguriert werden, um nach Wahl eine der folgenden Funktionen auszuführen: Empfang von Fernsteuerungen Das Chronothermostat kann die Befehle für die Einstellung der Funktionsart (Heizung oder Klimatisierung) und der Betriebsart HVAC (OFF, Economy, Precomfort, Comfort oder Auto) von anderen KNX-Geräten (z.B. -
Seite 55: Position Der Steuerungen
ALLGEMEINE BESCHREIBUNG ALLGEMEINE BESCHREIBUNG Position der Steuerungen Das Chronothermostat verfügt über ein LCD-Display mit Hintergrundbeleuchtung und vier immer zugängliche Steuertaster. -
Seite 56: Beschreibung Der Steuerungen
ALLGEMEINE BESCHREIBUNG Beschreibung der Steuerungen STEUERTASTER Symbol Auswahl der Betriebsart / Bestätigung Temperaturregelung (+) / Seitenanzeige Temperaturregelung (–) / Seitenanzeige Parametereinstellung / Profilprogrammierung DISPLAYANZEIGEN Tageszeit / Variabler Wert Zeitprofil / Eingangstemperatur Zeitprofil Wochentag Programmiermodus Menü Einstellungen Batterieladestatus Aktivierung Heizung Aktivierung Klimatisierung Funktionsart: Heizung Funktionsart: Klimatisierung Funktion Party... -
Seite 57: Installationsanweisungen
INSTALLATIONSANWEISUNGEN DISPLAYANZEIGEN Symbol Betriebsart Zeitschaltuhr - Variabler 1 Wert Zeitprofil - Variabler 2 Wert Zeitprofil - Variabler 3 Wert Zeitprofil - Variabler 4 Wert Zeitprofil Anzeige Zeitprogramm ACHTUNG: Die Installation des Geräts darf ausschließlich durch qualifiziertes Fachpersonal unter Beachtung der geltenden Bestimmungen und der Richtlinien für KNX-Installationen durchgeführt werden. -
Seite 58: Korrekte Positionierung
INSTALLATIONSANWEISUNGEN Korrekte Positionierung Für die korrekte Erhebung der Temperatur des zu kontrollierenden Raums darf das Chronothermostat nicht in Nischen, in der Nähe von Türen oder Fenstern oder neben Heizkörpern oder Klimageräten installiert werden und es darf keinen Luftströmen oder direkter Sonnenbestrahlung ausgesetzt werden. -
Seite 59: Gebrauchsanweisung
GEBRAUCHSANWEISUNG Einsetzen/Austausch der Batterien Zunächst sicherstellen, dass die Befestigungsschraube entfernt wurde, die ggf. für die Befestigung der Vorderseite am festen Teil benutzt wurde. Für den Zugriff auf das Batteriefach des Chronothermostats den abnehmbaren Teil vom festen trennen, indem man die Vorderseite zu sich zieht. -
Seite 60: Verhalten Bei Ausfall Und Rücksetzung Der Busversorgung
Genaue Informationen zur Einstellung der Parameter des Chronothermostats und zur Programmierung mit Easy Controller sind im Programmierhandbuch enthalten (www.gewiss.com). Programmierung mit ETS Das Gerät kann mit der Software ETS konfiguriert werden. Genauere Informationen zu den Konfigurationsparametern und ihren Werten sind im Technischen Handbuch enthalten (www.gewiss.com). -
Seite 61: Technische Daten
TECHNISCHE DATEN Kommunikation KNX-Bus Versorgung Über KNX-Bus, 29 V DC SELV + 2 Alkalibatterien 1,5 V AA (nicht mitgeliefert) für die Speicherung von Datum/Uhrzeit im Falle eines Ausfalls der Busspannung. Stromaufnahme vom Bus 10 mA Buskabel KNX TP1 Steuerelemente 4 frontseitige Tasten 1 Mini-Programmiertaste Ausgänge 1 Relais mit potentialfreiem Schließer/Öffner-Kontakt... - Seite 63 230 V ≥ 4 mm Cavo bus - Bus cable - Câble bus - Cable bus - Buskabel Conduttore di continuità elettrica - Electrical continuity conductor - Conducteur de continuité électrique - Conductor de continuidad eléctrica - Stromdurchgangsleiter Schermatura - Shielding - Blindage - Blindaje - Abschirmung Connessione dispositivo bus Bus device connection - Connexion dispositif bus - Conexión dispositivo bus...
- Seite 64 According to article 9 paragraph 2 of the European Directive 2004/108/EC, the responsible for placing the apparatus on the Community market is: GEWISS S.p.A Via A. Volta, 1 - 24069 Cenate Sotto (BG) Italy Tel: +39 035 946 111 Fax: +39 035 945 270 E-mail: qualitymarks@gewiss.com +39 035 946 111 sat@gewiss.com...