Herunterladen Inhalt Inhalt Diese Seite drucken
Gewiss GW 10 703 Bedienungsanweisung

Gewiss GW 10 703 Bedienungsanweisung

Relais-zeitthermostat für unterputzmontage
Inhaltsverzeichnis

Werbung

Verfügbare Sprachen
  • DE

Verfügbare Sprachen

  • DEUTSCH, seite 90
Cronotermostato a relè da incasso
Inset time thermostat with relay
Chronothermostat à relais, encastrable
Cronotermostato de relé empotrado
Relais-Zeitthermostat für Unterputzmontage
GW 10 703
GW 12 703
GW 14 703

Werbung

Inhaltsverzeichnis
loading

Inhaltszusammenfassung für Gewiss GW 10 703

  • Seite 1 Cronotermostato a relè da incasso Inset time thermostat with relay Chronothermostat à relais, encastrable Cronotermostato de relé empotrado Relais-Zeitthermostat für Unterputzmontage GW 10 703 GW 12 703 GW 14 703...
  • Seite 2 CEI 64-8 per gli apparecchi per uso domestico e similare, in ambienti non polverosi ed ove non sia necessaria una protezione speciale contro la penetrazione di acqua. L'organizzazione di vendita GEWISS é a disposizione per chiarimenti e informazioni tecniche.
  • Seite 3: Inhaltsverzeichnis

    INDICE ISTRUZIONI D’IMPIEGO pag. - Descrizione generale....................- Descrizione comandi ....................- Modalità di funzionamento ..................- Impostazione parametri................... - Personalizzazione del programma giornaliero............13 - Funzione Party/ Holiday ................... 15 - Funzionamento manuale ..................16 - Comando remoto..................... 17 - Funzionamento in caso di black out ................
  • Seite 4: Istruzioni D'impiego

    ISTRUZIONI D IMPIEGO Descrizione generale Il cronotermostato gestisce il controllo della temperatura ambiente ed il comando caldaie, valvole di zona, condizionatori, fan coil, ecc. , attraverso un uscita a relè. Il cronotermostato è dotato di un display LCD retroilluminato e di quattro pulsanti di comando.
  • Seite 5: Descrizione Comandi

    ISTRUZIONI D IMPIEGO Descrizione comandi PULSANTI DI COMANDO Simbolo MODE: selezione modalità MODE Incremento/Selezione parametri Decremento/Selezione parametri SET/PROG: Impostazione programmi/Programmazione SET/PROG SEGNALAZIONI A DISPLAY Profilo programma giornaliero Temperatura ambiente misurata Funzioni HOLIDAY e PARTY Segnalazione attivazione via remotizzatore GSM Tipo di funzionamento (riscaldamento/condizionamento) Giorno Attivazione riscaldamento/condizionamento m Modalità...
  • Seite 6: Modalità Di Funzionamento

    ISTRUZIONI D IMPIEGO Modalità di funzionamento Il cronotermostato prevede tre differenti modalità di funzionamento: - AUTOMATICO - MANUALE - OFF/ANTIGELO / PROTEZIONE ALTE TEMPERATURE Per commutare da una modalità all altra si usa il tasto MODE. Nel funzionamento automatico il cronotermostato uti- lizza un programma impostabile dall utente che può...
  • Seite 7 ISTRUZIONI D IMPIEGO Modalità di funzionamento Durante il funzionamento la chiusura del contatto di uscita (attivazione del riscaldamento/ condizionamento) è segnalata nel modo seguente: Riscaldamento Il simbolo indica l accensione del riscaldamento. Condizionamento Il simbolo indica l accensione del condizionamento.
  • Seite 8: Impostazione Parametri

    ISTRUZIONI D IMPIEGO Impostazione parametri Per eseguire l impostazione dei parametri premere una volta il tasto SET/PROG. Sul display appare il simbolo SET. Contemporaneamente il simbolo comincia a lampeggiare. A questo punto è possibile modificare, in sequenza: - il tipo di funzionamento condizionamento/riscaldamento - il giorno della settimana - ore - minuti...
  • Seite 9 ISTRUZIONI D IMPIEGO Impostazione parametri Selezione riscaldamento/condizionamento Quando il simbolo lampeggia è possibile sele- zionare il tipo di funzionamento con i tasti Per confermare premere il tasto MODE entro 30 secondi. Impostazione del giorno della settimana Quando la barra del giorno della settimana lampeggia, selezionare il giorno corrente con i tasti (lunedì=1, martedì=2,…, domenica=7).
  • Seite 10 ISTRUZIONI D IMPIEGO Impostazione parametri Impostazione dei minuti Quando le cifre dei minuti lampeggiano, impostare i mi- nuti con i tasti Per confermare i valori impostati premere il tasto MODE entro 30 secondi. Impostazione unità di misura temperatura Quando il simbolo °C o °F inizia a lampeggiare, selezio- nare l unità...
  • Seite 11 ISTRUZIONI D IMPIEGO Impostazione parametri Impostazione set point T2 All apparire del simbolo il valore di temperatura ini- zia a lampeggiare. Regolare il valore di T2 con i tasti Per confermare il valore impostato, premere il tasto MO- DE entro 30 secondi. Impostazione set point T3 All apparire del simbolo il valore di temperatura ini-...
  • Seite 12 ISTRUZIONI D IMPIEGO Impostazione parametri Attivazione autoapprendimento (solo tipo funziona- mento riscaldamento) All apparire del simbolo attivare (ON) o disattivare (OFF) la funzione con i tasti Per confermare il valore impostato premere il tasto MODE entro 30 secondi. L autoapprendimento permette di ottimizzare l anticipo (max 2 ore) sull attivazione del riscaldamento.
  • Seite 13: Personalizzazione Del Programma Giornaliero

    ISTRUZIONI D IMPIEGO Personalizzazione del programma giornaliero Per eseguire la personalizzazione del programma giornaliero preimpostato, o apportare una modifica, premere due volte il tasto SET/PROG. Sul display appare la scritta PROG mentre la barra del primo giorno della settimana inizia a lampeggiare. Selezionare il giorno desiderato con i tasti Per confermare la selezione premere il tasto MODE entro 30 secondi.
  • Seite 14 ISTRUZIONI D IMPIEGO Personalizzazione del programma giornaliero L orario viene decrementato/incrementato a passi di 15 minuti ad ogni pressione dei tasti , è perciò possibile definire fino a 4 periodi di programmazione ogni ora. Per confermare la programmazione premere prolungatamente il tasto MODE, automatica- mente si passa alla programmazione del giorno successivo.
  • Seite 15: Funzione Party/Holiday

    ISTRUZIONI D IMPIEGO Funzione Party/Holiday La funzione party permette di escludere temporaneamente il programma impostato (modalità auto) o il set point manuale (modalità MAN) inserendo un set point di temperatura diverso per un periodo compreso tra 1 e 23 ore. Questa funzione può...
  • Seite 16: Funzionamento Manuale

    ISTRUZIONI D IMPIEGO Funzione Party/Holiday Per attivare la funzione premere prolungatamente il ta- sto MODE (funzione PARTY), quindi premere nuovamen- te il tasto MODE (funzione HOLIDAY). Sul display appa- re il simbolo . Con i tasti impostare il nuovo valore del set point di temperatura. Premendo il tasto MODE si passa all impostazione del numero dei giorni di attivazione che viene visualizzato sul display.
  • Seite 17: Comando Remoto

    ISTRUZIONI D IMPIEGO Comando remoto Il cronotermostato dispone di una connessione seriale per il collegamento con il remotizza- tore GSM GW 90 821. Tramite comandi SMS (ad esempio da telefono cellulare) è possibile: • impostare il tipo di funzionamento (condizionamento/riscaldamento) •...
  • Seite 18: Programmi Preimpostati

    ISTRUZIONI D IMPIEGO Programmi preimpostati Il cronotermostato dispone di due programmi preimpostati, uno per il riscaldamento e uno per il condizionamento. PROGRAMMA RISCALDAMENTO Lunedì - Venerdì Sabato - Domenica...
  • Seite 19: Parametri Preimpostati

    ISTRUZIONI D IMPIEGO Programmi preimpostati PROGRAMMA CONDIZIONAMENTO Tutti i giorni della settimana Questi programmi preimpostati possono essere modificati e personalizzati secondo le pro- prie esigenze. Per eseguire le modifiche attenersi alle indicazioni contenute nel paragrafo “Personalizzazione del programma giornaliero”. Parametri preimpostati Giorno della settimana 1 : lunedì...
  • Seite 20: Istruzioni D'installazione

    ISTRUZIONI D INSTALLAZIONE Reset e ripristino dei valori preimpostati Premendo contemporaneamente i 4 tasti con tensione di rete presente, si effettua un re- set completo del cronotermostato. Attenzione: tutti i parametri impostati ed i programmi personalizzati vengono can- cellati. Alla riaccensione, il cronotermostato utilizza i parametri ed i programmi preimpostati in fab- brica.
  • Seite 21: Descrizione Morsetti

    ISTRUZIONI D INSTALLAZIONE Descrizione morsetti Morsetti di cablaggio Alimentazione L - Fase N - Neutro Relè di uscita 1 - Contatto NA 2 - Contatto NC 3 - Comune Linea seriale 4 - TX (dati in uscita) 5 - GND (comune) 6 - RX (dati in ingresso) Rimozione batteria In caso di necessità...
  • Seite 22: Caratteristiche Funzionali/Dati Tecnici

    CARATTERISTICHE FUNZIONALI / DATI TECNICI Tipo di funzionamento: riscaldamento e condizionamento Modalità di funzionamento: automatico, manuale, antigelo/protezione alte temperature Temperatura operativa: -5 °C ÷ +45 °C Temperatura misurata: 0 °C ÷ +45 °C Sonda di temperatura: NTC, 100kΩ a 25 °C Accuratezza della misura: ±0.5°C a 20°C Programmi preimpostati:...
  • Seite 23 E N G L I S H Inset time-thermostat with relay...
  • Seite 24 IEC 60364, or the European harmonization document HD 60364. GEWISS sales organization is ready to provide full explanations and technical data on request.
  • Seite 25 INDEX USER INSTRUCTIONS - General description ....................26 - Control description ....................27 - Operating modes..................... 28 - Setting parameters....................30 - Personalising the daily program ................35 - The Party/Holiday function..................37 - Manual operation ....................38 - Remote control......................39 - Operating in the case of a blackout.................
  • Seite 26: User Instructions

    USER INSTRUCTIONS General description The time-thermostat manages ambient temperature control and control of the boilers, zone valves, conditioning units, fan-coils, etc. through a relay output. The time-thermostat is fitted with a backlighted LCD VDU and four control buttons. MODE PROG...
  • Seite 27: Control Description

    USER INSTRUCTIONS Control description CONTROL BUTTONS Symbol MODE: select mode MODE Increment/Select parameters Decrement/Select parameters SET/PROG: Program setting/Programming SET/PROG VDU SIGNALS Daily program profile Measured ambient temperature HOLIDAY and PARTY functions Signal of activation via GSM remote control unit Operating type (heating/air conditioning) Hour Heating/air conditioning activation m Operating mode...
  • Seite 28: Operating Modes

    USER INSTRUCTIONS Operating modes The time-thermostat provides three different operating modes: - AUTOMATIC - MANUAL - OFF/ANTIFREEZE/HIGH TEMPERATURE PROTECTION Use the MODE key to switch from one mode to another. In automatic operation the time-thermostat uses a pro- gram that can be set by the user and which can also be different for each day of the week.
  • Seite 29 USER INSTRUCTIONS Operating modes During operation the closing of the output contact (heating/air conditioning activation) is signalled in the following way: Heating Symbol shows heating switch-on. Air conditioning Symbol shows air conditioning switch-on.
  • Seite 30: Setting Parameters

    USER INSTRUCTIONS Setting parameters Press the SET/PROG key once to set the parameters. The message “SET” is displayed on the VDU. The symbol starts to blink at the same time. At this point the following can be modified in sequence: - air conditioning/heating operating type - the day of the week - hours...
  • Seite 31 USER INSTRUCTIONS Setting parameters Selecting heating/air conditioning When the symbol blinks it is possible to select the operating type using the keys. Press the MODE key within 30 seconds to confirm. Setting the day of the week When the day of the week bar blinks, select the current day using the keys (Monday=1, Tuesday=2..
  • Seite 32 USER INSTRUCTIONS Setting parameters Setting the minutes When the minutes figures blink, set the minutes using keys. Press the MODE key within 30 seconds to confirm the values set. Setting the temperature unit of measurement When the °C or °F starts to blink, select the unit of mea- surement using the keys.
  • Seite 33 USER INSTRUCTIONS Setting parameters Setting set point T2 The temperature value starts to blink when the sym- bol appears. Adjust the value of T2 using the keys. Press the MODE key within 30 seconds to confirm the value set. Setting set point T3 The temperature value starts to blink when the sym- bol appears.
  • Seite 34 USER INSTRUCTIONS Setting parameters Activating self-learning (heating operating type only) When the symbol appears, activate (ON) or deacti- vate (OFF) the function using the keys. Press the MODE key within 30 seconds to confirm the value set. Self-learning is used to optimise the advance (max. 2 hours) for activating the heating.
  • Seite 35: Personalising The Daily Program

    USER INSTRUCTIONS Personalising the daily program Press the SET/PROG key twice to personalise the preset daily program or modify it. The message “PROG” is displayed on the VDU, while the bar of the first day of the week starts to blink. Select the required day using the keys.
  • Seite 36 USER INSTRUCTIONS Personalising the daily program The time is decremented/incremented in steps of 15 minutes each time the keys are pressed, so it is possible to define up to 4 programming periods each hour. Press the MODE key for an extended period to confirm the programming, there will be an automatic move to programming for the next day.
  • Seite 37: The Party/Holiday Function

    USER INSTRUCTIONS Party/Holiday function The party function is used to temporarily exclude the set program (AUTO mode) or the manual set point (MAN mode) by inserting a different temperature set point for a period of between 1 and 23 hours. This function can be used, for example, to extend the comfort period during a supper, a party, etc.
  • Seite 38: Manual Operation

    USER INSTRUCTIONS Party/Holiday function The function is activated by pressing the MODE key for an extended period (PARTY function) and then pressing the MODE key again (HOLIDAY function). The symbol is displayed on the VDU. keys are used to set the new temperature set point value.
  • Seite 39: Remote Control

    USER INSTRUCTIONS Remote control The time-thermostat has a serial connection for connecting to the GSM GW 90 821 remote control unit. Using SMS command (e.g. from a cellular telephone) it is possible to: • set the type of operation (air conditioning/heating) •...
  • Seite 40: Preset Program

    USER INSTRUCTIONS Preset programs The time-thermostat has two preset programs, one for heating and one for air condi- tioning. HEATING PROGRAM Monday - Friday Saturday - Sunday...
  • Seite 41: Preset Parameters

    USER INSTRUCTIONS Preset programs Preset programs Every day of the week These preset programs can be modified and personalised according to one s own require- ments. Follow the instructions contained in the “Personalising the daily program” para- graph to make the modifications. Preset parameters Day of the week 1 : Monday...
  • Seite 42: Installation Instructions

    INSTALLATION INSTRUCTIONS Reset and restore the preset values Pressing the 4 keys simultaneously with mains power present performs a complete reset of the timer-thermostat. N.B.: all parameters set and personalized programs will be cancelled. When the timer-thermostat is switched on again, it uses the parameters and programs preset in the factory.
  • Seite 43: Terminal Description

    INSTALLATION INSTRUCTIONS Terminal description Cabling terminals Power supply L - Phase N - Neutral Output relay 1 - NA contact 2 - NC contact 3 - Common Serial line 4 - TX (output data) 5 - GND (common) 6 - RX (input data) Battery removal If necessary (e.g.
  • Seite 44: Functional Features/Technical Data

    FUNCTIONAL FEATURES TECHNICAL DATA Type of operation: heating and air conditioning Operating modes: automatic, manual, antifreeze/high temperature protection Operating temperature: -5 °C ÷ +45 °C Measured temperature: 0 °C ÷ +45 °C Temperature probe: NTC, 100kΩ at 25°C Measurement accuracy: ±0.5°C to 20°C Preset programs: n°...
  • Seite 45 F R A N Ç A I S Chronothermostat à relais, encastrable...
  • Seite 46 électriques à basse tension CEI 60364, ou le document d'harmonisation européen HD 60364. Le réseau de vente de GEWISS est prêt à fournir des explications complètes et des données techniques sur demande.
  • Seite 47 INDEX INSTRUCTIONS D’UTILISATION p ge - Description générale ....................- Description des commandes ................... 49 - Modalités de fonctionnement .................. 50 - Programmation paramètres..................52 - Personnalisation du programme journalier .............. 57 - Fonction Party/Holiday..................... 59 - Fonctionnement manuel ..................60 - Commande à...
  • Seite 48: Instructions D'utilisation

    INSTRUCTIONS D'UTILISATION Description générale Le chronothermostat gère le contrôle de la température ambiante et la commande de chaudières, vannes de zone, climatiseurs, fan-coils, etc., grâce à une sortie à relais. Le chronothermostat est muni d’un afficheur LCD rétro éclairé et de quatre poussoirs de commande.
  • Seite 49: Description Des Commandes

    INSTRUCTIONS D'UTILISATION Description des commandes POUSSOIRS DE COMMANDE Symbole MODE : sélection de la modalité MODE Incrément / Sélection des paramètres Décrément / Sélection des paramètres SET/PROG : Définition des programmes / Programmation SET/PROG SIGNALISATIONS SUR AFFICHEUR Profil du programme journalier Température ambiante mesurée Fonctions HOLIDAY et PARTY Signalisation de l’activation par système...
  • Seite 50: Modalités De Fonctionnement

    INSTRUCTIONS D'UTILISATION Modalités de fonctionnement Le chronothermostat prévoit trois modes de fonctionnement différents : - AUTOMATIQUE - MANUEL - OFF/ANTIGEL / PROTECTION HAUTES TEMPÉRATURES Pour commuter d’un mode à un autre on utilise la touche MODE. Dans le fonctionnement automatique, le chronother- mostat utilise un programme programmable par l’utili- sateur, qui peut même être différencié...
  • Seite 51 INSTRUCTIONS D'UTILISATION Modalités de fonctionnement Pendant le fonctionnement, la fermeture du contact de sortie (activation chauffage / clima- tisation) est signalisée de la façon suivante: Chauffage Le symbole indique que le chauffage est allumé. Climatisation Le symbole indique que la climatisation est allumée. Ç...
  • Seite 52: Programmation Paramètres

    INSTRUCTIONS D'UTILISATION Programmation paramètres Pour exécuter la programmation des paramètres, appuyer une fois sur la touche SET/PROG. Le symbole SET apparaît sur l’afficheur. En même temps le symbole commence à clignoter. Il est alors possible de modifier, en séquence : - le type de fonctionnement : climatisation / chauffage - le jour de la semaine - les heures...
  • Seite 53 INSTRUCTIONS D'UTILISATION Programmation paramètres Sélection chauffage/climatisation Lorsque le symbole clignote, il est possible de sélectionner le type de fonctionnement en agissant sur les touches Pour confirmer, appuyer sur la touche MODE dans les 30 secondes qui suivent. Programmation du jour de la semaine Ç...
  • Seite 54 INSTRUCTIONS D'UTILISATION Programmation paramètres Programmation des minutes Quand les chiffres des minutes clignotent, programmer les minutes avec les touches Pour confirmer les valeurs programmées, appuyer sur la touche MODE dans les 30 secondes qui suivent. Programmation de l’unité de mesure de température Quand le symbole °C ou °F commence à...
  • Seite 55 INSTRUCTIONS D'UTILISATION Programmation paramètres Programmation du set-point T2 Quand le symbole apparaît, la valeur de la tempé- rature commence à clignoter. Régler la valeur de T2 avec les touches Pour confirmer la valeur programmée, appuyer sur la touche MODE dans les 30 secondes qui suivent. Programmation du set-point T3 Quand le symbole apparaît, la valeur de la tempé-...
  • Seite 56 INSTRUCTIONS D'UTILISATION Programmation paramètres Activation de l’autoapprentissage (disponible exclu- sivement pour le type de fonctionnement chauffage). Quand le symbole apparaît, activer (ON) ou désacti- ver (OFF) la fonction, avec les touches Pour confirmer la valeur programmée, appuyer sur la touche MODE dans les 30 secondes qui suivent. L’autoapprentissage permet d’optimiser l’avance (max 2 heures) de l’activation du chauffage.
  • Seite 57: Personnalisation Du Programme Journalier

    INSTRUCTIONS D'UTILISATION Personnalisation du programme journalier Pour exécuter la personnalisation du programme journalier préprogrammé, ou pour faire une modification, appuyer deux fois sur la touche SET/PROG. Sur l’afficheur apparaît le symbole PROG, et la barre du premier jour de la semaine commence à clignoter. Sélec- tionner le jour désiré, avec les touches Pour confirmer la sélection, appuyer sur la touche MODE dans les 30 secondes qui suivent.
  • Seite 58 INSTRUCTIONS D'UTILISATION Personnalisation du programme journalier L’horaire diminue/augmente à pas de 15 minutes à chaque pression des touches par conséquent il est possible de définir jusqu’à 4 périodes de programmation pour chaque heure. Pour confirmer la programmation, appuyer sur la touche MODE de façon prolongée ; on passe automatiquement à...
  • Seite 59: Fonction Party/Holiday

    INSTRUCTIONS D'UTILISATION Fonction Party/Holiday La fonction Party permet d’exclure temporairement le programme prédéfini (mode AUTO) ou bien le set point manuel (mode MAN), en insérant un set-point de température différent pour une période allant de 1 à 23 heures. On peut utiliser cette fonction, par exemple, pour prolonger la période de confort pendant un dîner, une fête, etc…...
  • Seite 60: Fonctionnement Manuel

    INSTRUCTIONS D'UTILISATION Fonction Party/Holiday Pour activer cette fonction, appuyer de façon prolongée sur la touche MODE (fonction PARTY), puis appuyer à nouveau sur la touche MODE (fonction HOLIDAY). Le symbole apparaît sur l’afficheur. Avec les touches , programmer la nouvelle valeur du set-point de température.
  • Seite 61: Commande À Distance

    INSTRUCTIONS D'UTILISATION Commande à distance Le chronothermostat dispose d’une connexion sérielle pour la liaison avec le système de contrôle à distance GSM GW 90 821. Grâce aux commandes SMS (par exemple à partir d’un portable) il est possible de : •...
  • Seite 62: Programmes Prédéfinis

    INSTRUCTIONS D'UTILISATION Programmes prédéfinis Le chronothermostat dispose de 2 programmes prédéfinis, un pour le chauffage et un pour la climatisation. PROGRAMME CHAUFFAGE Lundi - Vendredi Samedi - Dimanche...
  • Seite 63: Paramètres Prédéfinis

    INSTRUCTIONS D'UTILISATION Programmes prédéfinis PROGRAMME CLIMATISATION Tous les jours de la semaine Ces programmes prédéfinis peuvent être modifiés et personnalisés, suivant ses exigences. Pour exécuter les modifications, suivre les indications contenues au paragraphe “ Person- nalisation du programme journalier ”. Ç...
  • Seite 64: Instructions Pour L'installation

    INSTRUCTIONS POUR L INSTALLATION Reset et rétablissement des valeurs préprogrammées Si on appuie en même temps sur les 4 touches, avec la tension de secteur alimentée, on effectue le reset complet du chronothermostat. Attention : tous les paramètres programmés et les programmes personnalisés seront annulés.
  • Seite 65: Description Des Bornes

    INSTRUCTIONS POUR L INSTALLATION Description bornes Bornes de câblage Alimentation L - Phase N - Neutre Relais de sortie 1 - Contact NA 2 - Contact NC 3 - Commun Ligne sérielle 4 - TX (données en sortie) 5 - GND (commun) 6 - RX (données en entrée) Comment enlever la batterie Ç...
  • Seite 66: Caractéristiques Fonctionnelles / Données Techniques

    CARACTÉRISTIQUES FONCTIONNELLES / DONNÉES TECHNIQUES Type de fonctionnement : chauffage et climatisation Modalités de fonctionnement : mode automatique, mode manuel, antigel / protection hautes températures Température de fonctionnement : de -5° C à +45° C Température mesurée : de 0° C à +45° C Sonde de température : NTC, 100kΩ...
  • Seite 67 E S P A Ñ O L Cronotermostato de relé empotrado...
  • Seite 68 CEI 60364 o a la norma europea armonizada HD 60364. La organización de ventas de GEWISS está a disposición para proporcionar aclaraciones y datos técnicos si se solicitan.
  • Seite 69 ÍNDICE ISTRUCCIONES DE EMPLEO pág - Descripción general ....................70 - Descripción mandos....................71 - Modalidad de funcionamiento ................72 - Programación parámetros..................74 - Personalización del programa diario............... 79 - Función Party/ Holiday.................... 81 - Funcionamiento manual..................82 - Control remoto .......................
  • Seite 70: Istrucciones De Empleo

    ISTRUCCIONES DE EMPLEO Descripción general El cronotermostato controla la temperatura ambiente y el mando calderas, válvulas de zona, acondicionadores, fan coil, etc, mediante una salida de relé. El cronotermostato está dotado de una pantalla LCD retroiluminada y de cuatro pulsadores de mando.
  • Seite 71: Descripción Mandos

    ISTRUCCIONES DE EMPLEO Descripción mandos PULSADORES DE MANDO Símbolo MODE: selección modalidad MODE Aumento/Selección parámetros Disminución/Selección parámetros SET/PROG: Control de programas/Programación SET/PROG SEÑALIZACIONES EN LA PANTALLA Perfil programa diario Temperatura ambiente medida Funciones HOLIDAY y PARTY Señalización activación vía indicador remoto GSM Tipo de funcionamiento calefacción/condicionamiento) Día Hora...
  • Seite 72: Modalidad De Funcionamiento

    ISTRUCCIONES DE EMPLEO Modalidad de funcionamiento El cronotermostato prevé tres diferentes modalidades de funcionamiento: - AUTOMÁTICO - MANUAL - OFF/ANTICONGELANTE / PROTECCIÓN ALTAS TEMPERATURAS Para conmutar de una modalidad a otra se usa la tecla MODE. En el funcionamiento automático el cronotermostato utiliza un programa que puede programar el usuario y que también puede ser diferenciado para cada día de la semana.
  • Seite 73 ISTRUCCIONES DE EMPLEO Modalidad de funcionamiento Durante el funcionamiento el cierre del contacto de salida activación de la calefacción/ acondicionamiento) está señalada de la manera siguiente: Calefacción El símbolo indica el encendido de la calefacción. Acondicionamiento El símbolo indica el encendido del acondicionamiento. Ñ...
  • Seite 74: Programación Parámetros

    ISTRUCCIONES DE EMPLEO Programación parámetros Para efectuar la programación de los parámetros presionar una vez la tecla SET/PROG. En la pantalla aparece el símbolo SET. Al mismo tiempo el símbolo empieza a parpadear. En este momento es posible modificar, en secuencia: - tipo de funcionamiento condicionamiento/calefacción - el día de la semana - horas...
  • Seite 75 ISTRUCCIONES DE EMPLEO Programación parámetros Selección calefacción/acondicionamiento Cuando el símbolo parpadea es posible selec- cionar el tipo de funcionamiento con las teclas Para confirmar presionar la tecla MODE antes de 30 se- gundos. Programación del día de la semana Cuando la barra del día de la semana parpadea, selec- cionar el día corriente con las teclas (lunes=1, martes=2..domingo=7).
  • Seite 76 ISTRUCCIONES DE EMPLEO Programación parámetros Programación de los minutos Cuando las cifras de los minutos parpadean, programar los minutos con las teclas Para confirmar los valores presionar la tecla MODE antes de 30 segundos. Programación unidad de medida temperatura Cuando el símbolo °C o °F empieza a parpadear, selec- cionar la unidad de medida con las teclas Para confirmar el valor programado presionar la tecla MODE antes de 30 segundos.
  • Seite 77 ISTRUCCIONES DE EMPLEO Programación parámetros Programación set point T2 Cuando aparezca el símbolo el valor de temperatura empezará a parpadear. Regular el valor de T2 con las teclas Para confirmar el valor programado, presionar la tecla MODE antes de 30 segundos. Programación set point T3 Cuando aparezca el símbolo el valor de temperatura...
  • Seite 78 ISTRUCCIONES DE EMPLEO Programación parámetros Activación autoaprendizaje (solo tipo de funciona- miento calefacción) Cuando aparece el símbolo activar ON) o desactivar OFF) la función con las teclas Para confirmar el valor programado presionar la tecla MODE antes de 30 segundos. El autoaprendizaje permite optimizar el avance máx 2 horas) en la activación de la calefacción.
  • Seite 79: Personalización Del Programa Diario

    ISTRUCCIONES DE EMPLEO Personalización del programa diario Para efectuar la personalización del programa diario preprogramado o efectuar un cambio, presionar dos veces la tecla SET/PROG. Para efectuar la personalización del programa diario pre- programado o efectuar un cambio, presionar dos veces la tecla SET/PROG.
  • Seite 80 ISTRUCCIONES DE EMPLEO Personalización del programa diario El horario disminuye/aumenta a pasos de 15 minutos cuando se presionan las teclas , es por esto posible definir hasta 4 periodos de programación cada hora. Para confirmar la programación presionar durante algún minuto la tecla MODE, automáti- camente se pasa a la programación del día sucesivo.
  • Seite 81: Función Party/Holiday

    ISTRUCCIONES DE EMPLEO Función Party/Holiday La función party permite excluir temporalmente el programa programado modalidad au- to) o el set point manual modalidad MAN) introduciendo un set point de temperatura dife- rente durante un periodo incluido entre 1 y 23 horas. Esta función puede usarse, por ejemplo, para prolongar el periodo de confort durante una cena, una fiesta, etc.
  • Seite 82: Funcionamiento Manual

    ISTRUCCIONES DE EMPLEO Función Party/Holiday Para activar la función presionar prolongadamente la tecla MODE función PARTY), a continuación presionar de nuevo la tecla MODE función HOLIDAY). En la pan- talla aparece el símbolo . Con las teclas pro- gramar el nuevo valor del set point de temperatura. Presionando la tecla MODE se pasa a la programación del número de los días de activación que se visualiza en la pantalla.
  • Seite 83: Control Remoto

    ISTRUCCIONES DE EMPLEO Control remoto El cronotermostato dispone de una conexión de serie para la conexión con el indicador remo- to GSM GW 90 821. Mediante mandos SMS por ejemplo desde teléfono móvil) es posible: • programar el tipo de funcionamiento acondicionamiento/calefacción) •...
  • Seite 84: Programas Preprogramados

    ISTRUCCIONES DE EMPLEO Programas preprogramados El cronotermostato dispone de dos programas preprogramados, uno para la calefacción y uno para el acondicionamiento. PROGRAMA CALEFACCIÓN Lunes - Viernes Sábado - Domingo...
  • Seite 85: Parámetros Preprogramados

    ISTRUCCIONES DE EMPLEO Programas preprogramados PROGRAMA ACONDICIONAMIENTO Todos los días de la semana Estos programas preprogramados pueden modificarse y personalizarse según las propias exigencias. Para efectuar los cambios aténgase a las indicaciones contenidas en el pará- grafo “Personalización del programa diario”. Parámetros preprogramados Día de la semana 1 : lunes...
  • Seite 86: Istrucciones De Instalación

    ISTRUCCIONES DE INSTALACIÓN Reset y reajuste de los valores previamente programados Presionando contemporáneamente las 4 teclas con tensión de red presente, se efectúa un reset completo del cronotermostato. Atención: todos los parámetros programados y los programas personalizados se borran. Cuando se vuelve a encender, el cronotermostato utiliza los parámetros y los programas previamente programados en fábrica.
  • Seite 87: Descripción Bornas

    ISTRUCCIONES DE INSTALACIÓN Descripción bornas Bornas de cableado Alimentación L - Fase N - Neutro Relé de salida 1 - Contacto NA 2 - Contacto NC 3 - Común Línea de serie 4 - TX datos en salida) 5 - GND común) 6 - RX datos en entrada) Extracción batería Ñ...
  • Seite 88: Características Funcionales/Datos Técnicos

    CARACTERÍSTICAS FUNCIONALES DATOS TÉCNICOS Tipo de funcionamiento: calefacción y acondicionamiento Modalidad de funcionamiento: automático, manual, anticongelante/protección altas temperaturas Temperatura operativa: -5 °C ÷ +45 °C Temperatura medida: 0 °C ÷ +45 °C Sonda de temperatura: NTC, 100kΩ a 25°C Exactitud de la medida: ±0.5°C a 20°C Programas preprogramados: n°...
  • Seite 89 D E U T S C H Relais-Zeitthermostat für Unterputzmontage...
  • Seite 90: Achtung - Wichtig

    Installationsland geltenden Normen und Bestimmungen für Niederspannungsanlagen geregelt werden. Falls solche nicht vorgesehen sind, muss man die internationale Norm für Niederspannungsanlagen, IEC 60364, oder den Europäischen Harmonisierungsdokument HD 60364 beachten. Für genauere Informationen und technische Daten wenden Sie sich bitte an den Vertrieb von GEWISS.
  • Seite 91 INHALTSVERZEICHNIS BEDIENUNGSANWEISUNG eite - Allgemeine Beschreibung ..................92 - Steuerungsbeschreibung..................93 - Funktionsmodus...................... 94 - Parametereinstellung....................96 - Anpassung des Tagesprogramms ................101 - Funktion Party/ Holiday.................... 103 - Handbetrieb......................104 - Fernbedienung ......................105 - Funktion bei Stromausfall..................105 - Voreingestellte Programme..................
  • Seite 92: Bedienungsanweisung

    BEDIENUNGSANWEISUNG Allgemeine Beschreibung Das Zeitthermostat steuert über einen Relaisausgang die Überwachung der Umgebung- stemperatur und die Heizkesselsteuerung, Zonenventile, Klimageräte, Fan-Coil, usw. Das Zeitthermostat ist mit einem rückbeleuchteten LCD-Display und vier Steuertasten ausgestattet. MODE PROG...
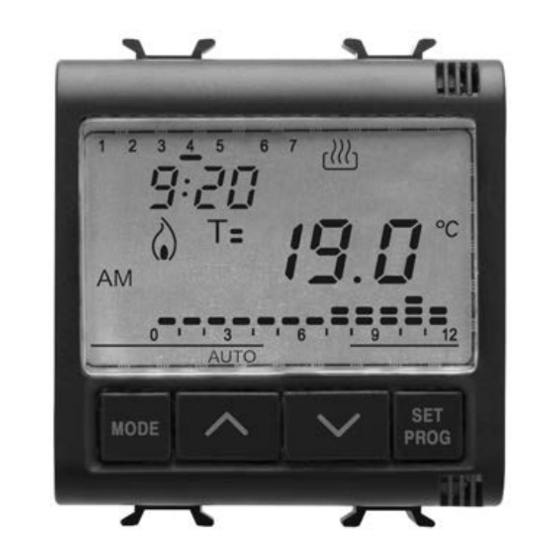
  • Seite 93: Steuerungsbeschreibung

    BEDIENUNGSANWEISUNG Steuerungsbeschreibung STEUERTASTEN Symbol MODE: Modusauswahl MODE Erhöhung / Auswahl Parameter Absenkung / Auswahl Parameter SET/PROG: Einstellung Programme / Programmierung SET/PROG DISPLAYANZEIGEN Profil Tagesprogramm Gemessene Umgebungstemperatur Funktionen HOLIDAY und PARTY Anzeige Aktivierung über GSM Fernsteuerung Funktionsart Heizung / Klimatisierung) Uhrzeit Aktivierung Heizung / Klimatisierung m Funktionsmodus OFF MAN AUTO...
  • Seite 94: Funktionsmodus

    BEDIENUNGSANWEISUNG Funktionsmodus Das Zeitthermostat sieht drei verschiedene Funktionsmodi vor: - AUTOMATIK - HANDBETRIEB - AUS / FROSTSCHUTZ / ÜBERTEMPERATURSCHUTZ Zum Umschalten zwischen den Funktionsmodi wird die Taste MODE verwendet. Beim Automatikbetrieb verwendet das Zeitthermostat ein Programm, das vom Anwender eingestellt wird, und für jeden Wochentag unterschiedlich sein kann.
  • Seite 95 BEDIENUNGSANWEISUNG Funktionsmodus Während des Betriebs wird das Schließen des Ausgangskontakts Aktivierung Heizung / Kli- matisierung) auf die folgende Weise angezeigt: Heizung Das Symbol zeigt das Einschalten der Heizung an. Klimatisierung Das Symbol zeigt das Einschalten der Klimatisierung...
  • Seite 96: Parametereinstellung

    BEDIENUNGSANWEISUNG Parametereinstellung Für die Parametereinstellung ein Mal die Taste SET/PROG drücken. Auf dem Display erscheint das Symbol SET. Gleichzeitig beginnt das Symbol oder zu blinken. Nun können nacheinander folgende Punkte geändert werden: - die Funktionsart Heizung / Klimatisierung - der Wochentag - Uhrzeit - Minuten - Temperatureinheit...
  • Seite 97 BEDIENUNGSANWEISUNG Parametereinstellung Auswahl Heizung / Klimatisierung Wenn das Symbol oder blinkt kann der Funk- tionsmodus mit den Tasten gewählt werden. Zur Bestätigung die Taste MODE innerhalb von 30 Sekunden drücken. Einstellung des Wochentags Wenn die Spalte des Wochentags blinkt den aktuellen Tag mit den Tasten wählen (Montag=1, Diens- tag=2….Sonntag=7).
  • Seite 98 BEDIENUNGSANWEISUNG Parametereinstellung Einstellung der Minuten Wenn die Minutenziffern blinken, diese mit den Tasten einstellen. Zur Bestätigung der eingestellten Werte die Taste MODE innerhalb von 30 Sekunden drücken. Einstellung der Temperatureinheit Wenn das Symbol °C oder °F beginnt zu blinken, kann die Einheit mit den Tasten gewählt werden.
  • Seite 99 BEDIENUNGSANWEISUNG Parametereinstellung Einstellung Sollwert T2 Bei der Anzeige des Symbols beginnt der Tempera- turwert zu blinken. Den Wert T2 mit den Tasten einstellen. Zur Bestätigung des eingestellten Werts die Taste MODE innerhalb von 30 Sekunden drücken. Einstellung Sollwert T3 Bei der Anzeige des Symbols beginnt der Tempera- turwert zu blinken.
  • Seite 100 BEDIENUNGSANWEISUNG Parametereinstellung Aktivierung Selbstlernfunktion (nur in der Funktions- art Heizung) Bei der Anzeige des Symbols die Funktion mit den Tasten aktivieren ON) oder deaktivieren OFF). Zur Bestätigung des eingestellten Werts die Taste MODE innerhalb von 30 Sekunden drücken. Die Selbstlernfunktion ermöglicht die Optimierung der vorzeitigen Einschaltung der Heizung max.
  • Seite 101: Anpassung Des Tagesprogramms

    BEDIENUNGSANWEISUNG Anpassung des Tagesprogramms Um die Anpassung des voreingestellten Tagesprogramms auszuführen, oder eine Änderung auszuführen muss die Taste SET/PROG zwei Mal gedrückt werden. Auf dem Display erscheint die Anzeige PROG, und die Spalte des ersten Wochentags beginnt zu blinken. Den gewünschten Tag mit den Tasten wählen.
  • Seite 102 BEDIENUNGSANWEISUNG Anpassung des Tagesprogramms Bei jedem Drücken der Tasten wird die Uhrzeit in 15 Minuten Schritten vor oder zurück bewegt, daher können 4 Programmierperioden für jede Stunde definiert werden. Zur Bestätigung der Programmierung muss die Taste MODE lange gedrückt werden, der Wechsel zur Programmierung des nächsten Tages erfolgt automatisch.
  • Seite 103: Funktion Party/Holiday

    BEDIENUNGSANWEISUNG Funktion Party/Holiday Die Funktion Party ermöglicht die vorübergehende Deaktivierung des eingestellten Pro- gramms Modus Auto) oder des manuellen Sollwerts Modus MAN), indem ein anderer Tem- peratursollwert für einen Zeitraum zwischen 1 und 23 Stunden eingestellt wird. Diese Funktion kann beispielsweise verwendet werden, um den Komfortzeitraum während eines Abendessens, eines Fests, usw.
  • Seite 104: Handbetrieb

    BEDIENUNGSANWEISUNG Funktion Party/Holiday Zur Aktivierung der Funktion die Taste MODE Funktion PARTY) lange drücken, anschließend erneut die Taste MODE Funktion HOLIDAY) drücken. Auf dem Display er- scheint das Symbol . Mit den Tasten den neu- en Temperatursollwert einstellen. Durch Drücken der Taste MODE erfolgt der Wechsel zur Einstellung der Tagesanzahl der Aktivierung, die auf dem Display angezeigt wird.
  • Seite 105: Fernbedienung

    BEDIENUNGSANWEISUNG Fernbedienung Das Zeitthermostat verfügt über einen seriellen Anschluss für den Anschluss der GSM Fern- steuerung GW 90 821. Folgende Optionen stehen mittels SMS Befehle z.B. über Mobiltele- fone) zur Verfügung: • Einstellen der Funktionsart Heizung / Klimatisierung) • Einstellen des Funktionsmodus Hand / Automatik / OFF) •...
  • Seite 106: Voreingestellte Programme

    BEDIENUNGSANWEISUNG Voreingestellte Programme Das Zeitthermostat verfügt über zwei voreingestellte Programme, eines für die Heizung und eines für die Klimatisierung. HEIZUNGSPROGRAMM Montag - Freitag Samstag - Sonntag...
  • Seite 107: Voreingestellte Parameter

    BEDIENUNGSANWEISUNG Voreingestellte Programme KLIMATISIERUNGSPROGRAMM Alle Wochentage Diese voreingestellten Programme können entsprechend der persönlichen Anforderungen geändert und angepasst werden. Für die Ausführung der Änderungen wird auf die Anwei- sungen des Abschnitts „Anpassung des Tagesprogramms“ verwiesen. Voreingestellte Parameter Wochentag 1 : Montag Uhrzeit 00:00 Sollwert Heizungstemperatur...
  • Seite 108: Installationsanweisung

    INSTALLATIONSANWEISUNG Reset und rückstellung der voreingestellten werte Wenn man die 4 Tasten bei anliegender Netzspannung gleichzeitig betätigt, führt man eine vollständige Nullstellung des Chronothermostats durch. Achtung: Alle eingestellten Parameter und kundenspezifisch gestaltete Programme werden gelöscht. Beim Wiedereinschalten verwendet das Chronothermostat in der Fabrik voreingestellte Parameter und Programme.
  • Seite 109: Klemmenbeschreibung

    INSTALLATIONSANWEISUNG Klemmenbeschreibung Verkabelungsklemmen Stromversorgung L - Phase N - Nullleiter Ausgangsrelais 1 - Kontakt NA 2 - Kontakt NC 3 - Allgemein Serielle Leitung 4 - TX ausgehende Daten) 5 - GND allgemein) 6 - RX eingehende Daten) Entfernen der Batterie Gegebenenfalls z.B.
  • Seite 110: Betriebseigenschaften Technische Daten

    BETRIEBSEIGENSCHAFTEN TECHNISCHE DATEN Funktionsart: Heizung und Klimatisierung Funktionsmodus: Automatik, Handbetrieb Frostschutz / Übertemperaturschutz Betriebstemperatur: -5 °C ÷ +45 °C Gemessene Temperatur: 0 °C ÷ +45 °C Temperatursonde: NTC, 100kΩ a 25°C Messgenauigkeit: ±0,5°C a 20°C Voreingestellte Programme: 2 Wochenprogramme Auflösung Stundenprogrammierung 15 Minuten Max.
  • Seite 111 Environnement et sur la Santé résultant d une élimination impropre des appareillages électriques et électroniques à la fin de leur durée d emploi. Gewiss participe activement aux opérations qui favorisent le réemploi, le recyclage et la récupération corrects des appareillages électriques et électroniques. Pour des informations supplémentaires, adressez-vous au service local d élimination des déchets ou au revendeur du produit.
  • Seite 112 According to article 9 paragraph 2 of the European Directive 2004/108/EC and to article R2 paragraph 6 of the Decision 768/2008/EC, the responsible for placing the apparatus on the Community market is: GEWISS S.p.A Via A. Volta, 1 - 24069 Cenate Sotto (BG) Italy Tel: +39 035 946 111 Fax: +39 035 945 270 E-mail: qualitymarks@gewiss.com +39 035 946 111 sat@gewiss.com...

Diese Anleitung auch für:

Gw 14 703Gw 12 703Chorus gw 10 703Chorus gw 12 703Chorus gw 14 703

Inhaltsverzeichnis