Herunterladen Inhalt Inhalt Diese Seite drucken
Silvercrest SHLF 2000 B2 Bedienungsanleitung

Silvercrest SHLF 2000 B2 Bedienungsanleitung

Heizlüfter mit fernbedienung
Vorschau ausblenden Andere Handbücher für SHLF 2000 B2:
Inhaltsverzeichnis

Werbung

Verfügbare Sprachen
  • DE

Verfügbare Sprachen

  • DEUTSCH, seite 58
CALEFACTOR CON MANDO A DISTANCIA SHLF 2000 B2
TERMOVENTILATORE CON TELECOMANDO SHLF 2000 B2
CALEFACTOR CON MANDO
A DISTANCIA
Instrucciones de servicio
TERMOVENTILADOR COM
COMANDO À DISTÂNCIA
Instruções de manejo
HEIZLÜFTER MIT FERNBEDIENUNG
Bedienungsanleitung
IAN 271514
CPE271514_Heizlüfter_mit_FB_Cover_LB5.indd 2
TERMOVENTILATORE
CON TELECOMANDO
Istruzioni per l'uso
FAN HEATER WITH
REMOTE CONTROL
Operating instructions
19.04.16 14:58

Werbung

Inhaltsverzeichnis

Fehlerbehebung

loading

Inhaltszusammenfassung für Silvercrest SHLF 2000 B2

  • Seite 1 CALEFACTOR CON MANDO A DISTANCIA SHLF 2000 B2 TERMOVENTILATORE CON TELECOMANDO SHLF 2000 B2 CALEFACTOR CON MANDO TERMOVENTILATORE A DISTANCIA CON TELECOMANDO Instrucciones de servicio Istruzioni per l’uso TERMOVENTILADOR COM FAN HEATER WITH COMANDO À DISTÂNCIA REMOTE CONTROL Instruções de manejo Operating instructions HEIZLÜFTER MIT FERNBEDIENUNG...
  • Seite 2 Español..................2 Italiano .................. 16 Português ................30 English ................... 44 Deutsch .................. 56...
  • Seite 3 Vista general / Panoramica / Visão geral / Overview / Übersicht 28 29 30...
  • Seite 4: Inhaltsverzeichnis

    Indice 1. Vista general ..................3 2. Uso adecuado.................4 3. Indicaciones de seguridad...............5 4. Volumen de suministro ..............8 5. Puesta en servicio ................8 Instalación del aparato..............8 Colocación de la pila..............9 6. Manejo ...................9 Encendido y apagado del aparato ..........9 Ajuste de la potencia de calefacción..........
  • Seite 5: Vista General

    1. Vista general Cuadro de mandos Rejilla de protección de salida de aire Base Interruptor de seguridad Compartimento para el mando a distancia Mango Rejilla de protección de entrada de aire Sensor de temperatura Interruptor de encendido/apagado Pantalla Tecla de espera 12 + Aumentar los valores - temperatura/tiempo 13 -...
  • Seite 6: Uso Adecuado

    ¡Muchas gracias por su 2. Uso adecuado confianza! El aparato es adecuado como calefacción adicional para espacios interiores secos. Le felicitamos por haber adquirido este cale- factor con ventilador. El aparato está concebido para el uso do- méstico y no es apto para fines industriales. Para un manejo seguro del aparato y para El aparato solo deberá...
  • Seite 7: Indicaciones De Seguridad

    3. Indicaciones de ¡ADVERTENCIA! Riesgo medio: la no ob- servación del aviso puede causar lesiones o seguridad daños materiales graves. Indicaciones de advertencia PRECAUCIÓN: riesgo reducido: la no ob- servación del aviso puede causar lesiones o En este manual de instrucciones encontrará daños materiales leves.
  • Seite 8 Este aparato está concebido para el uso doméstico y también en otros lugares similares, como en ... … comedores de empresa en tiendas, oficinas u otros lugares de trabajo; … fincas rústicas; … hoteles, moteles u otros alojamientos por parte de los huéspe- des;...
  • Seite 9: Peligro De Descarga Eléctrica

    PELIGRO de descarga El aparato se debe colocar exclusiva- mente sobre una superficie sólida, lisa, eléctrica seca y no inflamable. Conecte el enchufe sólo a una toma de Al colocar el aparato, mantenga alrede- corriente correctamente instalada y fá- dor de éste una distancia mínima de cilmente accesible y cuya tensión co- 0,5 m con respecto a otros aparatos o rresponda a la especificación indicada...
  • Seite 10: Volumen De Suministro

    4. Volumen de PELIGRO por las pilas suministro ¡PELIGRO DE EXPLOSIÓN! Coloque 1 Calefactor con ventilador las pilas con la polaridad en el sentido 1 Mando a distancia 19 correcto. Reemplácelas solo por otras 1 Pila de botón CR2032 pilas del mismo tipo u otro equivalente. 1 Manual de instrucciones Las pilas pueden causar la muerte si se ingieren.
  • Seite 11: Colocación De La Pila

    6. Manejo 5. Escoja la ubicación de tal forma que las personas, animales o plantas no se Los mismos símbolos en las teclas indican vean afectados de inmediato por la co- que la función es la misma. En estas instruc- rriente de aire caliente.
  • Seite 12: Ajuste De La Potencia De Calefacción

    6.2 Ajuste de la potencia de 6.4 Ajuste del tiempo de calefacción funcionamiento • Pulse Mode 21 las veces que sean ne- El aparato está provisto de un temporiza- cesarias hasta que en la pantalla 10 se dor 24 mediante el cual puede ajustar el indique el nivel de calefacción desea- tiempo de funcionamiento deseado.
  • Seite 13: Protección Contra Sobrecalentamiento

    6.6 Protección contra 6.8 Control antiheladas sobrecalentamiento El aparato dispone de una función llamada control antiheladas. Cuando esta función Para su seguridad este aparato cuenta con está activada, el aparato se enciende auto- una protección contra sobrecalentamiento. máticamente en cuanto la temperatura del En caso de que la temperatura en el interior entorno descienda a 6 °C.
  • Seite 14: Limpieza

    7. Limpieza 8. Solución de problemas Para poder disfrutar durante más tiempo de su aparato debe limpiarlo con regularidad. Si en algún momento el aparato no funciona como es debido, consulte en primer lugar la ¡PELIGRO de descarga eléctri- siguiente lista. Es posible que se trate de un problema sin importancia que usted mismo Antes de cada limpieza desconecte el pueda solucionar.
  • Seite 15: Eliminación

    9. Eliminación 10. Datos técnicos El símbolo del cubo de basu- Modelo: SHLF 2000 B2 ra con ruedas tachado signi- Tensión de la red: 220 - 240 V ~ 50 Hz fica que en la Unión Europea Clase de el producto se debe llevar a protección:...
  • Seite 16: Garantía De Hoyer Handel Gmbh

    11. Garantía de Cobertura de la garantía HOYER Handel GmbH El aparato ha sido fabricado conforme a unas directivas de calidad estrictas y ha sido com- Estimado cliente, probado y controlado antes de su entrega. Este aparato tiene un plazo de garantía de La garantía cubre los defectos del material o 3 años desde la fecha de compra.
  • Seite 17: Servicio Técnico

    • Puede enviar el producto defectuoso de forma gratuita a la dirección del servi- cio técnico proporcionada, adjuntando el comprobante de compra (recibo) y la descripción de la deficiencia, especifi- cando cuándo se ha producido. En www.lidl-service.com puede us- ted descargar este manual y mu- chos otros, junto con vídeos y productos de software.
  • Seite 18 Indice 1. Panoramica .................17 2. Uso conforme ................18 3. Istruzioni per la sicurezza ............19 4. Materiale in dotazione ..............22 5. Messa in funzione ................22 Collocazione dell'apparecchio ............22 Inserimento della batteria ..............23 6. Funzionamento ................23 Accensione e spegnimento dell'apparecchio ........23 Regolazione della potenzialità...
  • Seite 19: Panoramica

    1. Panoramica Pannello di comando Griglia di protezione uscita aria Base Interruttore di sicurezza Scomparto per telecomando Maniglia Griglia di protezione entrata aria Sonda termica Interruttore principale Display Tasto di standby 12 + Aumentare valori - temperatura/tempo 13 - Ridurre valori - temperatura/tempo Ricevitore infrarossi Timer accensione/spegnimento Attivazione/disattivazione funzione di rotazione...
  • Seite 20: Uso Conforme

    Vi ringraziamo per la 2. Uso conforme vostra fiducia! L'apparecchio è destinato al riscaldamento ausiliario di spazi interni asciutti. Congratulazioni per l'acquisto del vostro nuovo termoventilatore. L'apparecchio è pensato per l'uso domesti- co e non va utilizzato in ambito commercia- Per un impiego sicuro dell'apparecchio e le.
  • Seite 21: Istruzioni Per La Sicurezza

    3. Istruzioni per la AVVERTENZA! Rischio medio: la mancata osservanza di questa avvertenza può essere sicurezza causa di lesioni o gravi danni materiali. Avvertenze di sicurezza ATTENZIONE: rischio minimo: la mancata osservanza di questa avvertenza può essere Laddove necessario, nel presente manuale causa di lievi lesioni o danni materiali.
  • Seite 22 Questo apparecchio è destinato all'impiego sia in casa che per usi di tipo domestico, ad esempio … … nelle cucine dei lavoratori in negozi, uffici e altri locali com- merciali; … in tenute rurali; … da parte dei clienti di alberghi, motel e altre strutture residen- ziali;...
  • Seite 23 PERICOLO di scossa Quando si colloca l'apparecchio, man- tenere intorno ad esso una distanza mi- elettrica nima di 0,5 m da altri apparecchi o Collegare la spina solo ad una presa dalla parete. correttamente installata e facilmente ac- Non fare funzionare l'apparecchio in cessibile la cui tensione coincida con locali a rischio di esplosione o nelle vi- quella indicata sulla targhetta.
  • Seite 24: Materiale In Dotazione

    4. Materiale in L'ingestione di batterie può essere mor- tale. Conservare quindi le batterie fuori dotazione dalla portata dei bambini. Se viene in- 1 termoventilatore gerita una batteria, si deve subito ricor- 1 telecomando 19 rere all'assistenza medica. 1 piletta CR2032 Le batterie non devono essere caricate 1 manuale di istruzioni per l'uso o riattivate con altri strumenti, smontate,...
  • Seite 25: Inserimento Della Batteria

    6. Funzionamento 5. Scegliere un'ubicazione tale da impedi- re che persone, animali o piante venga- I simboli uguali sui tasti significano la stessa no colpiti immediatamente dal getto funzione. In queste istruzioni si descrive d'aria calda. l'azionamento mediante il telecoman- 6.
  • Seite 26: Regolazione Della Potenzialità Calorifera

    6.2 Regolazione della 6.4 Impostazione del tempo potenzialità calorifera di funzionamento • Premere Mode 21 fino a quando sul L'apparecchio è dotato di un timer 24 che display 10 compare il livello di riscal- consente di impostare il tempo di funziona- damento desiderato: mento desiderato.
  • Seite 27: Dispositivo Antisurriscaldamento

    6.6 Dispositivo 6.8 Dispositivo antigelo antisurriscaldamento L'apparecchio dispone di una cosiddetta funzione di dispositivo antigelo. Quando A scopo di sicurezza l'apparecchio è dotato questa funzione è attivata, l'apparecchio si di un dispositivo antisurriscaldamento. accende automaticamente non appena la Se la temperatura all'interno dell'apparec- temperatura ambiente scende a 6 °C.
  • Seite 28: Pulizia

    7. Pulizia 8. Risoluzione dei problemi Per poter sfruttare a lungo l'apparecchio è preferibile pulirlo regolarmente. Qualora l'apparecchio non funzioni corretta- mente, scorrere la checklist seguente, poiché l'anomalia di funzionamento potrebbe esse- PERICOLO di scossa elettrica! re dovuta a un piccolo problema che l'utente Prima di qualsiasi intervento di pulizia, è...
  • Seite 29: Smaltimento

    9. Smaltimento 10. Dati tecnici Il simbolo del bidone della Modello: SHLF 2000 B2 spazzatura su ruote barrato Tensione di rete: 220 - 240 V ~ 50 Hz significa che all’interno Classe di dell’Unione Europea il pro- protezione: dotto deve essere smaltito se- paratamente.
  • Seite 30: Garanzia Della Hoyer Handel Gmbh

    11.Garanzia della Entità della garanzia HOYER Handel GmbH L'apparecchio è stato prodotto con cura ba- sandosi su severe direttive di qualità ed è Gentile cliente, stato controllato scrupolosamente prima del- questo apparecchio è dotato di una garan- la consegna. zia di 3 anni a decorrere dalla data d'acqui- La garanzia si applica agli errori di materia- sto.
  • Seite 31: Centri Assistenza

    All'indirizzo www.lidl-service.com è possibile scaricare questo ma- nuale, molti altri manuali, filmati sui prodotti e software. Centri assistenza Assistenza Italia Tel.: 02 36003201 E-Mail: hoyer@lidl.it Assistenza Malta Tel.: 80062230 E-Mail: hoyer@lidl.com.mt IAN: 271514 Fornitore Si tenga presente che il seguente indirizzo non è...
  • Seite 32 Indice 1. Visão geral ..................31 2. Utilização correta .................32 3. Indicações de segurança ..............33 4. Material contido nesta embalagem ..........36 5. Colocação em funcionamento ............36 Colocar o aparelho ................36 Colocar a pilha ................37 6. Operação ..................37 Ligar e desligar o aparelho ............... 37 Regular a potência de aquecimento ...........
  • Seite 33: Visão Geral

    1. Visão geral Campo de comando Grelha de proteção saída de ar Base Interruptor de segurança Compartimento para o telecomando Pega Grelha de proteção entrada de ar Sensor térmico Interruptor principal Visor Tecla Standby 12 + Aumentar os valores - temperatura/tempo 13 - Reduzir os valores - temperatura/tempo Recetor de infravermelhos...
  • Seite 34: Utilização Correta

    Obrigado pela sua 2. Utilização correta confiança! O aparelho é adequado como aquecedor adicional para espaços interiores secos. Parabéns pela aquisição do seu novo termo- ventilador. Este aparelho destina-se apenas à utiliza- ção doméstica e não pode ser aplicado Para utilizar o aparelho com segurança e com fim industrial.
  • Seite 35: Indicações De Segurança

    3. Indicações de AVISO! Risco médio: não considerar o avi- so pode causar ferimentos ou danos mate- segurança riais graves. Indicações de aviso CUIDADO: nisco reduzido: não considerar o aviso, pode causar ferimentos ligeiros ou Quando necessário, são utilizadas as se- danos materiais.
  • Seite 36 Este aparelho destina-se a uma utilização doméstica ou seme- lhante, como por exemplo ... … em cozinhas para uso de funcionários em lojas, escritórios ou outros estabelecimentos comerciais; … em empreendimentos agrícolas; … para uso de hóspedes em hotéis, motéis ou outros estabeleci- mentos residenciais;...
  • Seite 37: Perigo De Incêndio

    PERIGO devido a choque Nunca utilize o aparelho para secar têxteis ou outras coisas, colocando-os elétrico sobre o aparelho ou à frente dele. Ligue a ficha de alimentação apenas a O aparelho só poderá ser colocado uma tomada de corrente devidamente numa superfície firme, plana, seca e instalada, com fácil acesso, e cuja ten- não inflamável.
  • Seite 38: Material Contido Nesta Embalagem

    4. Material contido PERIGO devido às pilhas nesta embalagem PERIGO DE EXPLOSÃO! Ao introdu- 1 Termoventilador zir a pilha, coloque-a com a polaridade 1 Telecomando 19 correta. As pilhas só podem ser substi- 1 Pilha de botão CR2032 tuídas por pilhas do mesmo tipo ou de 1 Manual de instruções um tipo equivalente.
  • Seite 39: Colocar A Pilha

    6. Operação 5. Escolha o lugar de colocação de modo que as pessoas, os animais ou as plan- Os símbolos iguais nas teclas designam a tas não sejam atingidas diretamente mesma função. Nestas instruções descreve- pela corrente de ar quente. se a utilização do aparelho com o teleco- 6.
  • Seite 40: Regular A Potência De Aquecimento

    6.2 Regular a potência de 6.4 Regular o tempo de aquecimento funcionamento • Prima Mode 21 tantas vezes até apa- O aparelho está equipado com um Timer recer no visor 10 o nível de aquecimen- (temporizador) 24, que lhe permite regular to desejado: o tempo de funcionamento que deseja.
  • Seite 41: Interruptor De Segurança

    2. Verifique se a entrada de ar ou a saída de 2.000 Watt. Ao preço de 25 cên- de ar estão obstruídas e elimine a cau- timos por quilowatt-hora, o custo sa da obstrução. seria de 12,00 euros por dia, ou se- Se não puder encontrar a causa da fa- ja, 360,00 euros por mês.
  • Seite 42: Solução Do Problema

    8. Solução do problema 9. Eliminar Se o seu aparelho não funcionar corretamen- O símbolo do contentor de te, siga primeiro esta lista de verificação. Tal- lixo com rodas com uma cruz vez se trate apenas de um pequeno problema significa que, na União Euro- que você...
  • Seite 43: Dados Técnicos

    10. Dados técnicos 11. Garantia da HOYER Handel GmbH Modelo: SHLF 2000 B2 Estimado Cliente, Tensão nominal: 220 - 240 V ~ 50 Hz A garantia do seu aparelho é de 3 anos a Classe de partir da data de compra. Caso este produ- proteção:...
  • Seite 44: Âmbito Da Garantia

    Âmbito da garantia • Poderá depois enviar o artigo conside- rado com defeito para o endereço da O aparelho foi produzido sob directivas ri- assistência técnica que lhe for comuni- gorosas de qualidade e inspeccionado an- cado, sem custos de porte para si, jun- tes da entrega.
  • Seite 46 Contents 1. Overview ..................45 2. Intended purpose ................46 3. Safety information ................. 47 4. Items supplied ................50 5. How to use ..................50 Setting up the device ................50 Inserting the battery................50 6. Operation ..................51 Switching the device on and off ............
  • Seite 47: Overview

    1. Overview Operating panel Protective grid of air outlet Base Safety switch Compartment for remote control Handle Protective grid of air inlet Temperature sensor Main switch Display Standby button 12 + Increase values - temperature/time 13 - Reduce values - temperature/time Infrared receiver Switch the timer on / off Switch the swivel function on / off...
  • Seite 48: Intended Purpose

    Thank you for your trust! 2. Intended purpose The device is suitable as auxiliary heating for Congratulations on your new fan heater. dry indoor spaces. For a safe handling of the device and in or- The device is designed for private home use der to get to know the entire scope of fea- and must not be used for commercial pur- tures:...
  • Seite 49: Safety Information

    3. Safety information WARNING! Moderate risk: failure to ob- serve this warning may result in injury or se- Warnings rious material damage. If necessary, the following warnings will be CAUTION: low risk: failure to observe this used in these operating instructions: warning may result in minor injury or mate- DANGER! High risk: failure to ob- rial damage.
  • Seite 50: Danger For Children

    In order to prevent overheating of the heating device, the heating device must not be covered. The device must never be set up directly under a wall socket, as the forming heat may lead to damage to the electric system. Never use the device close to a sink, a bath tub, a shower or a swimming pool, as water splashes could enter the device.
  • Seite 51: Danger From Batteries

    Do not use the device if there is visible damage to the device or the power ca- DANGER from batteries ble. DANGER OF EXPLOSION! Be sure to observe the correct polarity when in- serting the battery. Replace only with FIRE HAZARD the same or an equivalent type.
  • Seite 52: Items Supplied

    4. Items supplied NOTE: the device requires up to 10 amps 1 Fan heater electricity (2,000 watt). If you have connect- 1 Remote control 19 ed other consumers in the same electric cir- 1 Button cell CR2032 cuit, ensure that the maximum capacity of 1 Operating instructions the fuse is not exceeded, as the fuse will oth- erwise trigger.
  • Seite 53: Operation

    6. Operation 6.2 Setting the heat output Identical symbols on the buttons mean iden- • Press Mode 21 repeatedly until the de- tical functioning. These instructions describe sired heat setting is shown on the dis- the operation via the remote control 19. play 10: The selected function is shown on the dis- Low heat output: device oper-...
  • Seite 54: Swivel Function

    1. Press the button 24 in order to ad- 6.7 Safety switch just the timer setting. A safety switch 4 protects the device against The hour indicator flashes. damage caused from falling over. 2. Press the button + 20/- 22 in order to The safety switch 4 is positioned on the un- set the hours.
  • Seite 55: Cleaning

    7. Cleaning 8. Troubleshooting In order to enjoy your device for a long time, If your device fails to function as required, you should regularly clean it. please try this checklist first. Perhaps there is only a minor problem, and you can solve it yourself.
  • Seite 56: Disposal

    10. Technical specifications The symbol showing a wheel- ie bin crossed through indi- Model: SHLF 2000 B2 cates that the product Mains voltage: 220 - 240 V ~ 50 Hz requires separate refuse col- lection in the European Un- Protection class: II ion.
  • Seite 57: Warranty Period And Statutory Claims For Defects

    If the defect is covered by our warranty, the Handling in case of a warranty repaired or a new product will be returned claim to you. No new warranty period starts with In order to ensure prompt processing of your a repair or replacement of the product.
  • Seite 58 Inhalt 1. Übersicht ..................57 2. Bestimmungsgemäßer Gebrauch ............ 58 3. Sicherheitshinweise ............... 59 4. Lieferumfang ................. 62 5. Inbetriebnahme ................62 Gerät aufstellen .................. 62 Batterie einlegen ................. 63 6. Bedienung ..................63 Gerät ein- und ausschalten ..............63 Heizleistung einstellen .................
  • Seite 59: Übersicht

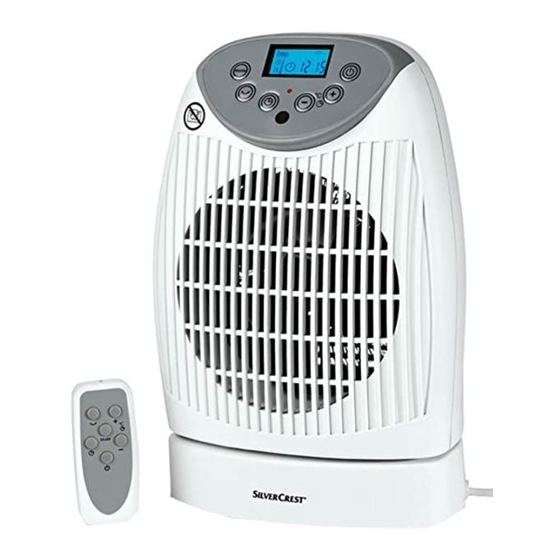
    1. Übersicht Bedienfeld Schutzgitter Luftaustritt Sockel Sicherheitsschalter Fach für Fernbedienung Griff Schutzgitter Lufteintritt Temperaturfühler Hauptschalter Display Standby-Taste 12 + Werte erhöhen - Temperatur/Zeit 13 - Werte verringern - Temperatur/Zeit Infrarot-Empfänger Timer ein-/ausschalten Schwenkfunktion ein-/ausschalten 17 Mode Betriebsmodus einstellen Kontroll-Leuchte Fernbedienung 20 + Werte erhöhen - Temperatur/Zeit 21 Mode Betriebsmodus einstellen...
  • Seite 60: Bestimmungsgemäßer Gebrauch

    Herzlichen Dank für Ihr 2. Bestimmungsgemäßer Vertrauen! Gebrauch Das Gerät ist geeignet als Zusatzheizung für Wir gratulieren Ihnen zu Ihrem neuen Heiz- trockene Innenräume. lüfter. Das Gerät ist für den privaten Haushalt kon- Für einen sicheren Umgang mit dem Gerät zipiert und darf nicht für gewerbliche Zwe- und um den ganzen Leistungsumfang ken- cke eingesetzt werden.
  • Seite 61: Sicherheitshinweise

    3. Sicherheitshinweise WARNUNG! Mittleres Risiko: Missachtung der Warnung kann Verletzungen oder Warnhinweise schwere Sachschäden verursachen. Falls erforderlich, werden folgende Warn- VORSICHT: Geringes Risiko: Missachtung hinweise in dieser Bedienungsanleitung ver- der Warnung kann leichte Verletzungen wendet: oder Sachschäden verursachen. GEFAHR! Hohes Risiko: Missach- HINWEIS: Sachverhalte und Besonderhei- tung der Warnung kann Schaden ten, die im Umgang mit dem Gerät beachtet...
  • Seite 62 Dieses Gerät ist ebenfalls dazu bestimmt, im Haushalt und in haushaltsähnlichen Anwendungen verwendet zu werden, wie beispielsweise ... … in Küchen für Mitarbeiter in Läden, Büros und anderen ge- werblichen Bereichen; … in landwirtschaftlichen Anwesen; … von Kunden in Hotels, Motels und anderen Wohneinrichtungen; …...
  • Seite 63: Gefahr Von Verletzung Durch Verbrennen

    GEFAHR durch Das Gerät darf ausschließlich auf einem Stromschlag festen, ebenen, trockenen und nicht brenn- Schließen Sie den Netzstecker nur an baren Untergrund aufgestellt werden. eine ordnungsgemäß installierte, leicht Halten Sie beim Aufstellen des Gerätes zugängliche Steckdose an, deren Span- ringsherum einen Mindestabstand von nung der Angabe auf dem Typenschild 0,5 m zu anderen Geräten oder der...
  • Seite 64: Gefahr Durch Batterien

    4. Lieferumfang GEFAHR durch Batterien 1 Heizlüfter EXPLOSIONSGEFAHR! Beachten Sie 1 Fernbedienung 19 beim Einlegen der Batterie die richtige 1 Knopfzelle CR2032 Polarität. Ersatz nur durch denselben 1 Bedienungsanleitung oder einen gleichwertigen Typ. Batterien können beim Verschlucken le- bensgefährlich sein. Bewahren Sie des- 5.
  • Seite 65: Batterie Einlegen

    6. Bedienung 5. Wählen Sie den Standort so, dass Per- sonen, Tiere oder Pflanzen nicht sofort Gleiche Symbole auf den Tasten bedeuten vom heißen Luftstrom getroffen werden. gleiche Funktion. In dieser Anleitung wird 6. Stecken Sie den Netzstecker in eine die Bedienung über die Fernbedienung 19 Steckdose, die den technischen Daten beschrieben.
  • Seite 66: Heizleistung Einstellen

    6.2 Heizleistung einstellen 1. Drücken Sie die Taste 24, um die Ti- mer Eingabe zu aktivieren. • Drücken Sie Mode 21 so oft, bis die Die Stundenanzeige blinkt. gewünschte Heizstufe im Display 10 2. Durch Drücken von + 20/- 22 stellen angezeigt wird: Sie die Stunden ein.
  • Seite 67: Sicherheitsschalter

    7. Reinigen 6.7 Sicherheitsschalter Das Gerät wird mit einem Sicherheitsschal- Damit Sie lange Freude an Ihrem Gerät ha- ter 4 gegen Schäden durch Umfallen ge- ben, sollten Sie es regelmäßig reinigen. schützt. Der Sicherheitsschalter 4 sitzt an der Unter- seite des Gerätes und schaltet dieses sofort GEFAHR durch Stromschlag! ab, falls das Gerät umfallen sollte.
  • Seite 68: Problemlösung

    8. Problemlösung 9. Entsorgen Sollte Ihr Gerät einmal nicht wie gewünscht Das Symbol der durchgestri- funktionieren, gehen Sie bitte erst diese chenen Abfalltonne auf Rä- Checkliste durch. Vielleicht ist es nur ein klei- dern bedeutet, dass das nes Problem, das Sie selbst beheben können. Produkt in der Europäischen Union einer getrennten Müll- sammlung zugeführt werden...
  • Seite 69: Technische Daten

    10. Technische Daten 11. Garantie der HOYER Handel GmbH Modell: SHLF 2000 B2 Sehr geehrte Kundin, sehr geehrter Kunde, Netzspannung: 220 - 240 V ~ 50 Hz Sie erhalten auf dieses Gerät 3 Jahre Ga- Schutzklasse: rantie ab Kaufdatum. Im Falle von Mängeln Leistung: 1.000/2.000 W...
  • Seite 70: Abwicklung Im Garantiefall

    Die Garantieleistung gilt für Material- oder Auf www.lidl-service.com können Fabrikationsfehler. Diese Garantie erstreckt Sie diese und viele weitere Handbü- sich nicht auf Produktteile, die normaler Ab- cher, Produktvideos und Software nutzung ausgesetzt sind und daher als Ver- herunterladen. schleißteile angesehen werden können oder für Beschädigungen an zerbrechlichen Tei- Service-Center len, z.
  • Seite 74 HOYER HANDEL GMBH Tasköprüstraße 3 22761 Hamburg Germany Estado de las informaciones · Stato attuale delle conoscenze · Estado das informações · Status of information · Stand der Informationen: 04/2016 · Ident.-Nr.: SHLF 2000 B2 IAN 271514 CPE271514_Heizlüfter_mit_FB_Cover_LB5.indd 1 19.04.16 14:58...

Inhaltsverzeichnis