Herunterladen Inhalt Inhalt Diese Seite drucken
Inhaltsverzeichnis

Werbung

Verfügbare Sprachen
  • DE

Verfügbare Sprachen

  • DEUTSCH, seite 90
ESTACIÓN METEOROLÓGICA PRÉMIUM /
STAZIONE METEOROLOGICA PREMIUM
ESTACIÓN METEOROLÓGICA
PRÉMIUM
Instrucciones de utilización y de seguridad
ESTAÇÃO METEOROLÓGICA
PREMIUM
Instruções de utilização e de segurança
PREMIUM-WETTERSTATION
Bedienungs- und Sicherheitshinweise
IAN 303756
STAZIONE METEOROLOGICA
PREMIUM
Indicazioni per l'uso e per la sicurezza
PREMIUM WEATHER STATION
Operation and Safety Notes

Werbung

Inhaltsverzeichnis
loading

Inhaltszusammenfassung für Auriol IAN 30375

  • Seite 1 ESTACIÓN METEOROLÓGICA PRÉMIUM / STAZIONE METEOROLOGICA PREMIUM ESTACIÓN METEOROLÓGICA STAZIONE METEOROLOGICA PRÉMIUM PREMIUM Instrucciones de utilización y de seguridad Indicazioni per l’uso e per la sicurezza ESTAÇÃO METEOROLÓGICA PREMIUM WEATHER STATION PREMIUM Operation and Safety Notes Instruções de utilização e de segurança PREMIUM-WETTERSTATION Bedienungs- und Sicherheitshinweise IAN 303756...
  • Seite 2 Instrucciones de utilización y de seguridad Página IT / MT Indicazioni per l’uso e per la sicurezza Pagina 25 Instruções de utilização e de segurança Página 47 GB / MT Operation and Safety Notes Page DE / AT / CH Bedienungs- und Sicherheitshinweise Seite...
  • Seite 3: Inhaltsverzeichnis

    Leyenda de pictogramas empleados .................... Página 1. Introducción ..........................Página 2. Información general ........................Página 3. Utilización conforme al uso prescrito ..................Página 4. Datos técnicos ..........................Página 5. Declaración de conformidad UE ....................Página 6. Advertencias de seguridad ......................Página 7.
  • Seite 4: Leyenda De Pictogramas Empleados

    Leyenda de pictogramas empleados Indicador de temperatura exterior Indicador de velocidad del viento Alcance de transmisión de 25 m entre Indicador de precipitaciones la estación transmisora y la receptora Punto de rocío con escarcha / Indicador de temperatura interior indicador de aviso de hielo Indicador de humedad Indicador de hora Indicador de dirección del viento...
  • Seite 5: Datos Técnicos

    meteorológica. La estación meteorológica con ane- – Presión atmosférica por debajo de 850 hPa: 850 hPa mómetro está equipada con un pluviómetro, un anemómetro, un barómetro un radiorreloj y un ca- – Temperatura de bochorno inferior a 14 °C: LL.L lendario.
  • Seite 6: Declaración De Conformidad Ue

    Duración con pilas totalmente cargadas: aprox. ¡PRECAUCIÓN: DAÑOS MATERIALES! 90 días de servicio J U sar exclusivamente el tipo de pilas indicadas. 5. Declaración de conformidad UE J V igilar la correcta polaridad. J C omprobar regularmente las pilas para descartar Nosotros, la empresa OWIM GmbH &...
  • Seite 7: Explicación De Términos

    8. Explicación de términos Dew Point: El punto de rocío (Dew Point) es el punto en el cual el aire precipita vapor de agua en forma de niebla y / o agua de condensación. Ejemplo: cuando el aire se enfría continuamente, si la humedad del aire se mantiene constante, la humedad relativa aumenta hasta el 100 %.
  • Seite 8: Puesta En Marcha

    – Termómetro de temperatura ambiente y medición – No exponer los instrumentos de medición a de la humedad ambiental exterior con memoria temperaturas inferiores a –20 °C o superiores del valor máximo y mínimo a 60 °C – Indicador de la presión atmosférica –...
  • Seite 9 (ø 5 mm) vigile que al hacerlo no pueda dañar reducen el alcance de la transmisión por radio. ningún cable eléctrico, tubería del agua o similar. Antes del montaje definitivo, compruebe la recep- 2. Presione los tacos en los agujeros taladrados ción por radio con la estación meteorológica.
  • Seite 10: Colocar Y Cambiar Las Pilas

    reducen el alcance de la transmisión por radio. – Apriete manualmente los 4 tornillos de la cubierta Antes de la elección definitiva del lugar de ins- del compartimento para las pilas. talación, compruebe la recepción por radio con la estación meteorológica. Cuando haya encontrado un lugar adecuado, ase- gúrese de que la superficie sea completamente hori- zontal para que se pueda realizar una medición de...
  • Seite 11: Vista General Del Aparato

    Pluviómetro: – Utilizando un destornillador para tornillos ranu- rados, suelte los 2 tornillos de sujeción situados uno frente a otro de la carcasa del pluviómetro. – Con cuidado, quite la carcasa de la base del aparato. – Retire la tira de papel del seguro de transporte (si lo hubiere) durante la primera puesta en marcha.
  • Seite 12 Teclas de la parte delantera Botón Pulsar 1 vez Mantener pulsador Botón Pulsar 1 vez Mantener aprox. pulsador 3 segundos aprox. WIND Indicación de 3 segundos ALARM la alarma de RAIN / CLEAR Cantidad de Borrar los viento y de la precipitaciones datos alarma de...
  • Seite 13: Preparación Del Anemómetro Y Del Pluviómetro, Y Registro En La Estación Meteorológica

    Pluviómetro: Botón Pulsar 1 vez Mantener pulsador Criba de hojas aprox. 3 segundos RAIN UNIT Configuración de la unidad de la cantidad de lluvia (mm o pul- gadas) Buscar la señal Compartimento Basculador del DCF-77 para las pilas de lluvia ZONE Cambiar entre la Configurar la...
  • Seite 14: Preparación Del Pluviómetro

    13.2 Preparación del pluviómetro pluviómetro en la pantalla. El proceso puede tardar hasta 4 minutos. – Ponga las pilas en el pluviómetro (consulte el punto 11. Colocar y cambiar las pilas / pluvió- 14. Configuración inicial de la metro). estación meteorológica –...
  • Seite 15: Ajuste De Dcf

    Minutos: Pulsando de nuevo el botón CLOCK pasa al ajuste de los minutos. Ahora parpadean los minutos en la pantalla. Con el botón ▲ y el botón ▼ puede ajus- tar los minutos. Pulsando de nuevo el botón CLOCK regresa a la in- dicación de la hora.
  • Seite 16: Ajuste De La Zona Horaria

    14.3 Ajuste de la zona horaria Set -1 hora: Atlántico, Gran Bretaña, Irlanda, Islandia, Portugal Durante la indicación de la hora puede cambiar entre la hora local y la zona horaria elegida. Las Set 0 horas: zonas horarias están divididas en 24 zonas. Puede Albania, Bélgica, Bosnia-Herzegovina, Dinamarca, elegir una zona horaria de +12 hasta –12 horas.
  • Seite 17: Configuración De La Unidad De La Presión Atmosférica

    16. Configuración de la unidad de la presión atmosférica Pulse el botón PRESSURE para cambiar entre las Desactivación de la función de alarma: unidades hPa (hectopascal), mb (milibar) e inHg Pulse dos veces el botón ALARM en la indicación (columna de mercurio en pulgadas). de la hora hasta que desaparezca .
  • Seite 18: Configuración De La Alarma De Viento

    Para ello, pulse el botón WIND UNIT que se encuen- Para ello pulse el botón WIND AL tantas veces tra en la parte posterior de la estación meteorológica, como sea necesario hasta que desaparezca el y cambiará entre las diferentes unidades. símbolo En caso de que una ráfaga de viento alcance el valor ajustado o lo sobrepase, suena una señal de...
  • Seite 19: Activar Y Desactivar La Alarma De Viento Y La Alarma De Sensación De Frío

    Alarma de viento y de sensación de frio activadas Ahora está activada la alarma de la sensación de frío. Con el botón WIND AL se puede desactivar 22. Configuración de la unidad de la alarma de la sensación de frío. Para ello, pulse medición de la lluvia el botón WIND AL hasta que...
  • Seite 20: Hora Y Fecha

    24.1 Hora y fecha 24.5 Cantidad de lluvia Pulse el botón CLOCK para cambiar entre la indica- La estación meteorológica memoriza automáticamente ción de la hora, la fecha y el día de la semana. Si la lluvia caída. La cantidad de lluvia se puede indicar durante aprox.
  • Seite 21: Alarma De Heladas

    24.6 Alarma de heladas Ejemplo: Pulse el botón RAIN / CLEAR hasta que se indique la cantidad de lluvia diaria. Se visualiza el valor de En cuanto la temperatura caiga por debajo de 4 °C, la cantidad de lluvia del día actual. Debajo se repre- en la pantalla aparece el signo de la alarma de he- senta en el diagrama la cantidad de lluvia del día ladas.
  • Seite 22: Valores Mínimos Y Máximos

    Unidad en inHg Unidad en hPa (mb) 25. Mantenimiento 25.1 Indicación de carga mínima de las pilas Horas evolución Cuando las pilas están agotadas, aparece el sím- bolo en el indicador. Hay símbolos separados 24.10 Valores mínimos y máximos para la estación meteorológica, el anemómetro y el pluviómetro.
  • Seite 23: Criba De Hojas Del Pluviómetro

    25.2 Criba de hojas del ¡ATENCIÓN! La estación meteorológica y el sensor pluviómetro externo contienen componentes electrónicos sensib- les. Las ondas de radio emitidas, por ejemplo, por Quite regularmente las hojas y otros objetos que teléfonos móviles, radioteléfonos, radios, mandos a se acumulan en el pluviómetro.
  • Seite 24: Eliminación

    28. Eliminación baterías deben reciclarse en un punto de recolección específico para ello. El embalaje está compuesto por materiales no conta- minantes que pueden ser desechados en el centro de reciclaje local. Tenga en cuenta el distintivo del embalaje para la separación de residuos. Está compuesto por abreviaturas (a) y núme- ros (b) que significan lo siguiente: 1–7: plásticos / 20–22: papel y cartón /...
  • Seite 25 Legenda dei Pittogrammi utilizzati ....................Pagina 26 1. Introduzione ..........................Pagina 26 2. Informazioni generali ......................... Pagina 26 3. Uso conforme ..........................Pagina 26 4. Dati tecnici ..........................Pagina 27 5. Dichiarazione UE di conformità ....................Pagina 28 6. Indicazioni relative alla sicurezza ..................... Pagina 28 7.
  • Seite 26: Legenda Dei Pittogrammi Utilizzati

    Legenda dei Pittogrammi utilizzati Display temperatura esterna Display velocità del vento Intervallo di trasmissione di 25 m tra il Display pioggia trasmettitore e la stazione di ricezione Punto di rugiada con gelo / Display temperatura interna display di avvertimento antigelo Display umidità...
  • Seite 27: Dati Tecnici

    Offre, inoltre, previsioni del tempo. La stazione me- 850 hPa – Heat Index inferiore a 14 °C: LL.L teo con anemometro è dotata inoltre di udometro, barometro, orologio radiocontrollato, calendario. – Dew Point inferiore a 0 °C: LL.L Solo per uso privato. Non utilizzare per usi indu- –...
  • Seite 28: Dichiarazione Ue Di Conformità

    5. Dichiarazione UE di conformità CAUTELA - DANNI ALLE COSE! J Noi, OWIM GmbH & Co. KG, Stiftsbergstraße 1, U tilizzare solo il tipo di batterie indicato. J DE-74167 Neckarsulm, GERMANIA, dichiariamo F are attenzione alla polarità della batteria. J sotto la nostra unica responsabilità, che il prodotto: C ontrollare regolarmente che non ci siano perdite stazione meteorologica premium, modello n°:...
  • Seite 29: Definizioni

    8. Definizioni Dew Point: Per punto di rugiada (Dew Point) si intende il punto in cui l’aria sprigiona il vapor acqueo sottoforma di nebbia e / o condensa. Esempio: se l’aria subisce un raffreddamento con- tinuo, a parità di umidità dell’aria, l’umidità relativa dell’aria sale fino al 100 %.
  • Seite 30: Messa In Funzione

    – Visualizzazione della pressione atmosferica – Tenere gli strumenti di misurazione lontano da – Visualizzazione della tendenza del tempo sostanze chimiche – Visualizzazione dello stato di carica della batteria (stazione meteo, anemometro e udometro) 10. Messa in funzione – Visualizzazione della direzione del vento –...
  • Seite 31 3. Avvitare nei tasselli le viti fornite e lasciare che Le collocazioni ottimali per l’installazione dell’anemo- un pezzetto delle viti sporga, in modo da potervi metro sono pali e tetti. In tali ubicazioni il vento può appendere la stazione meteo. agire direttamente sull’anemometro.
  • Seite 32: Inserimento E Sostituzione Delle Batterie

    garantire l’esecuzione di misurazioni della pioggia precise. È possibile posizionare semplicemente l’udometro o fissarlo con le viti in dotazione. 1. Marcare i punti di foratura con l’ausilio dell’u- dometro e prima di eseguire le perforazioni (ø 5 mm) accertarsi che durante la foratura non possano essere danneggiate linee elettriche, tubazioni dell’acqua o simili.
  • Seite 33: Presentazione Dell'apparecchio

    – Rimuovere precedentemente alla prima messa in funzione la striscia di carta utilizzata per la messa in sicurezza durante il trasporto (ove presenti). – Per aprire il portabatterie, allentare le 4 viti con testa a croce poste sul coperchio dello stesso. –...
  • Seite 34 Tasto Premere 1 Premere Tasto Premere 1 Premere volta per circa 3 volta per circa 3 WIND Velocità del ven- MEMORY Visualizzazione to media dei valori minimi (AVERAGE) e e massimi di raffiche (GUST) temperatura, umidità dell’aria, PRESSURE Modifica dell’u- Regolazione punto di rugiada nità...
  • Seite 35: Preparazione Dell'anemometro E Dell'udometro E Registrazione Sulla Stazione Meteo

    Udometro: Tasto Premere 1 Premere volta per circa 3 Filtro foglie RAIN UNIT Impostazione dell’unità di mi- sura della quan- tità di pioggia (mm o pollici) icerca del segnale radio Bascula pioggia Vano batterie DCF-77 ZONE Cambio tra ora Impostazione locale e ora uni- dell’ora univer- 13.
  • Seite 36: Preparazione Dell'udometro

    13.2 Preparazione dell’udometro misurati dal anemometro e dall’udometro si illumi- nano sul display. La procedura potrebbe durare – Inserire le batterie nell’udometro (fare riferimento 4 minuti al punto 11. Inserimento e sostituzione delle batterie / Udometro). 14. Impostazioni di base della –...
  • Seite 37: Adattamento Del Dcf

    Minuti: Giorno: Premendo nuovamente il tasto CLOCK si passa Premendo nuovamente il tasto CLOCK, si passa all’impostazione dei minuti. Sul display lampeggia- all’impostazione del giorno. Sul display lampeggia no i minuti. Con il tasto ▲ ed il tasto ▼ è possibile il giorno.
  • Seite 38: Impostazione Del Fuso Orario

    seguire le indicazioni, descritte nelle istruzioni al ATTENZIONE! punto “Adattamento del DCF-77”. Per impostare il fuso orario servirsi dei 14.3 Impostazione del fuso orario seguenti dati: -1 ora: Mentre è visualizzata l’ora è possibile commutare tra l’ora locale ed il fuso orario selezionato. I fusi Atlantico, Gran Bretagna, Irlanda, Islanda, Portogallo orari sono divisi in 24 zone.
  • Seite 39: Funzione Snooze

    Il segnale di sveglia torna quindi a suonare per circa 2 minuti. È possibile interrompere di nuovo il segnale di sveglia con il tasto SNOOZE / LIGHT o disattivarlo con il tasto ALARM. Con il tasto ▲ed il tasto ▼è possibile impostare i minuti. 16.
  • Seite 40: Impostazione Dell'unità Di Misura Per La Velocità Del Vento

    18. Impostazione dell’unità ALARM; sulla sinistra verrà visualizzata la velocità di misura per la velocità del vento del vento È possibile visualizzare la velocità del vento in 5 diverse unità di misura. – km / h (chilometri orari) – mph (miglia orarie) –...
  • Seite 41: Attivazione E Disattivazione Dell'allarme Vento E Dell'allarme Wind Chill

    Premere il tasto ▲ o ▼ per impostare il valore deside- rato. Alarme de vento ligado Confermare l’immissione con il tasto WIND ALARM; sulla sinistra verrà visualizzata la temperatura Wind Chill Alarme de índice de frio ligado Alarme de vento e de índice L’allarme Wind Chill è...
  • Seite 42: Visualizzazioni

    24. Visualizzazioni 24.4 Visualizzazione Heat Index e Dew Point Retroilluminazione: Per attivare la retroilluminazione, premere il tasto Per commutare tra Heat Index e Dew Point, premere SNOOZE / LIGHT. La retroilluminazione si spegne il tasto HEAT INDEX/DEW POINT. automaticamente dopo circa 10 secondi. 24.1 Ora e data 24.5 Quantità...
  • Seite 43: Allarme Ghiaccio / Gelo

    Viene visualizzato il valore corrente. In un diagram- ma, sotto al valore corrente viene indicato il relativo storico delle ultime 6 unità. 2 giorni prima: quantità di pioggia 156,7 mm con barra di visualizza- zione su –2 Quantità totale Quantità Quantità...
  • Seite 44: Variazione Della Pressione Atmosferica

    Soleggiato leggermente nuvoloso nuvoloso pioggia maltempo 24.12 Tendenza del tempo 24.9 Variazione della pressione Accanto alle previsioni del tempo è visualizzata anche atmosferica la tendenza del tempo. Tre frecce indicano rispetti- vamente tempo in miglioramento, stabile e in peggio- La stazione meteo indica le variazioni della pressione ramento.
  • Seite 45: Filtro Foglie Dell'udometro

    sostituzione delle batterie procedere come indicato durante il collegamento del rilevatore della pi- al punto 11. Inserimento e sostituzione delle batte- oggia con la stazione principale, il rilevatore rie. Tenere presente che durante la sostituzione delle della pioggia passa direttamente alla modalità batterie i dati memorizzati della stazione meteo pos- di prova.
  • Seite 46: Pulizia

    Se la stazione non dovesse funzionare correttamen- relative modifiche. Smaltire le batterie / gli accumula- te, rimuova temporaneamente le batterie e le reinse- tori e / o il prodotto presso i punti di raccolta indicati. risca dopo alcuni minuti. Uno smaltimento scorretto delle batterie / gli accumulatori procura 27.
  • Seite 47 Legenda dos pictogramas utilizados ..................... Página 48 1. Introdução ........................... Página 48 2. Informações gerais ........................Página 48 3. Utilização de acordo com as especificações ................Página 48 4. Dados técnicos ........................... Página 49 5. Declaração de conformidade UE ..................... Página 50 6.
  • Seite 48: Legenda Dos Pictogramas Utilizados

    Legenda dos pictogramas utilizados Visor de temperatura externa Visor de velocidade do vento Alcance de 25 m de transmissão Visor de chuva entre o transmissor e estação recetora Ponto de orvalho com gelo / Visor de temperatura interna visor de alerta de gelo Visor de umidade Visor de tempo Visor de direção do vento...
  • Seite 49: Dados Técnicos

    um barómetro, um relógio controlado por rádio e – Pressão atmosférica inferior a 850 hPa: 850 hPa – Heat Index inferior a 14 °C: LL.L um calendário. Destina-se apenas a uma utilização pessoal. Não é adequado para uma utilização – Dew Point inferior a 0 °C: LL.L comercial.
  • Seite 50: Declaração De Conformidade Ue

    Pluviómetro: 2 pilhas de 1,5 V e a manutenção pelo utilizador não devem ser (Corrente contínua), realizadas por crianças sem vigilância. tipo AA CUIDADO – DANOS MATERIAIS! Tempo de funcionamento das pilhas: aprox. 90 horas de serviço J U tilize somente o tipo de pilha indicado. J T enha atenção à...
  • Seite 51: Definições

    8. Definições Dew Point: O ponto de orvalho (Dew Point) é o ponto a partir do qual o ar começa a formar vapor de água em forma de nevoeiro e / ou água de condensação. Exemplo: se o ar for continuamente arrefecido, mantendo a humidade constante, a humidade relativa aumenta até...
  • Seite 52: Colocação Em Funcionamento

    10. Colocação em funcionamento – Indicação do estado da pilha (estação meteo- rológica, anemómetro e pluviómetro) – Indicação da direcção do vento – Indicação da escala de vento com alarme de vento ATENÇÃO! – Indicação do ponto de orvalho (Dew Point) –...
  • Seite 53 O pé de apoio previamente montado pode ser reti- Necessita de uma haste com um diâmetro de aprox. rado da estação meteorológica. Rebata o pé de 25–31 mm (não incluída) que se encontre numa apoio para baixo e retire-o da abertura. Para a posição estável na vertical.
  • Seite 54: Colocação E Substituição Das Pilhas

    1. Marque os furos com a ajuda do pluviómetro e, antes de os fazer (ø 5 mm), certifique-se de que ao furar aparede não danifica quaisquer cabos eléctricos, tubos de água, etc. 2. Empurre as buchas fornecidas nos furos até estas ficarem embutidas na parede.
  • Seite 55: Vista Geral Do Aparelho

    – Aquando primeira utilização, remova a tira de papel da segurança de transporte (se existente). – Para abrir o compartimento da pilha desaperte os 4 parafusos na tampa do compartimento da pilha. – Levante a tampa do compartimento da pilha. –...
  • Seite 56 Tecla Premir 1 x Premir Tecla Premir 1 x Premir durante durante aprox. 3 s. aprox. 3 s. WIND Velocidade MEMORY Indicação dos média do vento valores mín. E (AVERAGE) e máx. da tempe- rajadas de ratura, da humi- vento (GUST) dade, do ponto de orvalho PRESSURE...
  • Seite 57: Preparação Do Anemómetro E Do Pluviómetro, Bem Como Registo Na Estação Meteorológica

    Pluviómetro: Tecla Premir 1 x Premir durante Filtro de folhas aprox. 3 s. RAIN UNIT Configuração da unidade de medição da quantidade de chuva (mm ou polegadas) Procura do sinal Compartimento Pluviómetro de radiofrequên- da pilha de báscula cia DCF-77 ZONE Mudança entre Configuração...
  • Seite 58: Preparar O Pluviómetro

    13.2 Preparar o pluviómetro medição do anemómetro e do pluviómetro a piscar no visor. O processo pode demorar até 4 minutos. – Coloque as pilhas no pluviómetro (para tal, consulte Pluviómetro no ponto 11. Colocação 14. Configurações básicas da e substituição das pilhas). estação meteorológica –...
  • Seite 59: Configuração Dcf

    Minutos: Premindo outra vez a tecla CLOCK consegue proceder à configuração dos minutos. Os minutos aparecem a piscar no visor. Com a tecla ▲ e a tecla ▼ pode configurar os minutos. Premindo outra vez a tecla CLOCK consegue voltar à...
  • Seite 60: Configuração Do Fuso Horário

    14.3 Configuração do fuso horário Definir -1 hora: Atlântico, Grã-Bretanha, Irlanda, Islândia, Portugal Enquanto se encontra na indicação da hora, pode alternar entre a hora local e o fuso horário seleccio- Definir 0 horas: nado. Os fusos horários estão divididos em 24 zonas. Albânia, Bélgica, Bósnia-Herzegovina, Dinamarca, Pode seleccionar um fuso horário de +12 horas até...
  • Seite 61: Ajustar A Unidade Da Pressão Atmosférica

    16. Ajustar a unidade da pressão atmosférica Prima a tecla PRESSURE para mudar entre as unidades Desactivar a função de alarme: hPa (hectopascais), mb (milibares) e inHg (altura da Prima duas vezes a tecla ALARM na indicação da coluna de mercúrio em polegadas). hora, até...
  • Seite 62: Ajustar O Alarme De Vento

    Para tal, prima a tecla WIND UNIT, na parte posterior Se uma rajada de vento atingir ou ultrapassar o valor da estação meteorológica, para mudar entre as dife- definido é emitido um som de aviso durante aprox. rentes unidades. 1 minuto. Para além disso ainda pisca o símbolo no visor.
  • Seite 63: Ligar E Desligar O Alarme De Vento E O Alarme De Índice De Frio

    22. Ajuste da unidade para a o alarme de índice de frio. Para tal, prima a tecla medição da pluviosidade WIND AL até o símbolo se apagar. Se a temperatura de índice de frio atingir ou ficar Pode visualizar a quantidade de chuva em mm (mi- aquém do valor definido é...
  • Seite 64: Fuso Horário

    24.2 Fuso horário Valor digital: Através da tecla ZONE consegue visualizar o fuso horário seleccionado. Aparece ZONE ao lado da Valor hora. Ao premir novamente a tecla ZONE volta ou- Unidade tra vez à sua hora local. Diagrama: Unidade em polegadas Unidade em millímetros 24.3 Temperatura e humidade interior / exterior...
  • Seite 65: Alarme De Gelo / Geada

    24.7 Direcção do vento O anemómetro mostra automaticamente a direcção média do vento nos últimos 2 minutos. N = Norte NE = Nordeste Prima a tecla RAIN HISTORY para ver os detalhes. E = Este Premindo uma vez a tecla, salta para o dia seguinte. SE = Sudeste A seguir é...
  • Seite 66: Valores Mínimos E Máximos

    24.10 Valores mínimos e máximos Se for indicada a tempe- Utilizando a tecla MEMORY consegue visualizar ratura interior, a indica- os valores máximos e mínimos memorizados. ção do estado de carga das pilhas diz respeito à estação meteorológica. Se for indicada a tempe- ratura exterior, a indica- ção do estado de carga das pilhas diz respeito...
  • Seite 67: Limpeza

    = A velocidade, direcção e chill são mostrados caso, altere o local de instalação (p. ex. perto de como “-”. uma janela). Observe que o sensor exterior é insta- = O sensor de vento não está mais conectado lado sempre num raio de, no máximo, 25 metros com a estação principal.
  • Seite 68 As possibilidades de reciclagem dos arti- gos utilizados poderão ser averiguadas no seu Município ou Câmara Municipal. Não deposite o produto utilizado no lixo doméstico, a favor da proteção do am- biente. Elimine-o de forma responsável. Pode informar-se no seu município sobre os locais de recolha adequados e o seu período de funcionamento.
  • Seite 69 List of pictograms used........................Page 70 1. Introduction .............................Page 70 2. General information ........................Page 70 3. Intended use ...........................Page 70 4. Technical data ..........................Page 71 5. Simplified EU declaration of conformity..................Page 71 6. Safety information ..........................Page 72 7. Scope of delivery..........................Page 72 8.
  • Seite 70: List Of Pictograms Used

    List of pictograms used Outdoor temperature display Wind Speed display 25M transmission range between Rainfall display transmitter and receiver station Dew point with frost / ice warning Indoor temperature display display Humidity display Time display Wind Direction display Batteries included Premium weather station damage resulting from inappropriate use and failure to comply with the safety instructions.
  • Seite 71: Technical Data

    4. Technical data Values above the measurement values: – Room temperature above 50 °C: HH.H Measuring Range: – Outdoor temperature above 70 °C: HH.H Room Temperature: 0.0 °C to +50.0 °C, – Air humidity above 99 %: 99 % Resolution: 0.1 °C –...
  • Seite 72: Safety Information

    7. Scope of delivery compliance with Directives 2014/53/EU and 2011/65/EU. The full text of the EU declaration of conformity is avail- able at the following internet address: www.owim.com 6. Safety information DANGER FOR CHILDREN! J S wallowing batteries could be fatal. Keep batteries and the weather station out of the reach of children.
  • Seite 73: Definition Of Terms

    Wind Chill: The wind chill (Wind Chill) refers to the difference between the measured (air temperature) and the tem- perature felt on the human body, which depends on the wind speed. The wind chill is the measurement used for wind-dependant cooling of an object. Humans feel this wind chill particularly on the face.
  • Seite 74: Commissioning

    Rain gauge: – Transmits rainfall quantity to the weather station on 434 MHz frequency – Easy to stand or mount with screws on an even surface – It is best to stand or mount the rain gauge in an areas which are not protected from rain. 0.5 x 3 CAUTION! ø...
  • Seite 75 Vane Mast Wind Hexagonal socket head bolt wheel Washer Wind gauge assembly: Mounting clamp Washer Choose a suitable location for your wind gauge. – The wind gauge must be set up outdoors. – The wind must be able to access the wind Setting up the rain gauge: gauge from all sides to enable the wind force and wind direction to be measured accurately.
  • Seite 76: Inserting And Replacing Batteries

    11. Inserting and replacing batteries Weather station: – Open the battery compartment on the rear of Put the batteries first into the outdoor the weather station in the direction of the arrow. sensor (wind gauge / rain gauge), then – Insert the batteries (6 x 1.5 V type AA) ensuring into the weather station.
  • Seite 77: Product Overview

    12. Product overview Socket for 6 V (direct current) adaptor (adaptor not included) Weather Station: Temperature display and air Weather forecast and air pressure humidity indoors / outdoors Wind speed, wind direction Time and alarm and rainfall quantity Buttons – front side Button Press once Press for ap-...
  • Seite 78 Button Press once Press for ap- Button Press once Press for ap- prox. 3 sec. prox. 3 sec. CLOCK Switch display Set date and WIND UNIT Set the wind between local time speed unit time, date and (Beaufort, mph, day of the week m / s, km / h or knots) ALARM...
  • Seite 79: Preparing The Wind Gauge And Rain Gauge And Registering On The Weather Station

    Rain gauge: Leaf filter Battery Rain rocker compartment 13. Preparing the wind gauge and 13.3 Automatic wind gauge and rain gauge and registering on rain gauge registration on the weather station the weather station 13.1 Calibrating the wind gauge After inserting batteries in the wind gauge and the rain gauge, insert batteries in the weather station The wind gauge must be recalibrated when using it (see the instructions listed under Point 11.
  • Seite 80: Weather Station Basic Settings

    14. Weather station basic settings Year: Press the CLOCK button a second time to set the 14.1 Setting year. The year now appears on the display. Use ▲ and ▼ to set the year. – 12 / 24 hour format –...
  • Seite 81: Dcf-77 Synchronisation

    14.2 DCF-77 synchronisation This functions sets the time and date automatically. Press on the back side to activate the synchronisa- tion for radio-controlled DCF-77 time information. Press and the symbol appears on the display. When the transmission signal is received, a symbol appears.
  • Seite 82: Alarm Function

    Set +1 Hr.: Press the ALARM button again to reactivate the alarm Bulgaria, Estonia, Finland, Greece, Latvia, Lithuania, function. Press the CLOCK button to return to the Moldova, Romania, Turkey, Ukraine, Cyprus time display. If no button is pressed for approximately 20 seconds All other time zones can be found in your Atlas or while the switch is being made, the weather station on the Internet.
  • Seite 83: Setting The Wind Speed Unit

    the current air pressure value, e.g. from the newspaper Hold the WIND ALARM button down for approx. or Internet. 3 seconds until a confirmation tone sounds and the Hold the PRESSURE button down for approx. 3 seconds value flashes. until you hear a confirmation tone. The air pressure value now flashes on the display.
  • Seite 84: Switching The Wind Alarm And The Wind Chill Alarm On And Off

    Hold the WIND ALARM button down for approx. 3 seconds until a confirmation tone sounds and the value flashes. Wind Alarm on Wind Chill Alarm on Use ▲ or ▼ to set the desired value. Press the WIND ALARM to confirm the entry, which then appears on Wind and Wind Chill Alarm on left next to the Wind Chill temperature 22.
  • Seite 85: Date And Time

    24.1 Date and time displayed in different chronicles either as a digital value or in diagram form: Press the CLOCK button to switch between the time, date and day of the week. If no button has been Digital value: pressed for a period of approximately 20 seconds, the time display appears automatically.
  • Seite 86: Ice / Frost Alarm

    24.7 Wind direction The wind gauge automatically shows the average Press the RAIN HISTORY button to view the details. wind direction for the last 2 minutes. Every time the button is pressed, the display moves forward by one day. N = North Below, you will find a display for the past 2 days: NE = North East E = East...
  • Seite 87: Minimum And Maximum Values

    24.10 Minimum and If the indoors tempera- maximum values ture is displayed, the battery charge indica- Use the MEMORY button to display saved minimum tor applies for weather and maximum values. station. If the outside temperature is shown, the battery charge indi- cator applies for the wind gauge.
  • Seite 88: Cleaning

    = Always have a ”Beep” sound at the main unit. Cold (outdoor temperatures below 0°C) can reduce = Wind-chill alert was activated. When the wind- the battery power of the outdoor sensor and thereby chill alert is activated, in the 1st minute, first negatively impair the radio transmission.
  • Seite 89 hours can be obtained from your local authority. Faulty or used batteries / rechargeable batteries must be recycled in accordance with Directive 2006/66/EC and its amendments. Please return the batteries / rechargeable batteries and / or the product to the available collection points. Environmental damage through incorrect disposal of the batteries / rechargeable batteries!
  • Seite 90 Legende der verwendeten Piktogramme ..................Seite 91 1. Einleitung ............................Seite 91 2. Allgemeine Information ......................Seite 91 3. Bestimmungsgemäße Verwendung ..................Seite 91 4. Technische Daten ........................Seite 92 5. EU-Konformitätserklärung ......................Seite 92 6. Sicherheitshinweise ........................Seite 93 7. Lieferumfang ..........................Seite 93 8. Begriffserklärungen ........................Seite 94 9.
  • Seite 91: Legende Der Verwendeten Piktogramme

    Legende der verwendeten Piktogramme Anzeige Außentemperatur Windgeschwindigkeitsanzeige 25 m Sendereichweite zwischen Niederschlagsanzeige Sende- und Empfangsstation Taupunkt mit Frost-/ Anzeige Innenraumtemperatur Eiswarnungsanzeige Luftfeuchtigkeitsanzeige Zeitanzeige Windrichtungsanzeige Beiliegende Batterien Premium-Wetterstation Anleitung beschrieben, um Verletzungen oder Schäden zu vermeiden. Für Schäden durch unsachgemäße Handhabung und Nichtbeachtung der Sicherheits- 1.
  • Seite 92: Technische Daten

    einem Kalender. Nur zur privaten Nutzung. Nicht Überschreiten der Messwerte: für den gewerblichen Einsatz. – Raumtemperatur über 50 °C: HH.H – Außentemperatur über 70 °C: HH.H – Luftfeuchtigkeit über 99 %: 99 % 4. Technische Daten – Luftdruck über 1050 hPa: 1050 hPa –...
  • Seite 93: Sicherheitshinweise

    J mit den Normen / normativen Dokumenten der T auchen Sie die Wetterstation und den Außen- 2014/53/EU und 2011/65/EU übereinstimmt. sensor nie in Wasser oder andere Flüssigkeiten. J B eachten Sie die Hinweise zur Reinigung und Der vollständige Text der EU-Konformitätserklärung Aufbewahrung dieser Anleitung.
  • Seite 94: Begriffserklärungen

    den bei dieser Temperatur maximal möglichen Gehalt an Wasserdampf. Heat Index: Beim Hitzeindex (Heat Index) handelt es sich um die empfundene Lufttemperatur des menschlichen Körpers unter Berücksichtigung der gemessenen Lufttemperatur und der herrschenden Luftfeuchtigkeit. Wind Chill: Bei der Windkühle (Wind Chill) handelt es sich um den Unterschied zwischen der gemessenen (Luft- temperatur) und der gefühlten Temperatur, die von der Windgeschwindigkeit abhängig sind.
  • Seite 95: Inbetriebnahme

    – kann aufgestellt oder aufgehängt werden Aufstellen der Wetterstation: – nur für den Innengebrauch Die Wetterstation hat einen vormontierten Standfuß, mit dessen Hilfe sich die Wetterstation praktisch auf- Windmesser: stellen lässt. Hinweis: Ziehen Sie vor der Inbetriebnahme die – Überträgt Windgeschwindigkeit, Temperatur und Luftfeuchtigkeit zur Wetterstation über 434 MHz Schutzfolie vom Display der Wetterstation ab.
  • Seite 96: Aufstellen Des Regenmessers

    Befestigen Sie den Windmesser wie unten abgebildet mit den beigefügten Innensechskantschrauben, Unter- legscheiben, Befestigungsschrauben und Muttern. Vergewissern Sie sich nach der Montage, dass der Windmesser waagerecht ausgerichtet ist und festen Halt hat. Eine waagerechte Lage ist notwendig, um eine genaue Messung durchzuführen. Windfahne Mast Aufhänger...
  • Seite 97: Batterien Einlegen Und Wechseln

    1. Markieren Sie die Bohrlöcher mit Hilfe des Regen- messers und achten Sie vor dem Bohren der Bohrlöcher (ø 5 mm) darauf, dass beim Bohren keine elektrischen Leitungen oder Wasserleitungs- rohre o. Ä. beschädigt werden. 2. Schieben Sie die mitgelieferten Dübel in die Bohr- löcher, bis sie bündig mit der Wand abschließen.
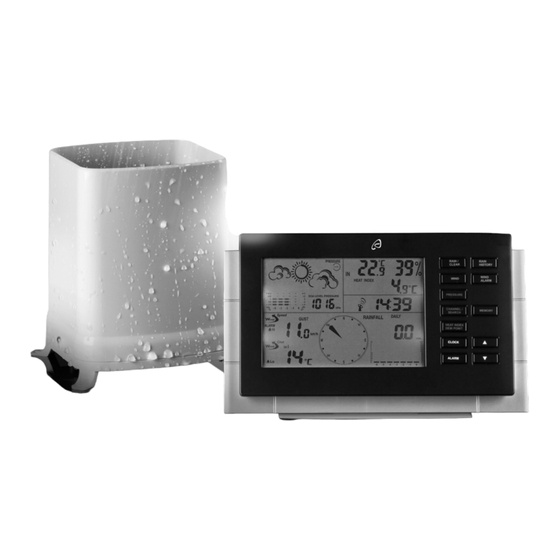
  • Seite 98: Geräteübersicht

    12. Geräteübersicht Aussparung liegt. Nur dann kann eine Wasser- dichtheit des Batteriefaches gewährleistet werden. – Ziehen Sie die 4 Schrauben an der Batterie- Wetterstation: fachabdeckung wieder handfest an. Temperaturanzeige und Luft- Wettervorhersage und Luftdruck feuchtigkeit innen / außen – Stülpen Sie das Gehäuse wieder vorsichtig über die Gerätebasis.
  • Seite 99 Tasten Rückseite Taste 1x drücken ca. 3 Sek. drücken Taste 1x drücken ca. 3 Sek. CLOCK Anzeigewechsel Einstellung von drücken zwischen lokaler Uhrzeit und Ein- und Aus- WIND AL Uhrzeit, Datum Datum schalten von und Wochentag Windalarm ALARM Alarmzeit Einstellung von und Windkühle- anzeigen und Alarmzeit...
  • Seite 100: Vorbereiten Des Windmessers Und Des Regenmessers Sowie Anmelden An Die Wetterstation

    Windmesser: – Legen Sie die Batterien gemäß der Polarität ein (beachten Sie dazu unter Punkt 11. Batterie ein- Gehäuse mit integriertem Windfahne mit legen und wechseln / Windmesser) Temperaturmesser und integriertem – Die Sendesignal LED leuchtet kurz auf. Der Luftfeuchtigkeitsmesser Kompass Windmesser ist jetzt kalibriert.
  • Seite 101: Manuelles Anmelden Des Windmessers Und Des Regen Messers An Die Wetterstation

    Die Wetterstation sucht sich automatisch die Funk- signale des Windmessers und des Regenmessers. Der Vorgang dauert ca. 4 Minuten. Stunden: Durch einen weiteren Druck auf die CLOCK-Taste 13.4 Manuelles Anmelden des kommen Sie zur Stunden-Einstellung. Es blinken jetzt Windmessers und des Regen- die Stunden im Display.
  • Seite 102: Dcf-77 Angleichung

    Monat: ACHTUNG! Durch einen weiteren Druck auf die CLOCK-Taste kommen Sie zur Monats-Einstellung. Es blinkt jetzt der Monat im Display. Mit der ▲-Taste und der Die Anzeigen von Zeit und Datum werden in Mittel- ▼-Taste können Sie den Monat einstellen. europa mittels des sog.
  • Seite 103: Alarmfunktion

    15. Alarmfunktion Zum Einstellen der Alarmzeit halten Sie während der Uhrzeitanzeige die ALARM-Taste 3 Sekunden gedrückt. Nach Ertönen eines Bestätigungssignals Mit der ZONE-Taste kehren Sie wieder zur Uhrzeit- erscheint auf dem Display ALARM und die Stunden anzeige zurück. Wird während der Zeitzonenein- blinken.
  • Seite 104: Luftdruckeinheit Einstellen

    Alarmsignal ausschalten: Mit der PRESSURE-Taste kehren Sie wieder zur Das Alarmsignal ertönt ca. 2 Minuten und blinkt. regulären Anzeige zurück. Wenn ca. 1 Minute keine Sie können es vorzeitig mit der ALARM-Taste aus- Einstelltaste gedrückt wird ebenso. schalten. Schlummerfunktion: Mit der SNOOZE / LIGHT-Taste können Sie das 18.
  • Seite 105: Wind Chill Alarm Einstellen

    Drücken Sie die ▲- oder die ▼-Taste, um den Drücken Sie die ▲- oder ▼-Taste, um den gewünschten gewünschten Wert einzustellen. Mit der WIND Wert einzustellen. ALARM-Taste bestätigen Sie die Eingabe und es Mit der WIND ALARM-Taste bestätigen Sie die erscheint links neben der Windgeschwindigkeit Eingabe und es erscheint links neben der Wind Chill Temperatur...
  • Seite 106: Einstellen Der Einheit Für Die Regenmessung

    10 Sekunden erlischt die Hintergrundbeleuchtung automatisch. Windalarm an 24.1 Uhrzeit und Datum Wind Chill Alarm an Drücken Sie die CLOCK-Taste, um zwischen der Zeit-, Datum-, Wochentaganzeige zu wechseln. Wenn ca. 20 Sekunden keine Taste gedrückt wird, kehrt die Wetterstation automatisch zur Uhrzeitanzeige Wind- und Wind Chill-Alarm an zurück.
  • Seite 107: Regenmenge

    24.5 Regenmenge Beispiel: Drücken Sie die RAIN / CLEAR-Taste, bis die tägliche Die Wetterstation hat einen automatischen Speicher Regenmenge angezeigt wird. Zu sehen ist als Wert für die gefallene Regenmenge. Sie können sich die die Regenmenge vom aktuellen Tag. Darunter ist im Regenmenge in verschiedenen Chroniken anzeigen Diagramm die Regenmenge sowohl vom aktuellen lassen.
  • Seite 108: Eis- / Frostalarm

    Einheit in inHg Einheit in hPa (mb) 24.6 Eis- / Frostalarm Sobald die Temperatur auf unter 4 °C fällt, erscheint im Display das Frostalarm-Zeichen. Dieses warnt Sie vor möglichem Bodenfrost. Stunden Verlauf 24.7 Windrichtung 24.10 Minimal- und Maximal-Werte Der Windmesser zeigt automatisch die durchschnitt- liche Windrichtung der letzten 2 Minuten an.
  • Seite 109: Wartung

    25. Wartung 26. Fehlerbehebung bei Störung der Messergebnisse 25.1 Batterietiefstandsanzeige 26.1 Fehler beheben Wetterstation Sind die Batterien leer, erscheint das Symbol der Anzeige. Es gibt für die Wetterstation, den Wind- = Fehler messer und den Regenmesser ein separates Symbol. = mögliche Ursache = Behebung Wird die Innentempe- ratur angezeigt, zählt...
  • Seite 110: Reinigen

    Messergebnisse beeinflussen. In diesem Fall Beachten Sie die Kennzeichnung der setzen Sie die Wetterstation und den Außensensor Verpackungsmaterialien bei der Abfall- zurück. Dies machen Sie, indem Sie die Batterien trennung, diese sind gekennzeichnet mit entnehmen und nach ca. 5 Sekunden wieder Abkürzungen (a) und Nummern (b) mit einsetzen.
  • Seite 111 OWIM GmbH & Co. KG Stiftsbergstraße 1 DE-74167 Neckarsulm GERMANY Model-No.: H13726 Version: 07 / 2018 Estado de las informaciones · Versione delle informazioni · Estado das informações · Last Information Update · Stand der Informationen: 04 / 2018 · Ident.-No.: H13726042018-5 IAN 303756...

Inhaltsverzeichnis