Inhaltsverzeichnis
Werbung
Verfügbare Sprachen
Verfügbare Sprachen
Quicklinks
PREMIUM-WETTERSTATION / PREMIUM
WEATHER STATION / STATION MÉTÉO PREMIUM
PREMIUM-WETTERSTATION
Bedienungs- und Sicherheitshinweise
STATION MÉTÉO PREMIUM
Instructions d'utilisation et consignes de sécurité
METEOSTANICE
Pokyny pro obsluhu a bezpečnostní pokyny
ESTAÇÃO METEOROLÓGICA PREMIUM
Instruções de utilização e de segurança
IAN 276553
PREMIUM WEATHER STATION
Operation and Safety Notes
PREMIUM WEERSTATION
Bedienings- en veiligheidsinstructies
ESTACIÓN METEOROLÓGICA
Instrucciones de utilización y de seguridad
Werbung
Kapitel
Inhaltsverzeichnis
Fehlerbehebung

Verwandte Anleitungen für Auriol IAN 27655


Inhaltszusammenfassung für Auriol IAN 27655
- Seite 1 PREMIUM-WETTERSTATION / PREMIUM WEATHER STATION / STATION MÉTÉO PREMIUM PREMIUM-WETTERSTATION PREMIUM WEATHER STATION Bedienungs- und Sicherheitshinweise Operation and Safety Notes STATION MÉTÉO PREMIUM PREMIUM WEERSTATION Instructions d‘utilisation et consignes de sécurité Bedienings- en veiligheidsinstructies METEOSTANICE ESTACIÓN METEOROLÓGICA Pokyny pro obsluhu a bezpečnostní pokyny Instrucciones de utilización y de seguridad ESTAÇÃO METEOROLÓGICA PREMIUM Instruções de utilização e de segurança...
- Seite 2 DE / AT / CH Bedienungs- und Sicherheitshinweise Seite GB / IE Operation and Safety Notes Page FR / BE Instructions d‘utilisation et consignes de sécurité Page NL / BE Bedienings- en veiligheidsinstructies Pagina 62 Pokyny pro obsluhu a bezpečnostní pokyny Strana 82 Instrucciones de utilización y de seguridad Página 101...
-
Seite 3: Inhaltsverzeichnis
Inhaltsverzeichnis Einleitung ..........................Seite Allgemeine Information ....................... Seite Bestimmungsgemäße Verwendung ..................Seite Technische Daten ......................... Seite Sicherheitshinweise ......................Seite Lieferumfang ......................... Seite Begriffserklärungen ......................Seite Funktionen ..........................Seite Inbetriebnahme ........................Seite Batterien einlegen und wechseln ..................Seite Geräteübersicht ........................Seite 11 Vorbereiten des Windmessers und des Regenmessers sowie Anmelden an die Wetterstation ........................ -
Seite 4: Einleitung
Einleitung / Allgemeine Information / Bestimmungsgemäße Verwendung / ... Premium-Wetterstation 3. Bestimmungsgemäße Verwendung 1. Einleitung Die Wetterstation mit Windmesser informiert Sie über die aktuellen Wetterverhältnisse. Zudem wird Wir beglückwünschen Sie zum Kauf Ihres neuen auch eine Wettervorhersage abgegeben. Die Wet- Produkts. -
Seite 5: Technische Daten / Sicherheitshinweise
Technische Daten / Sicherheitshinweise – Luftdruck unter 850 hPa: 850 hPa Model-Nr.: H13726, Version: 07 / 2016, auf das – Heat Index unter 14 °C : LL.L sich diese Erklärung bezieht, mit den Normen / – Dew Point unter 0 °C : LL.L normativen Dokumenten der 1999 / 5 / EG –... -
Seite 6: Lieferumfang
Sicherheitshinweise / Lieferumfang / Begriffserklärungen ½ Bei längerer Nichtbenutzung Batterien aus dem Gerät nehmen. ½ Tauchen Sie die Wetterstation und den Außen- sensor nie in Wasser oder andere Flüssigkeiten. ½ Beachten Sie die Hinweise zur Reinigung und Aufbewahrung dieser Anleitung. 6. -
Seite 7: Funktionen
Begriffserklärungen / Funktionen / Inbetriebnahme Wind Chill: – Montage nur an einem von Gebäuden, Mauern Bei der Windkühle (Wind Chill) handelt es sich um oder sonstigen Behinderungen freien Ort, da den Unterschied zwischen der gemessenen (Luft- sonst die Messwerte beeinflusst werden temperatur) und der gefühlten Temperatur, die von der Windgeschwindigkeit abhängig sind. -
Seite 8: Aufhänger
Inbetriebnahme 0.5 x 3 Aufhänger ø 5 mm 5 mm 10 mm Wandmontage Wetterstation: 1. Markieren Sie die Bohrlöcher (Abstand waage- recht ca.11,3 cm) für die Wetterstation und achten Sie vor dem Bohren der Bohrlöcher (ø 5 mm) darauf, dass beim Bohren keine elektrischen Leitungen oder Wasserleitungsrohre o.Ä. -
Seite 9: Aufstellen Des Regenmessers
Inbetriebnahme / Batterien einlegen und wechseln Befestigen Sie den Windmesser wie unten abgebildet 1. Markieren Sie die Bohrlöcher mit Hilfe des Regen- mit den beigefügten Innensechskantschrauben, Unter- messers und achten Sie vor dem Bohren der legscheiben, Befestigungsschrauben und Muttern. Bohrlöcher (ø 5 mm) darauf, dass beim Bohren Vergewissern Sie sich nach der Montage, dass der keine elektrischen Leitungen oder Wasserleitungs- Windmesser waagerecht ausgerichtet ist und festen... - Seite 10 Batterien einlegen und wechseln – Ziehen Sie die 4 Schrauben an der Batterie- fachabdeckung wieder handfest an. – Stülpen Sie das Gehäuse wieder vorsichtig über die Gerätebasis. – Fixieren Sie das Gehäuse wieder mit den Befestigungsschrauben an der Gerätebasis. Wetterstation: –...
-
Seite 11: Geräteübersicht
Geräteübersicht 11. Geräteübersicht Taste 1x drücken ca. 3 Sek. drücken Wetterstation: CLOCK Anzeigewechsel Einstellung von Temperaturanzeige und Luft- zwischen lokaler Uhrzeit und Wettervorhersage und Luftdruck feuchtigkeit Innen / Außen Uhrzeit, Datum Datum und Wochentag ALARM Alarmzeit Einstellung von anzeigen und Alarmzeit aktivieren / deaktivieren... -
Seite 12: Vorbereiten Des Windmessers Und Des Regenmessers Sowie Anmelden An Die Wetterstation
Geräteübersicht / Vorbereiten des Windmessers und des Regenmessers ... Tasten Rückseite Windmesser: Taste 1x drücken ca. 3 Sek. Gehäuse mit integriertem Windfahne mit Temperaturmesser und integriertem drücken Luftfeuchtigkeitsmesser Kompass Ein- und Aus- WIND AL schalten von Windalarm und Windkühle- Alarm WIND UNIT Einstellen von Windge-... -
Seite 13: Regenmesser Vorbereiten
Vorbereiten des Windmessers ... / Wetterstation Grundeinstellungen – Legen Sie die Batterien gemäß der Polarität ein Die Wetterstation sucht sich automatisch die Funk- (beachten Sie dazu unter Punkt 10. Batterie ein- signale des Windmessers und des Regenmessers. legen und wechseln / Windmesser) Der Vorgang dauert ca. -
Seite 14: Dcf-77 Angleichung
Wetterstation Grundeinstellungen Monat: Durch einen weiteren Druck auf die CLOCK-Taste kommen Sie zur Monats-Einstellung. Es blinkt jetzt der Monat im Display. Mit der ▲-Taste und der Stunden: ▼-Taste können Sie den Monat einstellen. Durch einen weiteren Druck auf die CLOCK-Taste kommen Sie zur Stunden-Einstellung. -
Seite 15: Zeitzoneneinstellung
Wetterstation Grundeinstellungen ACHTUNG! Die Anzeigen von Zeit und Datum werden in Mittel- europa mittels des sog. DCF-77-Funksignals übertragen. Der Sender befindet sich in der Nähe von Frankfurt Mit der ZONE-Taste kehren Sie wieder zur Uhrzeit- a. M. und sendet mit einem Übertragungsradius von anzeige zurück. -
Seite 16: Alarmfunktion
Alarmfunktion / Luftdruckeinheit einstellen / Luftdruckanpassung 14. Alarmfunktion Alarmsignal ausschalten: Das Alarmsignal ertönt ca. 2 Minuten und blinkt. Zum Einstellen der Alarmzeit halten Sie während Sie können es vorzeitig mit der ALARM-Taste aus- der Uhrzeitanzeige die ALARM-Taste 3 Sekunden schalten. gedrückt. -
Seite 17: Einstellen Der Einheit Für Die Windgeschwindigkeit
... / Einstellen der Einheit ... / Windalarm einstellen / Wind Chill Alarm einstellen Mit der PRESSURE-Taste kehren Sie wieder zur regulären Anzeige zurück. Wenn ca. 1 Minute keine Einstelltaste gedrückt wird ebenso. Drücken Sie die ▲- oder die ▼-Taste, um den gewünschten Wert einzustellen. -
Seite 18: Windalarm Und Wind Chill Alarm Ein- Und Ausschalten
... / Windalarm ... / Einstellen der Einheit ... / Einstellen der Temperatur-... / Anzeigen Windalarm an Drücken Sie die ▲- oder ▼-Taste, um den gewünschten Wert einzustellen. Wind Chill Alarm an Mit der WIND ALARM-Taste bestätigen Sie die Eingabe und es erscheint links neben der Wind Chill Temperatur Wind- und Wind Chill-Alarm an 21. -
Seite 19: Uhrzeit Und Datum
Anzeigen 23.5 Regenmenge 10 Sekunden erlischt die Hintergrundbeleuchtung automatisch. 23.1 Uhrzeit und Datum Die Wetterstation hat einen automatischen Speicher für die gefallene Regenmenge. Sie können sich die Drücken Sie die CLOCK-Taste, um zwischen der Zeit-, Regenmenge in verschiedenen Chroniken anzeigen Datum- Wochentaganzeige zu wechseln. -
Seite 20: Eis- / Frostalarm
Anzeigen 23.6 Eis- / Frostalarm Sie können sich die Historie im Detail anzeigen lassen. Beispiel: Drücken Sie die RAIN / CLEAR-Taste, bis die tägliche Sobald die Temperatur auf unter 4 °C fällt, erscheint Regenmenge angezeigt wird. Zu sehen ist als Wert im Display das Frostalarm-Zeichen. -
Seite 21: Minimal- Und Maximal-Werte
Anzeigen / Wartung / Fehlerbehebung bei Störung der Messergebnisse Einheit in inHg Einheit in hPa (mb) 24. Wartung 24.1 Batterietiefstandsanzeige Sind die Batterien leer, erscheint das Symbol der Anzeige. Es gibt für die Wetterstation, den Wind- messer und den Regenmesser ein separates Symbol. Wird die Innentempe- ratur angezeigt, zählt die Batterietiefstandsan-... -
Seite 22: Reinigen
Fehlerbehebung bei Störung ... / Reinigen / Entsorgen 27. Entsorgen Walkie-Talkies, Radios, Fernbedienungen oder Mikro- wellenherden, können die Funktionen der Wetterstation und Außensensor beeinflussen und zu ungenauen Die Verpackung besteht aus umweltfreundlichen Messergebnissen führen. Halten Sie daher mit der Materialien, die Sie über die örtlichen Recyclingstellen Wetterstation und dem Außensensor einen mög- entsorgen können. - Seite 23 Table of contents Introduction .........................Page General information ......................Page Intended use ........................Page Technical data ........................Page Safety information .......................Page Scope of delivery ........................Page Definition of terms .......................Page Functions ..........................Page Commissioning ........................Page Inserting and replacing batteries ..................Page Device overview ........................Page Preparing the wind gauge and rain gauge and registering on the weather station ..Page 12.1 Calibrating the wind gauge ....................Page 12.2...
-
Seite 24: Introduction
Introduction / General information / Intended use / Technical data Premium weather station The weather station is equipped with a rain gauge, wind gauge, barometer, radio clock and calendar. Only for personal use. Not for commercial use. 1. Introduction 4. Technical data We congratulate you on the purchase of your new product. -
Seite 25: Safety Information
Technical data / Safety information 5. Safety information – Air humidity above 99 %: 99 % – Air pressure above 1050 hPa: 1050 hPa – Heat Index above 60 °C: HH.H – Dew Point above 60 °C: HH.H DANGER FOR CHILDREN! –... -
Seite 26: Scope Of Delivery
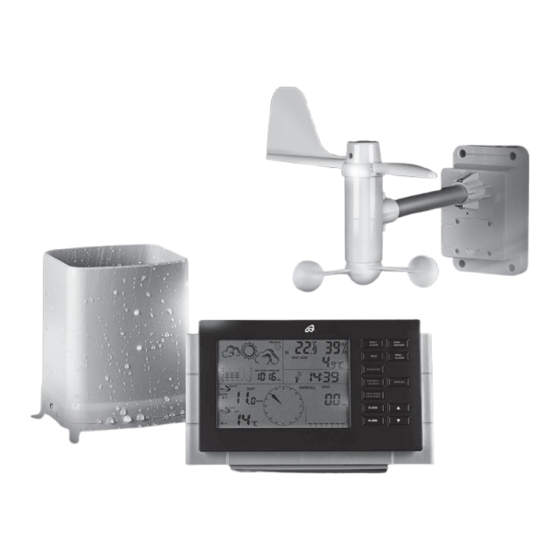
Scope of delivery / Definition of terms 6. Scope of delivery 1 weather station with stand 1 wind gauge with integrated temperature and air humidity sensor 1 rain gauge with leaf filter 6 screws suitable for ø 5 mm dowels 6 dowels ø... -
Seite 27: Functions
Functions / Commissioning 8. Functions CAUTION! Weather station: – Radio-controlled DCF-77 time signal reception Comply with the following safety instruc- with time display, time-zone setting tions when using the wind gauge and rain gauge: – Date display – Alarm clock with snooze function –... -
Seite 28: Commissioning
Commissioning Weather station – wall mounting: – The wind gauge must be assembled within the 1. Mark the drill holes (horizontal distance approxi- signal transmission range. Walls reduce the mately 11.3 cm) for the weather station and transmission range. Check the signal reception make sure that no electrical or water lines will be on the weather station before final assembly. -
Seite 29: Inserting And Replacing Batteries
Commissioning / Inserting and replacing batteries the transmission range. Check the signal reception on the weather station before final assembly. When you have found a suitable position, ensure that the surface is completely horizontal to guarantee accurate rainfall measurement. The rain gauge can simply be stood in the desired position or fixed with the screws provided. -
Seite 30: Device Overview
Inserting and replacing batteries / Device overview – To open the battery compartment, loosen the Socket for 6V DC adaptor (adaptor not included) 4 cross-head screws on the battery compart- ment cover. – Lift off the battery compartment cover. – Insert the batteries (2 x 1.5 V type AA) ensuring correct polarity. - Seite 31 Device overview Button Press once Press for ap- Button Press once Press for ap- prox. 3 sec. prox. 3 sec. PRESSURE Air pressure unit Air pressure ▼ Settings back Settings rewind modification adjustment (inHg, mb or hPa) Buttons – back side CHANNEL / Channel selec- Search for...
-
Seite 32: Preparing The Wind Gauge And Rain Gauge And Registering On The Weather Station
Device overview / Preparing the wind gauge and rain gauge and registering … Wind gauge: North Housing with built-in temperature gauge and air humidity gauge Vane with built-in compas MAST 12.2 Preparing the rain gauge – Insert the batteries in the rain gauge (see the instructions listed under Point 10. -
Seite 33: Manual Wind Gauge And Rain Gauge Registration On The Weather Station
Preparing the wind... / Weather station basic settings 12.4 Manual wind gauge and rain Minutes: gauge registration on the Press the CLOCK button again to set the minutes. weather station The minutes now flash on the display. Use ▲ and ▼ to set the minutes. -
Seite 34: Weather Station Basic Settings
Weather station basic settings 13.3 Setting the time zone You can switch between local time and the selected zone time while the time is displayed. The time zones are divided into 24 zones. You can select a time zone from +12 hours to –12 hours. Press the CLOCK button again to return to the time display. -
Seite 35: Alarm Function
Weather station basic settings / Alarm function / Setting the air pressure unit Set -1 Hr.: Atlantic, Great Britain, Ireland, Iceland, Portugal Set 0 Hrs.: Albania, Belgium, Bosnia-Herzegovina, Denmark, Deactivating the alarm function: Germany, France, Gibraltar, Italy, Croatia, Liechtenstein, Luxemburg, Malta, Macedonia, Monaco, The Neth- Press the ALARM button twice while the time is dis- erlands, Norway, Austria, Poland, San Marino, Sweden, played until... -
Seite 36: Air Pressure Adjustment
Setting the air ... / Air pressure ... / Setting the wind ... / Setting the Wind Alarm 18. Setting the wind alarm A wind alarm can be set for gusts (maximum speed for the last 10 minutes). Press the WIND ALARM 16. -
Seite 37: Setting The Wind Chill Alarm
Setting the ... / Switching the Wind... / Setting the rain.. / Setting the temperature ... 19. Setting the wind chill alarm 20. Switching the Wind Alarm and the Wind Chill Alarm on and off A Wind Chill Alarm can also be set. Press the WIND ALARM button until ALARM appears next Press the WIND AL button to switch the wind alarm... -
Seite 38: Display
Setting the temperature unit / Display 23.4 Displaying Heat Index and Dew Point Press the HEAT INDEX; DEW POINT button to switch between the Heat Index and Dew Point. 23. Display Background illumination: Press the SNOOZE / LIGHT button to switch on the 23.5 Rainfall quantity background illumination. -
Seite 39: Ice / Frost Alarm
Display 2 days earlier: rainfall Overall Quantity Quantity Quantity quantity 156.7 mm quantity each day each week each month with bar display at –2 Detailed information can be displayed on the history. Example: Press the RAIN / CLEAR until the rainfall quantity is You can display the history for weekly and monthly shown. -
Seite 40: Air Pressure Change
Display / Maintenance 23.12 Weather trend The weather trend is also shown in addition to the weather forecast. There is an arrow for increasing, stable and decreasing. 23.9 Air pressure change The weather station shows the changes in air pressure over the last 6 hours. -
Seite 41: Rain Gauge Leaf Filter
Maintenance / Troubleshooting errors in the … / Cleaning / Disposal 24.2 Rain gauge leaf filter 26. Cleaning Remove foliage and any other objects which collect Only clean the device with a damp cloth. Never in the leaf filter of the rain gauge regularly. Only immerse the weather station, wind gauge or rain then can precise rain measurement be guaranteed. - Seite 42 Table des matières Introduction ........................... Page 43 Informations générales ......................Page 43 Utilisation conforme ......................Page 43 Caractéristiques techniques....................Page 43 Consignes de sécurité ......................Page 44 Fourniture ..........................Page 45 Définitions ..........................Page 45 Fonctions ..........................Page 46 Mise en service ........................Page 46 Installation et remplacement des piles .................
-
Seite 43: Introduction
Introduction / Informations générales / Utilisation conforme / Caractéristiques ... Station météo premium LE SYMBOLE SUIVANT SIGNALE DES INFORMATIONS SUPPLÉMEN- TAIRES / COMPLÉMENTAIRES ! 1. Introduction 3. Utilisation conforme Nous vous félicitons pour l‘achat de votre nouveau produit. Vous avez opté pour un produit de grande qualité. -
Seite 44: Consignes De Sécurité
Caractéristiques techniques / Consignes de sécurité Les valeurs mesurées sont trop basses : Durée de fonctionnement avec des piles chargées : – Température intérieure inférieure à 0 °C : LL.L env. 90 jours – Température extérieure inférieure à –50 °C : LL.L –... -
Seite 45: Fourniture
Consignes de sécurité / Fourniture / Définitions ATTENTION – DOMMAGES MATÉRIELS ! ½ Utiliser exclusivement des piles du type indiqué. ½ Respecter la polarité. ½ Vérifier régulièrement que les piles ne fuient pas. ½ Si l’appareil reste longtemps inutilisé, retirer les piles. -
Seite 46: Fonctions
Définitions / Fonctions / Mise en service Wind Chill : Anémomètre : Le refroidissement éolien (aussi appelé température – Transmet la vitesse du vent, la température et ressentie) (Wind Chill) est la différence entre la tem- l’hygrométrie extérieure à la station météo via pérature de l’air mesurée et la température effecti- une fréquence de 434 MHz. - Seite 47 Mise en service 0.5 x 3 ø 5 mm 5 mm Niches 10 mm Montage mural de la station météo : 1. Marquez les trous à percer sur le mur (écart à l’horizontale ca. 11,3 cm) pour la station météo et veillez, avant de les percer (ø...
-
Seite 48: Installation Et Remplacement Des Piles
Mise en service / Installation et remplacement des piles 10. Installation et Assurez-vous après le montage que l’anémomètre remplacement des piles est parfaitement horizontal et solidement fixé. Une position horizontale est indispensable pour que la mesure soit précise. Insérez les piles pour commencer dans le capteur extérieur (anémomètre / pluvio- mètre), ensuite dans la station météo. -
Seite 49: Station Météo
Installation et remplacement des piles Station météo : – Ouvrez le compartiment à piles sur la face arrière de la station météo dans le sens de la flèche. – Insérez les piles (6 x 1,5 V de type AA) en respec- tant la polarité. -
Seite 50: Description De L'appareil
Description de l’appareil 11. Description de l’appareil Touche Appuyer 1 Appuyer fois env. 3 Station météo : secondes HEAT INDEX Indice de cha- Indication de température et leur (Heat In- Prévision météo et pression d’hygrométrie in térieur / extérieur dex) et point de rosée (Dew DEW POINT Point) -
Seite 51: Préparation De L'anémomètre Et Du Pluviomètre Et Enregistrement Dans La Station Météo
Description de l’appareil / Préparation de l’anémomètre et du pluviomètre ... Anémomètre : Touche Appuyer 1 Appuyer fois env. 3 Boîtier avec capteur de Hélice avec secondes température et d’hygro- boussole métrie intégré intégrée ▼ Réglages vers Défilement l’arrière rapide des réglages vers l’arrière Touches au dos de l’appareil... -
Seite 52: Préparation Du Pluviomètre
Préparation de l’anémomètre et du ... / Réglages de base de la station météo – Insérez les piles en respectant leur polarité (voir La station météo recherche automatiquement les si- les consignes au point 10. Insertion et rempla- gnaux RF de l’anémomètre et du pluviomètre. Ce cement des piles / Anémomètre) processus dure environ 4 minutes. -
Seite 53: Format Date
Réglages de base de la station météo Mois : En réappuyant sur la touche CLOCK, vous activez le réglage du mois. L’affichage du mois clignote alors. Heures : Avec les touches ▲ et ▼, vous pouvez régler le mois. En réappuyant sur la touche CLOCK, vous activez le réglage des heures. -
Seite 54: Réglage Du Fuseau Horaire
Réglages de base de la station météo / Fonction d’alarme proximité de Francfort-sur-le-Main et transmet des La touche ZONE vous permet de visualiser la zone données dans un rayon d’environ 1 500 km. Lorsque sélectionnée du fuseau horaire. ZONE apparaît à votre station météo reçoit ce signal, vous n’avez pas côté... -
Seite 55: Réglage De L'unité De Pression Atmosphérique
Fonction d’alarme / Réglage de l’unité ... / Adaptation de la pression... Avec les touches ▲ et ▼, vous pouvez régler les heures. environ. Pendant ce temps, clignote au-dessus de Une nouvelle pression sur la touche ALARM active l’affichage de l’heure. le réglage des minutes, qui clignotent. -
Seite 56: Réglage De L'unité De Mesure De Vitesse Du Vent
Réglage de l’unité de ... / Réglage de ... / Réglage de l’alarme refroidissement ... 17. Réglage de l’unité de mesure de vitesse du vent Vous pouvez faire afficher la vitesse du vent en 5 unités différentes. L’alarme vent est désormais activée. Avec la touche –... -
Seite 57: Activation Et Désactivation De L'alarme Vent Et De L'alarme De Refroidissement Éolien
... / Activation et ... / Réglage de l’unité ... / Réglage de l’unité ... Appuyez sur la touche ▲ ou ▼, pour régler la valeur souhaitée. Alarme refroidissement éolien Confirmez la saisie avec la touche WIND ALARM activée et elle apparaît à gauche à côté de la température ressentie Alarme refroidissement éolien activée Alarme vent et refroidissement... -
Seite 58: Indications
Indications 23. Indications 23.4 Affichage de l’indice de chaleur et du point de rosée Rétro-éclairage : Appuyez sur la touche SNOOZE / LIGHT pour allumer Appuyez sur la touche HEAT INDEX / DEW POINT le rétro-éclairage. Le rétro-éclairage s’éteint automa- pour commuter entre l’indice de chaleur et le point tiquement après environ 10 secondes. -
Seite 59: Alarme Gel / Givre
Indications Selon le même schéma, vous pouvez afficher l’histo- rique pour les semaines et les mois écoulés. Il n’y a pas d’historique disponible pour la pluviométrie Pluviométrie Pluviométrie Pluviométrie Pluviométrie totale (TOTAL) ! totale journalière hebdomadaire mensuelle Vous pouvez faire afficher l’historique détaillée. 23.6 Alarme gel / givre Exemple : Appuyez sur la touche RAIN / CLEAR jusqu’à... -
Seite 60: Changement De Pression Atmosphérique
Indications / Entretien 23.9 Changement de pression 23.12 Indication de tendance atmosphérique En plus des prévisions météorologiques, l’appareil La station météo affiche les changements de pression fournit une indication de tendance. Une flèche indique atmosphérique au cours des 6 dernières heures. respectivement la montée, la stabilité... -
Seite 61: Filtre À Feuilles Du Pluviomètre
Entretien / Dépannage en cas de résultats ... / Nettoyage / Elimination 24.2 Filtre à feuilles du pluviomètre 26. Nettoyage Retirez régulièrement les feuilles et autres choses accu- Utilisez exclusivement un chiffon humide pour nettoyer mulées dans le filtre du pluviomètre. C’est le seul les appareils. - Seite 62 Inhoudsopgave Inleiding ..........................Pagina Algemene informatie......................Pagina Beoogd gebruik .......................Pagina Technische gegevens .......................Pagina Veiligheidsinstructies ......................Pagina Leveringsomvang ......................Pagina Verklaring van begrippen ....................Pagina Functies ..........................Pagina Ingebruikneming ......................Pagina Batterijen plaatsen en vervangen ...................Pagina Overzicht van het apparaat ....................Pagina Voorbereiden van de windmeter en de regenmeter en aanmelden op het weerstation ...Pagina 12.1 Windmeter kalibreren ......................Pagina 12.2...
-
Seite 63: Inleiding
Inleiding / Algemene informatie / Beoogd gebruik / Technische gegevens Premium weerstation WIJST OP EXTRA / AANVULLENDE INFORMATIE! 1. Inleiding 3. Beoogd gebruik Hartelijk gefeliciteerd met de aankoop van uw nieuwe product. U heeft voor een hoogwaardig Het weerstation met windmeter informeert u over de product gekozen. -
Seite 64: Veiligheidsinstructies
Technische gegevens / Veiligheidsinstructies – Buitentemperatuur onder –50 °C: LL.L – Luchtvochtigheid onder 20 %: 20 % LET OP! – Luchtdruk onder 850 hPa: 850 hPa – Heat Index onder 14 °C: LL.L Wij OWIM GmbH & Co. KG, Stiftsbergstraße 1, –... -
Seite 65: Leveringsomvang
Veiligheidsinstructies / Leveringsomvang / Verklaring van begrippen VOORZICHTIG – MATERIËLE SCHADE! ½ Uitsluitend het aangegeven type batterij gebruiken. ½ Let op de juiste poolrichting. ½ De batterijen regelmatig controleren op uitlopen. ½ Batterijen uit het apparaat halen, als dit langere tijd niet wordt gebruikt. -
Seite 66: Functies
Verklaring van begrippen / Functies / Ingebruikneming Wind Chill: Regenmeter: Bij de windkoelte (Wind Chill) gaat het om het verschil – Geeft regenhoeveelheid door aan het weersta- tussen de gemeten (luchttemperatuur) en de gevoelde tion via 434 MHz-frequentie temperatuur, die afhankelijk is van de windsnelheid. –... - Seite 67 Ingebruikneming 0.5 x 3 ø 5 mm 5 mm Ophanging 10 mm Wandmontage weerstation: 1. Markeer de boorgaten voor het weerstation (afstand horizontaal ca. 11,3 cm) en let er vóór het boren van de boorgaten (ø 5 mm) op dat bij het boren geen elektriciteitsleidingen of water- leidingen o.i.d.
-
Seite 68: Batterijen Plaatsen En Vervangen
Ingebruikneming / Batterijen plaatsen en vervangen onderlegringen, bevestigingsbouten en moeren. (ø 5 mm) op dat bij het boren geen elektriciteits- Vergewis u er na de montage van dat de windmeter leidingen of waterleidingen o.i.d. beschadigd waterpas gericht is en stevig vastzit. Een horizontale raken. - Seite 69 Batterijen plaatsen en vervangen – Draai de 4 schroeven op het klepje van het batterijvak weer handvast aan. – Schuif de behuizing weer voorzichtig over de basis van het apparaat. – Zet de behuizing weer met de bevestigings- schroeven vast aan de basis van het apparaat. Weerstation: –...
-
Seite 70: Overzicht Van Het Apparaat
Overzicht van het apparaat 11. Overzicht van het apparaat Toets ca. 3 sec. indrukken indrukken Weerstation: CLOCK Omschakelen Instelling van Temperatuurweergave en weergave tussen tijd en datum Weervorspelling en luchtdruk luchtfochtigkeit binnen / buiten lokale tijd, da- tum en dag ALARM Alarmtijd weer- Instelling van... -
Seite 71: Voorbereiden Van De Windmeter En De Regenmeter En Aanmelden Op Het Weerstation
Overzicht van het apparaat / Voorbereiden van de windmeter en de ... Toetsen achterkant Regenmeter: Toets ca. 3 sec. Bladerenzeet indrukken indrukken In- en uitschake- WIND AL len von wind- alarm en windkoelte-alarm WIND UNIT Instellen van windsnelheids- Batterijvak Regenwip eenheid (Beau- fort, mph, m/s, km/h of knots) -
Seite 72: Regenmeter Voorbereiden
Voorbereiden van de windmeter ... / Weerstation basisinstellingen 12.2 Regenmeter voorbereiden 13. Weerstation basisinstellingen 13.1 Instelling – Plaats de batterijen in de regenmeter (zie daar- voor onder paragraaf 10. Batterij plaatsen en vervangen / Regenmeter). – 12 / 24-uursformaat – Verwijder de transportbeveiliging waarmee de –... -
Seite 73: Dcf-77 Afstemming
Weerstation basisinstellingen Jaar: Door nog eens op de CLOCK-toets te drukken komt Door nog eens op de CLOCK-toets te drukken keert u in de jaar-instelling. In het display knippert nu het u terug in de tijdsweergave. jaar. Met de ▲-toets en de ▼-toets kunt u het jaar in- stellen. -
Seite 74: Instelling Tijdzone
Weerstation basisinstellingen / Alarmfunctie 13.3 Instelling tijdzone Set -1 uur: Atlantische Oceaan, Groot-Britannië, Ierland, Ijsland, U kunt tijdens de tijdsweergave heen en weer scha- Portugal kelen tussen de tijd van uw land en de gekozen zo- netijd. De tijdzones zijn ingedeeld in 24 zones. U Set 0 uur: kunt een tijdzone van +12 uur tot –12 uur kiezen. -
Seite 75: Luchtdrukeenheid Instellen
Alarmfunctie / Luchtdrukeenheid ... / Luchtdrukaanpassing / Instellen van de ... 15. Luchtdrukeenheid instellen De alarmfunctie is geactiveerd en er verschijnt naast de tijd. Druk de PRESSURE-toets in om heen en weer te schakelen tussen de eenheden hPA (Hectopascal), mb (millibar) en inHg (kwikkolom in inch). Deactiveren van de alarmfunctie: Druk tweemaal de ALARM-toets in de tijdsweergave 16. -
Seite 76: Windalarm Instellen
Instellen van de ... / Windalarm instellen / Wind Chill-alarm instellen waarschuwingssignaal. Bovendien knippert nog op het display. 18. Windalarm instellen Druk de WIND ALARM-toets in om de alarmtoon voortijdig te onderbreken. blijft net zo lang knip- U kunt een windalarm voor windvlagen (hoogste peren tot de windvlagen (van de laatste 10 minu- snelheid van de laatste 10 minuten) instellen. -
Seite 77: Windalarm En Wind Chill-Alarm In- En Uitschakelen
... / Windalarm ... / Instellen van de ... / Instellen temperatuureenheid / Weergaven 21. Instellen van de eenheid deactiveren. Druk daarvoor net zo vaak op de voor de regenmeting WIND AL - toets, tot verdwijnt. Als de Wind Chill-temperatuur de ingestelde waarde U hebt de keuze de regenhoeveelheid in mm (milli- bereikt of onderschrijdt, klinkt een waarschuwings- meter) of in in (inch) te laten weergeven. -
Seite 78: Tijdzone
Weergaven 23.2 Tijdzone Digitale waarde: Met de ZONE-toets kunt u de gekozen tijdzone la- ten weergeven. Er verschijnt ZONE naast de tijd. Wert Door nog een op de ZONE-toets te drukken keert u Eenheid weer terug naar de tijd van uw land. Diagram: Eenheid in Inch Eendheid in Millimeter... -
Seite 79: Ijs-/Vorstalarm
Weergaven 23.7 Windrichting De windmeter geeft automatisch de gemiddelde windrichting van de laatste 2 minuten aan. N = noorden NE = noordoosten E = oosten Druk op de RAIN HISTORY-toets om de details te SE = zuidoosten zien. Met elke druk op de toets springt u een dag S = zuiden verder. -
Seite 80: Minimum- En Maximumwaarden
Weergaven / Onderhoud / Probleemoplossing bij storing van de meetresultaten 23.10 Minimum- en maximumwaarden Als de binnentempera- tuur wordt weergegeven, Met de MEMORY-toets kunt u de opgeslagen mini- staat de weergave laag mum- en maximumwaarden laten weergeven. batterijniveau bij het weerstation. -
Seite 81: Reinigen
Probleemoplossing bij storing van de meetresultaten / Reinigen / Verwijderen op een zo groot mogelijke afstand verwijderd van Informatie over de mogelijkheden om het uitgediende apparaten die radiogolven uitzenden. Tevens kan product na gebruik te verwijderen verstrekt uw ge- elektrostatische lading de meetresultaten beïnvloeden. meentelijke overheid. - Seite 82 Obsah Úvod ..........................Strana Všeobecné informace ......................Strana Používání v souladu s určením ..................Strana Technické údaje .......................Strana Bezpečnostní upozornění ....................Strana Obsah balení ........................Strana Slovníček pojmů .......................Strana Funkce ..........................Strana Uvedení do provozu ......................Strana Vložení a výměna baterií ....................Strana Přehled ovládání přístroje ....................Strana Příprava větroměru a srážkoměru, připojení k meteorologické stanici ......Strana 12.1 Kalibrace větroměru ......................Strana 12.2...
-
Seite 83: Úvod
Úvod / Všeobecné informace / Používání v souladu s určením / Technické údaje Meteostanice vybavena srážkoměrem, větroměrem, tlakoměrem, ukazatelem času řízeným rádiovým signálem a kalendářem. Výrobek používejte pouze k soukro- 1. Úvod mým účelům. Výrobek není určen ke komerčnímu využití Blahopřejeme Vám ke koupi nového výrobku. -
Seite 84: Bezpečnostní Upozornění
Technické údaje / Bezpečnostní upozornění 5. Bezpečnostní upozornění Překročení naměřených hodnot: – vnitřní teplota nad 50 °C: HH.H – venkovní teplota nad 70 °C: HH.H – vlhkost vzduchu nad 99 %: 99 % VÝROBEK JE NEBEZPEČNÝ – tlak vzduchu nad 1050 hPa: 1050 hPa PRO DĚTI! –... -
Seite 85: Obsah Balení
Obsah balení / Slovníček pojmů 6. Obsah balení 1 meteorologická stanice s opěrou 1 větroměr s integrovaným snímačem teploty a vlhkosti vzduchu 1 srážkoměr se sítkem na zachycování nečistot 6 šroubů k hmoždinkám ø 5 mm 6 hmoždinek ø 5 mm 4 šrouby s vnitřním šestihranem M6 včetně... -
Seite 86: Funkce
Funkce / Uvedení do provozu 8. Funkce POZOR Meteorologická stanice: – Rádiově řízený příjem časového signálu DCF-77 Dodržujte tato bezpečnostní upozornění s ukazatelem času, nastavení časového pásma k větroměru a srážkoměru: – Ukazatel data – Měřicí přístroje nikdy nenamáčejte do vody ani –... - Seite 87 Uvedení do provozu Montáž meteorologické stanice na stěnu: – Větroměr namontujte v dosahu rádiového signálu. 1. Vyznačte si vrtané otvory (ø 5 mm, ve vzdálenosti Zdi a stěny omezují dosah rádiového signálu. 11,3 cm od sebe) pro meteorologickou stanici a Před provedením montáže zkontrolujte, jak me- dávejte pozor, abyste během vrtání...
-
Seite 88: Vložení A Výměna Baterií
Uvedení do provozu / Vložení a výměna baterií Pokud jste našli vhodné místo, ujistěte se, že jde o úplně vodorovnou plochu, aby bylo zajištěno přesné měření srážek. Srážkoměr můžete jednoduše postavit nebo ho upevnit pomocí dodaných šroubů. 1. Vyznačte si vrtané otvory (ø 5 mm) podle sráž- koměru a dávejte pozor, abyste během vrtání... -
Seite 89: Přehled Ovládání Přístroje
Vložení a výměna baterií / Přehled ovládání přístroje 11. Přehled ovládání přístroje správně umístěn ve své drážce. Jedině tak lze zajistit, aby se do přihrádky na baterie nedostala Meteorologická stanice: voda. – 4 šrouby na krytu přihrádky na baterie opět pevně Předpověď... - Seite 90 Přehled ovládání přístroje Tlačítko 1 stisknutí Stisknutí na Tlačítko 1 stisknutí Stisknutí na cca 3 s cca 3 s ALARM Zobrazení a Nastavení času RAIN UNIT Nastavení jedno- aktivace / deakti- alarmu tek množství srá- vace času žek (mm nebo alarmu palce) RAIN...
-
Seite 91: Příprava Větroměru A Srážkoměru, Připojení K Meteorologické Stanici
Přehled ovládání přístroje / Příprava větroměru a srážkoměru ... 12.2 Příprava srážkoměru Srážkoměr: Sítko na zachycování – Vložte baterie do srážkoměru (postupujte podle nečistot bodu 10. Vložení a výměna baterie / Srážkoměr). – Odstraňte výplň, která chrání kolébku na zachy- cování... -
Seite 92: Základní Nastavení Meteorologické Stanice
Základní nastavení meteorologické stanice 13. Základní nastavení Rok: meteorologické stanice Dalším stisknutím tlačítka CLOCK přejdete do nasta- vení roku. Na displeji začne blikat rok. Stisknutím 13.1 Nastavení tlačítka ▲ a tlačítka ▼ můžete nastavit rok. – formát 12 / 24 hodin –... -
Seite 93: Příjem Signálu Dcf-77
Základní nastavení meteorologické stanice 13.2 Příjem signálu DCF-77 Tato funkce automaticky nastaví čas a datum. Stisknutím tlačítka můžete aktivovat příjem rádi- ového signálu DCF-77 k seřízení času a data. Stiskněte tlačítko a na displeji se zobrazí symbol . Pokud přístroj přijímá rádiový signál, zobrazí se ani- mace symbolu . -
Seite 94: Alarm
Základní ... / Alarm / Nastavení jednotek ... / Přizpůsobení tlaku vzduchu +1 hod: Opětovným stisknutím tlačítka ALARM můžete funkci Bulharsko, Estonsko, Finsko, Kypr, Litva, Lotyšsko, alarmu znovu aktivovat. Pomocí tlačítka CLOCK se Moldávie, Rumunsko, Řecko, Turecko, Ukrajina opět vrátíte do zobrazení času. Pokud během nastavování... -
Seite 95: Nastavení Jednotek Rychlosti Větru
Přizpůsobení ... / Nastavení jednotek rychlosti větru / Nastavení alarmu větru zjistěte aktuální hodnotu tlaku vzduchu např. z no- vin nebo na internetu. Stiskněte tlačítko PRESSURE na cca 3 sekundy, dokud nezazní potvrzovací tón. Začne blikat hodnota tlaku vzduchu. Stisknutím tlačítka ▲ nebo tlačítka ▼ nastavíte požadovanou hodnotu. -
Seite 96: Nastavení Alarmu Wind Chill
Nastavení ... / Zapnutí a vypnutí ... / Nastavení jednotek ... / Nastavení jednotek ... 19. Nastavení alarmu wind chill 20. Zapnutí a vypnutí alarmu větru a alarmu wind chill Meteorologická stanice umožňuje nastavit alarm faktoru wind chill. Stiskněte tlačítko WIND ALARM Stisknutím tlačítka WIND AL zapnete a vypnete tolikrát, dokud se slovo ALARM nezobrazí... -
Seite 97: Ukazatelé
Nastavení jednotek teploty / Ukazatelé 23.4 Ukazatelé tepelného indexu a rosného bodu Stisknutím tlačítka HEAT INDEX; DEW POINT můžete přepínat mezi tepelným indexem a rosným bodem. 23. Ukazatelé Podsvícení displeje: Stisknutím tlačítka SNOOZE / LIGHT zapnete pod- 23.5 Množství srážek svícení... -
Seite 98: Alarm Ledu A Mrazu
Ukazatelé Před 2 dny: množství celkové množství množství za množství srážek 156,7 mm se množství za den týden za měsíc sloupcovým diagra- Můžete si nechat zobrazit také podrobné údaje k mem u údaje –2 historii. Příklad: Podle stejného schématu si můžete zobrazit historii Tlačítko RAIN / CLEAR stiskněte tolikrát, dokud se množství... -
Seite 99: Změny Tlaku Vzduchu
Ukazatelé / Údržba 23.12 Tendence počasí Kromě předpovědi počasí je na displeji zobrazena také tendence počasí. Každá tendence, stoupavá, stálá a klesavá, je označena šipkou. 23.9 Změny tlaku vzduchu Meteorologická stanice eviduje změny tlaku vzduchu za posledních 6 hodin. hodnota jako výška hodnota v hPa rtuťového sloupce (inHg) (mbarech) -
Seite 100: Sítko Na Zachycování Nečistot Srážkoměru
Údržba / Odstraňování závad ... / Čištění / Likvidace 24.2 Sítko na zachycování nečistot 26. Čištění srážkoměru Přístroje čistěte pouze vlhkým hadříkem. Meteorolo- Odstraňujte pravidelně listí a ostatní předměty, které gickou stanici, větroměr ani srážkoměr v žádném se nahromadí v sítku na zachycování nečistot sráž- případě... - Seite 101 Índice Introducción........................Página 102 Información general ......................Página 102 Utilización conforme al uso prescrito ................Página 102 Datos técnicos ........................Página 102 Advertencias de seguridad .....................Página 103 Volumen de suministro .....................Página 104 Explicación de términos ....................Página 104 Funciones ..........................Página 105 Puesta en marcha ......................Página 106 Colocar y cambiar las pilas ....................Página 107 Vista general del aparato ....................Página 109 Preparación del anemómetro y del pluviómetro, y registro en la estación...
-
Seite 102: Introducción
Introducción / Información general / Utilización conforme ... / Datos técnicos Estación meteorológica 3. Utilización conforme al uso prescrito 1. Introducción La estación meteorológica con anemómetro le in- forma sobre las condiciones meteorológicas actua- Enhorabuena por la adquisición de su nuevo pro- les. -
Seite 103: Advertencias De Seguridad
Datos técnicos / Advertencias de seguridad – Temperatura exterior inferior a –50 °C: LL.L – Humedad del aire inferior al 20 %: 20 % ¡ATENCIÓN! – Presión atmosférica por debajo de 850 hPa: 850 hPa Nosotros OWIM GmbH & Co. KG, Stiftsbergstraße –... -
Seite 104: Volumen De Suministro
Advertencias de seguridad / Volumen de suministro / Explicación de términos ¡PRECAUCIÓN: DAÑOS MATERIALES! ½ Usar exclusivamente el tipo de pilas indicadas. ½ Vigilar la correcta polaridad. ½ Comprobar regularmente las pilas para descartar pérdidas. ½ Retirar las pilas en caso de que el aparato vaya a permanecer sin usarse durante un período prolongado. -
Seite 105: Funciones
Explicación de términos / Funciones momento se alcanza el punto de rocío y el aire en- – Indicador del punto de rocío (Dew Point) friado contiene el contenido máximo posible de va- – Alarma de heladas – Indicador de precipitacion es por de agua para esa temperatura. -
Seite 106: Puesta En Marcha
Puesta en marcha 9. Puesta en marcha ¡ATENCIÓN! Antes de montar la estación meteorológica, el ane- mómetro y el pluviómetro, familiarícese con ellos. Las instrucciones de uso se comprenden mejor con los aparatos en la mano. Instalación de la estación meteorológica: La estación meteorológica tiene un pie de soporte premontado que resulta muy práctico para instalarla. -
Seite 107: Colocar Y Cambiar Las Pilas
Puesta en marcha / Colocar y cambiar las pilas Fije el anemómetro, tal y como se muestra más El pluviómetro puede sencillamente colocarse o abajo, con las llaves Allen, las arandelas, los torni- bien fijarse con los tornillos suministrados. llos de sujeción y las tuercas adjuntas. 1. -
Seite 108: Estación Meteorológica
Colocar y cambiar las pilas – Para abrir el compartimento de las pilas, suelte los 4 tornillos de cabeza en cruz que se encuen- tran en la cubierta. – Quite la cubierta del compartimento de las pilas. – Coloque las pilas (2 x 1,5 V tipo AA) teniendo en cuenta la polaridad. -
Seite 109: Vista General Del Aparato
Colocar y cambiar las pilas / Vista general del aparato Botón Pulsar 1 vez Mantener Conector hembra para adaptador de pulsador 6 V de DC (el adaptador no está incluido en el volumen de suministro) aprox. 3 segundos WIND Velocidad media del viento (AVERAGE) y rá- fagas de viento... - Seite 110 Vista general del aparato Botón Pulsar 1 vez Mantener Botón Pulsar 1 vez Mantener pulsador pulsador aprox. aprox. 3 segundos 3 segundos MEMORY Indicación de los Buscar la señal valores mín. y del DCF-77 máx. guardados ZONE Cambiar entre la Configurar la automáticamente hora local y la...
-
Seite 111: Preparación Del Anemómetro Y Del Pluviómetro, Y Registro En La Estación Meteorológica
Vista general del aparato / Preparación del anemómetro ... 12.2 Preparación del pluviómetro Pluviómetro: Criba de hojas – Ponga las pilas en el pluviómetro (consulte el punto 10. Colocar y cambiar las pilas / pluvió- metro). – Quite la protección para el transporte que sujeta el basculador de lluvia. -
Seite 112: Configuración Inicial De La Estación Meteorológica
Preparación del anemómetro ... / Configuración inicial de la estación ... pluviómetro en la pantalla. El proceso puede tardar pantalla. Con el botón ▲y el botón ▼ puede ajustar hasta 4 minutos. los minutos. 13. Configuración inicial de la estación meteorológica Año: 13.1 Ajuste de Pulsando de nuevo el botón CLOCK pasa al ajuste... -
Seite 113: Ajuste De Dcf
Configuración inicial de la estación meteorológica Pulsando de nuevo el botón CLOCK regresa a la in- Ajuste de la zona horaria: dicación de la hora. Mantenga pulsado el botón ZONE durante 3 segun- dos. Se emite un tono de confirmación y en la pan- talla se muestra un 0 parpadeante. -
Seite 114: Función De Alarma
Configuración inicial ... / Función de alarma / Configuración de la unidad... Suecia, Suiza, Serbia, Eslovaquia, Eslovenia, España Desactivación de la función de alarma: (excepto las islas Canarias), Chequia, Hungría Pulse dos veces el botón ALARM en la indicación de la hora hasta que desaparezca . Set +1 hora: Bulgaria, Estonia, Finlandia, Grecia, Letonia, Lituania, Moldavia, Rumania, Turquía, Ucrania, Chipre... -
Seite 115: Adaptación De La Presión Atmosférica
Adaptación ... / Configuración de la ... / Configuración de la alarma de viento 16. Adaptación de la presión 17. Configuración de la atmosférica alarma de viento Después de poner las pilas en la estación meteoro- Puede configurar una alarma de viento para ráfagas lógica aparece una presión atmosférica de 1013 hPa. -
Seite 116: Configuración De La Alarma De Sensación De Frío
... / Configuración de la alarma ... / Activar y desactivar... / Configuración de ... Pulse el botón WIND ALARM para interrumpir pre- maturamente el sonido de la alarma. continúa parpadeando hasta que las ráfagas de viento (de los últimos 10 minutos) vuelvan a estar por debajo del valor límite. -
Seite 117: Configuración De La Unidad De Temperatura
Configuración de la ... / Configuración de la unidad de ... / Indicadores Cada vez que pulse el botón cambia la unidad de a presionar el botón ZONE, vuelve a aparecer su la indicación en la pantalla. hora local. 23.3 Temperatura y humedad del 22. -
Seite 118: Alarma De Heladas
Indicadores Diagrama: Pulse el botón RAIN HISTORY para ver los detalles. Unidad en pulgadas Unidad en millímetros Cada vez que pulse el botón avanza un día. A continuación una representación de los últimos 2 días: Día actual: cantidad de lluvia 250,2 mm con indicador de barra en 0 Evolución de los últimos días/semanas/meses desde el actual (0) hasta 6 días/semanas/meses antes (–6) -
Seite 119: Dirección Del Viento
Indicadores / Mantenimiento 23.7 Dirección del viento 23.10 Valores mínimos y máximos El anemómetro indica automáticamente la dirección Con el botón MEMORY puede mostrar los valores media del viento de los últimos 2 minutos. máximo y mínimo almacenados. N = Norte NE = Noreste E = Este SE = Sudeste... -
Seite 120: Criba De Hojas Del Pluviómetro
Mantenimiento / Solución de problemas ... / Limpieza / Eliminación Si se indica la tempera- mantenga la estación meteorológica y el sensor tura interior, la indicación exterior a la distancia máxima posible de aparatos de carga mínima de la que emitan ondas de radio. La carga electrostática batería corresponde a la también puede influir en los resultados de la medi- estación meteorológica. - Seite 121 Eliminación Puede averiguar las posibilidades de eliminación del producto estropeado en la administración de su comunidad o ciudad. No elimine el producto estropeado con los desechos domésticos, sino hágalo de manera correcta. Proteja así el medio ambiente. Se puede informar en la oficina competente de su administración sobre los puestos de recogida y sus horarios de atención al público.
- Seite 122 Índice Introdução ........................Página 123 Informações gerais ......................Página 123 Utilização de acordo com as especificações ..............Página 123 Dados técnicos .........................Página 123 Indicações de segurança ....................Página 124 Volume de entrega ......................Página 125 Definições .........................Página 125 Funções ..........................Página 126 Colocação em funcionamento ..................Página 126 Colocação e substituição das pilhas ................Página 128 Vista geral do aparelho ....................Página 130 Preparação do anemómetro e do pluviómetro, bem como registo na estação...
-
Seite 123: Introdução
Introdução / Informações gerais / Utilização de acordo ... / Dados técnicos Estação meteorológica premium 3. Utilização de acordo com as especificações 1. Introdução A estação meteorológica com anemómetro informa-o sobre as condições meteorológicas actuais. Para Damos-lhe os parabéns pela aquisição do seu além disso, também é... -
Seite 124: Indicações De Segurança
Dados técnicos / Indicações de segurança Valores de medição abaixo dos limites inferiores: ATENÇÃO! – Temperatura interior inferior a 0 °C: LL.L – Temperatura exterior inferior a –50 °C: LL.L A empresa OWIM GmbH & Co. KG, Stiftsberg- – Humidade inferior a 20 %: 20 % straße 1, D-74167 Neckarsulm, sob exclusiva –... -
Seite 125: Volume De Entrega
Indicações de segurança / Volume de entrega / Definições CUIDADO – DANOS MATERIAIS! ½ Utilize somente o tipo de pilha indicado. ½ Tenha atenção à polaridade correcta. ½ Verifique regularmente se as pilhas vazaram líquido. ½ Em caso de não utilização durante um longo período de tempo, retire as pilhas do aparelho. -
Seite 126: Funções
Definições / Funções / Colocação em funcionamento atingido e o ar arrefecido contém o teor máximo – Pode ser colocado sobre uma superfície ou de vapor de água possível com esta temperatura. pode ser pendurado – Apenas para a utilização no interior. Heat Index: O índice de calor (Heat Index) é... - Seite 127 Colocação em funcionamento Colocação da estação meteorológica: A estação meteorológica tem um pé de apoio previa- mente montado, que permite colocar a estação me- teorológica de forma prática. Orifícios para pendurar 0.5 x 3 ø 5 mm 5 mm 10 mm Montagem da estação meteorológica na parede: Montagem do anemómetro:...
-
Seite 128: Colocação E Substituição Das Pilhas
Colocação em funcionamento / Colocação e substituição das pilhas Fixe o anemómetro, como apresentado em baixo, 2. Empurre as buchas fornecidas nos furos até estas com os parafusos sextavados internos, arruelas ficarem embutidas na parede. planas, parafusos de fixação e porcas fornecidos. 3. - Seite 129 Colocação e substituição das pilhas Só então é possível garantir a estanqueidade do compartimento das pilhas. – Volte a apertar bem os 4 parafusos na tampa do compartimento da pilha. – Volte a colocar a caixa cuidadosamente na base do aparelho. –...
-
Seite 130: Vista Geral Do Aparelho
Vista geral do aparelho 11. Vista geral do aparelho Tecla Premir 1 x Premir durante Estação meteorológica: aprox. 3 s. Indicação da temperatura e da Previsão do tempo e HEAT INDEX Mudança de humidade interior / exterior pressão atmosférica indicação entre a temperatura sentida (Heat In- DEW POINT... -
Seite 131: Preparação Do Anemómetro E Do Pluviómetro, Bem Como Registo Na Estação Meteorológica
Vista geral do aparelho / Preparação do anemómetro e do pluviómetro Anemómetro: Tecla Premir 1 x Premir durante Caixa com medidor da tempera- Cata-vento com aprox. 3 s. tura e da humidade integrado bússola integrada ▲ Configurações Configurações para a frente para a frente rápido ▼... -
Seite 132: Preparar O Pluviómetro
Preparação do anemómetro ... / Configurações básicas da estação ... – Coloque as pilhas de acordo com a polaridade A estação meteorológica procura automaticamente (para tal, consulte Anemómetro no ponto 10. os sinais de radiofrequência do anemómetro e do Colocação e substituição das pilhas). pluviómetro. -
Seite 133: Configuração Dcf
Configurações básicas da estação meteorológica Horas: Mês: Premindo outra vez a tecla CLOCK consegue pro- Premindo outra vez a tecla CLOCK consegue proceder ceder à configuração das horas. As horas aparecem à configuração do mês. O mês aparece a piscar no a piscar no visor. -
Seite 134: Configuração Do Fuso Horário
Configurações básicas da estação meteorológica / Função de alarme CUIDADO! As indicações da hora e da data são transmitidas na Europa Central através do chamado sinal de radio- frequência DCF-77. O emissor encontra-se nas pro- ximidades de Frankfurt am Main e possui um alcance Através da tecla ZONE volta à... -
Seite 135: Desligar O Sinal De Alarme
Função de alarme / Ajustar a unidade da ... / Adaptação da pressão ... indicação da hora. Depois de se ouvir um sinal de confirmação aparece ALARM no visor e as horas pis- cam. Função snooze: Através da tecla SNOOZE / LIGHT pode interrom- per o sinal de alarme durante aprox. -
Seite 136: Ajuste Da Unidade Para A Velocidade Do Vento
Adaptação da ... / Ajuste da unidade ... / Ajustar o alarme de vento / Ajustar o ... Prima a tecla ▲ ou a tecla ▼ para configurar o valor desejado. Com a tecla WIND ALARM confirma a introdução e à esquerda, ao lado da velocidade 17. -
Seite 137: Ligar E Desligar O Alarme De Vento E O Alarme De Índice De Frio
... / Ligar e desligar o ... / Ajuste da unidade ... / Ajustar a unidade Mantenha a tecla WIND ALARM premida durante alarme estiver ligado surge o respectivo símbolo de aprox. 3 segundos até ser emitido um som de con- alarme firmação e o valor piscar. -
Seite 138: Indicações
Indicações 23. Indicações 23.4 Indicar Heat Index (índice de calor) e Dew Point (ponto de orvalho) Iluminação de fundo: Prima a tecla SNOOZE / LIGHT para ligar a ilumina- ção de fundo. A iluminação de fundo apaga-se au- Prima a tecla HEAT INDEX; DEW POINT para mudar tomaticamente após aprox. -
Seite 139: Alarme De Gelo / Geada
Indicações É indicado o valor actual. Por baixo encontra-se o respectivo histórico das últimas 6 unidades, repre- sentado num diagrama. 2 dias antes: quan- tidade de chuva 156,7 mm com o indi- cador de barras em –2 Quantidade Quantidade Quantidade Quantidade total diária... -
Seite 140: Alterações Da Pressão Atmosférica
Indicações / Manutenção 23.12 Tendência meteorológica Ao lado da previsão do tempo é indicada também a tendência meteorológica. Existe uma seta para subida, constante e descida. 23.9 Alterações da pressão atmosférica A estação meteorológica mostra as alterações da pressão atmosférica nas últimas 6 horas. Unidade em inHg Unidade em hPa (mb) 24. -
Seite 141: Filtro De Folhas No Pluviómetro
Manutenção / Eliminação de erros em caso ... / Limpeza / Eliminar a substituição das pilhas os dados memorizados na Frio (temperaturas exteriores abaixo de 0 °C) também estação meteorológica podem perder-se. pode influenciar de forma negativa a potência da pilha do sensor exterior e assim a transmissão rádio. - Seite 142 Eliminar As pilhas não podem ser eliminadas no lixo domés- tico. Podem conter metais pesados tóxicos e são consideradas resíduos perigosos. Os símbolos quí- micos dos metais pesados são os seguintes: Cd = cádmio, Hg = mercúrio, Pb = chumbo. Como tal, deposite as pilhas utilizadas num ponto de recolha adequado do seu município.
- Seite 143 OWIM GmbH & Co. KG Stiftsbergstraße 1 D-74167 Neckarsulm Model-No.: H13726 Version: 07 / 2016 Stand der Informationen · Last Information Update · Version des informations · Stand van de informatie · Stav informací · Estado de las informaciones · Estado das informações: 06 / 2016 ·...