Inhaltsverzeichnis
Werbung
Verfügbare Sprachen
Verfügbare Sprachen
Quicklinks
DE Schulter TENS
Gebrauchsanweisung .....................................................2
EN Shoulder TENS
Instructions for use .......................................................21
FR Appareil TENS pour épaules
Mode d'emploi .............................................................38
ES TENS para el hombro
Instrucciones de uso ....................................................57
IT
Apparecchio TENS per spalle
Istruzioni per l'uso ........................................................76
TR Omuz TENS cihazı
Kullanım kılavuzu ..........................................................94
RU Электростимулятор TENS для плеч
Инструкция по применению ....................................111
PL Urządzenie TENS do ramion
Instrukcja obsługi .......................................................130
EM 26
Werbung
Kapitel
Inhaltsverzeichnis
Fehlerbehebung

Verwandte Anleitungen für Beurer EM 26 TENS


Inhaltszusammenfassung für Beurer EM 26 TENS
- Seite 1 EM 26 DE Schulter TENS Gebrauchsanweisung .............2 EN Shoulder TENS Instructions for use ............21 FR Appareil TENS pour épaules Mode d’emploi .............38 ES TENS para el hombro Instrucciones de uso ............57 Apparecchio TENS per spalle Istruzioni per l’uso ............76 TR Omuz TENS cihazı Kullanım kılavuzu ............94 RU Электростимулятор...
-
Seite 2: Inhaltsverzeichnis
DEUTSCH Lesen Sie diese Gebrauchsanweisung sorgfältig durch, bewahren Sie sie für den späteren Gebrauch auf, machen Sie sie anderen Benutzern zu- gänglich und beachten Sie die Hinweise. Inhalt 1. Kennenlernen ............2 7. Reinigung und Aufbewahrung .......14 2. Zeichenerklärung .............3 8. Entsorgen ..............15 3. -
Seite 3: Schmerzbehandlung Mit Dem Em 26 Stimulationsgerät
Bereichen Wärme, Gewicht, Blutdruck, Körpertempe- ratur, Puls, Sanfte Therapie, Massage und Luft. Folgende Symbole werden in der Gebrauchsanweisung Mit freundlicher Empfehlung verwendet. Ihr Beurer-Team Warnhinweis auf Verletzungsge- Warnung fahren oder Gefahren für Ihre Ge- Schmerzbehandlung mit dem EM 26 Stimulati- sundheit. -
Seite 4: Wichtige Hinweise
Verpackung umweltgerecht entsorgen Hersteller Vor Nässe schützen 3. Wichtige Hinweise Sicherheitshinweise Seriennummer Warnung Die CE-Kennzeichnung bescheinigt die Konformität mit den grundlegenden An- • Verwenden Sie das Schulter TENS ausschließlich: forderungen der Richtlinie 93/42/EWG – am Menschen, für Medizinprodukte. – zur äußerlichen Anwendung, –... -
Seite 5: Vorsichtsmaßnahmen
• Bei gesundheitlichen Bedenken irgendwelcher Art kon- • Stecken Sie das Anschlusskabel der Elektrodenstecker sultieren Sie Ihren Hausarzt! nur in die dafür vorgesehene Bedieneinheit und die da- • Das Schulter TENS darf ausschließlich zur äußeren An- zugehörige Manschette. wendung an der menschlichen Schulter angewendet •... - Seite 6 Hinweise zu den Elektroden • Das Gerät kann in der Gegenwart von elektromag- netischen Störgrößen unter Umständen nur in einge- schränktem Maße nutzbar sein. Infolgedessen können Achtung z.B. Fehlermeldungen oder ein Ausfall des Displays/ • Die Elektroden dürfen nicht auf offenen Hautstellen an- Gerätes auftreten.
-
Seite 7: Die Elektroden Dürfen Nicht Angewendet Werden
• Auf akut oder chronisch erkrankter (verletzter oder ent- • Bei akuten oder chronischen Erkrankungen des Ma- zündeter) Haut, z.B. bei schmerzhaften und schmerzlo- gen-Darmtrakts. sen Entzündungen, Rötungen. • Bei Vorhandensein von metallischen Implantaten. • Bei Hautausschlägen (z.B. Allergien), Verbrennungen, •... - Seite 8 • Allen Sensibilitätsstörungen mit reduziertem Schmer- Achtung zempfinden (wie z.B. Stoffwechselstörungen). • Gleichzeitig durchgeführten medizinischen Behandlun- • Der Hersteller haftet nicht für Schäden, die durch un- gen. sachgemäßen oder falschen Gebrauch verursacht wur- • Mit der Stimulationsbehandlung auftretenden Be- den. schwerden.
-
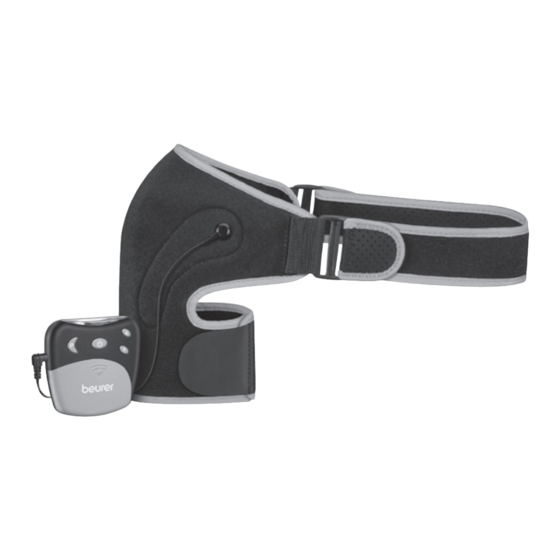
Seite 9: Gerätebeschreibung
• Schützen Sie Batterien vor übermäßiger Wärme. Pos. Bezeichnung • Explosionsgefahr! Keine Batterien ins Feuer werfen. Ein-/Aus-/Pause-Taste • Batterien dürfen nicht geladen oder kurzgeschlossen werden. Einstellung Intensität • Bei längerer Nichtbenutzung des Geräts die Batterien ▲ erhöhen aus dem Batteriefach nehmen. ▼... -
Seite 10: Inbetriebnahme
5. Inbetriebnahme Bevor Sie die Schultermanschette anlegen, be- feuchten Sie zuerst die Wasserkontaktelektro- Batterien einlegen den und die Schulter mit Wasser. Öffnen Sie das Batteriefach [4], in- dem Sie den Deckel an der gepfeil- Hinweis ten Markierung drücken nach unten Die Schultermanschette kann sowohl für die linke als auch schieben. -
Seite 11: Bedienung
6. Bedienung 5. Fixieren Sie die Manschette in der gewünschten Position mit Allgemeine Hinweise zur Anwendung den Klettverschlüssen. Achten Sie darauf, dass die Manschette Schalten Sie das Gerät erst ein, wenn die Manschet- nicht zu fest sitzt, die Wasser- te korrekt angelegt ist. Siehe Kapitel 5. kontaktelektroden jedoch noch über ausreichend Kontakt mit Das Schulter TENS ist für die individuelle Behandlung von... - Seite 12 Prog. Dauer TENS- Fre- Impuls- Modus Prog. Beschreibung & Behandlungsvorschläge Modus quenz dauer Behandlungsvorschläge*: wiederholt auftretende akute Schulterschmerzen, chronische Schulter- min. schmerzen. 0-10 Aku- 4 Hz 220 μs Kontinu- Kombiniert die Vorteile der Programme B, C & D. min. punk- ierlich Behandlungsvorschläge*: chronische Schulter- schmerzen...
-
Seite 13: Intensität Einstellen
Hinweis: Behandlungsvorschläge*: akute Schulterschmer- Wird während der Stimulation das Programm ge- zen, akute Schmerzschübe & Vorbeugung wechselt (beispielsweise von A nach B) erhöht sich • Sie beginnen vielleicht am besten mit diesem die Ausgangsintensität im neuen Programm schritt- Programm. weise bis zu der zuvor eingestellten Intensität. Dies •... -
Seite 14: Kontakterkennung
Ungewünschte Impulsänderungen verhindern Kontakterkennung Um zu vermeiden, dass sich während einer Behandlung Besitzen die Elektroden keinen Körperkontakt wird die In- die Intensität versehentlich erhöht, schalten Sie einfach die tensität automatisch auf Null eingestellt. Damit wird ver- Tastensperre ein. Dazu drücken Sie ca. 2 Sekunden lang hindert, dass es zu ungewünschten Reizen kommt. -
Seite 15: Aufbewahrung
Reinigung der Schultermanschette • Entfernen Sie die Batterien aus dem Gerät wenn Sie es längere Zeit nicht benutzen. Auslaufende Batterien können das Gerät beschädigen. Achtung 1. Bevor Sie mit der Reinigung beginnen, trennen Sie das 8. Entsorgen Anschlusskabel von der Manschette. Im Interesse des Umweltschutzes darf das Gerät 2. -
Seite 16: Problemlösung
9. Problemlösung Problem Mögliche Ursache Behebung Intensität am Gerät Problem Mögliche Ursache Behebung Senken Sie am Ge- ist zu hoch einge- rät die Intensität. Die Batterien sind Tauschen Sie die stellt. leer. Batterien aus Das Gerät Wasserkontaktelek- Gerät ausschalten. schaltet sich Die Batterien sind troden nicht ausrei- Elektroden be-... -
Seite 17: Technische Angaben
Problem Mögliche Ursache Behebung Problem Mögliche Ursache Behebung Wasserkon- Stoppen Sie die taktelektroden Die Manschette löst Anwendung und Wasserkontaktelek- Stimulation abnehmen und sich von der Haut. legen Sie die Man- troden liegen nicht ist wirkungs- erneut auf der Haut schette erneut an. korrekt auf der Haut platzieren. -
Seite 18: Garantie/ Service
(3 x 1,5 V AAA, Typ LR03) 11. Garantie/ Service Betriebsbedingungen 0 °C bis 40 °C, 20 bis 65% Die Beurer GmbH, Söflinger Straße 218, D-89077 Ulm relative Luftfeuchtigkeit (nachfolgend „Beurer“ genannt) gewährt unter den Lagerung 0 °C bis 55 °C, 10 bis 90%... - Seite 19 - Produkte, die unsachgemäß und/oder entgegen der vice: Bestimmungen der Bedienungsanleitung verwendet, ge- Beurer GmbH, Servicecenter reinigt, gelagert oder gewartet wurden sowie Produkte, Tel: +49 731 3989-144 die vom Käufer oder einem nicht von Beurer autorisier- ten Servicecenter geöffnet, repariert oder umgebaut wurden;...
- Seite 20 - Schäden, die auf dem Transportweg zwischen Hersteller und Kunde bzw. zwischen Servicecenter und Kunde entstehen - Produkte, die als 2.Wahl-Artikel oder als gebrauchte Artikel gekauft wurden; - Folgeschäden, welche auf einem Mangel dieses Produk- tes beruhen (es können für diesen Fall jedoch Ansprü- che aus Produkthaftung oder aus anderen zwingenden gesetzlichen Haftungsbestimmungen bestehen).
-
Seite 21: Getting To Know Your Device
ENGLISH Read these instructions for use carefully and keep them for later use, be sure to make them accessible to other users and observe the information they contain. Contents 1. Getting to know your device .........21 7. Cleaning and storage ..........33 2. -
Seite 22: Signs And Symbols
Warning notice indicating a risk and air. Warning of injury or damage to health. With kind regards, Safety note indicating possible Your Beurer team Important damage to the device/acces- Pain relief with the EM 26 stimulation device sory. How does electrical muscle stimulation work? Note Note on important information. -
Seite 23: Important Notes
3. Important notes Serial number Safety notes The CE labelling certifies that the Warning product complies with the essential • Only use the shoulder TENS: requirements of Directive 93/42/EEC on – on humans, medical devices. – externally, Disposal in accordance with the Waste –... - Seite 24 Precautions Do not use the device again until the reddening has dis- appeared. • If the skin becomes irritated over longer treatment times, Warning select a shorter application time instead. • During the initial few minutes, use the device while sitting •...
- Seite 25 an increase in electromagnetic emissions or a decrease • If you have a known or acute cardiac arrhythmia (ar- in the device’s electromagnetic immunity; this can result rhythmia), or disorders of the heart’s impulse and con- in faulty operation. duction system. •...
- Seite 26 • Ensure that no metallic objects come into contact with • If you are receiving medical treatment. the electrodes during stimulation. Failure to do so could • In the event of complaints linked to stimulation treat- result in spot burns. ment.
- Seite 27 • Do not charge or short-circuit batteries. Important • If the device is not to be used for a relatively long period, take the batteries out of the battery compartment. • The manufacturer is not liable for damage resulting from •...
-
Seite 28: Device Description
4. Device description Designation Overview of the control unit Battery status, appears when batteries are dead Intensity, level 0 – 20 Pause symbol, flashes when activated TIMER: Remaining time in the active program in minutes Button lock active Active program 5. - Seite 29 Connecting the connection 2. To fit the cuff more easily, first of all fix the bottom end of the cuff using the hook-and-loop fastener provid- cable and positioning the ed, and slip your arm through the opening in the cuff. shoulder cuff Then use your healthy arm to pull the cuff over your 1.
-
Seite 30: Operation
switched on for the first time, program A is automatically Replacing the battery activated. Please replace the batteries when the battery status sym- Selecting a program bol appears in the display [7]. The device provides 4 programs, each with 20 pulse inten- sities. - Seite 31 Prog. Dura- TENS Fre- Pulse Mode Prog. Description & treatment suggestions tion mode quency length Treatment suggestions*: acute shoulder pain, 25 min. Con- 110 Hz 60 μs Continu- acute flare-up of pain & prevention ven- • It is perhaps best to start with this program. tional •...
- Seite 32 Reacting to unpleasant sensations gradually in the new program until it reaches the intensity that was previously set. This can be stopped if required by If you feel a twinge or itching on your skin, you should pressing the intensity button ▼ [2] or by switching off the switch the device off and proceed as follows: device by pressing and holding the On/Off button [1] for •...
-
Seite 33: Cleaning And Storage
7. Cleaning and storage • Before putting on the cuff again, first clean the body parts to be treated. Cleaning the control unit Storage Important • Switch off the control unit and disconnect the connec- tion cable. Before beginning the cleaning process, disconnect the con- •... -
Seite 34: Troubleshooting
Problem Possible cause Solution Empty, completely flat batteries must be disposed of The intensity on the through specially designated collection boxes, recycling Lower the intensity device is set too points or electronics retailers. You are legally required to on the device. high. -
Seite 35: Technical Specifications
If you cannot find a solution to your problem here, contact Problem Possible cause Solution our Customer Services. Ensure that the The cuff is not cuff sits securely 10. Technical specifications positioned correctly on the skin and on the skin. cannot move. -
Seite 36: Warranty/Service
11. Warranty/service Operating conditions 0 °C to 40 °C, 20 to 65% relative humidity Beurer GmbH, Söflinger Straße 218, 89077 Ulm, Germany (hereinafter referred to as “Beurer”) provides a warranty Storage 0 °C to 55 °C, 10 to 90% for this product, subject to the requirements below and to relative humidity the extent described as follows. - Seite 37 Beurer shall carry out a opened, repaired or modified by the buyer or by a repair or a replacement delivery free of charge, in accord- service centre not authorised by Beurer; ance with these warranty conditions.
-
Seite 38: Familiarisation Avec L'appareil
FRANÇAIS Lisez attentivement ce mode d’emploi, conservez-le pour un usage ultéri- eur, mettez-le à disposition des autres utilisateurs et suivez les consignes qui y figurent. Sommaire 1. Familiarisation avec l’appareil .......38 7. Nettoyage et stockage ..........50 2. Symboles utilisés ...........39 8. -
Seite 39: Symboles Utilisés
Les symboles suivants sont utilisés dans le mode d’em- Sincères salutations, ploi. Votre équipe Beurer Ce symbole vous avertit des risques de blessures Traitement de la douleur avec l’appareil de Avertissement ou des dangers pour votre stimulation EM 26... -
Seite 40: Remarques Importantes
Des valeurs de sortie supérieures à Marque de certification pour les 10 mA sur chaque intervalle de 5 s produits exportés en Fédération de peuvent être émises par l’appareil Russie et dans les pays de la CEI. Éliminer l’emballage dans le respect de Fabricant l’environnement Protéger contre l’humidité... -
Seite 41: Mesures De Précaution
• Avant l’utilisation, assurez-vous que l’appareil et les • Ne décalez et ne déposez pas la manchette quand l’uni- accessoires ne présentent aucun dommage visible. En té de commande est allumée. cas de doute, ne l’utilisez pas et adressez-vous à votre •... - Seite 42 Remarques relatives aux électrodes car cela risque d’entraîner une variation des valeurs de sortie de l’appareil. • En présence d’interférences électromagnétiques, vous Attention risquez de ne pas pouvoir utiliser toutes les fonctions • Les électrodes ne doivent pas être placées sur des de l’appareil.
- Seite 43 • sur une peau atteinte d’une maladie chronique ou aiguë • en présence d’implants métalliques ; (blessure ou inflammation), par ex. en cas d’inflamma- • par des porteurs de pompe à insuline ; tions douloureuses ou indolores ou de rougeurs ; • dans des environnements à humidité élevée, par ex. •...
-
Seite 44: Avant La Mise En Service
• traitements médicaux menés en parallèle ; Attention • troubles survenus suite au traitement par stimulation ; • irritations cutanées sous les électrodes. • Le fabricant ne peut être tenu pour responsable des dommages causés par une utilisation inappropriée ou non conforme. Avertissement •... -
Seite 45: Description De L'appareil
• Risque d’explosion ! Ne jette pas les piles dans le Pos. Désignation feu. Touche Marche/Arrêt/Pause • Les piles ne doivent pas être rechargées ni court-circui- tées. Réglage de l’intensité • En cas de non-utilisation prolongée de l’appareil, retirer ▲ augmenter les piles du compartiment à... -
Seite 46: Mise En Service
5. Mise en service Avant de placer la manchette d’épaule, humi- difiez d’abord les électrodes à contact à eau et Insérer les piles l’épaule avec de l’eau. Ouvrez le compartiment à piles [4] en appuyant sur le couvercle au Remarque niveau de la flèche et en poussant La manchette d’épaule peut être utilisée aussi bien pour vers le bas. -
Seite 47: Utilisation
6. Utilisation 5. Fixez la manchette dans la position souhaitée à l’aide de Remarques générales relatives à l’utilisation la fermeture auto-aggripante. Assurez-vous que la manchette Allumez l’appareil après avoir placé la manchette n’est pas trop serrée, mais que correctement. Voir le chapitre 5. les électrodes à... - Seite 48 Prog. Durée Mode Fré- Durée Mode Prog. Description et propositions de traitement TENS quence d’impul- Propositions de traitement* : douleurs aiguës répé- sion tées au niveau de l’épaule, douleurs chroniques au 30 min niveau de l’épaule. 0 – 10 Acupu- 4 Hz 220 μs En continu Combine les avantages des programmes B, C...
- Seite 49 Remarque : Prog. Description et propositions de traitement si le programme est modifié (par exemple, s’il passe Propositions de traitement* : douleur aiguë au de A à B) pendant la stimulation, l’intensité augmente niveau de l’épaule, crises douloureuses aiguës et progressivement jusqu’à atteindre celle du nouveau prévention programme.
-
Seite 50: Fonction D'enregistrement
Éviter les changements d’intensité non désirés Détection du contact Pour éviter d’augmenter par inadvertance l’intensité au Si les électrodes ne sont pas en contact avec la peau, l’in- cours d’un traitement, il suffit d’activer le verrouillage. tensité est réduite automatiquement au niveau zéro. Cela Pour cela, appuyez environ 2 ... -
Seite 51: Élimination
Nettoyage de la manchette d’épaule • Si vous ne comptez pas l’utiliser avant longtemps, retirez les piles de l’appareil. Des piles qui fuient peuvent en- dommager l’appareil. Attention 1. Avant de débuter le nettoyage, déconnectez le câble de 8. Élimination connexion de la manchette. -
Seite 52: Solution Aux Problèmes
9. Solution aux problèmes Problème Cause possible Solution L’intensité de l’ap- Problème Cause possible Solution Baissez l’intensité pareil est trop éle- sur l’appareil. Les piles sont vides. Changez les piles vée. L’appareil Les piles ne sont Remettez les piles Les électrodes ne s’allume Éteignez l’appa- pas correctement... - Seite 53 Problème Cause possible Solution Problème Cause possible Solution Retirez les élec- Interrompez l’utili- La manchette se dé- Les électrodes trodes à contact sation et reposez colle de la peau. La stimula- à contact à eau ne à eau et repla- la manchette.
-
Seite 54: Caractéristiques Techniques
10. Caractéristiques techniques Stockage Entre 0 °C et 55 °C, 10 à 90 % d’humidité relative de l’air Circonférence du haut jusqu’à 120 cm Le numéro de série se trouve sur l’appareil ou dans le com- du corps en diagonale partiment à piles. Type EM 29 Nous nous réservons le droit d’effectuer des modifications Modèle... -
Seite 55: Garantie/Maintenance
Une demande de garantie ne peut être prise en compte Beurer garantit le bon fonctionnement et l’intégrité de ce que si l’acheteur présente produit. - une copie de la facture/du reçu et - le produit d’origine... - Seite 56 Beurer ; - les dommages survenus lors du transport entre le fabri- cant et le client ou entre le service client et le client ; - les produits achetés en tant qu’article de second choix ou d’occasion ;...
-
Seite 57: Artículos Suministrados
ESPAÑOL Lea atentamente estas instrucciones de uso, consérvelas para su futura utilización, póngalas a disposición de otros usuarios y respete las indica- ciones. Índice 1. Introducción ............57 7. Limpieza y conservación ........69 2. Explicación de los símbolos ........58 8. Eliminación ............70 3. -
Seite 58: Explicación De Los Símbolos
En estas instrucciones de uso se utilizan los siguientes Atentamente, símbolos. El equipo de Beurer Indicación de advertencia Advertencia sobre riesgos de lesiones u Tratamiento para aliviar el dolor con el aparato otros peligros para la salud. -
Seite 59: Indicaciones Importantes
El dispositivo puede emitir valores Sello de certificación para aquellos de salida efectivos por encima de productos que se exportan a la 10 mA promediados en intervalos de Federación de Rusia y a los países de 5 segundos la CEI. Eliminar el embalaje respetando el medio Fabricante ambiente Proteger de la humedad... -
Seite 60: Medidas De Precaución
• Antes de utilizar el aparato, deberá asegurarse de que ni • No utilice piezas adicionales no recomendadas por el este ni los accesorios presenten daños visibles. En caso fabricante. de duda, no lo use y póngase en contacto con su distri- •... - Seite 61 Indicaciones sobre los electrodos • En presencia de perturbaciones electromagnéticas, el aparato solo se puede usar de forma restringida y en determinadas circunstancias. Como consecuencia, po- Atención drían mostrarse mensajes de error o podrían apagarse la • Los electrodos no deben colocarse sobre heridas abier- pantalla o el dispositivo.
- Seite 62 • Sobre piel con enfermedades agudas o crónicas (herida • Si lleva una bomba de insulina. o inflamada), p. ej., con inflamaciones dolorosas o indo- • En un entorno con un nivel de humedad elevado, como loras, o enrojecimiento. el cuarto de baño, o durante el baño o la ducha. •...
-
Seite 63: Antes De La Puesta En Funcionamiento
• En caso de producirse irritaciones de la piel constantes • No utilice el aparato si se cae, si se ha expuesto a una debajo de los electrodos. humedad extrema o si resulta deteriorado por cualquier otro motivo. El aparato no se debe exponer a altas tem- peraturas ni a la luz solar. -
Seite 64: Descripción Del Aparato
• Utilice únicamente el mismo tipo de pila o un tipo equi- Pos. Denominación valente. • Cambie siempre todas las pilas a la vez. Tecla de programa/de bloqueo • ¡No utilice pilas recargables! Compartimento de las pilas • No despiece, abra ni triture las pilas. Conector hembra 4. -
Seite 65: Puesta En Funcionamiento
5. Puesta en funcionamiento Antes de colocarse el brazalete, humedezca con agua los electrodos y el hombro. Colocar las pilas Nota Abra el compartimento de las pilas [4] presionando en las flechas de la El brazalete puede utilizarse tanto para el hombro derecho tapa y tirando hacia abajo. -
Seite 66: Manejo
6. Manejo 5. Ajuste el brazalete en la posi- ción deseada con los cierres Indicaciones generales sobre la aplicación autoadherentes. Procure que el brazalete no quede demasiado No encienda el aparato hasta que el brazalete esté apretado, pero que los electro- colocado correctamente. - Seite 67 Prog. Dura- Modo Fre- Dura- Modo Prog. Descripción y sugerencias de tratamiento ción TENS cuen- ción del Sugerencias de tratamiento*: dolor de hombro impulso agudo recurrente, dolor de hombro crónico. 30 min Combina las ventajas de los programas B, C y D. 0-10 Acu- 4 Hz...
- Seite 68 Nota: Prog. Descripción y sugerencias de tratamiento Si se cambia de programa durante la estimulación Sugerencias de tratamiento*: dolor de hombro (por ejemplo, de A a B), la intensidad de salida au- agudo, recaídas de dolor agudas y prevención mentará gradualmente en el nuevo programa hasta •...
-
Seite 69: Función De Almacenamiento
Impedir cambios de impulsos no deseados Detección de contacto Para impedir que la intensidad aumente involuntariamente Si los electrodos no están en contacto con el cuerpo, la durante un tratamiento, active simplemente la tecla de blo- intensidad se ajustará automáticamente a cero. De esta queo. -
Seite 70: Eliminación
8. Eliminación Limpieza del brazalete A fin de preservar el medio ambiente, cuando el Atención aparato llegue al final de su vida útil no lo deseche con la basura doméstica. 1. Antes de proceder a la limpieza, desenchufe del brazalete Se puede desechar en los puntos de recogida adecuados el cable de conexión. -
Seite 71: Resolución De Problemas
9. Resolución de problemas Problema Posible causa Solución El ajuste del nivel Problema Posible causa Solución Disminuya el nivel de intensidad del de intensidad del Las pilas están gas- aparato es demasia- Cambie las pilas. aparato. tadas. El aparato do alto. no se en- Las pilas no se han Los electrodos no... -
Seite 72: Datos Técnicos
Problema Posible causa Solución Problema Posible causa Solución Retire los electro- Detenga la aplica- El brazalete se des- dos y vuelva a co- ción y vuelva a co- La estimula- Los electrodos no prende de la piel. locarlos sobre la locarse el brazalete. -
Seite 73: Garantía/Asistencia
De 0 °C a 55 °C, 10 a 90 % de 11. Garantía/asistencia humedad relativa del aire Beurer GmbH, Söflinger Straße 218, D-89077 Ulm (en lo El número de serie se encuentra en el aparato o en el com- sucesivo, «Beurer») concede una garantía para este pro- partimento de las pilas. - Seite 74 - una copia de la factura o del recibo de compra y por parte del comprador. - el producto original a Beurer o a un socio autorizado por Beurer. Esta garantía se ofrece solo para productos que el com- prador haya adquirido en tanto que consumidor con fines Quedan excluidos explícitamente de la presente garantía...
- Seite 75 - daños derivados que resulten de una falta del producto. En este caso, podrían invocarse eventualmente dere- chos derivados de la normativa de responsabilidad de productos o de otras disposiciones de responsabilidad legal preceptiva. Las reparaciones o la sustitución del producto no prolon- garán en ningún caso el periodo de garantía.
-
Seite 76: Indice 1. Introduzione
ITALIANO Leggere attentamente le presenti istruzioni per l'uso, conservarle per impieghi futuri, renderle accessibili ad altri utenti e attenersi alle indica- zioni. Indice 1. Introduzione ............76 7. Pulizia e conservazione .........88 2. Spiegazione dei simboli.........77 8. Smaltimento ............89 3. Indicazioni importanti ..........78 9. -
Seite 77: Spiegazione Dei Simboli
Cordiali saluti Avvertimento di pericolo di le- Il team Beurer Avvertenza sioni o di pericoli per la salute. Trattamento del dolore con l'elettrostimolatore Indicazione di sicurezza per EM 26 Attenzione possibili danni all'apparecchio/ Come funziona la corrente di stimolazione? agli accessori. -
Seite 78: Indicazioni Importanti
3. Indicazioni importanti Proteggere dall'umidità Indicazioni di sicurezza Avvertenza Numero di serie • Utilizzare l’apparecchio TENS per spalle esclusivamen- Il marchio CE certifica la conformità ai – su persone, requisiti di base della direttiva 93/42/ – per uso esterno, EEC sui dispositivi medici. –... -
Seite 79: Precauzioni D'impiego
• Un leggero arrossamento della pelle dopo l'utilizzo è • Non indossare dispositivi elettronici, come ad es. orolo- normale e scompare in poco tempo. gi, durante l'utilizzo dell'apparecchio. Utilizzare nuovamente l'apparecchio solo quando l'ar- Precauzioni d'impiego rossamento è sparito. • Se in caso di un lungo periodo terapeutico compaiono Avvertenza irritazioni cutanee, scegliere un tempo di utilizzo più... - Seite 80 funzionamento non corretto. Qualora fosse comunque Avvertenza necessario un utilizzo nel modo prescritto, è opportuno tenere sotto controllo questo apparecchio e gli altri ap- Per prevenire danni alla salute, si sconsiglia vivamente parecchi in modo da assicurarsi che funzionino corretta- l'utilizzo dell'apparecchio nei casi seguenti: mente.
-
Seite 81: Prima Dell'utilizzo Consultare Il Medico In Caso Di
Prima dell'utilizzo consultare il medico in caso di: stante l'intensità ridotta) possa comportare un pericolo, ad es. quando si guida l'auto o si comanda un macchi- • Malattie acute, in particolare in caso di sospetto o com- nario. provata presenza di disturbi della coagulazione, tenden- •... - Seite 82 • Non indossare mai il manicotto per le spalle con elettrodi • Pericolo d'ingestione! I bambini potrebbero ingerire metallici privi di copertura in quanto sussiste il rischio di le batterie e soffocare. Tenerle quindi lontano dalla por- lesioni. tata dei bambini. •...
-
Seite 83: Descrizione Dell'apparecchio
4. Descrizione dell'apparecchio Pos. Denominazione Panoramica unità di comando Stato della batteria, compare quando le batterie sono scariche Intensità, livello 0 - 20 Simbolo pausa, lampeggia se attivo TIMER: tempo residuo dei programmi attivi in minuti Blocco tasti attivo Programma attivo 5. - Seite 84 Collegamento del cavo di 2. Per una facile applicazione del manicotto, fissare dap- prima l'estremità inferiore con la chiusura a strappo alimentazione e applicazione prevista e infilare il braccio nell'apertura del manicotto. del manicotto per le spalle Con il braccio sano tirare quindi il manicotto sopra 1.
-
Seite 85: Uso
Selezione del programma Sostituzione delle batterie L'apparecchio offre 4 programmi con 20 intensità d'impul- Se compare l'indicatore dello so ciascuno. Nella seguente tabella è riportata una descri- stato della batteria [7], sostitu- zione dettagliata: ire le batterie. Prog. Durata Mo- Fre- Durata Modalità... - Seite 86 Prog. Descrizione e consigli di trattamento Consigli di trattamento*: dolori alle spalle acuti, attacchi di dolore acuti e prevenzione Consigli di trattamento*: dolori alle spalle acuti • Si suggerisce di iniziare con questo programma. ricorrenti, dolori alle spalle cronici. • L'azione lenitiva del dolore è riconducibile al Combina i vantaggi dei programmi B, C e D.
-
Seite 87: Esclusione Di Modifiche Indesiderate Degli Impulsi
Esclusione di modifiche indesiderate degli l'intensità impostata precedentemente. Se necessario, ciò può essere interrotto premendo il pulsante intensità ▼ [2] o impulsi spegnendo l'apparecchio tenendo premuto il pulsante ON/ Per evitare di modificare inavvertitamente l'intensità duran- OFF [1] per due secondi. te il trattamento, attivare il blocco tasti. -
Seite 88: Pulizia E Conservazione
Rilevamento dei contatti Pulizia del manicotto per le spalle Se gli elettrodi non sono a contatto con il corpo, l'intensi- Attenzione tà viene impostata automaticamente sullo zero. In questo modo si evitano irritazioni indesiderate. L'intensità non può 1. Prima di procedere alla pulizia, scollegare il cavo di ali- essere aumentata in assenza di contatto con la pelle. -
Seite 89: Smaltimento
9. Soluzione dei problemi • Rimuovere le batterie quando l'apparecchio non viene usato per un lungo periodo. La fuoriuscita del liquido dalle Problema Possibile causa Soluzione batterie può danneggiare l'apparecchio. Le batterie sono Sostituire le bat- 8. Smaltimento scariche. terie. L'apparec- chio non si Le batterie non sono... - Seite 90 Problema Possibile causa Soluzione Problema Possibile causa Soluzione Sull'apparecchio Rimuovere gli elet- è stata impostata Ridurre l'intensità trodi di contatto Gli elettrodi di con- un'intensità troppo sull'apparecchio. con acqua e riposi- La stimola- tatto con acqua elevata. zionarli sulla pelle. zione è...
-
Seite 91: Dati Tecnici
Problema Possibile causa Soluzione Parametro Tensione di uscita: (carico 500 ohm) max 50 Vpp/5,5 V rms Interrompere l'uti- Il manicotto si stac- Corrente di uscita: lizzo e riposiziona- ca dalla pelle. max 100 mApp/11 mArms re il manicotto. La stimo- Frequenza di uscita: Interrompere l'uti- lazione... -
Seite 92: Garanzia / Assistenza
Beurer garantisce la perfetta funzionalità e la completezza riguarda la compatibilità elettromagnetica. Apparecchia- di questo prodotto. ture di comunicazione mobili e portatili ad alta frequenza possono influire sul funzionamento di questo apparecchio. La garanzia mondiale è di 5 anni a partire dall’acquisto del Per informazioni più... - Seite 93 - una copia della fattura/prova d’acquisto e - il prodotto originale a Beurer o a un partner Beurer autorizzato. Sono espressamente esclusi dalla presente garanzia - l’usura dovuta al normale utilizzo o al consumo del prodotto;...
-
Seite 94: Teslimat Kapsamı
TÜRKÇE Lütfen bu kullanım kılavuzunu dikkatle okuyun, ileride gerekebileceği için saklayın, diğer kullanıcıların erişebilmesini sağlayın ve içindeki yönergelere uyun. İçindekiler 1. Ürün özellikleri ............94 7. Temizleme ve saklama.........106 2. İşaretlerin açıklaması ..........95 8. Bertaraf etme ............107 3. Önemli bilgiler ............96 9. -
Seite 95: İşaretlerin Açıklaması
2. İşaretlerin açıklaması Yeni cihazınızı iyi günlerde kullanmanızı dileriz. Beurer Ekibiniz Kullanım kılavuzunda aşağıdaki semboller kullanılmıştır. EM 26 stimülasyon cihazıyla ağrı tedavisi Yaralanma tehlikelerine veya sağ- Uyarıcı akım nasıl çalışır? Uyarı lığınızla ilgili tehlikelere yönelik TENS cihazı, elektriksel sinir stimülasyonu (TENS) yönte- uyarı. -
Seite 96: Önemli Bilgiler
Ambalaj çevreye zarar vermeyecek şekil- Üretici de bertaraf edilmelidir Nemden koruyun 3. Önemli bilgiler Güvenlik bilgileri Seri numarası Uyarı CE işareti, tıbbi ürünler için 93/42/EEC direktifinin temel şartları ile uyumluluğu • Omuz TENS cihazını sadece: belgeler. – insanlarda, – harici uygulama için, Elektrikli ve elektronik atık cihazlarla ilgili –... -
Seite 97: Güvenlik Önlemleri
Güvenlik önlemleri • Omuz TENS cihazı yalnızca insan omzunda harici olarak kullanılabilir. Vücudun başka yerlerinde kullanılması ciddi sağlık sorunlarına yol açabilir. Uyarı • Uygulamadan sonra cildin hafifçe kızarması normaldir ve • Uygulamayı ilk dakikalarda oturarak veya yatarak yapın, bu kızarıklık kısa bir süre içinde kaybolur. böylece ender durumlarda görülen vagal reaksiyon (hal- Cihazı... - Seite 98 romanyetik uyumluluğunun azalmasına neden olabilir ve • Bilinen veya akut kalp ritmi bozuklukları (aritmi) ve kalpte cihazın hatalı çalışmasına yol açabilir. diğer uyarılma oluşumu ve iletim bozukluklarında. • Bunun dikkate alınmaması cihaz performansının olum- • Nöbetli hastalıklarda (örn. epilepsi). suz etkilenmesine neden olabilir. •...
- Seite 99 • Stimülasyon sırasında metal nesnelerin elektrotlara te- • Ağrının daha az hissedilmesine neden olan tüm duyusal mas etmemesine dikkat edin, aksi halde noktasal yanık- bozukluklarda (örn. metabolizma bozuklukları). lar oluşabilir. • Aynı zamanda uygulanan tıbbi tedavilerde. • Sindirim sisteminde akut veya konik hastalıklar olması •...
- Seite 100 • Sadece aynı tip veya eşdeğer tip piller kullanın. Dikkat • Her zaman tüm pilleri aynı anda değiştirin. • Usulüne uygun olmayan veya yanlış kullanım sonucu • Şarj edilebilir pil kullanmayın! • Pilleri parçalamayın, açmayın veya ezmeyin. oluşan hasarlardan üretici firma sorumlu değildir. •...
-
Seite 101: Cihaz Açıklaması
4. Cihaz açıklaması Poz. Tanım Kumanda ünitesine genel bakış Pil durumu, piller tükendiğinde yanar Yoğunluk, seviye 0 – 20 Mola sembolü, etkinleştirildiğinde yanıp söner TIMER: Etkin programların kalan çalışma süresi (dakika) Tuş kilidi etkin Etkin program 5. İlk çalıştırma Pillerin takılması Kapağı... - Seite 102 Bağlantı kablosunun bağ- 2. Manşetleri daha kolay takmak için öngörülen kenetle- nen bantla ilk olarak manşetin alt tarafını sabitleyin ve lanması ve omuz manşetinin kolunuzu boşluktan manşetin içine sokun. Ardından takılması sağlıklı kolunuzu kullanarak manşetleri ağrıyan omzu- 1. Bağlantı kablosunu omuz manşe- nuzun üzerine geçirin.
-
Seite 103: Kullanım
Program seçme Pil değişimi Cihazda her birinde 20 impuls yoğunluğu bulunan 4 prog- Pil durumu göstergesi [7] yan- ram mevcuttur. Şu detaylı bilgi edinebilirsiniz: dığında lütfen pilleri değiştirin. • Kapağı ok işareti olan yerden bas- tırın ve aşağı kaydırarak pil bölme- sini [4] açın. - Seite 104 Prog. Süre TENS Fre- İmpuls Prog. Açıklama ve tedavi önerileri modu kans süresi Tedavi önerileri*: Tekrarlayan akut omuz ağrıları, 30 dk. kronik omuz ağrıları. 0-10 Aku- 4 Hz 220 μs Sürekli B, C ve D programlarının avantajlarını bir araya punk- getirir.
- Seite 105 önceden ayarlanmış yoğunluğa ulaşıncaya kadar adım Prog. Açıklama ve tedavi önerileri adım artar. Bu, gerekirse ▼ [2] tuşuna basılarak veya açma/ Tedavi önerileri*: Akut omuz ağrıları, akut ağrı nö- kapatma tuşuna [1] iki saniye basılıp cihaz kapatılarak dur- betleri ve önleme durulabilir.
-
Seite 106: Temizleme Ve Saklama
7. Temizleme ve saklama Rahatsız edici durumlarda yapılacaklar Cildiniz üzerinde batma veya kaşıntı hissettiğinizde cihazı Kumanda ünitesinin temizlenmesi kapatın ve aşağıdakileri yapın: • Elektrotlarda bir arıza olup olmadığını kontrol edin. Dikkat • Elektrot bağlantıları üzerindeki yuvarlak kapağın yerinde Temizlemeye başlamadan önce bağlantı kablosunu kuman- olup olmadığını... -
Seite 107: Bertaraf Etme
9. Sorun giderme Saklama • Bağlantı kablosunu kumanda ünitesi kapalı haldeyken ku- Sorun Olası neden Çözüm manda ünitesinden ayırın. • Manşeti vücudunuzdan çıkarın. Piller tükenmiştir. Pilleri değiştirin. • Bağlantı kablosunu omuz manşetinden ayırın. Cihaz • Kumanda ünitesini, omuz manşetini ve bağlantı kablosunu Piller doğru Pilleri tekrar açılmıyor. - Seite 108 Sorun Olası neden Çözüm Sorun Olası neden Çözüm Yoğunluğu azaltın Manşetin cilde Manşet cilde doğru ve bağlantı sıkıca oturmasını şekilde oturmamıştır. kablosunu sağlayın. konektörün içinde Manşeti bu Düzensiz Bağlantı kablosu 90° döndürün. kullanım stimülasyon. arızalıdır. Ciltte Kesintiler devam Manşet kirlenmiştir. kılavuzunda kızarıklıklar ediyorsa, bağlantı...
-
Seite 109: Teknik Veriler
6. maddesi uyarınca güvenlikle ilgili kontrollerin ger- Dalga biçimi Simetrik, iki fazlı dikdörtgen çekleştirilmesi gerekli değildir. impulslar Gerilim beslemesi 4,5 V 11. Garanti/servis (3 x 1,5 V AAA, Tip LR03) Beurer GmbH, Söflinger Straße 218, D-89077 Ulm (aşağıda “Beurer” olarak anılacaktır) bu ürün için aşağıdaki koşullar... - Seite 110 Aşağıdaki durumlar kesinlikle bu garanti kapsamının dışındadır: Beurer, bu ürünün kusursuz bir şekilde çalıştığını ve eksiksiz - Ürünün normal kullanımından veya tüketiminden kaynak- olduğunu garanti eder. lanan aşınmalar ve yıpranmalar; - Bu ürün ile birlikte teslim edilen ve usulüne uygun kulla- Yeni ve kullanılmamış...
-
Seite 111: Знакомство С Прибором
РУССКИЙ Внимательно прочтите инструкцию по применению, сохраните ее для последующего использования, храните в доступном для других пользователей месте и следуйте ее указаниям. Оглавление 1. Знакомство с прибором ........111 7. Очистка и хранение ...........124 2. Пояснения к символам ........112 8. Утилизация ............125 3. Важные указания ..........113 9. -
Seite 112: Пояснения К Символам
2. Пояснения к символам са, а также для мягкой терапии, массажа и очистки воздуха. В инструкции по применению используются следую- С наилучшими пожеланиями, щие символы. компания Beurer Предупреждает об опасности травми- Лечение боли при помощи электростимулято- Предупреждение рования или нанесе- ра EM 26 ния вреда здоровью. -
Seite 113: Важные Указания
Прибор может подавать Сертификационный знак для изделий, эффективные выходные величины экспортируемых в Российскую более 10 мА с интервалом каждые Федерацию и страны СНГ 5 секунд Утилизация упаковки в соответствии с предписаниями по охране Изготовитель окружающей среды Хранить в сухом месте 3. Важные указания Указания по технике безопасности Серийный номер Предупреждение Символ CE подтверждает •... -
Seite 114: Меры Предосторожности
• Прибор предназначен для работы в условиях, пере- пасность лицо осуществляет за ними надлежащий численных в настоящей инструкции по применению, надзор или они получили от этого лица инструкции в том числе в домашних условиях. по использованию прибора. • Перед использованием убедитесь, что прибор и его • Не давайте упаковочный материал детям (опасность принадлежности... - Seite 115 • Воздействие должно быть комфортным. Если при- • Несоблюдение данного указания может отрицатель- бор работает некорректно или у Вас появились но сказаться на рабочих характеристиках прибора. недомогание или боли, сразу же прекратите его ис- • Ни в коем случае не погружайте прибор в воду или пользование. другие...
- Seite 116 • При известных или острых нарушениях сердечного • Не используйте данный прибор одновременно с дру- ритма (аритмия) или других нарушениях ритма и про- гими приборами, посылающими электрические им- водимости сердца. пульсы Вашему телу. • При болезнях, протекающих с приступами (напри- • Прибор предназначен для личного использования. мер, эпилепсии).
- Seite 117 Перед применением проконсультируйтесь Перед первым использованием с лечащим врачом в следующих случаях. Внимание • При наличии острых заболеваний, в особенности на- рушений свертываемости крови, склонности к тром- • Перед использованием прибора следует удалить все боэмболическим заболеваниям или при подозрении упаковочные материалы. на эти заболевания, а также при наличии злокаче- •...
- Seite 118 • Ни в коем случае не открывайте прибор и не ремон- • Используйте батарейки только одного типа или рав- тируйте его самостоятельно, поскольку безупречная ноценных типов. работа в этом случае не гарантируется. Несоблюде- • Заменяйте все батарейки сразу. ние этого требования ведет к потере гарантии. • Не используйте перезаряжаемые аккумуляторы! •...
-
Seite 119: Описание Прибора
4. Описание прибора Поз. Наименование Элемент управления Уровень заряда батареек, появляется при использовании батареек Интенсивность, уровни 0–20 Значок паузы, мигает при активации ТАЙМЕР: оставшееся время текущей про- граммы в минутах Включение блокировки кнопок Текущая программа 5. Подготовка к работе Установка батареек Поз. Наименование... - Seite 120 Подключение соединитель- 2. Чтобы наложить манжету, зафиксируйте нижний конец манжеты с помощью застежки-липучки, ного кабеля и наложение вставьте руку в отверстие манжеты. Затяните ман- манжеты для плеча жету свободной рукой вокруг больного плеча. По- 1. Подключите соединительный сле подсоединения ремня застежку-липучку можно кабель к металлическим зажи- застегнуть...
-
Seite 121: Выбор Программы
плея [6]. При первом включении прибора автоматиче- Замена батареек ски активируется программа А. Когда появится символ ин- дикации смены батареек [7], Выбор программы замените батарейки. В приборе имеется 4 программы, в каждой по 20 уров- ней интенсивности импульса. В таблице ниже приво- • Откройте отделение для бата- дится... - Seite 122 Про- Про- Режим Часто- Дли- Режим Про- Описание и рекомендации грам- дол- TENS та тель- грам- ма жи- ность ма тель- импуль- Рекомендации *: повторяющиеся острые боли ность сов в плече, хронические боли в плече. 25 мин Им- 2 Гц 220 мкс Прерыви- Сочетает в себе преимущества программ B, пуль- (110 Гц...
- Seite 123 Указание Про- Описание и рекомендации Если во время стимуляции произошла смена грам- программы (например, с А на В), то выходная ма интенсивность новой программы повышается по- Рекомендации *: острые боли в плече, острые степенно до установленной интенсивности. При болевые приступы и профилактика. необходимости процесс можно остановить нажа- •...
-
Seite 124: Очистка И Хранение
Предупреждение нежелательных изменений Распознавание контакта импульса Если контакт электродов с телом отсутствует, интен- сивность автоматически становится нулевой. Это не- Чтобы избежать случайного повышения интенсивности обходимо во избежание нежелательного раздражаю- во время использования, включите блокировку кно- щего воздействия. Без контакта с телом невозможно пок. -
Seite 125: Утилизация
8. Утилизация Очистка манжеты для плеч В интересах охраны окружающей среды по за- Внимание вершении срока службы прибора запрещается утилизировать его вместе с бытовыми отхода- 1. Перед началом очистки отсоедините кабель от ман- ми. жеты. Утилизация производится через соответствующие 2. Осторожно очистите манжету в теплой мыльной воде. пункты... -
Seite 126: Решение Проблем
9. Решение проблем Проблема Возможные Меры причины по устранению Проблема Возможные Меры Установлена причины по устранению слишком высокая Уменьшите интен- Батарейки разря- Замените бата- интенсивность ра- сивность. Прибор жены. рейки. боты прибора. не включа- Батарейки встав- Снова установите ется. Водяные контакт- Выключите при- лены... -
Seite 127: Технические Данные
Проблема Возможные Меры Проблема Возможные Меры причины по устранению причины по устранению Снимите водяные Прекратите ис- контактные элект- Манжета отходит пользование и на- Водяные контакт- Стимуляция роды и устано- от кожи. ложите манжету ные электроды Стимуляция неэффек- вите их заново. заново. неправильно нало- прекра- тивна. Обеспечьте до- Прекратите... - Seite 128 Серийный номер находится на приборе или в отсеке Вес для батареек. — Прибор — Прибл. 90 г, включая батарейки Мы оставляем за собой право на технические измене- — Прибор, манжета — Прибл. 165 г, включая ния в связи с модернизацией и усовершенствованием и кабель батарейки изделия. Если способ и условия применения прибо- Размер...
-
Seite 129: Гарантия/Сервисное Обслуживание
11. Гарантия/сервисное обслуживание Более подробная информация по гарантии/сервису находится в гарантийном/сервисном талоне, который входит в комплект поставки. -
Seite 130: Zawartość Opakowania
Drodzy Klienci! ciela handlowego lub napisać na podany adres serwisu. Cieszymy się, że zdecydowali się Państwo na zakup na- szego produktu. Firma Beurer oferuje dokładnie przetesto- • 1 × mankiet do ramion wane, wysokiej jakości produkty przeznaczone do pomia- • 1 × pas do zakładania ru wagi, ciśnienia krwi, temperatury ciała i ... -
Seite 131: Objaśnienie Symboli
2. Objaśnienie symboli przyrządy do łagodnej terapii, masażu, ogrzewania oraz poprawy jakości powietrza. W instrukcji obsługi użyto następujących symboli. Z poważaniem Ostrzeżenie przed Zespół Beurer niebezpieczeństwem utraty Ostrzeżenie zdrowia lub odniesienia Leczenie bólu za pomocą urządzenia do stymu- obrażeń ciała. lacji EM 26 Ostrzeżenie przed... -
Seite 132: Ważne Wskazówki
Urządzenie może emitować skuteczne Oznakowanie certyfikacyjne produktów wartości wyjściowe ponad 10 mA eksportowanych do Federacji Rosyjskiej w interwałach co 5 sekund. oraz WNP. Opakowanie zutylizować w sposób Producent. przyjazny dla środowiska. Chronić przed wilgocią. 3. Ważne wskazówki Zasady bezpieczeństwa Numer seryjny. Ostrzeżenie Oznakowanie CE potwierdza zgodność z zasadniczymi wymogami dyrektywy •... -
Seite 133: Środki Ostrożności
• Urządzenie jest przeznaczone do użytkowania w każ- • Opakowanie należy przechowywać w miejscu niedo- dym otoczeniu wymienionym w niniejszej instrukcji ob- stępnym dla dzieci (niebezpieczeństwo uduszenia!). sługi, łącznie z otoczeniem domowym. • Należy stosować tylko akcesoria zalecane przez produ- • Przed użyciem należy się upewnić, że urządzenie ani ak- centa. - Seite 134 • Mankiet można zdjąć jedynie wówczas, gdy urządzenie • Nigdy nie umieszczać pasa do zakładania wokół szyi. jest wyłączone! Istnieje ryzyko uduszenia. • Nie korzystać z tego urządzenia w pobliżu (~1 m) instala- Wskazówki dotyczące elektrod cji wytwarzających fale krótkie lub mikrofale (np. telefony komórkowe), ponieważ...
- Seite 135 • ostre lub przewlekłe choroby skóry (rany lub zapalenia), • u osób z implantami metalowymi; np. w przypadku bolesnych lub bezbolesnych zapaleń, • u osób używających pomp insulinowych; zaczerwienień; • w środowisku o wysokiej wilgotności, np. w łazienkach, • wysypka (np. alergie), oparzenia, stłuczenia, obrzęki podczas kąpieli w wannie lub pod prysznicem. i rany otwarte lub w trakcie leczenia;...
-
Seite 136: Przed Uruchomieniem
• dolegliwości występujące podczas terapii stymulacyjnej; • Chronić urządzenie przed kurzem, zabrudzeniem i wil- • trwałe podrażnienia skóry z powodu zastosowania elek- gocią. trod. • Nie używać urządzenia, jeśli upadło lub było narażone na działanie dużej wilgoci bądź też uległo innym uszko- dzeniom. -
Seite 137: Opis Urządzenia
• Nie wolno ładować ani zwierać baterii. Poz. Nazwa • W przypadku niekorzystania z urządzenia przez dłuższy czas należy wyjąć baterie z przegrody. Przycisk włączania/wyłączania/pauzy • Używać tylko tego samego lub równoważnego typu ba- Ustawianie intensywności terii. ▲ zwiększanie • Zawsze należy wymieniać jednocześnie wszystkie bate- ▼... -
Seite 138: Uruchomienie
5. Uruchomienie Przed założeniem mankietu do ramion najpierw zwilżyć wodą elektrody kontaktowe oraz ramię. Wkładanie baterii Wskazówka Otworzyć komorę baterii [4] poprzez przyciśnięcie pokrywy w miejscu Mankietu do ramion można używać zarówno do lewego, oznaczonym strzałką w dół oraz jak i prawego ramienia. Ważne: Pas do zakładania przy przesunięcie. - Seite 139 5. Zamocować mankiet w odpo- • Aby użytkowanie urządzenia było możliwe, należy umie- wiedniej pozycji za pomocą ścić w komorze 3 baterie 1,5 V typu AAA (LR 03 micro). zapięć na rzepy. Upewnić się, Należy zwrócić uwagę na prawidłowe ułożenie wzglę- że mankiet nie jest zbyt napięty, dem biegunów.
-
Seite 140: Obsługa
6. Obsługa Progr. Czas Tryb Czę- Czas Tryb trwa- TENS stotli- trwania Ogólne wskazówki dotyczące użytkowania wość impulsu Urządzenie można włączyć dopiero po prawidłowym 30 min założeniu mankietu. Patrz rozdział 5. 0–10 Aku- 4 Hz 220 µs Ciągły punk- Urządzenie TENS do ramion jest przeznaczone do indywi- tura dualnego leczenia bólu ramion. - Seite 141 Progr. Opis i propozycje terapii Progr. Opis i propozycje terapii Propozycje terapii*: powtarzające się ostre bóle Propozycje terapii*: ostre bóle ramion, ostre napa- ramion, przewlekłe bóle ramion. dy bólowe i zapobieganie im Łączy zalety programów B, C & D. • Może najlepiej zacząć od tego programu. •...
- Seite 142 Zapobieganie niepożądanym zmianom impulsów intensywność wyjściowa w nowym programie zwiększa się stopniowo do uprzednio ustawionej intensywności. Aby uniknąć ewentualnego zwiększenia intensywno- W razie potrzeby można zatrzymać wzrost intensywności, ści podczas terapii, należy włączyć blokadę przycisków. naciskając przycisk regulacji intensywności ▼ [2] lub wy- W tym celu należy przez ok.
-
Seite 143: Funkcja Zapisywania
Rozpoznanie kontaktu Czyszczenie mankietu do ramion Jeśli elektrody nie mają kontaktu z ciałem, intensywność Uwaga zostanie automatycznie ustawiona na poziom zerowy. W ten sposób unika się niepożądanego podrażnienia. Bez 1. Przed rozpoczęciem czyszczenia należy odłączyć prze- kontaktu z ciałem nie można zwiększyć intensywności. wód przyłączeniowy od mankietu. -
Seite 144: Utylizacja
8. Utylizacja 9. Rozwiązywanie problemów W związku z wymogami w zakresie ochrony środo- Problem Możliwa przyczyna Rozwiązanie wiska nie należy wyrzucać urządzenia po zakoń- Baterie są zużyte. Wymienić baterie. czeniu eksploatacji wraz z odpadami domowymi. Urządzenie się nie włą- Należy je oddać do utylizacji w odpowiednim punkcie Baterie nie są... -
Seite 145: Dane Techniczne
Problem Możliwa przyczyna Rozwiązanie Problem Możliwa przyczyna Rozwiązanie Zmniejszyć inten- Mankiet jest poluzo- Zatrzymać urzą- sywność pracy wany i nie przylega dzenie i ponownie i obrócić przewód do skóry. założyć mankiet. Stymulacja przyłączeniowy zatrzymuje Zatrzymać urzą- Nieregularna Przewód przyłącze- Przewód przyłącze- w gnieździe o 90°. się... - Seite 146 61000-4-2, 61000-4-3, 61000-4-8) i wymaga zachowania Parametr Napięcie wyjściowe: szczególnych środków ostrożności odnośnie do kompa- (przy obciążeniu maks. 50 Vpp / 5,5 V rms tybilności elektromagnetycznej. Należy pamiętać, że prze- 500 omów) Prąd wyjściowy: nośne urządzenia komunikacyjne pracujące na wysokich maks. 100 mApp / 11 mArms częstotliwościach mogą zakłócać działanie urządzenia. Częstotliwość...
-
Seite 147: Gwarancja/Serwis
Roszczenie z tytułu gwarancji będzie rozpatrywane tylko Firma Beurer GmbH, Söflinger Straße 218, D-89077 Ulm wtedy, gdy kupujący może przedłożyć (zwana dalej „Beurer”) udziela gwarancji na ten produkt na na- - kopię faktury/paragon zakupu oraz stępujących warunkach i w poniżej opisanym zakresie. - Seite 148 Beurer GmbH • Söflinger Straße 218 • 89077 Ulm, Germany • www.beurer.com www.beurer-gesundheitsratgeber.com • www.beurer-healthguide.com...