Herunterladen Inhalt Inhalt Diese Seite drucken
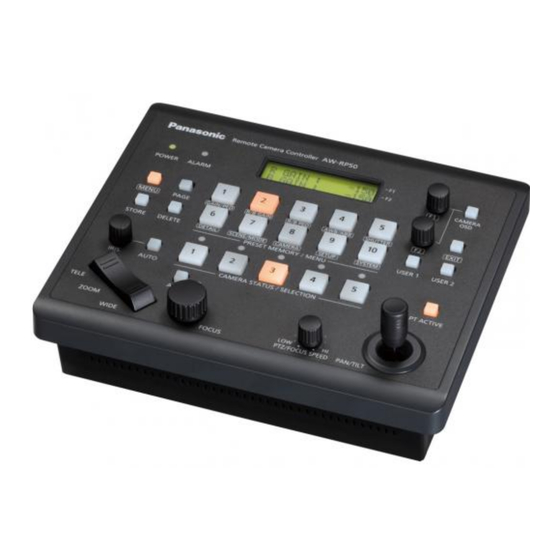
Panasonic AW-RP50E Bedienungsanleitung
Vorschau ausblenden Andere Handbücher für AW-RP50E:
Inhaltsverzeichnis

Werbung

Verfügbare Sprachen
  • DE

Verfügbare Sprachen

  • DEUTSCH, seite 48
Operating Instructions
<Operations and Settings>
Remote Camera Controller
AW-RP50E
Model No.
3TR006603BAA

Werbung

Inhaltsverzeichnis
loading

Inhaltszusammenfassung für Panasonic AW-RP50E

  • Seite 1 Operating Instructions <Operations and Settings> Remote Camera Controller AW-RP50E Model No. 3TR006603BAA...
  • Seite 2: Inhaltsverzeichnis

    ENGLISH VERSION Contents Setting the functions ..........17 Before use ..............2 Setting the remote camera operations ........18 Overview ..................2 Set ting the speed at which to move to the position set by the Trademarks and registered trademarks ........2 preset memory ..............20 About copyright and licence ............2 Set ting the operations to be performed when a preset operation Concerning the ratings display ...........2...
  • Seite 3: Before Use

     Disclaimer of warranty  This unit is a controller which is designed to control remote IN NO EVENT SHALL Panasonic System Networks Co., Ltd. BE LIABLE TO ANY PARTY OR ANY PERSON, EXCEPT cameras (cameras integrated with pan-tilt heads) and...
  • Seite 4: How To Turn The Power Of The Remote Cameras On And Off

    How to turn the power of the remote cameras on and off  How to turn the power of the  Turning on the power of a multiple number of cameras remote cameras on Follow one of the procedures below to turn on the power of Set the MENU button to ON.
  • Seite 5 How to turn the power of the remote cameras on and off  How to turn the power of the  Turning off the power of a multiple number of cameras remote cameras off Follow one of the procedures below to turn off the power of Set the MENU button to ON.
  • Seite 6: Setting And Operating The Preset Memories

    Setting and operating the preset memories This unit is provided with a function for registering the 4, 5 positions to be shot by the remote cameras and the settings of the remote cameras in the remote cameras themselves. Up to 100 sets of data (presets) can be registered in these memories.
  • Seite 7: Executing The Preset Data

    Setting and operating the preset memories  Executing the preset data   Deleting the preset memory  data Press one of the CAMERA STATUS/SELECTION Note buttons 1 to 5 to select the remote camera to This function does not work with the AW-PH400. be operated.
  • Seite 8: Selecting The Settings For A Selected Remote Camera

    Selecting the settings for a selected remote camera  Setting the pedestal  The following settings and adjustments can be performed for a selected remote camera directly from this unit. Perform the black level (pedestal) adjustment in order to make it easier to see the very dark parts of the images. •...
  • Seite 9: Setting The White Balance

    Selecting the settings for a selected remote camera  Setting the white balance  The modes which can be selected differ depending on the The ratio between RGB (three primary colours) is adjusted remote camera connected. so that white will be reproduced accurately. If the white balance is off, not only will white be reproduced poorly but the colour tone of the entire picture will also Remote...
  • Seite 10 Selecting the settings for a selected remote camera When automatic adjustment is performed, the following Automatically adjusting the white balance details are displayed on the LCD panel. Set the automatic adjustment if the colouring appears AWB ACTIVE: unnatural under certain light sources or other conditions. This appears while AWB is being executed.
  • Seite 11 Selecting the settings for a selected remote camera Manually adjusting the white balance Auto tracking white adjustment (ATW) ( Setting the R and B gain values) This function provides compensation automatically so that As with the automatic adjustment, fill the the white balance is adjusted even when the light source or colour temperature changes during shooting, so that images screen with a white subject.
  • Seite 12: Setting The Black Balance

    Selecting the settings for a selected remote camera  Setting the black balance  The black balance must be adjusted when using a remote Manually adjusting the black balance camera for the first time or when the remote camera has not ( Setting the R and B pedestal) been used for a prolonged period of time.
  • Seite 13: Setting The Shutter Speed

    Selecting the settings for a selected remote camera  Setting the shutter speed   Setting the detail  The shutter mode and shutter speed of the remote camera The image detail (image sharpness) can be adjusted. can be selected. Set the MENU button to ON.
  • Seite 14: Setting The Shooting Mode

    Selecting the settings for a selected remote camera  Setting the shooting mode   Specifying the colour bars  Select the shooting mode that matches the shooting The images to be output from the remote camera can be switched between the “camera images” and “colour bars”. conditions.
  • Seite 15: Operating The Menu Items Of The Selected Remote Camera

    Operating the menu items of the selected remote camera The menu operations of the remote cameras can be operated from the unit for the remote camera which is now selected. The CAMERA OSD button, F1 dial and F2 dial are used to perform the operations. When the CAMERA OSD button is held down, its indicator lights, and the on-screen menu of the selected remote camera is displayed as the output image of the remote camera.
  • Seite 16: Setting The User Buttons

    Setting the USER buttons  Registering functions in the  Menu items can be assigned to the two USER buttons (USER1, USER2). USER buttons The target function can be activated simply by pressing the USER button (USER1 or USER2). Set the MENU button to ON. Press the MENU button to light its indicator.
  • Seite 17: Tally Settings

    Tally settings Set enable (On) or disable (Off) for tally ON which provides the tally instructions to the remote camera in response to tally requests received via the GPI and network. Set the MENU button to ON. Press the MENU button to light its indicator. Set PRESET MEMORY/MENU 8 button (CAMERA) to ON.
  • Seite 18: Setting The Functions

    Setting the functions This section describes how the unit’s functions are set. Turn the F1 dial to select the target menu item. The following functions can be set. 1. P A N D IR ▼   Setting of the remote camera operations N O R M A L ...
  • Seite 19: Setting The Remote Camera Operations

    Setting the functions  Setting the remote camera  operations Set these operations by selecting the [SETUP] menu Setting the zooming direction followed by the [OPERATE] menu. From the [SETUP] menu, select [OPERATE] and display [ 4] O P E R A TE [ZOOM DIR].Then select either “NORMAL”...
  • Seite 20 Setting the functions  Switching from focus control to iris   Settings when the remote camera  control or vice versa moves horizontally or vertically during tele shooting It is possible to switch the control, which is implemented by dial and button operations, from focus control to iris control During tele shooting, the remote camera’s pan/tilt operation (or vice versa).
  • Seite 21: Setting The Speed At Which To Move To The Position Set By The Preset Memory

    Setting the functions  Setting the speed at which to   Returning the remote cameras  move to the position set by the to their home position preset memory The remote cameras connected can be returned to their home position. The speed at which to move to the position where the remote camera has been set to be in the preset memory From the [SETUP] menu, select [PRESET] and display [HOME...
  • Seite 22: Setting The Lower Limit

    Setting the functions  Setting the movement range  of the remote camera (limiter function) This unit has a limiter function which is a function that limits Display that appears with other remote cameras the movement range of the remote cameras. There are four limiter positions: the upper, lower, left and right limits of the movement range.
  • Seite 23 Setting the functions  Setting the right limit   Setting the left limit  From the [SETUP] menu, select [PTZ ADJ] and display [LIMIT From the [SETUP] menu, select [PTZ ADJ] and display [LIMIT LEFT]. Then set the left limit. RIGHT].
  • Seite 24 Setting the functions  Controlling the peripheral  devices connected to the remote cameras When any of the peripheral devices listed below are Controlling a wiper connected to the remote cameras, they can be controlled. • ND filter • Wiper This item is used to control a wiper when using a remote •...
  • Seite 25: Cameras

    Setting the functions  Adjusting the minimum lens   Exercising external control  zoom start speed over the preset memory data This adjustment ensures that the lens zoom will start moving Preset numbers can be assigned to execute presets for the smoothly in line with the inclination of the ZOOM button selected remote cameras when signals have been input to the TALLY/GPI input/output connector.
  • Seite 26: Locking The Button Operations

    Setting the functions  Locking the button operations   Adjusting the LCD panel  backlight This disables the operation of the CAMERA OSD button and PRESET MEMORY/MENU buttons (1 to 7). The backlight of the LCD panel can be adjusted. The button operations are locked using the MENU CTL item Make this adjustment using the LCD BL item on the of the [SETUP] menu.
  • Seite 27: Setting Linkup With The Switcher

    Setting linkup with the switcher This setting is used to link the unit with an optional switcher Turn the F2 dial, select the IP address, and then (AW-HS50). press the F2 dial to enter the selection. To link the unit with the switcher, the following settings must Set the IP address which has been set in the switcher.
  • Seite 28: Link Setting

    Setting linkup with the switcher  Link setting  Set the MENU button to ON. Press the MENU button to light its indicator. Set PRESET MEMORY/MENU 9 button (SETUP) to ON. When the button is pressed and its indicator is lit, the [SETUP] menu is displayed on the LCD panel.
  • Seite 29 Setting the functions when the unit is linked with the switcher Set the various functions to be used when the unit is linked Turn the F2 dial, select the remote camera, and with the switcher. then press the F2 dial to enter the selection. ...
  • Seite 30: Setting The Functions When The Unit Is Linked With The Switcher

    Setting the functions when the unit is linked with the switcher  Switcher settings  Turn the F2 dial, select the settings, and then press the F2 dial to change the setting. A setting for controlling the switcher linked with the unit is 2.
  • Seite 31 Setting the functions when the unit is linked with the switcher Bus setting Camera information setting From the [SETUP] menu, select [SW LINK] and display From the [SETUP] menu, select [SW LINK] and display [BUS]. Then set the material (AUX, PVW, PinP or KEY) to be [CAMSEL].
  • Seite 32 Setting the functions when the unit is linked with the switcher The following tally-related settings can be established using OA tally setting the menu. From the [SETUP] menu, select [SW LINK] and display   Enabling/disabling the tally information instructions [TALLY_IP].
  • Seite 33: Setting For The Information To Be Displayed On The Osd

    Setting the functions when the unit is linked with the switcher  Setting for the information to  Turn the F2 dial to select On or Off, and then press the F2 dial to enter the selection. be displayed on the OSD 2 .F OR MAT This setting displays the remote camera information on the Of f...
  • Seite 34 Setting the functions when the unit is linked with the switcher  Setting each information item to be  Iris value displayed From the [SETUP] menu, select [SW DISP] and display [IRIS]. Then set On or Off. Video format 7. I R I S From the [SETUP] menu, select [SW DISP] and display O f f [FORMAT].
  • Seite 35: Checking The Equipment Alarm Information

    Checking the equipment alarm information It is possible to check the alarm statuses of the unit and [Select POWER] the remote cameras assigned to the CAMERA STATUS/ The unit’s power supply alarm can be checked. SELECTION buttons. No ALARM: When the power supply is trouble-free. Set the MENU button to ON.
  • Seite 36: Returning The Unit To Its Factory Status

    Returning the unit to its factory status The unit’s settings can be returned to the factory statuses. Two methods can be used: One method returns all the Turn the F2 dial to select the initializing mode. settings to the factory statuses, and the other returns only the [SETUP] menu settings to the factory statuses.
  • Seite 37: Control Interface For External Devices

    Control interface for external devices  TALLY/GPI  TALLY IN 1 to TALLY IN 5 are contact input ports which are used to light the unit’s (D-sub 15-pin, female, inch thread) tally indicators (above the CAMERA STATUS/SELECTION buttons). The tally lamps light with contact input. GPI IN 1 to GPI IN 4 are contact input ports which are used to control the unit from an external source.
  • Seite 38: Setup Software

    Setup Software The “Setup Software” is an application which enables the same functions as the unit’s automatic IP settings to be executed from the host computer. This is used to set the network environment for operating the remote camera using the host computer. It can save the setting data files in the host computer, and it can load the saved files and reflect them in the network environment.
  • Seite 39 Setup Software  Displaying the “Setting” tab   List box  SW Input The IP address of the AW-RP50 connected to the The input connectors of the switcher are displayed in this network is displayed here. column. The information of the network environment established The input connector can be changed manually.
  • Seite 40 Setup Software  Auto IP setting   Changing the camera numbers  The camera numbers set for the remote cameras can be When IP addresses are to be changed changed. Click [RENEW]. Change the camera number for the remote New IP addresses are set in the target remote cameras camera concerned in the [CAMERA Select] and switcher.
  • Seite 41: Saving And Loading Data

    Setup Software  Saving and loading data  On the “File Operate” tab screen, the files with the network environment settings are saved and loaded.  Loading the setting files  Load the files with the network environment setting data. (Filename: .r50) Click [File], and specify the setting file to be loaded.
  • Seite 42: Referencing The Network Environment

    Setup Software  Referencing the network environment  On the “IP Address” tab, it is possible to select the IP addresses of the other AW-RP50 remote camera controllers which have been connected in the network. The information of the network environment created by the selected AW-RP50 units can be referenced using the “Setting” tab. Up to five AW-RP50 units can be selected.
  • Seite 43: Table Of Menu Items

    Table of menu items Button Menu item Control device Initial value Setting 1 GAIN/PED GAIN AW-HE50 Auto, 0dB, 3dB, 6dB, 9dB, 12dB, 15dB, 18dB AW-HE100 AUTO, 0 to 12dB, 15dB, 18dB (0dB to 12dB: 1 step) AW-HE870 AUTO, –6dB to 18dB (1 step) AW-E860, AW-E750, AUTO, 0 to 30dB, AW-E650, AW-E350...
  • Seite 44 Table of menu items Button Menu item Control device Initial value Setting 5 SHUTTER SHUTTER AW-HE50 Off, Step, Synchro AW-HE100 Off, Step, Synchro AW-HE870 Off, Step, Synchro, ELC AW-E860, AW-E750, Off, Step, Synchro, ELC AW-E650, AW-E350 AK-HC1500, AK-HC1800 Off, Step, Synchro SPEED AW-HE50 1/120, 1/250, 1/500, 1/1000,...
  • Seite 45 Table of menu items Button Menu item Control device Initial value Setting 9 SETUP [1]USER 1.USER1 SWLINK, BUSCONT, FASIST, CAMSEL, TALLY_IP, CAMINF, AWB, ABB, POWER OFF 2.USER2 SWLINK, BUSCONT, FASIST, CAMSEL, TALLY_IP, CAMINF, AWB, ABB, POWER OFF [2]SW LINK 1.SWLINK Off, On 2.BUSCONT Off, On...
  • Seite 46 Table of menu items Button Menu item Control device Initial value Setting 9 SETUP [6]FUNCTION 1.ND FILTER AW-HE50 “–––” AW-HE100 “–––” AW-HE870 Off, On AW-E860, AW-E750, Off, On AW-E650, AW-E350 AK-HC1500, AK-HC1800 Clear, 1/4, 1/16, 1/64 2.OPTION AW-HE50 Off, On AW-HE100 Off, On AW-PH360, AW-PH400,...
  • Seite 47 Table of menu items Button Menu item Control device Initial value Setting 10 SYSTEM [1]CAMERA CTL 1.CAM1 NoAsign Serial, Network, NoAsign 100.CAM100 [2]CAM ASSIGN 1.CAM1 192.168.000.010 100.CAM100 [3]SW CTL 1.SW NoAsign Network, NoAsign [4]SW ASSIGN 1.INPUT1 CAM1 2.INPUT2 CAM2 3.INPUT3 CAM3 NoAsign, CAM1 to 100 4.INPUT4...
  • Seite 48 DEUTSCHE AUSGABE (GERMAN VERSION) Inhalt Vor dem Gebrauch ............ 2 Zur ückstellen der Netzwerkkameras auf ihre Ausgangsstellung ...............20 Übersicht ..................2 Ein stellen der Schwenk-, Neige-, Zoom- und Warenzeichen und eingetragene Warenzeichen ......2 Fokussiergeschwindigkeit ...........20 Copyright und Lizenz ..............2 Ein stellen des Bewegungsbereichs der Netzwerkkamera Bezüglich des Typenschilds ............2 (Begrenzerfunktion) ............21 Haftungsausschluss ..............2...
  • Seite 49: Vor Dem Gebrauch

     Übersicht   Haftungsausschluss  Panasonic System Networks Co., Ltd. IST UNTER Bei diesem Gerät handelt es sich um ein Steuergerät, ANDEREM IN KEINEM DER UNTEN AUFGEFÜHRTEN das für die Fernsteuerung von Kameras (mit Schwenk- FÄLLE GEGENÜBER JURISTISCHEN PERSONEN ODER Neigeköpfen integrierte Kameras) und Schwenk-...
  • Seite 50: Ein- Und Ausschalten Der Netzwerkkameras

    Ein- und Ausschalten der Netzwerkkameras  Einschalten der  Einschalten mehrerer Kameras Netzwerkkameras Wenden Sie eines der folgenden Verfahren an, um die Stellen Sie die Taste MENU auf ON. Netzwerkkameras einzuschalten. Drücken Sie die Taste MENU, so dass ihre Lampe ...
  • Seite 51 Ein- und Ausschalten der Netzwerkkameras  Ausschalten der  Ausschalten mehrerer Kameras Netzwerkkameras Wenden Sie eines der folgenden Verfahren an, um die Stellen Sie die Taste MENU auf ON. Netzwerkkameras auszuschalten. Drücken Sie die Taste MENU, so dass ihre Lampe ...
  • Seite 52: Einstellen Und Verwalten Der Vorwahlspeicher

    Einstellen und Verwalten der Vorwahlspeicher Dieses Gerät ist mit einer Funktion ausgestattet, mit der die 4, 5 von den Netzwerkkameras aufzunehmenden Positionen und die Einstellungen der Netzwerkkameras in den Netzwerkkameras selbst registriert werden können. Bis zu 100 Datensätze (Voreinstellungen) können in diesen MENU PAGE GAIN/PED...
  • Seite 53: Ausführen Der Vorwahldaten

    Einstellen und Verwalten der Vorwahlspeicher  Ausführen der Vorwahldaten   Löschen der  Vorwahlspeicherdaten Drücken Sie eine der Tasten CAMERA STATUS/ Hinweis SELECTION 1 bis 5, um die zu steuernde Diese Funktion ist mit AW-PH400 unwirksam. Netzwerkkamera auszuwählen. Wählen Sie die Netzwerkkamera aus, die auf die im Vorwahlspeicher registrierte Kameraeinstellung Drücken Sie eine der Tasten CAMERA STATUS/ ausgerichtet werden soll.
  • Seite 54: Auswählen Der Einstellungen Für Eine Bestimmte Netzwerkkamera

    Auswählen der Einstellungen für eine bestimmte Netzwerkkamera  Einstellen des Schwarzwerts  Die folgenden Einstellungen und Justierungen können für eine bestimmte Netzwerkkamera direkt von diesem Gerät Führen Sie die Justierung des Schwarzpegels aus durchgeführt werden. (Schwarzwerts) durch, um die sehr dunklen Teile des Bilds besser sichtbar zu machen.
  • Seite 55: Einstellen Des Weißabgleichs

    Auswählen der Einstellungen für eine bestimmte Netzwerkkamera  Einstellen des Weißabgleichs  Die verfügbaren Modi hängen von der angeschlossenen Das Verhältnis zwischen RGB (drei Primärfarben) wird so Netzwerkkamera ab. justiert, dass Weiß exakt reproduziert wird. Ist der Weißabgleich verstellt, wird nicht nur Weiß schlecht reproduziert, sondern auch der Farbton des gesamten Bilds Netzwerkkamera Modus...
  • Seite 56: Auswählen Der Einstellungen Für Eine Bestimmte Netzwerkkamera

    Auswählen der Einstellungen für eine bestimmte Netzwerkkamera Wenn die automatische Justierung durchgeführt wird, Automatische Justierung des Weißabgleichs werden die folgenden Details auf dem LCD-Feld Aktivieren Sie die automatische Justierung, falls die angezeigt. Farbgebung unter bestimmten Lichtquellen oder anderen AWB ACTIVE: Bedingungen unnatürlich wirkt.
  • Seite 57 Auswählen der Einstellungen für eine bestimmte Netzwerkkamera Manuelle Justierung des Weißabgleichs Weißabgleich-Nachregelautomatik (ATW) (Einstellen der R- und B-Verstärkungswerte) Diese Funktion sorgt für eine automatische Kompensation, Füllen Sie den Bildschirm mit einem weißen so dass der Weißabgleich justiert wird, selbst wenn sich Lichtquelle oder Farbtemperatur während der Aufnahme Objekt aus, wie bei der automatischen ändern, so dass Bilder produziert werden, die optimal (d.
  • Seite 58: Einstellen Des Schwarzabgleichs

    Auswählen der Einstellungen für eine bestimmte Netzwerkkamera  Einstellen des  Schwarzabgleichs Manuelle Justierung des Schwarzabgleichs (Einstellen des R- und B-Schwarzwerts) Der Schwarzabgleich muss justiert werden, wenn eine Netzwerkkamera zum ersten Mal oder nach längerer Schließen Sie ein Oszilloskop oder einen Nichtbenutzung eingesetzt wird.
  • Seite 59: Einstellen Der Verschlusszeit

    Auswählen der Einstellungen für eine bestimmte Netzwerkkamera  Einstellen der Verschlusszeit   Einstellen des Details  Verschlussmodus und Verschlusszeit der Netzwerkkamera Das Bilddetail (Bildschärfe) kann justiert werden. können ausgewählt werden. Stellen Sie die Taste MENU auf ON. Stellen Sie die Taste MENU auf ON. Drücken Sie die Taste MENU, so dass ihre Lampe aufleuchtet.
  • Seite 60: Einstellen Des Aufnahmemodus

    Auswählen der Einstellungen für eine bestimmte Netzwerkkamera  Einstellen des Aufnahmemodus   Angeben der Farbbalken  Wählen Sie den für die Aufnahmebedingungen passenden Die von der Netzwerkkamera auszugebenden Bilder können zwischen “Kamerabilder” und “Farbbalken” werden. Aufnahmemodus. Wählen Sie den Modus gemäß den Aufnahmebedingungen und Ihrer Bevorzugung aus.
  • Seite 61: Ansteuern Der Menüposten Der Ausgewählten Netzwerkkamera

    Ansteuern der Menüposten der ausgewählten Netzwerkkamera Die Menüoperationen der Netzwerkkameras können vom Gerät aus für die gegenwärtig ausgewählte Netzwerkkamera angesteuert werden. Die Taste CAMERA OSD sowie die Knöpfe F1 und F2 werden zur Durchführung der Operationen verwendet. Wenn die Taste CAMERA OSD gedrückt gehalten wird, leuchtet ihre Lampe auf, und das Bildschirmmenü der gewählten Netzwerkkamera wird als Ausgabebild der Netzwerkkamera angezeigt.
  • Seite 62: Einstellen Der Benutzertasten

    Einstellen der Benutzertasten  Registrieren von Funktionen in  Menüposten können den zwei Benutzertasten (USER1, USER2) zugewiesen werden. den Benutzertasten Die Zielfunktion kann durch einfaches Drücken der Benutzertaste (USER1 oder USER2) aktiviert werden. Stellen Sie die Taste MENU auf ON. Drücken Sie die Taste MENU, so dass ihre Lampe aufleuchtet.
  • Seite 63: Tally-Einstellungen

    Tally-Einstellungen Legen Sie Aktivieren (On) oder Deaktivieren (Off) für Tally ON fest, so dass die Tally-Anweisungen als Antwort auf die über GPI und Netzwerk empfangenen Tally- Anforderungen zur Netzwerkkamera gesendet werden. Stellen Sie die Taste MENU auf ON. Drücken Sie die Taste MENU, so dass ihre Lampe aufleuchtet.
  • Seite 64: Einstellen Der Funktionen

    Einstellen der Funktionen Dieser Abschnitt beschreibt die Einstellung der Funktionen Drehen Sie den Knopf F1, um den gewünschten des Gerätes. Menüposten auszuwählen. Die folgenden Funktionen können eingestellt werden. 1. P A N D IR ▼   Einstellen der Netzwerkkamera-Operationen N O R M A L ...
  • Seite 65: Einstellen Der Netzwerkkamera

    Einstellen der Funktionen  Einstellen der Netzwerkkamera-  Operationen Legen Sie diese Operationen fest, indem Sie zunächst das Einstellen der Zoomrichtung Menü [SETUP] und dann das Menü [OPERATE] wählen. Wählen Sie [OPERATE] im Menü [SETUP], und zeigen Sie [ 4] O P E R A TE [ZOOM DIR] an.
  • Seite 66: Einstellungen Für Horizontale

    Einstellen der Funktionen  Umschalten von Fokussteuerung auf   Einstellungen für horizontale  Blendensteuerung und umgekehrt oder vertikale Bewegungen der Netzwerkkamera während der Tele- Es ist möglich, die von den Knopf- und Tastenbetätigungen Aufnahme ausgeübte Steuerung von Fokussteuerung auf Blendensteuerung umzuschalten (und umgekehrt).
  • Seite 67: Einstellen Der Geschwindigkeit Der Bewegung Zu Der Mit Dem Vorwahlspeicher Eingestellten Position

    Einstellen der Funktionen  Einstellen der Geschwindigkeit   Zurückstellen der  der Bewegung zu der mit dem Netzwerkkameras auf ihre Vorwahlspeicher eingestellten Ausgangsstellung Position Die angeschlossenen Netzwerkkameras können auf ihre Ausgangsstellung zurückgestellt werden. Die Geschwindigkeit, mit der die Netzwerkkamera sich zu der im Vorwahlspeicher gespeicherten Position bewegt, Wählen Sie [PRESET] im Menü...
  • Seite 68: Bewegungsbereichs Der Netzwerkkamera (Begrenzerfunktion)

    Einstellen der Funktionen  Einstellen des  Bewegungsbereichs der Netzwerkkamera (Begrenzerfunktion) Bei anderen Netzwerkkameras erscheinende Anzeige Dieses Gerät besitzt eine Begrenzerfunktion, die den Bewegungsbereich der Netzwerkkameras begrenzt. Der Einstellungszustand wird nach Abschluss der Vier Begrenzerpositionen sind vorhanden: die obere, untere, Einstellung im Posten LIMIT UP angezeigt.
  • Seite 69 Einstellen der Funktionen  Einstellen der rechten Grenze   Einstellen der linken Grenze  Wählen Sie [PTZ ADJ] im Menü [SETUP], und zeigen Sie Wählen Sie [PTZ ADJ] im Menü [SETUP], und zeigen Sie [LIMIT LEFT] an. Stellen Sie dann die linke Grenze ein. [LIMIT RIGHT] an.
  • Seite 70: Peripheriegeräte

    Einstellen der Funktionen  Steuern der an die  Netzwerkkameras angeschlossenen Peripheriegeräte Steuern eines Wischers Wenn eines der unten aufgelisteten Peripheriegeräte an die Dieser Posten dient der Steuerung eines Wischers, wenn Netzwerkkameras angeschlossen ist, kann es gesteuert eine Netzwerkkamera mit Wischerfunktion (AW-PH650 + werden.
  • Seite 71: Einstellen Der Minimalen Objektivzoom-Startgeschwindigkeit

    Einstellen der Funktionen  Einstellen der minimalen   Ausüben externer Kontrolle  Objektivzoom- über die Vorwahlspeicherdaten Startgeschwindigkeit Vorwahlnummern können zugewiesen werden, um Voreinstellungen für die ausgewählten Netzwerkkameras Diese Einstellung sorgt dafür, dass die Bewegung des anzuwenden, wenn Signale in den Ein-/Ausgangsanschluss Objektivzooms ruckfrei in Übereinstimmung mit der Neigung TALLY/GPI eingegeben worden sind.
  • Seite 72: Sperren Der Tastenfunktionen

    Einstellen der Funktionen  Sperren der Tastenfunktionen   Einstellen der LCD-Feld-  Hintergrundbeleuchtung Damit können Sie die Funktion der Taste CAMERA OSD und der Tasten PRESET MEMORY/MENU (1 bis 7) Die Hintergrundbeleuchtung des LCD-Felds kann eingestellt deaktivieren. werden. Die Tastenfunktionen werden mithilfe des Postens Nehmen Sie diese Einstellung mit dem Posten LCD BL im MENU CTL des Menüs [SETUP] gesperrt.
  • Seite 73 Einstellen der Kopplung mit dem Bildmischpult Diese Einstellung wird verwendet, um das Gerät mit einem Drehen Sie den Knopf F2, um die IP-Adresse zu optionalen Bildmischpult (AW-HS50) zu koppeln. wählen, und drücken Sie dann den Knopf F2, Um das Gerät mit dem Bildmischpult zu koppeln, müssen um die Wahl einzugeben.
  • Seite 74: Einstellen Der Kopplung Mit Dem Bildmischpult

    Einstellen der Kopplung mit dem Bildmischpult  Kopplungseinstellung  Stellen Sie die Taste MENU auf ON. Drücken Sie die Taste MENU, so dass ihre Lampe aufleuchtet. Stellen Sie die Taste PRESET MEMORY/ MENU 9 (SETUP) auf ON. Wenn die Taste gedrückt wird und ihre Lampe aufleuchtet, erscheint das Menü...
  • Seite 75 Einstellen der Funktionen bei Kopplung des Gerätes mit dem Bildmischpult Stellen Sie die verschiedenen zu benutzenden Funktionen Drehen Sie den Knopf F2, um die ein, wenn das Gerät mit dem Bildmischpult gekoppelt ist. Netzwerkkamera zu wählen, und drücken Sie dann den Knopf F2, um die Wahl einzugeben. ...
  • Seite 76: Einstellen Der Funktionen Bei Kopplung Des Gerätes Mit Dem Bildmischpult

    Einstellen der Funktionen bei Kopplung des Gerätes mit dem Bildmischpult  Bildmischpult-Einstellungen  Drehen Sie den Knopf F2, um die Einstellungen auszuwählen, und drücken Sie Eine Einstellung zur Steuerung des mit dem Gerät dann den Knopf F2, um die Einstellung zu gekoppelten Bildmischpults ist verfügbar.
  • Seite 77 Einstellen der Funktionen bei Kopplung des Gerätes mit dem Bildmischpult Bus-Einstellung Einstellung der Kamera-Information Wählen Sie [SW LINK] im Menü [SETUP], und zeigen Sie Wählen Sie [SW LINK] im Menü [SETUP], und zeigen Sie [BUS] an. Bestimmen Sie dann das zum Bildmischpult zu [CAMSEL] an.
  • Seite 78 Einstellen der Funktionen bei Kopplung des Gerätes mit dem Bildmischpult Die folgenden Tally-bezogenen Einstellungen können OA-Tally-Einstellung mithilfe des Menüs hergestellt werden. Wählen Sie [SW LINK] im Menü [SETUP], und zeigen Sie   Aktivieren/Deaktivieren der über das Netzwerk [TALLY_IP] an. Wählen Sie dann On oder Off. gesendeten Tally-Information 6 .
  • Seite 79: Einstellung Für Die Auf Dem Osd Anzuzeigende Information

    Einstellen der Funktionen bei Kopplung des Gerätes mit dem Bildmischpult  Einstellung für die auf dem  Drehen Sie den Knopf F2, um On oder Off zu wählen, und drücken Sie dann den Knopf F2, OSD anzuzeigende Information um die Wahl einzugeben. Diese Einstellung zeigt die Information der Netzwerkkamera 2 .F OR MAT auf dem OSD des Monitors an, der an das mit dem Gerät zu...
  • Seite 80: Einstellen Der Anzuzeigenden

    Einstellen der Funktionen bei Kopplung des Gerätes mit dem Bildmischpult  Einstellen der anzuzeigenden  Blendenwert Informationsposten Wählen Sie [SW DISP] im Menü [SETUP], und zeigen Sie [IRIS] an. Wählen Sie dann On oder Off. Videoformat 7. I R I S Wählen Sie [SW DISP] im Menü...
  • Seite 81: Überprüfen Der Geräte-Alarminformation

    Überprüfen der Geräte-Alarminformation Es ist möglich, die Alarmzustände des Gerätes und der [Wahl von POWER] den Tasten CAMERA STATUS/SELECTION zugewiesenen Der Stromversorgungsalarm des Gerätes kann überprüft Netzwerkkameras zu überprüfen. werden. No ALARM: Stellen Sie die Taste MENU auf ON. Wenn die Stromversorgung störungsfrei ist. Drücken Sie die Taste MENU, so dass ihre Lampe ALARM: aufleuchtet.
  • Seite 82: Rücksetzen Des Gerätes Auf Seine Werksvorgaben

    Rücksetzen des Gerätes auf seine Werksvorgaben Die Einstellungen des Gerätes können auf die Werksvorgaben zurückgesetzt werden. Drehen Sie den Knopf F2, um den Dazu können zwei Methoden verwendet werden: Bei Initialisierungsmodus auszuwählen. der einen Methode werden alle Einstellungen auf die Werksvorgaben zurückgesetzt, und bei der anderen 1.
  • Seite 83: Steuerschnittstelle Für Externe Geräte

    Steuerschnittstelle für externe Geräte  TALLY/GPI  Die Anschlüsse TALLY IN 1 bis TALLY IN 5 sind Kontakteingänge, die dazu dienen, (D-sub 15-polig, Buchse, Zollgewinde) die Tally-Lampen des Gerätes (oberhalb der Tasten CAMERA STATUS/SELECTION) zum Aufleuchten zu bringen. Die Tally-Lampen leuchten bei Kontakteingabe auf. Die Anschlüsse GPI IN 1 bis GPI IN 4 sind Kontakteingänge, die für die Steuerung des Gerätes über eine externe Quelle verwendet werden.
  • Seite 84: Setup-Software

    Setup-Software Die “Setup Software” ist eine Anwendung, die es ermöglicht, dieselben Funktionen wie die automatischen IP-Einstellungen des Gerätes vom Hostcomputer auszuführen. Die Software dient der Einstellung der Netzwerkumgebung zur Bedienung der Netzwerkkamera über den Hostcomputer. Sie ermöglicht es, die Einstellungsdateien im Hostcomputer zu speichern und die gespeicherten Dateien zu laden und in der Netzwerkumgebung zu reflektieren.
  • Seite 85 Setup-Software  Anzeigen der Registerkarte “Setting”   Listenfeld  SW Input Hier wird die IP-Adresse des mit dem Netzwerk In dieser Spalte werden die Eingangsanschlüsse des verbundenen AW-RP50 angezeigt. Bildmischpults angezeigt. Die Information der Netzwerkumgebung, die von dem Der Eingangsanschluss kann manuell geändert werden. hier gewählten AW-RP50 eingerichtet wurde, wird auf der Klicken Sie auf rechts, und wählen Sie “NoAsign”...
  • Seite 86: Automatische Ip-Einstellung

    Setup-Software  Automatische IP-Einstellung   Ändern der Kameranummern  Die für die Netzwerkkameras eingestellten Kameranummern Wenn IP-Adressen geändert werden sollen können geändert werden. Klicken Sie auf [RENEW]. Ändern Sie die Kameranummer für die Neue IP-Adressen werden in den betreffenden betreffende Netzwerkkamera im Feld Netzwerkkameras und im Bildmischpult eingestellt.
  • Seite 87: Speichern Und Laden Von Daten

    Setup-Software  Speichern und Laden von Daten  Die Dateien mit den Netzwerkumgebungseinstellungen werden im Fenster der Registerkarte “File Operate” gespeichert und geladen.  Laden der Einstellungsdateien  Laden Sie die Dateien mit den Netzwerkumgebungs-Einstellungsdaten. (Dateiname: .r50) Klicken Sie auf [File], und geben Sie die zu ladende Einstellungsdatei an. Der Name der ausgewählten Datei wird im Textfeld angezeigt.
  • Seite 88: Referenzieren Der Netzwerkumgebung

    Setup-Software  Referenzieren der Netzwerkumgebung  Auf der Registerkarte “IP Address” ist es möglich, die IP-Adressen der anderen Kamera-Fernsteuergeräte AW-RP50, die am Netzwerk angeschlossen sind, auszuwählen. Die Information der Netzwerkumgebung, die von den gewählten AW-RP50-Geräten eingerichtet wurde, kann auf der Registerkarte “Setting”...
  • Seite 89: Tabelle Der Menüposten

    Tabelle der Menüposten Taste Menüposten Steuervorrichtung Anfangswert Einstellung 1 GAIN/PED GAIN AW-HE50 Auto, 0dB, 3dB, 6dB, 9dB, 12dB, 15dB, 18dB AW-HE100 AUTO, 0 bis 12dB, 15dB, 18dB (0dB bis 12dB: 1 Schritt) AW-HE870 AUTO, –6dB bis 18dB (1 Schritt) AW-E860, AW-E750, AUTO, 0 bis 30dB, AW-E650, AW-E350 N/Eye L, N/Eye, N/Eye H...
  • Seite 90 Tabelle der Menüposten Taste Menüposten Steuervorrichtung Anfangswert Einstellung 5 SHUTTER SHUTTER AW-HE50 Off, Step, Synchro AW-HE100 Off, Step, Synchro AW-HE870 Off, Step, Synchro, ELC AW-E860, AW-E750, Off, Step, Synchro, ELC AW-E650, AW-E350 AK-HC1500, AK-HC1800 Off, Step, Synchro SPEED AW-HE50 1/120, 1/250, 1/500, 1/1000, 1/2000, 1/4000, 1/10000 AW-HE100 1/120, 1/250, 1/500, 1/1000,...
  • Seite 91 Tabelle der Menüposten Taste Menüposten Steuervorrichtung Anfangswert Einstellung 9 SETUP [1]USER 1.USER1 SWLINK, BUSCONT, FASIST, CAMSEL, TALLY_IP, CAMINF, AWB, ABB, POWER OFF 2.USER2 SWLINK, BUSCONT, FASIST, CAMSEL, TALLY_IP, CAMINF, AWB, ABB, POWER OFF [2]SW LINK 1.SWLINK Off, On 2.BUSCONT Off, On 3.BUS AUX, PVW, PinP, KEY 4.FASIST...
  • Seite 92 Tabelle der Menüposten Taste Menüposten Steuervorrichtung Anfangswert Einstellung 9 SETUP [6]FUNCTION 1.ND FILTER AW-HE50 “–––” AW-HE100 “–––” AW-HE870 Off, On AW-E860, AW-E750, Off, On AW-E650, AW-E350 AK-HC1500, AK-HC1800 Clear, 1/4, 1/16, 1/64 2.OPTION AW-HE50 Off, On AW-HE100 Off, On AW-PH360, AW-PH400, Off, On AW-PH405 AW-PH650...
  • Seite 93 Tabelle der Menüposten Taste Menüposten Steuervorrichtung Anfangswert Einstellung 10 SYSTEM [1]CAMERA CTL 1.CAM1 NoAsign Serial, Network, NoAsign 100.CAM100 [2]CAM ASSIGN 1.CAM1 192.168.000.010 100.CAM100 [3]SW CTL 1.SW NoAsign Network, NoAsign [4]SW ASSIGN 1.INPUT1 CAM1 2.INPUT2 CAM2 3.INPUT3 CAM3 NoAsign, CAM1 bis 100 4.INPUT4 CAM4 5.INPUT5...
  • Seite 94 VERSION FRANÇAISE (FRENCH VERSION) Table des matières Avant utilisation ............2 Retour des caméras distantes à leur position initiale ....20 Réglage de la vitesse de Pan, Tilt, zoom et mise au point ..20 Vue générale ................2 Rég lage de la plage de mouvement de la caméra distante Marques commerciales et marques commerciales déposées ..2 (fonction limiteur) ...............21 Au sujet du droit d’auteur et de la licence ........2...
  • Seite 95: Avant Utilisation

     Vue générale   Déni de la garantie  EN AUCUN CAS Panasonic System Networks Co., Ltd. Cet appareil est une commande conçue pour la caméras NE SERA TENU POUR RESPONSABLE POUR TOUTE distantes (caméras avec tête de panoramique horizontal/ PARTIE OU TOUTE PERSONNE, À...
  • Seite 96: Comment Mettre Les Caméras Distantes Sous Et Hors Tension

    Comment mettre les caméras distantes sous et hors tension  Comment mettre les caméras  Mise sous tension de plusieurs caméras distantes sous tension Suivre l’une des procédures ci-dessous pour mettre les Régler le bouton MENU à ON. caméras distantes sous tension. Appuyer sur le bouton MENU pour allumer son ...
  • Seite 97 Comment mettre les caméras distantes sous et hors tension  Comment mettre les caméras  Mise hors tension de plusieurs caméras distantes hors tension Suivre l’une des procédures ci-dessous pour mettre les Régler le bouton MENU à ON. caméras distantes hors tension. Appuyer sur le bouton MENU pour allumer son ...
  • Seite 98: Réglage Et Utilisation Des Mémoires Préréglées

    Réglage et utilisation des mémoires préréglées Cet appareil est pourvu d’une fonction permettant 4, 5 l’enregistrement des positions à filmer par les caméras distantes et des réglages des caméras distantes eux- mêmes. Jusqu’à 100 jeux de données (préréglages) peuvent être MENU PAGE GAIN/PED...
  • Seite 99: Exécution Des Données Préréglées

    Réglage et utilisation des mémoires préréglées  Exécution des données   Suppression des données de  préréglées mémoires préréglées Remarque Appuyer sur un des boutons 1 à 5 CAMERA Cette fonction ne fonctionne pas avec le AW-PH400. STATUS/SELECTION pour sélectionner la caméra distante à...
  • Seite 100: Sélection Des Réglages Pour Une Caméra Distante Sélectionnée

    Sélection des réglages pour une caméra distante sélectionnée  Réglage du niveau de noir  Les réglages et ajustements suivants peuvent être exécutés pour une caméra distante sélectionnée directement à cet Effectuer l’ajustement du niveau de noir pour rendre les appareil.
  • Seite 101: Réglage De La Balance Des Blancs

    Sélection des réglages pour une caméra distante sélectionnée  Réglage de la balance des  blancs Les modes sélectionnables varient selon les caméras distantes connectées. Le rapport entre les RGB (les trois couleurs primaires) est ajusté de sorte que le blanc soit reproduit correctement. Caméra Si la balance des blancs est désactivée, non seulement Mode...
  • Seite 102 Sélection des réglages pour une caméra distante sélectionnée A l’exécution de l’ajustement automatique, les détails Ajustement automatique de la balance des blancs suivants s’affichent au panneau LCD. Définir l’ajustement automatique si la coloration semble AWB ACTIVE: peu naturelle sous certaines sources lumineuses ou Apparaît pendant l’exécution de AWB.
  • Seite 103 Sélection des réglages pour une caméra distante sélectionnée Ajustement manuel de la balance des blancs Ajustement des blancs en suivi automatique (ATW) (Réglage des valeurs de gain R et B) Cette fonction assure automatiquement la compensation de Comme pour l’ajustement automatique, remplir sorte que la balance des blancs est ajustée, même quand la source lumineuse ou la température de la couleur change l’écran d’un sujet blanc.
  • Seite 104: Réglage De La Balance Des Noirs

    Sélection des réglages pour une caméra distante sélectionnée  Réglage de la balance des  noirs Ajustement manuel de la balance des noirs (Réglage du niveau de noir R et B) La balance des noirs doit être ajustée au premier emploi d’une caméra distante ou quand la caméra distante est Connecter un moniteur de forme d’onde ou restée inutilisée pendant une période prolongée.
  • Seite 105: Réglage De La Vitesse D'obturation

    Sélection des réglages pour une caméra distante sélectionnée  Réglage de la vitesse   Réglage du détail  d’obturation Le détail (netteté de l’image) est ajustable. Le mode d’obturation et la vitesse d’obturation de la caméra Régler le bouton MENU à ON. distante sont sélectionnables.
  • Seite 106: Sélection Du Mode De Prise De Vues

    Sélection des réglages pour une caméra distante sélectionnée  Sélection du mode de prise de   Spécifications des barres de  mire vues Les images à sortir de la caméra distante peuvent être Sélectionner le mode de prise de vues correspondant aux conditions de prise de vues.
  • Seite 107: Opération Des Items De Menu De La Caméra Distante Sélectionnée

    Opération des items de menu de la caméra distante sélectionnée Les opérations de menu des caméras distantes peuvent être exécutées à partir de l’appareil pour la caméra distante sélectionnée. Le bouton CAMERA OSD, et les cadrans F1 et F2 sont utilisés pour ces opérations. Quand le bouton CAMERA OSD est pressé, son indicateur s’allume, et le menu sur écran de la caméra distante sélectionnée s’affiche comme image de sortie de la caméra distante.
  • Seite 108: Réglage Des Boutons User

    Réglage des boutons USER  Enregistrement des fonctions  Des items de menu peuvent être assignés aux deux boutons USER (USER1, USER2). dans les boutons USER La fonction cible peut être activée simplement en appuyant sur le bouton USER (USER1 ou USER2). Régler le bouton MENU à...
  • Seite 109: Réglages De Signalisation (Tally)

    Réglages de signalisation (Tally) Régler Activé (On) ou Inactivé (Off) pour Tally ON qui fournit des instructions Tally à la caméra distante en réponse aux demandes Tally reçues via le GPI et le réseau. Régler le bouton MENU à ON. Appuyer sur le bouton MENU pour allumer son indicateur.
  • Seite 110: Réglage Des Fonctions

    Réglage des fonctions Cette section décrit comment régler les fonctions de Tourner le cadran F1 pour sélectionner l’item l’appareil. Les fonctions suivantes sont réglables. de menu cible.   Réglage des opérations des caméras distantes 1. P A N D IR ▼...
  • Seite 111: Réglage Des Opérations Des Caméras Distantes

    Réglage des fonctions  Réglage des opérations des  caméras distantes Régler ces opérations en sélectionnant le menu [SETUP], Réglage des directions de zooming puis le menu [OPERATE]. Au menu [SETUP], sélectionner [OPERATE] et afficher [ 4] O P E R A TE [ZOOM DIR].
  • Seite 112 Réglage des fonctions  Commutation du contrôle de la mise au   Réglages quand la caméra  point au contrôle de l’iris, et vice versa distante bouge horizontalement ou verticalement pendant la prise de vue Il est possible de commuter le contrôle, qui se fait par téléobjectif opérations de cadran et boutons, du contrôle de la mise au point au contrôle de l’iris (et vice versa).
  • Seite 113: Réglage De La Vitesse De Passage À La Position Réglée Par La Mémoire Préréglée

    Réglage des fonctions  Réglage de la vitesse de   Retour des caméras distantes à  passage à la position réglée leur position initiale par la mémoire préréglée Les caméras distantes connectées peuvent être remises à leur position initiale. La vitesse de passage à...
  • Seite 114 Réglage des fonctions  Réglage de la plage de  mouvement de la caméra distante (fonction limiteur) Cet appareil est pourvu d’une fonction limiteur qui limite la Affichage apparaissant avec une autre caméra distante plage de mouvement des caméras distantes. Il y a quatre positions de limitation: limites supérieure, inférieure, gauche et droite de l’étendue du mouvement.
  • Seite 115 Réglage des fonctions  Réglage de la limite droite   Réglage de la limite gauche  Au menu [SETUP], sélectionner [PTZ ADJ] et afficher Au menu [SETUP], sélectionner [PTZ ADJ] et afficher [LIMIT LEFT]. Puis régler la limite gauche. [LIMIT RIGHT].
  • Seite 116: Distantes

    Réglage des fonctions  Contrôle des périphériques  connectés aux caméras distantes Les dispositifs périphériques listés ci-dessous peuvent être Contrôle d’un balai contrôlés s’ils sont connectés aux caméras distantes. • Filtre ND • Balai Cet item set à contrôler un balai lors de l’utilisation d’une •...
  • Seite 117: Réglage De La Vitesse Minimale De Démarrage Du Zoom

    Réglage des fonctions  Réglage de la vitesse minimale   Exercice du contrôle extérieur  de démarrage du zoom sur les données de mémoire préréglée Ce réglage assure que le zoom commencera à bouger régulièrement en fonction du degré de pression du bouton Des numéros préréglés peuvent être assignés pour exécuter ZOOM quand le zoom est opéré...
  • Seite 118: Verrouillage Des Opérations Des Boutons

    Réglage des fonctions  Verrouillage des opérations des   Réglage du contre-jour du  panneau LCD boutons Le contre-jour du panneau LCD est ajustable. Ceci invalide l’opération du bouton CAMERA OSD et des boutons PRESET MEMORY/MENU (1 à 7). Effectuer ce réglage à...
  • Seite 119 Réglage de la liaison avec le commutateur Ce réglage sert à connecter l’appareil à un commutateur Tourner le cadran F2, sélectionner l’adresse IP, optionnel (AW-HS50). puis appuyer dessus pour entrer la sélection. Pour relier l’appareil avec le commutateur, les réglages Régler l’adresse IP qui a été...
  • Seite 120: Réglage De La Liaison Avec Le Commutateur

    Réglage de la liaison avec le commutateur  Réglage de la liaison  Régler le bouton MENU à ON. Appuyer sur le bouton MENU pour allumer son indicateur. Régler le bouton 9 PRESET MEMORY/MENU (SETUP) à ON. Quand le bouton est pressé et que son indicateur est allumé, le menu [SETUP] s’affiche au panneau LCD.
  • Seite 121 Réglage des fonctions quand l’appareil est relié au commutateur Régler les différentes fonctions à utiliser quand l’appareil est Tourner le cadran F2, sélectionner la caméra relié au commutateur. distante, puis appuyer sur le cadran F2 pour entrer la sélection.  Réglage de la sortie et de ...
  • Seite 122: Réglage Des Fonctions Quand L'appareil Est Relié Au Commutateur

    Réglage des fonctions quand l’appareil est relié au commutateur  Réglages du commutateur  Tourner le cadran F2, sélectionner les réglages, puis appuyer dessus pour changer le Un réglage pour le contrôle du commutateur connecté à réglage. l’appareil est disponible. Il s’établit au menu [SETUP].
  • Seite 123 Réglage des fonctions quand l’appareil est relié au commutateur Réglage de bus Réglage de l’information de caméra distante Au menu [SETUP], sélectionner [SW LINK] et afficher Au menu [SETUP], sélectionner [SW LINK] et afficher [BUS]. Puis régler les éléments (AUX, PVW, PinP ou KEY) à [CAMSEL].
  • Seite 124 Réglage des fonctions quand l’appareil est relié au commutateur Les réglages suivants liés à Tally peuvent être établis au Réglage OA Tally menu. Au menu [SETUP], sélectionner [SW LINK] et afficher   Activation/désactivation des instructions [TALLY_IP]. Puis régler à l’activation (On) ou désactivation d’information Tally envoyées via le réseau (Off).
  • Seite 125: Réglage Pour L'information À Afficher À L'osd

    Réglage des fonctions quand l’appareil est relié au commutateur  Réglage pour l’information à  Tourner le cadran F2 pour sélectionner On ou Off, puis appuyer dessus pour entrer la afficher à l’OSD sélection. Ce réglage affiche l’information de caméra distante à l’OSD 2 .F OR MAT du moniteur connecté...
  • Seite 126 Réglage des fonctions quand l’appareil est relié au commutateur  Réglage de chaque item d’information à  Valeur d’iris afficher Au menu [SETUP], sélectionner [SW DISP] et afficher [IRIS]. Puis régler à On ou Off. Format vidéo 7. I R I S Au menu [SETUP], sélectionner [SW DISP] et afficher O f f [FORMAT].
  • Seite 127: Contrôle De L'information D'alarme De L'équipement

    Contrôle de l’information d’alarme de l’équipement Il est possible de contrôler les états d’alarme de l’appareil [Sélectionner POWER] et des caméras distantes assignées aux boutons CAMERA L’état d’alarme de l’alimentation peut être contrôlé. STATUS/SELECTION. No ALARM: Quand l’alimentation est sans problème. Régler le bouton MENU à...
  • Seite 128: Remise De L'appareil Aux Réglages Usine

    Remise de l’appareil aux réglages usine L’appareil peut être remis à ses réglages usine. Deux méthodes sont utilisables: l’une retourne tous les Tourner le cadran F2 pour sélectionner le réglages aux réglages usine, et l’autre retourne seulement mode d’initialisation. les réglages du menu [SETUP] aux réglages usine. 1.
  • Seite 129: Interface De Contrôle Pour Les Dispositifs Extérieurs

    Interface de contrôle pour les dispositifs extérieurs  TALLY/GPI  TALLY IN 1 à TALLY IN 5 sont des ports d’entrée de contact utilisés pour (D-sub 15 broches, femelle, filet en pouces) allumer les témoins Tally de l’appareil (au-dessus des boutons CAMERA STATUS/SELECTION).
  • Seite 130: Logiciel D'implantation

    Logiciel d’implantation Le “Setup Software” est une application qui permet d’exécuter les mêmes fonctions que les réglages IP automatiques de l’appareil à partir de l’ordinateur hôte. Il est utilisé pour régler l’environnement du réseau pour l’opération des caméras distantes à partir de l’ordinateur hôte. Il peut sauvegarder les fichiers de données de réglages dans l’ordinateur hôte, et charger les fichiers sauvegardés et les répercuter dans l’environnement du réseau.
  • Seite 131 Logiciel d’implantation  Affichage de l’onglet “Setting”   Case de liste  SW Input L’adresse IP du AW-RP50 connecté au réseau est Les connecteurs d’entrée du commutateur sont affichés affichée ici. dans cette colonne. L’information de l’environnement de réseau établie par le Le connecteur d’entrée peut être changé...
  • Seite 132 Logiciel d’implantation  Réglage IP automatique   Changement des numéros de caméra  distante Quand les adresses IP doivent être changées Les numéros de caméra distante réglés pour les caméras distantes peuvent être changés. Cliquer sur [RENEW]. Les nouvelles adresses IP sont réglées dans les Changer le numéro de caméra distante pour caméras distantes cibles et le commutateur.
  • Seite 133: Sauvegarde Et Chargement De Données

    Logiciel d’implantation  Sauvegarde et chargement de données  A l’écran de l’onglet “File Operate”, les fichiers à réglages d’environnement de réseau sont sauvegardés et chargés.  Chargement des fichiers des réglages  Charger les fichiers avec données de réglage d’environnement de réseau. (Nom de fichier: .r50) Cliquer sur [File], et spécifier le fichier de réglage à...
  • Seite 134: Référence À L'environnement De Réseau

    Logiciel d’implantation  Référence à l’environnement de réseau  A l’onglet “IP Address”, il est possible de sélectionner les adresses IP des autres télécommandes de caméras distantes AW-RP50 qui ont été connectées dans le réseau. Référence aux informations sur l’environnement du réseau créées par les unités AW-RP50 sélectionnés peut être faite à l’onglet “Setting”.
  • Seite 135: Tableau Des Items De Menus

    Tableau des items de menus Bouton Items de menu Dispositif contrôlé Valeur initiale Réglage 1 GAIN/PED GAIN AW-HE50 Auto, 0dB, 3dB, 6dB, 9dB, 12dB, 15dB, 18dB AW-HE100 AUTO, 0 à 12dB, 15dB, 18dB (0dB à 12dB: 1 pas) AW-HE870 AUTO, –6dB à...
  • Seite 136 Tableau des items de menus Bouton Items de menu Dispositif contrôlé Valeur initiale Réglage 5 SHUTTER SHUTTER AW-HE50 Off, Step, Synchro AW-HE100 Off, Step, Synchro AW-HE870 Off, Step, Synchro, ELC AW-E860, AW-E750, Off, Step, Synchro, ELC AW-E650, AW-E350 AK-HC1500, AK-HC1800 Off, Step, Synchro SPEED AW-HE50...
  • Seite 137 Tableau des items de menus Bouton Items de menu Dispositif contrôlé Valeur initiale Réglage 9 SETUP [1]USER 1.USER1 SWLINK, BUSCONT, FASIST, CAMSEL, TALLY_IP, CAMINF, AWB, ABB, POWER OFF 2.USER2 SWLINK, BUSCONT, FASIST, CAMSEL, TALLY_IP, CAMINF, AWB, ABB, POWER OFF [2]SW LINK 1.SWLINK Off, On 2.BUSCONT...
  • Seite 138 Tableau des items de menus Bouton Items de menu Dispositif contrôlé Valeur initiale Réglage 9 SETUP [6]FUNCTION 1.ND FILTER AW-HE50 “–––” AW-HE100 “–––” AW-HE870 Off, On AW-E860, AW-E750, Off, On AW-E650, AW-E350 AK-HC1500, AK-HC1800 Clear, 1/4, 1/16, 1/64 2.OPTION AW-HE50 Off, On AW-HE100 Off, On...
  • Seite 139 Tableau des items de menus Bouton Items de menu Dispositif contrôlé Valeur initiale Réglage 10 SYSTEM [1]CAMERA CTL 1.CAM1 NoAsign Serial, Network, NoAsign à 100.CAM100 [2]CAM ASSIGN 1.CAM1 192.168.000.010 à 100.CAM100 [3]SW CTL 1.SW NoAsign Network, NoAsign [4]SW ASSIGN 1.INPUT1 CAM1 2.INPUT2 CAM2...
  • Seite 140 VERSIONE ITALIANA (ITALIAN VERSION) Sommario Ripristino della posizione iniziale delle videocamere remote ..20 Prima dell’uso ............2 Reg olazione della velocità di panoramica orizzontale, Descrizione generale ..............2 panoramica verticale, zoom e messa a fuoco ....20 Marchi di fabbrica e marchi di fabbrica registrati ......2 Imp ostazione del limite di corsa delle videocamere remote Riguardo a copyright e licenza ...........2 (funzione limitatore) ............21...
  • Seite 141: Prima Dell'uso

      Esonero dalla garanzia  La presente unità è un controller progettato per controllare IN NESSUN CASO Panasonic System Networks Co., videocamere remote (videocamere integrate con teste Ltd. DOVRÀ ESSERE RITENUTA RESPONSABILE NEI CONFRONTI DI ALCUNA PARTE O PERSONA,...
  • Seite 142: Accensione E Spegnimento Delle Videocamere Remote

    Accensione e spegnimento delle videocamere remote  Accensione delle videocamere  Accensione di più videocamere remote Per accendere le videocamere remote, eseguire una delle Impostare il tasto MENU su ON. procedure illustrate di seguito. Premere il tasto MENU per accenderne l'indicatore. ...
  • Seite 143 Accensione e spegnimento delle videocamere remote  Spegnimento delle  Spegnimento di più videocamere videocamere remote Per spegnere le videocamere remote, eseguire una delle Impostare il tasto MENU su ON. procedure illustrate di seguito. Premere il tasto MENU per accenderne l'indicatore. ...
  • Seite 144: Impostazione E Uso Delle Memorie Personalizzate

    Impostazione e uso delle memorie personalizzate L’unità è dotata di una funzione che consente di registrare 4, 5 le posizioni di ripresa e le impostazioni delle videocamere remote sulle videocamere stesse. Nelle memorie (personalizzate) è possibile registrare fino a 100 serie di dati. MENU PAGE GAIN/PED...
  • Seite 145: Richiamo Dei Dati Personalizzati

    Impostazione e uso delle memorie personalizzate  Richiamo dei dati personalizzati   Eliminazione dei dati delle  memorie personalizzate Premere uno dei tasti CAMERA STATUS/ Nota SELECTION da 1 a 5 per selezionare la Questa funzione non è utilizzabile con il modello videocamera remota da comandare.
  • Seite 146: Selezione Delle Impostazioni Per Una Videocamera Remota Selezionata

    Selezione delle impostazioni per una videocamera remota selezionata  Impostazione del livello di  È possibile eseguire le seguenti impostazioni e regolazioni per una videocamera remota selezionata direttamente spegnimento dall’unità. Eseguire la regolazione del livello del nero (livello di spegnimento) per agevolare la visione delle parti molto •...
  • Seite 147: Impostazione Del Bilanciamento Del Bianco

    Selezione delle impostazioni per una videocamera remota selezionata  Impostazione del bilanciamento  del bianco La modalità selezionabile varia a seconda della videocamera remota collegata. Viene regolato il rapporto tra i colori RGB (i tre colori primari) in modo da riprodurre accuratamente il bianco. Videocamera Se il bilanciamento del bianco non è...
  • Seite 148 Selezione delle impostazioni per una videocamera remota selezionata Durante la regolazione automatica, sul pannello LCD Regolazione automatica del bilanciamento del vengono visualizzati i seguenti dettagli. bianco AWB ACTIVE: Impostare la regolazione automatica se i colori appaiono Viene visualizzato durante l’esecuzione di AWB. innaturali con determinate sorgenti luminose o in altre AWB OK: Viene visualizzato per 3 secondi se AWB è...
  • Seite 149 Selezione delle impostazioni per una videocamera remota selezionata Regolazione manuale del bilanciamento del bianco Regolazione automatica costante del bianco (ATW) (Impostazione dei valori di guadagno R e B) Questa funzione esegue una compensazione automatica, Come per la regolazione automatica, riempire in modo da regolare il bilanciamento del bianco anche se la sorgente luminosa o la temperatura del colore variano lo schermo con un soggetto bianco.
  • Seite 150: Impostazione Del Bilanciamento Del Nero

    Selezione delle impostazioni per una videocamera remota selezionata  Impostazione del bilanciamento  del nero Regolazione manuale del bilanciamento del nero (Impostazione dei valori del livello di spegnimento R e B) Il bilanciamento del nero deve essere regolato quando si utilizza una videocamera remota per la prima volta o se la Collegare un monitor forma d’onda o un videocamera remota è...
  • Seite 151: Impostazione Della Velocità Otturatore

    Selezione delle impostazioni per una videocamera remota selezionata  Impostazione della velocità   Impostazione del dettaglio  otturatore È possibile regolare il dettaglio dell’immagine (nitidezza dell’immagine). È possibile selezionare la modalità otturatore e la velocità otturatore della videocamera remota. Impostare il tasto MENU su ON.
  • Seite 152: Impostazione Della Modalità Di Ripresa

    Selezione delle impostazioni per una videocamera remota selezionata  Impostazione della modalità di   Visualizzazione delle barre dei  colori ripresa È possibile alternare le immagini trasmesse dalla Selezionare la modalità di ripresa più adatta alle condizioni di ripresa. videocamera remota tra “immagini della videocamera”...
  • Seite 153: Uso Delle Voci Di Menu Della Videocamera Remota Selezionata

    Uso delle voci di menu della videocamera remota selezionata È possibile eseguire dall’unità le operazioni a menu delle videocamere remote selezionando una videocamera remota. Per eseguire le operazioni si utilizzano il tasto CAMERA OSD, la ghiera F1 e la ghiera F2. Tenendo premuto il tasto CAMERA OSD, l’indicatore si accende e il menu a schermo della videocamera remota selezionata viene visualizzato come immagine di uscita.
  • Seite 154: Configurazione Dei Tasti User

    Configurazione dei tasti USER  Registrazione delle funzioni nei  È possibile assegnare le voci di menu a due tasti USER (USER1, USER2). tasti USER La funzione desiderata può essere attivata semplicemente pre mendo il tasto USER (USER1 o USER2). Impostare il tasto MENU su ON.
  • Seite 155: Impostazioni Tally

    Impostazioni tally Impostare l’attivazione (On) o la disattivazione (Off) dei segnali tally ON, che forniscono le istruzioni sul tally alla videocamera remota in risposta alle richieste tally ricevute tramite GPI e la rete. Impostare il tasto MENU su ON. Premere il tasto MENU per accenderne l'indicatore. Impostare il tasto PRESET MEMORY/MENU 8 (CAMERA) su ON.
  • Seite 156: Configurazione Delle Funzioni

    Configurazione delle funzioni Questo capitolo descrive come configurare le funzioni Ruotare la ghiera F1 per selezionare la voce di dell’unità. menu desiderata. È possibile impostare le seguenti funzioni. 1. P A N D IR ▼   Impostazione delle operazioni della videocamera remota N O R M A L ...
  • Seite 157: Impostazione Delle Operazioni Della Videocamera Remota

    Configurazione delle funzioni  Impostazione delle operazioni  della videocamera remota Impostare le operazioni selezionando il menu [SETUP] Impostazione della direzione di zoom seguito dal menu [OPERATE]. Dal menu [SETUP], selezionare [OPERATE] e visualizzare [ 4] O P E R A TE [ZOOM DIR].
  • Seite 158 Configurazione delle funzioni  Passaggio dal controllo della messa   Impostazioni dello spostamento  a fuoco al controllo del diaframma o orizzontale o verticale della viceversa videocamera remota durante le riprese in modalità Tele È possibile alternare il controllo esercitato dalle operazioni della ghiera e dei tasti passando dal controllo della messa a Durante le riprese in modalità...
  • Seite 159: Impostazione Della Velocità Di Spostamento Nelle Posizioni Delle Memorie Personalizzate

    Configurazione delle funzioni  Impostazione della velocità di   Ripristino della posizione  spostamento nelle posizioni iniziale delle videocamere delle memorie personalizzate remote È possibile riportare alla posizione iniziale le videocamere È possibile impostare la velocità con cui la videocamera remota si sposta nelle posizioni registrate nelle memorie remote collegate.
  • Seite 160: (Funzione Limitatore)

    Configurazione delle funzioni  Impostazione del limite di corsa  delle videocamere remote (funzione limitatore) L’unità dispone di una funzione che limita la corsa delle Display visualizzato su altre videocamere remote videocamere remote. Sono disponibili quattro posizioni del limitatore: limite di corsa superiore, inferiore, sinistro e destro.
  • Seite 161: Videocamere Remote

    Configurazione delle funzioni  Impostazione del limite destro   Impostazione del limite sinistro  Dal menu [SETUP], selezionare [PTZ ADJ] e visualizzare Dal menu [SETUP], selezionare [PTZ ADJ] e visualizzare [LIMIT LEFT]. Quindi, impostare il limite sinistro. [LIMIT RIGHT]. Quindi, impostare il limite destro. L’impostazione visualizzata varia tra l’AW-HE50 e altre L’impostazione visualizzata varia tra l’AW-HE50 e altre videocamere remote.
  • Seite 162: Controllo Delle Periferiche

    Configurazione delle funzioni  Controllo delle periferiche  collegate alle videocamere remote Se collegate alle videocamere remote, è possibile Controllo di un tergicristallo controllare le seguenti periferiche. Se come videocamera remota correntemente selezionata • Filtro ND • Tergicristallo si utilizza una videocamera remota (AW-PH650 + •...
  • Seite 163: Regolazione Della Velocità Di Avvio Minima Dello Zoom Obiettivo

    Configurazione delle funzioni  Regolazione della velocità   Uso del controllo esterno  di avvio minima dello zoom sui dati delle memorie obiettivo personalizzate I numeri personalizzati possono essere assegnati per Questa regolazione permette di iniziare a spostare uniformemente lo zoom obiettivo a seconda dell’inclinazione eseguire le personalizzazioni per le videocamere remote selezionate dopo l’ingresso dei segnali nel connettore di del tasto ZOOM.
  • Seite 164: Blocco Delle Operazioni Dei Tasti

    Configurazione delle funzioni  Blocco delle operazioni dei   Regolazione della  retroilluminazione del pannello tasti Disattiva le operazioni del tasto CAMERA OSD e dei tasti PRESET MEMORY/MENU (da 1 a 7). È possibile regolare la retroilluminazione del pannello LCD. Le operazioni dei tasti vengono bloccate utilizzando la voce Eseguire la regolazione utilizzando la voce LCD BL nel MENU CTL del menu [SETUP].
  • Seite 165 Impostazione del collegamento con lo switcher Questa impostazione viene utilizzata per collegare l'unità Ruotare la ghiera F2, selezionare l’indirizzo con uno switcher opzionale (AW-HS50). IP e premere la ghiera F2 per confermare la Per collegare l’unità allo switcher, occorre configurare le selezione.
  • Seite 166: Impostazione Del Collegamento Con Lo Switcher

    Impostazione del collegamento con lo switcher  Impostazione del collegamento  Impostare il tasto MENU su ON. Premere il tasto MENU per accenderne l'indicatore. Impostare il tasto PRESET MEMORY/MENU 9 (SETUP) su ON. Premendo il tasto e accendendone l’indicatore, il menu [SETUP] viene visualizzato sul pannello LCD.
  • Seite 167 Impostazione delle funzioni quando l’unità è collegata allo switcher Impostare le varie funzioni da utilizzare quando l’unità è Ruotare la ghiera F2, selezionare la collegata allo switcher. videocamera remota e premere la ghiera F2 per confermare la selezione.  Impostazione dell’uscita ...
  • Seite 168: Impostazione Delle Funzioni Quando L'unità È Collegata Allo Switcher

    Impostazione delle funzioni quando l’unità è collegata allo switcher  Impostazioni dello switcher  Ruotare la ghiera F2, selezionare le impostazioni e premere la ghiera F2 per È disponibile un’impostazione che consente di controllare lo modificare l’impostazione. switcher collegato all’unità. L’impostazione viene configurata tramite il menu [SETUP].
  • Seite 169 Impostazione delle funzioni quando l’unità è collegata allo switcher Impostazione del bus Impostazione delle informazioni sulla videocamera Dal menu [SETUP], selezionare [SW LINK] e visualizzare Dal menu [SETUP], selezionare [SW LINK] e visualizzare [BUS]. Quindi, impostare il materiale (AUX, PVW, PinP o [CAMSEL].
  • Seite 170 Impostazione delle funzioni quando l’unità è collegata allo switcher Tramite il menu è possibile configurare le seguenti Impostazione tally OA impostazioni tally. Dal menu [SETUP], selezionare [SW LINK] e visualizzare   Attivazione/disattivazione delle istruzioni sulle [TALLY_IP]. Quindi, selezionare On o Off. informazioni tally inviate attraverso la rete 6 .
  • Seite 171: Impostazione Delle Informazioni Da Visualizzare Sul Pannello Osd

    Impostazione delle funzioni quando l’unità è collegata allo switcher  Impostazione delle informazioni  Ruotare la ghiera F2 per selezionare On o Off, quindi premere la ghiera F2 per confermare la da visualizzare sul pannello selezione. 2 .F OR MAT Questa impostazione visualizza le informazioni relative alle Of f videocamere remote sul pannello OSD del monitor collegato...
  • Seite 172 Impostazione delle funzioni quando l’unità è collegata allo switcher  Impostazione di ogni voce delle  Valore diaframma informazioni da visualizzare Dal menu [SETUP], selezionare [SW DISP] e visualizzare [IRIS]. Quindi, selezionare On o Off. Formato video 7. I R I S Dal menu [SETUP], selezionare [SW DISP] e visualizzare O f f [FORMAT].
  • Seite 173: Controllo Delle Informazioni Sugli Allarmi Delle Apparecchiature

    Controllo delle informazioni sugli allarmi delle apparecchiature È possibile controllare lo stato di allarme dell’unità e delle [Selezionando POWER] videocamere remote assegnate ai tasti CAMERA STATUS/ È possibile controllare l’allarme di alimentazione dell’unità. SELECTION. No ALARM: L’alimentazione non presenta problemi. Impostare il tasto MENU su ON.
  • Seite 174: Ripristino Delle Impostazioni Di Fabbrica Dell'unità

    Ripristino delle impostazioni di fabbrica dell’unità Le impostazioni dell’unità possono essere riportate ai valori di fabbrica. Ruotare la ghiera F2 per selezionare la È possibile utilizzare due metodi: Un metodo riporta tutte modalità di inizializzazione. le impostazioni ai valori di fabbrica, l’altro riporta ai valori di fabbrica solo le impostazioni del menu [SETUP].
  • Seite 175: Interfaccia Di Controllo Per Dispositivi Esterni

    Interfaccia di controllo per dispositivi esterni  TALLY/GPI  Gli ingressi da TALLY IN 1 a TALLY IN 5 sono porte di ingresso a contatto (D-sub 15 pin, femmina, filettatura in pollici) utilizzate per accendere gli indicatori tally dell’unità (sopra i tasti CAMERA STATUS/SELECTION).
  • Seite 176: Software Di Configurazione

    Software di configurazione Il “Setup Software” è un’applicazione che consente di eseguire le stesse funzioni di configurazione IP automatica dell’unità attraverso un computer host. Viene utilizzato per configurare l’ambiente di rete e utilizzare la videocamera remota tramite il computer host. Consente di salvare i file dei dati di configurazione sul computer host e di caricare i file salvati per eseguirli nell’ambiente di rete.
  • Seite 177 Software di configurazione  Visualizzazione della scheda “Setting”   Elenco a discesa  SW Input Visualizza l’indirizzo IP dell’AW-RP50 collegato in rete. I connettori di ingresso dello switcher vengono Le informazioni sull’ambiente di rete configurato visualizzati in questa colonna. dall’AW-RP50 e selezionato in questa schermata Il connettore di ingresso può...
  • Seite 178 Software di configurazione  Configurazione IP automatica   Modifica dei numeri delle videocamere  È possibile modificare i numeri delle videocamere impostati Se occorre modificare gli indirizzi IP per le videocamere remote. Fare clic su [RENEW]. Modificare il numero di videocamera per la Vengono impostati nuovi indirizzi IP per le videocamere videocamera remota desiderata nella casella remote e lo switcher desiderati.
  • Seite 179: Salvataggio E Caricamento Dei Dati

    Software di configurazione  Salvataggio e caricamento dei dati  Nella scheda “File Operate” è possibile salvare e caricare le impostazioni dell’ambiente di rete.  Caricamento dei file di configurazione  Caricare i file con i dati di configurazione dell’ambiente di rete. (Nome del file: .r50) Fare clic su [File] e specificare il file di configurazione da caricare.
  • Seite 180: Indicazioni Di Riferimento Nell'ambiente Di Rete

    Software di configurazione  Indicazioni di riferimento nell’ambiente di rete  Nella scheda “IP Address”, è possibile selezionare gli indirizzi IP degli altri controller remoti videocamera AW-RP50 collegati in rete. Le informazioni sull’ambiente di rete creato mediante le unità AW-RP50 selezionate possono essere indicate come riferimento utilizzando la scheda “Setting”.
  • Seite 181: Tabella Delle Voci Di Menu

    Tabella delle voci di menu Tasto Voce di menu Dispositivo di controllo Valore iniziale Impostazione 1 GAIN/PED GAIN AW-HE50 Auto, 0dB, 3dB, 6dB, 9dB, 12dB, 15dB, 18dB AW-HE100 AUTO, Da 0 a 12dB, 15dB, 18dB (Da 0dB a 12dB: 1 passo) AW-HE870 AUTO, Da –6dB a 18dB (1 passo)
  • Seite 182 Tabella delle voci di menu Tasto Voce di menu Dispositivo di controllo Valore iniziale Impostazione 5 SHUTTER SHUTTER AW-HE50 Off, Step, Synchro AW-HE100 Off, Step, Synchro AW-HE870 Off, Step, Synchro, ELC AW-E860, AW-E750, Off, Step, Synchro, ELC AW-E650, AW-E350 AK-HC1500, AK-HC1800 Off, Step, Synchro SPEED AW-HE50...
  • Seite 183 Tabella delle voci di menu Tasto Voce di menu Dispositivo di controllo Valore iniziale Impostazione 9 SETUP [1]USER 1.USER1 SWLINK, BUSCONT, FASIST, CAMSEL, TALLY_IP, CAMINF, AWB, ABB, POWER OFF 2.USER2 SWLINK, BUSCONT, FASIST, CAMSEL, TALLY_IP, CAMINF, AWB, ABB, POWER OFF [2]SW LINK 1.SWLINK Off, On...
  • Seite 184 Tabella delle voci di menu Tasto Voce di menu Dispositivo di controllo Valore iniziale Impostazione 9 SETUP [6]FUNCTION 1.ND FILTER AW-HE50 “–––” AW-HE100 “–––” AW-HE870 Off, On AW-E860, AW-E750, Off, On AW-E650, AW-E350 AK-HC1500, AK-HC1800 Clear, 1/4, 1/16, 1/64 2.OPTION AW-HE50 Off, On AW-HE100...
  • Seite 185 Tabella delle voci di menu Tasto Voce di menu Dispositivo di controllo Valore iniziale Impostazione 10 SYSTEM [1]CAMERA CTL NoAsign Serial, Network, NoAsign 1.CAM1 100.CAM100 [2]CAM ASSIGN 192.168.000.010 1.CAM1 100.CAM100 [3]SW CTL 1.SW NoAsign Network, NoAsign [4]SW ASSIGN 1.INPUT1 CAM1 2.INPUT2 CAM2 3.INPUT3...
  • Seite 186 VERSIÓN ESPAÑOLA (SPANISH VERSION) Índice Antes del uso ..............2 Ret orno de las cámaras remotas a sus posiciones originales ................20 Perspectiva general ..............2 Aju ste de la velocidad de panorámica, inclinación, zoom y Marcas comerciales y marcas comerciales registradas .....2 enfoque ................20 Acerca de los derechos de autor y de la licencia .......2 Aju ste del margen de movimiento de la cámara remota...
  • Seite 187: Antes Del Uso

     Perspectiva general   Renuncia de la garantía  Panasonic System Networks Co., Ltd. NO ACEPTA Esta unidad es un controlador que ha sido diseñado NINGÚN TIPO DE RESPONSABILIDAD CON PERSONAS para controlar cámaras remotas (cámaras integradas LEGALES O FÍSICAS, A EXCEPCIÓN DEL REEMPLAZO con cabezales de panorámica-inclinación) y sistemas de...
  • Seite 188: Cómo Conectar Y Desconectar La Alimentación De Las Cámaras Remotas

    Cómo conectar y desconectar la alimentación de las cámaras remotas  Cómo conectar la alimentación  Conexión de la alimentación de múltiples cámaras de las cámaras remotas Siga uno de los procedimientos de abajo para conectar la Ponga el botón MENU en ON. alimentación de las cámaras remotas.
  • Seite 189 Cómo conectar y desconectar la alimentación de las cámaras remotas  Cómo desconectar la  Desconexión de la alimentación de múltiples cámaras alimentación de las cámaras remotas Ponga el botón MENU en ON. Siga uno de los procedimientos de abajo para desconectar Pulse el botón MENU para encender su indicador.
  • Seite 190: Ajuste Y Operación De Las Memorias De Preajustes

    Ajuste y operación de las memorias de preajustes Esta unidad está provista con una función para registrar en 4, 5 las propias cámaras remotas, las posiciones que se van a filmar mediante las cámaras remotas y los ajustes de las cámaras remotas.
  • Seite 191: Ejecución De Los Datos De Preajustes

    Ajuste y operación de las memorias de preajustes  Ejecución de los datos de   Eliminación de datos de la  preajustes memoria de preajustes Nota Pulse uno de los botones CAMERA STATUS/ Esta función no se activa con la AW-PH400. SELECTION 1 a 5 para seleccionar la cámara remota que va a utilizar.
  • Seite 192: Selección De Los Ajustes Para Una Cámara Remota Seleccionada

    Selección de los ajustes para una cámara remota seleccionada  Ajuste del pedestal  Los ajustes siguientes se pueden realizar directamente desde esta unidad para una cámara remota seleccionada. Realice el ajuste del nivel del negro (pedestal) para poder ver más fácilmente las partes muy oscuras de las imágenes. •...
  • Seite 193: Ajuste Del Balance Del Blanco

    Selección de los ajustes para una cámara remota seleccionada  Ajuste del balance del blanco  Los modos que se pueden seleccionar cambian La relación entre RGB (tres colores primarios) se ajusta de dependiendo de la cámara remota conectada. forma que el blanco pueda reproducirse con precisión. Si el balance del blanco está...
  • Seite 194 Selección de los ajustes para una cámara remota seleccionada Cuando se realiza el ajuste automático, los siguientes Ajuste automático del balance del blanco detalles se visualizan en el panel LCD. Establezca el ajuste automático si el colorido parece que no AWB ACTIVE: es natural bajo ciertas fuentes de luz u otras condiciones.
  • Seite 195 Selección de los ajustes para una cámara remota seleccionada Ajuste manual del balance del blanco Ajuste del blanco con seguimiento automático (Ajuste de los valores de ganancia R y B) (ATW) Como en el caso del ajuste automático, llene la Esta función proporciona compensación automáticamente para que el balance del blanco se ajuste incluso cuando pantalla con un motivo blanco.
  • Seite 196: Ajuste Del Balance Del Negro

    Selección de los ajustes para una cámara remota seleccionada  Ajuste del balance del negro  El balance del negro deberá ajustarse cuando se utilice una Ajuste manual del balance del negro cámara remota por primera vez o cuando la cámara remota (Ajuste de pedestal R y B) no haya sido utilizada durante mucho tiempo.
  • Seite 197: Ajuste De La Velocidad Del Obturador

    Selección de los ajustes para una cámara remota seleccionada  Ajuste de la velocidad del   Ajuste de detalle  obturador El detalle de la imagen (nitidez de imagen) se puede ajustar. El modo y la velocidad del obturador de la cámara remota Ponga el botón MENU en ON.
  • Seite 198: Ajuste Del Modo De Filmación

    Selección de los ajustes para una cámara remota seleccionada  Ajuste del modo de filmación   Especificación de la franja  cromática Seleccione el modo de filmación que concuerde con las condiciones de filmación. Las imágenes que salen de la cámara remota se pueden Seleccione el modo según las condiciones de filmación y cambiar entre “imagen de cámara”...
  • Seite 199: Utilización De Los Elementos De Menú De La Cámara Remota Seleccionada

    Utilización de los elementos de menú de la cámara remota seleccionada Las operaciones con menú de las cámaras remotas se pueden controlar desde la unidad para la cámara remota que se encuentra ahora seleccionada. Para realizar estas operaciones se utilizan el botón CAMERA OSD, el dial F1 y el dial F2. Cuando se mantiene pulsado el botón CAMERA OSD, su indicador se enciende, y el menú...
  • Seite 200: Ajuste De Los Botones User

    Ajuste de los botones USER  Registro de funciones en los  Los elementos de menú se pueden asignar a los dos botones USER (USER1 y USER2). botones USER La función objetivo se puede activar fácilmente pulsando el botón USER (USER1 y USER2). Ponga el botón MENU en ON.
  • Seite 201: Ajustes De Señalización

    Ajustes de señalización Establezca activar (On) o desactivar (Off) para la señalización ON que proporciona instrucciones de señalización a la cámara remota en respuesta a las peticiones de señalización recibidas a través del GPI y la red. Ponga el botón MENU en ON. Pulse el botón MENU para encender su indicador.
  • Seite 202: Ajuste De Las Funciones

    Ajuste de las funciones Esta sección describe cómo se establecen las funciones de Gire el dial F1 para seleccionar el elemento de la unidad. Se pueden establecer las funciones siguientes. menú objetivo.   Ajuste de las operaciones de la cámara remota 1.
  • Seite 203: Ajuste De Las Operaciones De La Cámara Remota

    Ajuste de las funciones  Ajuste de las operaciones de la  cámara remota Ajuste estas operaciones seleccionando primero el menú Ajuste del sentido del zoom [SETUP] y después el menú [OPERATE]. Desde el menú [SETUP] seleccione [OPERATE] y visualice [ 4] O P E R A TE [ZOOM DIR].
  • Seite 204 Ajuste de las funciones  Cambio de control de enfoque a control   Ajustes cuando la cámara remota  de iris o viceversa se mueve horizontal o verticalmente durante la telefilmación El control, que se realiza mediante operaciones de diales y botones, se puede cambiar de control de enfoque a control Durante la telefilmación, la operación de panorámica- del iris o viceversa.
  • Seite 205: Establecida Por La Memoria De Preajustes

    Ajuste de las funciones  Ajuste de la velocidad a la   Retorno de las cámaras  que moverse a la posición remotas a sus posiciones establecida por la memoria de originales preajustes La cámara remota conectada puede volver a colocarse en su posición original.
  • Seite 206: Aju Ste Del Margen De Movimiento De La Cámara Remota (Función De Limitador)

    Ajuste de las funciones  Ajuste del margen de  movimiento de la cámara remota (función de limitador) Esta unidad tiene una función de limitador, que es una Visualización que aparece con otras cámaras remotas función que limita el margen de movimiento de las cámaras remotas.
  • Seite 207 Ajuste de las funciones  Ajuste del límite derecho   Ajuste del límite izquierdo  Desde el menú [SETUP] seleccione [PTZ ADJ] y visualice Desde el menú [SETUP] seleccione [PTZ ADJ] y visualice [LIMIT LEFT]. Luego ponga el límite izquierdo.. [LIMIT RIGHT].
  • Seite 208: Control De Aparatos Periféricos Conectados A Cámaras Remotas

    Ajuste de las funciones  Control de aparatos periféricos  conectados a cámaras remotas Se podrá controlar cualquier aparato periférico enumerado más abajo que se encuentre conectado a las cámaras Control de un limpiador remotas. • Filtro ND • Limpiador Este elemento se utiliza para controlar un limpiador cuando •...
  • Seite 209: Ajuste De La Velocidad Mínima Del Inicio De Funcionamiento Del Zoom

    Ajuste de las funciones  Ajuste de la velocidad mínima   Control externo sobre los datos  del inicio de funcionamiento de la memoria de preajustes del zoom Se pueden asignar números de preajustes para ejecutar preajustes de las cámaras remotas seleccionadas cuando Este ajuste asegura que el zoom del objetivo empiece a se han introducido señales por el conector de entrada/salida moverse suavemente en línea con la inclinación del botón...
  • Seite 210: Bloqueo De Las Operaciones De Los Botones

    Ajuste de las funciones  Bloqueo de las operaciones de   Ajuste de la luz de fondo del  panel LCD los botones La luz de fondo del panel LCD se puede ajustar. Esto desactiva la operación del botón CAMERA OSD y de los botones PRESET MEMORY/MENU (1 a 7).
  • Seite 211: Ajuste De Enlace Con El Conmutador

    Ajuste de enlace con el conmutador Este ajuste se utiliza para enlazar la unidad con un Gire el dial F2, seleccione la dirección IP conmutador opcional (AW-HS50). y luego pulse el dial F2 para introducir la Para enlazar la unidad con el conmutador, en la unidad selección.
  • Seite 212: Ajuste Del Enlace

    Ajuste de enlace con el conmutador  Ajuste del enlace  Ponga el botón MENU en ON. Pulse el botón MENU para encender su indicador. Ponga el botón PRESET MEMORY/MENU 9 (SETUP) en ON. Cuando se pulse el botón y se encienda su indicador, el menú...
  • Seite 213: Ajuste De Las Funciones Cuando Se Enlaza La Unidad Con El Conmutador

    Ajuste de las funciones cuando se enlaza la unidad con el conmutador Establezca las diversas funciones que van a utilizarse Gire el dial F2, seleccione la cámara remota cuando la unidad esté enlazada con el conmutador. y luego pulse el dial F2 para introducir la selección.
  • Seite 214: Ajustes De Conmutador

    Ajuste de las funciones cuando se enlaza la unidad con el conmutador  Ajustes de conmutador  Gire el dial F2, seleccione los ajustes y luego pulse el dial F2 para cambiar el ajuste. Se encuentra disponible un ajuste para controlar el 2.
  • Seite 215 Ajuste de las funciones cuando se enlaza la unidad con el conmutador Ajuste de bus Ajuste de información de cámara Desde el menú [SETUP], seleccione [SW LINK] y visualice Desde el menú [SETUP], seleccione [SW LINK] y visualice [BUS]. Luego seleccione el material (AUX, PVW, PinP o [CAMSEL].
  • Seite 216 Ajuste de las funciones cuando se enlaza la unidad con el conmutador Utilizando el menú se pueden establecer los ajustes Ajuste de señalización OA relacionados con la señalización siguientes. Desde el menú [SETUP], seleccione [SW LINK] y visualice   Activación/desactivación de las instrucciones de [TALLY_IP].
  • Seite 217: Ajuste De La Información Que Va A Visualizarse En La Osd

    Ajuste de las funciones cuando se enlaza la unidad con el conmutador  Ajuste de la información que va  Gire el dial F2 para seleccionar On u Off y luego pulse el dial F2 para introducir la a visualizarse en la OSD selección.
  • Seite 218 Ajuste de las funciones cuando se enlaza la unidad con el conmutador  Ajuste de cada elemento de información  Valor de iris que va a visualizarse Desde el menú [SETUP], seleccione [SW DISP] y visualice [IRIS]. Luego seleccione On u Off. Formato de vídeo 7.
  • Seite 219: Comprobación De La Información De Alarma Del Equipo

    Comprobación de la información de alarma del equipo Es posible comprobar los estados de alarma de la unidad y [Select POWER] de las cámaras remotas asignadas a los botones CAMERA La alarma del suministro de alimentación de la unidad se STATUS/SELECTION.
  • Seite 220: Retorno De La Unidad A Su Estado Establecido En La Fábrica

    Retorno de la unidad a su estado establecido en la fábrica Los ajustes de la unidad pueden volver a ponerse en el estado en que se encontraban al salir ésta de la fábrica. Gire el dial F1 para seleccionar el modo de Se pueden utilizar dos métodos: Uno de ellos cambia todos inicialización.
  • Seite 221: Control De Interfaz Para Aparatos Externos

    Control de interfaz para aparatos externos  TALLY/GPI  TALLY IN 1 a TALLY IN 5 son puertos de entrada de contacto que se utilizan para (D-sub de 15 contactos, hembra, encender los indicadores de señalización de la unidad (ubicados encima de los rosca en pulgadas) botones CAMERA STATUS/SELECTION).
  • Seite 222: Software De Ajuste

    Software de ajuste El “Setup Software” es una aplicación que permite ejecutar las mismas funciones que las de los ajustes IP automáticos de la unidad desde el ordenador anfitrión. Esto se utiliza para establecer el entorno de red para controlar la cámara remota utilizando el ordenador anfitrión. Esto puede guardar los archivos de datos de ajuste en el ordenador anfitrión, y puede cargar los archivos guardados y reflejarlos en el entorno de red.
  • Seite 223 Software de ajuste  Visualización de la ficha “Setting”   List box  SW Input La dirección IP del AW-RP50 conectado a la red se Los conectores de entrada del conmutador se visualizan visualiza aquí. en esta columna. La información del entorno de red establecido por el El conector de entrada se puede cambiar manualmente.
  • Seite 224 Software de ajuste  Ajuste automático IP   Cambio de números de cámaras  Los números de cámaras establecidos para las cámaras Cuando se van a cambiar la direcciones IP remotas se pueden cambiar. Haga clic en [RENEW]. Cambie el número de cámara para la Las direcciones IP nuevas se establecen en las cámara remota pertinente en la casilla cámaras remotas objetivo y en el conmutador.
  • Seite 225: Para Guardar Y Cargar Datos

    Software de ajuste  Para guardar y cargar datos  En la pantalla de la ficha “File Operate” se guardan y se cargan los archivos con los ajustes del entorno de la red.  Carga de archivos de ajustes  Cargue los archivos con los datos de ajuste del entorno de la red.
  • Seite 226: Referenciación Del Entorno De La Red

    Software de ajuste  Referenciación del entorno de la red  En la ficha “IP Address” es posible seleccionar las direcciones IP de los otros controladores de cámaras remotas AW-RP50 que han sido conectados a la red. La información del entorno de la red creado por las unidades AW-RP50 seleccionadas se puede referenciar utilizando la ficha “Setting”.
  • Seite 227: Tabla De Elementos De Menús

    Tabla de elementos de menús Botón Elemento de menú Aparato de control Valor inicial Ajuste 1 GAIN/PED GAIN AW-HE50 Auto, 0dB, 3dB, 6dB, 9dB, 12dB, 15dB, 18dB AW-HE100 AUTO, 0 a 12dB, 15dB, 18dB (0dB a 12dB: 1 paso) AW-HE870 AUTO, –6dB a 18dB (1 paso) AW-E860, AW-E750,...
  • Seite 228 Tabla de elementos de menús Botón Elemento de menú Aparato de control Valor inicial Ajuste 5 SHUTTER SHUTTER AW-HE50 Off, Step, Synchro AW-HE100 Off, Step, Synchro AW-HE870 Off, Step, Synchro, ELC AW-E860, AW-E750, Off, Step, Synchro, ELC AW-E650, AW-E350 AK-HC1500, AK-HC1800 Off, Step, Synchro SPEED AW-HE50...
  • Seite 229 Tabla de elementos de menús Botón Elemento de menú Aparato de control Valor inicial Ajuste 9 SETUP [1]USER 1.USER1 SWLINK, BUSCONT, FASIST, CAMSEL, TALLY_IP, CAMINF, AWB, ABB, POWER OFF 2.USER2 SWLINK, BUSCONT, FASIST, CAMSEL, TALLY_IP, CAMINF, AWB, ABB, POWER OFF [2]SW LINK 1.SWLINK Off, On...
  • Seite 230 Tabla de elementos de menús Botón Elemento de menú Aparato de control Valor inicial Ajuste 9 SETUP [6]FUNCTION 1.ND FILTER AW-HE50 “–––” AW-HE100 “–––” AW-HE870 Off, On AW-E860, AW-E750, Off, On AW-E650, AW-E350 AK-HC1500, AK-HC1800 Clear, 1/4, 1/16, 1/64 2.OPTION AW-HE50 Off, On AW-HE100...
  • Seite 231 Tabla de elementos de menús Botón Elemento de menú Aparato de control Valor inicial Ajuste 10 SYSTEM [1]CAMERA CTL 1.CAM1 NoAsign Serial, Network, NoAsign 100.CAM100 [2]CAM ASSIGN 1.CAM1 192.168.000.010 100.CAM100 [3]SW CTL 1.SW NoAsign Network, NoAsign [4]SW ASSIGN 1.INPUT1 CAM1 2.INPUT2 CAM2 3.INPUT3...
  • Seite 232 РУССКАЯ ВЕРСИЯ (RUSSIAN VERSION) Содержание Перед использованием ............2 Возврат удаленных камер в начальное положение ......20 Общие сведения ..................2 Регу лировка скорости поворота, наклона, трансфокации и фокусировки ..................20 Торговые знаки и зарегистрированные торговые знаки ......2 Уста новка диапазона перемещений удаленной камеры (функция Об...
  • Seite 233: Перед Использованием

      НИ В КАКИХ СЛУЧАЯХ, КРОМЕ ЗАМЕНЫ ИЛИ ОБОСНОВАННОГО Данное устройство является контроллером, предназначенным для ТЕХОБСЛУЖИВАНИЯ ПРОДУКТА, Panasonic System Networks Co., управления удаленными камерами (камерами с интегрированными Ltd. НЕ НЕСЕТ ОТВЕТСТВЕННОСТИ ПЕРЕД ЛЮБОЙ СТОРОНОЙ панорамно-наклонными головками) и системами панорамно- ИЛИ...
  • Seite 234: Камер

    Как включать и выключать питание удаленных камер  Как включать питание удаленных  Включение питания нескольких камер одновременно камер Для включения питания удаленных камер выполните одну из Установите кнопку MENU в положение ON. процедур, которые приведены ниже. Нажмите кнопку MENU, чтобы загорелся ее индикатор. ...
  • Seite 235 Как включать и выключать питание удаленных камер  Как выключать питание удаленных  Выключение питания нескольких камер одновременно камер Для выключения питания удаленных камер выполните одну из Установите кнопку MENU в положение ON. процедур, которые приведены ниже. Нажмите кнопку MENU, чтобы загорелся ее индикатор. ...
  • Seite 236: Сохранение Данных В Предустановленных Шаблонах Памяти

    Настройка предустановленных шаблонов памяти и управление ими В данном устройстве предусмотрена функция для сохранения 4, 5 в самих удаленных камерах положений, в которых удаленные камеры должны выполнять съемку, а также установок удаленных камер. В таких шаблонах памяти можно сохранять до 100 сочетаний MENU PAGE GAIN/PED...
  • Seite 237: Вызов Предустановленных Данных

    Настройка предустановленных шаблонов памяти и управление ими  Вызов предустановленных данных  Удаление данных   предустановленных шаблонов Нажмите одну из кнопок CAMERA STATUS/ памяти SELECTION от 1 до 5 для выбора удаленной Примечание камеры, управление которой необходимо осуществлять. Эта функция не работает с устройством AW-PH400. Выберите...
  • Seite 238: Выбор Установок Для Выбранной Удаленной Камеры

    Выбор установок для выбранной удаленной камеры  Настройка гашения  Непосредственно с данного устройства можно выполнять перечисленные ниже установки и регулировки для выбранной Для того чтобы очень темные части изображения были лучше удаленной камеры. видны, необходимо выполнить регулировку уровня черного (уровня...
  • Seite 239: Настройка Баланса Белого

    Выбор установок для выбранной удаленной камеры  Настройка баланса белого  Режимы, которые можно выбирать, отличаются в зависимости от Соотношение между RGB (тремя основными цветами) подключенной удаленной камеры. регулируется таким образом, чтобы белый цвет отображался более точно. Если баланс белого выключен, не только белый цвет будет Удаленная...
  • Seite 240 Выбор установок для выбранной удаленной камеры Во время выполнения автоматической регулировки на панели Автоматическая регулировка баланса белого ЖК-дисплея отображаются перечисленные ниже детали. Установите автоматическую регулировку баланса белого, AWB ACTIVE: если при определенных источниках света или других условиях Данная индикация появляется во время выполнения функции AWB. цветопередача...
  • Seite 241 Выбор установок для выбранной удаленной камеры Регулировка баланса белого вручную Автоматическое слежение за балансом белого (ATW) (Установка степеней усиления R и B) Данная функция предусматривает выполнение автоматической Как и в случае с автоматической регулировкой, на компенсации таким образом, что баланс белого регулируется даже...
  • Seite 242: Настройка Баланса Черного

    Выбор установок для выбранной удаленной камеры  Настройка баланса черного  Баланс черного необходимо регулировать при первом Регулировка баланса черного вручную использовании удаленной камеры или в случаях, когда удаленная (Установка уровня гашения R и B) камера не использовалась в течение длительного периода времени.
  • Seite 243: Настройка Скорости Затвора

    Выбор установок для выбранной удаленной камеры  Настройка скорости затвора  Настройка детализации   В данном пункте можно регулировать детализацию изображения Можно выбрать режим затвора и скорость затвора удаленной камеры. (резкость изображения). Установите кнопку MENU в положение ON. Установите кнопку MENU в положение ON. Нажмите...
  • Seite 244: Настройка Режима Съемки

    Выбор установок для выбранной удаленной камеры  Настройка режима съемки  Указание цветовых полос   Выберите режим съемки, который соответствует условиям съемки. Изображение, выводимое из удаленной камеры можно Выберите режим в соответствии с условиями съемки и переключать между режимами “изображение с камеры” и “цветовые...
  • Seite 245: Управление Пунктами Меню Выбранной Удаленной Камеры

    Управление пунктами меню выбранной удаленной камеры Операциями меню удаленных камер можно управлять с данного устройства для удаленной камеры, которая выбрана в данный момент. Для выполнения операций используются кнопка CAMERA OSD, диск F1 и диск F2. При удержании кнопки CAMERA OSD нажатой загорается ее индикатор, а в качестве выходного изображения удаленной камеры отображается...
  • Seite 246 Настройка кнопок USER Двум кнопкам USER (USER1, USER2) можно назначать пункты  Сохранение функций для кнопок  меню. USER Целевую функцию можно активировать простым нажатием кнопки USER (USER1 или USER2). Установите кнопку MENU в положение ON. Нажмите кнопку MENU, чтобы загорелся ее индикатор. POWER ALARM CAMERA...
  • Seite 247 Установки сигнальной метки Активируйте (On) или деактивируйте (Off) пункт командной метки ON, который обеспечивает отправку на удаленную камеру сигнальных инструкций в ответ на сигнальные запросы, полученные через GPI или сеть. Установите кнопку MENU в положение ON. Нажмите кнопку MENU, чтобы загорелся ее индикатор. Установите...
  • Seite 248: Настройка Функций

    Настройка функций В данном разделе приведено описание настройки функций Поверните диск F1 для выбора целевого пункта устройства. меню. Можно установить перечисленные ниже функции. 1. P A N D IR ▼   Установка операций удаленной камеры N O R M A L ...
  • Seite 249 Настройка функций  Установка операций удаленной  камеры Установка направления трансфокации Данные операции можно устанавливать путем выбора меню [SETUP] после меню [OPERATE]. В меню [SETUP] выберите подменю [OPERATE] и отобразите [ 4] O P E R A TE пункт [ZOOM DIR]. Затем выберите значение “NORMAL” или “REVERSE”.
  • Seite 250 Настройка функций  Переключение с управления фокусировкой  Установки, при которых удаленная   на управления диафрагмой или наоборот камера перемещается горизонтально или вертикально во время телевизионной Можно переключать управление, которое осуществляется путем съемки использования диска и кнопки, с управления фокусировкой на управление...
  • Seite 251 Настройка функций  Установка скорости, с которой  Возврат удаленных камер в   камера должна перемещаться начальное положение в положение, указанное в Подключенные удаленные камеры можно вернуть в начальное положение. предустановленном шаблоне памяти В меню [SETUP] выберите подменю [PRESET] и отобразите пункт [HOME POSITION].
  • Seite 252 Настройка функций  Установка диапазона перемещений  удаленной камеры (функция ограничителя) В данном устройстве предусмотрена функция ограничителя, Дисплей, отображаемый для остальных камер которая является функцией, применимой для ограничения диапазона перемещений удаленной камеры. Существует четыре положения ограничителя: верхний, нижний, Статус установки отображается в пункте LIMIT UP по завершении левый...
  • Seite 253 Настройка функций  Установка левого предела  Установка правого предела   В меню [SETUP] выберите подменю [PTZ ADJ] и отобразите пункт В меню [SETUP] выберите подменю [PTZ ADJ] и отобразите пункт [LIMIT LEFT]. Затем установите левый предел. [LIMIT RIGHT]. Затем установите правый предел. Отображаемая...
  • Seite 254 Настройка функций  Управление периферийными  устройствами, подключенными к удаленным камерам При подключении к удаленным камерам какого-либо из Управление стеклоочистителем перечисленных ниже периферийных устройств можно осуществлять управление таким устройством. Данный пункт используется для управления стеклоочистителем при использовании удаленной камеры (наружная панорамно- •...
  • Seite 255 Настройка функций  Регулировка минимальной  Осуществление внешнего   стартовой скорости трансфокации управления данными предустановленного шаблона объектива памяти Если управление трансфокацией объектива осуществляется с помощью кнопки ZOOM, данная регулировка обеспечивает Можно назначать предустановленные номера для выполнения плавное начало движения объектива при трансфокации в предустановленных...
  • Seite 256 Настройка функций  Блокировка использования кнопок  Регулировка подсветки панели   ЖК-дисплея С помощью данной функции можно заблокировать использование кнопки CAMERA OSD и кнопок PRESET MEMORY/MENU Подсветку панели ЖК-дисплея можно регулировать. (от 1 до 7). Данную регулировку можно выполнять в пункте LCD BL меню Использование...
  • Seite 257 Установка соединения с видеомикшером Данная установка используется для соединения устройства с Поверните диск F2 для выбора IP-адреса, а затем дополнительным видеомикшером (AW-HS50). нажмите диск F2 для ввода выбранного значения. Для соединения устройства с видеомикшером, должны быть Установите IP-адрес, который установлен в видеомикшере. выполнены...
  • Seite 258 Установка соединения с видеомикшером  Установка соединения  Установите кнопку MENU в положение ON. Нажмите кнопку MENU, чтобы загорелся ее индикатор. Установите кнопку PRESET MEMORY/MENU 9 (SETUP) в положение ON. Когда кнопка нажата и горит ее индикатор, на панели ЖК-дисплея отображается меню [SETUP]. [ 1 ] U S E R ▼...
  • Seite 259 Установка функций для управления устройством, соединенным с видеомикшером Установите различные функции, используемые для управления Поверните диск F2 для выбора удаленной камеры, устройством, соединенным с видеомикшером. а затем нажмите диск F2 для ввода выбранного значения.  Установка выходного и входного  2.
  • Seite 260 Установка функций для управления устройством, соединенным с видеомикшером Поверните диск F2 для выбора установок, а затем  Установки видеомикшера  нажмите диск F2 для изменения установки. Доступна установка для управления видеомикшером, соединенным с устройством. 2. B U S C O N T Данную...
  • Seite 261 Установка функций для управления устройством, соединенным с видеомикшером Установка шины Установка информации о камере В меню [SETUP] выберите подменю [SW LINK] и отобразите пункт В меню [SETUP] выберите подменю [SW LINK] и отобразите пункт [BUS]. Затем установите материал (AUX, PVW, PinP или KEY), [CAMSEL].
  • Seite 262 Установка функций для управления устройством, соединенным с видеомикшером В меню можно установить приведенные ниже установки, Установка сигнальной метки OA связанные с сигнальной меткой. В меню [SETUP] выберите подменю [SW LINK] и отобразите пункт   Активация/деактивация команд сигнальной информации, [TALLY_IP]. Затем установите значение On или Off. отправляемых...
  • Seite 263 Установка функций для управления устройством, соединенным с видеомикшером Поверните диск F2 для выбора значения On или  Настройка информации, которая  Off, а затем нажмите диск F2 для ввода выбранного должна отображаться в экранном значения. меню 2 .F OR MAT С...
  • Seite 264 Установка функций для управления устройством, соединенным с видеомикшером  Установка каждого пункта информации,  Значение диафрагмы который необходимо отображать В меню [SETUP] выберите подменю [SW DISP] и отобразите пункт [IRIS]. Затем установите значение On или Off. Видеоформат 7. I R I S В...
  • Seite 265 Проверка информации об аварийной сигнализации оборудования Можно проверять статусы аварийной сигнализации устройства [При выборе пункта POWER] и удаленных камер, назначенных кнопкам CAMERA STATUS/ Можно проверять аварийную сигнализацию источника питания SELECTION. устройства. No ALARM: Установите кнопку MENU в положение ON. Если нет проблем с источником питания. Нажмите...
  • Seite 266: Возвращение Настроек Устройства К Заводским Установкам

    Возвращение настроек устройства к заводским установкам Настройки устройства можно вернуть к заводским установкам. Можно использовать два способа: С помощью первого способа Поверните диск F2 для выбора режима происходит возврат всех настроек к заводским установкам, а с инициализации. помощью второго способа к заводским установкам возвращаются только...
  • Seite 267: Интерфейс Управления Внешними Устройствами

    Интерфейс управления внешними устройствами  TALLY/GPI  Контактные входные порты от TALLY IN 1 до TALLY IN 5 используются для того, чтобы (D-sub 15-штырьковый, гнездовой, загорались сигнальные индикаторы устройства (над кнопками CAMERA STATUS/SELECTION). с дюймовой резьбой) При поступления сигнала на контактный вход загораются сигнальные лампы. Контактные...
  • Seite 268: Setup Software

    Setup Software Программное обеспечение “Setup Software” является прикладной программой, которая позволяет выполнять на хост-компьютере функции, аналогичные автоматической установке IP устройства. Данное программное обеспечение используется для установки сетевого окружения для управления удаленной камерой с помощью хост- компьютера. С его помощью можно сохранять файлы с установочными данными на хост-компьютере, а затем загружать сохраненные файлы и отображать...
  • Seite 269 Setup Software  Отображение закладки “Setting”   Окно списка  SW Input В данном окне отображается IP-адрес подключенного к сети В данной колонке отображаются входные разъемы контроллера AW-RP50. видеомикшера. На закладке “Setting” отображается информация о сетевом Входной разъем можно изменять вручную. окружении, созданном...
  • Seite 270 Setup Software  Автоустановка IP  Изменение номеров камер   Можно изменять номера камер, установленные для удаленных При необходимости изменить IP-адреса камер. Нажмите кнопку [RENEW]. В поле [CAMERA Select] измените номер камеры Для целевых удаленных камер и видеомикшера для соответствующей удаленной камеры. устанавливаются...
  • Seite 271: Сохранение И Загрузка Данных

    Setup Software  Сохранение и загрузка данных  В окне закладки “File Operate” можно сохранять и загружать файлы с установками сетевого окружения.  Загрузка установочных файлов  Загрузите файлы с установочными данными сетевого окружения. (Имя файла: .r50) Нажмите кнопку [File] и укажите установочный файл, который необходимо загрузить. В...
  • Seite 272: Обращение К Сетевому Окружению

    Setup Software  Обращение к сетевому окружению  На закладке “IP Address” можно выбирать IP-адреса других удаленных контроллеров камер AW-RP50, которые были подключены к сети. На закладке “Setting” можно обратиться к информации о сетевом окружении, созданном выбранными устройствами AW-RP50. Можно выбрать до пяти устройств AW-RP50. В...
  • Seite 273 Список пунктов меню Начальное Кнопка Пункт меню Устройство для управления Установка значение 1 GAIN/PED GAIN AW-HE50 Auto, 0dB, 3dB, 6dB, 9dB, 12dB, 15dB, 18dB AUTO, От 0 до 12dB, 15dB, 18dB AW-HE100 (От 0dB до 12dB: 1 шаг) AW-HE870 AUTO, От...
  • Seite 274 Список пунктов меню Начальное Кнопка Пункт меню Устройство для управления Установка значение 5 SHUTTER SHUTTER AW-HE50 Off, Step, Synchro AW-HE100 Off, Step, Synchro AW-HE870 Off, Step, Synchro, ELC AW-E860, AW-E750, Off, Step, Synchro, ELC AW-E650, AW-E350 AK-HC1500, AK-HC1800 Off, Step, Synchro SPEED AW-HE50 1/120, 1/250, 1/500, 1/1000,...
  • Seite 275 Список пунктов меню Начальное Кнопка Пункт меню Устройство для управления Установка значение 9 SETUP [1]USER 1.USER1 SWLINK, BUSCONT, FASIST, CAMSEL, TALLY_IP, CAMINF, AWB, ABB, POWER OFF 2.USER2 SWLINK, BUSCONT, FASIST, CAMSEL, TALLY_IP, CAMINF, AWB, ABB, POWER OFF [2]SW LINK 1.SWLINK Off, On 2.BUSCONT Off, On...
  • Seite 276 Список пунктов меню Начальное Кнопка Пункт меню Устройство для управления Установка значение 9 SETUP [6]FUNCTION 1.ND FILTER AW-HE50 “–––” AW-HE100 “–––” AW-HE870 Off, On AW-E860, AW-E750, Off, On AW-E650, AW-E350 AK-HC1500, AK-HC1800 Clear, 1/4, 1/16, 1/64 2.OPTION AW-HE50 Off, On AW-HE100 Off, On AW-PH360, AW-PH400,...
  • Seite 277 Список пунктов меню Начальное Кнопка Пункт меню Устройство для управления Установка значение 10 SYSTEM [1]CAMERA CTL 1.CAM1 NoAsign Serial, Network, NoAsign до 100.CAM100 [2]CAM ASSIGN 1.CAM1 192.168.000.010 до 100.CAM100 [3]SW CTL 1.SW NoAsign Network, NoAsign [4]SW ASSIGN 1.INPUT1 CAM1 2.INPUT2 CAM2 NoAsign, От...
  • Seite 278 © Panasonic System Networks Co., Ltd. 2010 F0610Y1070...

Inhaltsverzeichnis