Inhaltsverzeichnis
Werbung
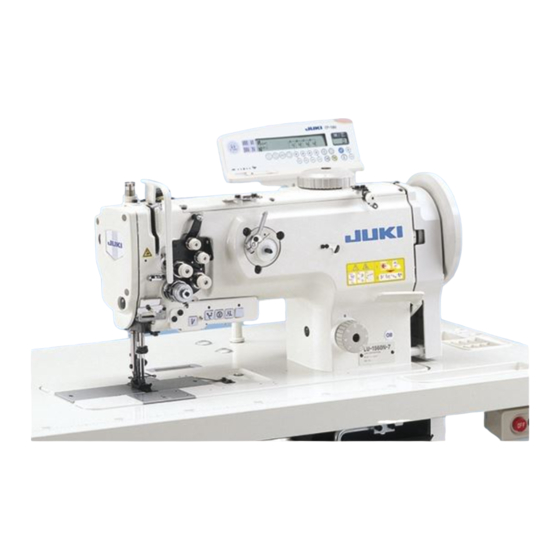
LU-1560N
LU-1560N-7
取扱説明書
INSTRUCTION MANUAL BETRIEBSANLEITUNG
MANUEL D'UTILISATION MANUAL DE INSTRUCCIONES
MANUALE D'ISTRUZIONI
注意:
このたびは、当社の製品をお買い上げいただきまして、ありがとうございました。
安全に使用していただくために、使用前に必ずこの取扱説明書をお読みください。
また、いつでもすぐに読めるように、この取扱説明書を保管してください。
NOTE :
Read safety instructions carefully and understand them before using.
Retain this Instruction Manual for future reference.
HINWEIS :
Lesen Sie die Sicherheitsanweisungen aufmerksam durch, um sich mit ihnen vertraut
zu machen, bevor Sie diese Maschine in Betrieb nehmen. Bewahren Sie diese
Bedienungsanleitung für spätere Bezugnahme auf.
NOTE :
Avant d'utiliser la machine, lire attentivement toutes les consignes de sécurité.
Conserver ce manuel pour pouvior le consulter en cas de besoin.
NOTA :
Antes de comenzar a usar esta máquina lea con detención hasta comprender todas las
instrucciones de sequridad. Conserve este Manual de instrucciones a mano para futuras
consultas.
NOTA :
Leggere attentamente e compredere tutte le istruzioni per la sicurezza prima di inziare l' uso
di questa macchina. Conservare questo Manuale d'Instruzioni per pronto riferimento.
注意 :
为了安全地使用,请您在使用之前一定阅读本使用说明书。
另外,请您注意保管本使用说明书,以便随时查阅。
LU-1561N
LU-1561N-7
使用说明书
No.02
40095679
Werbung
Inhaltsverzeichnis

Verwandte Anleitungen für JUKI LU-1560N


Inhaltszusammenfassung für JUKI LU-1560N
- Seite 1 LU-1560N LU-1561N LU-1560N-7 LU-1561N-7 取扱説明書 INSTRUCTION MANUAL BETRIEBSANLEITUNG MANUEL D’UTILISATION MANUAL DE INSTRUCCIONES 使用说明书 MANUALE D’ISTRUZIONI 注意: このたびは、当社の製品をお買い上げいただきまして、ありがとうございました。 安全に使用していただくために、使用前に必ずこの取扱説明書をお読みください。 また、いつでもすぐに読めるように、この取扱説明書を保管してください。 NOTE : Read safety instructions carefully and understand them before using. Retain this Instruction Manual for future reference. HINWEIS : Lesen Sie die Sicherheitsanweisungen aufmerksam durch, um sich mit ihnen vertraut zu machen, bevor Sie diese Maschine in Betrieb nehmen.
- Seite 3 安全にご使用していただくために ミシン,自動機,付帯装置 ( 以下機械と言う ) は、縫製作業上やむをえず機械の可動部品の近くで作業する ため、可動部品に接触してしまう可能性が常に存在していますので、実際にご使用されるオペレータの方、 および保守,修理などをされる保全の方は、事前に以下の 安全についての注意事項 を熟読されて、十分 理解された上でご使用ください。この 安全についての注意事項 に書かれている内容は、お客様が購入さ れた商品の仕様には含まれない項目も記載されています。 なお、取扱説明書および製品の警告ラベルを十分理解していただくために、警告表示を以下のように使い分 けております。これらの内容を十分に理解し、指示を守ってください。 ( I ) 危険の水準の説明 機械操作時,保守時,当事者,第 3 者が取り扱いを誤ったり、その状況を回避しな 危険 い場合、死亡または重傷を招く差し迫った危険のあるところ。 機械操作時,保守時,当事者,第 3 者が取り扱いを誤ったり、その状況を回避しな 警告 い場合、死亡または重傷を招く潜在的可能性のあるところ。 機械操作時,保守時,当事者,第 3 者が取り扱いを誤ったり、その状況を回避しな 注意 い場合、中・軽傷害を招く恐れのあるところ。 (II) 警告絵表示および表示ラベルの説明 運動部に触れて、怪我をする恐れ 作業時にミシンを持つと、手を があります。 怪我する恐れがあります。...
- Seite 4 安全についての注意事項 事故とは: 人身並びに財産 に損害を与える ことをいう。 危険 1. 感電事故防止のため、電装ボックスを開ける必要のある場合は、電源を切り念のため 5 分以上経過 してから蓋を開けてください。 注意 基本的注意事項 1. ご使用される前に、取扱説明書および付属に入っている全ての説明書類を必ずお読みください。 また、いつでもすぐに読めるように、この取扱説明書を大切に保存してください。 2. 本項に書かれている内容は、購入された機械の仕様に含まれていない項目も記載されています。 3. 針折れによる事故防止のため、安全眼鏡を着用してください。 4. 心臓用ペースメーカーをお使いの方は、専門医師とよくご相談のうえお使いください。 安全装置・警告ラベル 1. 安全装置の欠落による事故防止のため、この機械を操作する際は、安全装置が所定の位置に正しく 取り付けられ正常に機能することを確認してから操作してください。安全装置については、 「安全装 置と警告ラベルについて」の頁を参照してください。 2. 人身事故防止のため、安全装置を外した場合は、必ず元の位置に取り付け、正常に機能することを 確認してください。 3. 人身事故防止のため、機械に貼り付けてある警告ラベルは、常にはっきり見えるようにしておいて ください。剥がれたり汚損した場合、新しいラベルと交換してください。 用途・改造 1. 人身事故防止のため、この機械は、本来の用途および取扱説明書に規定された使用方法以外には使 用しないでください。用途以外の使用に対しては、当社は責任を負いません。 2. 人身事故防止のため、 機械には改造などを加えないでください。 改造によって起きた事故に対しては、 当社は責任を負いません。...
- Seite 5 各使用段階における注意事項 運 搬 1. 人身事故防止のため、機械の持ち上げ,移動は、機械質量を踏まえ安全を確保した方法で行ってく ださい。なお機械質量については、取扱説明書本文をご確認ください。 2. 人身事故防止のため、持ち上げ,移動の際は、転倒,落下などを起こさないよう十分安全策をとっ てください。 3. 予期せぬ事故や落下事故,機械の破損防止のため、開梱した機械を再梱包して運搬することはおや めください。 開 梱 1. 人身事故防止のため、開梱は上から順序よく行ってください。木枠梱包の場合は、特に釘には十分 注意してください。また、釘は板から抜き取ってください。 2. 人身事故防止のため、機械は重心位置を確かめて、慎重に取り出してください。 据え付け (I ) テーブル,脚 1. 人身事故防止のため、テーブル,脚は純正部品を使用してください。やむをえず非純正部品を使用 する場合は、機械の重量,運転時の反力に十分耐え得るテーブル,脚を使用してください。 2. 人身事故防止のため、脚にキャスタを付ける場合は、十分な強度をもったロック付きキャスタを使 用し、機械の操作中や保守,点検,修理の時に機械が動かないようにロックしてください。 (II)ケーブル,配線 1. 感電,漏電,火災事故防止のため、ケーブルは使用中無理な力が加わらないようにしてください。 また、V ベルトなどの運転部近くにケーブル配線する時は、30mm 以上の間隔をとって配線してく ださい。 2. 感電,漏電,火災事故防止のため、タコ足配線はしないでください。 3. 感電,漏電,火災事故防止のため、コネクタは確実に固定してください。 また、コネクタを抜く時は、コネクタ部を持って抜いてください。 (III)接地 1.
- Seite 6 6. サーボモータをご使用の場合は、機械停止中はモータ音がしません。不意の起動による事故防止の ため、電源の切り忘れに注意してください。 7. 過熱による火災事故を防ぐため、モータ電源ボックスの冷却口をふさいで使用することはやめてく ださい。 給 油 1. 機械の給油箇所には、JUKI 純正オイル,JUKI 純正グリスを使用してください。 2. 炎症,カブレを防ぐため、目や身体に油が付着した時は、直ちに洗浄してください。 3. 下痢,嘔吐を防ぐため、誤って飲み込んだ場合は、直ちに医師の診断を受けてください。 保 守 1. 不慣れによる事故防止のため、修理,調整は機械を熟知した保全技術者が取扱説明書の指示範囲で 行ってください。また、部品交換の際は、当社純正部品を使ってください。不適切な修理,調整お よび非純正部品使用による事故に対しては、当社は責任を負いません。 2. 不慣れによる事故や感電事故防止のため、電気関係の修理,保全 ( 含む配線 ) は、電気の専門知識 の有る人、または当社,販売店の技術者に依頼してください。 3. 不意の起動による事故防止のため、エアシリンダなどの空気圧を使用している機械の修理や保全を 行う時は、空気の供給源のパイプを外し、残留している空気を放出してから行ってください。 4. 人身事故防止のため、修理調整,部品交換などの作業後は、ねじ,ナットなどがゆるんでいないこ とを確認してください。 5. 機械の使用期間中は、定期的に清掃を行ってください。この際、不意の起動による事故防止のため、 必ず電源を切りミシンおよびモータが完全に停止したことを確認してから行ってください。 6. 保守,点検,修理の作業の時は、必ず電源を切りミシンおよびモータが完全に停止したことを確認 してから行ってください。 (クラッチモータの場合、電源を切った後もモータは惰性でしばらく回り...
- Seite 7 より安全にお使いいただくための注意事項 1. 電源スイッチを入れる時および、ミシン運転中は、針の下付近に指を入れないでく ださい。 2. ミシン運転中に天びんカバー内に指を入れないでください。 警告 3. ミシンを倒す時やベルトカバーおよび V ベルトを外す時は、電源スイッチを切っ てください。 4. ミシン運転中は、はずみ車、天秤付近に指、頭髪、衣類を近づけたり、物を置かな いでください。 5. 指ガードは外した状態で運転しないでください。 6. ミシンを倒す時、指等をはさまないよう注意してください。 1. 安全のため電源アース線を外した状態で、ミシンを運転しないでください。 2. 電源プラグ挿抜の際は、前もって必ず電源スイッチを切ってください。 3. 雷が発生している時は安全のため作業をやめ、電源プラグを抜いてください。 注意 4. 寒い所から急に暖かい所に移動した時など、結露が生じることがあるので、十分に 水滴の心配がなくなってから、電源を入れてください。 5. 火災防止の為に電源プラグは定期的にコンセントから抜いてプラグの刃の根元、 及 び刃と刃の間を清掃してください。 6. ミシン操作中、釜は高速で回転しています。手への損傷防止のため、運転中は釜付近 へ絶対に手を近づけないでください。また、 ボビン交換の時は電源を切ってください。 7. 不意の起動による事故防止のため、電源の切り忘れに注意してください。 8. 本製品は精密機器のため、水や油をかけたり、落下させるなどの衝撃を与えないよ うに、取扱いには十分注意してください。...
- Seite 8 TO ENSURE SAFE USE OF YOUR SEWING MACHINE For the sewing machine, automatic machine and ancillary devices (hereinafter collectively referred to as "machine"), it is inevitable to conduct sewing work near moving parts of the machine. This means that there is always a possibility of unintentionally coming in contact with the moving parts.
- Seite 9 SAFETY PRECAUTIONS i en nal in r r ea a age DANGER W en i i ne e n r l b n aining ele ri al ar in e re be re ening er in r er re en a i en lea ing ele ri al CAUTION...
- Seite 10 PRECAUTIONS TO E TA EN IN ARIOUS OPERATION STAGES Tran r a i n li an ine in a a e anner a ing n i era i n Re er e in r an al re en alling r r ing be re li ing r ine in r er again...
- Seite 11 ine an le el be re re e bel er an bel in r er re en a i en e b abr ine r I a er e n i e ine i a re re n in r er re en a i en e b abr...
-
Seite 12: For Safe Operation
FOR SAFE OPERATION 1. Keep your hands away from needle when you turn ON the power switch or while the machine is in operation. 2. Do not put your fi ngers into the thread take-up cover while the machine is operating. - Seite 13 Model LU-1500N Series Description Industrial Sewing Machine Function make stitches and sew Applied harmonized standards, in particular : EN ISO12100, EN ISO10821, EN 50581 Manufacturer : JUKI CORPORATION 2-11-1, Tsurumaki, Tama-shi, Tokyo, Japan...
- Seite 14 ZUR GEWÄHRLEISTUNG DES SICHEREN GEBRAUCHS IHRER NÄHMASCHINE Für eine Nähmaschine, automatische Maschine und Zusatzvorrichtungen (im Folgenden kollektiv als "Ma- schine" bezeichnet), ist es unerlässlich, die Näharbeit in der Nähe von beweglichen Teilen der Maschine durchzuführen. Dies bedeutet, dass stets die Möglichkeit besteht, versehentlich mit den beweglichen Teilen in Berührung zu kommen.
-
Seite 15: Sicherheitsvorrichtungen Und Warnaufklebe
SICHERHEITSHINWEISE Ein Unfall bedeutet "die Ver ursachung von Verletzungen oder Tod oder Sachschäden". GEFAHR VORSICHT 1. Lesen Sie vor der Benutzung der Maschine unbedingt die Bedienungsanleitung und andere erläuternde halten sind. sacht werden. Facharzt konsultieren. Sicherheitsvorrichtungen und Warnaufklebe Unfälle zu verhüten. oder sich gelöst hat, ersetzen Sie ihn unbedingt durch einen neuen. -
Seite 16: Installation (I) Tisch Und Tischständer
gen oder Tod führen können. letzungen oder Tod führen können. Achten Sie besonders bei Maschinen, die in Kisten geliefert werden, Installation (I) Tisch und Tischständer wicht und der Reaktionskraft während des Betriebs standzuhalten. (II) Kabel und Verdrahtung (III) Erdung erdete Steckdose an. (IV) Motor 1. -
Seite 17: Wartung
Motors verursachte Unfälle zu verhüten. Hautreizung zu verhüten. zu verhüten. Wartung verursachte Unfälle zu verhüten. ben und Muttern fest sitzen. Motor verursachte Unfälle zu verhüten. Trägheit noch eine Weile weiter. Lassen Sie daher Sorgfalt walten.) Unfälle zu verhüten, die zu Verletzungen oder Tod führen können. Unfälle zu verhüten, die zu Verletzungen oder Tod führen können. -
Seite 18: Für Sicheren Betrieb
FÜR SICHEREN BETRIEB 1. Halten Sie beim Einschalten des Netzschalters oder während des Betriebs der Ma- schine Ihre Hände von der Nadel fern. 2. Fassen Sie während des Betriebs der Maschine nicht mit Ihren Fingern hinter die Fadenhebelabdeckung. 3. Schalten Sie grundsätzlich den Netzschalter aus, bevor Sie den Maschinenkopf kippen oder die Riemenabdeckung und die Keilriemen entfernen. - Seite 19 Il est inévitable que des travaux soient exécutés à proximité de pièces mobiles de la machine à coudre, de la machine automatique ou des dispositifs annexes (désignés par la suite sous le terme collectif de "ma- de maintenance et de réparation de la machine de lire attentivement les PRÉCAUTIONS DE SÉCURITÉ maintenance sur celle-ci.
- Seite 20 PRÉCAUTIONS DE SÉCURITÉ DANGER VORSICHT xviii...
- Seite 21 PRÉCAUTIONS À PRENDRE AUX DIVERSES ÉTAPES DU FONCTIONNEMENT ( I )
- Seite 23 POUR LA SÉCURITÉ D’UTILISATION 1. Ne pas approcher les mains de l’aiguille lorsqu’on place l’interrupteur d’ alimentation sur marche ou pendant le fonctionnement de la machine. 2. Ne pas mettre les doigts derrière le couvercle du releveur de fi l pendant le fonctionnement de la machine.
- Seite 24 PARA GARANTIZAR EL USO SEGURO DE SU MÁQUINA DE COSER En relación con el uso de la máquina de coser, máquina automática y dispositivos auxiliares (de aquí en que se toquen piezas móviles involuntariamente. Por lo tanto, a los operadores u operadoras que mane- máquina, se les recomienda leer detenidamente las siguientes PRECAUCIONES DE SEGURIDAD y te- ner un cabal conocimiento de las mismas antes de usar/efectuar el mantenimiento de la máquina.
- Seite 25 PRECAUCIONES DE SEGURIDAD corporales o muerte o daños a la propiedad”. PELIGRO corriente eléctrica y esperar unos cinco minutos o más antes de abrir la cubierta, para evitar accidentes que resulten en electrochoques. PRECAUCIÓN Precauciones básicas vos que se suministran con los accesorios de la máquina. Tenga a mano el manual de instrucciones y los documentos explicativos para su rápida consulta.
- Seite 26 PRECAUCIONES A TOMAR EN DIVERSAS ETAPAS DE OPERACIÓN Transporte tar la caída de la máquina, para protegerse contra accidentes que puedan resultar en lesiones corpora- les o muerte. 3. Una vez que se haya desembalado la máquina, no la vuelva a embalar para su transporte, para proteger la máquina contra averías resultantes de la caída o accidente imprevisto.
-
Seite 27: Ambiente Operativo
JUKI. 2. Para evitar accidentes causados por la falta de familiaridad con la máquina o accidentes por electro- componentes eléctricos a un técnico electricista de su compañía o a JUKI o el distribuidor en su área. - Seite 28 PARA SEGURIDAD EN LA OPERACION 1. Mantenga sus manos lejos de la aguja cuando posicione en ON el interruptor de la corriente eléctrica o mientras la máquina de coser esté funcionando. 2. No ponga us dedos sobre la cubierta del tirahilo cuando la máquina de coser esté funcionando.
- Seite 29 Per la macchina per cucire, la macchina automatica ed i dispositivi ausiliari (di seguito denominati collettiva- mente come "macchina"), è inevitabile condurre lavori di cucitura vicino a parti in movimento della macchina. consiglia vivamente, agli operatori che azionano effettivamente la macchina e al personale di manutenzione coinvolto nella manutenzione e riparazione della macchina, di leggere con attenzione per comprendere ap- pieno le seguenti prima di utilizzare la macchina/effettuare la manu-...
- Seite 30 AVVERTENZE PER LA SICUREZZA xxviii...
- Seite 31 xxix...
-
Seite 33: Per Un Utilizzo Sicuro
PER UN UTILIZZO SICURO 1. Tenere le mani lontano dall’ago quando si accende l’interruttore dell’alimentazione o la macchina è in funzione. 2. Non mettere mai le dita sotto il carter tirafi lo a macchina in funzione. 3. Spegnere l’interruttore dell’alimentazione prima di inclinare la testa della macchina o di rimuovere il copricinghia e le cinghie a V. - Seite 34 ❶ ❶ ❸ ❷ ❷ ❶ ・ ・ ❸ ❷ ・ ・ ・ ❸ ・ xxxii...
- Seite 35 xxxiii...
- Seite 36 xxxiv...
- Seite 37 xxxv...
- Seite 38 xxxvi...
-
Seite 39: Inhaltsverzeichnis
23. SEWING SPEED TABLE..........................53 24. MOTOR PULLEY AND V BELT ........................56 25. RESETTING THE SAFETY CLUTCH ......................58 26. ADJUSTING THE AUTOMATIC PRESSER FOOT LIFTER (LU-1560N-7, LU-1561N-7) ....... 59 27. TROUBLES IN SEWING AND CORRECTIVE MEASURES ................62 xxxvii... - Seite 40 20. REGLAGE DU LEVIER D’OUVERTURE DE LA BOITE A CANETTE ............45 21. POSITION DU COUTEAU FIXE ET REGLAGE DE LA PRESSION DU COUTEAU (LU-1560N-7, LU-1561N-7) ..47 22. REGLAGE DE LA HAUTEUR DE RELEVAGE DU PIED PRESSEUR ET DU PIED TROTTEUR ....50 23.
- Seite 41 20. MODO DE AJUSTAR LA PALANCA DE ABRIR LA CÁPSULA DE BOBINA ..........45 21. POSICION DE LA CONTRACUCHILLA Y AJUSTE DE PRESION DE LA CUCHILLA (LU-1560N-7, LU-1561N-7) ... 47 22. MODO DE AJUSTAR LA CANTIDAD DE ELEVACIÓN DEL PRENSATELAS Y DEL PIE MÓVIL ....50 23.
-
Seite 43: ミシン運転前のご注意
ミシン運転前のご注意 注意 機械の誤動作や損傷をさけるために、次の項目を確認してください。 • 最初に機械を使用する前には、きれいに掃除してください。 輸送中にたまったほこりを全て取り除き、給油を行ってください。 • 正しい電圧設定になっているか確認してください。 電源プラグが正しくつながれているか確認してください。 • 絶対に電圧仕様の異なった状態で使用しないでください。 • ミシンの回転方向は、プーリ側よりみて反時計方向です。逆回転させないように注意してください。 • 頭部および油タンクに油を注油しないうちは、絶対にミシンを運転しないでください。 • 試運転する時は、ボビンと上糸を外してください。 • 最初の1カ月間は縫い速度を落とし、2,000 sti/min 以下でご使用ください。 • ミシンが確実に停止してから、はずみ車操作をしてください。 BEFORE OPERATION CAUTION : Check the following so as to prevent maloperation of and damage to the machine. •... -
Seite 44: Vor Dem Betrieb Zu Beachten
VOR DEM BETRIEB ZU BEACHTEN VORSICHT : Überprüfen Sie die folgenden Punkte, um Fehlbedienung und Beschädigung der Maschine zu verhüten. • Reinigen Sie die Maschine gründlich, bevor Sie sie nach der Installation erstmalig in Betrieb nehmen. Säubern Sie die Maschine gründlich von Staub, der sich während des Transports angesammelt hat, und ölen Sie sie gut. -
Seite 45: Misure Di Sicurezza Da Adottare Prima Della Messa In Funzione
ANTES DE LA OPERACION PRECAUTIONES : Compruebe los siguientes ítemes para evitar cualquier mal funcionamiento o daños en la máquina de coser. • Antes de poner en operación la máquina de coser por primera después de montada, límpiela a fondo. Quite todo el polvo que se haya acumulado durante el transporte y lubríquela bien con aceite. -
Seite 46: Specifications
Hand lifter lever : 9 mm Lift of presser foot Knee lifter : 16 mm Auto - lifter : 16 mm Lubricating oil JUKI New Defrix Oil No. 2 - Equivalent continuous emission - Equivalent continuous emission - Equivalent continuous emission sound pressure level (L... -
Seite 47: Technische Daten
Greifer Vertikalachsengreifer mit 2,0-facher Kapazität Handlifter : 9 mm Nähfußhub Knielifter : 16 mm Auto - Lifter : 16 mm Schmieröl JUKI New Defrix Oil No. 2 - Entsprechender kontinuierlicher - Entsprechender kontinuierlicher - Entsprechender kontinuierlicher Emissions-Schalldruckpegel Emissions-Schalldruckpegel Emissions-Schalldruckpegel ) am Arbeitsplatz:... -
Seite 48: Caratteristiche Tecniche
Elevadora de rodilla : 16 mm Elevador automático auto : 16 mm Aceite lubricante JUKI New Defrix Oil No. 2 - Nivel de presión de ruido de - Nivel de presión de ruido de - Nivel de presión de ruido de emisión continua equivalente... - Seite 49 – 7 –...
-
Seite 50: ミシンの据え付け
1. ミシンの据え付け / INSTALLATION / INSTALLATION / INSTALLATION / INSTALACION / INSTALLAZIONE / 1) ミシンは二人で持って運んでください。 (注意) プーリを持たないでください。 2) ミシンを置く場所に、ドライバー等の突起物を 置かないでください。 3) ヒンジ座、頭部支えゴム等の取り付け 付属のヒンジ座 1 、頭部支えゴム 2 等を、釘 3 でテーブルに止めてください。 ※ 滑り板を開ける時にテーブルと当たる場合は、 頭部支えゴム 2 とヒンジ座 1 の下に付属のス ペーサーゴム 4 と 5 を入れてください。 1) Carry the sewing machine with two persons. - Seite 51 4) オイルパンの取り付け 付属のオイルパン 1 を 8 箇所木ねじでテーブ テーブル 作業者側 Table ルに止めてください。 Operator’s side Tisch Bedienerseite 4) Attaching the oil pan Table Côté opérateur Fix the oil pan 1 supplied with the machine by Mesa Lado de la operadora Tavolo tightening eight wood screws. Lato dell’operatore 7 mm 4) Anbringen der Ölwanne...
- Seite 52 7) ヒンジ 1 をベッドの穴に入れ、テーブルのゴ ムヒンジにかみ合わせて、頭部を四隅の頭部支 えゴムの上におろしてください。 7) Fit hinge 1 into the opening in the machine bed, and fi t the machine head to table rubber hinge before placing the machine head on rubber seats on the four corners. 7) Das Scharnier 1 in die Öffnung des Maschinenbetts einpassen, und den Maschinenkopf erst in das [ヒンジ取り付け穴]/ [Hinge attaching hole] /...
- Seite 53 3 dans la direction de l’axe de levier de genouillère 4 et assembler ces pièces. (LU-1560N, LU-1561N) 10) Régler l’orientation de la genouillère avec les vis de fi xation 5 , 6 et 7 . (LU-1560N, LU-1561N) 9) Ajuste la unión 1 de la almohadilla de la rodilla, el brazo 2 de instalación del eje vertical del elevador de rodilla y la palanca 3 de almohadilla de la rodilla en la dicción del eje 4 de la palanca elevadora de rodilla y ensamble estos...
-
Seite 54: ベルト張力の調整
2. ベルト張力の調整 / ADJUSTING THE BELT TENSION / EINSTELLEN DER RIEMENSPANNUNG / REGLAGE DE LA TENSION DE COURROIE / MODO DE AJUSTAR LA TENSIÓN DE LA CORREA / REGOLAZIONE DELLA TENSIONE DELLA CINGHIA / 注意: 不意の起動による人身事故を防ぐために電源を切り、モータの回転が止まったことを確認してから行ってください。 WARNING : To avoid possible personal injury due to abrupt start of the machine, turn off the power to the machine and check to be sure that the motor has totally stopped rotating in prior. -
Seite 55: 停止位置の確認 (Lu-1560N-7, Lu-1561N-7)
ADJUSTING THE STOP POSITION (LU-1560N-7, LU-1561N-7) / ÜBERPRÜFEN DER STOPPPOSITION (LU-1560N-7, LU-1561N-7) / VERIFICATION DE LA POSITION D’ARRET (LU-1560N-7, LU-1561N-7) / MODO DE COMPROBAR LA POSICIÓN DE PARADA (LU-1560N-7, LU-1561N-7) / CONTROLLO DELLA POSIZIONE D’ARRESTO (LU-1560N-7, LU-1561N-7) / 注意: 不意の起動による人身事故を防ぐために電源を切り、モータの回転が止まったことを確認してから行ってください。... - Seite 56 Point de repère du volant Centre, blanc-blanc Position d’arrêt SUPERIEURE Jaune Position d’arrêt INFERIEURE Rouge Pour le réglage de la came de coupe-fi l Rotation arrière pour le relevage de l’ Sans couleur aiguille 1) Sur les positions d’arrêt et de réglage respectives, le point de repère 1 du bras de la machine s’aligne sur le point de repère 2 du volant.
-
Seite 57: ベルトカバーの取り付け
4. ベルトカバーの取り付け / ATTACHING THE BELT COVER / ANBRINGEN DER RIEMENABDECKUNG / POSE DU COUVRE-COURROIE / MODO DE COLOCAR LA CUBIERTA DE LA CORREA / FISSAGGIO DEL COPRICINGHIA / 注意: 不意の起動による人身事故を防ぐために電源を切り、モータの回転が止まったことを確認してから行ってください。 WARNING : To avoid possible personal injury due to abrupt start of the machine, turn off the power to the machine and check to be sure that the motor has totally stopped rotating in prior. - Seite 58 1) Attach belt cover stud 7 to the screw hole in the arm. 2) Fix belt cover (right) 1 on the arm with screws 2 and 3) Fit belt cover (left) 3 to notch A and B of the belt cover (right).
- Seite 59 1) Coloque el saliente 7 de la cubierta de la correa en el agujero de tornillo en el brazo. 2) Fije la cubierta de la correa (derecha) 1 en el brazo con los tornillos 2 y 8 . 3) Encaje la cubierta de la correa (izquierda) 3 en las muescas A y B de la cubierta de la correa (derecha). 4) Fije la cubierta de la correa 3 (izquierda) con los tornillos 4 , 5 y 6 .
-
Seite 60: 自動逆送り自動押え上げ付き頭部のエアー関係 (Lu-1560N-7, Lu-1561N-7)
5. 自動逆送り自動押え上げ付き頭部のエアー関係 (LU-1560N-7, LU-1561N-7) / THE AIR DRIVE UNIT OF THE SEWING MACHINE EQUIPPED WITH AUTOMATIC REVERSE FEED DEVICE AND AUTO-LIFTER (LU-1560N-7, LU-1561N-7) / LUFTANTRIEBSEINHEIT FÜR NÄHMASCHINEN MIT AUTOMATISCHER RÜCKWÄRTSNÄHVORRICHTUNG UND AUTO-LIFTER (LU-1560N-7, LU-1561N-7) / INSTALLATION DE L’UNITE PNEUMATIQUE DE LA MACHINE AVEC DISPOSITIF D’... -
Seite 61: Montieren Der Luftregeleinheit
(1) Attaching the air control unit Solenoid valve Cylinder 1) Attach regulator (asm.) 1 to the underside of the table with wood screws 2 supplied with the regulator. 2) Attach air control unit (asm.) 3 to the four places on the underside of the table with wood screws 4 supplied with the unit. -
Seite 62: Einstellen Des Luftdrucks
(2) エアー圧の調整 小 大 使用エアー圧は、0.45 ∼ 0.5 MPa です。 Decrease Increase Verringern Erhöhen フィルタレギュレータの調節つまみ 1 で調整して Diminution Augmentation ください。 Disminuir Aumentar Diminuzione Aumento (2) Adjusting the air pressure The operating air pressure is 0.45 to 0.5 MPa. Adjust the air pressure using air pressure regulating knob 1 of the fi... -
Seite 63: Lubrication
6. 給油 / LUBRICATION / SCHMIERUNG / LUBRIFICATION / LUBRICACION / LUBRIFICAZIONE / 注意: 不意の起動による人身事故を防ぐために電源を切り、モータの回転が止まったことを確認してから行ってください。 WARNING : To avoid possible personal injury due to abrupt start of the machine, turn off the power to the machine and check to be sure that the motor has totally stopped rotating in prior. WARNUNG : Um mögliche Verletzungen durch plötzliches Anlaufen der Maschine zu verhüten, schalten Sie die Stromversorgung der Maschine aus, und vergewissern Sie sich, daß... - Seite 64 その他について 1) 矢印で示された箇所には、毎日適量を注油して ください。 2) 初めて運転される前、または長期間使用しな かった場合には、矢印で示した箇所およびトッ プカバー 1 を外し、各フェルトと油芯に適量 を注油してください。 (注意) 必要以上に給油すると、油もれの原因とな ります。 For other parts 1) Apply an adequate amount of oil once a day to the points marked with the arrow marks. 2) Before you operate your machine for the fi rst time, or after an extended period of disuse, apply an adequate amount of oil to the points marked with the arrow marks and to each felt and oil wick after removing top...
- Seite 65 4) Insert oil pipe 3 into fi lter 4 of the oil tank and fi x the pipe with a clip. 5) Pour the JUKI New Defrix Oil No. 2 into the oil tank until HIGH level is reached. 6) Add the same lubricating oil up to HIGH level as soon as the oil level has come down to LOW level.
- Seite 66 6. Place cover (lower) 9 , fi lter 8 and cover (upper) 7 in orderin the oil tank, and fi x them with butterfl y nut 6 . 7. Insert the oil pipe into the oil tank and fi x it with a clip. Fill the oil tank with JUKI New Defrix Oil No. 2 up to HIGH level. ■ Reinigen des Öltanks 1.
-
Seite 67: Nettoyage Du Réservoir D'huile
7. Introduire le tuyau d’huile dans le réservoir d’huile et le fi xer avec un collier. Remplir le réservoir d’huile avec de l’huile JUKI New Defrix Oil N° 2 jusqu'au niveau HIGH. ■ Modo de limpiar el tanque del aceite 1. - Seite 68 ■ 8) 釜の油量調節は、ナット !5 をゆるめ油量調節 ねじ !4 で行います。右に回すと少なく、左に 回すと多くなります。 9) 適正量は、紙を釜外周近くに置いて、約 5 秒で 油量(跡)が左図のように、薄くすじができる 程度です。 多い 少ない 8) Loosen nut !5 and turn oil amount adjustment screw !4 to adjust the amount of oil in the hook. Turning the screw clockwise A will decrease the amount of oil in the hook or counterclockwise B will increase it.
-
Seite 69: 針の取り付け方
8) Die Mutter !5 lösen, und die Ölmengen-Regulierschraube !4 drehen, um die Ölmenge im Greifer einzustellen. Durch Drehen der Schraube im Uhrzeigersinn A wird die Ölmenge im Greifer verringert, während sie durch Drehen entgegen dem Uhrzeigersinn B vergrößert wird. 9) Zum Prüfen der Ölmenge ein Blatt Papier in die Nähe des Greiferumfangs bringen. Die Ölmenge ist angemessen, wenn Ölspritzer vom Greifer nach ungefähr fünf Sekunden erscheinen, wie in der linken Abbildung gezeigt. - Seite 70 1) Turn the handwheel to bring the needle bar to the highest position of its stroke. 2) Loosen needle clamp screws 2 , and hold needles 1 so that the long grooves in the needles come inside respectively. 3) Push needles 1 deep into the needle clamp holes until they will go no further.
-
Seite 71: ボビンの出し入れ
8. ボビンの出し入れ / ATTACHING AND REMOVING THE BOBBIN / EINSETZEN UND ENTFERNEN DER SPULE / POSE ET RETRAIT DE LA CANETTE / MODO DE METER Y DE SACAR LA BOBINA / INSERIMENTO E RIMOZIONE DELLA BOBINA / 注意: 不意の起動による人身事故を防ぐために電源を切り、モータの回転が止まったことを確認してから行ってください。 WARNING : To avoid possible personal injury due to abrupt start of the machine, turn off the power to the machine and check to be sure that the motor has totally stopped rotating in prior. -
Seite 72: 下糸の通し方
9. 下糸の通し方 / THREADING THE HOOK / EINFÄDELN DES GREIFERS / ENFILAGE DU CROCHET / MODO DE ENHEBRAR EL GANCHO / INFILATURA DEL FILO NEL CROCHET / 注意: 不意の起動による人身事故を防ぐために電源を切り、モータの回転が止まったことを確認してから行ってください。 WARNING : To avoid possible personal injury due to abrupt start of the machine, turn off the power to the machine and check to be sure that the motor has totally stopped rotating in prior. -
Seite 73: 糸巻き糸案内の取り付け
2) Ajuste la posición de la guía del hilo consultando “11. MODO DE BOBINAR UNA BOBINA”. 3) Para el LU-1560N y LU-1561N golpee la varilla 3 de la guia del hilo de bobina hacia dentro del brazo de la máquina. -
Seite 74: 下糸の巻き方
11. 下糸の巻き方 / WINDING A BOBBIN / BEWICKELN EINER SPULE / BOBINAGE D’UNE CANETTE / MODO DE BOBINAR UNA BOBINA / AVVOLGIMENTO DELLA BOBINA / • LU-1560N • LU-1560N-7 LU-1561N LU-1561N-7 1) 1 ∼ 4 の順に糸を通し、ボビンに数回巻き付けます。 2) 糸巻きレバー A を倒します。... -
Seite 75: 上糸の通し方
AVVERTIMENTO : Al fi ne di evitare ferimenti causati dall’avvio improvviso della macchina, spegnere la macchina ed assicurarsi in anticipo che il motore abbia completamente cessato di ruotare. • LU-1560N • LU-1560N-7 LU-1561N LU-1561N-7... -
Seite 76: 縫い目長さの調節
• LU-1560N • LU-1560N-7 LU-1561N LU-1561N-7 9 - I !0 - J 8 - H 9 - I !1 - K !2 - L !2 - L !3 - M 7 - G 8 - H 1. Monte la guía a del hilo del brazo en la cubierta 1. -
Seite 77: Rückwärtsnähen
2) Las puntadas de transporte inverso se hacen en tanto que usted mantenga presionada la palanca. 3) Suelte el interruptor, y la máquina de coser operará en la dirección de transporte normal. (2) Pespunte de transporte inverso a simple tacto manual (LU-1560N-7, LU-1561N-7) 1) Pulse el interruptor 3 a simple tacto. -
Seite 78: 糸調子
14. 糸調子 / THREAD TENSION / FADENSPANNUNG / TENSION DES FILS / TENSION DEL HILO / TENSIONE DEL FILO / (1) 上糸張力の調節 1) 第一糸調子ナット 1 を右に回すと、糸切り後 の針先に残る糸の長さが短くなり、左へ回すと 長くなります。 短 2) 第二糸調子ナット 2 を右に回すと上糸張力は 長 強くなり、左へ回すと弱くなります。 強 弱 (1) Adjusting the needle thread tension 1) Turn thread tension nut No. -
Seite 79: Einstellen Der Spulenfadenspannung
注意: 不意の起動による人身事故を防ぐために電源を切り、モータの回転が止まったことを確認してから行ってください。 WARNING : To avoid possible personal injury due to abrupt start of the machine, turn off the power to the machine and check to be sure that the motor has totally stopped rotating in prior. WARNUNG : Um mögliche Verletzungen durch plötzliches Anlaufen der Maschine zu verhüten, schalten Sie die Stromversorgung der Maschine aus, und vergewissern Sie sich, daß... -
Seite 80: 糸取りばね
15. 糸取りばね / THREAD TAKE-UP SPRING / FADENANZUGSFEDER / RESSORT DE RELEVAGE DU FIL / MUELLE DEL TIRAHILO / MOLLA TIRAFILO / (1) 糸取りばねの動き量をかえる時 1) 左側の糸取りばね 1 はストッパー止めねじ 2 をゆるめ、ストッパー 3 を左右に動かします。 2) 右側の糸取りばね 4 はストッパー止めねじ 5 をゆるめ、ストッパー 6 を左右に動かします。 3)... -
Seite 81: 押え上げについて
(1) Per modifi care la corsa della molla tirafi lo 1) Per molla tirafi lo 1 sul lato sinistro, allentare vite di fi ssaggio 2 e spostare scontro 3 verso sinistra o destra. 2) Per molla tirafi lo 4 sul lato destro, allentare vite di fi ssaggio 5 e spostare scontro 6 verso sinistra o destra. 3) Spostare lo scontro verso destra per aumentare o verso sinistra per ridurre la corsa. -
Seite 82: 押え圧力の調節
17. 押え圧力の調節 / ADJUSTING THE PRESSURE OF THE PRESSER FOOT / EINSTELLEN DES NÄHFUSSDRUCKS / REGLAGE DE LA PRESSION DU PIED PRESSEUR / MODO DE AJUSTAR LA PRESION DEL PRENSATELAS / REGOLAZIONE DELLA PRESSIONE DEL PIEDINO PREMISTOFFA / 1) 押え調節ダイヤル 1 を右へ回すと強くなり、 左へ回すと弱くなります。... -
Seite 83: 針と釜の関係
18. 針と釜の関係 / NEEDLE-TO-HOOK RELATION / NADEL-HAKEN-BEZIEHUNG / RELATION ENTRE L’AIGUILLE ET LE CROCHET / RELACION DE AGUJA A GANCHO / RELAZIONE FASE AGO-CROCHET / 注意: 不意の起動による人身事故を防ぐために電源を切り、モータの回転が止まったことを確認してから行ってください。 WARNING : To avoid possible personal injury due to abrupt start of the machine, turn off the power to the machine and check to be sure that the motor has totally stopped rotating in prior. - Seite 84 0.05 to 0.1 mm / 0,05 bis 0,1 mm 0,05 à 0,1 mm / 0,05 a 0,1 mm da 0,05 a 0,1 mm / 1) Set the stitch dial to 0 [zero]. 2) Turn the handwheel and loosen setscrew 1 in the needle bar connection to adjust so that a clearance of 1.5 mm is provided between the top end of the needle eyelet of needle 2 and blade point 3 of the hook when the needle bar is raised by 2.3 mm from the lowest position of its stroke.
- Seite 85 1) Fije a 0 (cero) el cuadrante de puntadas. 2) Gire el volante y afl oje el tornillo 1 en la conexión de la barra de aguja para hacer el ajuste de modo que se provea una separación de 1,5 mm entre el extremo superior del ojal de la aguja 2 y la punta de la hoja 3 del gancho cuando la barra de aguja se levanta 2,3 mm desde la posición inferior de su recorrido.
-
Seite 86: 釜針受けの調整
19. 釜針受けの調整 / ADJUSTING THE HOOK NEEDLE GUARD / EINSTELLEN DES GREIFERNADELSCHUTZES / REGLAGE DU PARE-AIGUILLE DE CROCHET / MODO DE AJUSTAR EL PROTECTOR DE AGUJA DE GANCHO / REGOLAZIONE DELLA PROTEZIONE AGO DEL CROCHET / 注意: 不意の起動による人身事故を防ぐために電源を切り、モータの回転が止まったことを確認してから行ってください。 WARNING : To avoid possible personal injury due to abrupt start of the machine, turn off the power to the machine and check to be sure that the motor has totally stopped rotating in prior. -
Seite 87: 中釜案内の調整
1) はずみ車を正規方向に回し、中釜案内 1 を最 後退位置にします。 2) ボビンケース 2 を矢印方向に回し、中釜止め 3 を針板 4 の溝に当てます。 3) 中釜案内止めねじ 5 をゆるめ、中釜案内とボ ビンケースの突起部 A とのすき間を 0.1 ∼ 0.2 mm(LU-1560N-7, 1561N-7) 、 0.1 ∼ 0.3 mm(LU-1560N, 1561N)にします。 0.1 ∼ 0.2 mm (LU-1560N-7, 1561N-7) 0.1 ∼ 0.3 mm (LU-1560N, 1561N) - Seite 88 3) Afl oje el tornillo 5 en la palanca de abrir la cápsula de canilla y haga el ajuste de modo que se provea una separación de 0,1 a 0,2 mm (LU-1560N-7, 1561N-7), 0,1 a 0,3mm (LU-1560N, 1561N) entre la palanca de abrir la cápsula de canilla y la sección saliente A de la cápsula de canilla.
-
Seite 89: 固定メスの位置・メス圧の調整 (Lu-1560N-7, Lu-1561N-7)
21. 固定メスの位置・メス圧の調整(LU-1560N-7, LU1561N-7) / POSITION OF THE COUNTER KNIFE AND ADJUSTMENT OF THE KNIFE PRESSURE (LU-1560N-7, LU-1561N-7) / POSITION DES GEGENMESSERS UND EINSTELLUNG DES MESSERDRUCKS (LU-1560N-7, LU-1561N-7) / POSITION DU COUTEAU FIXE ET REGLAGE DE LA PRESSION DU COUTEAU (LU-1560N-7, LU1561N-7) /... -
Seite 90: Adjusting The Counter Knife
Strike / Ausschlag / Contact / Golpear / Far battere / Strike Ausschlag Contact Golpear Far battere 1.5 ± 0.2 mm 2 ± 0.2 mm Strike Ausschlag Contact Golpear Far battere Knife pressure starts to be developed Messerdruck baut sich auf La pression du couteau commence à... - Seite 91 1) Déplacer le couteau mobile à la main jusqu'à l'extrémité de sa course avant. • Réglage du couteau fi xe 2) Desserrer les vis de fi xation 1 des socles de couteau fi xe, puis régler la position des couteaux fi xes de manière que l’extrémité...
-
Seite 92: 押え足と上送り足上昇量の調整
REGLAGE DE LA HAUTEUR DE RELEVAGE DU PIED PRESSEUR ET DU PIED TROTTEUR / MODO DE AJUSTAR LA CANTIDAD DE ELEVACIÓN DEL PRENSATELAS Y DEL PIE MÓVIL / REGOLAZIONE DELLA QUANTITÀ DI SOLLEVAMENTO DEL PIEDINO PREMISTOFFA E DEL PIEDINO MOBILE / • LU-1560N-7, LU-1561N-7 上昇量の調節はダイヤル 1 で行い、時計方向に回 すと大きくなり、反時計方向に回すと小さくなりま... - Seite 93 The amount of alternate vertical movement of the presser foot and the walking foot is normally equal. To increase the amount of alternate vertical movement, move upper feed arm 1 upward in the range of the slot. To decrease it, move the upper feed arm downward. Then, tighten the nut 3 . To change the lifting amount of the presser foot and that of the walking foot, loosen screw 2 in the upper feed arm, turn the handwheel to this side and tighten screw 2 when the bottom faces of the presser foot and the walking foot are fl...
-
Seite 94: 縫い速度一覧表
Circa 4 mm Línea demarcadora grabada C Linea di riferimento incisa C Aprox. 3 mm Circa 3 mm 23. 縫い速度一覧表 最高縫い速度は、縫製条件により下表のように設定されています。 各条件に合わせて最高縫い速度をセットし、設定値を越えないようにしてください。 1) 交互上下量による最高縫い速度 • LU-1560N, LU-1561N • LU-1560N-7, LU-1561N-7 縫い目 縫い目 6mm を 縫い目 縫い目 6mm を 交互上下量 交互上下量 6mm 以下... -
Seite 95: 23. Sewing Speed Table
Set the maximum sewing speed appropriately in accordance with the sewing conditions given taking care not to exceed the corresponding specifi ed value. 1) Maximum sewing speed in accordance with the amount of alternate vertical movement of the walking foot and presser foot • LU-1560N, LU-1561N • LU-1560N-7, LU1561N-7 Amount of alternate vertical Stitch length :... - Seite 96 Régler la vitesse maximale de couture selon les conditions de couture en veillant à ne pas dépasser la vitesse spécifi ée pour les conditions respectives. 1) Vitesse de couture maximale en fonction de la hauteur de mouvement alternatif vertical du pied trotteur et du pied presseur • LU-1560N, LU-1561N • LU-1560N-7, LU-1561N-7 Longueur Longueur...
- Seite 97 Impostare la velocità massima di cucitura appropriatamente a seconda delle condizioni di cucitura mostrate facendo attenzione a non superare i corrispondenti valori specifi cati. 1) Velocità massima di cucitura a seconda della quantità di movimento verticale alternato del piedino mobile e piedino premistoffa LU-1560N, LU-1561N LU-1560N-7, LU-1561N-7 • •...
-
Seite 98: モータプーリとVベルト
モータ回転数 有効径 サイズ 50 Hz 2,840 rpm φ M 44 60 Hz 3,400 rpm φ M 43 LU-1560N 2,500 sti/min φ 93.3 mm LU-1561N 50 Hz 1,430 rpm φ 160 M 47 60 Hz 1,715 rpm φ 135 M 46 モータは三相の... - Seite 99 50 Hz 2.840 tr/mn φ 80 M 44 LU-1560N 60 Hz 3.400 tr/mn φ 65 M 43 2.500 sti/min φ 93,3 mm 50 Hz 1.430 tr/mn φ 160 M 47...
-
Seite 100: 安全装置の復帰
25. 安全装置の復帰 / RESETTING THE SAFETY CLUTCH / RÜCKSTELLEN DER SICHERHEITSKUPPLUNG / REARMEMENT DE L’EMBRAYAGE DE SECURITE / MODO DE REPOSICIONAR EL EMBRAGUE DE SEGURIDAD / RIPRISTINO DELLA FRIZIONE DI SICUREZZA / 注意: 不意の起動による人身事故を防ぐために電源を切り、モータの回転が止まったことを確認してから行ってください。 WARNING : To avoid possible personal injury due to abrupt start of the machine, turn off the power to the machine and check to be sure that the motor has totally stopped rotating in prior. -
Seite 101: 自動押え上げの調整 (Lu-1560N-7, Lu-1561N-7)
2) La procedura di ripristino viene completata quando il volantino fa uno scatto. (Attenzione) Girare il volantino manualmente, e controllare che il pulsante 1 sia ritornato. 26. 自動押え上げの調整 (LU-1560N-7, LU-1561N-7) / ADJUSTING THE AUTOMATIC PRESSER FOOT LIFTER (LU-1560N-7, LU- 1561N-7) / EINSTELLEN DER AUTOMATISCHEN NÄHFUSSLÜFTUNG (LU-1560N-7, LU-... - Seite 102 1) シリンダを全圧縮させた時、押え上昇量が 16 mm になるように、調整ナット 1 をゆるめて シリンダロッド 2 を回し調整します。 A 方向に回すと小さくなり、 B 方向に回すと 大きくなります。 2) 調整が終わったら、調整ナット 1 を締めます。 1) Loosen adjustment nut 1 , turn cylinder rod 2 and adjust so that the lifting amount of the presser foot is 16 mm when the cylinder is fully compressed.
-
Seite 103: 縫いにおける現象と原因・対策
27. 縫いにおける現象と原因・対策 現象 原因 対策 ™ 釜剣先の傷は、 細目の紙やすりで研ぐ。 1 糸道、針先、釜剣先、針板の中釜止め 1. 糸切れ (糸がほつれ、または 溝に傷がある。 針板の中釜止め溝はバフで仕上げる。 すり切れる) 2 上糸張力が強い。 ™ 上糸張力を弱くする。 ™ すき間を小さくする。 3 中釜案内のすき間が大きい。 「20. 中釜案内の調整」参照。 ™ 「18. 針と釜の関係」参照。 4 針と釜剣先が当たる。 ™ 適正油量にする。 「6. 給油」参照。 5 釜部の油量が少ない。 6 上糸張力が弱い。 ™ 上糸張力を強くする。 (布裏に上糸が... -
Seite 104: 27. Troubles In Sewing And Corrective Measures
27. TROUBLES IN SEWING AND CORRECTIVE MEASURES Troubles Causes Corrective measures 1 Thread path, needle point, hook blade point ™ Remove the sharp edges or burrs on the 1. Thread breakage (Thread frays or is worn or bobbin case resting groove on the throat blade point of hook using a fi... -
Seite 105: 27. Nähstörungen Und Abhilfemassnahmen
27. NÄHSTÖRUNGEN UND ABHILFEMASSNAHMEN Störung Ursachen Abhilfemaßnahmen ™ Die scharfen Kanten oder Grate auf 1 Fadenbahn, Nadelspitze, 1. Fadenriß (Faden fasert aus oder ist abgewetzt.) Hakenmesserspitze oder die der Hakenmesserspitze mit feinem Spulenkapselrille auf der Stichplatte haben Schmirgelpapier entfernen. Die scharfe Kanten oder Grate. -
Seite 106: Lubrification
27. PROBLEMES DE COUTURE ET REMEDES Problèmes Causes Remèdes ™ Eliminer les arêtes vives ou les aspérités 1 Présence d’arêtes vives ou d’aspérités sur 1. Cassure du fi l (Fil effi loché ou usé) le trajet du fi l, la pointe de l’aiguille, la pointe sur la pointe de la lame du crochet avec de de la lame de crochet ou la gorge de la la toile émeri à... - Seite 107 27. PROBLEMAS EN EL COSIDO Y MEDIDAS CORRECTIVAS Problemass Causas Medidas correctivas ™ Elimine los bordes cortantes o las rebabas 1 La trayectoria del hilo, la punta de la aguja, 1. Se rompe el hilo (El hilo es débil o está la punta de la hoja del gancho o la ranura en en la punta de la hoja del gancho usando desgastado)
-
Seite 108: Inconvenienti In Cucitura E Rimedi
27. INCONVENIENTI IN CUCITURA E RIMEDI Inconvenienti Cause Rimedi ™ Rimuovere i bordi taglienti o le sbavature 1 La scanalatura del fi lo, la punta dell’ago, 1. Rottura del fi lo (Il fi lo si sfi laccia o si consuma) il bordo del crochet o la scanalatura di sulla punta del crochet usando una tela alloggiamento della capsula sulla placca... - Seite 109 ™ ™ ™ ™ ™ ™ ™ ™ ™ ™ ™ ™ ™ ™ ™ ™ ™ ™ ™ ™ ™ ™ ™ ™ ™ ™ ™ ™ ™ – 67 –...
- Seite 112 * Les spécifi cations données dans le présent Manuel d’utilisation sont sujettes à modifi cation sans préavis. Sírvase ponerse en contacto con nuestros distribuidores o agentes en su área siempre que necesite alguna Copyright C 2010-2013 JUKI CORPORATION información más detallada.