Inhaltsverzeichnis
Werbung
Verfügbare Sprachen
Verfügbare Sprachen
Quicklinks
Werbung
Inhaltsverzeichnis
Fehlerbehebung

Verwandte Anleitungen für Velleman SG21000


Inhaltszusammenfassung für Velleman SG21000
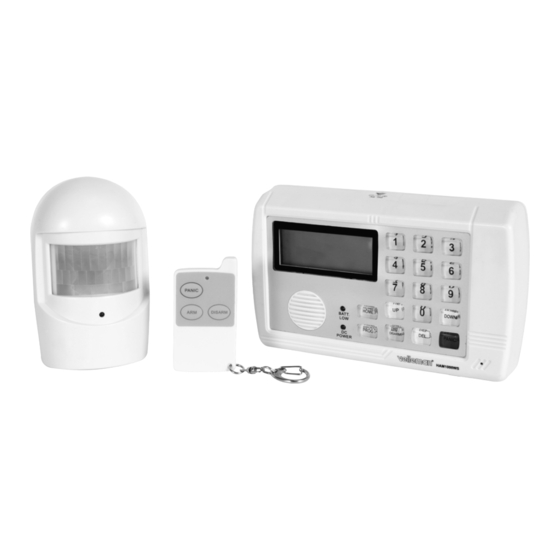
- Seite 1 SG21000 WIRELESS SECURITY ALARM SYSTEM DRAADLOOS BEVEILIGINGSSYSTEEM SYSTÈME DE SÉCURITÉ SANS FIL SISTEMA DE SEGURIDAD INALÁMBRICO DRAHTLOSES ALARMSYSTEM USER MANUAL GEBRUIKERSHANDLEIDING NOTICE D’EMPLOI MANUAL DEL USUARIO BEDIENUNGSANLEITUNG...
-
Seite 3: Safety Instructions
• This system can provide valuable protection for your home and property if used properly. However, it cannot guarantee complete protection against burglary or robbery. Therefore, VELLEMAN nv will not be responsible for any losses or damages which occur during the use of this product. -
Seite 4: Installation
LCD. Press ARM/DISARM to confirm. 3. Able or disable the siren using UP or DOWN. Press ARM/DISARM to confirm. 4. Press UP or DOWN to select another setup option or press PROG three times to exit. HAM1000WS_v3 VELLEMAN... - Seite 5 1. Press the PANIC button on the main unit or hold the PANIC button pressed for 2 seconds on the remote control. The alarm will sound instantly. 2. Enter the access code and press ARM/DISARM on the main unit to stop the siren. You can also hold DIASRM pressed for 2 seconds on the remote control. HAM1000WS_v3 VELLEMAN...
-
Seite 6: Other Functions
1. Open the battery cover using an appropriate screwdriver and install 1 x CR2032 battery (incl.). Mind the polarity. The batteries should last 5 to 6 months (normal operation). 2. Close the battery compartment. b. Transmission Range The transmission range is ± 20m. Replace the batteries if you have to shorten this range. HAM1000WS_v3 VELLEMAN... -
Seite 7: Troubleshooting
• Make sure you’ve entered the correct access code. If not, re-enter the code. • Reset ( ) the main unit using a sharp object and try to arm/disarm again. No remote control function • Check the battery and replace if necessary. • Reprogram the ID code (see “5.b. ID Codes”) HAM1000WS_v3 VELLEMAN... -
Seite 8: Technical Specifications
Verplaats in dit geval het toestel of richt het naar een ander punt. • Dit systeem beschermt uw huis en eigendom voldoende mits een correct gebruik. Het garandeert echter geen volledige bescherming tegen inbraak of diefstal. VELLEMAN nv kan dus niet verantwoordelijk worden gesteld voor diefstal of beschadiging van eigendom tijdens inbraak. - Seite 9 Druk op ARM/DISARM om te bevestigen. 3. Activeer of deactiveer de sirene met UP of DOWN. Druk op ARM/DISARM om te bevestigen. 4. Druk op UP of DOWN om een andere configuratieoptie te selecteren of druk driemaal op PROG om te verlaten. HAM1000WS_v3 VELLEMAN...
-
Seite 10: Het Toestel Gebruiken
1. Druk op PANIC op de hoofdeenheid button of houd PANIC op de afstandsbediening gedurende 2 seconden ingedrukt. Het paniekalarm wordt onmiddellijk ingeschakeld. 2. Geef de toegangscode in en druk op ARM/DISARM op de hoofdeenheid om het alarm uit schakelen. U kunt ook DIASRM op de afstandsbediening gedurende 2 seconden ingedrukt houden. HAM1000WS_v3 VELLEMAN... -
Seite 11: Andere Functies
9. De afstandsbediening (order code HAM1000WS/RC, meegelev.) a. De batterijen plaatsen 1. Open het batterijvak met een gepaste schroevendraaier en plaats 1 x CR2032-batterij (meegelev.). Respecteer de polariteit. De batterijen hebben een levensduur van 5 tot 6 maanden (normaal gebruik). 2. Sluit het batterijvak. HAM1000WS_v3 VELLEMAN... - Seite 12 3. Plaats nu de sensoren aan het raam of de deurlijst met de dubbele tape. Zorg dat u beide markeringen op één lijn plaatst ( en ). 4. Verbind de sensor met de zender. Verbind in serie wanneer u meer dan één sensor gebruikt (zie fig.). HAM1000WS_v3 VELLEMAN...
- Seite 13 1 x CR2032-batterij (meegelev.) Gewicht van de hoofdeenheid 850g Voor meer informatie omtrent dit product, zie www.velleman.eu. De informatie in deze handleiding kan te allen tijde worden gewijzigd zonder voorafgaande kennisgeving. HAM1000WS – SYSTÈME DE SÉCURITÉ SANS FIL 1. Introduction et caractéristiques Referencia Electrónica Embajadores:...
-
Seite 14: Paramétrage Du Système
• Ce système peut être un ensemble très efficace et protéger votre demeure et vos biens lors d’une utilisation comme décrit. Le système ne garantit pas toutefois la protection contre les vols et les cambriolages. SA VELLEMAN ne sera aucunement responsable de dommages ou de pertes survenues lors de l’usage de ce produit. - Seite 15 L’alarme 1. Une fois le système armé, l’unité principale affichera l’icône TRIGGER et la zone de détection dès l’interception d’un signal dans la zone protégée. Vous entendrez une sirène pendant 30 secondes après l’écoulement du délai d’entrée. HAM1000WS_v3 VELLEMAN...
-
Seite 16: Autres Fonctions
2. Choisir un endroit de montage approprié. Forer des trous à une hauteur de 1.5 à 2m, insérer une cheville dans chaque trou et fixer le support à l’aide des vis. Fixer le détecteur sur le support et aligner comme illustré. HAM1000WS_v3 VELLEMAN... - Seite 17 Tester le capteur Avant le montage, il est conseillé de tester la portée de transmission. Enfoncer la touche HOME sur l’unité principale, patienter 60 secondes, ouvrir et refermer le commutateur magnétique du capteur afin d’amorcer l’alarme. Tirer l’antenne si nécessaire. HAM1000WS_v3 VELLEMAN...
-
Seite 18: Problèmes Et Solutions
1 pile type CR2032 (incl.) Poids de l’unité principale 850g Pour plus d’information concernant cet article, visitez notre site web www.velleman.eu. Toutes les informations présentées dans cette notice peuvent être modifiées sans notification préalable. HAM1000WS – SISTEMA DE SEGURIDAD INALÁMBRICO 1. -
Seite 19: Instrucciones De Seguridad
Si es el caso, desplace el aparato o diríjalo a otro punto. • Este sistema protege su casa y posesiones de manera muy eficaz al utilizarlo de manera correcta. Sin embargo, no garantiza una protección completa contra robos. VELLEMAN SA no será responsable de daños o pérdidas causados durante un robo. -
Seite 20: Utilizar El Aparato
4. Oirá otro bip sonoro después de 60 segundos. La alarma está activada. 5. La unidad principal detecta el estado del sensor (cerrado o abierto). La alarma se activa si el sensor sigue abierto después de 5 segundos. HAM1000WS_v3 VELLEMAN... -
Seite 21: Otras Funciones
Antes de montar el sensor, compruebe el alcance de transmisión. Pulse HOME de la unidad principal y alinee el detector para obtener una superficie lo más grande posible. Fije el detector provisionalmente. Pase delante del sensor para accionar el sensor. Oirá un sonido. Si la unidad principal no emite ningún sonido, alinee el detector. HAM1000WS_v3 VELLEMAN... - Seite 22 • Conecte el sensor al emisor. Asegúrese de que establezca una conexión en bucle. Establezca una conexión en serie si utiliza más de un sensor (véase fig.). c. Uso El aparato pasa al modo ‘stand-by’ 60 segundos después de haber introducido la pila. HAM1000WS_v3 VELLEMAN...
-
Seite 23: Solución De Problemas
1 pila del tipo CR2032 (incl.) Peso de la unidad principal 850g Para más información sobre este producto, visite nuestra página web www.velleman.eu. Se pueden modificar las especificaciones y el contenido de este manual sin previo aviso. HAM1000WS – DRAHTLOSES ALARMSYSTEM 1. -
Seite 24: Sicherheitshinweise
Alarm ohne Grund ertönt. Verstellen Sie das Gerät in diesem Fall oder richten Sie es auf einen anderen Punkt. • Dieses System schützt ihr Haus und Besitzt bei korrekter Anwendung. Es garantiert aber keinen völligen Schutz vor Einbruch oder Diebstahl. VELLEMAN NV übernimmt also keine Haftung für Diebstahl oder Schäden während eines Einbruchs. - Seite 25 3. Zuerst erscheint das Datum und danach erscheint die Zeit im Display (JJ/MM/TT). Sie können die blinkenden Ziffern nun mit UP oder DOWN ändern. Drücken Sie ARM/DISARM, um Ihre Wahl zu bestätigen. 4. Drücken Sie PROG wenn Sie alles eingestellt haben. HAM1000WS_v3 VELLEMAN...
-
Seite 26: Den Abstand Zwischen Sensor Und Haupteinheit Überprüfen
6. ZONE 1 blinkt im Display. Wählen Sie die Zone mit UP oder DOWN aus und drücken Sie ARM/DISARM, um Ihre Wahl zu bestätigen. Drücken Sie danach ON oder OFF, um die Zone ein- oder auszuschalten. Drücken Sie ARM/DISARM zur Bestätigung. 7. Drücken Sie HOME wieder, um den Modus zu verlassen. HAM1000WS_v3 VELLEMAN... -
Seite 27: Der Bewegungsmelder (Bestell-Nr. Ham1000Ws/Mds, Mitgeliefert)
2. Suchen Sie sich einen geeigneten Montageort. Befestigen Sie den Sensor mit doppelseitigem Klebeband am Fenster oder am Türrahmen. Sorgen Sie dafür, dass beide Markierungen ausgerichtet sind ( und ). 3. Es ist möglich, zusätzliche Sensoren anzuschließen und so eine gesicherte Oberfläche auszubreiten. • Öffnen Sie das Batteriefach des Tür-/Fenstersensors. HAM1000WS_v3 VELLEMAN... -
Seite 28: Tür-/Fenstersensor Mit Alarm (Bestell-Nr. Ham1000Ws/Dws, Optional)
9VDC / 500mA (inkl.) (9V-Backup-Batterie, Bestell-Nr. 6LR61, nicht mitgeliefert) Bewegungsmelder 1 x 9V-Batterie (Bestell-Nr. 6LR61) Fernbedienung 1 x CR2032-Batterie (mitgeliefert) Gewicht der Haupteinheit 850g Für mehr Informationen zu diesem Produkt, siehe www.velleman.eu. Alle Änderungen ohne vorherige Ankündigung vorbehalten. HAM1000WS_v3 VELLEMAN... -
Seite 29: Ec Declaration Of Conformity
EN 61000-3-2 : 2000 EN 50130-4 : 1995 + A1 : 1998 EN 61000-3-3 : 1995 + A1 : 2001 This declaration is the sole responsibility of the manufacturer / importer : VELLEMAN COMPONENTS N.V. Legen Heirweg, 33 9890 Gavere Belgium... - Seite 30 Assessment of compliance of the product with the requirements relating to the Low Voltage Directive was based on the following standards : EN 60950-1 : 2001 This declaration is the sole responsibility of the manufacturer / importer : VELLEMAN COMPONENTS N.V. Legen Heirweg, 33 9890 Gavere Belgium...
- Seite 31 Déclaration de conformité R&TTE R&TTE Konformitätserklärung Declaración de conformidad R&TTE We / wij / nous / Wir / Nostros Velleman Components NV Legen Heirweg, 33 9890 Gavere (België) Declare on our own responsibility that the finished product(s) : Verklaren op eigen verantwoordelijkheid dat het afgewerkte product : Déclarons sous notre propre responsabilité...
- Seite 32 Technische gegevens zijn beschikbaar en kunnen worden aangevraagd bij : Die technische Dokumentation zu den oben gennanten Produkten wird geführt bei: Los datos técnicos están disponibles y pueden ser solicitados a: Velleman Components NV Legen Heirweg, 33 9890 Gavere (België) Place and date of issue / Plaats en datum van uitgifte / Place et date d’émission / Ort und...