Werbung
Quicklinks
INSTALLAZIONE – INSTALLATION
MONTAGE – EINBAU
Art. 00-1212E-CR
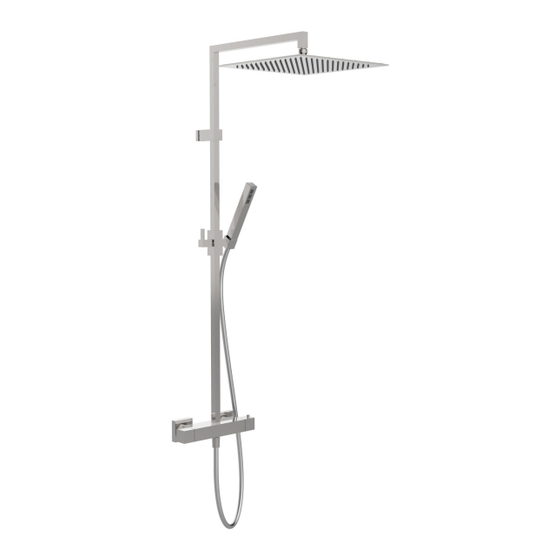
COLONNA COMPLETA "EXTREME MySlim" CON RUBINETTO TERMOSTATICO
"EXTREME MySlim" COMPLETE SHOWER COLUMN WITH INTEGRATED THERMOSTATIC FAUCET
"EXTREME MySlim" COLONNE DE DOUCHE COMPLETE DE ROBINET THERMOSTATIQUE INTEGRE'
"EXTREME MySlim" KOMPLETTE DUSCHSÄULE MIT THERMOSTATISCHEN WASSERHAHN
Werbung

Verwandte Anleitungen für Calflex CARIMALI 00-1212E-CR


Inhaltszusammenfassung für Calflex CARIMALI 00-1212E-CR
- Seite 1 INSTALLAZIONE – INSTALLATION MONTAGE – EINBAU Art. 00-1212E-CR COLONNA COMPLETA "EXTREME MySlim" CON RUBINETTO TERMOSTATICO “EXTREME MySlim“ COMPLETE SHOWER COLUMN WITH INTEGRATED THERMOSTATIC FAUCET “EXTREME MySlim“ COLONNE DE DOUCHE COMPLETE DE ROBINET THERMOSTATIQUE INTEGRE’ "EXTREME MySlim" KOMPLETTE DUSCHSÄULE MIT THERMOSTATISCHEN WASSERHAHN...
- Seite 2 Pos. Cod. Q.ty Realizzare l’impianto di adduzione delle acque seguendo le indicazioni WCOR0099CR riportate nello schema. Ingresso acqua calda a sinistra con attacco da G1/2”. Ingresso acqua fredda a destra con attacco da G1/2”. WTUB0183CR/SC Make the connections to the water plant by following the indications showed in the pictures above.
- Seite 3 Avvitare i raccordi eccentrici agli attacchi dell’impianto, utilizzando canapa o similari per realizzare la tenuta idraulica. Screw the eccentric connectors onto the plant elbows and use hemp or similar material to assure the waterproofing. Visser les raccords excentriques sur les raccords de l’implantation, utiliser du chanvre ou un similaire pour assurer l’étanchéité.
- Seite 4 Montare il miscelatore termostatico alla parete serrando le calotte con chiave esagonale da 30 mm. Fix the thermostatic mixer to the wall tightening the nuts by a 30 mm hexagonal wrench. Monter le thermostatique à la paroi et serrant les calottes avec une clé...
- Seite 5 Marcare la posizione del supporto di fermo. Mark the position of the fixing support. Marquer la position du support de fixation. Markieren die Lage der unbeweglichen Stütze. Sfilare la parte superiore della colonna dall’apposita sede. Remove the upper part of the column from its seat. Désenfiler la partie supérieure de la colonne de son siège.
- Seite 6 Inserire il tassello nel foro e fissare il supporto alla parete serrando la vite. Insert the plug into the hole and fix the support to the wall by tightening the screw. Insérer le tasseau dans le trou et fixer le support au mur en vissant la visse.
- Seite 7 Serrare i grani di bloccaggio con chiave a brugola da 2 mm. Tighten the screws with a 2mm Allen wrench. Serrer les vis de blocage avec une clé Allen 2 mm. Verschließen die Blockierung-Stifte mit einem 2mm Inbusschlüssel. Avvitare i raccordi conici del flessibile alla colonna ed alla doccetta.
-
Seite 8: Uso E Manutenzione
Avvitare il soffione all’attacco da 1/2” del tubo. Assicurarsi di inserire la guarnizione. Complimenti, la colonna è installata. Screw the shower head to the 1/2" connection of the tube. Be sure to have put the washer. Congratulation, the shower column is installed. Visser la pomme de douche au raccord 1/2"... -
Seite 9: Verwendung Und Wartung
USO E MANUTENZIONE: Smontaggio cartuccia termostatica per pulizia o sostituzione USE AND MAINTENANCE: Removing the thermostatic cartridge for cleaning or replacement UTILISATION ET ENTRETIEN: Retrait de la cartouche thermostatique pour le nettoyage ou le remplacement VERWENDUNG UND WARTUNG: Das Entfernen der Thermostat-Kartusche zum Reinigen oder Austauschen Chiudere gli ingressi dell’acqua fredda e dell’acqua calda. - Seite 10 Sfilare la cartuccia termostatica. Pull the thermostatic cartridge. Tirer la cartouche thermostatique. Entfernen die thermostatische Kartusche. Nel caso fosse necessario pulire i filtri a rete utilizzare uno spazzolino e risciacquare in acqua corrente; nel caso di incrostazioni di calcare immergere per 8-10 ore la cartuccia in una soluzione di acqua e aceto (50%) e poi risciacquare in acqua corrente.
- Seite 11 Assicurarsi che la cartuccia sia in posizione corretta. Make sure the cartridge is in the correct position. S’assurer que la cartouche est en position correct. Sich versichern, dass die neue Keramik-Kartusche in der geschlossenen Position ist. Avvitare il grano con chiave a brugola da 2 mm. Screw the screw with a 2 mm Allen key.
- Seite 12 Inserire la placchetta. Put the cover plate. Insérer la plaquette cache trou. Legen des deckte Plättchen.
- Seite 13 USO E MANUTENZIONE: Sostituzione della cartuccia deviatore USE AND MAINTENANCE: Replacement of the diverter cartridge UTILISATION ET ENTRETIEN: remplacement de la cartouche d’inverseur en céramique VERWENDUNG UND WARTUNG: Austausch der Umstellung Keramik-Kartusche Chiudere gli ingressi dell’acqua fredda e dell’acqua calda. Aprire la manopola di regolazione della portata [2].
- Seite 14 Assicurarsi che la nuova cartuccia deviatore sia in posizione chiuso. Make sure the new diverter cartridge is in the closed position. S’assurer que la nouvelle cartouche d’inverseur est en position fermée. Sich versichern, dass die neue Umstellung Keramik- Kartusche in der geschlossenen Position ist. Inserire la cartuccia deviatore nel corpo del miscelatore.
- Seite 15 Bloccare la manopola del deviatore avvitando il grano con chiave a brugola da 2 mm. Block the diverter handle by screwing the screw with a 2 mm Allen key. Fermer la poignée d’inverseur en vissant la vis avec une clé Allen de 2 mm.
- Seite 16 Per una politica di continuo miglioramento, CALFLEX S.r.l. si riserva la possibilità di applicare modifiche tecniche sui suoi articoli senza nessun preavviso. For a continuous improvement policy, CALFLEX S.r.l. reserves the right to modify the technical features of its articles at any time without notice.