Herunterladen Inhalt Inhalt Diese Seite drucken
LaserLiner VideoControl-Master Bedienungsanleitung
Vorschau ausblenden Andere Handbücher für VideoControl-Master:
Inhaltsverzeichnis

Werbung

Verfügbare Sprachen
  • DE

Verfügbare Sprachen

  • DEUTSCH, seite 1
60
200
5"
VideoControl-Master
ø 11
DE
02
EN
14
26
NL
38
DA
FR
50
ES
62
IT
74
PL
86
FI
PT
SV
NO
TR
RU
UK
CS
ET
LV
LT
RO
BG
EL

Werbung

Inhaltsverzeichnis
loading

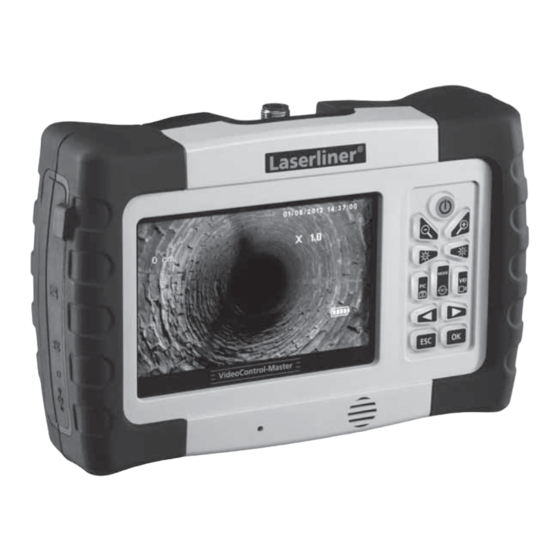
Inhaltszusammenfassung für LaserLiner VideoControl-Master

  • Seite 1 VideoControl-Master ø 11 5"...
  • Seite 2: Allgemeine Sicherheitshinweise

    Weitergabe des Gerätes mitzugeben. Funktion / Verwendung Der VideoControl-Master ist die Basiseinheit zum Anschluss verschiedener Kameraeinheiten. Zusammen mit einer Kameraeinheit werden farbige Videobilder an das LCD zur Überprüfung schwer zugänglicher Stellen wie z.B. in Rohrleitungen, Kanälen, Lüftungs- und Abgasinstallationen gesendet.
  • Seite 3 VideoControl-Master ON/OFF Aufnahme Video Start / Stop – Zoom / Bildselektion aufheben Navigationstaste / Wiedergabemodus + Zoom / Bildselektion Navigationstaste / Wiedergabemodus / – LED-Beleuchtung / Abspielgeschwindigkeit Lautstärke – ESC: Menü verlassen + LED-Beleuchtung / Lautstärke + Bestätigen / Sprachaufzeichnung...
  • Seite 4: Sd-Karte Einlegen

    Einstellungsmodus Menüsprache Meterzähler (nur mit Pipe- Control-LevelFlex-Camera) Datum/Uhrzeit Menü Sprache Videoausgang Videoformat PAL / NTSC Datum/Zeit-Setup Videoformat Alles löschen Automatische Abschaltung Auto Aus Eingangsquelle Eingangsquelle Meterzähler Videoausgang Alles löschen SD-Karte einlegen SD-Karte entfernen Menüsprache einstellen Menü Sprache Datum/Zeit-Setup Videoformat 3 sec 3 sec Auto Aus Eingangsquelle...
  • Seite 5: Led-Beleuchtung

    VideoControl-Master Bild-/Videoaufnahmen Gerät einschalten, Kamerakopf am Flexschlauch ausrichten und an die gewünschte Position führen. Bei schlechten Lichtverhältnissen LED-Beleuchtung einschalten. Weiter entfernte oder kleine Objekte heran- zoomen. Durch die manuelle Bildrotation kann das Bild auf dem Monitor schrittweise um 90° gedreht werden.
  • Seite 6: Wiedergabe Von Bild-/Videoaufnahmen

    Bild mit Sprachaufzeichnung 2012/01/05 12:50:28 2012/01/05 12:50:28 0 cm X 1.0 0 cm X 1.0 00 : 00 : 32 START STOP 3 sec Wiedergabe von Bild-/Videoaufnahmen Gerät einschalten und mit den Pfeiltasten in den Wiedergabemodus schalten. Eine Bildübersicht wird auf dem Display angezeigt.
  • Seite 7 VideoControl-Master Wiedergabe Video 2012/01/05 12:50:28 2012/01/05 12:50:28 2012/01/05 12:50:28 0 cm 0 cm 0 cm IMG00001 IMG00001 IMG00001 00 : 00 : 32 00 : 00 : 32 Vorlauf Video Wiedergabe Lautstärke Sprachaufzeichnung 2012/01/05 12:50:28 2012/01/05 12:50:28 2012/01/05 12:50:28 0 cm X 1.0...
  • Seite 8: Mehrere Bilder In Der Bildübersicht Löschen

    Mehrere Bilder in der Bildübersicht löschen Löschen ausgewähle Dateien Löschen ausgewähle Dateien Nein Nein 2 sec Bildvergleichsfunktion 2012/01/05 12:50:28 2012/01/05 12:50:28 0 cm 0 cm...
  • Seite 9: Sprache Ändern

    VideoControl-Master Einstellungsmodus Menü Sprache Datum/Zeit-Setup Videoformat 3 sec 3 sec Auto Aus Eingangsquelle MODE Der Einstellungsmodus wird nach 10 Sekunden automatisch beendet oder kann durch drücken der ESC-Taste beendet werden. Sprache ändern (DE, EN, NL, DA, FR, ES, IT, PL, FI, PT, SV, NO, TR, RU, UK, CS, ET, LV, LT, RO, BG, EL) Menü...
  • Seite 10 Datum/Zeit-Setup Menü Sprache Datum/Zeit-Setup Videoformat Auto Aus Eingangsquelle Datum/Zeit-Setup Setup Setup Datumsformat dd . mm . yyyy dd . mm . yyyy Zeitformat 22 . 08 . 2012 23 . 08 . 2012 Setup 12 : 00 : 08 12 : 00 : 08 Display Ein Display Ein 22 / 23 / …...
  • Seite 11: Automatische Abschaltung

    VideoControl-Master Videoformat Menü TV Ausgang TV Ausgang Sprache NTSC NTSC Datum/Zeit-Setup Videoformat Auto Aus Eingangsquelle Automatische Abschaltung Menü Automatik aus Automatik aus Sprache Deaktivieren Deaktivieren Datum/Zeit-Setup 5 Minuten 5 Minuten Videoformat 10 Minuten 10 Minuten Auto Aus 15 Minuten 15 Minuten...
  • Seite 12: Hinweise Zur Benutzung

    Zum Wechseln des Akkus, senden Sie das Gerät an UMAREX-Laserliner. Anschluss an einen Monitor Der VideoControl-Master kann durch das mitgelieferte Kabel an einen Monitor angeschlossen werden. Verwenden Sie hierzu Anschluss „g“ und wählen Sie im Menü den entsprechenden Videoausgang aus, siehe hierzu „8.7 Videoausgang“.
  • Seite 13: Akku Laden

    EU-Bestimmungen und Entsorgung Das Gerät erfüllt alle erforderlichen Normen für den freien Warenverkehr innerhalb der EU. Dieses Produkt ist ein Elektrogerät und muss nach der europäischen Richtlinie für Elektro- und Elektronik-Altgeräte getrennt gesammelt und entsorgt werden. Weitere Sicherheits- und Zusatzhinweise unter: http://laserliner.com/info?an=vcm...
  • Seite 14: General Safety Instructions

    Function / Application VideoControl-Master is the base unit for connecting various camera units. Working with a camera unit, colour video images are sent to the LCD for inspecting all places that are difficult to access such as pipelines, canals, ventilation pipes and exhaust gas systems.
  • Seite 15 VideoControl-Master 2012/01/05 12:50:28 0 cm X 1.0 0 cm X 1.0 CAMERA 00 : 00 : 32 00 : 00 : 32 current date Intensity of LED lighting Recording time current time Battery status Voice recording Length measure (only with...
  • Seite 16: Setting The Menu Language

    Settings mode Menu language Length measure (only with PipeControl-LevelFlex-Camera) Menu Date/Time Language Video output Date/time setup Video format PAL / NTSC Video format Delete all Auto power off Auto power off Input source Length measure Input source Video output Delete all Inserting SD card Removing the SD card Setting the menu language...
  • Seite 17: Led Lighting

    VideoControl-Master Still images/Video recordings Switch on unit, line up the camera head on the flex cable and move it to the required position. If lighting conditions are poor, switch on the LED lighting. Zoom in on distant or small objects. The manual image rotation function enables the image to be rotated by 90°...
  • Seite 18: Full Screen Mode

    Still image with voice recording 2012/01/05 12:50:28 2012/01/05 12:50:28 0 cm X 1.0 0 cm X 1.0 00 : 00 : 32 START STOPP 3 sec Playback of still images/video recordings Switch on unit and select the playback mode with the arrow keys. The display shows an overview of image recordings.
  • Seite 19 VideoControl-Master Video playback 2012/01/05 12:50:28 2012/01/05 12:50:28 2012/01/05 12:50:28 0 cm 0 cm 0 cm IMG00001 IMG00001 IMG00001 00 : 00 : 32 00 : 00 : 32 Video forward Voice recording Volume playback 2012/01/05 12:50:28 2012/01/05 12:50:28 2012/01/05 12:50:28 0 cm X 1.0...
  • Seite 20 Deleting several images in the image overview Delete selected files Delete selected files 2 sec Image comparison function 2012/01/05 12:50:28 2012/01/05 12:50:28 0 cm 0 cm...
  • Seite 21: Changing The Language

    VideoControl-Master Settings mode Menu Language Date/time setup Video format 3 sec 3 sec Auto power off Input source MODE Setting mode is automatically deactivated after 10 seconds or can be cancelled by pressing the ESC button. Changing the language (DE, EN, NL, DA, FR, ES, IT, PL, FI, PT, SV, NO, TR, RU, UK, CS, ET, LV, LT, RO, BG, EL)
  • Seite 22: Date/Time Setup

    Date/time setup Menu Language Date/time setup Video format Auto power off Input source Date/time setup Setup Setup Date format dd . mm . yyyy dd . mm . yyyy Time format 22 . 08 . 2012 23 . 08 . 2012 Setup 12 : 00 : 08 12 : 00 : 08...
  • Seite 23: Auto Power Off

    VideoControl-Master Video format Menu TV output TV output Language NTSC NTSC Date/time setup Video format Auto power off Input source Auto power off Menu Auto off Auto off Language Disable Disable Date/time setup 5 min 5 min Video format 10 min...
  • Seite 24: Video Output

    Send in the unit to UMAREX-Laserliner for the battery to be changed. Connecting to a monitor The VideoControl-Master can be connected to a monitor with the supplied cable. Use connection „g“ for this purpose and select the corresponding video output in the menu, see „8.7 Video Output“.
  • Seite 25: Battery Charging

    This device complies with all necessary standards for the free movement of goods within the EU. This product is an electric device and must be collected separately for disposal according to the European Directive on waste electrical and electronic equipment. Further safety and supplementary notices at: http://laserliner.com/info?an=vcm...
  • Seite 26: Algemene Veiligheidsaanwijzingen

    Functie / toepassing De VideoControl-Master is de basiseenheid voor de aansluiting op verschillende camera-eenheden. Samen met een camera-eenheid worden gekleurde videobeelden naar het lcd gestuurd ter controle van moeilijk toegankelijke plaatsen zoals bijv. buisleidingen, rioleringen, ventilatie- en uitlaatgasinstallaties.
  • Seite 27 VideoControl-Master ON/OFF Opname video Start / stop – Zoom / Fotoselectie ongedaan maken Navigatietoets / Weergavemodus + Zoom / Fotoselectie Navigatietoets / Weergavemodus / – LED-verlichting / Afspeelsnelheid Volume – ESC: menu verlaten + LED-verlichting / Volume + Bevestigen / Spraakopname beëindigen...
  • Seite 28: Menu-Taal Instellen

    Instellingsmodus Menu-taal Lengte te meten (alleen met PipeControl-LevelFlex-Camera) Menu Datum/tijd Taal Video uitgang Datum/Tijd-instellingen Video formaat PAL / NTSC Video formaat Alles wissen Automatisch uitschakelen Automatische uitschakeling Invoerbron Lengte te meten Invoerbron Video uitgang Alles wissen SD-kaart plaatsen SD-kaart verwijderen Menu-taal instellen Menu Taal...
  • Seite 29: Led-Verlichting

    VideoControl-Master Foto- / video-opnames Schakel het apparaat in, richt de camerakop aan het uiteinde van de flexibele slang en beweeg hem vervolgens naar de gewenste positie. Schakel de ledverlichting in geval van slechte lichtomstandigheden in. U kunt kleine objecten of objecten op afstand dichterbij halen (zoomen). Het beeld op de monitor kan met behulp van de beeldrotatie stapsgewijs 90°...
  • Seite 30 Foto met spraakopname 2012/01/05 12:50:28 2012/01/05 12:50:28 0 cm X 1.0 0 cm X 1.0 00 : 00 : 32 START STOP 3 sec Weergave van foto- / video-opnames Schakel het apparaat in en kies de weergavemodus met behulp van de pijltoetsen. Een foto-overzicht wordt op het display weergegeven.
  • Seite 31 VideoControl-Master Videoweergave 2012/01/05 12:50:28 2012/01/05 12:50:28 2012/01/05 12:50:28 0 cm 0 cm 0 cm IMG00001 IMG00001 IMG00001 00 : 00 : 32 00 : 00 : 32 Vooruitspoelen video Weergave Volume spraakopname 2012/01/05 12:50:28 2012/01/05 12:50:28 2012/01/05 12:50:28 0 cm X 1.0...
  • Seite 32 Meerdere foto‘s wissen in het foto-overzicht Geselecteerde bestanden wissen Geselecteerde bestanden wissen 2 sec Foto-vergelijkingsfunctie 2012/01/05 12:50:28 2012/01/05 12:50:28 0 cm 0 cm...
  • Seite 33: Taal Wijzigen

    VideoControl-Master Instellingsmodus Menu Taal Datum/Tijd-instellingen Video formaat 3 sec 3 sec Automatisch uitschakelen Invoerbron MODE De instelmodus wordt automatisch na 10 seconden beëindigd of kan worden beëindigd door het indrukken van de toets ESC. Taal wijzigen (DE, EN, NL, DA, FR, ES, IT, PL, FI, PT, SV, NO, TR, RU, UK, CS, ET, LV, LT, RO, BG, EL)
  • Seite 34 Datum/Tijd-instellingen Menu Taal Datum/Tijd-instellingen Video formaat Automatisch uitschakelen Invoerbron Datum/Tijd-instellingen Setup Setup Datumaanduiding dd . mm . yyyy dd . mm . yyyy Tijdsaanduiding 22 . 08 . 2012 23 . 08 . 2012 Setup 12 : 00 : 08 12 : 00 : 08 Weergave Aan Weergave Aan...
  • Seite 35: Automatische Uitschakeling

    VideoControl-Master Video formaat Menu TV uitgang TV uitgang Taal NTSC NTSC Datum/Tijd-instellingen Video formaat Automatisch uitschakelen Invoerbron Automatische uitschakeling Menu Automatisch uit Automatisch uit Taal Deactiveren Deactiveren Datum/Tijd-instellingen 5 min 5 min Video formaat 10 min 10 min Automatisch uitschakelen...
  • Seite 36: Usb-Gegevensoverdracht

    Voor de vervanging van de accu stuurt u het apparaat naar UMAREX-Laserliner. Aansluiting op een monitor De VideoControl-Master kan met behulp van de bijgeleverde kabel worden aangesloten op een monitor. Gebruik hiervoor de aansluiting ‚g‘ en kies de betreffende video-uitgang in het menu, zie hiervoor ‚8.7 Video-uitgang‘.
  • Seite 37: Accu Laden

    VideoControl-Master Accu laden – De netadapter/het laadtoestel mag alleen in gesloten ruimten gebruikt en niet aan vocht of regen blootgesteld worden omdat anders gevaar voor elektrische schokken bestaat. – Laad de accu vóór het gebruik van het apparaat compleet op.
  • Seite 38: Sikkerhedsanvisninger

    Funktion / anvendelse VideoControl-Master er grundenheden for tilslutning af forskellige kameraenheder. Sammen med en kameraenhed sendes videobilleder i farver til LCD-enheden for at kontrollere vanskeligt tilgængelige steder fx i rørledninger, kanaler, ventilations- og udluftningsinstallationer.
  • Seite 39 VideoControl-Master ON/OFF Optagelse video Start / Stop – Zoom / Annuller billedvalg Navigationstast / Gengivelsesmodus + Zoom / Billedvalg Navigationstast / Gengivelsesmodus / – Diodelampe / Afspilningshastighed Lydstyrke – ESC: Afslut menu + Diodelampe / Lydstyrke + Bekræft / Afslut lydoptagelse...
  • Seite 40 Indstillingsmodus Menusprog Længde foranstaltning (kun med PipeControl- Menu Dato/klokkeslæt LevelFlex-Camera) Sprog Dato/tid indst. Video format PAL / NTSC Video format Videoudgang Autom. Sluk Automatisk slukning Ingangskilde Slet alle Længde foranstaltning Ingangskilde Videoudgang Slet alt Indsæt SD-kort Tag SD-kort ud Indstil menusprog Menu Sprog Dato/tid indst.
  • Seite 41 VideoControl-Master Billed-/videooptagelse Tænd for apparatet, indstil kamerahovedet på flexslangen og anbring det i den ønskede position. Under dårlige lysforhold kan man tænde diodelampen. Man kan zoome ind på fjerne eller små objekter. Via den manuelle billedrotation kan billedet drejes i trin a 90° på monitoren. Når man trykker kortvarigt på...
  • Seite 42 Billede med stemmeoptagelse 2012/01/05 12:50:28 2012/01/05 12:50:28 0 cm X 1.0 0 cm X 1.0 00 : 00 : 32 START STOP 3 sec Gengivelse af billed-/videooptagelser Tænd for apparatet, og skift til gengivelsesmodus ved hjælp af piletasterne. Der vises en billedoversigt på displayet.
  • Seite 43 VideoControl-Master Gengivelse video 2012/01/05 12:50:28 2012/01/05 12:50:28 2012/01/05 12:50:28 0 cm 0 cm 0 cm IMG00001 IMG00001 IMG00001 00 : 00 : 32 00 : 00 : 32 Fremadspoling video Gengivelse Lydstyrke stemmeoptagelse 2012/01/05 12:50:28 2012/01/05 12:50:28 2012/01/05 12:50:28 0 cm X 1.0...
  • Seite 44 Sletning af flere billeder i billedoversigten Sletning af udvalgte filer Sletning af udvalgte filer 2 sec Billedsammenligningsfunktion 2012/01/05 12:50:28 2012/01/05 12:50:28 0 cm 0 cm...
  • Seite 45: Skift Sprog

    VideoControl-Master Indstillingsmodus Menu Sprog Dato/tid indst. Video format 3 sec 3 sec Autom. Sluk Ingangskilde MODE Indstillingsmodus afsluttes automatisk efter 10 sekunder - eller kan afsluttes ved at trykke på ESC-knappen. Skift sprog (DE, EN, NL, DA, FR, ES, IT, PL, FI, PT, SV, NO, TR, RU, UK, CS, ET, LV, LT, RO, BG, EL)
  • Seite 46 Dato/tid indst. Menu Sprog Dato/tid indst. Video format Autom. Sluk Ingangskilde Dato/tid indst. Opsætning Opsætning Datoformat dd . mm . yyyy dd . mm . yyyy Tidsformat 22 . 08 . 2012 23 . 08 . 2012 Opsætning 12 : 00 : 08 12 : 00 : 08 Vise Tænd Vise Tænd...
  • Seite 47: Automatisk Slukning

    VideoControl-Master Video format Menu TV udgang TV udgang Sprog NTSC NTSC Dato/tid indst. Video format Autom. Sluk Ingangskilde Automatisk slukning Menu Autom. Sluk Autom. Sluk Sprog Deaktiver Deaktiver Dato/tid indst. 5 min 5 min Video format 10 min 10 min Autom.
  • Seite 48 Hvis de genopladelige batterier skal udskiftes, skal man sende apparatet til UMAREX-Laserliner. Tilslutning til en monitor VideoControl-Master kan sluttes til en monitor ved det medfølgende kabel. Man benytter tilslutningen „g“ og vælger den ønskede videoudgang i menuen, se „8.7 Videoudgang“.
  • Seite 49 VideoControl-Master Oplad akku – Strømforsyningen/opladeren må kun bruges i lukkede rum; må ikke udsættes for fugt eller regn, da der ellers er risiko for elektrisk stød. – Inden apparatet tages i brug, skal batterierne lades helt op. – Man må kun benytte den vedlagte lysnetadapter/oplader. Hvis der benyttes en forkert lysnetadapter/oplader, bortfalder garantien.
  • Seite 51 VideoControl-Master Date actuelle Intensité de l’éclairage DEL Durée de l‘enregistrement Heure actuelle État de charge des piles Enregistrement vocal Mesurer la longueur Brancher une caméra Enregistrement vocal (uniquement avec la fonction Emplacement Symbole image PipeControl-LevelFlex-Camera) mémoire occupé Durée de Degré de zoom (1.0 - 2.0) Symbole vidéo...
  • Seite 52: Réglage De La Langue Du Menu

    Mode de réglage Langue du menu Mesurer la longueur (uniquement avec la fonction Menu Date/Temps PipeControl-LevelFlex-Camera) Langue Date/Temps Format de vidéo PAL / NTSC Format de vidéo Sortie de vidéo Arrêt auto Arrêt automatique Source d’entree Tout supprimer Mesurer la longueur Source d’entree Sortie de vidéo Tout supprimer...
  • Seite 53: Rotation De L'image

    VideoControl-Master Enregistrement d’images/vidéo Mettre l‘appareil sous tension, orienter la tête de la caméra au niveau du tuyau flexible et la mettre à la position souhaitée. Activer l’éclairage DEL en cas de mauvaise visibilité. Zoomer sur des objets de petite taille ou éloignés. La rotation manuelle permet de faire tourner l‘image de 90° sur le moniteur. Actionner brièvement la touche PIC pour enregistrer une image et la mémoriser sur la carte SD.
  • Seite 54 Image avec enregistrement vocal 2012/01/05 12:50:28 2012/01/05 12:50:28 0 cm X 1.0 0 cm X 1.0 00 : 00 : 32 MARCHE ARRÊT 3 sec Reproduction d’images/d’enregistrement vidéo Mettre l‘appareil sous tension et activer le mode de lecture en utilisant les touches fléchées. Une vue d‘ensemble des images s‘affiche à...
  • Seite 55: Lecture Vidéo

    VideoControl-Master Lecture vidéo 2012/01/05 12:50:28 2012/01/05 12:50:28 2012/01/05 12:50:28 0 cm 0 cm 0 cm IMG00001 IMG00001 IMG00001 00 : 00 : 32 00 : 00 : 32 Avance vidéo Lecture Volume enregistrement vocal 2012/01/05 12:50:28 2012/01/05 12:50:28 2012/01/05 12:50:28 0 cm X 1.0...
  • Seite 56 Effacement de plusieurs images dans la vue d‘ensemble Effacer des images sélectionnées Effacer des images sélectionnées 2 sec Fonction de comparaison des images 2012/01/05 12:50:28 2012/01/05 12:50:28 0 cm 0 cm...
  • Seite 57: Mode De Réglage

    VideoControl-Master Mode de réglage Menu Langue Date/Temps Format de vidéo 3 sec 3 sec Arrêt auto Source d’entree MODE Le système quitte automatiquement le mode de réglage au bout de 10 secondes ou il est possible d‘y mettre fin en appuyant sur la touche ESC (ECHAP).
  • Seite 58 Date/Temps Menu Langue Date/Temps Format de vidéo Arrêt auto Source d’entree Date/Temps Configuration Configuration Format de la date dd . mm . yyyy dd . mm . yyyy Format de l‘heure 22 . 08 . 2012 23 . 08 . 2012 Configuration 12 : 00 : 08 12 : 00 : 08...
  • Seite 59: Arrêt Automatique

    VideoControl-Master Format de vidéo Menu Sortie de TV Sortie de TV Langue NTSC NTSC Date/Temps Format de vidéo Arrêt auto Source d’entree Arrêt automatique Menu Auto off Auto off Langue Déactiver Déactiver Date/Temps 5 min 5 min Format de vidéo...
  • Seite 60: Tout Supprimer

    Branchement sur un moniteur Il est possible de brancher le VideoControl-Master sur un moniteur en utilisant le câble fourni avec l‘appareil. Pour cela, utiliser le raccord „g“, puis sélectionner la sortie vidéo correspondante au menu, voir à ce sujet la section „8.7 Sortie vidéo“.
  • Seite 61: Remise À Zéro

    Ce produit est un appareil électrique et doit donc faire l‘objet d‘une collecte et d‘une mise au rebut sélectives conformément à la directive européenne sur les anciens appareils électriques et électroniques (directive DEEE). Autres remarques complémentaires et consignes de sécurité sur http://laserliner.com/info?an=vcm...
  • Seite 62: Funcionamiento Y Uso

    Funcionamiento y uso El VideoControl-Master es la unidad básica a la que se conectan las diferentes unidades de cámaras. Una unidad de cámara envía al LCD imágenes de vídeo en color para la comprobación de puntos de difícil acceso como en tuberías, canales, instalaciones de ventilación y de gases de escape.
  • Seite 63 VideoControl-Master ON/OFF Grabar vídeo Inicio / Stop Zoom – / Cancelar selección de imágenes Tecla de navegación / Modo de reproducción Zoom + / Selección de imagen Tecla de navegación / Modo de reproducción / – Iluminación LED / Velocidad de reproducción Volumen –...
  • Seite 64 Modo de configuración Idioma de los menús Medir la longitud (solo con PipeControl-LevelFlex-Camera) Menu Fecha y hora Idioma Salida de video Ajustar fecha/hora Formato de video PAL / NTSC Formato de video Eliminar todo Auto apagado Apagado automático Fuente de entrada Medir la longitud Fuente de entrada Salida de video...
  • Seite 65: Iluminación Led

    VideoControl-Master Toma de imágenes y vídeos Encender el aparato, orientar el cabezal de la cámara del tubo flexible y llevarlo a la posición deseada. Si las condiciones lumínicas son malas, encienda la iluminación LED. Acerque o amplíe los objetos que se encuentren alejados o sean muy pequeños.
  • Seite 66 Imagen con grabación de voz 2012/01/05 12:50:28 2012/01/05 12:50:28 0 cm X 1.0 0 cm X 1.0 00 : 00 : 32 INICIO STOP 3 sec Reproducción de fotos y vídeos Encender el aparato y cambiar al modo de reproducción con las flechas. En la pantalla se visualiza una pantalla general de las imágenes.
  • Seite 67: Reproducción De Vídeo

    VideoControl-Master Reproducción de vídeo 2012/01/05 12:50:28 2012/01/05 12:50:28 2012/01/05 12:50:28 0 cm 0 cm 0 cm IMG00001 IMG00001 IMG00001 00 : 00 : 32 00 : 00 : 32 Avanzar vídeo Reproducción de Volumen grabación de voz 2012/01/05 12:50:28 2012/01/05 12:50:28...
  • Seite 68 Borrar varias imágenes en la pantalla general Borrar archivos seleccionados Borrar archivos seleccionados 2 sec Función de comparación de imágenes 2012/01/05 12:50:28 2012/01/05 12:50:28 0 cm 0 cm...
  • Seite 69 VideoControl-Master Modo de configuración Menu Idioma Ajustar fecha/hora Formato de video 3 sec 3 sec Auto apagado Fuente de entrada MODE El modo de ajuste finaliza automáticamente al cabo de 10 segundos o bien al pulsar la tecla ESC. Modificar idioma...
  • Seite 70 Ajustar fecha/hora Menu Idioma Ajustar fecha/hora Formato de video Auto apagado Fuente de entrada Ajustar fecha/hora Configuración Configuración Formato de fecha dd . mm . yyyy dd . mm . yyyy Formato de hora 22 . 08 . 2012 23 . 08 . 2012 Configuración 12 : 00 : 08 12 : 00 : 08...
  • Seite 71: Apagado Automático

    VideoControl-Master Formato de video Menu Salida de TV Salida de TV Idioma NTSC NTSC Ajustar fecha/hora Formato de video Auto apagado Fuente de entrada Apagado automático Menu Auto apagado Auto apagado Idioma Desactivar Desactivar Ajustar fecha/hora 5 min 5 min...
  • Seite 72 Conexión a un monitor El VideoControl-Master puede ser conectado a un monitor con el cable adjunto. Utilice para ello la entrada „g“ y seleccione en el menú la correspondiente salida de vídeo. Véase al respecto el punto 8.7 „Salida de vídeo“.
  • Seite 73: Carga De La Batería

    VideoControl-Master Carga de la batería – Utilizar el alimentador de red o el cargador únicamente dentro de espacios cerrados; no exponer a la humedad ni a la lluvia, en caso contrario, existe riesgo de descarga eléctrica. – Cargar completamente la batería antes de usar el aparato.
  • Seite 74: Indicazioni Generali Di Sicurezza

    Funzione / utilizzo VideoControl-Master è l‘unità base alla quale si possono collegare diverse unità telecamera. In combi- nazione con un‘unità obiettivo vengono inviate immagini video a colori all‘LCD per il controllo di punti difficilmente raggiungibili, per esempio, in tubature, canali, impianti di aerazione e scarico gas combusti.
  • Seite 75 VideoControl-Master ON/OFF Ripresa video Start / Stop Zoom – / Conservare selezione immagini Tasto di navigazione / Modalità di riproduzione Zoom + / Selezione immagini Tasto di navigazione / Modalità di riproduzione / Illuminazione LED – / Velocità di riproduzione Volume –...
  • Seite 76: Impostare La Lingua Del Menu

    Modalità di impostazione Lingua del menu Misura di lunghezza (solo con PipeControl-LevelFlex-Camera) Menu Data/Ora Lingua Uscita video Impostazione Data/Ora Formato video PAL / NTSC Formato video Cancellare tutto Spegnimento automatico Spegnimento automatico Origine ingresso Misura di lunghezza Origine ingresso Uscita video Cancellare tutto Inserire scheda SD Rimuovere la SD Card...
  • Seite 77: Rotazione Immagine

    VideoControl-Master Ripresa di immagini/video Accendere l‘apparecchio, posizionare la testa dell‘obiettivo sul tubo flessibile e condurla al punto desiderato. In caso di ridotta luminosità accendere il LED di illuminazione. Utilizzare lo zoom per ingrandire oggetti piccoli o lontani. L‘immagine può essere ruotata progressivamente di 90° sul monitor con la funzione di rotazione manuale.
  • Seite 78 Immagine con registrazione voce 2012/01/05 12:50:28 2012/01/05 12:50:28 0 cm X 1.0 0 cm X 1.0 00 : 00 : 32 START STOP 3 sec Riproduzione di immagini/video Accendere l‘apparecchio e passare alla modalità di riproduzione utilizzando i tasti freccia. A display viene visualizzata una panoramica delle immagini.
  • Seite 79 VideoControl-Master Riproduzione video 2012/01/05 12:50:28 2012/01/05 12:50:28 2012/01/05 12:50:28 0 cm 0 cm 0 cm IMG00001 IMG00001 IMG00001 00 : 00 : 32 00 : 00 : 32 Avanzamento video Riproduzione Volume registrazione voce 2012/01/05 12:50:28 2012/01/05 12:50:28 2012/01/05 12:50:28 0 cm X 1.0...
  • Seite 80 Cancellare più immagini nella panoramica immagini Cancellare i file selezionati Cancellare i file selezionati Sì Sì 2 sec Funzione di confronto immagini 2012/01/05 12:50:28 2012/01/05 12:50:28 0 cm 0 cm...
  • Seite 81: Modifica Della Lingua

    VideoControl-Master Modalità di impostazione Menu Lingua Impostazione Data/Ora Formato video 3 sec 3 sec Spegnimento automatico Origine ingresso MODE La modalità di impostazione termina automaticamente dopo 10 secondi o può essere interrotta premendo il tasto ESC. Modifica della lingua (DE, EN, NL, DA, FR, ES, IT, PL, FI, PT, SV, NO, TR, RU, UK, CS, ET, LV, LT, RO, BG, EL)
  • Seite 82: Impostazione Data/Ora

    Impostazione Data/Ora Menu Lingua Impostazione Data/Ora Formato video Spegnimento automatico Origine ingresso Impostazione Data/Ora Set up Set up Formato data dd . mm . yyyy dd . mm . yyyy Formato ora 22 . 08 . 2012 23 . 08 . 2012 Set up 12 : 00 : 08 12 : 00 : 08...
  • Seite 83: Formato Video

    VideoControl-Master Formato video Menu Uscita TV Uscita TV Lingua NTSC NTSC Impostazione Data/Ora Formato video Spegnimento automatico Origine ingresso Spegnimento automatico Menu Spegnimento automatico Spegnimento automatico Lingua Disattiva Disattiva Impostazione Data/Ora 5 min 5 min Formato video 10 min 10 min...
  • Seite 84: Sostituzione Delle Batterie

    Per sostituire le batterie ricaricabili, inviate l‘apparecchio a UMAREX-Laserliner. Collegamento a un monitor VideoControl-Master può essere collegato a un monitor servendosi del cavo in dotazione. Utilizzare a tal fine l‘attacco "g" e selezionare nel menu la rispettiva uscita video, si veda il punto "8.7 Uscita video".
  • Seite 85: Caricare L'accumulatore

    VideoControl-Master Caricare l‘accumulatore – Utilizzare l’alimentatore/il caricabatterie solo in locali chiusi evitando di esporlo all’umidità o alla pioggia altrimenti si corre il rischio di scosse elettriche. – Prima di utilizzare l‘apparecchio caricare completamente l‘accumulatore. – Utilizzare solo l‘alimentatore/il caricabatterie in dotazione. L‘utilizzo di alimentatori/caricabatterie non idonei fa decadere la garanzia.
  • Seite 86: Ogólne Zasady Bezpieczeństwa

    Funkcja / zastosowanie VideoControl-Master jest bazową jednostką do podłączenia różnego rodzaju jednostek kamerowych. Z jednostki kamerowej przesyłane są barwne obrazy wideo na wyświetlacz LCD w celu kontroli trudno dostępnych miejsc, takich jak np. przewody rurowe, kanały, instalacje wentylacyjne i odprowadzania spalin.
  • Seite 87 VideoControl-Master ON/OFF Zapis wideo Start / Stop – Zoom / Anulowanie wyboru obrazów Nawigacja / Tryb odtwarzania + Zoom / Wybór obrazów Nawigacja / Tryb odtwarzania / – Oświetlenie LED / Szybkość odczytu Głośność – ESC: wyjście z menu + Oświetlenie LED / Głośność...
  • Seite 88 Tryb konfiguracji Język menu Długość środek (tylko z Pipe- Control-LevelFlex-Camera) Menu Data/Czas Jezyk Wyjście wideo Data/Czas Format wideo PAL / NTSC Format wideo Usuń wszystkie Auto wylaczanie Automatyczne wyłączanie Źr. wejścia Długość środek Źr. wejścia Wyjscie wideo Usun wszystkie Wkładanie karty SD Wyjęcie karty pamięci SD Ustawienie języka menu Menu...
  • Seite 89 VideoControl-Master Rejestracja zdjęć / wideo Włączyć urządzenie, głowicę kamery na elastycznym przewodzie wyprostować i umieścić w wymaganej pozycji. W przypadku złej widoczności włączyć oświetlenie LED. Obiekty oddalone lub mniejsze przybliżyć za pomocą zoomu. Za pomocą manualnego obrotu obrazu można obracać obraz na monitorze etapami o 90°.
  • Seite 90 Obraz z zapisem mowy 2012/01/05 12:50:28 2012/01/05 12:50:28 0 cm X 1.0 0 cm X 1.0 00 : 00 : 32 START STOP 3 sec Odtwarzanie zdjęć i nagrań wideo Włączyć urządzenie i za pomocą przycisków ze strzałkami uruchomić tryb odtwarzania. Na wyświetlaczu pojawia się...
  • Seite 91: Odtwarzanie Wideo

    VideoControl-Master Odtwarzanie wideo 2012/01/05 12:50:28 2012/01/05 12:50:28 2012/01/05 12:50:28 0 cm 0 cm 0 cm IMG00001 IMG00001 IMG00001 00 : 00 : 32 00 : 00 : 32 Przewijanie Odtwarzanie Głośność do przodu wideo zapisu mowy 2012/01/05 12:50:28 2012/01/05 12:50:28...
  • Seite 92 Usuwanie kilku obrazów w podglądzie obrazów Usuń wybrane pliki Usuń wybrane pliki 2 sec Funkcja porównywania obrazów 2012/01/05 12:50:28 2012/01/05 12:50:28 0 cm 0 cm...
  • Seite 93: Zmiana Języka

    VideoControl-Master Tryb konfiguracji Menu Jezyk Data/Czas Format wideo 3 sec 3 sec Auto wylaczanie Źr. wejścia MODE Tryb ustawień wyłącza się automatycznie po 10 sekundach lub może zostać wyłączony przyciskiem ESC. Zmiana języka (DE, EN, NL, DA, FR, ES, IT, PL, FI, PT, SV, NO, TR, RU, UK, CS, ET, LV, LT, RO, BG, EL)
  • Seite 94 Data/Czas Menu Jezyk Data/Czas Format wideo Auto wylaczanie Źr. wejścia Data/Czas Konfiguracja Konfiguracja Format daty dd . mm . yyyy dd . mm . yyyy Format czasu 22 . 08 . 2012 23 . 08 . 2012 Konfiguracja 12 : 00 : 08 12 : 00 : 08 Wyswietl Wlacz Wyswietl Wlacz...
  • Seite 95: Automatyczne Wyłączanie

    VideoControl-Master Format wideo Menu TV Out TV Out Jezyk NTSC NTSC Data/Czas Format wideo Auto wylaczanie Źr. wejścia Automatyczne wyłączanie Menu Auto wylaczanie Auto wylaczanie Jezyk Wylacz Wylacz Data/Czas 5 min 5 min Format wideo 10 min 10 min Auto wylaczanie...
  • Seite 96: Wymiana Akumulatora

    W celu wymiany akumulatora proszę przesłać urządzenie do UMAREX-Laserliner. Podłączenie do monitora VideoControl-Master może zostać podłączony do monitora za pomocą dostarczanego z urządzeniem kabla. Proszę używać wyjścia „g“ i wybrać w menu odpowiednie wyjście wideo, patrz punkt „8.7 wyjście wideo“.
  • Seite 97: Ładowanie Akumulatora

    VideoControl-Master Ładowanie akumulatora – Zasilacz-ładowarkę wolno używać wyłącznie w zamkniętych pomieszczeniach. Wystawianie go na działanie wilgoci lub deszczu grozi porażeniem prądem elektrycznym. – Przed użyciem urządzenia całkowicie naładować akumulator. – Stosować tylko załączony zasilacz / ładowarkę. Stosowanie nieprawidłowego zasilacza / ładowarki powoduje utratę gwarancji.
  • Seite 99 VideoControl-Master...
  • Seite 100 VideoControl-Master SERVICE Umarex GmbH & Co. KG – Laserliner – Möhnestraße 149, 59755 Arnsberg, Germany Tel.: +49 2932 638-300, Fax: +49 2932 638-333 info@laserliner.com Umarex GmbH & Co. KG Donnerfeld 2 59757 Arnsberg, Germany Tel.: +49 2932 638-300, Fax: -333...

Inhaltsverzeichnis