
Verwandte Anleitungen für Electrolux ERN2201AOW


Inhaltszusammenfassung für Electrolux ERN2201AOW
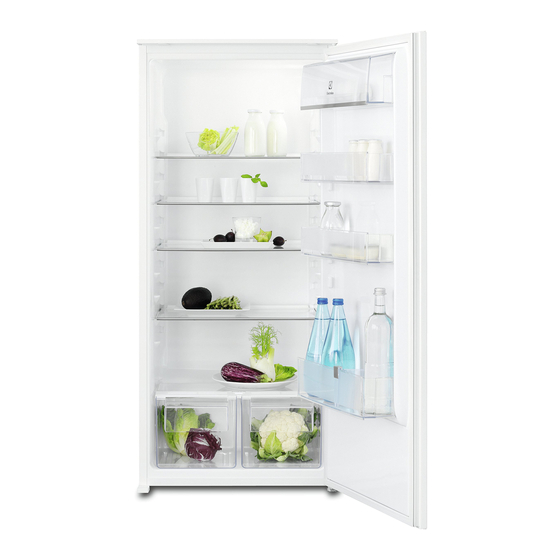
- Seite 1 ERN2201AOW Refrigerator User Manual Réfrigérateur Notice d'utilisation Kühlschrank Benutzerinformation Frigorífico Manual de instrucciones...
- Seite 1 ERN2201AOW Refrigerator User Manual Réfrigérateur Notice d'utilisation Kühlschrank Benutzerinformation Frigorífico Manual de instrucciones...
-
Seite 33: Reparatur- Und Kundendienst
10. TECHNISCHE DATEN................... 48 WIR DENKEN AN SIE Vielen Dank, dass Sie sich für ein Gerät von Electrolux entschieden haben. Sie haben ein Produkt gewählt, hinter dem jahrzehntelange professionelle Erfahrung und Innovation stehen. Bei der Entwicklung dieses großartigen und eleganten Geräts haben wir an Sie gedacht. -
Seite 34: Sicherheitsinformationen
SICHERHEITSINFORMATIONEN Lesen Sie vor der Montage und dem Gebrauch des Geräts zuerst die Gebrauchsanleitung. Der Hersteller übernimmt keine Verantwortung für Verletzungen und Beschädigungen durch unsachgemäße Montage. Bewahren Sie die Gebrauchsanleitung griffbereit auf. 1.1 Sicherheit von Kindern und schutzbedürftigen Personen Das Gerät kann von Kindern ab 8 Jahren und... -
Seite 35: Sicherheitsanweisungen
DEUTSCH Betreiben Sie in den Lebensmittelfächern des Geräts • keine anderen als die vom Hersteller empfohlenen Elektrogeräte. Reinigen Sie das Gerät nicht mit einem Wasser- oder • Dampfstrahl. Reinigen Sie das Gerät mit einem weichen, feuchten • Tuch. Verwenden Sie ausschließlich Neutralreiniger. Benutzen Sie keine Scheuermittel, scheuernde Reinigungsschwämmchen, Lösungsmittel oder Metallgegenstände. -
Seite 36: Verwendung
Typenschild den Daten Ihrer • Stellen Sie keine heißen Stromversorgung entsprechen. Gegenstände auf die Kunststoffteile Wenden Sie sich andernfalls an eine des Geräts. Elektrofachkraft. • Bewahren Sie keine entzündbaren • Schließen Sie das Gerät nur an eine Gase und Flüssigkeiten im Gerät auf. -
Seite 37: Betrieb
DEUTSCH • Achten Sie darauf, dass die Wärmetauschers nicht beschädigt Kühleinheit in der Nähe des wird. 3. BETRIEB 3.1 Einschalten des Geräts 1. Drehen Sie den Temperaturregler auf eine niedrigere Einstellung, um die Stecken Sie den Stecker in die minimal mögliche Kühlung zu Netzsteckdose. -
Seite 38: Feuchtigkeitsregulierung
4.3 Feuchtigkeitsregulierung Möglichkeiten für das Einsetzen der Ablagen bieten. In die Glasablage ist eine Vorrichtung mit 4.2 Positionierung der (über einen Schieber verstellbaren) Schlitzen integriert, die die Türablagen Feuchtigkeitsregelung in den Gemüseschubladen ermöglicht. Die Türablagen können in verschiedener Höhe positioniert werden; damit ermöglichen sie das Lagern verschieden... -
Seite 39: Reinigung Und Pflege
DEUTSCH • Decken Sie die Lebensmittel ab oder • Obst und Gemüse: Gründlich reinigen verpacken Sie diese entsprechend, und in die dafür vorgesehene(n) besonders wenn sie stark riechen. Schublade(n) legen. • Legen Sie die Lebensmittel so hinein, • Butter und Käse: Diese sollten stets in dass um sie Luft frei zirkulieren kann. -
Seite 40: Abtauen Des Kühlschranks
6.4 Stillstandszeiten dass diese sauber und frei von Fremdkörpern sind. Bei längerem Stillstand des Geräts 3. Spülen und trocknen Sie diese müssen Sie folgende Vorkehrungen sorgfältig ab. treffen: 4. Reinigen Sie den Kondensator und den Kompressor auf der 1. Trennen Sie das Gerät von der Geräterückseite, falls diese... -
Seite 40: Abtauen Des Kühlschranks
6.4 Stillstandszeiten dass diese sauber und frei von Fremdkörpern sind. Bei längerem Stillstand des Geräts 3. Spülen und trocknen Sie diese müssen Sie folgende Vorkehrungen sorgfältig ab. treffen: 4. Reinigen Sie den Kondensator und den Kompressor auf der 1. Trennen Sie das Gerät von der Geräterückseite, falls diese... - Seite 41 DEUTSCH 7.1 Was tun, wenn ... Problem Mögliche Ursache Abhilfe Das Gerät funktioniert Das Gerät ist ausge‐ Schalten Sie das Gerät ein. nicht. schaltet. Der Netzstecker wurde Stecken Sie den Netzstecker nicht richtig in die Steck‐ korrekt in die Steckdose. dose gesteckt.
- Seite 41 DEUTSCH 7.1 Was tun, wenn ... Problem Mögliche Ursache Abhilfe Das Gerät funktioniert Das Gerät ist ausge‐ Schalten Sie das Gerät ein. nicht. schaltet. Der Netzstecker wurde Stecken Sie den Netzstecker nicht richtig in die Steck‐ korrekt in die Steckdose. dose gesteckt.
-
Seite 42: Austauschen Der Lampe
Problem Mögliche Ursache Abhilfe Es wurden zu viele Leb‐ Legen Sie weniger Leben‐ ensmittel gleichzeitig ein‐ smittel gleichzeitig ein. gelegt. Die Tür wurde zu häufig Öffnen Sie die Tür nur, wenn geöffnet. es notwendig ist. Die Kaltluft kann im Ger‐... -
Seite 42: Austauschen Der Lampe
Problem Mögliche Ursache Abhilfe Es wurden zu viele Leb‐ Legen Sie weniger Leben‐ ensmittel gleichzeitig ein‐ smittel gleichzeitig ein. gelegt. Die Tür wurde zu häufig Öffnen Sie die Tür nur, wenn geöffnet. es notwendig ist. Die Kaltluft kann im Ger‐... - Seite 43 DEUTSCH Bei einigen Modellen können min. 5 cm Funktionsstörungen 200 cm auftreten, wenn sie außerhalb dieses Temperaturbereichs betrieben werden. Der ordnungsgemäße Betrieb wird nur innerhalb des min. angegebenen 200 cm Temperaturbereichs gewährleistet. Bei Fragen zum Aufstellungsort des Geräts wenden Sie sich an den Verkäufer, unseren Kundendienst oder ACHTUNG!
- Seite 43 DEUTSCH Bei einigen Modellen können min. 5 cm Funktionsstörungen 200 cm auftreten, wenn sie außerhalb dieses Temperaturbereichs betrieben werden. Der ordnungsgemäße Betrieb wird nur innerhalb des min. angegebenen 200 cm Temperaturbereichs gewährleistet. Bei Fragen zum Aufstellungsort des Geräts wenden Sie sich an den Verkäufer, unseren Kundendienst oder ACHTUNG!
-
Seite 44: Montage Des Geräts
6. Setzen Sie das Distanzstück ein. 7. Installieren Sie die Tür. 8. Ziehen Sie den oberen Stift fest. 4. Schieben Sie das Gerät auf der den 8.5 Montage des Geräts Scharnieren gegenüberliegenden Seite in Pfeilrichtung (2) so weit wie ACHTUNG! möglich gegen die Seitenwand des... -
Seite 44: Montage Des Geräts
6. Setzen Sie das Distanzstück ein. 7. Installieren Sie die Tür. 8. Ziehen Sie den oberen Stift fest. 4. Schieben Sie das Gerät auf der den 8.5 Montage des Geräts Scharnieren gegenüberliegenden Seite in Pfeilrichtung (2) so weit wie ACHTUNG! möglich gegen die Seitenwand des... - Seite 45 DEUTSCH 10. Bauen Sie das Belüftungsgitter (B) ein. 11. Stecken Sie die Scharnierabdeckungen (E) auf das Scharnier auf. 12. Trennen Sie die Teile (Ha), (Hb), (Hc) und (Hd) ab. 8. Entfernen Sie das entsprechende Teil aus der Scharnierabdeckung (E). Achten Sie darauf, im Falle eines rechten Scharniers Teil DX bzw.
- Seite 45 DEUTSCH 10. Bauen Sie das Belüftungsgitter (B) ein. 11. Stecken Sie die Scharnierabdeckungen (E) auf das Scharnier auf. 12. Trennen Sie die Teile (Ha), (Hb), (Hc) und (Hd) ab. 8. Entfernen Sie das entsprechende Teil aus der Scharnierabdeckung (E). Achten Sie darauf, im Falle eines rechten Scharniers Teil DX bzw.
- Seite 46 19. Setzen Sie das Führungsstück erneut auf die Führungsschiene und schrauben Sie es mit den mitgelieferten Schrauben fest. 20. Richten Sie die Tür des Einbaumöbels und die Gerätetür mit dem Führungsstück (Hb) aus. 15. Öffnen Sie die Gerätetür und die Möbeltüre in einem Winkel von 90°.
-
Seite 47: Geräusche
DEUTSCH 9. GERÄUSCHE Während das Gerät in Betrieb ist, entstehen bestimmte Geräusche (Kompressor und Kühlkreislauf). HISSS! BRRR SSSRRR! SSSRRR! HISSS! HISSS! -
Seite 48: Technische Daten
CRACK! CRACK! BLUBB! BLUBB! 10. TECHNISCHE DATEN 10.1 Technische Daten Abmessungen der Einbaunische Höhe 1225 Breite Tiefe Spannung Volt 230 - 240 Frequenz Die technischen Daten befinden sich auf Innenseite des Geräts sowie auf der dem Typenschild auf der Außen- oder Energieplakette. - Seite 64 www.electrolux.com/shop...