Xerox DocuMate 3920 Benutzerhandbuch
Inhaltsverzeichnis
Quicklinks
Kapitel
Inhaltsverzeichnis

Verwandte Anleitungen für Xerox DocuMate 3920


Inhaltszusammenfassung für Xerox DocuMate 3920
- Seite 1 August 2010 05-0805-000 Xerox DocuMate 3920 User’s Guide...
- Seite 2 Design © 2010 Xerox Corporation. All rights reserved. XEROX®, XEROX and Design® and DocuMate® are trademarks of Xerox Corporation in the United States and/or other countries. Content © 2010 Visioneer, Inc. All rights reserved. The Visioneer brand name and OneTouch® logo are registered trademarks of Visioneer, Inc.
-
Seite 3: Inhaltsverzeichnis
The Xerox DocuMate 3920 Scanner ........ - Seite 4 Cleaning the Scanner ..............114 Xerox DocuMate 3920...
- Seite 5 Xerox DocuMate 3920 Scanner Specifications ........
- Seite 6 Table of Contents Xerox DocuMate 3920 User’s Guide...
- Seite 7 The Xerox DocuMate 3920 Scanner on page 11 Your new Xerox scanner can quickly scan single-sided or double-sided stacks of documents with the Automatic Document Feeder (ADF), or single items on the Flatbed glass. With this scanner you can scan documents and send them electronically to a file server, email message, printer, fax machine, FTP site, or website directly from the scanner.
-
Seite 8: Welcome
Welcome What’s in the Box Before proceeding, check the contents of the box. If items are missing or damaged, contact the dealer where you purchased the scanner. Xerox DocuMate 3920 Scanner USB Cable Power Supply Telephone Power Cord Power Cord... -
Seite 9: Setup Requirements
Refer to your Windows documentation for instructions on setting the color quality and resolution for the monitor. Documentation The following documentation is provided with your scanner: Quick Install Guide—Abbreviated installation instructions. • Scanner User’s Guide—On the Installation Disc; contains detailed installation, scanning, • configuration, and maintenance information. Xerox DocuMate 3920 User’s Guide... -
Seite 10: Internet Communication Features
PDF, JPEG, TIFF, or MTIFF file format. FTP, HTTP, HTTPS servers Xerox DocuMate 3920 CIFS servers (Windows) Scan to E-Mail—When you send an e-mail to someone via the scanner, the scanner uses SMTP (Simple Mail Transfer Protocol) to transfer your outgoing e-mails to your SMTP mail server, and then send these e-mails to your recipients through the internet. -
Seite 11: The Xerox Documate 3920 Scanner
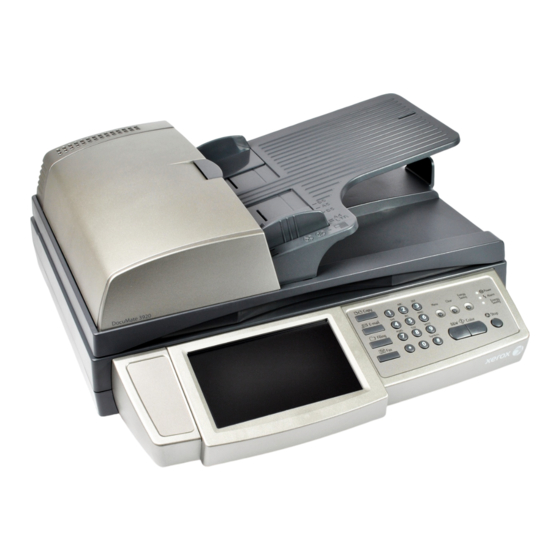
Welcome The Xerox DocuMate 3920 Scanner ADF Cover Release Automatic Input Tray Paper Guides LCD Touch Screen Document Feeder (ADF) Scanner Lid Control Panel Output Tray Paper Stop Power Switch Power Jack Printer Connection Network PC Connection Telephone Line Port... - Seite 12 Telephone Line Connection Port—To use the scanner as a regular fax machine, connect a telephone cord to the LINE port and to an “RJ-11” telephone jack in a wall or switch. The TEL port should be ignored since a handset is not provided with this scanner. Xerox DocuMate 3920 User’s Guide...
-
Seite 13: Scanner Setup
If you wish to return to factory default settings, simply press and hold the Clear button for NOTE: over 5 seconds. All the values in the Management and Administrative Settings will be changed back to factory defaults. Xerox DocuMate 3920 User’s Guide... -
Seite 14: Unpack And Assemble The Scanner
Open the ADF cover and carefully remove any foam particles that may have gotten inside the Automatic Document Feeder, then close the cover. Lift the scanner lid and slide the locking tab to its unlocked position. The scanner will not scan when locked. Unlocked position Xerox DocuMate 3920 User’s Guide... -
Seite 15: Connecting The Cables
Connect the other end of your Ethernet LAN cable to an available port on your Ethernet Hub or wall. Connecting the Telephone Line Plug one end of the telephone line to the LINE jack at the right end of the rear panel. Xerox DocuMate 3920 User’s Guide... - Seite 16 Connect the other end to the COPY port at the rear of the scanner. Turn on the Power Press the power switch to the “|” position to turn on the scanner. After showing the boot up message, the LCD screen displays the preset ready status. Xerox DocuMate 3920 User’s Guide...
-
Seite 17: Using The Scanner Control Panel
Filing—Enables scanning to a file server, Fax—Enables the scan and send to a fax through the intranet, using FTP, HTTP, machine function. HTTPS, or CIFS. You can only scan in Black & White when faxing. Xerox DocuMate 3920 User’s Guide... - Seite 18 Color mode. Stop—Press to stop scanning. Status LEDs—Indicates the hardware status. Power—Indicates that the power is on and ready for scanning. Alarm—Indicates hardware and transmission errors. Energy Saving—Indicates that the scanner is in low-power mode. Xerox DocuMate 3920 User’s Guide...
-
Seite 19: Summary Of The Menu Options
Country Code—Select the code for the country you live in so that you can send and receive faxes. • Time Zone—Select the time zone for the area you live. Date/Time—Set the date and time for the scanner. • Xerox DocuMate 3920 User’s Guide... - Seite 20 Energy Saver (Timer)—Press the down arrow to select an option from the list. System Auto Reset (Timer)—This is the amount of time before the LCD panel • changes back to the Default Mode. Press the down arrow and select an option from the list. Xerox DocuMate 3920 User’s Guide...
- Seite 21 57 for detailed configuration instructions for these options. • Filing Template—Select this option to specify the default server to send the scanned file to, and specify the default scan settings when sending the file. Xerox DocuMate 3920 User’s Guide...
-
Seite 22: Using The Lcd Soft Keyboard
Backspace—press this key to remove any characters you have entered. Enter—press this key to change the cursor position to the next line. Return—saves the information you entered and closes the soft keyboard. Xerox DocuMate 3920 User’s Guide... -
Seite 23: Adding The Scanner To The Network
26 also contains a table of data required for setting the scanner to send email messages. You will need to get the information listed in that table from your network administrator as well. Xerox DocuMate 3920 User’s Guide... - Seite 24 “Reboot the machine.” When the scanner is on again, you will be able to access the network from the scanner, and you will be able to configure the scanner remotely from a computer on the network. Xerox DocuMate 3920 User’s Guide...
-
Seite 25: Networking Error Messages
Failed to create socket for DHCP Check IP address of DHCP server or contact your network administrator for further help. Failed to search DHCP server. Failed to get IP from DHCP server. Failed to renew IP from DHCP server. Xerox DocuMate 3920 User’s Guide... -
Seite 26: Adding The Email Server Information
The port number of your LDAP server. 12 Login Name: Input the login name and password to access the LDAP server. 13 Password: 14 Base DN: Input the Base DN (Distinguished Name) for the LDAP server. Xerox DocuMate 3920 User’s Guide... - Seite 27 Fill in each field with the appropriate information on the Device E-mail Account tab. Select SMTP or POP3 as the authentication method for the SMTP server, and fill in the appropriate information for that authentication. SMTP Authentication POP3 Authentication Xerox DocuMate 3920 User’s Guide...
- Seite 28 “anonymous” as the user name and password, leave the fields blank instead. The scanner will display a maximum of 100 match results in a single search. Press OK when you are done configuring the E-mail options. Xerox DocuMate 3920 User’s Guide...
-
Seite 29: Setting The Default Scan Function
The LCD touch screen displays the following menu. Press the Management button on the LCD touch screen. Press Login on the password prompt screen. There is no default username and password set for the scanner management options. Xerox DocuMate 3920 User’s Guide... - Seite 30 Press Exit to close the Menu screen. Power cycle the scanner to save the changes. When the scanner is back on, the default mode will now be the option you selected in the Device Management screen. Xerox DocuMate 3920 User’s Guide...
-
Seite 31: Loading Documents To Scan
Staples and paper clips can jam the feed mechanism and scratch the internal components. Also remove any labels, stickers, or Post-It™ notes that may come off during the scanning process and get stuck in the scanner. Misuse as described here will void your scanner’s warranty. Xerox DocuMate 3920 User’s Guide... -
Seite 32: Scanning From The Automatic Document Feeder (Adf)
Fan the edges of the paper to make sure none of the pages are stuck together. Adjust the paper guides for the width of the paper being scanned. Adjust the Paper Stop at the back of the scanner for the length of the paper. Xerox DocuMate 3920 User’s Guide... - Seite 33 Load the stack of documents face up, with their tops into the Automatic Document Feeder. Xerox DocuMate 3920 User’s Guide...
-
Seite 34: Scanning From The Flatbed Glass
You must remove these pages prior to scanning if you want to scan from the Flatbed. Lift the scanner cover and place an item face down on the glass. Align the item with the arrow on the reference frame then close the cover. Xerox DocuMate 3920 User’s Guide... -
Seite 35: Copying
To use the Copy function, you need to connect the scanner to a USB InkJet or Laser printer that supports PCL. Make sure the printer is connected and turned on before turning on the scanner. The scanner will detect a printer during the power-up cycle only. Xerox DocuMate 3920 User’s Guide... -
Seite 36: Scanning To A Printer
Use the numeric keypad on the scanner to set the number of copies you want printed. Press the B&W or Color button on the scanner to start scanning. The scanner starts scanning and sends the image to the attached printer. Xerox DocuMate 3920 User’s Guide... -
Seite 37: Scan Options For Copying
Text—choose this option if you are making copies of text documents. This option prints the fastest of these options. • Photo—choose this option if your document contains pictures for clearer graphic quality. This option prints slower than the others. Xerox DocuMate 3920 User’s Guide... - Seite 38 Advanced Copy Settings Option Description Collate Choose the order you want your copies to be placed in. Sort (e.g. pages 1,2,3 / 1,2,3 / 1,2,3) • • Stack (e.g. pages 1,1,1 / 2,2,2 / 3,3,3). Xerox DocuMate 3920 User’s Guide...
- Seite 39 Note: The selection of orientation varies depending on the type of duplex printing. Duplex Availability of Orientation 1 to 1 sided All options are unavailable. 2 to 1 sided All options are available. Xerox DocuMate 3920 User’s Guide...
- Seite 40 (Note: In the Stamp field, there is a small “Soft Keyboard” icon shown at the upper- right corner. Touch anywhere on the Stamp field to bring up the soft keyboard to enter your stamp characters.) Example: Xerox DocuMate 3920 User’s Guide...
-
Seite 41: Setting The Default Copy Options
Change the settings as needed, and then click the Update button to send the changes to the scanner. Power cycle the scanner. Please refer to Managing the Scanner Remotely on page 89 for detailed information about accessing and navigating the scanner options remotely. Xerox DocuMate 3920 User’s Guide... -
Seite 42: Information Messages When Copying
Turn off the printer. Turn on the printer. Turn on the scanner. Paper size not supported Please set the supported paper size to the tray of the printer. HLT and * are not sup- ported. Xerox DocuMate 3920 User’s Guide... -
Seite 43: Copy Specifications
Paper saving (N-Up) 1 in 1, 2 in 1, 4 in 1 (landscape), 4 in 1 (portrait) Collate Sort/Stack Duplex 1–1 / 2-1 Orientation for Duplex Long Edge to Long Edge, Short Edge to Long Edge Xerox DocuMate 3920 User’s Guide... - Seite 44 Xerox DocuMate 3920 User’s Guide...
-
Seite 45: E-Mail
To use the E-mail option, the scanner must already be set up to work on the network, and have the Mail Server options configured in the scanner. Please refer to the Scanner Setup chapter for further details Adding the Scanner to the Network Adding the Email Server Information. Xerox DocuMate 3920 User’s Guide... -
Seite 46: Scanning To E-Mail
Press Return on the soft-keyboard to return to the main E-mail screen. Instead of inputting the E-mail address manually, you can select email address(es) from the scanner’s address book. Touch the Address Book icon on the E-mail main screen. Xerox DocuMate 3920 User’s Guide... - Seite 47 Place the next page on the flatbed, or document batch in the ADF, and press Bind to continue. After you are done scanning all pages in the document, choose End to close the dialog box. Xerox DocuMate 3920 User’s Guide...
-
Seite 48: Scan Options For E-Mailing
75 / 100 / 150 / 200 / 300 / 400 / 600 dpi • Note: If you are scanning duplex (two-sided) paper, the resolution for color or gray scanning have a maximum option of 300 dpi. Xerox DocuMate 3920 User’s Guide... - Seite 49 File Separation Limit the file size of the attachment of each outgoing message to avoid the size limi- tation of SMTP servers. Choices are: • 1MB / 3MB / 5MB / 10MB / 30MB / Unlimited Xerox DocuMate 3920 User’s Guide...
- Seite 50 Also, virtually all desk- top scanners can produce TIFF images. JPEG JPEG (Joint Photographic Experts Group) compression provides the best results with continuous-tone color and the smallest file size. Xerox DocuMate 3920 User’s Guide...
- Seite 51 The following is an example of file size based on selected scanning options and file format. Color: A4 @ 200 dpi TIFF (10 MB) / PDF (53 KB) / JPEG (212 KB) B&W: A4 @ 200 dpi TIFF (100 KB) / PDF (20 KB) / JPEG (5 MB) Xerox DocuMate 3920 User’s Guide...
-
Seite 52: Setting The Default E-Mail Options
Change the settings as needed, and then click the Update button to send the changes to the scanner. Power cycle the scanner. Please refer to Managing the Scanner Remotely on page 89 for detailed information about accessing and navigating the scanner options remotely. Xerox DocuMate 3920 User’s Guide... -
Seite 53: Using The Address Book
Managing the Scanner Address Book on page 104 for instructions on setting up the scanner’s address book. The section Adding the Email Server Information on page 26 contains instructions on setting the scanner access to an LDAP server. Xerox DocuMate 3920 User’s Guide... -
Seite 54: Information Messages When E-Mailing
Choose SMTP authentication for E-mail security or turn off the mail server’s authentication and try again. Mailbox unavailable Check “To” address. User not local Check “To” address. Service unavailable Contact your network administrator for further help. Xerox DocuMate 3920 User’s Guide... - Seite 55 Check the IP address of the LDAP server. Or contact your network administrator for help. LDAP port error Check if the port number is correct. LDAP user password error Check if the password is correct. Xerox DocuMate 3920 User’s Guide...
-
Seite 56: E-Mail Specifications
Windows 2003 Active Directory with SFU(Service for Unix) Windows Server 2000 + MS Exchange 5.5 Lotus Notes R5 Supported Mail Application Microsoft Outlook 2000 Microsoft Outlook Express 5.0 Microsoft Outlook Express 6 Eudora 4.3.2J Lotus Notes R5 MAC built-in MAIL Application Xerox DocuMate 3920 User’s Guide... -
Seite 57: Filing
The scanner must already be set up to work on the network. Please refer to the Scanner Setup chapter for further details on “Adding the Scanner to the Network”. Xerox DocuMate 3920 User’s Guide... -
Seite 58: Scanning To A Folder
Note that if Multi-Level(gray) is enabled, on the Scan Options tab, pressing the B&W button on the scanner will send a grayscale image. The scanner starts scanning and sends the image to the folder you specified. Xerox DocuMate 3920 User’s Guide... - Seite 59 Place the next page on the flatbed, or document batch in the ADF, and press Bind to continue. After you are done scanning all pages in the document, choose End to close the dialog box. Xerox DocuMate 3920 User’s Guide...
-
Seite 60: Scan Options For Filing
ADF or more than one page from the flatbed. After scanning the 1st batch or 1st page, a dialog box will pop up asking if you wish to Bind or End. Choose Bind to scan the next batch or page or choose End to stop scanning. Xerox DocuMate 3920 User’s Guide... - Seite 61 Note: Choose MTIFF or PDF when you need to scan multi-page documents and convert it to a single image file. Compression Level: Low, Medium, High (If TIFF or MTIFF is selected as a file format, the compression Level is defined as Raw only.) Xerox DocuMate 3920 User’s Guide...
- Seite 62 The following is an example of file size based on selected scanning options and file format. Color: A4 @ 200 dpi TIFF (10 MB) / PDF (53 KB) / JPEG (212 KB) B&W: A4 @ 200 dpi TIFF (100 KB) / PDF (20 KB) / JPEG (5 MB) Xerox DocuMate 3920 User’s Guide...
-
Seite 63: Setting The Folder Template
Change the settings as needed, then click the Update button to send the changes to the scanner. Power cycle the scanner. Please refer to Managing the Scanner Remotely on page 89 for detailed information about accessing and navigating the scanner options remotely. Xerox DocuMate 3920 User’s Guide... - Seite 64 Enter an e-mail address if you wish to send the filing report to an e-mail. Create a Subfolder Choose ON to enable the server to create a subfolder when sending the scanned image to the destination server. (Check if you are authorized to write under the desti- nation server.) Xerox DocuMate 3920 User’s Guide...
-
Seite 65: Creating A New Folder
The New Folder screen displays the server and scanning parameters that are the same as the options in the folder Folder Template except the Folder Name. Please refer to Filing Manager on page 108 for instructions on setting up the scanner to send to a filing server. Xerox DocuMate 3920 User’s Guide... -
Seite 66: Information Messages When Filing
Contact your server administrator to change permissions on this privi- lege. HTTP MKCOL method not imple- The target HTTP server does not support MKCOL to create the directory. mented Create the directory on the server in advance. Xerox DocuMate 3920 User’s Guide... - Seite 67 HTTP server unavailable Contact your server administrator for help. HTTP server does not support HTTP The server does not support HTTP version 1.1 (the type the scanner version 1.1 uses), contact your server administrator for help. Xerox DocuMate 3920 User’s Guide...
-
Seite 68: Filing Specifications
Compression Level Low / Medium / High Supported Resolution 75, 100, 150, 200, 300, 400, 600 dpi Default Resolution B/W: 200 dpi Gray: 200 dpi Color: 200 dpi Most Used Folders No. of Filing Folders Xerox DocuMate 3920 User’s Guide... -
Seite 69: Faxing
You need to connect the scanner to a USB InkJet or Laser printer that supports PCL to receive faxes. Make sure the printer is turned on before turning on the scanner. The scanner will detect the printer during the power on cycle only. Xerox DocuMate 3920 User’s Guide... -
Seite 70: Fax Settings
Enter the number to access the PSTN (Pubic Switched Telephone Network) line if your device’s fax telephone line is used as an extension. For example, enter 0 or 9 in the field via the soft keyboard. Xerox DocuMate 3920 User’s Guide... - Seite 71 Choices are: Enable, Disable Detect Busy Tone Choose Enable to allow this scanner to detect a busy tone when sending a fax. Choices are: Enable, Disable (The default setting varies based on country code.) Xerox DocuMate 3920 User’s Guide...
- Seite 72 If you want to cancel a previously set delayed fax, touch the Cancel Fax Job tab to dis- play the Cancel Fax Job screen. Touch the fax job you want to cancel and then touch the Delete button to cancel the fax job. Xerox DocuMate 3920 User’s Guide...
-
Seite 73: Configuring The Fax Settings Remotely
Please refer to Managing the Scanner Remotely on page 89 for detailed information about accessing and navigating the scanner options remotely. Xerox DocuMate 3920 User’s Guide... -
Seite 74: Scanning To Fax
You can also select multiple fax numbers at one time. To enter the next fax number, press the Down-arrow key, at the right of the Phone Number field, after finishing entering the first fax number. Instead of inputting the phone number manually, you can select phone numbers from the scanner’s phone book. Xerox DocuMate 3920 User’s Guide... - Seite 75 LCD screen. The next section describes each feature in detail. Press the B&W button on the scanner to start scanning. The scanner starts scanning and sends the image as a fax to the number you specified. Xerox DocuMate 3920 User’s Guide...
- Seite 76 Place the next page on the flatbed, or document batch in the ADF, and press Bind to continue. After you are done scanning all pages in the document, choose End to close the dialog box. Xerox DocuMate 3920 User’s Guide...
-
Seite 77: Scan Options For Faxing
Paper Size Select the size of the paper you are scanning from the list. Choices are: • A4 / Letter / Legal Note that Legal size is available only when scanning from the ADF. Xerox DocuMate 3920 User’s Guide... -
Seite 78: More Settings
Sets the default status of polling reception. Choose ON to use the scanner to poll other machines. Polling is the process of retrieving faxes from another fax machine. Overseas Mode Sets the default overseas mode. Choose ON to avoid transmission problems when fax- ing overseas. Xerox DocuMate 3920 User’s Guide... -
Seite 79: Setting The Default Fax Options
Change the settings as needed, and then click the Update button to send the changes to the scanner. Power cycle the scanner. Please refer to Managing the Scanner Remotely on page 89 for detailed information about accessing and navigating the scanner options remotely. Xerox DocuMate 3920 User’s Guide... -
Seite 80: Using The Phone Book
You can manage the phone book locally at the scanner, using the control panel and LCD touch screen, or remotely using the embedded web page phone book. You will need the scanner’s IP address to access it through the Network Management Tool or web browser. Xerox DocuMate 3920 User’s Guide... - Seite 81 Press anywhere in the Phone Number field to show the soft keyboard. You can input the phone number using the soft keyboard or the numeric keypad on the scanner. Press Return when you are finished. When you are done programming phone numbers. Press OK to close the Phone Book. Xerox DocuMate 3920 User’s Guide...
- Seite 82 Press anywhere in the Group Name field to show the soft keyboard to input the name you want to associate with the phone number you want to program. Press Return when you are finished. When you are done programming the phone groups. Press OK to close the Phone Book. Xerox DocuMate 3920 User’s Guide...
- Seite 83 Power cycle the scanner so you can access the updated phone book from the scanner. To edit or delete names from the phone book, simply make your changes in the phone book manager fields then click Update to send the information to the scanner. Xerox DocuMate 3920 User’s Guide...
- Seite 84 Click Add to save your settings and return to the Phone Group List screen. Click the Update button to send the information to the scanner. Power cycle the scanner so you can access the updated phone book from the scanner. Xerox DocuMate 3920 User’s Guide...
-
Seite 85: Information Messages When Faxing
Your fax machine received an invalid fax message from the remote fax machine. Please try again or use another line. The line quality is poor. Please try again or use another line. If the error still occurs, please call your service support. Xerox DocuMate 3920 User’s Guide... - Seite 86 Your fax machine received an invalid fax message from the remote fax machine. Please try again or use another line. The line quality is poor. Please try again or use another line. If the error still occurs, please call your service support. Xerox DocuMate 3920 User’s Guide...
-
Seite 87: Fax Specifications
Transmission Speed Approximately 3 seconds (*1) Page Memory 2.0 MB in Flash Speed Dial 200 sets Error Correction Mode Contrast Control 7 Levels Monitor Speaker Busy Tone Detection Redial Automatic / Manual Immediate Transmission Memory Transmission Xerox DocuMate 3920 User’s Guide... - Seite 88 Xerox DocuMate 3920 User’s Guide...
-
Seite 89: Managing The Scanner Remotely
• User Account Management • Define The Shortcut Buttons • E-Mail Address Book Manager • Filing Manager Xerox DocuMate 3920 User’s Guide... -
Seite 90: Accessing The Scanner
When you use this utility, you do not need to know the scanner’s IP address. The utility will search and display all Xerox DocuMate 3920 scanners on the network. The Network Management Tool is located on the installation disc you received with the scanner. - Seite 91 Make sure the box for the Network Management Tool is selected. The software provided with your scanner may differ slightly from the list shown in the window. NOTE: Click Install Now. Follow the on-screen instructions to complete the software installation. Xerox DocuMate 3920 User’s Guide...
-
Seite 92: Using The Network Management Tool
• New Device—Click on this option to open the following prompt to input the scanner’s IP address. Enter the IP address then click on OK to add the scanner to the Network Management Tool utility. Xerox DocuMate 3920 User’s Guide... - Seite 93 Select the computer’s network card from the Network Adapter list then click on the Search button. When searching is complete, all Xerox DocuMate 3920 scanner’s on your network will be displayed in the list. Select the scanners you want to configure then click the Add button.
-
Seite 94: Accessing The Scanner From A Web Browser
Launch your internet browser. In the URL field, type in the scanner’s IP address, and then press the enter key on your keyboard. The scanner’s embedded web page will now display in your web browser. Xerox DocuMate 3920 User’s Guide... -
Seite 95: Using The Embedded Web Page
Country Code—Select the code for the country you live in so that you can send and receive faxes. • Network Settings— Adding the Scanner to the Network on page 23 Please refer to for instructions for adding your scanner to the network. Xerox DocuMate 3920 User’s Guide... -
Seite 96: Administrative Settings Options
Address Book Manager—Please refer to • Managing the Scanner Address Book on page 104. Filing Manager—Please refer to • Filing Manager on page 108. Shortcut—Please refer to • Configuring the Shortcut Buttons on page 101. Xerox DocuMate 3920 User’s Guide... -
Seite 97: Account Management
After changing the authentication method, and creating user accounts, power cycle the scanner for the data to refresh to the scanner. A user is then required to input a login name and password to use the scanner. Xerox DocuMate 3920 User’s Guide... -
Seite 98: Account List
Once you have chosen either Local, SMTP server, LDAP server, or HTTP server as your security type. You need to set each local user’s login name and password. To create a new account, click the Account List link to open the Account List dialog box. Xerox DocuMate 3920 User’s Guide... - Seite 99 You only need to give a new name and password for the new user without changing any other settings. Click Update to save the settings or Cancel to return to the Account Management screen without saving any changes. Xerox DocuMate 3920 User’s Guide...
- Seite 100 A confirmation message appears to confirm your deletion. Click OK to confirm or Cancel to exit. Click Update to save the settings or Cancel to return to the Account Management screen without saving any changes. Xerox DocuMate 3920 User’s Guide...
-
Seite 101: Configuring The Shortcut Buttons
Login to proceed. Click on the down arrow next to the Default Mode field and select Shortcut from the list. Click on the Update button to send this setting to the scanner. Click on the Shortcut link. Xerox DocuMate 3920 User’s Guide... - Seite 102 57 • Faxing on page 69 10. After you are finished selecting settings for the Shortcut button, click on Update to send the information to the scanner and return to the Shortcut menu. Xerox DocuMate 3920 User’s Guide...
-
Seite 103: Scanning Using The Shortcut Buttons
Press the B&W or Color button, on the scanner, to start scanning. If you configured the Shortcut button with Multi-Level(gray) to ON, pressing the B&W button on NOTE: the control panel will produce a grayscale scan. Xerox DocuMate 3920 User’s Guide... -
Seite 104: Managing The Scanner Address Book
LCD panel, input the correct information here then click on Login. The Address Book manager screen will now be displayed in the window. Use this window to add, update, or delete email addresses and/or groups in the scanner’s address book. Xerox DocuMate 3920 User’s Guide... -
Seite 105: Managing E-Mail Addresses
Cancel to return to the Address Book Manager screen without adding the e-mail address to the Address Book. Click Update to send the changes to the scanner, or Exit to leave without saving the address. Up to 2,000 e-mail addresses can be entered in the Address Book. NOTE: Xerox DocuMate 3920 User’s Guide... -
Seite 106: Managing E-Mail Groups
Select an e-mail address on the right side and then click <- to add a member to the group. Click Add to temporarily save the changes, or Cancel to return to the Address Book Manager screen without adding a new group. Xerox DocuMate 3920 User’s Guide... - Seite 107 Click Update to send the changes to the scanner, or Exit to leave without saving any changes. Xerox DocuMate 3920 User’s Guide...
-
Seite 108: Filing Manager
HTTP uses RFC 2616 [HTTP 1.1] as the protocol, and the default port is usually 80. If you are not using the default HTTP port to send and save files, you must change the HTTP Port of the scanner to the port for the web server you are using. Xerox DocuMate 3920 User’s Guide... - Seite 109 For instructions on how to setup SSL properly on the server, please refer to the server’s instruction manual. After SSL has been installed, please check if the SSL port is editable and the directory security has been selected. Xerox DocuMate 3920 User’s Guide...
- Seite 110 XP, select the “Sharing” tab, and then select “Share this folder”. Click the “Permissions” button to open “Permissions for the shared directory” dialog box. Click the “Full Control” option to allow full privileges to the shared directory. Xerox DocuMate 3920 User’s Guide...
-
Seite 111: Maintenance
Replacing the ADF Pad Assembly on page 117 • Replacing the Roller Assembly on page 121 • Xerox DocuMate 3920 Scanner Specifications on page 123 • Xerox DocuMate 3920 Parts List on page 124 This section contains information about maintenance, troubleshooting, scanner specifications, and spare parts. -
Seite 112: Safety Precautions
Never use aerosol sprays or compressed air, or attempt to lubricate parts with an oil or silicon spray. • Never service the scanner in an area where there are open liquid containers. • Never pour or spill liquid on the scanner or any of its components. Xerox DocuMate 3920 User’s Guide... -
Seite 113: Clearing Paper Jams
ADF. If the jammed page is too far in the scanner to be removed from the ADF, gently pull the page NOTE: out from under the paper tray. Xerox DocuMate 3920 User’s Guide... -
Seite 114: Cleaning The Scanner
As you’re cleaning the roller, make sure it rotates easily, and continue rotating it in that direction while wiping it clean. Do NOT force the roller to rotate in the opposite direction. Forcing the roller to rotate will damage it, and may cause the scanner to feed pages incorrectly. Xerox DocuMate 3920 User’s Guide... -
Seite 115: Cleaning The Scanner Glass
ADF during scanning, this thin glass plate is where the images are captured by the scanner. Clean the raised, thin plate of glass here if lines appear on scans from the ADF, but not from the Flatbed glass. Xerox DocuMate 3920 User’s Guide... -
Seite 116: Cleaning The Lcd-Display
Cleaning the LCD-display To clean the display surface, use a soft lint-free cloth, either dry or moistened with neutral detergent or ethanol. Do not use any organic solvents, acid, nor alkali solution. Xerox DocuMate 3920 User’s Guide... -
Seite 117: Replacing The Adf Pad Assembly
114. You can order replacement ADF pad assemblies from the Parts & Accessories page for your scanner at www.xeroxscanners.com. Please refer to the section Xerox DocuMate 3920 Parts List on page 124 for ordering information. ADF Pad Parts List... - Seite 118 Press in the top of the ADF pad housing and lift up to release the housing from the scanner. Rotate the housing up and out of the scanner. Squeeze the plastic clamps that hold the ADF pad in place and lift the pad up and out of the scanner. Remove the tension spring. Xerox DocuMate 3920 User’s Guide...
- Seite 119 Press down on the pad to snap the part into the scanner. Slots for the traction pad Place the new tension spring in the slot in the scanner. Tension spring slot Xerox DocuMate 3920 User’s Guide...
- Seite 120 Press down on the end of the housing to snap the housing in place. Note that the end of the housing piece will be held up slightly by the tension spring. 10. Close the cover when you are finished. Xerox DocuMate 3920 User’s Guide...
-
Seite 121: Replacing The Roller Assembly
Open the ADF cover. The roller assembly is located in the underside of the ADF cover. Roller Assembly Lift up the green lock flange to unlock the roller from the ADF cover. Green lock flange Xerox DocuMate 3920 User’s Guide... - Seite 122 Align the tab on the green lock flange with the slot in the ADF cover, then rotate the tab on the lock into the scanner. Slot for the lock flange Lock flange Press down on the lock flange to lock the roller into the scanner. Close the ADF cover when you are finished. Xerox DocuMate 3920 User’s Guide...
-
Seite 123: Xerox Documate 3920 Scanner Specifications
Xerox DocuMate 3920 Scanner Specifications Optical resolution 600 dpi Light source Cold Cathode Fluorescent Lamp Image sensor Bit depth 24-bit color, 8-bit grayscale, 1-bit bitonal (black & white) Scan method Single-pass Flatbed with 3-pass Duplex ADF ADF specifications Maximum Item Size 8.5” x 14” (216 mm x 356 mm) Minimum Item Size 5.8”... -
Seite 124: Xerox Documate 3920 Parts List
Please use the following part names and numbers when ordering replacements for your Xerox DocuMate 3920 scanner. You can order the replacement parts from the Parts & Accessories page for your scanner at www.xeroxscanners.com, or contact the Customer Service department. Please refer to... -
Seite 125: Appendix
131 • Product Safety Certification on page 132 • Regulatory Information on page 133 • Compliance Information on page 134 • Illegal Copies on page 135 • EH&S Contact Information on page 138 Xerox DocuMate 3920 User’s Guide... -
Seite 126: Safety Introduction
Please read the following instructions carefully before operating the machine and refer to them as needed to ensure the continued safe operation of your machine. Your Xerox product and supplies have been designed and tested to meet strict safety requirements. These include safety agency evaluation and certification, and compliance with electromagnetic regulations and established environmental standards. -
Seite 127: Emc
(1) This device may not cause harmful interference, and (2) this device must accept any interference received, including interference that may cause undesired operation. Changes and modifications to this equipment not specifically approved by Xerox may void the user’s authority to operate this equipment. -
Seite 128: Operational Safety Information
Your Xerox equipment and supplies have been designed and tested to meet strict safety requirements. These include safety agency examination, approval, and compliance with established environmental standards. To ensure the continued safe operation of your Xerox equipment, follow these safety guidelines at all times: Do These •... -
Seite 129: Electrical Information
Plug the power cable directly into a correctly grounded electrical outlet. If you are not sure whether or not an outlet is correctly grounded, consult an electrician. Do not use an adapter to connect any Xerox equipment to an electrical outlet that lacks a ground connection terminal. -
Seite 130: Emergency Power Off
Emergency Power Off If any of the following conditions occur, turn off the machine immediately and disconnect the power cable from the electrical outlet. Contact an authorized Xerox Service Representative to correct the problem: • The equipment emits unusual odors or makes unusual noises. -
Seite 131: Maintenance Information
Do not perform any maintenance procedures unless you have been trained to do them by an authorized local dealer or unless a procedure is specifically described in the user manuals. Xerox DocuMate 3920 User’s Guide... -
Seite 132: Product Safety Certification
Product Safety Certification This product is certified by the following Agency using the Safety standards listed: Agency Standard Underwriters Laboratories Inc. UL60950-1 1st (2003) First Edition (USA/ Canada) IEC60950-1: 2001 Second Edition Xerox DocuMate 3920 User’s Guide... -
Seite 133: Regulatory Information
Regulatory Information Certifications in Europe The CE mark applied to this product, symbolizes Xerox’s declaration of conformity with the following applicable European Union Directives, as of the dates indicated: December 12, 2006: Council Directive 2006/95/EC as amended. Approxi- mation of the laws of the member states related to low voltage equipment. -
Seite 134: Compliance Information
Compliance Information Product Recycling & Disposal: USA & Canada If you are managing the disposal of your Xerox product, please note that the product contains lamp(s) with mercury, and may contain lead, Perchlorate and other materials whose disposal may be regulated due to environmental considerations. -
Seite 135: Illegal Copies
Further information of these provisions may be obtained from the Copyright Office, Library of Congress, Washington, D.C. 20559. Ask for Circular R21. Certificates of Citizenship or Naturalization. (Foreign Naturalization Certificates may be photographed.) Passports. (Foreign Passports may be photographed.) Immigration Papers. Draft Registration Cards. Xerox DocuMate 3920 User’s Guide... -
Seite 136: Canada
The above list is provided for your convenience and assistance, but it is not all inclusive, and no liability is assumed for its completeness or accuracy. In case of doubt, consult your solicitor. Xerox DocuMate 3920 User’s Guide... -
Seite 137: Other Countries
Copyright material or trademarks without the consent of the owner Postage stamps and other negotiable instruments Note: This list is not inclusive and no liability is assumed for either its completeness or accuracy. In case of doubt, contact your legal counsel. Xerox DocuMate 3920 User’s Guide... -
Seite 138: Eh&S Contact Information
EH&S Contact Information Contact Information For more information on Environment, Health, and Safety in relation to this Xerox product and supplies, please contact the following customer help lines: USA & Canada: 1-800-828-6571 Europe: +44 1707 353 434 Xerox DocuMate 3920... -
Seite 139: Index
E-Mail, 46, 53 Calibration Error, 42 E-mail, 17 Cancel Fax Jobs, 72 Email Address, 20 CD-ROM drive, 9 E-Mail Default, 21, 52 Check printer cable or status, 42 E-mail error messages, 54 CIFS, 10, 64, 110 Xerox DocuMate 3920 User’s Guide... - Seite 140 Mail Server, 27, 56 Function keys, 17 Management, 29, 101 Manual Receive, 72 Margin Adjustment, 38 Margin Shift, 43 Gateway IP, 23 Memory Transmission, 87 Grayscale, 103 Menu, 29, 41 Group Address, 53 Menu Map, 19 Xerox DocuMate 3920 User’s Guide...
- Seite 141 Soft Keyboard, 22, 40 Power Switch, 12 soft keyboard, 81, 82 Print Orientation Software, 91 Long Edge, Short Edge, 39, 40 Sound Volume, 71 Paper Saving, 40 Speed, 37 Printer, 35, 69 SSL, 109 Printing Stamp, 40 Xerox DocuMate 3920 User’s Guide...
- Seite 142 9 Target URL, 64 Port #, 64 Text, 37, 49 TIFF, 10, 50, 62 Time Zone, 19 Transmission Report, 71 Transmission Speed, 87 Unit, 38 Usage Report, 19 User Account Management, 89 Variable, 37 Xerox DocuMate 3920 User’s Guide...
- Seite 144 August 2010 05-0805-000 Xerox DocuMate 3920 Benutzerhandbuch...
- Seite 145 Design © 2010 Xerox Corporation. Alle Rechte vorbehalten. XEROX®, XEROX und Design® und DocuMate® sind Marken der Xerox Corporation in den Vereinigten Staaten und/oder anderen Ländern. Inhalt © 2010 Visioneer, Inc. Alle Rechte vorbehalten. Der Markenname und das Logo von Visioneer® und OneTouch® sind eingetragene Marken der Visioneer, Inc.
- Seite 146 Spezifikationen des Scanners Xerox DocuMate 3920 ........
- Seite 147 EH&S-Kontaktinformationen ............49 Index Xerox DocuMate 3920 Benutzerhandbuch...
-
Seite 148: Willkommen
Willkommen Dieses Kapitel enthält: • Lieferumfang auf Seite 6 • Computerspezifikationen auf Seite 7 • Dokumentation auf Seite 8 • Der Scanner Xerox DocuMate 3920 auf Seite 9 Xerox DocuMate 3920 Benutzerhandbuch... -
Seite 149: Lieferumfang
Bevor Sie mit der Installation der Software beginnen, überprüfen Sie den Inhalt des Lieferkartons, und vergewissern Sie sich, dass alle Teile enthalten sind. Wenn Teile fehlen oder beschädigt sind, wenden Sie sich an den Fachhändler, bei dem Sie den Scanner erworben haben. Scanner Xerox DocuMate 3920 USB-Kabel Netzkabel... -
Seite 150: Computerspezifikationen
VGA- oder SVGA-Monitor Die folgenden Einstellungen werden für den Monitor empfohlen: • 16-Bit- oder 32-Bit-Farbqualität • Auflösung von mindestens 800 x 600 Pixel Anleitungen zum Festlegen von Farbqualität und Auflösung des Bildschirms finden Sie in der Windows-Dokumentation. Xerox DocuMate 3920 Benutzerhandbuch... -
Seite 151: Dokumentation
Dem Scanner liegt die folgende Dokumentation bei: • Schnellstartanleitung: Enthält eine Zusammenfassung der Installationsanweisungen. • Benutzerhandbuch für den Xerox-Scanner: Befindet sich auf der Installations-Disc. Das Benutzerhandbuch enthält ausführliche Informationen zum Einrichten, Scannen, Konfigurieren sowie Warten des Geräts. • Readme: Enthält die neuesten Informationen zum Scanner und zur Installation der Software. -
Seite 152: Der Scanner Xerox Documate 3920
Willkommen Der Scanner Xerox DocuMate 3920 Deckelentriegelung Automatischer Vorlagenfac Papierführung Scannerdeckel des automatischen Vorlageneinzug Vorlageneinzugs Bedienfeld Ausgabefach Papierstopper Netzschalter Netzanschlussbuchse COPY-Anschluss LAN-Anschluss USB-Anschluss LINE-Anschluss Vorlagenfach: Hält die Vorlagen in der korrekten Position im Scanner. Kann ausgeklappt werden, um Vorlagen verschiedener Längen zu halten. - Seite 153 USB-Anschluss (Universal Serial Bus): Über diesen Anschluss wird der Scanner mit dem Computer verbunden. LINE-Anschluss: Schließen Sie ein Ende des Telefonkabels am Anschluss LINE auf der Rückseite des Scanners an. Schließen Sie das andere Ende des Telefonkabels an einer RJ-11-Telefonbuchse an. Xerox DocuMate 3920 Benutzerhandbuch...
-
Seite 154: Auspacken Des Scanners
Anschließen des Netzteils auf Seite 14 Stellen Sie den Scanner nach dem Auspacken auf einer Oberfläche auf, die das Gewicht des Scanners tragen kann. Die Oberfläche muss waagerecht sein, damit die Scannerlampe beim Scannen nicht blockiert. Xerox DocuMate 3920 Benutzerhandbuch... -
Seite 155: Aufbauen Des Scanners
Öffnen Sie den Deckel des automatischen Vorlageneinzugs, entfernen Sie sorgfältig eventuell in den Vorlageneinzug eingedrungene Schaumstoffteile. Heben Sie den Scannerdeckel an, und schieben Sie die Scannerverriegelung in die entriegelte Position. Der Scanner kann nicht betrieben werden, wenn er verriegelt ist. Xerox DocuMate 3920 Benutzerhandbuch... - Seite 156 Ziehen Sie die Schutzfolie vom LCD-Touchscreen ab. Xerox DocuMate 3920 Benutzerhandbuch...
-
Seite 157: Anschließen Des Netzteils
Schließen Sie das Netzteil am entsprechenden Netzanschluss am Scanner an. Verwenden Sie nur das mit dem Scanner gelieferte Netzteil (HiTron HEG75-S240320-7L). HINWEIS: Andere Netzteile können den Scanner beschädigen und führen zum Erlöschen der Garantie. Schließen Sie das Netzkabel an das Netzteil und eine Wandsteckdose an. Xerox DocuMate 3920 Benutzerhandbuch... -
Seite 158: Laden Von Zu Scannenden Vorlagen
Einzugmechanismus blockieren und die internen Bauteile des Geräts zerkratzen. Entfernen Sie außerdem sämtliche Aufkleber, Etiketten oder Haftnotizen, die sich während des Scanvorgangs lösen und im Scanner stecken bleiben können. Bei einer derartigen Fehlbedienung gehen sämtliche Garantieansprüche in Bezug auf den Scanner verloren. Xerox DocuMate 3920 Benutzerhandbuch... -
Seite 159: Scannen Über Den Automatischen Vorlageneinzug (Adf)
Fächern Sie die Blätter auf, um sicherzustellen, dass diese nicht aneinander kleben. Passen Sie die Papierführung an die Breite der Vorlage an. Stellen Sie den Papierstopper an der Rückseite des Scanners auf die Länge des Papiers ein. Xerox DocuMate 3920 Benutzerhandbuch... - Seite 160 Legen Sie den Stapel von Vorlagen mit der zu scannenden Seite nach oben und der Oberkante zuerst in den automatischen Vorlageneinzug ein. Xerox DocuMate 3920 Benutzerhandbuch...
-
Seite 161: Scannen Über Das Vorlagenglas
Heben Sie den Scannerdeckel an, und legen Sie die Vorlage mit der zu scannenden Seite nach unten auf das Vorlagenglas. Richten Sie die Vorlage am Pfeil auf dem Bezugsrahmen aus, und schließen Sie dann den Deckel. Xerox DocuMate 3920 Benutzerhandbuch... -
Seite 162: Wartung
Austauschen der Walze auf Seite 27 • Fehlerbehebung auf Seite 30 • Spezifikationen des Scanners Xerox DocuMate 3920 auf Seite 32 • Ersatzteilliste für Xerox DocuMate 3920 auf Seite 33 In diesem Abschnitt finden Sie Informationen zur Reinigung, Fehlerbehebung, Deinstallation und den technischen Daten des Scanners. -
Seite 163: Sicherheitshinweise
Sicherheitshinweise Beachten Sie die folgenden Sicherheitshinweise, um den sicheren Betrieb Ihres Xerox-Geräts sicherzustellen. Beachten Sie diese Punkte • Trennen Sie das Netzkabel von der Steckdose, bevor Sie das Gerät reinigen. Verwenden Sie ausschließlich für dieses Gerät geeignete Verbrauchs- bzw. Zubehörmaterialien; andernfalls kann es zu Leistungseinschränkungen oder Gefährdungen kommen. -
Seite 164: Beheben Eines Papierstaus
Entnehmen Sie das gestaute Papier, und schließen Sie die Abdeckung wieder. Sie können Papierstaus vermeiden, indem Sie das Papier vor dem Scannen glätten und ausrichten, die Führungsschienen an das Papierformat anpassen und das Papier gerade in den automatischen Vorlageneinzug einlegen. Xerox DocuMate 3920 Benutzerhandbuch... -
Seite 165: Reinigen Des Scanners
Drehrichtung lässt sie sich leicht drehen; drehen Sie die Walze, während Sie sie reinigen. Drehen Sie die Walze NICHT in entgegengesetzter Richtung. Dadurch wird der Scanner beschädigt. Dies kann außerdem dazu führen, dass der Scanner die Seiten nicht mehr ordnungsgemäß einzieht. Xerox DocuMate 3920 Benutzerhandbuch... -
Seite 166: Reinigen Des Vorlagenglases
Bezugsrahmen auf. Dies ist der Bereich des Vorlagenglases, in dem Bilder erfasst werden, während die Vorlage beim Scannen durch den automatischen Vorlageneinzug gezogen wird. Reinigen Sie die erhöhte, dünne Glasplatte, wenn auf den ADF- Scans Linien erscheinen, die beim Scannen über das Vorlagenglas nicht auftreten. Xerox DocuMate 3920 Benutzerhandbuch... -
Seite 167: Austauschen Des Adf-Pads
Probleme mit dem Einziehen von Vorlagen im automatischen Vorlageneinzug deuten auf eine Abnutzung des ADF-Pads hin. • Öffnen Sie die Abdeckung des automatischen Vorlageneinzugs. Das Pad befindet sich in der Mitte des automatischen Vorlageneinzugs. So tauschen Sie das ADF-Pad aus: Xerox DocuMate 3920 Benutzerhandbuch... - Seite 168 Xerox DocuMate 3920 Benutzerhandbuch...
- Seite 169 Xerox DocuMate 3920 Benutzerhandbuch...
-
Seite 170: Austauschen Der Walze
Beachten Sie, dass das Zahnrad rechts an der Walze durch Öffnen des Deckels des automatischen Vorlageneinzugs automatisch freigegeben wird, sodass Sie die Walze ausbauen können. Die Walze ist in einer Mulde im Deckel des automatischen Vorlageneinzugs befestigt. Xerox DocuMate 3920 Benutzerhandbuch... -
Seite 171: So Ersetzen Sie Die Walze
So ersetzen Sie die Walze Halten Sie die Walze am rechten Ende fest, und führen Sie das linke Ende in die Halterung ein. Vergewissern Sie sich, dass das Rädchen am linken Ende der Walze fest in der Halterung sitzt. Xerox DocuMate 3920 Benutzerhandbuch... - Seite 172 Flansch ordnungsgemäß in der Sperrlasche positioniert ist. Schließen Sie den Deckel des automatischen Vorlageneinzugs. Drücken Sie den Deckel des automatischen Vorlageneinzugs vorsichtig nach unten, bis er mit einem Klick einrastet. Der Scanner ist nun mit der neuen Walze einsatzbereit. Xerox DocuMate 3920 Benutzerhandbuch...
-
Seite 173: Fehlerbehebung
Vorlagen liegen, wird der Deckel leicht angehoben, und dadurch wird verhindert dass die über den automatischen Vorlageneinzug eingezogenen Seiten auf dem Glas aufliegen. Wenn dies der Fall ist, können die Seiten den automatischen Vorlageneinzug nicht verlassen, und ein Papierstau kann auftreten. Xerox DocuMate 3920 Benutzerhandbuch... - Seite 174 Welche Schritte müssen ausgeführt werden, um „gerade“ Seiten zu erhalten? Stellen Sie sicher, dass die Papierführungen an den Seitenrändern ausgerichtet sind. Wenn Sie Vorlagen scannen, die kleiner als die Mindesteinstellungen der Papierführungen sind, scannen Sie diese Vorlagen stattdessen auf dem Vorlagenglas. Xerox DocuMate 3920 Benutzerhandbuch...
-
Seite 175: Spezifikationen Des Scanners Xerox Documate 3920
Spezifikationen des Scanners Xerox DocuMate 3920 Optische Auflösung 600 dpi Bittiefe 24 Bit-Color, 8 Bit-Graustufen, 1 Bit Strichzeichnungen/Text Scanmethode Automatischer Vorlageneinzug (ADF) und Vorlagenglas Maximale Objektgrößen Vorlagenglas 216 x 297 mm (8,5 x 11,69 Zoll) Spezifikationen des automatischen Vorlageneinzugs Maximale Objektgrößen 216 x 356 mm (8,5 x 14 Zoll) Mindestobjektgröße... -
Seite 176: Ersatzteilliste Für Xerox Documate 3920
Ersatzteilliste für Xerox DocuMate 3920 Verwenden Sie beim Bestellen von Ersatzteilen für den Scanner die folgenden Teilenamen und - nummern. Teilename Teilenummer ADF-Pad 57-0129-000 Walzenbaugruppe 57-0128-000 35-0223-000 (U.S.) Netzkabel 35-0104-000 (EUR) 35-0105-000 (U.K.) Netzteil 37-0086-000 USB-Kabel 35-0118-000 Telefonkabel 35-0224-000 Xerox DocuMate 3920... - Seite 177 Xerox DocuMate 3920 Benutzerhandbuch...
-
Seite 178: Anhänge
Seite 41 • Wartungsinformationen auf Seite 42 • Sicherheitszertifizierungen auf Seite 43 • Gesetzliche Bestimmungen auf Seite 44 • Informationen zur Konformität auf Seite 45 • Unzulässige Kopien auf Seite 46 • EH&S-Kontaktinformationen auf Seite 49 Xerox DocuMate 3920 Benutzerhandbuch... -
Seite 179: Einleitende Sicherheitshinweise
Lesen Sie die folgenden Hinweise vor Inbetriebnahme des Geräts sowie bei Bedarf sorgfältig durch, um den sicheren Betrieb des Geräts sicherzustellen. Alle Produkte und Zubehörmaterialien von Xerox wurden unter Berücksichtigung strengster Sicherheitsbestimmungen hergestellt und getestet. Dazu gehören die Prüfung und Zertifizierung durch die zuständigen Sicherheitsbehörden ebenso wie die Einhaltung der Bestimmungen zur... -
Seite 180: Emv
Störungen sein, einschließlich solcher Störungen, die den Betrieb unerwünscht beeinflussen könnten. Modifikationen an diesem Gerät, die nicht ausdrücklich durch Xerox genehmigt wurden, führen möglicherweise dazu, dass Sie die Berechtigung für den Betrieb dieses Geräts verlieren. -
Seite 181: Betriebliche Sicherheitshinweise
Reinigungssprays, da diese u. U. brennbar sind und Explosionen verursachen können. • Lassen Sie stets Sorgfalt walten, wenn Sie das Gerät bewegen. Wenden Sie sich an den örtlichen Xerox-Kundendienst, wenn das Kopiergerät an einen Ort außerhalb Ihres Gebäudes bewegt werden soll. •... -
Seite 182: Elektrische Informationen
Steckdose ordnungsgemäß geerdet ist, wenden Sie sich an einen Elektriker. Schließen Sie Xerox-Geräte niemals mittels eines Zwischensteckers an eine Steckdose ohne Schutzerde an. Stellen Sie das Gerät nicht so auf, das andere Personen auf das Stromkabel treten oder darüber stolpern können. -
Seite 183: Gerät Von Der Stromversorgung Trennen
Gerät von der Stromversorgung trennen Das Netzkabel fungiert als Trennvorrichtung des Geräts. Der Gerätestecker wird an der Rückseite des Geräts angeschlossen. Um das Gerät vollständig von der Stromversorgung zu trennen, ziehen Sie das Netzkabel aus der Steckdose. Xerox DocuMate 3920 Benutzerhandbuch... -
Seite 184: Ausschalten In Notfällen
Ausschalten in Notfällen Schalten Sie das Gerät in den nachfolgend aufgeführten Fällen unverzüglich aus, und ziehen Sie das Netzkabel aus der Steckdose. Wenden Sie sich außerdem an einen autorisierten Xerox- Servicemitarbeiter, um das Problem zu beheben. • Das Gerät gibt ungewöhnliche Gerüche oder ungewöhnliche Geräusche von sich. -
Seite 185: Wartungsinformationen
Unter diesen Abdeckungen befinden sich keine durch Bedienkräfte zu wartenden Teile. Führen Sie keine Wartungsarbeiten durch, es sei denn, Sie wurden von einem autorisierten Händler dazu angeleitet oder die entsprechende Vorgehensweise wird ausdrücklich in der Dokumentation beschrieben. Xerox DocuMate 3920 Benutzerhandbuch... -
Seite 186: Sicherheitszertifizierungen
Sicherheitszertifizierungen Dieses Produkt wurde von folgenden Einrichtungen gemäß den folgenden Normen zertifiziert: Einrichtung Standard Underwriters Laboratories Inc. UL60950-1 (2003) erste Ausgabe (USA/Kanada) TÜV IEC60950-1: 2001 (2. Auflage) Xerox DocuMate 3920 Benutzerhandbuch... -
Seite 187: Gesetzliche Bestimmungen
Gesetzliche Bestimmungen Zertifizierungen in Europa Das CE-Zeichen auf diesem Gerät bedeutet, das Xerox eine Erklärung der Konformität zu folgenden EURichtlinien mit Wirkung ab dem angegebenen Datum abgegeben hat: 12. Dezember 2006: EU-Richtlinie 2006/95/EG in der aktuellen Fas- sung. Angleichung der Rechtsvorschriften der Mitgliedsstaaten im Zusammenhang mit Nieder- spannungsgeräten. -
Seite 188: Informationen Zur Konformität
Informationen zur Konformität Produktentsorgung und -recycling: USA und Kanada Bei der Entsorgung des Xerox-Geräts ist zu beachten, dass das Gerät Lampen mit Quecksilber enthält; außerdem kann das Gerät Blei, Perchlorat und andere Stoffe enthalten, deren Entsorgung u. U. bestimmten Umweltschutzbestimmungen unterliegt. Der Gehalt an diesen Stoffen entspricht bei Markteinführung ohne Einschränkungen den einschlägigen internationalen Bestimmungen. -
Seite 189: Unzulässige Kopien
Urheberrechtlich geschützte Materialien, außer mit der Genehmigung seitens des Urheberrechtsinhabers oder unter den Bestimmungen zur angemessenen Verwendung („Fair Use“) bzw. den Rechten von Bibliotheken der US-Urheberschutzgesetze. Weitere Informationen sind vom Copyright Office, Library of Congress, Washington, D.C. 20559 erhältlich. Circular R21 anfordern. Xerox DocuMate 3920 Benutzerhandbuch... -
Seite 190: Kanada
Regierung Kanadas oder einer Provinz bzw. einer Regierung eines anderen Staates als Kanada eingerichtet wurde. Geprägte oder geklebte Steuermarken, die als Einnahmequelle für die Regierung Kanadas oder einer Provinz oder der Regierung eines anderen Staates als Kanada verwendet werden. Xerox DocuMate 3920 Benutzerhandbuch... -
Seite 191: Andere Länder
Dokumente, die dem Urheber- oder Markenrecht unterliegen, ohne Zustimmung des Rechteinhabers Postwertzeichen und übertragbare Handelspapiere Hinweis: Diese Liste erhebt keinen Anspruch auf Vollständigkeit. Für die Vollständigkeit und Richtigkeit wird keine Haftung übernommen. Ziehen Sie bei Zweifeln einen Rechtsanwalt zurate. Xerox DocuMate 3920 Benutzerhandbuch... -
Seite 192: Eh&S-Kontaktinformationen
EH&S-Kontaktinformationen Kontaktinformationen Weitere Informationen zu Umwelt-, Gesundheits- und Sicherheitsaspekten in Zusammenhang mit diesem Xerox-Produkt erhalten Sie unter der folgenden Telefonnummer: USA und Kanada: 1-800-828-6571 +44 1707 353 434 Xerox DocuMate 3920 Benutzerhandbuch... - Seite 193 Xerox DocuMate 3920 Benutzerhandbuch...
-
Seite 194: Index
Vorlagenfach, 9 Automatischer Vorlageneinzug, Reinigung, 22 Bedienfeld, 9 Bittiefe, 32 Computerspezifikationen, 7 Dokumentation, 8 DVD-ROM-Laufwerk, 7 Fehlerbehebung, 30 Monitor, 7 Netzanschlussbuchse, 10 Netzschalter, 9 Papierführung, 9 Papierstau, 21 Papierstopper, 9 RAM, 7 Scanner Anschließen des Netzteils, 14 Xerox DocuMate 3920 Benutzerhandbuch... - Seite 195 Xerox DocuMate 3920 Benutzerhandbuch...