Dimplex DANVILLE DNV20AB Bedienungsanleitung
Inhaltsverzeichnis
Verfügbare Sprachen
Verfügbare Sprachen
Quicklinks
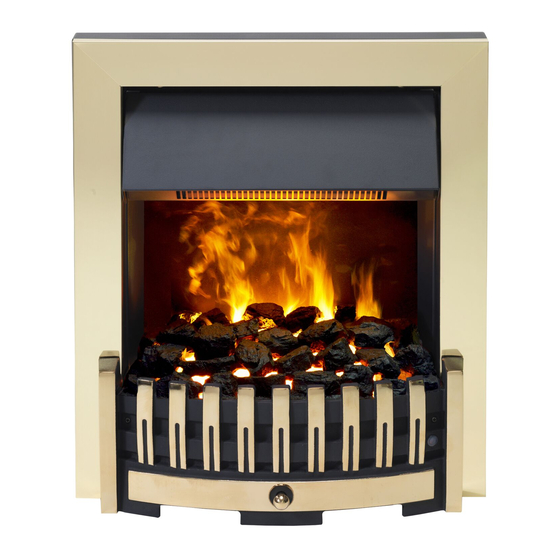
DNV20AB, DNV20BR, DNV20BL & DNV20CH
EN : This product is only suitable for well insulated rooms or occasional use. DE : Dieses Produkt ist nur für gut isolierte Bereiche oder gelegentli-
che Verwendung geeignet. FR : Ce produit convient uniquement à des endroits bien isolés ou pour un usage occasionnel. IT : Questo prodotto è
adatto solo per spazi ben isolati o per uso occasionale. ES : Este producto sólo es adecuado para espacios bien aislados o un uso ocasional. NL :
Dit product is uitsluitend geschikt voor goed geïsoleerde ruimten of voor sporadisch gebruik. PL : Produkt ten jest odpowiedni wyłącznie do dobrze
odizolowanych miejsc lub do okazjonalnego użytku. NO : Dette produktet egner seg kun for godt isolerte rom eller sporadisk bruk. RO : Acest
produs este adecvat exclusiv spaţiilor bine ventilate sau utilizării ocazionale. CZ : Tento výrobek je vhodný pouze do dobře izolovaných prostor
nebo k příležitostnému použití. DK : Dette produkt er kun egnet til velisolerede rum eller lejlighedsvis brug. PT : Este produto somente é adequado
para espaços bem isolados ou uso ocasional. SE : Denna produkt är endast avsedd för välisolerade utrymmen eller tillfällig användning. FI : Tämä
tuote soveltuu ainoastaan hyvin eristettyihin tiloihin tai satunnaiseen käyttöön. SK : Tento výrobok je vhodný len pre dobre izolované priestory alebo
na občasné použitie. SI : Ta izdelek je primeren le za dobro izolirane prostore ali za občasno uporabo. HR : Ovaj proizvod je pogodan samo za
dobro izolirane prostore ili povremenu upotrebu. HU : Ez a termék csak jól szigetelt terekhez vagy eseti használatra alkalmas.
The product complies with the European Safety Standards EN60335-2-30 and the European Standard Electromagnetic Compatibility (EMC)
EN55014, EN60555-2 and EN60555-3 These cover the essential requirements of EEC Directives 2006/95/EC and 2004/108/EC
DANVILLE
08/51651/0 Issue 8
OCN 10670
Inhaltsverzeichnis

Verwandte Anleitungen für Dimplex DANVILLE DNV20AB


Inhaltszusammenfassung für Dimplex DANVILLE DNV20AB
- Seite 1 DANVILLE DNV20AB, DNV20BR, DNV20BL & DNV20CH EN : This product is only suitable for well insulated rooms or occasional use. DE : Dieses Produkt ist nur für gut isolierte Bereiche oder gelegentli- che Verwendung geeignet. FR : Ce produit convient uniquement à des endroits bien isolés ou pour un usage occasionnel. IT : Questo prodotto è adatto solo per spazi ben isolati o per uso occasionale.
- Seite 2 DE ............................ 1 GB ............................. 8 RU ..........................14 FR ..........................20 IT ........................... 26...
-
Seite 3: Dimplex Opti-Myst Kamineinsätze
Dimplex Opti-myst Kamineinsätze Modell: DNV20AB, DNV20BR, DNV20BL, DNV20CH WICHTIG: DIESE ANLEITUNG FÜR ZUKÜNFTIGE NACHSCHLAGEZWECKE SORGFÄLTIG AUFBEWAHREN Wichtige Sicherheitshinweise Beim Gebrauch von elektrischen Geräten sollten die grundlegenden Sicherheitsmaßnahmen immer befolgt werden, um das Risiko von Brandbildung, elektrischem Schock und Verletzungen zu minim- ieren. -
Seite 4: Allgemeine Informationen
Technische Information : Modell Nr: DNV20AB, DNV20BR, DNV20BL, DNV20CH Wärmeabgabe 230V 240V Nennwärmeabgabe Mindestwärmeabgabe Maximale kontinuierliche Wärme- abgabe max,c Zusätzlicher Stromverbrauch Im Standby-Betrieb med mekanisk termostat og indendørs temperaturstyring. Allgemeine Informationen Das Heizgerät vorsichtig auspacken und die Verpackung für spätere Zwecke aufbewahren, z. B. für einen Umzug oder für die Rücksendung an den Händler. -
Seite 5: Betrieb Des Feuers
3. Vergewissern Sie sich, dass das Gerät auf OFF (Aus) geschaltet ist. 4. Den Kamineinsatz seitlich an der Umrandung festhalten und vorsichtig in Einbaulage manövrieren. Den Kamineinsatz an eine Steckdose anschließen, die mit 13 A/240 V versorgt wird. Sicherstellen, dass das Netzkabel nicht unter dem Kamineinsatz verklemmt ist, da es sonst beschädigt werden kann. -
Seite 6: Wartung
6. Ziehen Sie die defekte Lampe mit den Kontaktstiften vorsichtig nach oben aus dem Lampensockel heraus (siehe Abb. 4 und 4a). Bauen Sie als Ersatzlampe eine Dimplex Opti-myst Farblampe für 12 V, 45 W, Sockel Gu5.3 mit 8º Abstrahlwinkel ein. (Bestellung über www. - Seite 7 6. Ziehen Sie die defekte Lampe mit den Kontaktstiften vorsichtig nach oben aus dem Lampensockel heraus (siehe Abb. 4 und 4a). Bauen Sie als Ersatzlampe eine Dimplex Opti-myst Farblampe für 12 V, 45 W, Sockel Gu5.3 mit 8º Abstrahlwinkel ein. (Bestellung über www.
-
Seite 8: Weitere Informationen
Ihren gesetzlichen Rechten, die von dieser Gewährleistung unberührt bleiben. Wenn Sie Kundendienstinformationen oder Hilfe zu diesem Produkt benötigen, besuchen Sie bitte die Website www.dimplex.co.uk. Unter dem Punkt „After Sales“ (Kundendienst) finden Sie unsere Lösungsvorschläge im Falle eines Problems. Sie können auch unsere Hotline unter 0845 600 5111 (GB) oder 01 842 4833 (Irland) anrufen. - Seite 9 Fehlerdiagnose Symptom Ursache Abhilfe Der Flammeneffekt Netzstecker ist nicht angeschlossen. Prüfen Sie, ob der Netzstecker richtig an die lässt sich nicht Steckdose angeschlossen ist. einschalten. Wenig Wasser. Prüfen Sie, ob der Wassertank gefüllt ist, und ob sich Wasser im Sumpf befindet. Der Niederspannungsstecker ist nicht richtig Prüfen Sie, ob der Stecker korrekt angeschlossen.
- Seite 34 Fig.1 Fig.2 Fig.3 Fig.4a Fig.4...
- Seite 35 Fig.6 Fig.5 Fig.6a Fig.7 Fig.8 Fig.9...
- Seite 36 Fig.10 Fig.11 Fig.12...