Herunterladen Inhalt Inhalt Diese Seite drucken
Palazzetti EASY TOUCH Verwendung Und Betrieb
Vorschau ausblenden Andere Handbücher für EASY TOUCH:

Werbung

Verfügbare Sprachen
  • DE

Verfügbare Sprachen

  • DEUTSCH, seite 24
IT
UTILIZZO E FUNZIONALITÀ
EN
USE AND FUNCTION
DE
VERWENDUNG UND BETRIEB
FR
UTILISATION ET FONCTIONNEMENT
ES
USO Y FUNCIONES
STUFE A PELLET
PELLETOFEN - POÊLES À GRANULÉS - PELLET ESTUFA
Il presente manuale è parte integrante del prodotto.
Si raccomanda di leggere attentamente le istruzioni prima
dell'installazione, manutenzione o utilizzo del prodotto.
This manual is an integral part of the product.
Read the instructions carefully before installing, servicing or
operating the product.
Die vorliegende Anleitung ist fester Bestandteil des Produkts.
Vor der Installation, Wartung und Verwendung die Anleitungen
stets aufmerksam durchlesen.
-
PELLET STOVES
Le présent manuel fait partie intégrante du produit.
Il est conseillé de lire attentivement les consignes
avant l'installation, l'entretien ou l'utilisation du produit.
Este
manual
es
Se recomienda leer detenidamente las instrucciones antes
de la instalación, el mantenimiento y el uso del producto..
EASY
TOUCH
parte
integrante
del
producto.

Werbung

Inhaltsverzeichnis
loading

Inhaltszusammenfassung für Palazzetti EASY TOUCH

  • Seite 1 UTILIZZO E FUNZIONALITÀ USE AND FUNCTION VERWENDUNG UND BETRIEB UTILISATION ET FONCTIONNEMENT USO Y FUNCIONES STUFE A PELLET PELLET STOVES PELLETOFEN - POÊLES À GRANULÉS - PELLET ESTUFA EASY TOUCH Il presente manuale è parte integrante del prodotto. Si raccomanda di leggere attentamente le istruzioni prima dell’installazione, manutenzione o utilizzo del prodotto.
  • Seite 2 Gentile cliente, desideriamo innanzitutto ringraziarLa per la preferenza che ha voluto accordarci acquistando il nostro prodotto e ci congratuliamo con Lei per la scelta. Per consentirLe di utilizzare al meglio la Sua nuova stufa, la invitiamo a seguire attentamente quanto descritto nel presente manuale. Dear Customer, We’d like to thank you for having purchased one of our products and congratulate you on your choice.
  • Seite 3 INDICE PANNELLO COMANDI DESCRIZIONE USO DEL PANNELLO COMANDI PARAMETRI DI FUNZIONAMENTO OPERAZIONI PRELIMINARI CARICAMENTO PELLET ALIMENTAZIONE ELETTRICA IMPOSTAZIONI INIZIALI UTILIZZO DELLA STUFA ACCENSIONE MODIFICA DEI PARAMETRI SPEGNIMENTO FUNZIONAMENTO CON SONDA AMBIENTE A BORDO STUFA FUNZIONI DISPONIBILI TIMER FUNZIONE RISPARMIO “ECO MODE” FUNZIONE DELTA DI RIACCENSIONE RIACCENSIONE DOPO IL BLACK-OUT FUNZIONE “BLOCCO TASTIERA”...
  • Seite 4: Pannello Comandi

    1 PANNELLO COMANDI Prima di procedere con la lettura del manuale, prendere visione della descrizione della stufa contenuta nel relativo manuale allegato. 1.1 DESCRIZIONE Il pannello comandi è composto da: A) una parte superiore con i led di stato e le icone retroilluminate che identi cano ciascuna funzione;...
  • Seite 5: Uso Del Pannello Comandi

    1.1.2 Descrizione dei menu ICONA FUNZIONE DESCRIZIONE VALORI Potenza Impostazione della potenza di funzionamento 1..5 Ventilazione Impostazione della velocità del ventilatore dell’aria ambiente. OFF*,1..5; Auto; Hi *(ove previsto) Visualizza la temperatura letta in ambiente e permette di impostare la Temperatura 12°C ..
  • Seite 6 1.3 PARAMETRI DI FUNZIONAMENTO Il funzionamento della stufa è determinato dai parametri di Potenza, Ventilazione e Temperatura impostati dall’utente. 1.3.1 La potenza de nisce la quantità di calore prodotta dalla stufa e quindi incide direttamente anche sui consumi. Per modi care la potenza: a) Portarsi con i tasti sul menu potenza e premere il tasto...
  • Seite 7: Operazioni Preliminari

    2 OPERAZIONI PRELIMINARI 2.1 CARICAMENTO PELLET La prima operazione da eseguire prima di accendere il prodotto è quella di riempire il serbatoio di combustibile (pellet) utilizzando preferibilmente una apposita paletta. Non svuotare il sacco direttamente nel serbatoio per evitare di caricare della segatura o altri elementi estranei che potrebbero compromettere il buon funzionamento della stufa e per evitare di disperdere il pellet al di fuori del serbatoio.
  • Seite 8 2.3.2 E’ possibile impostare il grado di attenuazione della luminosità del display quando è nella modalità standby. a) Agendo sui tasti freccia portarsi sul menu setup e premere il tasto b) Selezionare la password “7” con il tasto e confermare con il tasto [11] c) Scorrere con il tasto e selezionare il sottomenu...
  • Seite 9: Utilizzo Della Stufa

    3 UTILIZZO DELLA STUFA 3.1 ACCENSIONE Per accendere la stufa tenere premuto il tasto per qualche secondo. L’icona a forma di amma inizierà a lampeggiare, durante la fase di accensione no a restare ssa a stufa accesa. Accensione automatica: la stufa è dotata di un dispositivo automatico che consente l’accensione del pellet senza l’utilizzo di altri accenditori tradizionali.
  • Seite 10: Funzioni Disponibili

    4 FUNZIONI DISPONIBILI 4.1 TIMER E’ possibile impostare, abilitare ed assegnare ai vari giorni della settimana, i programmi personalizzati per l’accensione e/o lo spegnimento automatico della stufa. Per ciascun programma si può impostare: ora di accensione, ora di spegnimento e temperatura desiderata. I giorni della settimana sono identi cati da numeri: Lunedì...
  • Seite 11: Funzione Antigelo

    4.2 FUNZIONE RISPARMIO “ECO MODE” Abilitando questa funzione si fa in modo che la stufa, al raggiungimento della temperatura desiderata in ambiente, si spenga. Se tale funzione non è abilitata, la stufa modula il proprio funzionamento per mantenere la temperatura desiderata consumando il meno possibile. Per abilitare/disabilitare tale funzione: a) Agendo sui tasti freccia portarsi sul menu setup...
  • Seite 12: Gestione Degli Allarmi

    5 GESTIONE DEGLI ALLARMI Nel caso si veri chi un’anomalia nel funzionamento, viene attivata la seguente procedura: 1) allarme acustico (beep); 2) si illumina uno dei seguenti led di sistema: 3) se l’anomalia riguarda un errore, la stufa si spegnerà. La pressione prolungata del tasto “annulla”...
  • Seite 13 INDEX CONTROL PANEL DESCRIPTION USING THE CONTROL PANEL OPERATING PARAMETERS PRELIMINARY OPERATIONS LOADING THE PELLETS POWER SUPPLY INITIAL SETTINGS STARTING THE STOVE MODIFYING THE PARAMETERS SWITCHING OFF OPERATION WITH ROOM PROBE ON THE STOVE TIMER “ECO MODE” SAVING FUNCTION RESTART DELTA FUNCTION RESTARTING AFTER A POWER FAILURE “LOCK KEYPAD”...
  • Seite 14: Control Panel

    6 CONTROL PANEL Before reading the manual, review the description of the stove given in the enclosed manual. 6.1 DESCRIPTION The control panel consists of: A) a top part with status LEDs and backlit icons that identify each function; B) LED display; C) ON button D) “Cancel”...
  • Seite 15: Using The Control Panel

    6.1.2 ICON FUNCTION DESCRIPTION VALUES Power Stove output setting 1..5 It allows you to set the fan speed. OFF*,1..5; Auto; Hi *(where featured) Displays the room temperature reading and is used to set the desired Temperature 12°C .. 51°C temperature. Fuel Not used Timer...
  • Seite 16: Operating Parameters

    6.3 OPERATING PARAMETERS Stove operation is determined by the Power level, Fan and Temperature parameters set by the user. 6.3.1 The power level de nes the amount of heat produced by the stove and consequently directly affects fuel consumption. To change the power level: a) Use the buttons to go to the power menu and press...
  • Seite 17: Preliminary Operations

    7 PRELIMINARY OPERATIONS 7.1 LOADING THE PELLETS The rst operation to be performed before starting the appliance is to ll the hopper with fuel (pellets). The pellets are loaded into in the hopper using a scoop. Do not empty the sack directly into the hopper so as to avoid loading sawdust or other foreign bodies that may affect proper stove operation and avoid spilling pellets outside of the hopper.
  • Seite 18 7.3.2 Display brightness when in standby mode can be set. a) Use the arrow buttons to go to the setup menu and then press b) Use the button to select the password “7” and then press to con rm; [11] c) Use the button to scroll to and select submenu and press...
  • Seite 19: Switching Off

    To start the stove hold the button for several seconds. The ame icon will start ashing during the ignition stage until remaining on steady when the stove has started. Automatic stove ignition: the stove comes with an automatic device that starts the pellet stove without using other traditional re lighters.
  • Seite 20 9.1 TIMER It’s possible to set, enable and assign to the various days of the week, customised programs for automatically switching the stove on and off. For each program, the following can be set: on time, off time and desired temperature. The days of the week are identi ed by numbers: Monday = “d1”, Tuesday = “d2”;...;...
  • Seite 21 Enabling this function means that the stove switches off when reaching the desired room temperature. If this function is not enabled, the stove modulates operation so as to maintain the desired temperature while consuming the least amount of fuel possible. To enable/disable the function: a) Use the arrow buttons to go to the setup menu...
  • Seite 22: Alarm Management

    ALARM MANAGEMENT If a malfunction occurs, the following procedure is activated: 1) audible alarm (beep); 2) one of the following system LEDs come on: 3) if the problem concerns an error, the stove will switch off. Pressing and holding the “cancel” button shows the error code on the display: DESCRIPTION POSSIBLE CAUSES...
  • Seite 23 INHALT BEDIENFELD BESCHREIBUNG BENUTZUNG DES BEDIENPANELS BETRIEBSPARAMETER ERSTE SCHRITTE PELLETZUFÜHRUNG STROMVERSORGUNG ANFÄNGLICHE EINSTELLUNGEN GEBRAUCH DES OFENS EINSCHALTEN BEARBEITEN DER PARAMETER AUSSCHALTEN BETRIEB MIT RAUMTEMPERATURFÜHLER AM OFEN TIMER SPARFUNKTION “ECO MODE“ FUNKTION EINSCHALTDIFFERENZ WIEDEREINSCHALTEN NACH STROMAUSFALL FUNKTION „TASTATURSPERRE“ FROSTSCHUTZFUNKTION...
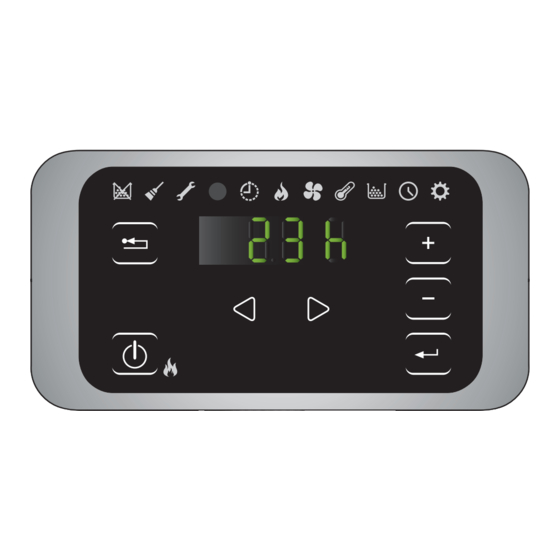
  • Seite 24 6 BEDIENFELD Vor dem Lesen der Anleitung die Beschreibung des Heizofens zurate ziehen, die im beiliegenden Handbuch enthalten ist. 6.1 BESCHREIBUNG Bestandteile des Bedienpanels: A) obere Anzeigeleiste mit den Status-LEDs und den hinterleuchteten Symbolen der einzelnen Funktionen; B) LED-Display; C) inschalttaste D) Taste „Abbrechen“...
  • Seite 25: Benutzung Des Bedienpanels

    6.1.2 SYMBOL FUNKTION BESCHREIBUNG WERTE Leistung Einstellung der Betriebsstufe 1..5 Lüftung Damit koennen Sie die Geschwindigkeit des Raumluftgeblaeses OFF*,1..5; Auto; Hi einstellen *(sofern vorgesehen) Anzeige der im Raum abgelesenen Temperatur und Möglichkeit Temperatur 12°C .. 51°C zur Einstellung der gewünschten Temperatur. Brennstoff Diese Funktion wird nicht verwendet.
  • Seite 26: Betriebsparameter

    6.3 BETRIEBSPARAMETER Der Ofenbetrieb wird von den benutzerde nierten Leistungs-, Lüftungs- und Temperaturparametern bestimmt. 6.3.1 Die Leistung de niert die vom Ofen erzeugte Wärmemenge und hat daher direkten Ein uss auf den Verbrauch. Zur Änderung der Leistung: a) Mit den Tasten das Menü...
  • Seite 27: Erste Schritte

    7 ERSTE SCHRITTE Bevor das Gerät eingeschaltet wird, muss als erstes der Brennstoffbehälter (Pellets) gefüllt werden. Schütten Sie die Pellets nicht direkt aus dem Sack in den Behälter, um nicht versehentlich Sägemehl oder andere Fremdkörper einzufüllen, die den einwandfreien Betrieb des Ofens beeinträchtigen könnten, und um keine Pellets außerhalb des Behälters zu verstreuen.
  • Seite 28 7.3.2 Der Benutzer kann einstellen, wie stark die Display-Helligkeit im Standby-Modus gedämpft wird. a) Mit den Tasten das Menü Setup aufrufen und die Taste drücken; b) Mit der Taste das Passwort “7” anwählen und mit der Taste bestätigen; [11] c) Mit der Taste scrollen, das Untermenü...
  • Seite 29: Gebrauch Des Ofens

    8 GEBRAUCH DES OFENS 8.1 EINSCHALTEN Zum Einschalten des Ofens die Taste ein paar Sekunden lang gedrückt halten. Während der Einschaltphase beginnt das Flammensymbol zu blinken und sobald der Ofen eingeschaltet ist, wechselt es auf Dauerlicht. Automatische Einschaltung: Der Ofen verfügt über eine automatische Vorrichtung, mit der die Pellets ohne Zuhilfenahme anderer, herkömmlicher Anzündhilfen angezündet werden können.
  • Seite 30 9.1 TIMER Mit dieser Funktion können die benutzerde nierten Programme für das automatische Ein- und/oder Ausschalten des Ofens eingerichtet, aktiviert und den verschiedenen Wochentagen zugewiesen werden. Für jedes Programm kann eingestellt werden: Einschaltuhrzeit, Ausschaltuhrzeit und gewünschte Temperatur. Die Wochentage sind durch Zahlen gekennzeichnet: Montag = “d1”, Dienstag = “d2”;...; Sonntag = “d7“. 9.1.1 a) Mit den Tasten das Menü...
  • Seite 31: Funktion Einschaltdifferenz

    9.2 SPARFUNKTION “ECO MODE“ Bei Aktivierung dieser Funktion wird der Ofen bei Erreichen der gewünschten Raumtemperatur ausgeschaltet. Wenn diese Funktion nicht aktiviert ist, moduliert der Ofen seinen Betrieb, um die gewünschte Temperatur bei geringstmöglichem Verbrauch zu halten. Zur Aktivierung/Deaktivierung dieser Funkt: a) Mit den Tasten das Menü...
  • Seite 32 Bei Auftreten einer Betriebsstörung wird die folgende Prozedur aktiviert: 1) Akustischer Alarm (Piepton); 2) Eine der folgenden System-LEDs leuchtet auf: 3) Wenn die Störung einen Fehler betrifft, wird der Ofen ausgeschaltet Durch anhaltendes Drücken der Taste „Abbrechen“ wird der Fehlercode auf dem Display angezeigt: FEHLERCODE BESCHREIBUNG MÖGLICHE URSACHEN...
  • Seite 33 INDEX PANNEAU DE COMMANDE DESCRIPTION UTILISATION DU CLAVIER DE COMMANDE PARAMÈTRES DE FONCTIONNEMENT OPERATIONS PRELIMINAIRES REMPLISSAGE DES PELLETS ALIMENTATION ELECTRIQUE PARAMÉTRAGES PRÉLIMINAIRES UTILISATION DU POELE ALLUMAGE MODIFICATION DES PARAMETRES EXTINCTION FONCTIONNEMENT AVEC UNE SONDE AMBIANTE INSTALLÉE SUR LE POÊLE FONCTIONS DISPONIBLES FONCTION TIMER FONCTION ÉCONOMIE “ECO MODE”...
  • Seite 34: Panneau De Commande

    6 PANNEAU DE COMMANDE Avant d’entamer la lecture du manuel, consulter la description du poêle contenue dans le manuel en annexe. 6.1 DESCRIPTION Composition du clavier de commande: A) la partie haute avec les LEDS d’état et les ic nes rétro éclairées identi ant chaque fonction, B) écran à...
  • Seite 35 6.1.2 ICON FUNCTION DESCRIPTION VALEURS Puissance Mise au point de la puissance de fonctionnement 1..5 Ventilation Réglez la puissance du ventilateur de l’air ambiant. OFF*,1..5; Auto; Hi *(si prévue) Af che la température ambiante et permet de programmer la température Temperature 12°C ..
  • Seite 36 6.3 PARAMÈTRES DE FONCTIONNEMENT Le fonctionnement du poêle dépend des paramètres de Puissance, Ventilation et Température réglés par l’utilisateur. 6.3.1 La puissance correspond à la quantité de chaleur produite par le poêle, et in ue donc directement sur la consommation. Pour modi er la puissance: a) A l’aide des touches sélectionner le menu puissance...
  • Seite 37: Operations Preliminaires

    7 OPERATIONS PRELIMINAIRES 7.1 REMPLISSAGE DES PELLETS La première opération à effectuer avant d’allumer le poêle est celle de remplir la trémie de pellets. Les pellets doivent être versés dans la trémie avec une petite pelle. Ne pas vider directement le sac dans la trémie pour ne pas y jeter de la sciure ou des corps étrangers qui pourraient nuire au bon fonctionnement du poêle, et ne pas verser de pellets en dehors de...
  • Seite 38 7.3.2 Il est possible de mettre au point la luminosité de l’écran lorsqu’il est en mode veille. a) A l’aide des touches , sélectionner le menu Con guration et appuyer sur b) Sélectionner le mot de passe “7” avec la touche et con rmer avec la touche [11] c) À...
  • Seite 39: Utilisation Du Poele

    8 UTILISATION DU POELE 8.1 ALLUMAGE Pour allumer le poêle, appuyer sur la touche pendant quelques secondes. L’icône de la amme se met à clignoter pendant la phase d’allumage, puis reste allumée xement pour signaler l’allumage du poêle. Allumage automatique: le poêle est équipé d’un dispositif automatique permettant d’allumer les pellets sans recourir aux allume-feux traditionnels.
  • Seite 40: Fonctions Disponibles

    9 FONCTIONS DISPONIBLES 9.1 FONCTION TIMER Cette fonction permet de programmer et d’assigner aux différents jours de la semaine des programmes personnalisés permettant d’allumer et/ou d’éteindre automatiquement le poêle. Il est possible de mettre au point jusqu’à six programmes personnalisés. Dans chaque programme on peut mettre au point l’heure d’allumage et d’extinction ainsi que la température souhaitée.
  • Seite 41 FONCTION ÉCONOMIE “ECO MODE” Cette fonction éteint le poêle lorsque la température ambiante programmée est atteinte. Si cette fonction n’est pas activée, le poêle module son fonctionnement pour maintenir la température programmée en consommant le moins possible. Pour activer/désactiver cette fonction: a) A l’aide des touches , sélectionner le menu Con guration et appuyer sur...
  • Seite 42: Gestion Des Alarmes

    10 GESTION DES ALARMES Un dysfonctionnement est signalé par la procédure suivante: 1) avertissement sonore (bip); 2) allumage de l’une des icônes suivantes: 3) s’il s’agit d’une alarme, le poêle s’éteint; 4) l’ef eurement prolongé de la touche “annuler” af che le code de l’alarme: DESCRIPTION CAUSES PROBABLES MESSAGE...
  • Seite 43 ÍNDICE PANEL DE MANDOS DESCRIPCIÓN USO DEL PANEL DE MANDO PARÁMETROS DE FUNCIONAMIENTO OPERACIONES PRELIMINARES CARGA DE LOS PELLETS ALIMENTACIÓN ELÉCTRICA PROGRAMACIONES INICIALES USO DE LA ESTUFA ENCENDIDO MODIFICACIÓN DE LOS PARÁMETROS APAGADO FUNCIONAMIENTO CON SONDA AMBIENTE A BORDO ESTUFA FUNCIONES DISPONIBLES FUNCIÓN TEMPORIZADOR FUNCIÓN AHORRO “ECO MODE”...
  • Seite 44: Panel De Mandos

    6 PANEL DE MANDOS Antes de leer este manual, consultar la descripción de la estufa en el manual adjunto. 6.1 DESCRIPCIÓN El panel de mando se compone de: A) una parte superior con los led de estado y los iconos con iluminación posterior que identi can cada función;...
  • Seite 45 6.1.2 Descripción de los menús ICONO FUNCIÓN DESCRIPCIÓN VALORES Potencia Programación de la potencia de funcionamiento 1..5 Ventilación Regulación de la velocidad del ventilador del aire ambiente. OFF*,1..5; Auto; Hi *(donde esté previsto) Muestra la temperatura leída en la estancia y permite programar la Temperature 12°C ..
  • Seite 46: Parámetros De Funcionamiento

    6.3 PARÁMETROS DE FUNCIONAMIENTO El funcionamiento de la estufa depende de los parámetros de Potencia, Ventilación y Temperatura programados por el usuario. 6.3.1 MODIFICACIÓN DE LA POTENCIA La potencia de ne la cantidad de calor producida por la estufa y por lo tanto incide directamente también en los consumos.
  • Seite 47: Operaciones Preliminares

    7 OPERACIONES PRELIMINARES 7.1 CARGA DE LOS PELLETS La primera operación a realizar antes de encender el producto es llenar el depósito de combustible (pellet). No cargar directamente de la bolsa para evitar de descargar aserrín u otros elementos extraños que pueden afectar el buen funcionamiento de la estufa y para evitar que se esparzan pellets fuera del depósito.
  • Seite 48 7.3.2 Se puede programar el grado de atenuación de la luminosidad del visor cuando está en el modo standby. a) Usando los botones ir al menú setup y pulsar el botón b) Seleccionar la contraseña “7” con el botón y con rmar con el botón [11] c) Pasar con el botón , seleccionar el submenú...
  • Seite 49: Uso De La Estufa

    8 USO DE LA ESTUFA 8.1 ENCENDIDO Para encender la estufa mantener presionado el botón durante algunos segundos. El icono en forma de llama comenzará a parpadear, durante la fase de encendido hasta quedar ja con la estufa encendida. Encendido automático: La estufa está dotada de un dispositivo automático que permite el encendido del pellet sin recurrir al uso de otros encendedores tradicionales.
  • Seite 50: Funciones Disponibles

    9 FUNCIONES DISPONIBLES 9.1 FUNCIÓN TEMPORIZADOR Con esta función se pueden programar, habilitar y asignar a los diferentes días de la semana, los programas personalizados para el encendido y/o el apagado automático de la estufa. Para cada programa se pueden programar: hora de encendido, hora de apagado y temperatura deseada. Los días de la semana se identi can por los números: Lunes = “d1”, Martes = “d2”;...;...
  • Seite 51: Función Anticongelación

    9.2 FUNCIÓN AHORRO “ECO MODE” Habilitando esta función cuando la estufa alcanza la temperatura deseada en el ambiente, se apaga. Si dicha función no es habilitada, la estufa modula su funcionamiento para mantener la temperatura deseada consumiendo lo menos posible. Para habilitar/deshabilitar dicha función: a) Usando los botones ir al menú...
  • Seite 52: Gestión De Las Alarmas

    10 GESTIÓN DE LAS ALARMAS Si se produce una anomalía en el funcionamiento, se activa el siguiente procedimiento: 1) Alarma acústica (beep); 2) Se ilumina uno de los siguientes led de sistema: 3) Si la anomalía se re ere a un error, la estufa se apagará. La presión prolongada del botón “anular”...
  • Seite 56 Palazzetti accepts no liability for any mistakes in this handbook and is free to modify the features of its products without prior notice.

Inhaltsverzeichnis