Herunterladen Inhalt Inhalt Diese Seite drucken

Werbung

Verfügbare Sprachen
  • DE

Verfügbare Sprachen

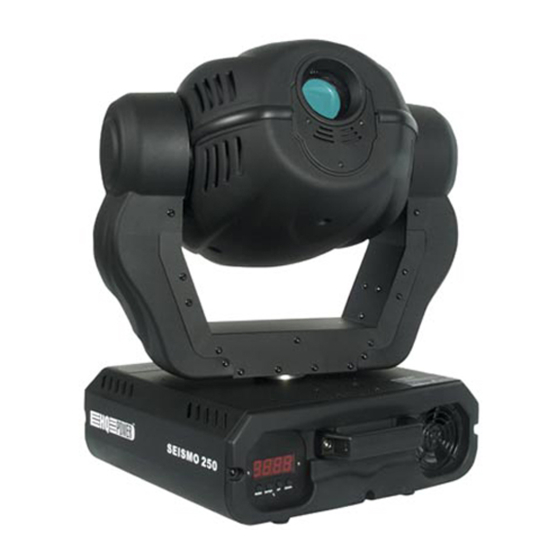
VDP250MHS13 – PROFESSIONAL 13-CHANNEL MOVING HEAD SEISMO 250
1. Introduction & Features
To all residents of the European Union
Important environmental information about this product
This symbol on the device or the package indicates that disposal of the device after its lifecycle could harm
the environment.
Do not dispose of the unit (or batteries) as unsorted municipal waste; it should be taken to a specialised
company for recycling.
This device should be returned to your distributor or to a local recycling service.
Respect the local environmental rules.
If in doubt, contact your local waste disposal authorities.
Thank you for buying the VDP250MHS13! It should come with an XLR connection cable, a safety cable with a hook
and this manual. If the device was damaged in transit, don't install or use it and contact your dealer.
Please read the manual thoroughly before bringing this device into service.
2. Safety Instructions
Be very careful during the installation: touching live wires can cause life-threatening electroshocks.
Do not touch the device during operation as the housing heats up.
Keep this device away from rain and moisture.
Unplug the mains lead before opening the housing.
• Damage caused by disregard of certain guidelines in this manual is not covered by the warranty and the dealer
will not accept responsibility for any ensuing defects or problems.
• A qualified technician should install and service this device.
• Do not switch the device on immediately after it has been exposed to changes in temperature. Protect the device
against damage by leaving it switched off until it has reached room temperature.
• This device falls under protection class I. It is therefore essential that the device be earthed. Have a qualified
person carry out the electric connection.
• Make sure that the available voltage does not exceed the voltage stated in the specifications of this manual.
• Do not crimp the power cord and protect it against damage. Have an authorised dealer replace it if necessary.
• Disconnect the device from the mains to clean it or when it is not in use. Handle the power cord by the plug only.
• There may be some smoke or a particular smell when the device is activated for the first time. This is normal and
any smoke or smell will gradually disappear.
• Do not look directly at the light source as sensitive people may go into epileptic seizure if they do.
• Note that damage caused by user modifications to the device is not covered by the warranty.
• Keep the device away from children and unauthorised users.
3. General Guidelines
• This device is designed for professional use on stage, in discos, theatres, etc. The VDP250MHS13 should only be
used indoors with an alternating current of max. 230VAC / 50Hz.
• Lighting effects are not designed for permanent operation: regular operation breaks will prolong their lives.
• Do not shake the device. Avoid brute force when installing or operating the device.
• Select a location where the device is protected against extreme heat (see "Technical Specifications"), dust and
moisture. Respect a minimum distance of 0.5m between the device's light output and any illuminated surface.
• Use an appropriate safety cable to fix the device (e.g. VDLSC8).
VDP250MHS13
1
HQ POWER

Werbung

Inhaltsverzeichnis
loading

Inhaltszusammenfassung für HQ Power VDP250MHS13

  • Seite 1 If in doubt, contact your local waste disposal authorities. Thank you for buying the VDP250MHS13! It should come with an XLR connection cable, a safety cable with a hook and this manual. If the device was damaged in transit, don't install or use it and contact your dealer.
  • Seite 2: Installation

    Press the ends of the fixation-ring together with an appropriate tool and remove it. Remove the gobo and insert the new gobo. Press the ends of the fixation-ring together and insert it in the front of the gobo. 1. fixation ring 2. gobo 3. wheel VDP250MHS13 HQ POWER...
  • Seite 3: Front Panel

    • Have a qualified electrician carry out the electric connection. • Connect the device to the mains with the power plug. Do not connect it to a dimming pack. • The installation has to be approved by an expert before the device is taken into service. VDP250MHS13 HQ POWER...
  • Seite 4 Forwards rotation fast / slow CHANNEL 8 PRISM No rotation Backwards rotation slow / fast Open Rotating gobo 1 Rotating gobo 2 CHANNEL 9 ROTATING GOBOS Rotating gobo 3 Rotating gobo 4 Rotating gobo 5 Backwards rotation slow / fast VDP250MHS13 HQ POWER...
  • Seite 5 Connect the provided XLR cable to the female 3-pin XLR output of your controller and the other side to the male 3- pin XLR input of the VDP250MHS13. Multiple VDP250MHS13s can be linked through serial linking. The linking cable should be two core, screened cable with XLR input and output connectors.
  • Seite 6: Function Table

    In the case of the 13-channel VDP250MHS13, you will have to set the start address of the first unit to 1, the second unit to 14 (1 + 13), the third to 27 (14 + 13), and so on.
  • Seite 7: Technical Specifications

    Heeft u vragen, contacteer dan de plaatselijke autoriteiten inzake verwijdering. Dank u voor uw aankoop! Lees deze handleiding grondig voor u het toestel in gebruik neemt. De VDP250MHS13 wordt geleverd met een XLR kabel, een veiligheidskabel met haak en deze handleiding. Als het toestel werd beschadigd tijdens het transport, installeer het dan niet en raadpleeg uw dealer.
  • Seite 8: Algemene Richtlijnen

    Is de straal te helder aan de randen, verlaag de intensiteit van het licht door de lamp dichter bij de reflector te plaatsen. Draai aan de A schroef tot het licht gelijkmatig is verdeeld. Is het licht helderder in het midden, plaats dan de lamp wat verder weg van de reflector. VDP250MHS13 HQ POWER...
  • Seite 9 • Een geschoolde elektricien moet het toestel aansluiten. • Sluit het toestel via de stekker aan op het lichtnet. Sluit het niet aan op een dimmerpack. • De installatie moet voor het eerste gebruik gekeurd worden door een expert. VDP250MHS13 HQ POWER...
  • Seite 10 Voorwaartse draaibeweging van snel naar traag KANAAL 8 PRISMA Geen draaibeweging Achterwaartse draaibeweging van traag naar snel Open Draaiende gobo 1 Draaiende gobo 2 KANAAL 9 DRAAIENDE GOBO’S Draaiende gobo 3 Draaiende gobo 4 Draaiende gobo 5 Achterwaartse draaibeweging traag / snel VDP250MHS13 HQ POWER...
  • Seite 11 Zwart / Helderheid c. DMX-512 verbindingen Verbind een XLR kabel met de XLR uitgang van uw controller en de XLR ingang van de VDP250MHS13. U kunt meerdere VDP250MHS13's serieel verbinden. De verbindingskabel moet een beschermde kabel zijn met dubbele kern en met een XLR in- en uitgangsverbinding.
  • Seite 12: Reiniging En Onderhoud

    In het geval van de 16-kanaals VDP250MHS13, zult u het startadres van het eerste toestel op 1 moeten instellen, van het tweede toestel op 17 (1 + 16), van het derde op 33 (17 + 16), enz.
  • Seite 13: Technische Specificaties

    Max. temperatuur behuizing 80°C De informatie in deze handleiding kan te allen tijde worden gewijzigd zonder voorafgaande kennisgeving. VDP250MHS13 – PROJECTEUR LYRE PROFESSIONNEL A 13 CANAUX SEISMO 250 1. Introduction Aux résidents de l'Union Européenne Des informations environnementales importantes concernant ce produit Ce symbole sur l'appareil ou l'emballage indique que, si l'appareil est jeté...
  • Seite 14: Directives Générales

    (B). Centrez le faisceau (la partie la plus lumineuse de l’image). Si l’image est trop claire sur les bords, diminuer l’intensité lumineuse en déplaçant l’ampoule vers le réflecteur. Tournez la vis (A) jusqu’à ce que le faisceau soit uniforme. Si l’image est trop claire au milieu, éloignez l’ampoule du réflecteur. VDP250MHS13 HQ POWER...
  • Seite 15: Panneau Frontal

    • La construction portante de l’appareil doit être capable de supporter 10 x le poids de l’appareil pendant une heure, sans qu’une déformation de la construction en résulte. • Fixez votre VDP250MHS13 à l’aide d’un câble de sécurité. • Evitez de vous positionner en dessous de l’appareil pour l’enlever ou lors du montage ou du nettoyage. Un technicien qualifié...
  • Seite 16 Pas de mouvement rotatif Mouvement rotatif en arrière de lent à rapide Ouvert Gobo rotatif 1 Gobo rotatif 2 KANAAL 9 GOBOS ROTATIFS Gobo rotatif 3 Gobo rotatif 4 Gobo rotatif 5 Mouvement e arrière lent / rapide VDP250MHS13 HQ POWER...
  • Seite 17 2 vers broche 3 (voir illustration à gauche) qui prévient la corruption du signal de contrôle numérique par le bruit électrique. Cette fiche XLR est connectée à la sortie XLR du dernier appareil de la série. VDP250MHS13 HQ POWER...
  • Seite 18: Panneau De Controle

    "écoutera" un autre canal. Changer les réglages d'un canal n’influencera donc qu'un seul appareil. Dans le cas du VDP250MHS13, un appareil à 16 canaux, vous devez mettre l'adresse de départ du premier appareil sur 1, le second appareil sur 17 (1 + 16), le troisième sur 33 (17 + 16), etc.
  • Seite 19: Spécifications Techniques

    Si tiene dudas, contacte con las autoridades locales para eliminación. ¡Gracias por haber comprado el VDP250MHS13! Lea cuidadosamente las instrucciones del manual antes de usarlo. Este aparato está equipado con un cable XLR, un cable de seguridad con gancho y este manual del usuario. Si el aparato ha sufrido algún daño en el transporte no lo instale y póngase en contacto con su distribuidor.
  • Seite 20: Normas Generales

    3. Normas generales • Este aparato ha sido diseñado para uso profesional en una discoteca, un teatro, etc. El VDP250MHS13 sólo está permitido para una conexión con una fuente de corriente CA de máx. 230Vca/50Hz y para el uso en interiores.
  • Seite 21: Panel Frontal

    • El soporte donde irá el aparato, debe ser capaz de sostener 10 veces el peso de éste durante una hora, sin que se produzca una deformación de dicho soporte. • Fije el VDP250MHS13 con un cable de seguridad. • Evite ponerse debajo del aparato durante el montaje, la limpieza, etc. Un técnico especializado debe revisar el aparato antes de la puesta en marcha.
  • Seite 22 LÁMPARA ON/OFF Y CANAL 6 Sin función REINICIALIZACIÓN Lámpara desactivada después de 3 seg. Sin función Blanco Rojo Amarillo Magenta CANAL 7 COLOR 1 Verde Naranja Azul Rosa Efecto arco iris hacia adelante de lento a rápido VDP250MHS13 HQ POWER...
  • Seite 23 Conexiones DMX-512 Conecte la salida XLR de su controlador a la entrada XLR del VDP250MHS13 con un cable XLR. Es posible conectar varios VDP250MHS13 en serie. Utilice un cable blindado de doble hilo conductor con entrada y salida XLR.
  • Seite 24: Panel De Control

    En el caso del VDP250MHS13, de 13 canales, la dirección inicial del primer aparato es 1. Introduzca 17 (1 + 16) para el segundo aparato, 33 (17 + 16) para el tercer aparato, etc.
  • Seite 25: Especificaciones

    Falls Zweifel bestehen, wenden Sie sich für Entsorgungsrichtlinien an Ihre örtliche Behörde. Wir bedanken uns für den Kauf des VDP250MHS13! Bitte lesen Sie vor Inbetriebnahme des Gerätes diese Bedienungsanleitung sorgfältig durch. Der VDP250MHS13 wird mit einem XLR-Kabel, einem Sicherheitsfangseil mit Haken und dieser Bedienungsanleitung geliefert.
  • Seite 26: Allgemeine Richtlinien

    3. Allgemeine Richtlinien • Dieses Gerät ist eine Lichtsteuerung für den professionellen Einsatz auf Bühnen, in Discotheken, Theater, usw. Der VDP250MHS13 ist nur zur Verwendung in Innenräumen und mit einer Wechselspannung von 230Vac/50Hz konzipiert. • Lichteffekte sind nicht für permanenten Betrieb entworfen worden. Regelmäßiges Ausschalten wird die Lebensdauer verlängern.
  • Seite 27: Enter-Taste

    3. Rad d) Umschreibung (siehe Abb.3) 1. Moving Head 2. Joch 3. Griff 4. Basis FRONTPLATTE 5. Ein-/Ausschalter 6. DMX-Ausgang 7. DMX-Eingang 8. Stromversorgungskabel 9. Sicherung RÜCKSEITE 10. MODE-Taste 11. ENTER-Taste 12. UP-Taste 13. DOWN-Taste 14. Display VDP250MHS13 HQ POWER...
  • Seite 28 : Lampe ein/aus & zurücksetzen KANAL 7 : Farben KANAL 8 : Prisma KANAL 9 : drehende Gobos KANAL 10 : Index drehende Gobos, Drehbewegung Gobo KANAL 11 : Fokussierung KANAL 12 : Shutter / Stroboskop KANAL 13 : Dimmerintensität VDP250MHS13 HQ POWER...
  • Seite 29 Schwarz / Helligkeit c. DMX-512-Anschlüsse Verbinden Sie ein XLR-Kabel mit dem XLR-Ausgang des Controllers und den XLR-Eingang des VDP250MHS13. Sie können mehrere VDP250MHS13 in Serie verbinden. Die Verbindung muss mit einem zweipoligen geschirmten Kabel und mit XLR Ein- und Ausgangsverbindung erfolgen.
  • Seite 30 Sie die Einstellungen für 1 Kanal verändern, werden nur die Einstellungen von diesem Kanal geändert. Im Fall des 13-Kanal VDP250MHS13 werden Sie die Startadresse der ersten Einheit auf 1, der zweiten Einheit auf 17 (1 + 16), der dritten Einheit auf 33 (17 + 16), usw.
  • Seite 31: Reinigung Und Wartung

    Lampe wird für Testzwecke mitgeliefert. DMX-Kanäle 13 Kanäle Helligkeit 18000 LUX Sicherung T3.15A, 230VAC Abmessungen 400 x 400 x 476mm Gewicht 25kg Max. Umgebungstemperatur 45°C Max. Gehäusetemperatur 80°C Änderungen in Technik und Ausstattung ohne vorherige Ankündigung vorbehalten. VDP250MHS13 HQ POWER...

Inhaltsverzeichnis