Lextronix E1 Bedienungsanleitung
Am/fm/shortwave radio

Verwandte Anleitungen für Lextronix E1

Inhaltszusammenfassung für Lextronix E1
- Seite 1 . l e x t r o n i x u s a . d e M A N U A L A M / F M / S H O R T W A V E R A D I O lextronix...
-
Seite 2: Side Panel
E1_manual_lextronix_APR06.qrk 5/4/06 4:52 PM Page 2 BEDIENUNGSANLEITUNG E1 AM/FM/Shortwave Radio FRONT PANEL DESCRIPTION (See page 12) SIDE PANEL TOP PANEL DESCRIPTION (See page 16) DESCRIPTION (See page 19) KONFORMITÄTSERKLÄRUNG lextronix VERANTWORTLICHE GESELLSCHAFT : Corporation 1015 Corporation Way Palo Alto, CA 94303 USA... -
Seite 3: Wichtige Sicherheitshinweise
An exclamation point within an equilateral triangle is intended to alert the user to the presence of important operating and maintenance (servicing) instructions in E1 DISPLAY DESCRIPTION (See page 17) the literature accompanying the appliance. WARNING WARNING: TO REDUCE THE RISK OF FIRE OR ELECTRIC SHOCK, DO NOT EXPOSE THE APPLIANCE TO RAIN OR MOISTURE. DO NOT OPEN THE CABINET, REFER SERVICING TO QUALIFIED PERSONNEL ONLY. - Seite 4 Steckers außer Kraft. Warnung - Falls dieses Sie keine Flüssigkeiten in das Gerät. VIELEN DANK FÜR DEN KAUF EINES LEXTRONIX E1 EMPFÄNGERS. DIESER EMPFÄNGER WURDE NACH HÖCHSTEN Gerät mit einem 3-poligen Erdungsstecker ausgestattet ist, 19. Wartung – Nehmen Sie Wartungsarbeiten nicht selbst vor.
-
Seite 5: Inhaltsverzeichnis
- ANTENNEN FINDEN NETZTEIL und EXTERNE GLEICHSTROMQUELLEN Stecken Sie an der Seite des Empfängers den - ZEITSTATIONEN Der Empfänger lextronix E1 wird mit einem Netzteil ver- Ausgangsstecker des Netzteils oder einer anderen - EINFÜHRUNG IN SINGLE SIDEBAND (SSB) sorgt. Stromquelle in die Buchse 9 VDC, 1 A. -
Seite 6: Auspacken
Abbildung dargestellt. Nach dieser Zeit wird wieder die BATTERIEBETRIEB Vorhänge oder andere entflammbare Materialien soll- Der lextronix E1 Empfänger ist für den Erhalt des INSTALLATION ten nicht im direkten Kontakt mit dem Netzteil sein, um Speicherinhalts nicht von den Batterien abhängig. Um eine Überhitzung zu vermeiden. -
Seite 7: Anforderungen An Antennen
Antennen für LF, MW, SW (HF-Bereiche) und operating the lextronix E1 receiver on a table or similar UKW. Mit einem PN 278-265B Adapter (PAL-TO-F) von surface in front of you, as shown below. -
Seite 8: Beschreibung Der Vorderseite Des E1
4:52 PM Page 14 BEDIENUNGSANLEITUNG BESCHREIBUNG DER VORDERSEITE DES E1 BESCHREIBUNG DER VORDERSEITE DES E1 Fortsetzung 6. DIREKTE TASTENEINGABE ativ zu seiner nominalen Position in kHz direkt über Numerische Tastatur – Tasten von 0 bis 9 und '.' können der PBT-Taste angezeigt. Im UKW-Modus wird für zur direkten Eingabe von Frequenzen, Nummern der diese Taste nichts angezeigt. - Seite 9 Mit dieser Taste können Sie das Gerät ein- und auss- "TIME" drücken, wird zwischen lokaler Zeit und GMT Der Einstellknopf 'TUNING' ist das wichtigste umgeschaltet. Bedienelement zum Einstellen des E1 Empfängers. Im Stereo-Signale in die LINE IN-Buchse (an der Seite des chalten. VFO-Modus wird die Frequenz bei Drehungen im Gerätes) einspeisen und diese durch den Lautsprecher...
-
Seite 10: Beschreibung Des Displays Vom E1
E1_manual_lextronix_APR06.qrk 5/4/06 4:52 PM Page 18 BEDIENUNGSANLEITUNG BESCHREIBUNG DER VORDERSEITE DES E1 Fortsetzung BESCHREIBUNG DES DISPLAYS VOM E1 21. DISPLAY Shortwave Band Designators Hierbei handelt es sich um ein Punktmatrix-LC-Display. Band High Freq Siehe Abschnitt BESCHREIBUNG DES DISPLAYS für 120 Meter... -
Seite 11: Zeitanzeige
5/4/06 4:52 PM Page 20 BEDIENUNGSANLEITUNG BESCHREIBUNG DES DISPLAYS VOM E1 Fortsetzung BESCHREIBUNG DES DISPLAYS VOM E1 Fortsetzung angezeigt, wenn das entsprechende Band ausgewählt Wenn Sie die Taste 'SSB' drücken, wird der Single der Taste ‘< SELECT >’ durch die verfügbaren 28. -
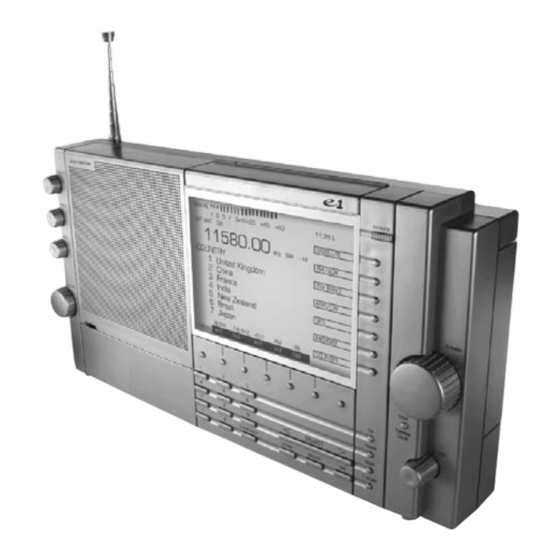
Seite 12: Beschreibung Der Seite Des E1
E1_manual_lextronix_APR06.qrk 5/4/06 4:52 PM Page 22 BEDIENUNGSANLEITUNG BESCHREIBUNG DER SEITE DES E1 1. TELESKOPANTENNE Der Empfänger hat eine integrierte Teleskopantenne, die für alle Frequenzbänder verwendet werden kann. Achten Sie darauf, dass der Drehpunkt der Antenne vollständig ausgezogen ist, damit die Antenne aus der senkrechten Position bewegt werden kann. -
Seite 13: Erste Schritte
ALLGEMEINE BEDIENUNGSHINWEISE Beispiele: die Eingabe übernommen und sofort zu der eingegebe- Ziffern 4', ‘1' ein. Der lextronix E1 Empfänger wurde für eine einfache 700 KHz nen Frequenz gesprungen. Wenn Sie den Bedienung entwickelt. Nehmen Sie sich etwas Zeit, um Drücken Sie ‘7', ’0' , ’0' , ’.’ ,’ .’ ** Dezimalpunkt (.) kein zweites Mal drücken, wird die... -
Seite 14: Am-Synchronbetrieb
Einstellknopf erzielt werden reduzieren. Mehr Informationen hierzu finden Sie im kann. Im AM SYNC-Betrieb fängt vorübergehend, FREQUENCY RESOLUTION The E1 receive tunes in the following steps: Abschnitt "BANDPASSEINSTELLUNG" im nächsten während des Einstellens, 'AM SYNC' zu blinken an, bis Abschnitt. - Seite 15 ERSTE SCHRITTE Fortsetzung MEMORY-FUNKTIONEN 'MONO' ausgewählt wurde. TONSIGNALE Der lextronix E1 Empfänger reagiert auf fast alle Zum Umschalten zwischen STEREO und MONO im Tastenbedienungen mit einem hörbaren Ton, außer Menü AUDIO SETTINGS: wenn der Ton im Menü AUDIO SETTINGS, Punkt 2, •...
-
Seite 16: Kennung Des Frequenzbandes
Abschnitt beschrieben wurden, verfügt der Seite der Taste ‘< SELECT >’, um den Cursor an die die Funktionstaste 'MEMORY' wird wieder invertiert lextronix E1 Empfänger über 1200 Stationsspeicher, die Anders als bei den vorher beschriebenen MEMORY- nächste Stelle zu bewegen. Wiederholen Sie den angezeigt und Sie können mit dem Einstellknopf oder... - Seite 17 E1_manual_lextronix_APR06.qrk 5/4/06 4:52 PM Page 32 BEDIENUNGSANLEITUNG COUNTRY-FUNKTIONEN Fortsetzung COUNTRY-FUNKTIONEN Fortsetzung Mit Hilfe der Funktion SEEK, die bei jeder gespeicherten der Cursor auf 601 und die Stationen von 601 bis 610 COUNTRY-Modus zu kommen. gespeicherten Frequenz suchen wollen, gibt es zwei Station mit einem vorgegebenen Signalpegel anhalten werden angezeigt.
-
Seite 18: Hauptmenü
Page 34 BEDIENUNGSANLEITUNG E1 MENÜS E1 MENÜS Fortsetzung In der folgenden Beschreibung der Menüs beziehen sich die Ziffern vor jedem Punkt auf die Tasten der numerischen HAUPTMENÜ Tastatur. Drücken Sie einfach die Ziffer, die dem Menüpunkt entspricht, um den entsprechenden Punkt zu aktivieren. -
Seite 19: Audio Settings
5/4/06 4:52 PM Page 36 BEDIENUNGSANLEITUNG E1 MENÜS Fortsetzung E1 MENÜS Fortsetzung 1. ENHANCED SSB OFF / ON - Erweitertes SSB aus/ein - Wenn Sie ‘1' drücken, können Sie zwischen ENHANCED AUDIO SETTINGS SSB ON und OFF umschalten. Erweitertes SSB bietet, durch eine Audio-Synchronisierungsschaltung, 30dB zusätzliche Das Menü... - Seite 20 E1_manual_lextronix_APR06.qrk 5/4/06 4:52 PM Page 38 BEDIENUNGSANLEITUNG E1 MENÜS Fortsetzung E1 MENÜS Fortsetzung SET CLOCKS CLOCK MODES Das Menü für die Einstellungen der Uhr wird aufgerufen, wenn sie im Menü AUDIO SETTINGS einmal die Taste '8' Das Menü für die Einstellung der Uhrenmodi wird aufgerufen, wenn sie im Menü SET CLOCKS einmal die Taste '8' (MORE) (MORE) drücken oder wenn Sie im Hauptmenü...
- Seite 21 6. TIMER 2 MEM CH – Stationsspeicher Timer 2 – Drücken Sie die Taste '6', um die Nummer der MEMORY- oder COUNTRY- Station einzugeben, die Sie beim Einschalten des lextronix E1 durch Timer 1 hören möchten. 7. MAIN MENU – Drücken Sie ‘7', um wie vorher bereits beschrieben in das Hauptmenü zurückzukehren.
-
Seite 22: Die Funktion Seek
Balken angezeigt werden, dass Sie rechts über den 5. DISABLE – Drücken Sie die Taste ‘DISABLE’, um Timer 2 zu deaktivieren. Der lextronix E1 Empfänger verfügt über eine Rauschunterdrückungspegel hinausragen, hält die Suchfunktion (SEEK), mit man im VFO-, MEMORY- oder Suchfunktion an und da Signal ist zu hören. -
Seite 23: Uhr- Und Timer-Funktionen
(Nummer 11 in der Beschreibung der oder lokale Zeit) muss die gleiche sein für die der Timer auf der numerischen Tastatur, können Sie zwischen Mit der Funktion T.SCAN des lextronix E1 können Sie für Vorderseite auf Seite 13). Sie hören einen Signalton und programmiert ist. -
Seite 24: Timerfunktionen
BEDIENUNGSANLEITUNG UHR- UND TIMER-FUNKTIONEN Fortsetzung UHR- UND TIMER-FUNKTIONEN Fortsetzung Hinweis: Damit die Zeit beim E1 automatisch eingestellt (1) Drücken Sie die Taste '2', um die Weltzeit EINSTELLEN DER EIN- UND AUSSCHALTZEITEN DER TIMER werden kann, muss der Empfänger über das Netzteil ver- einzustellen. -
Seite 25: Besondere Anwendungen Und Funktionen
VFO-, MEMOTY- oder COUNTRY-Modus. Durch wiederholtes Drücken der Taste 'TIME', schaltet die Anzeige zwischen TIMER 1, TIMER 2, CLOCKS und den normalen Anzeigen um. BESONDERE ANWENDUNGEN UND FUNKTIONEN Der lextronix E1 Empfänger hat einige besondere tiviert werden, wenn Sie die Taste ‘CLEAR/LOCK’ für 3 Funktionen, die im Hauptteil dieser Bedienungsanleitung Sekunden lang drücken. -
Seite 26: Einstellschritte Für Frequenzband
• Wenn der Empfänger ausgeschaltet ist und Sie die Zum Auswählen der anderen Schrittgröße: • Drücken Sie die Taste 'POWER', um das E1 Taste 'LIGHT' drücken, wird die Beleuchtung zwischen Drücken Sie die Taste ‘MENU’, um das Hauptmenü auszuschalten. -
Seite 27: Quick Reference Guide
E1_manual_lextronix_APR06.qrk 5/4/06 4:52 PM Page 52 BEDIENUNGSANLEITUNG QUICK REFERENCE GUIDE QUICK REFERENCE GUIDE Fortsetzung QUICK REFERENCE GUIDE Timer ON/OFF programmieren (ab Seite 53) • Drücken Sie die Taste ‘MENU’, um das Hauptmenü aufzu- rufen. Normale Frequenzanzeige auswählen (VFO) (Seite 19 Punkt 20) •... -
Seite 28: Glossar
Steckdosen. • COUNTRY-Station aufrufen (Seite 28) • Wählen Sie mit ‘TUNING’ oder ‘< SELECT >’den HF - High Frequency band. Hochfrequenzband. Am E1 gewünschten Stationsspeicher aus. AM - Amplitudenmodulation. Die Frequenz des Empfänger besteht es aus den Bändern LW, MW und Informationssignals ist nicht mehr unmittelbar im Kurzwelle. -
Seite 29: Fehlerbehebung
Sie für den mobilen Einsatz welche ein. SZEIT Eigentum von lextronix über. Für Ersatzteile und - (D) Die Beleuchtung wurde mit der Taste (D) Schalten Sie die Beleuchtung mit der Die Garantie beginnt ab Kaufdatum und gilt nur für... -
Seite 30: Anhang
23:00 Uhr bewusst in Ihre Gegend Postadresse: bestimmtes Band auswählt. WAS SIND FREQUENZBEREICHE? senden, ganz egal wo Sie sich aufhalten. Diese lextronix Corporation Das sollte man zuerst wissen, da es am wichtigsten ist. Frequenzen können auch um Sonnenaufgang und 1015 Corporation Way EIN HILFREICHER VERGLEICH Wenn Sie bereits MW- oder UKW-Radio gehört haben,... - Seite 31 Antennen eingesetzt werden. umwandelt. McKay Dymek stellt das Modell DA- geringe Leistung von 50 bis 1000 Watt. Die Lextronix Corporation stellt keine Kurzwellenantennen 100EM (ca. $200 USD) her, das man auf einem Masten Amateurfunker findet man am einfachsten; andere her und verkauft diese auch nicht.
-
Seite 32: Lextronix E1 Quick Guide
UKW-Frequenzen haben immer einen Dezimalpunkt, 9:00 Uhr: 25, 31, 41 und 49 Meter sind normalerweise soll. Drücken Sie zweimal die Taste STORE, um den Versorgen Sie das E1 über das Netzteil oder legen Sie z.B. 88.8 MHz. Achten Sie darauf, dass Sie den gut. -
Seite 33: Anzeige Der Lokalen Zeit Oder Von Gmt
Programmiermodus für Timer zu verlassen. Stellen Sie es finden kann. Nachts ist es wahrscheinlich 5000 oder das E1 auf den Radiosender ein, den Sie gerne hören 10000 Kilohertz. Tagsüber könnte es 10000, 15000 möchten, wenn der Timer einschaltet. Aktivieren Sie oder 20000 Kilohertz verwenden. -
Seite 34: Technische Daten
E1_manual_lextronix_APR06.qrk 5/4/06 4:52 PM Page 66 BEDIENUNGSANLEITUNG TECHNISCHE DATEN DES lextronix E1 FREQUENZBEREICH IF-Frequenz - SSB, AM: E1 BEDIENUNGSANLEITUNG Stromverbrauch im Batteriebetrieb mit einem • AM, LSB, USB: • 1. IF 45,0 MHz Externe Antenne durchschnittlichen Audioausgang von 1/4 W: - LW: 100 bis 500 kHz •... - Seite 35 E1_manual_lextronix_APR06.qrk 5/4/06 4:52 PM Page 68 BEDIENUNGSANLEITUNG BLOCK DIAGRAM - lextronix E1 SIGNAL FLOW BLOCK DIAGRAM...
-
Seite 68: Block Diagram
E1_manual_lextronix_APR06.qrk 5/4/06 4:52 PM Page 134 MANUAL BLOCK DIAGRAM - lextronix E1 SIGNAL FLOW BLOCK DIAGRAM...