Herunterladen Inhalt Inhalt Diese Seite drucken
auna IR-110 Anschluss- Und Anwendungshinweise
Vorschau ausblenden Andere Handbücher für IR-110:

Werbung

Verfügbare Sprachen

Verfügbare Sprachen

IR-110 Internetradio
10030728 10030729
www.auna-multimedia.com

Werbung

Inhaltsverzeichnis
loading

Inhaltszusammenfassung für auna IR-110

  • Seite 1 IR-110 Internetradio 10030728 10030729 www.auna-multimedia.com...
  • Seite 2 Sehr geehrter Kunde, zunächst möchten wir Ihnen zum Erwerb Ihres Gerätes gratulieren. Bitte lesen Sie die folgenden Anschluss- und Anwendungshinweise sorgfältig durch und befolgen Sie diese um möglichen technischen Schäden vorzubeugen. Warnung • Das Gerät enthält Teile, die dem Benutzer nicht zugänglich sind. Reparaturen dürfen nur von qualifizier- ten Fachkräften durchgeführt werden.
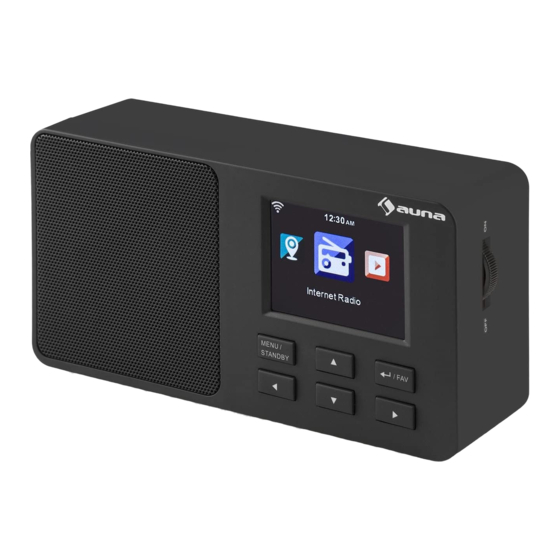
  • Seite 3 Übersicht Lautsprecher Display Gedrückt halten zum ein-/ausschalten Menu / Standby Kurz drücken zum Aufrufen des Menüs Oben Navigieren in Listen und Menüs Aktuelle auswahl bestätigen Enter / Fav Im Radiomodus: Favoritenliste anzeigen Links Unten Navigieren in Listen und Menüs Rechts DC 5V Netzteil-Anschluss Kopfhörer-Anschluss USB-Slot...
  • Seite 4: Erste Inbetriebnahme / Gerät Einrichten

    Erste Inbetriebnahme / Gerät Einrichten Nachdem Sie das Gerät von der Verpackung befreit und aufgestellt haben, verbinden Sie es zunächst mit- hilfe des Netzteils mit einer Haushaltssteckdose. Schalten Sie es mit STANDBY ein. Gerät einrichten • Nach dem ersten Einschalten des Geräts wird ein Startbildschirm angezeigt, es folgt die Aufforderung, die Menüsprache zu wählen.
  • Seite 5: Hauptmenü Und Funktionen

    Hauptmenü und Funktionen Bedienen Sie das Hauptmenü mit den Pfeiltasten und ENTER. Sie haben von hier aus Zugriff auf die Haupt- funktionen und -Menüs My mediaU, Internet Radio, Media Center, DAB, FM, Information Center und Einstellungen mit den jeweiligen Unterpunkten: Standby Hauptmenü: My mediaU...
  • Seite 6: Menü: Einstellungen

    Nutzen Sie diese Option, wenn Sie mit der Materie vertraut sind und falls Sie mehrere Funktnetzwerke abwechselnd nutzen. • Check Network When Power On: Aktivieren Sie, damit das IR-110 bei je- dem Neustart automatisch die (einzugebende) Verbindung wiederfindet. • Stellen Sie hier das Format der Uhrzeit- (12h oder 24std) sowie der Datums- darstellung (YY/MM/DD oder DD/MM/YY oder MM/DD/YY) ein.
  • Seite 7: Information Center

    Reihenfolge abgespielt). Der Standard-DLNA-Name lautet IR-110. Ändern Sie, falls gewünscht, hier. DLNA Setup Aktivieren Sie die Resume When Power On Funktion, damit das IR-110 nach dem EInschalten dort weitermacht, wo es aufgehört hat: beim zuletzt gehörten Stream Resume When PWR oder Sender.
  • Seite 8 Media Center Falls Sie an Ihrem Rechner oder Mediacenter/Medienserver Medien für UPnP Streaming freigegeben haben, tauchen die entsprechenden Dateien hier auf. Falls mehr als ein UPnP-Server im WLAN gefunden wurde, können Sie hier zwi- schen den Alternativen wählen. UPnP Bitte beachten Sie: Das Gerät kann nur Dateien abspielen, wenn die Dateinamen unter 40 Zeichen lang sind und in lateinischen Buchstaben geschrieben sind.
  • Seite 9: Internet Radio

    Öffnen Sie erst Systemeinstellungen > Netzwerk und Internet > Freigabeoptionen > Medien Streaming und fügen Sie das IR-110 hinzu. • Starten Sie dann den Windows Media Player und erlauben Sie die Remote-Bedienung des IR-110. Hinweise: • Für das Streaming von Smartphones oder Tablets empfehlen sich frei verfügbare apps wie bubbleU- PnP, oder Twonky Beam.
  • Seite 10 Einige für Android-Smartphones erhältliche Apps (z.B. Air Music Control) erlauben die Steuerung des Inter- net-Radios vom Smartphone aus. Verbinden Sie das Smartphone nach dem Herunterladen und Installieren entsprechender Apps mit dem selben Netzwerk, in dem auch Ihr IR-110 verbunden ist. Bitte beachten Sie, dass während der App-Nutzung die Media-Player-UPnP-Verbindung nicht möglich ist.
  • Seite 11: Hinweise Zur Entsorgung

    Hinweise zur Entsorgung Befi ndet sich die linke Abbildung (durchgestrichene Mülltonne auf Rädern) auf dem Produkt, gilt die Europäische Richtlinie 2002/96/EG. Diese Produkte dürfen nicht mit dem normalen Hausmüll entsorgt werden. Informieren Sie sich über die örtlichen Re- gelungen zur getrennten Sammlung elektrischer und elektronischer Gerätschaften. Richten Sie sich nach den örtlichen Regelungen und entsorgen Sie Altgeräte nicht über den Hausmüll.
  • Seite 12: Technische Daten / Technical Data

    Technische Daten / Technical Data Artikelnummer 10030728, 10030729 Item Stromversorgung DC 5V (Netzteil für AC 220-240V, 50-60Hz mitgeliefert) Power supply DC 5V (adaptor for AC 220-240V, 50-60Hz supplied) Unterstützte Formate WMA, MP3, WAV, AAC Supported file types Netzwerk 802.11b/g/n(WLAN), supporting WEP, WPA, WPA2 (PSK), WPS Network Streaming UPnP, DLNA Lautsprecher...
  • Seite 13: Important Safety Advice

    Dear Customer, Congratulations on purchasing this product. Please read and follow these instructions, in order to avoid damaging the item. We do not cover any damages that may arise from improper use of the item or the disregard of the safety instructions. Important Safety Advice •...
  • Seite 14 Overview...
  • Seite 15 Front: Speaker Display Hold to switch on/off Menu / Standby Press to enter menu Navigate through lists or menues Select / confirm current selection SEL / FAV Radio mode: Show favourites/add to favourites Left Down Navigate through lists or menues Right Rear: DC 5V In...
  • Seite 16 If your WiFi router is equipped with a WPS button, you can select the WPS PBC option to connect. In this case you only have to press the WPS button on your router within 2 minutes to connect. Your auna radio is now ready to use.
  • Seite 17 Main Menu and Functions Navigate through the main menu, using the arrow buttons and SEL. From here, you can access the main functions and menues My mediaU, Internet Radio, Media Center, DAB, FM, Information Center and Configurations with their sub menues: Standby Main menu My mediaU...
  • Seite 18: Menu: Configurations

    Standby or Select Clock Radio to set the digital clock in Standby. When it is enabled, My mediaU will exist on the main menu. If various mediaU Manage My MediaU accounts exist in the IR-110, Select the default login account in here. • Wireless Network Configuration: Enable/disable WiFi network. When you enable the WiFi network, the system will automatically select the required AP.
  • Seite 19 Turn off or set the sleep time of 15/30/60/90/120/150/180 minutes. Once the time is set, there will be a bed icon with remaining minutes at the top right corner Sleep Timer and the device will turn to standby then. Press Sleep on the remote control for the shortcut of this function.
  • Seite 20 Streaming & App Operation IR-110 is the default device name for DLNA, and you may rename it as you like. The information below is the introduction of how to setup up media streaming from PC or other media server. Study the own instruction of the software or apps you use to enjoy music streaming if necessary.
  • Seite 21 Besides UPnP, IR-110 supports DLNA function, you share the music files from PC or Android mobile, and you use your PC, Android mobile or iPhone / iPad to control music playback on the IR-110. (It is not required to control each playback on the IR-110.) •...
  • Seite 22 Internet Radio After successfully connecting to any internet radio station, the bit rate and the format will be displayed on the display. Sub menues: List of my favorite preset stations. It supports 250 favorite entries including sta- tion and folder. During the station playing screen, press and hold PRESET/BT on the device or Preset on the remote control to save the station as my favorite.
  • Seite 23: Environment Concerns

    If you are controlling the Internet Radio via app, a UPnP connection to Windows Media Player may not be possible. After the smartphone is connected to the same network as the Internet radio connected, launch the app “Air Music Control”. The App shows the main menu with Local Radio, Internet Radio, Media Center, Confi - guration, Information modes.
  • Seite 24 Cher client, Toutes nos félicitations pour l’acquisition de ce nouvel appareil. Veuillez lire attentivement les instruc- tions suivantes de branchement et d’utilisation afin d’éviter d’éventuels dommages. Avertissement • L‘appareil contient des pièces qui ne sont pas accessibles à l‘utilisateur. Les réparations de l’appareil ne doivent effectuées que par un atelier professionnel agréé.
  • Seite 25 Aperçu Enceinte Écran Maintenez appuyé pour allumer ou éteindre l‘appareil Menu/ Veille (standby) Appuyez brièvement pour appeler les menus Haut Navigation dans les listes et menus Confirmer la sélection actuelle Enter /Fav En menu radio : afficher la liste des favoris Gauche Naviguer vers les listes et les menus Droite...
  • Seite 26 Première mise en service / configuration de l‘appareil Après avoir déballé et installé l‘appareil, branchez d‘abord l‘appareil sur une prise domestique à l‘aide de l‘adaptateur secteur. Allumez-le en appuyant sur STANDBY. Configuration de l‘appareil • Au premier démarrage de l‘appareil, un écran de démarrage s‘affiche, puis il vous est demandé de choisir la langue de menu.
  • Seite 27 Menu principal et fonctions Utilisez le menu principal avec les touches fléchées et la touche ENTER. A partir d‘ici, vous avez accès aux fonctions et menus principaux My mediaU, Radio Internet, Média Center, DAB, FM, Information Center et Réglages avec les sous-items suivants : Standby Menu principal : My mediaU...
  • Seite 28 Utilisez cette option si vous vous y connaissez bien avec le matériel et si vous n‘utilisez pas toujours le même réseau sans fil. Check Network When Power On : activez pour que la IR-110 retrouve auto- • matiquement sa connexion (configurée) à chaque nouveau démarrage.
  • Seite 29 Le nom Standard DLNA est IR-110. Changez-le ici si vous le souhaitez. DLNA Setup Activez la fonction Resume When Power On pour que la IR-110 poursuive là où elle s‘est arrêtée lorsque vous la redémarrez : avec le dernier Streaming écouté ou la Resume When PWR dernière station.
  • Seite 30 Media Center Si vous avez partagé des médias depuis votre ordinateur ou Média center/ser- veur de médias pour UPnP Streaming, choisissez ici les fichiers correspondants. Si vous avez trouvé plus d‘un serveur UPnP-Server sur le réseau Wifi, vous pouvez choisir parmi les différentes possibilités. UPnP Veuillez noter : l‘appareil ne peut lire que des fichiers avec des noms de moins de 40 caractères écrits en caractères latins.
  • Seite 31 Twonky Beam. • Pendant la diffusion par DLNA vous pouvez uniquement modifier le volume sur la IR-110 ou utiliser la touche Standby/Power. Les autres fonctions sont inactives. Débranchez la connexion du côté de l‘ordinateur ou du smartphone.
  • Seite 32 Internet depuis un smartphone. Connectez le smartphone sur le même réseau que la radio IR-110 après avoir téléchargé et installé l‘application correspondante. Veuillez noter que la connexion UPnP du Media Player est impossible pendant que vous utilisez l‘application.
  • Seite 33: Conseils Pour Le Recyclage

    Conseils pour le recyclage Le pictogramme ci-contre apposé sur le produit signifi e que la directive européenne 2002/2006/CE (DEEE) s‘applique (poubelle à roues barrée d’une croix). Ces produits ne peuvent être jetés dans les poubelles domestiques courantes. Renseignez-vous concernant les règles appliquées pour la collecte d’appareils électriques et élect- roniques.
  • Seite 34: Fiche Technique

    Fiche technique Numéro d‘article 10030728, 10030729 Alimentation DC 5V (Adaptateur fourni pour AC 220-240 V, 50-60 Hz) Formats de lecture WMA, MP3, WAV, AAC Réseau 802.11b/g/n(WLAN), compatible WEP, WPA, WPA2 (PSK), WPS Streaming UPnP, DLNA Lautsprecher 2 x 2,5W Speakers Connectivité...

Inhaltsverzeichnis