Herunterladen Inhalt Inhalt Diese Seite drucken
Inhaltsverzeichnis

Werbung

Verfügbare Sprachen
  • DE

Verfügbare Sprachen

  • DEUTSCH, seite 1

Werbung

Inhaltsverzeichnis
loading

Inhaltszusammenfassung für auna iTuner 320 ME

  • Seite 3: Inhaltsverzeichnis

    Sehr geehrter Kunde, wir gratulieren Ihnen zum Erwerb Ihres Gerätes. Lesen Sie die folgenden Hinweise sorgfältig durch und befolgen Sie diese, um möglichen Schäden vorzubeugen. Für Schäden, die durch Missachtung der Hinweise und unsachgemäßen Gebrauch entstehen, übernehmen wir keine Haftung. Scannen Sie den folgenden QR-Code, um Zugriff auf die aktuellste Bedienungsanleitung und weitere Informationen rund um das Produkt zu erhalten:...
  • Seite 4: Technische Daten

    TECHNISCHE DATEN Artikelnummer 10035110 Stromversorgung 220-240 V ~ 50/60 Hz LIEFERUMFANG Hauptgerät Netzadapter W-LAN Antenne DAB/FM Antenne Fernbedienung Bedienungsanleitung...
  • Seite 5: Sicherheitshinweise

    SICHERHEITSHINWEISE Allgemeine Hinweise • Blitzschlag - Wenn Sie das Gerät länger nicht benutzen oder es gewittert, ziehen Sie den Stecker aus der Steckdose oder trennen Sie das Gerät vom Antennenanschluss. Dadurch werden Schäden am Produkt durch Blitzschlag und Überspannung vermieden. •...
  • Seite 6: Geräteübersicht Und Tasten

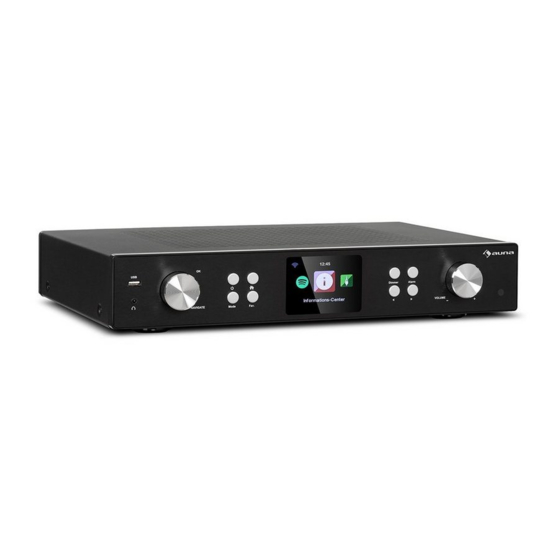
    Besondere Hinweise • Kinder ab 8 Jahren, psychisch, sensorisch und körperlich eingeschränkte Menschen dürfen das Gerät nur benutzen, wenn sie vorher von einer für sie verantwortlichen Aufsichtsperson ausführlich mit den Funktionen und den Sicherheitsvorkehrungen vertraut gemacht wurden und die damit verbundenen Risiken verstehen. •...
  • Seite 7 Vorderansicht Digitaler optischer DC-IN-Anschluss Audioausgang Digitaler koaxialer WLAN-Antenne Audioausgang Analoger Audioanschluss R/L LAN-Eingang Analoger Audioeingang Antennenanschluss Analoger Audioausgang Antennenhalter...
  • Seite 8: Bildschirmsymbole

    BILDSCHIRMSYMBOLE Verbindung wird hergestellt, das Gerät funktioniert Keine Verbindung zum drahtlosen Netzwerk Drahtlose Verbindung hergestellt VHF Empfang: Mono VHF Radioempfang: Stereo VHF Radiofunktionsauswahl AUX Funktionsauswahl Lautsprecher aus Suche Alarm an Als Favoriten gespeicherte Internetradiosender Gespeicherte FM-Sender...
  • Seite 9: Fernbedienungsfunktionen

    FERNBEDIENUNGSFUNKTIONEN Standbytaste Stummtaste Hauptmenü 4 Gespeicherte Sender, Favoriten, etc. 5 DAB-/FM-Suche 6 Lokale Sender Mediacenter, vorheriger Titel 8 Mediacenter, wiedergeben/ pausieren Mediacenter, nächster Titel 10 Alarmtaste 11 Modusauswahl 12 Equalizereinstellung 13 Nach oben 14 Nach links 15 Bestätigungstaste 16 Nach rechts 17 Nach unten 18 Lautstärke senken 19 Lautstärke erhöhen...
  • Seite 10: Analoger Audioanschluss

    ANALOGER AUDIOANSCHLUSS Cinch-Kabel Verbinden Sie ein das Cinch-Kabel (nicht im Lieferumfang enthalten) mit Soundbar, TV oder Lautsprecher. AUX-Kabel Verbinden Sie ein 3,5 mm AUX-OUT-Kabel (nicht im Lieferumfang enthalten) mit Soundbar, Standlautsprecher oder Mini-Lautsprecher.
  • Seite 11: Digitaler Audioanschluss

    DIGITALER AUDIOANSCHLUSS Optisches Kabel Verbinden Sie ein optisches Kabel (nicht im Lieferumfang enthalten) mit Soundbar, TV oder Lautsprecher. Coax-Kabel Verbinden Sie ein koaxiales Kabel (nicht im Lieferumfang enthalten) mit dem koaxialem Eingang von externen Verstärkern mit eingebautem Decoder.
  • Seite 12: Installation

    INSTALLATION Batterie in die Fernbedienung einsetzen • Entfernen Sie die Plastikfolie vom Batteriefach. • Ziehen Sie das Batteriefach mit Ihrem Daumen heraus. • Legen Sie zwei Batterien des Typs AAA 3 V in das Batteriefach ein. Achten Sie darauf, dass die positive Seite nach oben zeigt.
  • Seite 13: Inbetriebnahme Und Bedienung

    INBETRIEBNAHME UND BEDIENUNG Netzwerkanforderungen • Breitbandverbindung in Kombination mit einem an ein Kabel angeschlossenen/ kabellosen Zugangspunkt, Router oder ähnlichem Netzwerkgerät. • Das Netzwerkgerät muss die drahtlose Netzwerkverbindung WLAN (802.11b/g/n) unterstützen. • Ein mit dem Netzwerk verbundener PC/ Smartphone. Die Geräte müssen sich im gleichen Netzwerk befinden, wie das Radio.
  • Seite 14 • Wählen Sie zum Herstellen der Netzwerkverbindung „Yes“ (ja) aus. • Wählen Sie, falls Sie einen WPS-Router besitzen, „Yes (WPS)“ aus. Drücken Sie die WPS-Taste auf Ihrem Router. • Wenn Sie „Yes“ (ja) auswählen, sucht das Gerät nach verfügbaren WLAN- Netzwerken und listet diese kurze Zeit später auf dem Bildschirm auf.
  • Seite 15 Option 2: Eingabe des Passworts per Fernbedienung Geben Sie das Passwort mithilfe der Zahlen und Buchstaben auf der Fernbedienung ein. Der Cursor zeigt das aktuelle Eingabefeld an. Drücken Sie mehrfach die entsprechende Zahlentaste, um die folgenden Zeichen aufzurufen: Eintrag löschen (Abstand) @ ! ”...
  • Seite 16 Sobald die Verbindung hergestellt wurde, erscheint das Hauptmenü mit den wichtigsten Untermenüpunkten: • Internetradio: Zugang zu Radiosendern weltweit • Media Center: Zugang zu Ihren UPnP Geräten via Software mit Streamingfähigkeit • Informationscenter: Zugang zu Informationen über das Wetter, Finanzen und Systeminformationen •...
  • Seite 17: Informationen Zum Streamen Von Musik

    INFORMATIONEN ZUM STREAMEN VON MUSIK • Der voreingestellte Gerätename ist: iTuner 320 ME. Sie können das Gerät beliebig umbenennen. • Die nachfolgenden Informationen sind eine Einführung in die Einrichtung von Musikstreaming vom Computer und anderen Medien aus. • Beachten Sie, dass von Ihnen verwendete Apps zum Streamen von Musik eigene Anleitungen besitzen.
  • Seite 18: Dlna Funktion

    Erlauben Sie, dass Medien mit Ihrem Gerät geteilt werden Fügen Sie die Audiodateien und Ordner, welche mit Ihrem Gerät geteilt werden sollen, der Medienbibliothek hinzu. Sie können Musik ebenfalls von anderen Musikservern, wie beispielsweise Ihrem Smartphone, streamen (Android): • Verbinden Sie das Smartphone mit dem Netzwerk. •...
  • Seite 19 Teilen Sie die Medien auf Ihrem PC zunächst mit Ihrem Gerät: Bedienfeld > Network and Internet (Netzwerk und Internet) > Network and Sharing Center (Netzwerk und Teilen) > Media streaming options (Streamoptionen für Medien). Öffnen Sie den Windows Media Player, um die Bedienung über andere Geräte zu aktivieren.
  • Seite 20 Klicken Sie mit der rechten Maustaste auf einen beliebigen Musiktitel der Bibliothek und wählen Sie die Wiedergabe über Ihr Gerät aus. Ein Kontrollfenster für die Musikwiedergabe wird auf Ihrem Gerät angezeigt.
  • Seite 21 Sie können in Google Play oder im Apple Store nach beliebigen kostenlosen oder kostenpflichtigen DLNA-Apps suchen, wenn Sie ein Smartphone, Tablet, iPhone oder iPad verwenden. Die Verwendung von Bubble UPnP wird empfohlen. Es besteht die Möglichkeit, dass einige Apps das Streamen vom iPhone und iPod nicht unterstützen.
  • Seite 22: Hauptmenü

    HAUPTMENÜ Im Hauptmenü können die folgenden Modi ausgewählt werden: My media U, DAB-Radio, FM-Radio, AUX in, USB-Wiedergabe, Spotify, Internetradio, Lokale Radiosender, Einstellungen, Information Center, Media Center. EINSTELLUNGEN My mediaU Bibliothek – Radiosender via Internet verwalten Um jederzeit Zugriff auf Ihre weltweiten Lieblingsradiosender zu haben, können Sie, wenn Sie über ein mobiles Endgerät mit Streaming-Fähigkeit verfügen, einen kostenfreien Zugang zur Medienbibliothek unter www.
  • Seite 23 Sie müssen ebenfalls die MAC-Adresse Ihres Geräts (auf MediaU Seriennummer genannt) kennen, um Ihr Gerät unter „Personalize Your Internet Radio“ registrieren zu können. Auf diese kann unter Information Center > System information > Wireless Info > MAC Adress zugegriffen werden. Nach der Registrierung muss diese Funktion unter Information Center >...
  • Seite 24 • Abhängig von Ihren persönlichen My mediaU Einstellungen, kann das Aussehen des Bildschirms Ihres Geräts variieren. • Wenn Ihr Gerät noch nicht bei MediaU registriert wurde, erscheint eine entsprechende Nachricht, wenn Sie My mediaU aktivieren möchten. • Falls Sie Ihr Gerät auf mehreren Konten registriert haben, werden diese nach der Aktivierung alle angezeigt, so dass Sie das gewünschte Konto auswählen können.
  • Seite 25 Wenn Sie beispielsweise einen Podcast manuell hinzufügen möchten, müssen Sie die jeweilige URL kennen. Gehen Sie hierfür folgendermaßen vor: Füllen Sie in Ihrem MediaU-Konto unter „Add Manually“ (manuell hinzufügen) die markierten Felder aus. 2. Gehen Sie im Stream unter Configuration > Manage my mediaU und aktivieren Sie dieses erneut durch Drücken OK.
  • Seite 26 Manuelle Konfiguration: Sie können DHPC auswählen (die IP-Adresse wird automatisch zugeordnet) oder die IP-Adresse für die drahtlose Netzwerkverbindung manuell eingeben. Wenn Sie die manuelle Einstellung für eine Kabelverbindung auswählen, müssen folgende Daten eingegeben werden: • SSID (Name des Zugangspunktes) • IP-Adresse •...
  • Seite 27 • Die Umstellung von Sommer- auf Winterzeit muss manuell vorgenommen werden. • Sie können zwischen dem 12- und 24-Stunden-Format wählen. • Das Datum YY (Jahr), MM (Monat) und DD (Tag) kann in den Formaten YY/MM/DD, DD/MM/YY oder MM/DD/YY eingestellt werden. •...
  • Seite 28 • Die ersten beiden Alarme sind ähnlich dem normalen Alarm. Schalten Sie das Gerät ein, stellen Sie die aktuelle Uhrzeit ein und stellen Sie anschließend ein, wie häufig der Alarm klingeln soll. Sie können zwischen „täglich“, „einmalig“ und „an bestimmten Wochentagen“ auswählen.
  • Seite 29 Sprache Wählen Sie die gewünschte Sprache aus: Englisch/ Deutsch/ Französisch/ Ungarisch/ Tschechisch/ Slowakisch/ Polnisch/ Türkisch. Hintergrundbeleuchtung anpassen (Dimmer) • Sie können die Helligkeit der Hintergrundbeleuchtung anpassen. • Wählen Sie „Power Saving“ aus, um die Helligkeit der Hintergrundbeleuchtung im Standby-Modus zu regulieren und wählen Sie zum Aktivieren „Turn On“...
  • Seite 30: Energieverwaltung

    Energieverwaltung • Sie können einstellen, dass das Gerät im Hauptmenü oder wenn keine WLAN-Verbindung besteht, automatisch in den Standby-Modus wechselt. • Stellen Sie den Timer der Energieverwaltung (5/ 15/ 30 Minuten) so ein, dass sich das Gerät, wenn Sie es nicht bedienen, automatisch in den Standby-Modus begibt.
  • Seite 31: Wiedergabeeinstellung

    Sie können zwischen „Off“ (keine Wiederholung oder Zufallswiedergabe), „Repeat all“ (Wiederholung aller Titel), „Repeat one“ (einen Titel wiederholen) oder „Shuffle“ (Zufallswiedergabe). DLNA Einstellung • Der voreingestellte Gerätename für DLNA ist: iTuner 320 ME. • Der Gerätename kann am PC oder Smartphone in den DLNA- Einstellungen geändert werden.
  • Seite 32 Equalizer • Der voreingestellte Equalizermodus ist „Normal“. • Sie können zwischen „Normal“, „Flat“, „Jazz“, „Rock“, „Soundtrack“, „Classical“, „Pop“ oder „News“ auswählen. • Drücken Sie die Taste EQ der Fernbedienung, um zwischen den einzelnen Modi zu wechseln. Beim Einschalten Wiedergabe fortsetzen •...
  • Seite 33: Fm-Einstellung

    FM-Einstellung Wählen Sie bei der Radio-Wiedergabe MONO oder STEREO aus. MY MEDIAU Lassen Sie Ihre mediaU Senderliste auf dem mediaU Server anzeigen und wiedergeben. Erstellen Sie zunächst Ihr Konto (siehe Abschnitt Anpassung von My mediaU). INTERNETRADIO Nachdem die Verbindung zu einem Sender erfolgreich hergestellt wurde, werden die Bitgeschwindigkeit und das Senderformat auf dem Bildschirm angezeigt.
  • Seite 34 • Wenn Sie die gespeicherte Senderliste geöffnet haben, wählen Sie einen Sender aus und drücken Sie zum Starten der Wiedergabe die Taste OK. • Wenn Sie einen Sender markiert haben, gelangen Sie durch Drücken der Taste in das Untermenü. Dort können Sie einen Sender löschen (ein Sender wird von der Favoritenliste entfernt), Sie können die Liste nach oben und unten durchgehen, Umbenennen (Sie können einen Radiosender beliebig benennen), den Sender wiedergeben,...
  • Seite 35 • Wenn Sie „Auto Scan“ auswählen, wird jeder Sender des Untermenüs für 30 Sekunden abgespielt, bis alle Sender ausgewählt wurden oder Sie zum Unterbrechen die Taste OK drücken. • Drücken Sie die Taste Info, um die jeweilige Senderinformation anzeigen zu lassen. Verlauf •...
  • Seite 36: Media Center

    MEDIA CENTER UPnP • Falls Sie „geteilte Medien“ eingerichtet haben, können Sie diese via UPnP anzeigen lassen. • Falls mehr als ein Gerät zum Teilen von Medien zur Verfügung steht, werden die Alternativen aufgelistet. • Wählen Sie das Medium aus, von welchem Sie Musik über das Gerät wiedergeben lassen möchten.
  • Seite 37: Informationscenter

    INFORMATIONSCENTER Wetterinformationen • Es stehen für 2000 Städte Wetterinformationen und Wettervorhersagen zur Verfügung. • Wählen Sie für genaue Wetterangaben das Land und die Stadt aus. • Die Wetterinformationen können ebenfalls im Standby-Modus angezeigt werden. • Drücken Sie auf der Wetterinformationsseite die Taste .
  • Seite 38: Geräteinformationen

    Geräteinformationen • Die aktuelle Systemversion und die Details zur Netzwerkverbindung werden angezeigt. • Die Informationen beinhalten die MAC-Adresse, welche für die Registrierung bei my mediaU benötigt wird. USB-Wiedergabe • Stecken Sie nach der Auswahl von „USB-Playback“ den USB-Stick in den USB-Anschluss auf der Vorderseite von Ihrem Gerät.
  • Seite 39: Fm-Radio

    FM-RADIO • Im FM-Radiomodus wird analoges Breitbandradio empfangen. • Drücken Sie die Tasten am Gerät oder der Fernbedienung, um die FM-Sendersuche zu starten. • Die Frequenzanzeige geht während der Suche nach oben. • Sobald ein Sender empfangen wird, stoppt der Sendersuchlauf. •...
  • Seite 40: Bt-Verbindung

    DAB-Sendersuche • Drücken Sie die Taste am Gerät oder die Taste SCAN der Fernbedienung, um die Sendersuche zu starten. Der Suchfortschritt wird Ihnen durch einen Balken auf dem Bildschirm angezeigt. • Sobald die Sendersuche beendet ist, wählt das Radio den ersten gefundenen alphanumerischen Sender aus und beginnt die Wiedergabe.
  • Seite 41: Fernsteuerung Über Airmusic

    FERNSTEUERUNG ÜBER AIRMUSIC Sie können in Google Play oder im Apple Store nach beliebigen kostenlosen oder kostenpflichtigen Apps suchen, wenn Sie ein Smartphone, Tablet, iPhone oder iPad verwenden. Wir empfehlen Ihnen AirMusic. Mit der AirMusic Control App können Sie das Radio mit Hilfe Ihres Smartphones fernsteuern.
  • Seite 42: Spotify Connect

    SPOTIFY CONNECT Dein neues Gerät hat Spotify Connect Verwende dein Smartphone, Tablet oder deinen Computer als Fernbedienung für Spotify. Auf spotify.com/connect erfährst du mehr. Lizenzen Die Spotify Software unterliegt Drittanbieter-Lizenzen, die Sie hier finden: https://www.spotify.com/connect/third-party-licenses Alle aufgeführten Marken sind Warenzeichen der jeweiligen Unternehmen. Fehler und Auslassungen ausgenommen und technischen Änderungen unterliegend.
  • Seite 43: Hinweise Zur Entsorgung

    HINWEISE ZUR ENTSORGUNG Befindet sich die linke Abbildung (durchgestrichene Mülltonne auf Rädern) auf dem Produkt, gilt die Europäische Richtlinie 2012/19/EU. Diese Produkte dürfen nicht mit dem normalen Hausmüll entsorgt werden. Informieren Sie sich über die örtlichen Regelungen zur getrennten Sammlung elektrischer und elektronischer Gerätschaften.
  • Seite 45 Dear Customer, Congratulations on purchasing this device. Please read the following instructions carefully and follow them to prevent possible damages. We assume no liability for damage caused by disregard of the instructions and improper use. Scan the QR code to get access to the latest user manual and more product information.
  • Seite 46: Technical Data

    TECHNICAL DATA Item number 10035110 Power supply 220-240 V ~ 50/60 Hz SCOPE OF DELIVERY Main unit Adapter W-LAN Antenna DAB/FM Antenna Remote Control Manual...
  • Seite 47: Safety Instructions

    SAFETY INSTRUCTIONS General information • Lightning - If you are not going to use the device for a long time or if there is a storm, disconnect the plug from the electrical outlet and disconnect the device from the antenna connector. This will avoid damage to the product that may be caused by lightning or overvoltage.
  • Seite 48: Device Overview And Buttons

    Special Instructions • This device may be only used by children 8 years old or older and persons with limited physical, sensory and mental capabilities and / or lack of experience and knowledge, provided that they have been instructed in use of the device by a responsible person who understands the associated risks.
  • Seite 49 Front view DC IN connector Digital optical audio output WLAN antenna Digital coaxial audio output Analog audio connection R/L LAN input Analog audio input Antenna connection Analogue audio output Antenna holder...
  • Seite 50: Screen Icons

    SCREEN ICONS Connection is established, the device is working No connection to the wireless network Wireless connection established VHF reception: Mono VHF radio reception: Stereo VHF radio function selection AUX function selection Speaker off Search Alarm on Internet radio stations saved as favourites Stored FM stations...
  • Seite 51: Remote Control Functions

    REMOTE CONTROL FUNCTIONS Standby button Mute button Main menu Saved stations, favourites, etc. DAB/FM search Local stations Mediacenter, previous title Media centre, play/pause Mediacenter, next title 10 Alarm button Mode selection 12 Equalizer setting 13 To the top 14 To the left 15 Confirmation key 16 To the right 17 Down...
  • Seite 52: Analog Audio Connection

    ANALOG AUDIO CONNECTION Cinch cable Connect the RCA cable (not supplied) to the soundbar, TV or speakers. AUX cable Connect a 3.5 mm AUX-OUT cable (not supplied) to a soundbar, floorstander or mini speaker.
  • Seite 53: Digital Audio Connection

    DIGITAL AUDIO CONNECTION Optical cable Connect an optical cable (not supplied) to the soundbar, TV or speakers. Coax cable Connect a coaxial cable (not supplied) to the coaxial input of external amplifiers with built-in decoder.
  • Seite 54: Installation

    INSTALLATION Inserting the battery in the remote control • Remove the plastic film from the battery compartment. • Pull the battery compartment out with your thumb. • Insert two AAA 3V batteries into the battery compartment. Make sure that the positive side is facing up.
  • Seite 55: Commissioning And Operation

    COMMISSIONING AND OPERATION Network requirements • Broadband connection in combination with a cabled/wireless access point, router or similar network device. • The network device must support the wireless network connection WLAN (802.11b/g/n) • A PC/ smartphone connected to the network. The devices must be on the same network as the radio.
  • Seite 56 • Select “Yes” to establish the network connection. • If you have a WPS router, select Yes (WPS). Press the WPS button on your router. • If you select “Yes“ (yes), the device will search for available wireless networks and list them on the screen a short time later. •...
  • Seite 57 Option 2: Entering the password by remote control Enter the password using the numbers and letters on the remote control. The cursor indicates the current input field. Press the corresponding number button repeatedly to display the following characters: Delete entry (Space) @ ! ”...
  • Seite 58 As soon as the connection is established, the main menu with the most important submenu items appears: • Internet radio: Access to radio stations worldwide • Media Center: Access to your UPnP devices via software with streaming capability • Information center: Access to weather, financial and system information •...
  • Seite 59: Information About Streaming Music

    INFORMATION ABOUT STREAMING MUSIC • The default device name is: iTuner 320 ME. You can rename the device as desired. • The following information is an introduction to setting up streaming music from your computer and other media. • Note that any apps you use to stream music have their own instructions.
  • Seite 60: Dlna Function

    Allow media to be shared with your device Add the audio files and folders that you want to share with your device to the Media Library. You can also stream music from other music servers, such as your phone (Android): •...
  • Seite 61 First share the media on your PC with your device: Control panel > Network and Internet > Network and Sharing Center > Media streaming options. Open the Windows Media Player to enable operation via other devices.
  • Seite 62 Right-click any song in the library and choose to play it on your device. A control window for music playback is displayed on your device.
  • Seite 63 You can search for any free or paid DLNA app in Google Play or the Apple Store if you use a smartphone, tablet, iPhone or iPad. The use of Bubble UPnP is recommended. Some apps may not support streaming from iPhone and iPod, but iPhone and iPod can still be used to control music playback from other servers.
  • Seite 64: Main Menu

    MAIN MENU The following modes can be selected in the main menu: My media U, DAB Radio, FM Radio, AUX in, USB Play, Spotify, Internet Radio, Local Radio Stations, Settings, Information Center, Media Center. SETTINGS My mediaU Library - manage radio stations via the Internet To have access to your favorite radio stations around the world at any time, if you have a mobile device with streaming capability, you can create a free access to the Media Library at www.mediaU.net and add as many devices...
  • Seite 65 You also need to know the MAC address of your device (called serial number on MediaU) to register your device under “Personalize Your Internet Radio“. This can be accessed under Information Center > System information > Wireless Info > MAC Address. After registration, this feature must be enabled under Information Center >...
  • Seite 66 • Depending on your personal My mediaU settings, the appearance of the screen of your device may vary. • If your device has not yet been registered with MediaU, a message will appear when you try to activate My mediaU. •...
  • Seite 67 For example, if you want to add a podcast manually, you need to know its URL. To do this, follow these steps: Fill in the marked fields under “add manually“ in your mediau account 2. Go to configuration > manage my mediau in the stream and enable it again by pressing ok.
  • Seite 68 Manual configuration: You can select DHPC (the IP address is assigned automatically) or enter the IP address for the wireless network connection manually. If you select the manual setting for a wired connection, the following information must be entered: • SSID (name of the access point) •...
  • Seite 69 • The changeover from summer to winter time must be carried out manually. • You can choose between the 12-hour and 24-hour format. • The date YY (year), MM (month) and DD (day) can be set in the formats YY/MM/DD, DD/MM/YYY or MM/DD/YYY. •...
  • Seite 70 • The first two alarms are similar to the normal alarm. Turn the power on, set the current time, and then set how often the alarm should ring. You can choose between “daily“, “once“ and “on specific weekdays“. • Set the corresponding values by turning the volume control or pressing the buttons on the remote control.
  • Seite 71 Language Select the desired language: English/ German/ French/ Hungarian/ Czech/ Slovak/ Polish/ Turkish. Adjusting the background lighting (dimmer) • You can adjust the brightness of the backlight. • Select “Power Saving“ to adjust the brightness of the backlight in standby mode and select “Turn On“ to activate. •...
  • Seite 72 Power Management • You can set the unit to automatically enter standby mode in the main menu or when there is no wireless connection. • Set the power management timer (5/15/30 minutes) so that the unit automatically enters standby mode when you are not operating it. •...
  • Seite 73 Off (no repeat or shuffle), Repeat all, Repeat one, or Shuffle. DLNA Setting • The default device name for DLNA is: iTuner 320 ME. • The device name can be changed on the PC or Smartphone in the DLNA settings.
  • Seite 74 Equalizer • The default equalizer mode is “Normal“. • You can select from “Normal”, “Flat“, “Jazz“, “Rock“, “Soundtrack“, “Classical“, “Pop“ or “News“. • Press the EQ button on the remote control to switch between each mode. Resume playback when power is turned on •...
  • Seite 75: My Mediau

    FM setting During radio playback, select MONO or STEREO. MY MEDIAU Display and play back your mediaU channel list on the mediaU server. First create your account (see section Customizing My mediaU). INTERNET RADIO After the connection to a station is successfully established, the bit rate and station format are displayed on the screen.
  • Seite 76 • When you have opened the saved channel list, select a station and press OK to start playback. • If you have highlighted a station, press the button to enter the submenu. There you can delete a station (a station is removed from the Favourites list), scroll up and down the list, rename (you can name a radio station as you like), play the station, or use the station as an alarm sound (if you select “Internet radio“...
  • Seite 77 • If you select “Auto Scan“, each channel of the submenu will be played for 30 seconds until all channels are selected or you press OK to interrupt. • Press the Info button to display the respective channel information. History •...
  • Seite 78: Media Center

    MEDIA CENTER UPnP • If you have set up “shared media“, you can display it via UPnP. • If more than one device is available for media sharing, the alternatives will be listed. • Select the media from which you want to play music on the device. •...
  • Seite 79: Information Center

    INFORMATION CENTER Weather information • Weather information and weather forecasts are available for 2000 cities. • Select the country and city for accurate weather information. • The weather information can also be displayed in standby mode. • On the weather information page, press the button .
  • Seite 80: Device Information

    Device information • The current system version and network connection details are displayed. • The information includes the MAC address, which is required for registration with my mediaU. USB Playback • After selecting “USB Playback“, insert the USB stick into the USB port on the front of your device.
  • Seite 81: Fm Radio

    FM RADIO • In FM radio mode, analogue broadband radio is received. • Press the buttons on the unit or remote control to start FM station search. • The frequency display will go up while searching. • As soon as a station is received, the station search stops. •...
  • Seite 82: Bt Connection

    DAB station search • Press the button on the unit or the SCAN button on the remote control to start the channel search. The progress of the search is indicated by a bar on the screen. • As soon as the station search is finished, the radio selects the first alphanumeric station it finds and starts playing.
  • Seite 83: Remote Control Via Airmusic

    REMOTE CONTROL VIA AIRMUSIC You can search for any free or paid apps in Google Play or the Apple Store if you use a smartphone, tablet, iPhone or iPad. We recommend AirMusic. The AirMusic Control App lets you remote control the radio using your smartphone.
  • Seite 84: Spotify Connect

    SPOTIFY CONNECT Your new device has Spotify Connect built in Use your phone, tablet or computer as a remote control for Spotify. Go to spotify.com/connect to learn how. Licenses The Spotify Software is subject to third party licenses found here: https://www.spotify.com/connect/third-party-licenses All listed brands are trademarks of their companies.
  • Seite 85: Hints On Disposal

    HINTS ON DISPOSAL According to the European waste regulation 2012/19/ EU this symbol on the product or on its packaging indicates that this product may not be treated as household waste. Instead it should be taken to the appropriate collection point for the recycling of electrical and electronic equipment.
  • Seite 87 Estimado cliente: Le felicitamos por la adquisición de este producto. atentamente siguiente manual siga cuidadosamente las instrucciones de uso con el fin de evitar posibles daños. La empresa no se responsabiliza de los daños ocasionados por un uso indebido del producto o por haber desatendido las indicaciones de seguridad.
  • Seite 88: Datos Técnicos

    DATOS TÉCNICOS Número del artículo 10035110 Suministro eléctrico 220-240 V ~ 50/60 Hz CONTENIDO DEL ENVÍO Unidad principal Adaptador de corriente Antena W-LAN Antena DAB/FM Mando a distancia Instrucciones de funcionamiento...
  • Seite 89: Indicaciones De Seguridad

    INDICACIONES DE SEGURIDAD Indicaciones generales • Relámpago - Si no va a utilizar el aparato durante un periodo largo de tiempo o si hay una tormenta eléctrica, desenchufe el aparato de la toma de corriente y desconecte el conector de antena. De este modo, protegerá...
  • Seite 90: Descripción Del Aparato

    Indicaciones especiales • Este aparato puede ser utilizado por niños mayores de años y personas con discapacidades físicas, sensoriales y mentales y/o con falta de experiencia y conocimientos, siempre y cuando hayan sido instruidos sobre el uso del aparato y comprendan los peligros y riesgos asociados. •...
  • Seite 91 Vista posterior Conexión DC-IN Salida de audio óptica digital Salida de audio coaxial Antena WLAN digital Conexión de audio analógico Entrada de LAN Entrada de audio analógico Conexión de la antena Salida de audio analógico Soporte de la antena...
  • Seite 92: Símbolos De La Pantalla

    SÍMBOLOS DE LA PANTALLA Conexión está establecida, el dispositivo funciona No hay conexión a la red inalámbrica Conexión inalámbrica establecida Recepción VHF: Mono Recepción de radio VHF: estéreo Selección de función de radio VHF Selección de función AUX Altavoz apagado Búsqueda Alarma está...
  • Seite 93: Mando A Distancia

    MANDO A DISTANCIA Botón de espera Botón de silencio Menú principal 4 Estaciones almacenadas, favoritas, etc. 5 Búsqueda dab/fm 6 Estaciones locales Media center/ pista anterior 8 Media center/ reproducir/pausa Media center, siguiente pista 10 Botón de alarma 11 Selección de modo 12 Ajuste del ecualizador 13 Arriba 14 Izquierda...
  • Seite 94 CONEXIÓN DE AUDIO ANALÓGICA Cable RCA Conecte el cable RCA (no incluido) a la barra de sonido, el televisor o los altavoces. Cable AUX Conecte un cable AUX-OUT de 3,5 mm (no incluido) a una barra de sonido, un soporte de suelo o un mini altavoz.
  • Seite 95 CONEXIÓN DE AUDIO DIGITAL Cable óptico Conecte un cable óptico (no incluido) a la barra de sonido, el televisor o los altavoces. Cable coaxial Conecte un cable coaxial (no incluido) a la entrada coaxial de los amplificadores externos con decodificador incorporado.
  • Seite 96: Instalación

    INSTALACIÓN Insertar las pilas en el mando a distancia • Retire la película plástica del compartimento de las pilas. • Tire del compartimento de la batería con el pulgar. • Inserte dos pilas de tipo AAA 3 V en el compartimento de las pilas.
  • Seite 97: Puesta En Marcha Y Funcionamiento

    PUESTA EN MARCHA Y FUNCIONAMIENTO Requisitos de la red • Conexión de banda ancha en combinación con un punto de acceso cableado/inalámbrico, un enrutador o un dispositivo de red similar. • El dispositivo de red debe soportar la conexión de red inalámbrica WLAN (802.11b/g/n) •...
  • Seite 98 • Seleccione “YES“ (SÍ) para establecer la conexión de red. • Si tiene un router WPS, seleccione YES (WPS). Presiona el botón WPS de tu router. • Si selecciona „YES“ (sí), el dispositivo buscará las redes inalámbrica disponibles y las enumera en la pantalla poco tiempo después. •...
  • Seite 99 Opción 2: Introducir la contraseña por control remoto Introduzca la contraseña con los números y letras del mando a distancia. El cursor indica el campo de entrada. Presione el botón numérico correspondiente repetidamente para mostrar los siguientes caracteres: Borrar la entrada (Distancia) @ ! ”...
  • Seite 100 Tan pronto como se establece la conexión, aparece el menú principal con los elementos más importantes del submenú: • Radio por Internet: Acceso a las emisoras de radio de todo el mundo • Media Center: Acceso a sus dispositivos UPnP a través de un software con capacidad de transmisión •...
  • Seite 101: Información Sobre La Música En Streaming

    INFORMACIÓN SOBRE LA MÚSICA EN STREAMING • El nombre del dispositivo por defecto es: iTuner 320 ME. Puede renombrar el dispositivo como desee. • La siguiente información es una introducción a la configuración de la transmisión de música desde la computadora y otros medios.
  • Seite 102: Función Dlna

    Permita que los medios sean compartidos con su dispositivo Añada a la Biblioteca multimedia los archivos y carpetas de audio que quiera compartir con su dispositivo. También puede transmitir música de otros servidores de música, como su teléfono (Android): • Conecte su teléfono a la red.
  • Seite 103 En primer lugar, comparte el contenido multimedia de tu PC con tu dispositivo: Panel de control > Red e Internet > Centro de redes y recursos compartidos > Opciones de transmisión de medios. Abra el Reproductor de Windows Media para habilitar el control desde otros dispositivos.
  • Seite 104 Haga clic con el botón derecho del ratón en cualquier canción de la biblioteca y elija reproducir desde tu dispositivo. Aparece un panel de control de reproducción de música en el dispositivo.
  • Seite 105 Puedes buscar cualquier aplicación DLNA gratuita o de pago en Google Play o en el Apple Store si utiliza un teléfono inteligente, una tableta, un iPhone o un iPad. Se recomienda el uso de Bubble UPnP. Puede que algunas aplicaciones no sean compatibles con el streaming desde el iPhone y el iPod, pero el iPhone y el iPod pueden seguir utilizándose para controlar la reproducción de música desde otros servidores.
  • Seite 106: Menú Principal

    MENÚ PRINCIPAL En el menú principal se pueden seleccionar los siguientes modos: Mi media U, DAB Radio, FM Radio, AUX in, USB Play, Spotify, Radio Internet, Estaciones de Radio Locales, Ajustes, Centro de Información, Centro de Medios. AJUSTES Mi biblioteca mediaU - administrar estaciones de radio a través de Internet Para tener acceso a sus estaciones de radio favoritas en todo el mundo en cualquier momento, si tiene un dispositivo móvil con capacidad de...
  • Seite 107 También necesita saber la dirección MAC de su dispositivo (llamada número de serie en MediaU) para registrar su dispositivo en „Personalice su radio de Internet“. Se puede acceder a esto en Centro de Información > Información del sistema > Información Inalámbrica > Dirección MAC. Después del registro, esta función debe activarse en Centro de Información >...
  • Seite 108 • Dependiendo de la configuración personal de My mediaU, el aspecto de la pantalla de su dispositivo puede variar. • Si su dispositivo no se ha registrado aún en MediaU, aparecerá un mensaje cuando intente activar Mi mediaU. • Si ha registrado su dispositivo en más de una cuenta, estas cuentas después de la activación, se muestran todas para que pueda seleccionar la cuenta deseada.
  • Seite 109 Por ejemplo, si quiere añadir un podcast manualmente, necesitas saber su URL. Para hacerlo, siga estos pasos: Rellene los campos marcados en „Añadir manualmente“ en su cuenta de MediaU 2. Vaya a Configuración > Administrar mi mediaU en el stream y actívalo de nuevo presionando OK.
  • Seite 110 Configuración manual: Puede seleccionar DHPC (la dirección IP se asigna automáticamente) o introducir la dirección IP para la conexión de la red inalámbrica manualmente. Si selecciona el ajuste manual para una conexión con cable, debe introducir la siguiente información: • SSID (nombre del punto de acceso) •...
  • Seite 111 • El cambio del horario de verano al de invierno debe hacerse manualmente. • Puede elegir entre el formato de 12 y 24 horas. • La fecha YY (año), MM (mes) y DD (día) pueden ser introducidos en los formatos YY/MM/DD, DD/MM/YYY o MM/DD/YYY. •...
  • Seite 112 • Las dos primeras alarmas son similares a la alarma normal. Encienda la energía, ponga la hora actual y luego establezca la frecuencia con la que debe sonar la alarma. Puedes elegir entre „diario“, „una vez“ y „en días específicos de la semana“. •...
  • Seite 113 Idioma Seleccione el idioma deseado: Inglés, alemán, francés, húngaro, checo, eslovaco, polaco y turco. Ajuste de la iluminación de fondo (regulador de intensidad) • Puede ajustar el brillo de la luz de fondo. • Seleccione „Ahorro de energía“ para ajustar el brillo de la luz de fondo en el modo de espera para ajustar y seleccione para activarla „Encender“.
  • Seite 114 Administración de la energía • Puede configurar la unidad para que entre automáticamente en el modo de espera en el menú principal o cuando no haya una conexión inalámbrica. • Ajuste el temporizador de gestión de la energía (5/15/30 minutos) de manera, que entre automáticamente en el modo de espera si no se usa.
  • Seite 115 (aleatorio). Ajuste de la DLNA • El nombre del dispositivo por defecto para la DLNA es: iTuner 320 ME. • El nombre del dispositivo se puede cambiar en el PC o Smartphone en la DLNA y se pueden cambiar los ajustes.
  • Seite 116 Ecualizador • El modo de ecualización predeterminado es „Normal“. • Puedes elegir entre „Normal“, „Plano“, „Jazz“, „Rock“, „Banda Sonora“,“Clásico“, „Pop“ o „Noticias“. • Pulse el botón EQ del mando a distancia para cambiar entre los modos individuales. Reanudar la reproducción cuando se encienda •...
  • Seite 117: Mi Mediau

    Ajuste de FM Durante la reproducción de la radio, seleccione MONO o ESTÉREO. MI MEDIAU Mostrar y reproducir la lista de canales de mediaU en el servidor de mediaU. Primero cree su cuenta (véase la sección Personalización de Mi mediaU). RADIO INTERNET Una vez que se establece con éxito la conexión con una estación, la velocidad de bits y el formato de la estación se muestran en la pantalla.
  • Seite 118 Cuando haya abierto la lista de canales guardados, seleccione una emisora y pulse OK para iniciar la reproducción. • Si ha resaltado una emisora, pulse el botón para entrar en el submenú. Allí puede borrar una emisora (una emisora se elimina de la lista de favoritos).
  • Seite 119 • Si selecciona “Auto Scan” (Búsqueda automática), cada canal del submenú se reproducirá durante 30 segundos hasta que se seleccionen todos los canales o pulse OK para interrumpir. • Presione el botón de información para mostrar la información del canal respectivo.
  • Seite 120: Media Center (Centro De Medios)

    MEDIA CENTER (CENTRO DE MEDIOS) UPnP • Si ha configurado „medios compartidos“, puede visualizarlos a través de UPnP. • Si hay más de un dispositivo disponible para compartir medios, se enumerarán las alternativas. • Selecciona el medio desde el que quieres reproducir música en el dispositivo.
  • Seite 121: Centro De Información

    CENTRO DE INFORMACIÓN Información meteorológica • Se dispone de información y pronósticos meteorológicos para 2000 ciudades. • Seleccione el país y la ciudad para obtener información meteorológica precisa. • La información meteorológica también puede visualizarse en el modo de espera. •...
  • Seite 122 Información del dispositivo • Se muestran la versión actual del sistema y los detalles de la conexión a la red. • La información incluye la dirección MAC, que se requiere para el registro en mi mediaU. Reproducción USB • Después de seleccionar “USB Playback” (Reproducción USB), inserte el lápiz de memoria USB en el puerto USB de la parte delantera del dispositivo.
  • Seite 123: Radio Fm

    RADIO FM • En el modo de radio FM, se recibe la radio de banda ancha analógica. • Pulse el botón ] de la unidad o del mando a distancia para iniciar la búsqueda de la estación FM. • La pantalla de la frecuencia sube durante la búsqueda. •...
  • Seite 124: Conexión Bt

    Búsqueda en la estación DAB • Pulse el botón de la unidad o el botón SCAN del mando a distancia para iniciar la búsqueda de canales. El progreso de la búsqueda se indica con una barra en la pantalla. • Tan pronto como la búsqueda de emisoras termina, la radio selecciona la primera emisora alfanumérica que encuentra y comienza a reproducir.
  • Seite 125: Control Remoto A Través De Airmusic

    CONTROL REMOTO A TRAVÉS DE AIRMUSIC Puede buscar cualquier aplicación gratuita o de pago en Google Play o en el Apple Store si utiliza un teléfono inteligente, una tableta, un iPhone o un iPad. Recomendamos AirMusic. La aplicación AirMusic Control App te permite controlar a distancia la radio con tu smartphone.
  • Seite 126: Conexión A Spotify

    CONEXIÓN A SPOTIFY Este reproductor tiene una conexión a Spotif Usa tu teléfono, tu tablet o tu computadora como control remoto de Spotify. Para más información, entra a spotify.com/connect Licencias El software Spotify está sujeto a los derechos de uso de terceros, que se encuentran en la siguiente página: https://www.spotify.com/connect/third-party-licenses Todas las marcas comerciales mencionadas son marcas comerciales...
  • Seite 127: Retirada Del Aparato

    RETIRADA DEL APARATO Si el aparato lleva adherida la ilustración de la izquierda (el contenedor de basura tachado) entonces rige la normativa europea, directiva 2012/19/UE. Este producto no debe arrojarse a un contenedor de basura común. Infórmese sobre las leyes territoriales que regulan la recogida separada de aparatos eléctricos y electrónicos.
  • Seite 129 Cher client, Toutes nos félicitations pour l’acquisition de ce nouvel appareil. Veuillez lire attentivement les instructions suivantes de branchement et d’utilisation afin d’éviter d’éventuels dommages. Le fabricant ne saurait être tenu pour responsable des dommages dus au non-respect des consignes de sécurité et à la mauvaise utilisation de l’appareil.
  • Seite 130: Fiche Technique

    FICHE TECHNIQUE Numéro d'article 10035110 Alimentation 220-240 V ~ 50/60 Hz CONTENU DE L‘EMBALLAGE Appareil principal Adaptateur secteur Antenne Wifi Antenne DAB/FM Télécommande Mode d‘emploi...
  • Seite 131: Consignes De Sécurité

    CONSIGNES DE SÉCURITÉ Consignes générales • Foudre - Si vous n‘utilisez pas l‘appareil pendant une longue période ou s‘il y a de l‘orage, débranchez la fiche de la prise et débranchez l‘antenne de l‘appareil. Cela évite d‘endommager le produit à cause de la foudre et des surtensions.
  • Seite 132: Aperçu De L'appareil Et Touches

    Consignes particulières • Cet appareil peut être utilisé par des enfants de 8 ans ou plus et des personnes ayant des capacités physiques, sensorielles et mentales limitées et / ou dénuées d‘expérience et de connaissances, à condition d‘avoir été instruits au fonctionnement de l‘appareil par une personne responsable et d‘en comprendre les risques associés.
  • Seite 133 Vue de dos Sortie audio optique Prise CC-IN numérique Sortie audio coaxiale Antenne de Wifi numérique Prise audio analogique R/L Entrée de réseau local Entrée audio analogique Prise d'antenne Sortie audio analogique Support d'antenne...
  • Seite 134: Symboles À L'écran

    SYMBOLES À L‘ÉCRAN Connexion en cours, l'appareil fonctionne Pas de connexion au réseau sans fil Connexion sans fil établie Réception VHF : Mono Réception radio VHF: Stéréo Sélection de la fonction radio VHF Sélection de la fonction AUX Enceinte désactivée Recherche Alarme activée Radios Internet enregistrées comme favoris...
  • Seite 135: Fonctions De La Télécommande

    FONCTIONS DE LA TÉLÉCOMMANDE Touche de veille Touche muet Menu principal 4 Stations mémorisées, favoris, etc. 5 Recherche dab/fm 6 Stations locales Mediacenter, titre précédent 8 Mediacenter, lecture / pause Mediacenter, titre suivant 10 Touche d‘alarme 11 Choix du mode 12 Réglages de l‘égaliseur 13 Haut...
  • Seite 136: Prise Audio Analogique

    PRISE AUDIO ANALOGIQUE Câble RCA Connectez le câble RCA (non inclus) à la barre de son, au téléviseur ou à l‘enceinte. Câble AUX Connectez un câble AUX-OUT de 3,5 mm (non inclus) à la barre de son, à l‘enceinte sur pied ou à la mini enceinte.
  • Seite 137: Prise Audio Numérique

    PRISE AUDIO NUMÉRIQUE Câble optique Connectez un câble optique (non inclus) à la barre de son, au téléviseur ou à l‘enceinte. Câble coaxial Connectez un câble coaxial (non inclus) à l‘entrée coaxiale des amplificateurs externes avec décodeur intégré.
  • Seite 138: Installation

    INSTALLATION Installation des piles dans la télécommande • Retirez le film plastique du compartiment des piles. • Utilisez votre pouce pour retirer le compartiment à piles. • Insérez deux piles AAA 3 V dans le compartiment à piles. Assurez-vous que le côté positif est orienté...
  • Seite 139: Mise En Marche Et Utilisation

    MISE EN MARCHE ET UTILISATION Configuration réseau • Une connexion à large bande avec un point d‘accès câblé / sans fil, un routeur ou un périphérique réseau similaire. • Le périphérique réseau doit prendre en charge la connexion réseau sans fil Wifi (802.11b/g/n).
  • Seite 140 • Sélectionnez „Oui“ pour établir la connexion réseau. • Si vous avez un routeur WPS, sélectionnez „Oui (WPS)“. Appuyez sur le bouton WPS de votre routeur. • Si vous sélectionnez „Oui“, l‘appareil recherche les réseaux Wifi disponibles et les liste à l‘écran peu de temps après. •...
  • Seite 141 Option 2 : saisie du mot de passe avec la télécommande Saisissez le mot de passe à l‘aide des chiffres et des lettres de la télécommande. Le curseur affiche le champ de saisie actuel. Appuyez plusieurs fois sur la touche numérique correspondante pour appeler les caractères suivants : Annuler la saisie (Espace) @ ! ”...
  • Seite 142 Dès que la connexion est établie, le menu principal apparaît avec les éléments de sous-menu les plus importants : • Radio Internet : accès aux stations de radio du monde entier • Media Center : accès à vos appareils UPnP par un logiciel avec capacité de streaming •...
  • Seite 143: Informations Sur Le Streaming De Musique

    INFORMATIONS SUR LE STREAMING DE MUSIQUE • Le nom d‘appareil par défaut est : iTuner 320 ME. Vous pouvez renommer l‘appareil comme vous le souhaitez. • Les informations suivantes sont une introduction à la configuration du streaming de musique à partir de votre ordinateur et d‘autres médias.
  • Seite 144: Fonction Dlna

    Autorisez le partage de médias avec votre appareil Ajoutez les fichiers et dossiers audio à partager avec votre appareil à la bibliothèque multimédia. Vous pouvez également diffuser de la musique à partir d‘autres serveurs de musique, tels que votre smartphone (Android) : •...
  • Seite 145 Partagez d‘abord les médias sur votre PC avec votre appareil : Panneau de configuration> Network and Internet (Réseau et Internet) > Network and Sharing Center (Centre Réseau et partage) > Media streaming options (Options de streaming multimédia). Ouvrez Windows Media Player pour activer le contrôle à partir d‘autres appareils.
  • Seite 146 Faites un clic droit sur n‘importe quel titre de la bibliothèque et sélectionnez la lecture sur votre appareil. Une fenêtre de contrôle pour la lecture de musique apparaît sur votre appareil.
  • Seite 147 Vous pouvez rechercher des applications DLNA gratuites ou payantes sur Google Play ou Apple Store à l‘aide d‘un smartphone, d‘une tablette, d‘un iPhone ou d‘un iPad. L‘utilisation de Bubble UPnP est recommandée. Il est possible que certaines applications ne prennent pas en charge le streaming depuis iPhone et iPod.
  • Seite 148: Menu Principal

    MENU PRINCIPAL Les modes suivants peuvent être sélectionnés dans le menu principal: My media U, radio DAB, radio FM, AUX in, lecture USB, Spotify, radio Internet, stations de radio locales, paramètres, centre d‘information, centre multimédia. PARAMÈTRES Bibliothèque My mediaU– gestion des stations de radio par Internet Pour avoir accès à...
  • Seite 149 Il vous faudra également l‘adresse MAC de votre appareil (appelé numéro de série MediaU) pour enregistrer votre appareil sous „Personnaliser votre radio Internet“. Vous la trouverez sous Centre d‘informations> Informations système> Informations sans fil> Adresse MAC. Après l‘enregistrement, activez cette fonction dans Centre d‘information> Informations système>...
  • Seite 150 • En fonction de vos paramètres personnels My mediaU, l‘apparence de l‘écran de votre appareil peut varier. • Si votre appareil n‘est pas encore enregistré auprès de MediaU, un message apparaît et vous propose d‘activer My mediaU. • Si vous avez enregistré votre appareil sur plusieurs comptes, ils s‘affichent tous après l‘activation pour que vous puissiez sélectionner le compte souhaité.
  • Seite 151 Par exemple, si vous souhaitez ajouter un podcast manuellement, vous devez connaître l‘URL. Pour ce faire, procédez comme suit : Remplissez les champs marqués de votre compte MediaU sous „Add manually“ (Ajouter manuellement). 2. Accédez à Configuration> Gérer mon mediaU dans le flux et réactivez-le en appuyant sur OK.
  • Seite 152 Configuration manuelle : Vous pouvez sélectionner DHPC (l‘adresse IP est attribuée automatiquement) ou saisir manuellement l‘adresse IP pour la connexion au réseau sans fil. Si vous sélectionnez le réglage manuel pour une connexion par câble, vous devez saisir les données suivantes : •...
  • Seite 153 • Le passage de l‘heure d‘été à l‘heure d‘hiver doit être effectué manuellement. • Vous pouvez choisir entre le format 12 et 24 heures. • La date AA (année), MM (mois) et JJ (jour) peut être définie dans les formats AA / MM / JJ, JJ / MM / AA ou MM / JJ / AA. •...
  • Seite 154 • Les deux premières alarmes sont similaires à l‘alarme normale. Allumez l‘appareil, réglez l‘heure actuelle, puis définissez la fréquence à laquelle l‘alarme doit sonner. Vous pouvez choisir entre „tous les jours“, „une seule fois“ et „certains jours de la semaine“. •...
  • Seite 155 Langue Sélectionnez la langue souhaitée: anglais / allemand / français / hongrois / tchèque / slovaque / polonais / turc. Réglage de la luminosité de l‘écran (Dimmer) • Vous pouvez régler la luminosité du rétroéclairage. • Sélectionnez „Power Saving“ pour régler le rétro-éclairage en mode veille et sélectionnez „Activer“...
  • Seite 156 Gestion de l‘alimentation • Vous pouvez configurer l‘appareil pour qu‘il passe automatiquement en mode veille dans le menu principal ou lorsqu‘il n‘y a pas de connexion Wifi. • Réglez la minuterie de gestion de l‘énergie (5/15/30 minutes) pour que l‘appareil passe automatiquement en mode veille lorsque vous ne l‘utilisez pas.
  • Seite 157 „Repeat all“ (répétition de tous les titres), „Repeat one“ (répétition d‘un titre) ou „Shuffle“ (lecture aléatoire). Paramètres DLNA • Le nom d‘appareil par défaut pour DLNA est : iTuner 320 ME. • Le nom de l‘appareil peut être modifié sur le PC ou le smartphone dans les paramètres DLNA.
  • Seite 158 Egaliseur • Le mode d‘égalisation par défaut est „Normal“. • Vous pouvez choisir entre „Normal“, „Flat“, „Jazz“, „Rock“, „Soundtrack“, „Classical“, „Pop“ ou „News“. • Appuyez sur EQ de la télécommande pour basculer entre les modes. Reprise de la lecture au démarrage •...
  • Seite 159: My Mediau

    Paramètres FM Sélectionnez MONO ou STEREO pour la lecture radio. MY MEDIAU Affichez et lisez votre liste de stations mediaU sur le serveur mediaU. Créez d‘abord votre compte (voir la section Personnalisation de My mediaU). RADIO INTERNET Une fois la connexion à une station établie, le débit binaire et le format de la station s‘affichent à...
  • Seite 160 • Après avoir ouvert la liste des stations enregistrées, sélectionnez une station et appuyez sur OK pour démarrer la lecture. • Lorsque vous avez marqué une station, vous pouvez accéder au sous- menu en appuyant sur la touche . Là, vous pouvez supprimer une station (de la liste des favoris), vous pouvez faire défiler la liste vers le haut ou vers le bas, renommer (renommer n‘importe quelle station de radio), écouter la station ou utiliser la station comme sonnerie d‘alarme...
  • Seite 161 • Si vous sélectionnez „Recherche automatique“, chaque station du sous-menu sera lue pendant 30 secondes jusqu‘à ce que toutes les stations aient été lues ou jusqu‘à ce que vous appuyiez sur OK pour l‘interrompre. • Appuyez sur Info pour afficher les informations de station respectives. Historique •...
  • Seite 162: Media Center

    MEDIA CENTER UPnP • Si vous avez configuré des „médias partagés“, vous pouvez les afficher par UPnP. • Si plusieurs périphériques de partage multimédia sont disponibles, la liste s‘affiche. • Sélectionnez le support à partir duquel vous souhaitez écouter de la musique sur l‘appareil.
  • Seite 163: Centre D'informations

    CENTRE D‘INFORMATIONS Informations météo • Les informations météorologiques et les prévisions météo sont disponibles pour 2000 villes. • Sélectionnez le pays et la ville pour obtenir des informations météo précises. • Les informations météo peuvent également être affichées en mode veille.
  • Seite 164 Informations sur l‘appareil • La version actuelle du système et les détails de la connexion réseau s‘affichent. • Les informations incluent l‘adresse MAC requise pour l‘enregistrement auprès de mon médiaU. Lecture en USB • Après avoir sélectionné „Lecture USB“, insérez la clé USB dans le port USB à...
  • Seite 165: Radio Fm

    RADIO FM • La radio analogique à large bande est reçue en mode radio FM. • Appuyez sur les touches de l‘appareil ou de la télécommande pour lancer la recherche de station FM. • L‘affichage des fréquences augmente pendant la recherche. •...
  • Seite 166: Connexion Bt

    Recherche de stations DAB • Appuyez sur la touche de l‘appareil ou sur SCAN sur la télécommande pour lancer la recherche de station. La progression de la recherche est indiquée par une barre sur l‘écran. • Dès que la recherche de station est terminée, la radio sélectionne la première station alphanumérique trouvée et démarre la lecture.
  • Seite 167: Contrôle À Distance Avec Airmusic

    CONTRÔLE À DISTANCE AVEC AIRMUSIC Vous pouvez rechercher des applications gratuites ou payantes sur Google Play ou Apple Store à l‘aide d‘un smartphone, d‘une tablette, d‘un iPhone ou d‘un iPad. Nous vous recommandons AirMusic. Avec l‘application AirMusic Control, vous pouvez contrôler la radio avec votre smartphone à...
  • Seite 168: Spotify Connect

    SPOTIFY CONNECT Votre nouvel appareil a Spotify Connect Utilisez votre téléphone, votre tablette ou votre ordinateur comme une télécommande pour contrôler Spotify. Accédez à spotify.com/connect pour en savoir plus. Licences Le logiciel Spotify est soumis aux droits d’utilisation de tiers, consultables à la page suivante : https://www.spotify.com/connect/third-party-licenses Toutes les marques citées sont des marques de leurs sociétés respectives.
  • Seite 169: Conseils Pour Le Recyclage

    CONSEILS POUR LE RECYCLAGE Le pictogramme ci-contre apposé sur le produit signifie que la directive européenne 2012/19/UE s‘applique (poubelle à roues barrée d’une croix). Ces produits ne peuvent être jetés dans les poubelles domestiques courantes. Renseignez-vous concernant les règles appliquées pour la collecte d’appareils électriques et électroniques.
  • Seite 171 Gentile cliente, La ringraziamo per aver acquistato il dispositivo. La preghiamo di leggere attentamente le seguenti istruzioni per l’uso e di seguirle per evitare possibili danni tecnici. Non ci assumiamo alcuna responsabilità per danni scaturiti da una mancata osservazione delle avvertenze di sicurezza e da un uso improprio del dispositivo.
  • Seite 172: Dati Tecnici

    DATI TECNICI Numero articolo 10035110 Alimentazione 220-240 V ~ 50/60 Hz VOLUME DI CONSEGNA Dispositivo principale Adattatore Antenna Wi-Fi Antenna DAB/FM Telecomando Manuale d’uso...
  • Seite 173: Avvertenze Di Sicurezza

    AVVERTENZE DI SICUREZZA Avvertenze generali • Colpo di fulmine – Se il dispositivo non viene utilizzato o c’è un temporale, staccare la spina dalla presa di corrente e scollegare il dispositivo dalla connessione dell’antenna. In questo modo si evitano danni al dispositivo dovuti a colpi di fulmine o sovratensione. •...
  • Seite 174: Descrizione Del Dispositivo E Tasti

    Avvertenze particolari • Questo dispositivo può essere utilizzato da bambini a partire da 8 anni e da persone con limitate capacità fisiche e psichiche o con conoscenza ed esperienza limitate, solo se sono stati istruiti sulle modalità d’uso e comprendono i rischi e i pericoli connessi. •...
  • Seite 175 Lato posteriore Connessione DC-IN Uscita audio ottica digitale Uscita audio coassiale Antenna Wi-Fi digitale Connessione audio analgica Ingresso LAN Ingresso audio analogico Connessione antenna Uscita audio analogica Supporto antenna...
  • Seite 176: Simboli Sullo Schermo

    SIMBOLI SULLO SCHERMO La connessione viene stabilita, il dispositivo funziona. Nessuna connessione alla rete senza fili. Connessione senza fili stabilita. Ricezione VHF: mono Ricezione radio VHF: stereo Selezione della funzione radio VHF Selezione della funzione AUX Altoparlante spento Ricerca Sveglia accesa Emittente radio web salvate nei preferiti Emittente FM salvata...
  • Seite 177: Funzioni Del Telcomando

    FUNZIONI DEL TELCOMANDO Standby Muto Menu principale Emittente salvata, preferiti, ecc. Ricerca DAB/FM Emittente locale Mediacenter, titolo precedente Mediacenter, riprodurre/mettere in pausa Mediacenter, titolo successivo 10 Sveglia Selezione modalità 12 Impostazioni di equalizzazione 13 Verso l’alto 14 Verso sinistra 15 Confermare 16 Verso destra 17 Verso il basso 18 Abbassare il...
  • Seite 178: Collegamento Audio Analogico

    COLLEGAMENTO AUDIO ANALOGICO Cavo RCA Collegare il cavo RCA (non incluso in consegna) con soundbar, TV o altoparlante. Cavo AUX Collegare un cavo AUX-OUT da 3,5 mm (non incluso in consegna) con soundbar, altoparlante o mini altoparlante.
  • Seite 179: Collegamento Audio Digitale

    COLLEGAMENTO AUDIO DIGITALE Cavo ottico Collegare un cavo ottico (non incluso in consegna) con soundbar, TV o altoparlante. Cavo coassiale Collegare un cavo coassiale (non incluso in consegna) con l’ingresso coassiale di amplificatori esterni con decoder integrato.
  • Seite 180: Installazione

    INSTALLAZIONE Inserire le batterie nel telecomando • Rimuovere la pellicola di plastica dal vano delle batterie. • Estrarre il vano con il pollice. • Inserire due batterie AAA da 3 V nel vano, facendo attenzione che il lato positivo sia rivolto verso l’alto.
  • Seite 181: Messa In Funzione E Utilizzo

    MESSA IN FUNZIONE E UTILIZZO Requisiti di rete • Connessione a banda larga in combinazione con un punto di accesso, router o dispositivi di rete similari connesso con un cavo/senza filo. • Il dispositivo di rete deve supportare la connessione Wi-Fi (802.11b/g/n). •...
  • Seite 182 • Selezionare “Yes” (sì) per stabilire una connessione alla rete. • Selezionare “Yes (WPS)” se avete un router WPS. Premere il tasto WPS sul router. • Se si seleziona “Yes” (sì), il dispositivo cerca reti Wi-Fi disponibili e le elenca sullo schermo. •...
  • Seite 183 Opzione 2: inserimento della password con il telecomando Inserire la password con i numeri e le lettere sul telecomando. Il, cursore indica il campo di inserimento attuale. Premere più volte i tasti numerici, per accedere ai seguenti caratteri: Cancellare l’inserimento (Spazio) @ ! ”...
  • Seite 184 Non appena è stata stabilita la connessione, compare il menu principale con i sottomenu più importanti: • Web radio: accesso a emittenti radio in tutto il mondo. • Mediacenter: accesso ai vostri dispositivo UPnP tramite software con capacità di streaming. •...
  • Seite 185: Informazioni Sullo Streaming Musicale

    INFORMAZIONI SULLO STREAMING MUSICALE • Il nome predefinito è iTuner 320 ME. È possibile rinominare a piacere il dispositivo. • Le seguenti informazioni sono un’introduzione per realizzare lo streaming musicale da computer e altri supporti. • Tenere presenti i relativi manuali d’uso delle app utilizzate per lo streaming.
  • Seite 186: Funzione Dlna

    Consentire al condivisione di file con il dispositivo. Aggiungere alla raccolta i file audio e le cartelle da condividere con il dispositivo. Lo streaming musicale è possibile anche da altri server, come ad es. lo smartphone (Android): • Collegare lo smartphone con la rete. •...
  • Seite 187 Condividere i file sul PC con il dispositivo: Pannello di controllo>Network e Internet (Rete e Internet)>Network and Sharing Center (Rete e Centro condivisioni)>Media Streaming Options (Opzioni di streaming per file). Aprire Windows Media Player per attivare il controllo tramite altri dispositivi.
  • Seite 188 Cliccare con il tasto destro del mouse sul titolo desiderato della raccolta e selezionare la riproduzione dal dispositivo. Una finestra di controllo per la riproduzione compare sul dispositivo.
  • Seite 189 È possibile cercare app DLNA gratuite o a pagamento su Google Play o Apple Store se si utilizza uno smartphone, tablet, iPhone o iPad. Si consiglia l’utilizzo di Bubble UPnP. È possibile che alcune app non supportino lo streaming da iPhone e iPad. iPhone e iPad possono però...
  • Seite 190: Menu Principale

    MENU PRINCIPALE Nel menu principale è possibile selezionare le seguenti modalità: My mediaU, radio DAB, radio FM, AUX in, riproduzione USB, Spotify, web radio, emittenti locali, impostazioni, centro informazioni e mediacenter. IMPOSTAZIONI Raccolta My mediaU – Gestire le emittenti radio tramite Internet Per avere sempre accesso alle emittenti globali che preferite, se avete a disposizione un dispositivo mobile adatto allo streaming, potete creare un account gratuito su www.mediaU.com e aggiungerci tutti i dispositivi che...
  • Seite 191 È necessario anche conoscere l’indirizzo MAC del dispositivo (chiamato numero di serie su MediaU) per poterlo registrare presso “Personalize Your Internet Radio”. È possibile accedervi seguendo Information Center > System information > Wireless Info > MAC Address. Dopo la registrazione, questa funzione deve essere attivata presso Information Center >...
  • Seite 192 • Aggiungere manualmente • In base alle impostazioni My mediaU personali, l’aspetto dello schermo può variare. • Se il dispositivo non è stato ancora registrato su MediaU, compare un messaggio a riguardo, che chiede se si desidera attivare My mediaU. •...
  • Seite 193 Se, ad es., si desidera raggiungere manualmente un podcast, è necessario conoscere il relativo URL. Procedere in questo modo: Compilare i campi indicati nell’account MediaU presso “Add Manually” (aggiungere manualmente). 2. In stream, andare su Configuration > Manage my mediaU e attivare di nuovo premendo OK.
  • Seite 194 Configurazione manuale: È possibile selezionare DHPC (l’indirizzo IP viene affidato automaticamente) o inserire manualmente l’indirizzo IP per la connessione alla rete senza fili. Se si seleziona l’impostazione manuale per la connessione a cavo, è necessario inserire i seguenti dati: • SSID (nome del punto di accesso) •...
  • Seite 195 • Il passaggio da ora solare a ora legale deve essere realizzato manualmente. • Si può scegliere tra formato a 12 o 24 ore. • La data può essere impostata in tre formati: YY/MM/DD, DD/MM/YY o MM/DD/TT (Y= anno, M=mese, D=giorno). •...
  • Seite 196 • Le prime due sveglie sono simile alla sveglia normale. Accendere il dispositivo, impostare l’ora attuale e impostare la frequenza con cui deve suonare la sveglia. È possibile scegliere tra “ogni giorno”, “una volta” e “in certi giorni della settimana”. •...
  • Seite 197 Lingua Selezionare la lingua desiderata: inglese/tedesco/francese/ungherese/ ceco/slovacco/polacco/turco. Regolare l’illuminazione di fondo (dimmer) • È possibile regolare l’intensità dell’illuminazione di fondo. • Selezionare “Power Saving” per regolare l’illuminazione di fondo in modalità standby e selezionare “Turn on” per attivarla. • È possibile impostare quanto a lungo rimane illuminato lo schermo della radio in caso di non utilizzo.
  • Seite 198 Gestione energetica • È possibile impostare il passaggio automatico in standby quando il dispositivo è nel menu principale o se non c’è connessione Wi-Fi. • Impostare il timer della gestione energetica (5/15/30 minuti), in modo che il dispositivo passi in standby automaticamente se non viene utilizzato.
  • Seite 199 “Repeat all” (ripetizione di tutti i titoli), “Repeat one” (ripetere un titolo) o “Shuffle” (riproduzione casuale). Impostazione DLNA • Il nome predefinito del dispositivo per DLNA è: iTuner 320 ME. • Il nome del dispositivo può essere modificato nelle impostazioni DLNA di PC o smartphone.
  • Seite 200 Equalizzatore • La modalità di equalizzazione predefinita è “Normal”. • È possibile scegliere tra: “Normal”, “Flat”, “Jazz”, “Rock”, “Soundtrack”, “Classical”, “Pop”o “News”. • Premere EQ sul telecomando per passare tra le diverse modalità. Riprendere la riproduzione quando si riaccende il dispositivo •...
  • Seite 201: My Mediau

    Impostazione FM Selezionare MONO o STEREO per la riproduzione della radio. MY MEDIAU Visualizzare e riprodurre la lista di emittenti mediaU sul server mediaU. Per prima cosa, creare un account (v. paragrafo sull’impostazione di My mediaU). WEB RADIO Dopo aver stabilito con successo il collegamento con un’emittente, vengono mostrati sullo schermo la velocità...
  • Seite 202 • Quando è stato aperto l’elenco di emittenti salvate, selezionarne una e premere OK per iniziare l’ascolto. • Se si seleziona un’emittente, premendo si accede al sottomenu. Qui è possibile cancellare un’emittente (rimuoverla dall’elenco dei preferiti), scorrere l’elenco verso l’alto o verso il basso, rinominare (cambiare nome a un’emittente radio) o utilizzare l’emittente come sveglia (se si seleziona “Internetradio”...
  • Seite 203: Emittenti Locali

    • Se si seleziona “Auto Scan”, viene riprodotta per 30 secondi ogni emittente del sottomenu, fino a quando tutte le emittenti sono state selezionate o si preme OK per interrompere. • Premere Info per visualizzare le informazioni dell’emittente in questione. Cronologia •...
  • Seite 204: Media Center

    MEDIA CENTER UPnP • Se sono stati impostati “file condivisi”, è possibile visualizzarli tramite UPnP. • Se sono disponibili diversi dispositivo per la condivisione di file, vengono elencate le alternative. • Selezionare il supporto da cui accedere alla musica da riprodurre tramite il dispositivo.
  • Seite 205: Centro Informazioni

    CENTRO INFORMAZIONI Informazioni meteo • Sono disponibili informazioni e previsioni meteo per 2000 città. • Selezionare Paese e città per ottenere informazioni meteo precise. • Le informazioni meteo possono essere mostrate anche in standby. • Premere sulla schermata delle informazioni meteo. Compare “Add to Standby”.
  • Seite 206 Informazioni sul dispositivo • Indicano la versione attuale del software e i dettagli sulla connessione alla rete. • Le informazioni contengono indirizzo MAC, che è necessario per la registrazione su my mediaU. Riproduzione USB • Dopo aver selezionato “USB-Playback”, inserire un supporto USB nell’apposita connessione sul lato anteriore del dispositivo.
  • Seite 207: Radio Fm

    RADIO FM • In modalità radio FM viene ricevuta la radio analogica a banda larga. • Premere su dispositivo o telecomando per iniziare la ricerca di emittenti FM. • L’indicazione della frequenza si muove verso l’alto durante la ricerca. • Non appena viene ricevuta un’emittente, la ricerca si ferma.
  • Seite 208: Connessione Bt

    Ricerca emittenti DAB • Premere sul dispositivo o SCAN sul telecomando per avviare la ricerca. Il progresso della ricerca viene indicato da una barra sullo schermo. • Quando la ricerca è conclusa, la radio seleziona la prima emittente alfanumerica trovata e inizia la riproduzione. Aprire emittenti salvate •...
  • Seite 209: Controllo A Distanza Tramite Airmusic

    CONTROLLO A DISTANZA TRAMITE AIRMUSIC Se si desidera utilizzare uno smartphone, un tablet, un iPhone o un iPad, è possibile cercare su Google Play o Apple Store app gratuite o a pagamento. Consigliamo di utilizzare AirMusic. Con la app di controllo AirMusic è possibile gestire il dispositivo dallo smartphone.
  • Seite 210: Spotify Connect

    SPOTIFY CONNECT Il vostro nuovo dispositivo è dotato di Spotify Connect Usa il tuo cellulare, tablet o computer come telecomando remoto per Spotify. Vai su spotify.com/connect per scoprire come. Licenze Il software Spotify è sottoposto a diritti utente di parti terze, consultabili alla pagina web seguente: https://www.spotify.com/connect/third-party-licenses Tutti i marchi indicati sono marchi registrati delle relative aziende.
  • Seite 211: Smaltimento

    SMALTIMENTO Se sul prodotto è presente la figura a sinistra (il cassonetto dei rifiuti mobile sbarrato), si applica la direttiva europea 2012/19/UE. Questi prodotti non possono essere smaltiti con i rifiuti normali. Informarsi sulle disposizioni vigenti in merito alla raccolta separata di dispositivi elettrici ed elettronici. Non smaltire i vecchi dispositivi con i rifiuti domestici.

Diese Anleitung auch für:

10035110

Inhaltsverzeichnis