Herunterladen Inhalt Inhalt Diese Seite drucken
Inhaltsverzeichnis

Werbung

Verfügbare Sprachen

Verfügbare Sprachen

Schnurlostelefon
Téléphone sans fil
CD7702
Telefono senza fili
Cordless telephone
Bedienungsanleitung
Mode d'emploi
Istruzioni per l'uso
Operating Instructions

Werbung

Inhaltsverzeichnis
loading

Inhaltszusammenfassung für switel CD7702

  • Seite 1 Schnurlostelefon Téléphone sans fil CD7702 Telefono senza fili Cordless telephone Bedienungsanleitung Mode d’emploi Istruzioni per l’uso Operating Instructions...
  • Seite 2 CD7702 Bedienungsanleitung ..... Mode d’emploi ......
  • Seite 3: Inhaltsverzeichnis

    − Inhaltsverzeichnis − Allgemeine Hinweise ..........Bestimmungsgemäße Verwendung .
  • Seite 4 − Inhaltsverzeichnis − Lesen und beantworten ............Nachrichtenton Ein/Aus .
  • Seite 5: Allgemeine Hinweise

    Gerätefüße Spuren auf der Abstellfläche entstehen. Netzteil Verwenden Sie nur das mitgelieferte SWITEL Steckernetzteil, da andere Netzteile das Telefon zerstören können. Es besteht Lebensgefahr, wenn das Netzteil geöffnet und nicht vom Stromnetz getrennt wird.
  • Seite 6: Leistungsmerkmale

    − Leistungsmerkmale − Leistungsmerkmale Telefon Digitaler DECT/GAP Standard Bis zu 10 Stunden Dauergespräch − bis zu 85 Stunden Stand−by SMS senden und empfangen Sprachverschlüsselung für hohe Sicherheit Tonwahlverfahren (MFV) Hervorragende Darstellung durch beleuchtetes Display Einfache Bedienung durch grafische Menüführung Rufnummernanzeige im Display (CLIP) Anruferliste mit 50 Speicherplätzen für erhaltene/entgangene Anrufe Wahlwiederholung der letzten 20 Rufnummern Telefonbuch mit 150 Speicherplätzen inklusive Namen...
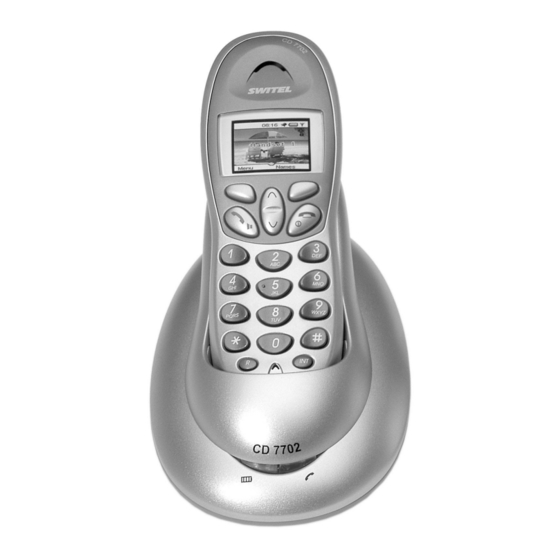
  • Seite 7: Bedienelemente

    − Bedienelemente − Bedienelemente Mobilteil 1. Grafisches Farb−Display 2. Gewählte Nummer / Lautstärke + / Menü−Navigation aufwärts 3. Telefonbuch 4. Gespräch beenden / Ein / Aus 5. Entgangene Anrufe / Lautstärke − / Menü−Navigation abwärts 6. Tastensperre 7. Intern− und Konferenzgespräche 8.
  • Seite 8: Inbetriebnahme

    − Inbetriebnahme − Inbetriebnahme Sicherheitshinweise Achtung: Lesen Sie vor der Inbetriebnahme unbedingt die allgemeinen Hinweise am Anfang dieser Bedienungsanleitung. Verpackungsinhalt prüfen Zum Lieferumfang gehören: eine Basisstation und eine Ladestation ein Telefonanschlusskabel zwei Mobilteile vier Standard−Akkus zwei Netzteile eine Bedienungsanleitung Basisstation anschließen Stellen Sie die Basisstation in der Nähe Ihrer Telefonanschlussdose und einer Netzsteckdose auf.
  • Seite 9: Bedienung

    − Bedienung − Bedienung Das Display Das Display zeigt Ihnen alle wichtigen Funktionen mit verschiedenen Symbolen an. Es ist mit einer automatischen Hintergrundbeleuchtung ausgestattet, die das Display bei jedem Tastendruck für ca. 30 Sekunden beleuchtet. Die Navigation mit den Tasten Alle Funktionen sind über ein sehr benutzerfreundliches, grafisches Menü...
  • Seite 10: Freisprechen

    − Bedienung − Freisprechen 1. Drücken Sie während eines Gesprächs erneut die Taste (. Jetzt hören Sie den Gesprächspartner über den Lautsprecher des Mobilteils. 2. Drücken Sie erneut die Taste (, um das Freisprechen zu beenden. Rufnummern aus dem Telefonbuch wählen Nachdem Sie einige Rufnummern im Telefonbuch gespeichert haben (siehe Rufnummer in das Telefonbuch eingeben"...
  • Seite 11: Nebenstellenanlagen / Zusatzdienste

    Sie bei dem Händler, bei dem die Anlage gekauft wurde. R−Taste und die Zusatzdienste der Swisscom Ihr SWITEL−Telefon unterstützt die wichtigsten Zusatzdienste der Swisscom (z. B. Makeln, Anklopfen, Dreier−Konferenz). Die Zusatzdienste arbeiten mit einer Flash−Zeit von 300 ms (Einstellung siehe Kapitel 14.4).
  • Seite 12: Menüstruktur

    − Menüstruktur − Menüstruktur Hier finden Sie die Menüstruktur Ihres Telefons. Im Ruhezustand öffnen Sie die Menüauswahl durch Drücken der Taste <. Aus Gründen der Übersichtlichkeit sind nicht immer alle Ebenen jedes Menüpunktes dargestellt. Nachricht schreiben Optionen Senden an Suchen Speichern Symbol einfügen Benutzername...
  • Seite 13 − Menüstruktur − Mobilteil Rufton Externe Anrufe Interne Anrufe Ruftonlautstärke Name Mobilteil Sprache Menüfarbe Auto. Gesprächsanna Zugangskode Basis− Einstellungen Rufton Basis Lautstärke Basis Vorrang Mobilteil Alle Mobilteile Mobilteil aus- wählen Mobilteil 1−5 Ruftöne 2 Ruftöne 4 Flashzeiten Ruftöne 6 System−PIN (Voreinstellung: 0000) Zeiteinstel- lung Wecker...
  • Seite 14: Das Telefonbuch

    − Das Telefonbuch − Das Telefonbuch Im Ruhezustand gelangen Sie durch Drücken der Taste > in das Menü des Telefonbuches. In das Telefonbuch können 150 Rufnummern mit dazugehörigen Namen gespeichert werden. Für die Eingabe eines Namens haben Sie 16 Zeichen zur Verfügung. Die maximale Länge einer Rufnummer beträgt 20 Zeichen. Rufnummer in das Telefonbuch eingeben 1.
  • Seite 15: Eintrag Aus Dem Telefonbuch Löschen

    − Das Telefonbuch − Hinweis: Hinweise zur Namenseingabe unter 8.1.1. 6. Drücken Sie die Taste <. Im Display wird die Nummer angezeigt. Bei Bedarf ändern Sie die Nummer oder fahren Sie fort mit Schritt 7. 7. Drücken Sie die Taste <. Die Änderung wird im Display bestätigt. 8.
  • Seite 16: Sms−Nachrichten

    Service Center Die Verteilung aller SMS−Nachrichten erfolgt über ein Service Center. Die Swisscom", cablecom" und weitere Telefonnetzbetreiber bieten diesen Service an. Ihr SWITEL Telefon ist für den Betrieb (Senden und Empfangen von SMS−Nachrichten) bei Swisscom" und cablecom" vorbereitet. Service Center der Swisscom"...
  • Seite 17: Gespeicherte Sms−Nachricht Versenden

    − SMS Nachrichten − 4. Wählen Sie mit der Taste - oder + im Display die Option Nachricht schreiben". 5. Drücken Sie die Taste <. Geben Sie nun den Text über das Zahlenfeld ein. Es sind bis zu 160 Zeichen möglich. Hinweis: Texteingabe siehe 8.1.1.
  • Seite 18: Nachrichtenton Einstellen (Morseton, Diskret, Polyphon)

    − SMS Nachrichten − Nachrichtenton einstellen (Morseton, Diskret, Polyphon) 1. Drücken Sie die Taste <. 2. Wählen Sie mit der Taste - oder + im Display den Menüpunkt SMS". 3. Drücken Sie die Taste <. 4. Wählen Sie mit der Taste - oder + im Display die Option Einstellungen". 5.
  • Seite 19: Postfach/Benutzer−Daten Anzeigen

    − SMS Nachrichten − 9.9.2 Postfach/Benutzer−Daten anzeigen Hinweis: Für die Konfiguration des Postfachbetriebes beim Netzbetreiber benötigen Sie die Postfach−ID (Durchwahlziffer). Das allgemeine Postfach hat die Postfach−ID 0". Bei der Anmeldung weiterer Benutzer wird automatisch die niedrigste freie Postfach−ID (1−4) vergeben. 1.
  • Seite 20: Anruferlisten

    − Anruferlisten − Anruferlisten 10.1 Rufnummernanzeige (Clip) Mit der Rufnummernanzeige können Sie bei eingehenden Gesprächen erkennen, wer Sie anruft. Wenn diese Funktion an Ihrer Telefonleitung zur Verfügung steht, zeigt Ihnen das Display bereits die Rufnummer des Anrufers, wenn das Telefon klingelt. Hat der Anrufer das Senden seiner Rufnummer gesperrt, kann die Rufnummer nicht angezeigt werden.
  • Seite 21: Entgangene Anrufe

    − Anruferlisten − 10.3 Entgangene Anrufe In der Liste Entgangene Anrufe" werden alle nicht entgegengenommene Anrufe gespeichert, sodass Sie auch während Ihrer Abwesenheit keinen Anruf verpassen. Sie haben drei Möglichkeiten, in die Anruferliste Entgangene Anrufe" zu gelangen: Drücken Sie die Taste -, oder wird im Display angezeigt, dass entgangene Anrufe gespeichert wurden, drücken Sie die Taste <, oder wie unter 10.3.1 beschrieben.
  • Seite 22: Eintrag Im Telefonbuch Speichern

    − Anruferlisten − 10.4.3 Eintrag im Telefonbuch speichern Eine in der Anruferliste Gewählte Nummern" gespeicherte Rufnummer kann direkt im Telefonbuch gespeichert werden. 1. Drücken Sie die Taste +. Im Display werden die gewählten Nummern angezeigt. 2. Wählen Sie mit der Taste - oder + im Display die gewünschte Nummer aus. 3.
  • Seite 23: Mobilteil

    − Mobilteil − Mobilteil An Ihrem Mobilteil können Sie nach Ihren Wünschen, verschiedene Einstellungen vornehmen. 11.1 Ruftonmelodie zuweisen (interne und externe Anrufe) Sie können internen und externen Anrufen unterschiedliche Ruftonmelodien zuweisen. Die Einstellung ist am Beispiel für externe Anrufe beschrieben. 1.
  • Seite 24: Automatische Gespächsannahme Aktivieren

    − Mobilteil − 11.6 Automatische Gespächsannahme aktivieren Wenn Sie diese Funktion eingestellt haben, können Sie einen Anruf einfach durch Entnahme des Mobilteils aus der Basisstation entgegennehmen. Sie müssen dann nicht extra die Gesprächstaste ( drücken. 1. Drücken Sie die Taste <. 2.
  • Seite 25: Mobilteile An− Und Abmelden

    − Mobilteile an− und abmelden − Mobilteile an− und abmelden 12.1 Mobilteil anmelden 1. Drücken Sie die Taste <. 2. Wählen Sie mit der Taste - oder + im Display den Menüpunkt Anmeldung". 3. Drücken Sie die Taste <. 4. Wählen Sie mit der Taste - oder + im Display die Option Mobilteil anmelden". 5.
  • Seite 26: Mehrere Mobilteile

    Melden Sie Ihr Mobilteil an einer neuen Basis an, wird es automatisch an der alten abgemeldet. Hinweis: Über den international genormten GAP Standard können SWITEL−Mobilteile und auch Mobilteile von Fremdherstellern in das Telefonsystem integriert werden. Genauso können Sie ein SWITEL Mobilteil an Basisstationen anderer Hersteller anmelden, sofern diese Geräte nach dem GAP Standard...
  • Seite 27: Basis−Einstellungen

    − Basis−Einstellungen − Basis−Einstellungen Unter diesem Menüpunkt sind Einstellungen beschrieben, die die Basisstation betreffen, wie z. B. Ruftonmelodie, Ruftonlautstärke und System−PIN. 14.1 Ruftonmelodie der Basisstation zuweisen 1. Drücken Sie die Taste <. 2. Wählen Sie mit der Taste - oder + im Display den Menüpunkt Basis−Einstellungen". 3.
  • Seite 28: System−Pin Ändern

    − Basis−Einstellungen − 5. Drücken Sie die Taste <. Im Display erscheinen zwei Flashzeiten zur Auswahl. 6. Wählen Sie mit der Taste - oder + die Flashzeit Flash 1" (100 ms ) oder Flash 2" (300 ms). 7. Drücken Sie die Taste <. Die Zuweisung wird im Display bestätigt. 8.
  • Seite 29: Zeiteinstellung

    − Zeiteinstellung − Zeiteinstellung Sie verpassen keinen Termin durch die 24−Stunden−Uhr mit integrierter Weck−/Alarmfunktion. 15.1 Zeit und Datum einstellen 1. Drücken Sie die Taste <. 2. Wählen Sie mit der Taste - oder + im Display den Menüpunkt Zeiteinstellung". 3. Drücken Sie die Taste <. 4.
  • Seite 30: Fehlerbeseitigung

    − Fehlerbeseitigung − Fehlerbeseitigung Haben Sie Probleme mit Ihrem Telefon, kontrollieren Sie bitte zuerst die folgenden Hinweise. Bei Garantieansprüchen wenden Sie sich bitte an Ihren Fachhändler. Die Garantiezeit beträgt 2 Jahre. Fehler Lösungen Das Display zeigt nichts an − Mobilteil ist nicht eingeschaltet. −...
  • Seite 31: Wichtige Informationen

    Sollte Ihr Gerät dennoch einen Defekt innerhalb der Garantiezeit aufweisen, wenden Sie sich bitte unter Vorlage Ihrer Kaufquittung ausschließlich an das Geschäft, in dem Sie Ihr SWITEL − Gerät gekauft haben. Alle Gewährleistungsansprüche nach diesen Bestimmungen sind ausschließlich gegenüber Ihrem Fachhändler geltend zu machen.
  • Seite 33 − Table des matières − Généralités ............Utilisation conforme aux prescriptions .
  • Seite 34 − Table des matières − Lire et répondre ............. . . Activer/désactiver la sonnerie du message .
  • Seite 35: Généralités

    être fournie. Restitution des anciens appareils Si vous souhaitez jeter votre appareil SWITEL, veuillez l’apporter à votre déchetterie communale (p. ex. centre de recyclage). Le symbole ci−contre sur votre téléphone signifie que votre appareil ne doit pas être jeté...
  • Seite 36: Température Et Conditions D'environnement

    − Généralités − 1.10 Température et conditions d’environnement Le téléphone est conçu pour fonctionner dans des pièces abritées d’une température de 10°C à 30 °C. La base ne doit pas être placée dans des pièces humides comme la salle de bains ou la buanderie. Evitez le contact avec des sources de chaleur comme les radiateurs et n’exposez pas l’appareil à...
  • Seite 37: Caractéristiques

    − Caractéristiques − Caractéristiques Téléphone DECT/GAP numérique standard Jusqu’à 10 heures de communication − jusqu’à 85 heures en mode veille Envoyer et recevoir un SMS Codage de la parole pour une grande sécurité Numérotation à fréquence vocale (MFV) Excellent affichage par écran lumineux Simplicité...
  • Seite 38: Eléments De Manipulation

    − Eléments de manipulation − Eléments de manipulation Combiné 1. Affichage graphique en couleur 2. Numéro composé / volume + / navigation dans le menu vers le haut 3. Répertoire (annuaire) 4. Terminer la communication / marche / arrêt 5. Appels manqués/ volume − / navigation dans le menu vers le bas 6.
  • Seite 39: Mise En Service

    − Mise en service − Mise en service Remarques concernant la sécurité Attention : Avant la mise en service, vous devez lire les généralités se trouvant au début de ce mode d’emploi. Contrôle du contenu du paquet Les éléments suivants font partie de la livraison : une base et une station de chargement un câble de raccordement téléphonique deux combinés...
  • Seite 40: Manipulation

    − Manipulation − Manipulation L’écran L’écran vous indique toutes les fonctions essentielles avec des symboles différents. Il est équipé d’un rétro−éclairage automatique qui éclaire l’écran pendant environ 30 secondes à chaque actionnement d’une touche. La navigation avec les touches Vous avez accès à toutes les fonctions par l’intermédiaire d’un menu graphique très facile à utiliser. Si vous tenez toujours compte des textes du menu de l’écran, vous naviguerez sûrement et intuitivement.
  • Seite 41: Composition Des Numéros D'appel Du Répertoire

    − Manipulation − Composition des numéros d’appel du répertoire Après que vous ayez enregistré vos numéros d’appel dans le répertoire (voir Saisie des numéros d’appel dans le répertoire", chapitre 8.1), ces derniers peuvent être consultés rapidement et facilement. 1. Appuyez sur la touche >. Les enregistrements du répertoire apparaissent à l’écran dans l’ordre alphabétique.
  • Seite 42: Installations À Postes / Services Supplémentaires

    Touche R de mise en attente et les services supplémentaires de la Swisscom Votre téléphone SWITEL soutient les services supplémentaires les plus importants de la Swisscom (par ex. le va−et−vient, la signalisation d’appel en instance, la conférence à trois). La Swisscom travaille avec un temps de flash de 300 ms (réglage : voir chapitre 14.4).
  • Seite 43: Structure Du Menu

    − Structure du menu − Structure du menu Vous trouverez ci−dessous la structure du menu de votre téléphone. En mode veille, ouvrez la sélection du menu avec la touche <. Pour plus de clarté, les niveaux de chacun des points du menu ne sont pas tous toujours représentés.
  • Seite 44 − Structure du menu − Combiné Sonnerie Appels externes Appels internes Volume de sonnerie Nom du combiné Choix langue Couleurs du menu Décroché automatique Code d’accès Configuration base Sonnerie base Volume base Priorité de sonnerie Tous les combinés Sélection combiné Combiné...
  • Seite 45: Le Répertoire

    − Le répertoire − Le répertoire En mode de veille, vous accédez au menu du répertoire par la touche >. Vous pouvez enregistrer 150 numéros d’appel, nom inclus, dans le répertoire. Pour la saisie d’un nom, vous avez 16 caractères à votre disposition. La longueur maximale d’un numéro d’appel est de 20 caractères.
  • Seite 46: Supprimer Un Enregistrement Du Répertoire

    − Le répertoire − 5. Appuyez sur la touche <. Le nom apparaît à l’écran. Modifiez au besoin le nom ou reportez vous à l’étape 6. Remarque: Remarques concernant la saisie du nom au chap. 8.1.1. 6. Appuyez sur la touche <. Le numéro s’affiche à l’écran. Modifiez au besoin le numéro ou reportez vous à...
  • Seite 47: Messages Sms

    Centre de service La distribution des messages SMS se fait par un centre de service. "Swisscom", "cablecom" et d’autres exploitants du réseau proposent ce service. Votre téléphone SWITEL possède déjà la fonction (envoi et réception de messages SMS) avec Swisscom" et cablecom".
  • Seite 48: Envoyer Un Message Sms Enregistré

    − Messages SMS − 2. Sélectionnez avec les touches - ou + le point du menu "SMS" à l’écran. 3. Appuyez sur la touche <. 4. Sélectionnez avec les touches - ou + l’option écrire message" à l’écran. 5. Appuyez sur la touche <. Saisissez maintenant le texte par l’intermédiaire du pavé numérique. 160 caractères max.
  • Seite 49: Régler La Sonnerie Du Message (Sonnerie Morse, Discrète, Polyphone)

    − Messages SMS − Régler la sonnerie du message (sonnerie morse, discrète, polyphone) 1. Appuyez sur la touche <. 2. Sélectionnez avec les touches - ou + le point du menu "SMS" à l’écran. 3. Appuyez sur la touche <. 4.
  • Seite 50: Afficher Les Données D'une Boîte/ D'un Utilisateur

    − Messages SMS − 9.9.2 Afficher les données d’une boîte/ d’un utilisateur Remarque: Pour la configuration du fonctionnement de la boîte auprès de l’exploitant du réseau, vous nécessitez un numéro ID (chiffre de numérotation). La boîte générale a le numéro ID 0". Lors de l’inscription d’autres utilisateurs, le plus petit numéro ID libre (1−4) est automatiquement attribué.
  • Seite 51: Journaux Des Appels

    − Journaux des appels − Journaux des appels 10.1 Affichage du numéro d’appel (CLIP) L’affichage du numéro d’appel vous permet de savoir qui vous appelle à l’arrivée d’une communication. Si cette fonction est à votre disposition dans votre ligne téléphonique, l’écran vous indique le numéro du correspondant dès que le téléphone sonne.
  • Seite 52: Appels Manqués

    − Journaux des appels − 10.3 Appels manqués Le journal appels manqués" enregistre tous les appels qui n’ont pas été acceptés pour que vous ne ratiez aucun appel en votre absence. Vous avez 3 possibilités pour accéder au journal des "appels manqués" : Appuyez sur la touche - ou, si l’écran affiche que l’appel a été...
  • Seite 53: Supprimer Un Journal Des Appels

    − Journaux des appels − 5. Appuyez sur la touche <. Saisissez les noms par l’intermédiaire du pavé numérique. 6. Appuyez deux fois sur la touche <. La saisie est confirmée à l’écran. 7. En appuyant sur la touche > vous retournez à chaque fois au niveau supérieur du menu. Remarque: Dès que le numéro d’appel a été...
  • Seite 54: Combiné

    − Combiné − Combiné Vous pouvez effectuer au choix plusieurs paramétrages sur votre combiné. 11.1 Attribution d’une mélodie d’appel (appels internes et externes) Vous pouvez attribuer plusieurs mélodies d’appel selon si l’appel est interne ou externe. Le paramétrage décrit ici est valable aussi pour les appels externes.
  • Seite 55: Activer Le Code D'accès (Indicatif Réseau)

    − Combiné − 4. Sélectionnez avec les touches - ou + l’option mise en communication automatique". 5. Appuyez sur la touche <. 6. Sélectionnez avec les touches - ou + l’option activé". 7. Appuyez sur la touche <. L’attribution est confirmée à l’écran. 8.
  • Seite 56: Déclarer Et Retirer Des Combinés

    − Déclarer et retirer des combinés − Déclarer et retirer des combinés 12.1 Déclarer un combiné 1. Appuyez sur la touche <. 2. Sélectionnez avec les touches - ou + le point du menu "déclaration" à l’écran. 3. Appuyez sur la touche <. 4.
  • Seite 57: Plusieurs Combinés

    Par l’intermédiaire du GAP standard normé international, il est possible d’intégrer les combinés SWITEL ainsi que les combinés de fabricants autres dans le système téléphonique. De même, vous pouvez déclarer un combiné SWITEL sur des bases d’autres fabricants dans la mesure où ces appareils travaillent d’après le GAP standard.
  • Seite 58: Paramétrages De La Base

    − Paramétrages de la base − Paramétrages de la base A ce point du menu, vous trouverez la description des paramétrages concernant la base, comme p. ex. la mélodie d’appel, le volume de la sonnerie d’appel et le PIN du système. 14.1 Attribuer une mélodie d’appel à...
  • Seite 59 − Paramétrages de la base − 11. Appuyez sur la touche <. L’attribution est confirmée à l’écran. 12. En appuyant sur la touche > vous retournez à chaque fois au niveau supérieur du menu. Remarque: Si vous avez oublié le code PIN, vous pouvez l’obtenir de nouveau en appelant notre service en ligne.
  • Seite 60: Réglage De L'horloge

    − Réglage de l’horloge − Réglage de l’horloge Vous ne manquerez aucun de vos rendez−vous grâce à l’horloge 24h et sa fonction réveil/alarme intégrée. 15.1 Réglage de la date et de l’heure 1. Appuyez sur la touche <. 2. Sélectionnez avec les touches - ou + le point du menu réglage horloge". 3.
  • Seite 61: Elimination Des Perturbations

    − Elimination des perturbations − Elimination des perturbations Si vous avez des problèmes avec votre téléphone, contrôlez tout d’abord les indications suivantes sur votre appareil. En ce qui concerne le droit à la garantie, veuillez vous adresser à votre revendeur. La durée de la garantie est de 2 ans.
  • Seite 62: Informations Importantes

    17.2 Garantie Les appareils Switel sont fabriqués et testés selon les procédés de production les plus modernes. Les matériaux choisis et la haute technologie assurent un fonctionnement parfait et une longue durée de vie. La garantie ne rentre pas en jeu si l’exploitant du réseau téléphonique ou une installation à postes supplémentaires éventuellement insérée est responsable du disfonctionnement de l’appareil.
  • Seite 63 − Indice − Indicazioni generali ..........Utilizzo conforme alle disposizioni .
  • Seite 64: Indice

    − Indice − Leggere e rispondere ............Suono messaggi On/Off .
  • Seite 65: Indicazioni Generali

    Alimentatore di rete Utilizzare esclusivamente l’alimentatore a spina SWITEL fornito in dotazione visto che altri alimentatori di rete potrebbero addirittura danneggiare il telefono. Pericolo di vita in caso di apertura dell’alimentatore a spina senza precedente scollegamento dalla rete elettrica.
  • Seite 66: Temperatura E Ambiente Circostante

    − Indicazioni generali − 1.10 Temperatura e ambiente circostante Il telefono è stato progettato per l’uso in ambienti chiusi e protetti con una temperatura compresa tra 10 °C e 30 °C. Si consiglia di evitare l’uso della stazione base in ambienti esposti a umidità come bagno e locali di lavaggio.
  • Seite 67: Caratteristiche Funzionali

    − Caratteristiche funzionali − Caratteristiche funzionali Telefono Standard DECT/GAP digitale Fino a 10 ore di autonomia di conversazione − fino a 85 ore di stand−by Invio e ricezione di SMS Codifica della parola per elevata sicurezza Procedura di selezione a toni (MFV) Ottima visualizzazione grazie a display retroilluminato Semplice esercizio grazie a guida menu grafica Visualizzazione del numero di chiamata su display (CLIP)
  • Seite 68: Elementi Di Comando

    − Elementi di comando − Elementi di comando Unità portatile 1. Display grafico a colori 2. Numero selezionato / Volume + / Navigazione menu verso sopra 3. Rubrica telefonica 4. Concludere chiamata / On / Off 5. Chiamate mancate / Volume − / Navigazione menu verso sotto 6.
  • Seite 69: Messa In Funzione

    − Messa in funzione − Messa in funzione Indicazioni di sicurezza Attenzione: Leggere assolutamente prima della messa in funzione le indicazioni generali riportate all’inizio delle presenti istruzioni per l’uso. Verificare il contenuto della confezione La confezione contiene: una stazione base e un’unità portatile un cavo di collegamento telefonico due unità...
  • Seite 70: Esercizio

    − Esercizio − Esercizio Il display Sul display sono visualizzate tutte le funzioni più importanti con i rispettivi simboli. Il display dispone di una retroilluminazione automatica che si attiva ogni volta che si preme un tasto per una durata di ca. 30 secondi. Navigare con i tasti Tutte le funzioni sono accessibili attraverso un menu grafico di facile uso.
  • Seite 71: Funzione Vivavoce

    − Esercizio − Funzione vivavoce 1. Premere nuovamente il tasto ( durante lo svolgimento di una chiamata. A questo punto è possibile sentire il partner di chiamata attraverso l’altoparlante dell’unità portatile. 2. Premere nuovamente il tasto ( per disattivare la funzione di vivavoce. Selezionare numeri di chiamata nella rubrica telefonica Dopo aver memorizzato alcuni numeri di chiamata all’interno della rubrica telefonica (vedi Immettere numero di chiamata nella rubrica telefonica"...
  • Seite 72: Impianti Telefonici Interni / Servizi Addizionali

    Tasto R e i servizi addizionali della SWISSCOM Il telefono SWITEL supporta i più importanti servizi addizionali della SWISSCOM (per es. funzioni di chiamata in attesa, avviso di chiamata, conferenza a tre). I servizi addizionali della SWISSCOM operano con un tempo flash di 300 ms (per l’impostazione vedi capitolo 14.4).
  • Seite 73: Struttura Di Menu

    − Struttura di menu − Struttura di menu Qui è riportata la struttura di menu del presente telefono. In stato di riposo la selezione dei menu disponibili è realizzata premendo il tasto <. Per una maggiore facilità di visione generale, nei vari livelli non sono sempre visualizzate tutte le voce di menu.
  • Seite 74 − Struttura di menu − Imposta Por- Chiamate tatile Melodia esterne Chiamate interne Volume Nome Portatile Lingua Colore Menu Risposte Automatica Codice di Accesso Imposta Base Suoneria Volume Suoneria Priorità Portatile Tutti i Portatili Seleziona Porta- tile Portatile 1−5 Suoneria 2 Suoneria 4 Segnale flash Suoneria 6...
  • Seite 75: La Rubrica Telefonica

    − La rubrica telefonica − La rubrica telefonica Lo stato di riposo si raggiunge premendo il tasto > nel menu relativo alla rubrica telefonica. La rubrica telefonica consente di memorizzare 150 numeri di chiamata assieme al nome del rispettivo interlocutore. Per l’immissione di un nome sono disponibili 16 caratteri.
  • Seite 76: Cancellare Voce Dalla Rubrica Telefonica

    − La rubrica telefonica − 7. Premere il tasto <. La modifica è confermata sul display. 8. Premendo una volta il tasto > si ritorna alla rubrica telefonica per procedere all’immissione di altre voci. 9. Premendo il tasto > è possibile fare ritorno al livello di menu precedente. Cancellare voce dalla rubrica telefonica 1.
  • Seite 77: Messaggi Sms

    La distribuzione di tutti i messaggi SMS avviene attraverso un centro di assistenza. "Swisscom", "cablecom" così come anche altri gestori di rete telefonica offrono questo servizio. Il telefono SWITEL è predisposto per il funzionamento (invio e ricezione di messaggi SMS) nelle reti "Swisscom" e "cablecom".
  • Seite 78: Scrivere E Inviare

    − Messaggi SMS − Scrivere e inviare Avvertenza: L’invio di un messaggio SMS non è possibile da un impianto telefonico interno. Per procedere all’invio di un messaggio SMS è necessario disattivare il Codice di accesso" (vedi capitolo 11.7). 1. Premere il tasto <. 2.
  • Seite 79: Impostare Suono Messaggi (Suono Morse, Discreto, Polifonico)

    − Messaggi SMS − 7. Premere il tasto <. 8. Selezionare con il tasto - o + nel display in base alle proprie esigenze l’opzione On" oppure Off" 9. Premere il tasto <. 10. Premendo il tasto > è possibile fare ritorno al livello di menu precedente. Impostare suono messaggi (suono Morse, discreto, polifonico) 1.
  • Seite 80: Visualizzare Dati Di Casella Postale/Utente

    − Messaggi SMS − 11. Premere il tasto <. Immettere la password una seconda volta utilizzando i tasti numerici. 12. Premere il tasto <. La casella postale è stata creata. 13. Premendo il tasto > è possibile fare ritorno al livello di menu precedente. 9.9.2 Visualizzare dati di casella postale/utente Avvertenza:...
  • Seite 81: Elenchi Di Chiamate

    − Elenchi di chiamata − Elenchi di chiamate 10.1 Visualizzazione del numero di chiamata (CLIP) Grazie alla funzione di visualizzazione del numero di chiamata è possibile individuare il chiamante in caso di telefonata in arrivo. A condizione che la linea telefonica offra questa funzione, sul display LCD sarà visualizzato il numero del chiamante non appena il telefono squilla.
  • Seite 82: Chiamate Mancate

    − Elenchi di chiamata − 10.3 Chiamate mancate Nell’elenco Chiamate mancate" sono memorizzate tutte le chiamate mancate, funzione che consente di non perdere nessuna telefonata anche in caso di assenza. Sono tre le possibilità per accedere all’elenco Chiamate mancate": Premendo il tasto -, oppure il display indica che sono state memorizzate delle chiamate mancate, premendo il tasto <, oppure vedi quanto descritto in 10.3.1.
  • Seite 83: Memorizzare Voce Nella Rubrica Telefonica

    − Elenchi di chiamata − 10.4.3 Memorizzare voce nella rubrica telefonica L’apparecchio consente di memorizzare un numero di chiamata visualizzato nell’elenco "Numeri selezionati" direttamente nella rubrica telefonica. 1. Premere il tasto +. Sul display sono visualizzati i numeri selezionati. 2. Selezionare con il tasto - o + nel display il numero desiderato. 3.
  • Seite 84: Unità Portatile

    − Unità portatile − Unità portatile E’ possibile compiere impostazioni differenti all’unità portatile in base alle proprie preferenze. 11.1 Assegnare melodia di suoneria (chiamate interne ed esterne) E’ possibile assegnare melodie di suoneria differenti per chiamate interne ed esterne. La rispettiva impostazione è descritta all’esempio di chiamate esterne.
  • Seite 85: Attivare La Ricezione Automatica Chiamate

    − Unità portatile − 11.6 Attivare la ricezione automatica chiamate Avendo impostato questa funzione è possibile compiere la ricezione di una chiamata in arrivo estraendo semplicemente l’unità portatile dalla stazione base. In tal caso non è quindi necessario premere appositamente il tasto di chiamata (.
  • Seite 86: Selezione E Deselezione Dell'unità Portatile

    − Selezione e deselezione dell’unità portatile − Selezione e deselezione dell’unità portatile 12.1 Selezione unità portatile 1. Premere il tasto <. 2. Selezionare con il tasto - o + nel display la voce di menu Selezione". 3. Premere il tasto <. 4.
  • Seite 87: Maggior Numero Di Unità Portatili

    Lo standard internazionale GAP consente di integrare unità portatili SWITEL così come unità portatili di altri costruttori in un unico sistema telefonico. Allo stesso modo è possibile selezionare unità portatili SWITEL per stazioni base di altri costruttori, a condizione che gli apparecchi dispongano della funzione GAP standard.
  • Seite 88: Impostazioni Di Base

    − Impostazioni di base − Impostazioni di base In questa voce di menu sono descritte le impostazioni relative alla stazione base, come per es. melodia di suoneria, volume della suoneria chiamata e PIN di sistema. 14.1 Assegnare una melodia di suoneria alla stazione base 1.
  • Seite 89: Modificare Pin Di Sistema

    − Impostazioni di base − 14.5 Modificare PIN di sistema 1. Premere il tasto <. 2. Selezionare con il tasto - o + nel display la voce di menu Impostazioni di base". 3. Premere il tasto <. Sul display sono visualizzate opzioni differenti. 4.
  • Seite 90: Impostazione Orario

    − Impostazione orario − Impostazione orario Grazie all’orologio 24 ore con funzione sveglia e allarme integrato non si perderà più nessun appuntamento. 15.1 Impostare orario e data 1. Premere il tasto <. 2. Selezionare con il tasto - o + nel display la voce di menu Impostazione orario". 3.
  • Seite 91: Eliminazione Di Errori

    − Eliminazione di errori − Eliminazione di errori In presenza di problemi con il telefono, si prega di verificare innanzitutto quanto riportato nelle seguenti indicazioni. In caso di reclami entro il periodo di garanzia, rivolgersi al rivenditore autorizzato. Il periodo di garanzia riscopre 2 anni.
  • Seite 92: Informazioni Importanti

    17.2 Garanzia Gli apparecchi Switel sono costruiti e collaudati in osservanza dei processi di produzione più moderni. L’impiego di materiali selezionati e tecnologie altamente sviluppate garantiscono un perfetto funzionamento ed una lunga durata in vita. Non è possibile richiamarsi alla presente garanzia nel caso in cui la causa per il malfunzionamento dell’apparecchio risale al gestore della rete telefonica o ad un eventuale impianto telefonico interno interposto.
  • Seite 93 − Contents − General Information ..........Intended use .
  • Seite 94 − Contents − Reading and answering ............SMS alert signal on/off .
  • Seite 95: General Information

    PBXs. Disposing of old equipment To dispose of your SWITEL equipment, bring it to the local collection point provided by the public waste disposal authority (e.g. recycling center). The adjacent symbol on the telephone signifies that this equipment must not be disposed of in domestic waste.
  • Seite 96: Cleaning And Upkeep

    − General Information − 1.11 Cleaning and upkeep Clean the housing surfaces with a dry, soft, fluff−free cloth. Never use cleaning agents or aggressive solvents. Apart from occasionally cleaning the housing, no other upkeep is necessary. The rubber footpads on the base station are not resistant to all cleaning agents.
  • Seite 97: Features

    − Features − Features Telephone Digital DECT / GAP standard Up to 10 hours continuous conversation − up to 85 hours standby Send and receive SMS Voice scrambling for high level of security Tone dialling method (DTMF) Excellent display legibility through illuminated display Easy operation through graphical menu guidance Caller number display (CLIP function) Calls list with 50 memory segments for calls received/missed...
  • Seite 98: Operating Elements

    − Operating Elements − Operating Elements Handset 1. Graphical colour display 2. Dialled calls / Volume + / Menu navigation upwards 3. Phone book 4. End call / On / Off 5. Missed calls / Volume − / Menu navigation downwards 6.
  • Seite 99: Starting Up

    − Starting Up − Starting Up Safety notes Caution: It is essential to read the General Information at the beginning of this manual before starting Checking the package contents The package contains: one base station and one charging station a telephone connection cable two handsets four standard batteries two power adapter plugs with cable...
  • Seite 100: Operation

    − Operation − Operation Display The display indicates all the important functions by means of various icons. It is equipped with an automatic back−lighting feature which lights up the display for approx. 30 seconds when any button is pressed. Navigation using the buttons All the functions can be accessed by means of a user friendly, graphical menu.
  • Seite 101: Dialling Phone Numbers Stored In The Phone Book

    − Operation − Dialling phone numbers stored in the phone book After phone numbers have been stored in the phone book (refer to Entering phone numbers in the phone book , Chapter 8.1), they can be called quickly and easily. 1.
  • Seite 102: Private Branch Exchanges / Supplementary Services

    R button with supplementary services provided by Swisscom Your SWITEL telephone supports the most important supplementary services provided by Swisscom (e.g. brokering, call waiting, three−way conferencing, etc.). Supplementary services operate with a recall time of 300 ms (refer to Chapter 14.4 for settings).
  • Seite 103: Menu Structure

    − Menu Structure − Menu Structure This section describes the menu structure of your telephone. When in standby, open the menu selection by pressing the < button. For reasons of clarity, all the levels of each menu item are not always depicted. Write Message Options Send to...
  • Seite 104 − Menu Structure − Handset Ringtone External Calls Internal Calls Ring Volume Handset Name Language Menu Colour Auto Talk PABX Access Code Base settings Base Ringtone Base Volume Handset Priority All Handsets Select Handset Handset 1−5 Rings 2 Rings 4 Recall Mode Rings 6 System−PIN (default setting: 0000)
  • Seite 105: Phone Book

    − Phone Book − Phone Book When in standby, press the > button to open the phone book menu. The phone book can be used to store a maximum of 150 phone numbers together with the associated names. A name can have a maximum of 16 characters.
  • Seite 106: Deleting An Entry From The Phone Book

    − Phone Book − Deleting an entry from the phone book 1. Press the > button. The phone book opens in the display. 2. Use the - or + button to select the required entry in the display. NOTE: To select an entry directly, press the corresponding button to enter the first letter of the name required. To select the name Peter"...
  • Seite 107: Sms Text Messages

    The distribution of all text messages is performed by an SMS centre. The Swisscom", cablecom" and other telephone network providers offer this service. Your SWITEL telephone is set up for operation (sending and receiving text messages) via the Swisscom" and cablecom".
  • Seite 108: Sending Saved Sms Messages

    − SMS Text Messages − 3. Press the < button. 4. Use the - or + button to select the Write Message" option in the display. 5. Press the < button. Enter the text using the digit keys. A maximum of 160 characters are possible. NOTE: Refer to 8.1.1 to enter text.
  • Seite 109: Setting The Sms Alert Signal (Morse, Discreet, Polyphonic)

    − SMS Text Messages − Setting the SMS alert signal (Morse, Discreet, Polyphonic) 1. Press the < button. 2. Use the - or + button to select the SMS" option in the display. 3. Press the < button. 4. Use the - or + button to select the Settings" option in the display. 5.
  • Seite 110: Displaying Mailbox/User Data

    − SMS Text Messages − 9.9.2 Displaying mailbox/user data NOTE: In order to configure the mailbox operation with the telephone network provider, you need the mailbox ID (extension number). The general mailbox has the mailbox ID 0". When other users are registered, the lowest mailbox ID available is automatically assigned (1−4).
  • Seite 111: Calls Lists

    − Calls Lists − Calls Lists 10.1 Caller number display (CLIP function) The CLIP function enables you to view the number of a caller when a call is received. If this function is available with your telephone line, the number of the caller appears in the display when the phone rings. If the caller has deactivated the transfer of his phone number, the number is not displayed.
  • Seite 112: Missed Calls

    − Calls Lists − 10.3 Missed calls The Missed calls" list contains all the calls not taken so that you will not miss any calls even if your are absent. There are three ways to access the Missed calls" list: Press the - button or If the display indicates that missed calls have been saved, press the <...
  • Seite 113: Save Entry In The Phone Book

    − Calls Lists − 10.4.3 Save entry in the phone book A phone number stored in the Dialled calls" list can be transferred directly to the phone book. 1. Press the + button. The list of dialled numbers appears in the display. 2.
  • Seite 114: Handset

    − Handset − Handset Various settings can be defined on the handset according to individual needs. 11.1 Assigning a ringing melody (internal and external calls) Internal and external calls can be assigned different ringing melodies. The setting procedure is described according to the example of external calls.
  • Seite 115: Activating The Auto Talk Function

    − Handset − 11.6 Activating the Auto Talk function When the Auto Talk function has been activated, calls can be taken simply by removing the handset from the base station. The Call button ( need not be pressed in addition. 1.
  • Seite 116: Registering And Deregistering Handsets

    − Registering and Deregistering Handsets − Registering and Deregistering Handsets 12.1 Register handset 1. Press the < button. 2. Use the - or + button to select the Registration" option in the display. 3. Press the < button. 4. Use the - or + button to select the Register Handset" option in the display. 5.
  • Seite 117: Multiple Handsets

    The standardised GAP Standard enables SWITEL handsets and even those from other manufacturers to be integrated in the telephone system. In the same way, an SWITEL handset can be registered on base stations from other manufacturers as long as they comply with the GAP Standard.
  • Seite 118: Base Settings

    − Base Station Settings − Base Settings This menu option relates to base station settings which can be changed, such as ringing melody, ring volume and system PIN. 14.1 Assigning a ringing melody to the base station 1. Press the < button. 2.
  • Seite 119: Changing The System Pin

    − Base Station Settings − 14.5 Changing the system PIN 1. Press the < button. 2. Use the - or + button to select the Base settings" option in the display. 3. Press the < button. Several options appear in the display. 4.
  • Seite 120: Time Settings

    − Time Settings − Time Settings The 24−hour clock with integrated alarm function can be used to ensure you don’t miss any appointments. 15.1 Setting the time and date 1. Press the < button. 2. Use the - or + button to select the Time settings" option in the display. 3.
  • Seite 121: Troubleshooting

    − Troubleshooting − Troubleshooting Should problems arise with the telephone, refer to the following information. In the case of claims under the terms of guarantee, contact your sales outlet. There is a 2 year period of guarantee. Faults Corrective measures Nothing appears in the display −...
  • Seite 122: Important Information

    If your device shows signs of defect during the period of guarantee, please return it to the sales outlet in which you purchased the SWITEL device together with the purchase receipt. All rights to claims under the terms of guarantee in accordance with this agreement must be asserted exclusively with regard to your sales outlet. Two years after the purchase and transfer of our products, claims under the terms of guarantee can no longer be asserted.
  • Seite 124: Declaration Of Conformity

    TELGO AG Route d’Englisberg 17 CH−1763 Granges−Paccot Declare under our own responsibility that the product MODEL: CD7702 DESCRIPTION: Cordless digital DECT telephone Is in conformity with directives: R&TTE Directive (1999/5/EC) COMPLIANCE IS ACHIEVED BY CONFORMITY TO THE FOLLOWING: EN 301 406 EN 301 489−1/6...

Diese Anleitung auch für:

Cd 770

Inhaltsverzeichnis