Clearaudio TT5 Bedienungsanleitung
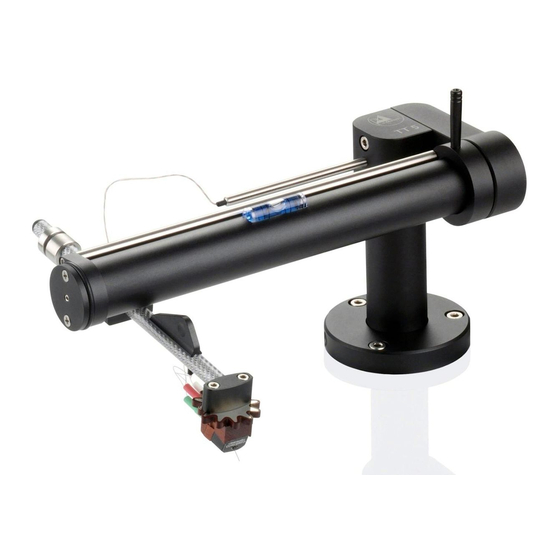
Tangential tonarm
Inhaltsverzeichnis
Verfügbare Sprachen
Verfügbare Sprachen
Quicklinks
TT5
Tangential tonearm / Tangential Tonarm
Spardorfer Str. 150 • D-91054 Erlangen • Tel. +49 9131 40300100 • FAX + 49 9131 40300119
clearaudio electronic
www.clearaudio.de • www.analogshop.de • info@clearaudio.de
©clearaudio electronic GmbH
User manual
Bedienungsanleitung
Made in Germany
®
GmbH
Version: 2.1_25.11.2016_E+D
Kapitel
Inhaltsverzeichnis

Verwandte Anleitungen für Clearaudio TT5


Inhaltszusammenfassung für Clearaudio TT5
- Seite 14 User manual / Bedienungsanleitung Sehr verehrte clearaudio - Kundin, sehr verehrter clearaudio - Kunde, wir gratulieren Ihnen! Sie haben sich für einen der besten Tonarme, den neuen clearaudio Tangential Tonarm entschieden. Ein erstklassiges, in aufwändiger Handarbeit gefertigtes Produkt der clearaudio electronic GmbH.
- Seite 15 User manual / Bedienungsanleitung Inhaltsverzeichnis 1. Lieferumfang 2. Befestigung des Klemmringes 17 - 18 3. Aufsetzen des Tonarms 4. Montage des Tonabnehmers Einstellungen 20 - 23 6. Besondere Hinweise 7. Technische Daten Garantiebedingungen © clearaudio electronic GmbH 2016 Seite / Page 15...
-
Seite 16: Lieferumfang
Tonarm angepassten Verpackung, die einen sicheren Transport garantiert. Bitte bewahren Sie diese Verpackung für den Fall eines Transports auf und kontrollieren Sie den Lieferumfang Ihres neu erworbenen clearaudio Tangential Tonarmes. Achten Sie vor der Entnahme des Tonarmes aus seiner Verpackung auf das empfindliche Signalkabel, dass Sie mit größtmöglicher Vorsicht behandeln sollten. -
Seite 17: Befestigung Des Klemmringes
User manual / Bedienungsanleitung 2. Befestigung des Aluminium-Klemmringes Sollte auf Ihrem clearaudio Laufwerk bereits ein Aluminium-Klemmring oder eine Rundbasis mit einem Lochdurchmesser von 24,85 mm montiert sein, bitte mit Punkt 3 fortfahren. Montage des Aluminium-Klemmringes auf einem clearaudio Laufwerk: Befestigen Sie den Aluminium-Klemmring auf der sauberen Oberfläche des Laufwerkchassis mit den drei mitgelieferten Innensechskantschrauben (M4 x 10) und dem passenden Inbusschlüssel... -
Seite 18: Montage Des Aluminium-Klemmringes Auf Einem Laufwerk Anderer Hersteller
In diesem Fall können Sie den Klemmring mit handelsüblichen Schrauben in der entsprechenden Länge und den dazu passenden Muttern befestigen (V2A-Inbus). Abb. 4: Montage des Klemmrings auf einem Laufwerk anderer Hersteller Seite / Page 18 © clearaudio electronic GmbH 2016... -
Seite 19: Aufsetzen Des Tt5 Tonarms
Beachten Sie dabei folgende Farbcodierung: Rot: rechter Kanal / R+ Grün: rechter Kanal / R- Weiß: linker Kanal / L+ Blau: linker Kanal / L- Abb. 6: Montage des Tonabnehmers Abb. 7: Montierter Tonabnehmer © clearaudio electronic GmbH 2016 Seite / Page 19... -
Seite 20: Tt5 Einstellungen
Der Tonabnehmer darf nur mit minimaler Kraft abgesenkt werden. Die Wahl des Gegengewichtes ist abhängig vom Eigengewicht des Tonabnehmers. Abb. 8: Montage des Gewichtes Benutzen Sie zum Festziehen der Gewichte den Inbusschlüssel (# 1,5). Abb. 9: Festziehen des Gewichtes Seite / Page 20 © clearaudio electronic GmbH 2016... -
Seite 21: Vta-Einstellung
Lockern Sie die beiden Schrauben (siehe Abb. 11 ) um circa eine Umdrehung. Durch abwechselndes Festziehen der Schrauben können Sie unter Beachtung der Wasserwaage den Tonarm in Waage bringen, bis die Blase in der Waage in der Mitte steht. Abb. 11: Horizontale Einstellung © clearaudio electronic GmbH 2016 Seite / Page 21... -
Seite 22: Einstellung Des Azimuth (Vertikale Position Des Tonabnehmer - Diamant In Der Rille)
Sie hierbei die Grundposition des Rohres beizubehalten (Optimalmaß: 64 mm von der Nadelspitze bis zur Vorderkante des Wägelchens, siehe Abb. 14). 90° Abb. 12: Optimaler Azimuth Abb. 13: Einstellung des Azimuth 64 mm Abb. 14: Grundposition © clearaudio electronic GmbH 2016 Seite / Page 22... -
Seite 23: Einstellung Der Tangentialen
Stellen Sie die korrekte Auflagekraft Ihres Tonabnehmers laut der Herstelleranleitung ein. Zur Einstellung der korrekten Auflagekraft empfehlen wir die digitale Tonabnehmerwaage „Weight Watcher“ von clearaudio (Art. AC094; auch erhältlich über www.analogshop.de). Nach Abschluss aller Einstellungen achten Sie bitte darauf, dass das Signalkabel eine gleichmäßige Schlaufe nach hinten bildet. -
Seite 24: Besondere Hinweise
Originalverpackung. Andernfalls könnte Ihr Tonarm ernsthafte Schäden davon tragen. 6.3 Service Information Wenn eine Wartung oder Reparatur an einem clearaudio Produkt erforderlich ist, wenden Sie sich bitte zuerst immer an Ihren Händler oder Vertriebspartner. Alternativ können Sie clearaudio direkt kontaktieren und wir werden Sie von Ihrer nächstgelegenen Servicestelle beraten. -
Seite 25: Technische Daten
Garantie 5 Jahre* * nur bei korrekt ausgefüllter und innerhalb von 14 Tagen an clearaudio eingesandter Garantiekarte. Änderungen bleiben vorbehalten. Lieferbar solange Vorrat reicht. Für Druckfehler keine Haftung. Irrtümer vorbehalten - Kopien und Abdrucke - auch nur auszugsweise - bedürfen der schriftlichen Genehmigung durch die clearaudio electronic GmbH. -
Seite 26: Warranty Information
RETAIN YOUR PURCHASE RECEIPT Your purchase receipt is your permanent record of a valuable purchase. It should be kept in a safe place to be referred to as necessary for insurance purposes or when corresponding with clearaudio. IMPORTANT When seeking warranty service, it is the responsibility of the consumer to establish proof and date of purchase. Your purchase receipt or invoice is adequate for such proof.