Herunterladen Inhalt Inhalt Diese Seite drucken
Cameo MATRIX 300 RGB Bedienungsanleitung

Cameo MATRIX 300 RGB Bedienungsanleitung

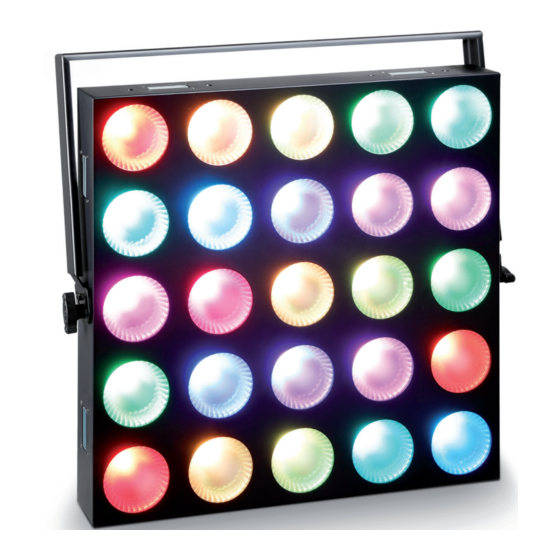
Led matrix panel 5x5 10w rgb
Inhaltsverzeichnis

Werbung

Verfügbare Sprachen
  • DE

Verfügbare Sprachen

  • DEUTSCH, seite 13
USER´S MANUAL
BEDIENUNGSANLEITUNG
MANUEL D`UTILISATION
MANUAL DE USUARIO
INSTRUKCJA OBSŁUGI
MANUALE D' USO
MATRIX 300 RGB
LED MATRIX PANEL 5X5 10W RGB
CLMP10WRGB

Werbung

Inhaltsverzeichnis
loading

Inhaltszusammenfassung für Cameo MATRIX 300 RGB

  • Seite 1 USER´S MANUAL BEDIENUNGSANLEITUNG MANUEL D`UTILISATION MANUAL DE USUARIO INSTRUKCJA OBSŁUGI MANUALE D‘ USO MATRIX 300 RGB LED MATRIX PANEL 5X5 10W RGB CLMP10WRGB...
  • Seite 2: Inhaltsverzeichnis

    CONTENTS / INHALTSVERZEICHNIS / CONTENU / CONTENIDO / TREŚĆ / CONTENUTO ENGLISH ESPAÑOL PREVENTIVE MEASURES MEDIDAS DE SEGURIDAD 33-34 INTRODUCTION INTRODUCCIÓN CONNECTIONS, OPERATING AND DISPLAY ELEMENTS CONEXIONES, ELEMENTOS DE MANEJO Y ELEMENTOS DE OPERATION VISUALIZACIÓN 35-36 MOUNTING FUNCIONAMIENTO 36-38 DMX TECHNOLOGY MONTAJE TECHNICAL DATA TECNOLOGÍA DMX...
  • Seite 3: English

    We have designed this product to operate reliably over many years. Please read this User‘s Manual carefully, so that you can begin making optimum use of your Cameo Light product quickly. Learn more about Cameo Light on our website WWW.CAMEOLIGHT.COM.
  • Seite 4: Introduction

    CAUTION: To reduce the risk of electric shock, do not remove cover (or back). There are no user serviceable parts inside. Maintenance and repairs should be exclusively carried out by qualified service personnel. The warning triangle with lightning symbol indicates dangerous uninsulated voltage inside the unit, which may cause an electrical shock.
  • Seite 5: Connections, Operating And Display Elements

    Blue power input socket for power supply to the device. A suitable power cable is included. POWER OUT White power output socket for the power supply of additional CAMEO spotlights. Ensure that the total current consumption of all connected devices does not exceed the value specified on the device in amperes (A).
  • Seite 6: Operation

    CARRY HANDLE Two carry handles are provided at the back of the device so as to facilitate transport and mounting. SAFETY EYELET An eyelet for a safety cable is to be found at the upper edge of the device at the back. Overhead installation may only be carried out by qualified personnel.
  • Seite 7: Slave Mode

    CONFIGURE DMX MODE Press MODE repeatedly until “ChAn” appears in the display. Now press ENTER and select the desired DMX mode using UP and DOWN as required (DMX 03Ch, 05Ch, 19Ch, 28Ch, 78Ch). Confirm your entry by pressing ENTER. Tables with the channel assignment of the different DMX modes can be found in these instructions under DMX CONTROL. ->...
  • Seite 8 SYSTEM SETTINGS AND SYSTEM INFORMATION To adjust system settings and access system information, press MODE repeatedly until "Sett" appears in the display. Confirm by pressing ENTER. You can now use UP and DOWN to select and edit one of the following menu items: ->...
  • Seite 9: Mounting

    MOUNTING Single mounting in a traverse system is carried out using either a swivel bracket (Fig. A) or two Omega mounting brackets (Fig. B). A swivel bracket and two Omega mounting brackets are included, along with a set of screws and U-discs and the tools required (1x5 mm and 1x6 mm hexagonal tool).
  • Seite 10: Dmx Technology

    DMX TECHNOLOGY DMX-512 DMX (Digital Multiplex) is the designation for a universal transmission protocol for communications between corresponding devices and controllers. A DMX controller sends DMX data to the connected DMX device(s). The DMX data is always transmitted as a serial data stream that is forwarded from one connected device to the next via the "DMX IN"...
  • Seite 11: Technical Data

    TECHNICAL DATA Model: CLMP10WRGB Product type: LED MATRIX PANEL Type: 5X5 matrix Colour spectrum: Number of LEDs: LED type: 10 W Tri LED Refresh rate: 8000 Hz Beam angle: 40° DMX input: 3-pin and 5-pin male XLR DMX output: 3-pin and 5-pin female XLR DMX mode: 3-channel, 5-channel, 19-channel, 28-channel, 78-channel DMX functions:...
  • Seite 12: Fcc Statement

    FCC STATEMENT This device complies with Part 15 of the FCC Rules. Operation is subject to the following two conditions: (1) This device may not cause harmful interference, and (2) This device must accept any interference received, including interference that may cause undesired operation CE Compliance Adam Hall GmbH states that this product meets the following guidelines (where applicable): R&TTE (1999/5/EC) or RED (2014/53/EU) from June 2017...
  • Seite 13: Deutsch

    Dieses Gerät wurde unter hohen Qualitätsanforderungen entwickelt und gefertigt, um viele Jahre einen reibungslosen Betrieb zu gewähr- leisten. Bitte lesen Sie diese Bedienungsanleitung sorgfältig, damit Sie Ihr neues Produkt von Cameo Light schnell und optimal einsetzen können. Weitere Informationen über Cameo Light erhalten Sie auf unserer Website WWW.CAMEOLIGHT.COM.
  • Seite 14: Einführung

    die Leitungen H05VV-F, oder gleichartig, entsprechen. Geeignete Leitungen werden von Adam Hall angeboten. Mit diesen Leitungen können Sie mehrere Geräte über den Power out Anschluss mit dem Power IN Anschluss eines weiteren Gerätes verbinden. Beachten Sie, dass die gesamte Stromaufnahme aller angeschlossenen Geräte den vorgegebenen Wert nicht überschreitet (Aufdruck auf dem Gerät). Achten Sie darauf, Netzleitungen so kurz wie möglich zu halten.
  • Seite 15: Anschlüsse, Bedien- Und Anzeigeelemente

    Blaue Netzeingangsbuchse für die Spannungsversorgung des Geräts. Ein geeignetes Netzkabel befindet sich im Lieferumfang. POWER OUT Weiße Netzausgangsbuchse für die Netzversorgung weiterer CAMEO Scheinwerfer. Achten Sie darauf, dass die gesamte Stromaufnahme aller angeschlossenen Geräte den auf dem Gerät in Ampere (A) angegebenen Wert nicht überschreitet.
  • Seite 16: Bedienung

    LÜFTUNGSSCHLITZE Achten Sie darauf, dass die Lüftungsschlitze nicht abgedeckt werden und Luft ungehindert zirkulieren kann. TRAGEGRIFF Zwei Tragegriffe an der Geräterückseite erleichtern den Transport und die Montage. SICHERUNGSÖSE Eine Öse für ein Sicherungsseil befindet sich auf der Rückseite, an der Oberkante des Geräts. Überkopfmontage darf nur von dafür ausgebildetem Personal durchgeführt werden.
  • Seite 17 DMX-BETRIEBSART EINSTELLEN Drücken Sie die MODE-Taste so oft, bis im Display „ChAn“ angezeigt wird. Drücken Sie nun auf ENTER und wählen die gewünschte DMX-Betriebsart mit Hilfe der Tasten UP und DOWN aus (DMX 03Ch, 05Ch, 19Ch, 28Ch, 78Ch). Bestätigen Sie die Eingabe mit ENTER. Tabellen mit der Kanalbelegung der verschiedenen DMX-Modi finden Sie in dieser Anleitung unter DMX STEUERUNG.
  • Seite 18: Systemeinstellungen Und Systeminformationen

    SYSTEMEINSTELLUNGEN UND SYSTEMINFORMATIONEN Um Systemeinstellungen vorzunehmen und Systeminformationen auszulesen, drücken Sie die MODE-Taste so oft, bis im Display „Sett“ angezeigt wird. Bestätigen Sie mit ENTER. Sie können nun mit Hilfe der UP und DOWN Tasten einen der folgenden Menüpunkte auswählen und bearbeiten: ->...
  • Seite 19: Montage

    MONTAGE Die Einzelmontage in einem Traversensystem erfolgt entweder mit Hilfe eines Schwenkbügels (Abb. A), oder zweier Omega-Montagebügel (Abb. B). Ein Schwenkbügel und zwei Omega-Montagebügel befinden sich im Lieferumfang, ebenso ein Satz Schrauben und U-Scheiben, sowie geeignetes Werkzeug (1x 5mm und 1x 6mm Sechskant-Werkzeug). Sorgen Sie in beiden Fällen für eine feste Verbindung am Gerät, nutzen geeignete Traversenklemmen für die Montage (nicht im Lieferumfang enthalten) und sichern es gegen Herabfallen mit einem geeig- neten Sicherungsseil an der Sicherungsöse (Sicherungsseil nicht im Lieferumfang enthalten, Sicherungsöse auf der Rückseite).
  • Seite 20: Dmx Technik

    DMX TECHNIK DMX-512 DMX (Digital Multiplex) ist die Bezeichnung für ein universelles Übertragungsprotokoll für die Kommunikation zwischen entsprechenden Geräten und Controllern. Ein DMX-Controller sendet DMX-Daten an das/die angeschlossene(n) DMX-Gerät(e). Die DMX-Datenübertragung erfolgt stets als serieller Datenstrom, der über die an jedem DMX-fähigen Gerät vorhandenen DMX IN- und DMX OUT-Anschlüsse (XLR-Steckverbinder) von einem angeschlossenen Gerät an das nächste weitergeleitet wird, wobei die maximale Anzahl der Geräte 32 nicht überschreiten darf.
  • Seite 21: Technische Daten

    TECHNISCHE DATEN Modell: CLMP10WRGB Produktart: LED MATRIX PANEL Typ: 5X5 Matrix Farbspektrum: LED Anzahl: LED Typ: 10W Tri LED Wiederholrate: 8000 Hz Abstrahlwinkel: 40° DMX-Eingang: 3-Pol und 5-Pol XLR männlich DMX-Ausgang: 3-Pol und 5-Pol XLR weiblich DMX-Modus: 3-Kanal, 5-Kanal, 19-Kanal, 28-Kanal, 78-Kanal DMX Funktionen: Master Dimmer, Dimmer Fine, Auto-Programme, Sound-Programme, Stroboskop Standalone Funktionen:...
  • Seite 22: Ce-Konformität

    CE-Konformität Hiermit erklärt die Adam Hall GmbH, dass dieses Produkt folgenden Richtlinien entspricht (soweit zutreffend): R&TTE (1999/5/EG) bzw. RED (2014/53/EU) ab Juni 2017 Niederspannungsrichtlinie (2014/35/EU) EMV-Richtlinie (2014/30/EU) RoHS (2011/65/EU) Die vollständige Konformitätserklärung finden Sie unter www.adamhall.com. Des Weiteren können Sie diese auch unter info@adamhall.com anfragen.
  • Seite 23: Francais

    Cet appareil a été développé et fabriqué en appliquant des exigences de qualité très élevées: il garantit des années de fonctionnement sans problème.Veuillez lire attentivement ce Manuel Utilisateur : vous apprendrez rapidement à utiliser votre appareil Cameo Light de façon optimale.
  • Seite 24: Introduction

    34. Respectez une distance minimale de 0,5m par rapport à des matériaux inflammables. 35. Si vous désirez alimenter plusieurs projecteurs simultanément, les conducteurs du câble secteur doivent posséder une section minimale de 1,5 mm². Dans l’Union Européenne, les câbles électriques doivent être de type H05VV-F ou équivalent. Adam Hall propose des câbles secteur adaptés.
  • Seite 25: Raccordements, Éléments De Commande Et D'affichage

    Prise d’entrée bleue pour l’alimentation de l’appareil. Un câble réseau adapté est fourni. POWER OUT (SORTIE D’ALIMENTATION) Prise de sortie blanche pour l’alimentation d’autres projecteurs CAMEO. Assurez-vous que la consommation totale de tous les appareils connectés ne dépasse pas la valeur en ampères (A) indiquée sur l’appareil.
  • Seite 26: Mode D'utilisation

    FENTES D’AÉRATION Veiller à ne pas couvrir les fentes de ventilation et à assurer une bonne circulation de l’air. POIGNÉE DE TRANSPORT Deux poignées de transport situées à l’arrière de l’appareil facilitent le transport et le montage. ŒILLET DE SÉCURITÉ Un œillet se trouve à...
  • Seite 27: Réglage Du Mode Dmx

    RÉGLAGE DU MODE DMX Appuyer plusieurs fois sur la touche MODE jusqu’à ce que la mention « ChAn » s’affiche à l’écran. Appuyer ensuite sur ENTER, puis sélectionner le mode DMX voulu à l’aide des touches UP et DOWN (DMX 03Ch, 05Ch, 19Ch, 28Ch, 78Ch). Valider la sélection en appuyant sur ENTER. Les tableaux d’affectation des canaux correspondant aux différents modes DMX figurent dans la section PILOTAGE EN MODE DMX de ce manuel.
  • Seite 28 PARAMÈTRES DU SYSTÈME ET INFORMATIONS SUR LE SYSTÈME Pour configurer les paramètres du système et lire les informations sur le système, appuyer plusieurs fois sur la touche MODE, jusqu'à ce que la mention « Sett » s'affiche à l'écran. Validez en appuyant sur ENTER. Avec les touches UP et DOWN, sélectionner l’une des options de menu suivantes : ->...
  • Seite 29: Montage

    MONTAGE Le montage individuel d’un système de traverses est réalisé soit à l’aide d’un support inclinable (Fig. A), soit à l’aide de deux omégas de fixation (Fig. B). Le volume de livraison comprend un support inclinable et deux omégas de fixation, ainsi qu’un jeu de vis et de rondelles et des outils appropriés (1 outil hexagonal 5 mm et 1 outil 6 mm).
  • Seite 30: Technique Dmx

    TECHNIQUE DMX DMX-512 Le terme DMX (Digital Multiplex) désigne un protocole de transport universel permettant la communication entre des appareils et des contrôleurs à ce format. Un contrôleur DMX envoie des données DMX aux appareils DMX qui lui sont connectés. Les données DMX sont transportées sous forme d'un flux série, renvoyé...
  • Seite 31: Caractéristiques Techniques

    CARACTÉRISTIQUES TECHNIQUES Modèle : CLMP10WRGB Catégorie de produit : PANNEAU MATRICE LED Type : Matrice 5 x 5 Spectre de couleurs : Nombre de LED : Type de LED : LED tricolores 10 W Fréquence de rafraîchissement : 8 000 Hz Angle de dispersion : 40° Entrée DMX : XLR 3 broches et 5 broches mâle Sortie DMX : XLR 3 broches et 5 broches femelle Mode DMX :...
  • Seite 32 Conformité CE La société Adam Hall GmbH déclare par la présente que ce produit est compatible avec les régulations suivantes (le cas échéant) : R&TTE (1999/5/EG) et RED (2014/53/EU) à partir de juin 2017 Directive basse tension (2014/35/EU) Directive CEM (2014/30/EU) RoHS (2011/65/EU) La Déclaration de Conformité...
  • Seite 33: Español

    Este equipo está diseñado y fabricado con los estándares de calidad más exigentes, para garantizar un correcto funcionamiento durante muchos años.Lea atentamente este manual de usuario para poder aprovechar rápidamente toda la funcionalidad de su nuevo producto de Cameo Light. Más información sobre Cameo Light en la web WWW.CAMEOLIGHT.COM. MEDIDAS DE SEGURIDAD 1.
  • Seite 34: Introducción

    (polvo, nicotina, niebla, etc.), deberá realizarse periódicamente el mantenimiento o la limpieza del equipo por personal especializado, para evitar cualquier sobrecalentamiento o fallo de funcionamiento (mantenimiento y limpieza no cubiertos por la garantía). 34. Asimismo, deberá dejarse una distancia mínima de 0,5 metros con cualquier material inflamable. 35.
  • Seite 35: Conexiones, Elementos De Manejo Y Elementos De Visualización

    POWER OUT Toma de salida de red de color blanco para la alimentación eléctrica de otros focos CAMEO. Asegúrese de que el consumo de corriente total de todos los equipos conectados no supere el valor en amperios (A) indicado en el equipo.
  • Seite 36: Funcionamiento

    RANURAS DE VENTILACIÓN Asegúrese de que las ranuras de ventilación no estén tapadas y de que pueda circular aire libremente. ASA DE TRANSPORTE Las dos asas de transporte situadas en la parte posterior del equipo facilitan el transporte y el montaje. CÁNCAMO DE SEGURIDAD Hay un cáncamo para un cable de seguridad en la parte posterior, en el borde superior del equipo.
  • Seite 37: Modo Esclavo

    CONFIGURAR EL MODO OPERATIVO DMX Pulse el botón MODE varias veces hasta que aparezca la indicación «ChAn» en la pantalla. Ahora, pulse ENTER y seleccione el modo operativo DMX deseado mediante los botones UP y DOWN (DMX 03Ch, 05Ch, 19Ch, 28Ch, 78Ch). Confirme la entrada pulsando ENTER. Puede encontrar tablas con la asignación de canales de los distintos modos DMX en la sección CONTROL DMX de este manual.
  • Seite 38 CONFIGURACIÓN E INFORMACIÓN DEL SISTEMA Para realizar ajustes en el sistema y ver la información del sistema, pulse varias veces el botón MODE hasta que aparezca «Sett» en la pantalla. Confirme pulsando ENTER. Ahora puede seleccionar y editar una de las siguientes opciones del menú mediante los botones UP y DOWN: ->...
  • Seite 39: Montaje

    MONTAJE El montaje individual en un sistema de travesaño se realiza o bien con un soporte orientable (fig. A) o bien con dos soportes de montaje omega (fig. B). El volumen de suministro incluye un soporte orientable y dos soportes de montaje omega, así como un juego de tornillos y arandelas y una herramienta adecuada (1 llave hexagonal de 5 mm y 1 de 6 mm).
  • Seite 40: Tecnología Dmx

    TECNOLOGÍA DMX DMX512 DMX (Digital Multiplex) es el nombre de un protocolo universal utilizado como medio de comunicación entre dispositivos y controladores. El controlador DMX envía datos DMX a los equipos DMX conectados. Los datos DMX se envían como datos serie que se transmiten de equipo a equipo a través de los conectores XLR «DMX IN»...
  • Seite 41: Datos Técnicos

    DATOS TÉCNICOS Modelo: CLMP10WRGB Clase de producto: PANEL DE MATRIZ LED Tipo: Matriz de 5 x 5 Espectro cromático: Número de LED: Tipo de LED: LED tricolor de 10 W Frecuencia de refresco: 8000 Hz Ángulo de dispersión: 40° Entrada DMX: XLR macho de 3 y 5 pines Salida DMX: XLR hembra de 3 y 5 pines...
  • Seite 42 Conformidad CE Adam Hall GmbH declara por la presente que este producto es conforme con las siguientes directivas (según sea aplicable): R&TTE (1999/5/CE) o RED (2014/53/UE) a partir de junio de 2017 Directiva de baja tensión (2014/35/UE) Directiva EMC (2014/30/UE) RoHS (2011/65/UE) Puede consultar la declaración de conformidad completa en www.adamhall.com.
  • Seite 43: Polski

    To urządzenie zostało zaprojektowane i wyprodukowane przy zastosowaniu najwyższych kryteriów jakościowych w celu zapewnienia wieloletniej bezawaryjnej eksploatacji. Proszę starannie przeczytać niniejszą instrukcję obsługi, aby móc jak najszybciej zacząć użytkować ten produkt marki Cameo Light. Więcej informacji na temat Cameo Light znajdą Państwo na naszej stronie internetowej pod adresem WWW.CAMEOLIGHT.COM.
  • Seite 44: Wprowadzenie

    32. Instalacja urządzenia powinna odbywać się, gdy urządzenie nie jest podłączone do źródła zasilania (należy wyjąć wtyczkę z gniazda). 33. Kurz i inne osady wewnątrz urządzenia mogą je uszkodzić. W zależności od warunków otoczenia (kurz, nikotyna, opary itp.) urządzenie powinno być konserwowane lub czyszczone przez wykwalifikowanego specjalistę (usługa nieobjęta gwarancją), aby zapobiec przegrzaniu i nieprawidłowemu działaniu.
  • Seite 45: Przyłącza, Elementy Obsługowe I Wskaźniki

    Niebieskie gniazdo zasilania sieciowego urządzenia. Kabel sieciowy znajduje się w zestawie. POWER OUT Białe gniazdo do zasilania dodatkowego reflektora Cameo. Należy się upewnić, że całkowity pobór prądu wszystkich podłączonych urządzeń nie przekracza wartości w amperach (A) podanej na urządzeniu. PODSTAWA BEZPIECZNIKOWA WAŻNA WSKAZÓWKA:Wymieniaj bezpiecznik tylko na bezpiecznik tego samego typu i o tych samych parametrach zgodnie z nadrukiem na...
  • Seite 46: Obsługa

    SZCZELINY WENTYLACYJNE Aby zapobiec przegrzaniu się urządzenia, nie wolno zakrywać szczelin wentylacyjnych i należy zapewnić swobodną cyrkulację powietrza. UCHWYTY Dwa uchwyty z tyłu urządzenia ułatwiają transport i montaż. UCHO ZABEZPIECZAJĄCE Ucho liny zabezpieczającej znajduje się z tyłu, u góry urządzenia. Montaż...
  • Seite 47 USTAWIANIE TRYBU DMX Naciskaj przycisk MODE, aż na wyświetlaczu pokaże się „ChAn”. Naciśnij ENTER i wybierz żądany tryb DMX przyciskami UP i DOWN (03Ch, 05Ch, 19Ch, 28Ch, 78Ch). Potwierdź wprowadzone ustawienia przyciskiem ENTER. Tabele wykorzystania kanałów dla różnych trybów DMX można znaleźć w tej instrukcji w punkcie STEROWANIE DMX. ->...
  • Seite 48 USTAWIENIA I INFORMACJE SYSTEMOWE Aby zmienić ustawienia systemowe i odczytać informacje o systemie, naciśnij kilkakrotnie przycisk MODE, aż na wyświetlaczu pojawi się napis „Sett”. Potwierdź, naciskając ENTER. Teraz możesz przyciskami UP i DOWN wybrać i edytować jeden z poniższych punktów menu: ->...
  • Seite 49: Montaż

    MONTAŻ Pojedynczy montaż na kratownicy odbywa się za pomocą pałąka obrotowego (rys. A) lub dwóch pałąków montażowych Omega (rys. B. W zestawie znajduje się pałąk obrotowy i dwa pałąki montażowe Omega, a także komplet śrub i podkładek oraz odpowiednie narzędzia (śrubokręty sześciokątne 5 mm i 6 mm).
  • Seite 50: Technika Dmx

    TECHNIKA DMX DMX-512 DMX (Digital Multiplex) to nazwa uniwersalnego protokołu transmisji do komunikacji między odpowiednimi urządzeniami a kontrolerami. Kontroler DMX wysyła dane DMX do podłączonych urządzeń DMX. Transmisja danych DMX następuje zawsze w formie szeregowego strumienia danych, który jest przekazywany z jednego urządzenia do następnego przez znajdujące się...
  • Seite 51: Dane Techniczne

    DANE TECHNICZNE Model: CLMP10WRGB Rodzaj produktu: PANEL MATRYCY LED Typ: matryca 5 x 5 Spektrum kolorów: Liczba diod LED: Typ diod LED: 10 W Tri LED Częstotliwość odświeżania: 8000 Hz Kąt rozwarcia wiązki świetlnej: 40° Wejście DMX: 3-pinowe i 5-pinowe złącze męskie XLR Wyjście DMX: 3-pinowe i 5-pinowe złącze żeńskie XLR Tryb DMX:...
  • Seite 52 Deklaracja zgodności CE Firma Adam Hall GmbH niniejszym oświadcza, że produkt ten jest zgodny z następującymi dyrektywami (o ile mają zastosowanie): dyrektywa w sprawie urządzeń radiowych i końcowych urządzeń telekomunikacyjnych (1999/5/WE) lub dyrektywa w sprawie urządzeń radiowych (2014/53/UE) od czerwca 2017 r. dyrektywa niskonapięciowa (2014/35/UE) dyrektywa w sprawie kompatybilności elektromagnetycznej (2014/30/UE) dyrektywa w sprawie ograniczenia stosowania niektórych niebezpiecznych substancji w sprzęcie elektrycznym i elektronicznym (2011/65/UE)
  • Seite 53: Italiano

    Questo dispositivo è stato sviluppato e prodotto in conformità con elevati standard qualitativi che ne garantiscono il regolare funzionamento per molti anni. Leggete attentamente questo manuale d‘uso per utilizzare al meglio il vostro nuovo prodotto Cameo Light. Per maggiori informazioni su Cameo Light consultare la nostra pagina Web WWW.CAMEOLIGHT.COM.
  • Seite 54: Introduzione

    (senza garanzia, interventi a carico del proprietario) per evitare surriscaldamento e malfunzionamenti. 34. La distanza dai materiali infiammabili deve essere di almeno 0,5 m 35. I cavi di rete utilizzati per l’alimentazione elettrica di più dispositivi devono avere una sezione di almeno 1,5 mm². I cavi impiegati nell’Unione Europea devono essere di tipo H05VV-F o simile.
  • Seite 55: Connessioni, Elementi Di Comando E Visualizzazione

    Presa di ingresso blu per l’alimentazione elettrica dell’apparecchio. L’apposito cavo di alimentazione è fornito in dotazione. POWER OUT Presa di uscita bianca per l’alimentazione elettrica di altri proiettori CAMEO. Tener presente che la potenza totale assorbita dagli apparecchi collegati non deve superare i 3 ampere.
  • Seite 56: Utilizzo

    FESSURA DI VENTILAZIONE Verificare che le fessure di ventilazione non vengano coperte e che l’aria possa circolare liberamente. MANIGLIA Due maniglie sul pannello posteriore dell’apparecchio facilitano il trasporto e il montaggio. OCCHIELLO DI SICUREZZA Sul lato superiore del dispositivo, in corrispondenza del bordo superiore, è predisposto un occhiello per il cavo di sicurezza. Il montaggio sopratesta deve essere effettuato unicamente da personale qualificato.
  • Seite 57: Modalità Slave

    IMPOSTAZIONE DELLA MODALITÀ DI FUNZIONAMENTO DMX Premere più volte il tasto MODE fino a quando sul display non appare “ChAn”. Premere ENTER e con i tasti UP e DOWN selezionare la modalità di funzionamento DMX desiderata (DMX 03Ch, 05Ch, 19Ch, 28Ch, 78Ch). Confermare premendo ENTER. Le tabelle con l’assegnazione dei canali delle diverse modalità...
  • Seite 58 IMPOSTAZIONI DI SISTEMA E INFORMAZIONI DI SISTEMA Per eseguire le impostazioni di sistema e leggere le informazioni di sistema, premere più volte il tasto MODE finché sul display non appare "Sett". Confermare con ENTER. Con i tasti UP e DOWN è quindi possibile selezionare e modificare una delle seguenti voci di menu: ->...
  • Seite 59: Montaggio

    MONTAGGIO Il montaggio singolo in un sistema a sospensione si esegue con una staffa orientabile (fig. A) o con due staffe di montaggio Omega (fig. B). In dotazione vengono fornite una staffa orientabile e due staffe di montaggio Omega, un set di viti e rondelle e l'attrezzatura adatta (una chiave esagonale da 5 mm e una da 6 mm).
  • Seite 60: Tecnologia Dmx

    TECNOLOGIA DMX DMX512 DMX (Digital Multiplex) è la sigla di un protocollo di trasmissione universale per la comunicazione tra dispositivi e controller. Un controller DMX invia dati DMX ai dispositivi DMX collegati. I dati DMX vengono sempre trasmessi come flusso di dati seriale, che viene inoltrato da un dispositivo collegato al successivo attraverso le connessioni (connettori XLR) DMX IN e DMX OUT presenti per ogni dispositivo DMX compatibile, per un massimo di 32 dispositivi.
  • Seite 61: Dati Tecnici

    DATI TECNICI Modello: CLMP10WRGB Tipologia di prodotto: PANNELLO MATRICE A LED Tipo: Matrice 5X5 Spettro cromatico: Numero di LED: Tipo di LED: LED tricolori da 10 W Frequenza di ripetizione: 8000 Hz Angolo di dispersione: 40° Ingresso DMX: XLR maschio a 3 poli e 5 poli Uscita DMX: XLR femmina a 3 poli e 5 poli Modalità...
  • Seite 62 Conformità CE Con la presente Adam Hall GmbH dichiara che questo prodotto soddisfa le seguenti direttive (ove pertinente): Direttiva R&TTE (1999/5/CE) e RED (2014/53/UE) da giugno 2017 Direttiva bassa tensione (2014/35/CE) Direttiva CEM (2014/30/UE) RoHS (2011/65/UE) La dichiarazione di conformità completa è reperibile al sito www.adamhall.com. Per ulteriori informazioni è...
  • Seite 63: Dmx Control

    DMX CONTROL / DMX STEUERUNG / PILOTAGE DMX / CONTROL DMX / STEROWANIE DMX / CONTROLLO DMX 3-CH Mode 0% to 100% Green 0% to 100% Blue 0% to 100% 5-CH Mode Dimmer Master Dimmer 0-100% Strobe open Strobe closed Strobe Strobe slow ->...
  • Seite 64 Effect 1 (Straight Line Fade left <> right) Effect 2 (Straight Line Fade left >) Effect 3 (Straight Line Fade up <> down) Effect 4 (Straight Line Fade up >) Effect 1-4 (Random Straight Line fade) Effect 5 (Cross CW ) Effect 6 (Square 2Step in >...
  • Seite 65 Effect Pattern Speed Stop Effect Pattern Pos. (0°,45°,90°135°,180°,225°,270°) Effect Pattern Speed Stop Pattern Speed Effect Pattern Speed, slow > fast, forward Effect Pattern Speed, fast > slow, back Effect Pattern Speed Stop Sound Trigger Sensitivity Low > High Invert Invert / Swap Effect Pattern Swap Swap / Invert 19-CH Mode...
  • Seite 66 off (disable Background functions) Letters (enable Background functions) Numbers & Symbols (enable Background functions) Folder Selection Pattern 1 (enable Background functions) Pattern 2 (enable Background functions) Effect Pattern (enable Background functions) Letters (adding with RGB or Colour Macros & sep. Background functions) Emtpy Effect Pattern Speed Stop Effect Pattern Pos.
  • Seite 67 Background Dimmer (All Background CH14 Master Dimmer 0-100% functions are enable with enable Pattern) Strobe open Strobe closed Puls Random, slow -> fast Ramp up Random, slow -> fast CH15 Background Strobe Ramp down Random, slow -> fast Random Strobe Effect, slow fast Strobe Break Effekt, 5s…..1s ( Very Short Flash) Strobe slow ->...
  • Seite 68 19-CH Mode Numbers & Symbols (adding with RGB or Colour Macros & < sep. Background functions)" > ^ (turned 180°) Arrow top Arrow right Arrow left Arrow bottom Arrow top left Arrow top right Arrow bottom left Arrow bottom right All LEDs ON.
  • Seite 69 Even Dots (2,4,6…) Odd Dots (1,3,5…) Triangle Top (1-5,7-9,13) Triangle Bottom (21-25,17-19,13) Egg-Timer (1-5,7-9,13,17-19,21-25) 1. Line horizontal (1-5) 2. Line horizontal (6-10) 3. Line horizontal (11-15) 4. Line horizontal (16-20) 5. Line horizontal (21-25) 1. Line vertical (5,10,15,20,25) 2. Line vertical (4,9,14,19,24) 3.
  • Seite 70 Bow Tie (1,5-7,9-17,19-21,25) Two Dots 1+25 Two Dots 2+24 Two Dots 3+23 Two Dots 4+22 Two Dots 5+21 Two Dots 10+16 Two Dots 15+11 Two Dots 20+6 Two Dots 7+19 Two Dots 8+18 Two Dots 9+17 Two Dots 12+14 1. 4 Dots outer ring (1,5,21,25) 2.
  • Seite 71 Effect 1 (Straight Line left <> right) Effect 2 (Straight Line left >) Effect 3 (Straight Line up <> down) Effect 4 (Straight Line up >) Effect 1-4 (Random Straight Line) Effect 5 (Cross CW ) Effect 6 (Square 2Step in > out) Effect 7 (Square 2Step in >...
  • Seite 72 28-CH Mode Dimmer Master Dimmer 0-100% Dimmer Fine (16Bit) Dimmer Fine 0-100% Strobe open Strobe closed Puls Random, slow -> fast Ramp up Random, slow -> fast Strobe Ramp down Random, slow -> fast Random Strobe Effect, slow fast Strobe Break Effekt, 5s…..1s ( Very Short Flash) Strobe slow ->...
  • Seite 73 Color Macro Colour off Amber Yellow warm Yellow Green Turquoise Cyan Blue Lavender Mauve Magenta Pink Warm White White Cold White Colour Jumping Speed slow -> fast / Colour 1 -> 12 Colour Fading Speed slow -> fast / Colour 1 -> 12 78-CH Mode Dimmer Master Dimmer 0-100%...
  • Seite 74 CH23 Green 7 0% to 100% CH24 Blue 7 0% to 100% CH25 Red 8 0% to 100% CH26 Green 8 0% to 100% CH27 Blue 8 0% to 100% CH28 Red 9 0% to 100% CH29 Green 9 0% to 100% CH30 Blue 9 0% to 100%...
  • Seite 75 CH73 Red 24 0% to 100% CH74 Green 24 0% to 100% CH75 Blue 24 0% to 100% CH76 Red 25 0% to 100% CH77 Green 25 0% to 100% CH78 Blue 25 0% to 100%...
  • Seite 76 WWW.CAMEOLIGHT.COM Adam Hall GmbH | Adam-Hall-Str. 1 | 61267 Neu-Anspach | Germany Tel. +49(0)6081/9419-0 | Fax +49(0)6081/9419-1000 web : www.adamhall.com | e-mail : mail@adamhall.com REV: 01...

Diese Anleitung auch für:

Clmp10wrgb

Inhaltsverzeichnis